Quick User Guide. Copyright Malgn Technology Co., Ltd. All rights reserved.
|
|
|
- Barbara Thornton
- 5 years ago
- Views:
Transcription


1 Quick User Guide Copyright Malgn Technology Co., Ltd. All rights reserved. 1
2 Contents 4 KeyFlow Pro Introduction 5 About KeyFlow Pro Libraries 6 KeyFlow Pro User Interface 7 Getting Started 7 Creating a New Library 8 Creating a New Project 8 Creating a New Group 9 Importing Media 10 Importing from Hard Disk 11 Importing from Cameras 12 Adding Live Folders 13 Setting Notification Option 14 Previewing Media Assets 16 Searching for Media Assets 17 Organizing Media Assets 17 Entering Tags 18 Moving Media Assets 18 Deleting Media Assets 19 Dragging and Dropping to Other Applications 20 Annotations 20 Markers 21 Keywords 22 Favorites 23 Searching for Annotations 24 Exporting Annotations 25 Sending to Other Applications 25 Final Cut Pro X 26 Final Cut Pro 7 27 Premiere Pro CC 28 Numbers 2
3 29 Metadata 29 Organizing Custom Metadata Group 30 Creating User-Defined Metadata Field 31 Advanced Search using Metadata 32 Workflow Automation 32 Creating a User-Defined Workflow 33 Applying the Workflow 34 Interacting with Final Cut Pro X 34 Adding Final Cut Pro X Clip Metadata 35 On-the-fly Project Sharing 36 Exporting to KeyFlow Pro 36 Installing FCPX Agent 39 Sharing Libraries 39 Configuring Shared Libraries 40 Connecting to Shared Library 42 Working with Shared Libraries 45 Switching Libraries 46 Additional Features 46 Smart Folders 47 Watcher 48 Batch Relink 3
4 KeyFlow Pro Introduction Designed for You and Your Team KeyFlow Pro. A simple, elegant and surprisingly powerful media manager built for everyone. Edit, store, play, share, search, mark, tag, encode, upload and a whole lot more with KeyFlow Pro. Today s users generate more video, audio, pictures, and project files than ever before. These files represent lifetimes of work and memories users can t afford to lose. Whether it s on a laptop, thumb drive, or even a large server array, KeyFlow Pro can keep the files that matter most online, searchable, and easily sharable. Fully integrated with Final Cut Pro X KeyFlow Pro operates seamlessly with Final Cut Pro X. Add Finder tags, annotations (markers, keywords, and favorites), assign roles, log notes, scenes, reels, takes and more to files in the KeyFlow Pro Library. KeyFlow Pro allows unique, on-the-fly FCP X project sharing by simply dragging between FCP X and KeyFlow Pro. You no longer need to export and import XML to share FCP X projects. FCP X collaboration has never been easier. The free FCP X Agent export plugin can return clip or timeline metadata edits back to KeyFlow Pro. Key Features All Media Types: Supports a variety of video, audio, images, documents and extras. (i.e package, fonts and compressed files). Manual or Auto Import: Choose between Manual Import (Copy to library or Leave files in place) or Auto Import (Live Folders). Preview Video: Creates low-res H.264 preview files during import. Allows you to copy the preview files into one folder. Advanced Search: Supports various advanced search options such as Boolean Search, Annotation Search, Location Search, Metadata Search, and Path Name in Source Location. Notification: Allows the Notification Option for a Live Folder you to get macos Notifications in real-time when new files are added. Finder Tags Integration: Finder tags can be sent to KeyFlow Pro when importing media, and can be added from KeyFlow Pro. Annotations: Screen and preview footage with markers and keywords in any video and audio clip for use in Final Cut Pro X. XML Support: Supports various XML options such as Send to Final Cut Pro X (or Final Cut Pro 7), Export Final Cut Pro X XML (or Final Cut Pro 7 XML) and Export XML for Premiere. Share Libraries: Client users can search, preview, tag, upload media and edit metadata on the shared Library over the network. Remote Upload: Client users can upload media with Copy to library or Leave files in place (or Store-to). Watch Folder: Automatically import files to specific projects in your KeyFlow Pro Library using Watch Folders. Drag & Drop: Easily drag and drop media files from KeyFlow Pro to any application. Particularly, share FCPX projects or events onthe-fly using Drag-and-Drop between KeyFlow Pro and Final Cut Pro X. User-Defined Workflow: Create a variety of time saving actions like tag, encode and transfer with KeyFlow Pros workflow designer. Duplication Check: Prevent duplicate media in your KeyFlow Pro Library with the duplication check option. Batch Relink: When files are moved to the different volume or folder, batch relink will update the media location path. Custom Metadata Set: Add user-defined metadata fields easily and configure custom metadata sets. Or use the default sets of EXIF, TIFF, IPTC, Final Cut Pro X and RED metadata. Camera Auto-Detection: KeyFlow Pro automatically detects cameras and sorts them by newest first. FCPX Agent for KeyFlow Pro (Optional): Export a FCPXML file, or both FCPXML and a QuickTime movie from Final Cut Pro X to KeyFlow Pro with the free FCPX Agent plugin (provided separately). 4
5 About KeyFlow Pro Libraries KeyFlow Pro organizes and manages your media assets within Libraries. Although KeyFlow Pro uses some terms used in Final Cut Pro X (such as Libraries and Projects), but the way they function are fundamentally different. Key Terms of KeyFlow Pro Libraries Upon first opening of KeyFlow Pro, you need to create a new Library. Typically, each user has one Library, which can be stored anywhere (ex. local hard drive, DAS, SAN, or NAS). A Library can contain an unlimited number of Projects, Groups, and Media Assets. All Libraries amongst users can be shared simultaneously on a local network, but only one can be opened at a time. You can switch back and forth between different Libraries in your Library List with a single click. Projects A Project is a collection that holds Groups and Media Assets within the Library. The Media Assets can be easily moved around between the Projects as needed. Groups A Group is a subfolder that can hold Media Assets within the Project. The Group can be moved into another Group within the same Project. Live Folders A Live Folder is similar to a Watch Folder, as both can import Media Assets automatically on the Finder. However, while files in Watch Folders are moved into Projects, files in Live Folders are remained on the Finder and updated automatically as any changes occur at the Finder level. Media Assets A Media Asset is the most fundamental element in the Library and is managed by KeyFlow Pro. KeyFlow Pro creates a Media Asset for every imported or uploaded media file, which can contain a copied media from source file or alias linked to source file, a thumbnail, a preview file (for video), and a metadata. You can use Import option to store Media Assets inside or outside of the Library. There are two types of Media Assets: Copy: Copied Media Asset imported into the Library by using Copy to library option. It will be managed inside the Library, so will always remain online. Reference (Alias): Media Asset linked to file in its current existing location or in another location by using Leave files in place or Store to option. The source files of the Reference Media Assets will be managed from outside of the Library. 5


, Metadata, *Annotations of the selected file, Background jobs, and Active")
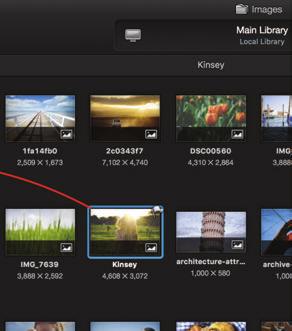
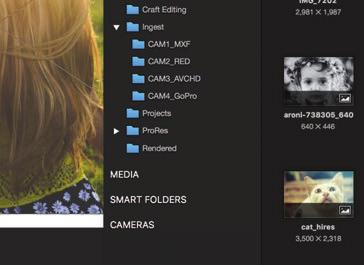
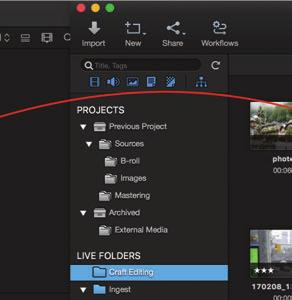
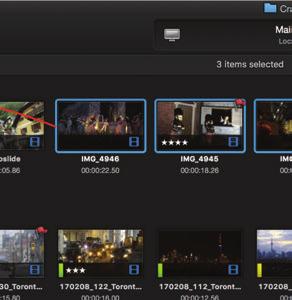
6 KeyFlow Pro User Interface KeyFlow Pro has four primary sections shown below. Toolbar Sidebar Media Assets Inspector Toolbar: Common tasks are on the left. The center displays current Library information, and a drop down list of all available connected or imported libraries. On the right, choose one of five view modes (thumbnail, list, hybrid, preview and map). Farther right are on/off toggles for the left Sidebar and right inspector. On the far right is the download list for quick access to any media downloaded from the KeyFlow Pro Library. Sidebar: Contains the primary Search box, Projects and Groups, *Live Folders, Media types, User generated *Smart Folders and list of connected Cameras and/or media cards. Media Assets: Presents all media assets in the primary center window. Displayed media is based on current selected project, group, media category or search results. Inspector: Contains Info (incl. Color, Tags, Workflows), Metadata, *Annotations of the selected file, Background jobs, and Active Sessions window. * Live Folders: The ability to automatically detect, import and update any changes in the folder. * Smart Folders: The ability to search desired media asset and categorize automatically by combining several search condition. * Annotations: The ability to add markers, keywords and favorites based on the timecode on a single video or audio clip. 6


 Note: Library Permissions can be changed in at any time in the Library pane in the Preferences. (see page 39.")
7 Getting Started Creating a New Library When opening KeyFlow Pro for the first time, the following dialogue box will appear., the following dialogue box will appear. Library Name (Required) Description (Optional) Location (Required) Set permissions for shared Library (Optional) Shared: Make the Library accessible to users on a network. Creatable: Users can upload and duplicate media on a shared Library. (Shared option must be checked.) Editable: Allows users to edit metadata or tags, add annotations and move media to Trash. (Only Library owners can empty trash.) Note: Library Permissions can be changed in at any time in the Library pane in the Preferences. (see page 39.) Client users cannot create Projects/Groups and Live Folders on the shared Library of the server. (Only Library owners of the server can create Projects/Groups and Live Folders.) After selecting Create Library, a Library package file will be created (see below) in the designated location. 7

8 There are many ways to create Libraries, Projects and Groups. To create a new KeyFlow Pro Library, do one of the following: Choose File > New > Library (or press Shift-Command-N). Click the New button on the Toolbar, then choose Library. Press the large + icon on the center of the screen in the Media Assets section. Creating a New Project Projects organize media in KeyFlow Pro without affecting the file s Finder location. To create a new project, do one of the following: Choose File > New > Project (or press Command-N). Click the New button on the Toolbar, then choose Project. Press + icon on the bottom left corner of the Sidebar, then choose New Project. Press the large + icon on the center of the screen in the Media Assets section. In the Create a New Project pop up box, enter the name of the project and click Create Project. Add selected items to new project: When checked, any media selected within an existing project or group will be moved into the newly created project. Creating a New Group Groups organize media on an even deeper level. You can move files between projects and groups without affecting the file s Finder location. To create a new group, do one of the following: Choose File > New > Group (or press Shift-Command-G). Click the New button on the Toolbar, then choose Group. Right-click a project (or group) and choose New Group from the pop-up menu. Press + icon on the bottom left corner of the Sidebar, then choose New Group. Once the Create a New Group dialogue box appears, enter the name of the group and click Create Group. Add selected items to new group: When checked, any media selected within an existing project or group will be moved into the newly created project. Note: One Library can contain multiple Projects and Groups. 8
.")
 transcoder during import. If necessary, the preview files can be copied into one folder.")

 AVFoundation encoder (By default) 3rd Party Transcoder Settings (optional, if required) - FFmpeg encoder for MXF, AVCHD and XAVC")
, you should install an additional 3rd party")

9 Importing Media Once a Library and Project have been created, media can now be imported. KeyFlow Pro supports all types of media: video, audio, images, documents and extra files (i.e package, fonts and compressed files). For video files, if you set the preview file option in the Preferences before importing media, a low-resolution preview file will be created in the background through a built-in H.264 (MP4) transcoder during import. If necessary, the preview files can be copied into one folder. To create a preview file: Choose KeyFlow Pro > Preferences (or press Command-,). Click Encoder pane. Create Preview File during Import option is checked. Resolution and Video/Audio Bitrate settings for Preview file. Note: With Audio Pass Through option, Preview files can keep all the audio tracks in source video. (for MOV & MXF) AVFoundation encoder (By default) 3rd Party Transcoder Settings (optional, if required) - FFmpeg encoder for MXF, AVCHD and XAVC - REDCINE-X PRO encoder for R3D KeyFlow Pro encodes video using AVFoundation encoder by default. If you want to use any formats not supported by AVFoundation (such as MXF, AVCHD, XAVC, and R3D), you should install an additional 3rd party transcoder (FFmpeg and REDCINE-X PRO). After downloading each from the download links below, place each file into the Drop zones, and that's it. Note: If you don't check the "Create Preview File during import" option, you can create one later as long as the media is online. And, KeyFlow Pro now allows you to copy and gather preview files into one folder. It also immediately removes the.mp4 extension automatically. This can greatly reduce the time required to upload proxy files over the network to a cloud service for proxy editing. 9
. Click the Import button on the left of the Toolbar.")
10 Importing from Hard Disk You can import media from either an internal disk or an external hard disk. To import media from a hard disk, do one of the following: Choose File > Import Files to Library Name (or press Command-I). Click the Import button on the left of the Toolbar. Press + icon on the bottom left corner of the Sidebar, then choose Import Files to Library Name. In Finder, drag and drop media into KeyFlow Pro directly. (Either folder or individual file is supported.) Import media window will appear as shown below. Choose New project or existing project. Automatically calculate type and size of selected media. According to filters chosen below, it updates change immediately. Filter by file type. Filter by file extension. (for example, MOV, JPG, PDF) Filter by text in File name. Choose either *Copy to library or *Leave files in place (*Store to). (Default setting can be changed in Preferences.) If checked, it does not import duplicate media in the Library. If checked, it automatically brings folder name to tags. If needed, enter disk label. (Automatically brings the Hard Disk s name) Before importing media, you can preview the media, enter tags beforehand, and delete unnecessary media from the import list. (Note: In this case, import list of Check media to import will be applied first, and then filters setting will be considered in result.) Click "Import" on the bottom-right to import media into the selected project. Note: Finder tags are visible by KeyFlow Pro on import, and Tags entered within KeyFlow Pro are detectable in Finder. * Copy to library: Stores the media inside the Library. In this case, KeyFlow Pro keeps all your media assets within the packaged Library file. * Leave files in place: Creates reference files that simply point to the source media without copying them. Enables the use of external devices for media storage. * Store to: Gives you the power to organize your media externally on import. Select a Finder location for KeyFlow Pro to copy the imported media to. 10

 After selecting the media to import, a pop-up window will appear.")
 that are supported by Mac OS X (or macos) can be")
11 Importing from Cameras If you connect a camera, KeyFlow Pro will automatically mount it to the bottom-left of the Sidebar. You can either import all or only selected media. (Only Copy to library option is supported to import from cameras.) After selecting the media to import, a pop-up window will appear. Choose either a new or an existing project, and then click Import. Note: Generally, all cameras (including ios devices) that are supported by Mac OS X (or macos) can be detected. If using a tapeless camcorder or camera, mount it on Finder first, and then bring in the media as if you're importing from an external hard disk. 11
. Click the New button on the Toolbar, then choose Live Folder.")
12 Adding Live Folders Live Folders automatically detect, import, and update the changes made in the Finder. You can set the frequently updated folders on the Finder as Live Folder. To add the Live Folders from the Finder, do one of the following: Choose File > New > Live Folder (or press Shift-Command-L). Click the New button on the Toolbar, then choose Live Folder. Right-click an existing Live Folder and choose New Live Folder from the pop-up menu. Press + icon on the bottom left corner of the Sidebar, then choose New Live Folder. Then select the folder you want to import as a Live Folder. All media in Live Folders and changes in the Finder level are imported and updated automatically. Because your current folder structure remains unchanged, you can manage Live Folder media files at the Finder level. The file type is indicated in the blue icon. The Live Folder icons reflect the current state of the folder (see below). The icons displayed in the Live Folders are: Icon Description Successfully scanned Currently scanning Waiting to be scanned Offline (Occurs when the top level folder name has been changed or when the disk with the Live Folder has been disconnected. The Live Folder will be Online when the top level folder name has been returned to its source or the disk has been reconnected.) An error occurred Notification Option turned on (macos notification will alert you in real-time when and what is added into the Live Folder.) KeyFlow Pro additionally supports both an interval-based Auto Scan and a Manual Scan ( Disable Auto Scan ) in Preferences. (See more details about these options on.) Note: The library should be stored into the Server s local hard disk for the optimal scanning performance of the Live Folders. 12


13 Setting Notification Option ith macos Notifications integration, now your collaborative workflow can be faster and smarter than ever. Once you set the Notification Option in each desired Live Folder, the macos notifications will alert you in real-time when and what is added into the Live Folder, even while you're working on other apps. This means you no longer need to manually notify your collaborators each and every time a new file is added. To set the Notification Option, do the following: Choose the desired Live Folder, right-click and select Show Info. Select and check the options in the Notification Option you want. Note: In order to use this feature, make sure that KeyFlow Pro alert style in the Notification Center in System Preferences. You now can also take advantage of the various options within the Notification center. When new files are added to the Live Folder where you set the notification option, the macos notification will alert you in real-time. 13
: View media as thumbnail images. You can adjust size of the images by moving slide bar at the bottom-right of the Media Assets section. 2.")
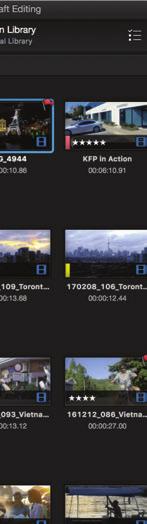
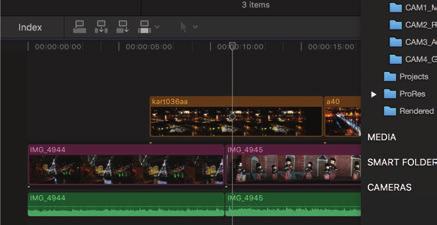
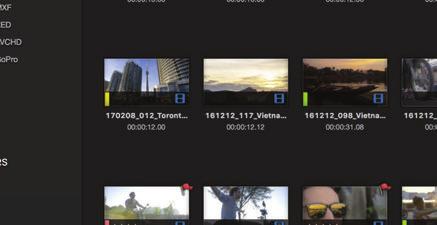
14 Previewing Media Assets KeyFlow Pro provides five view modes for the Media Assets section, and for convenience, toggle switches for the Sidebar and Inspector are available Thumbnail view (Command-1): View media as thumbnail images. You can adjust size of the images by moving slide bar at the bottom-right of the Media Assets section. 2. List View (Command-2): View media as a list. This allows for easy sorting by media info. 3. Hybrid View (Command-3): A combination of the Thumbnail view and List view. 4. Preview View (Command-4): For images, the preview window shows the source file. For video, preview window will play either a preview file, or the source. Annotations are available in the Preview view mode. 5. Map View (Command-5): Integrated with Apple Maps Service, media with GPS location info can be indicated on the map. In the Map category on the left Sidebar, you can find media taken from specific locations through searching by city or street address. You can widen your Media Assets section by using the show/hide toggle buttons for the Sidebar and Inspector. 6. Hide or Show Sidebar (Command-[): Hide or show Sidebar on the left side of the Media Assets section. 7. Hide or Show Inspector (Command-]): Hide or show Inspector on the right side of the Media Assets section. Note: KeyFlow Pro supports *Quick Look for fast and easy previews. By default, you can use Quick Look to view source files in Thumbnail view by using the Space bar. For video files, press Space bar to view source media, and press Option-Space bar" to view the preview file (if created during import). You can set the Quick Look Video default option. If you set to the Preview file, you can see the preview file instead of original file by using Space bar. * Quick Look: Supported in Mac OS X (or macos) Space bar enables you to quickly preview files on Finder. 14
 as needed.")


. 4.")


15 Preview Video Double clicking a video clip in any view mode will switch it to Preview mode. Then, the video clip will be automatically started. You can playback video through the built-in video player and add annotations(markers, keywords and favorites) as needed. When in Preview mode: Play / Pause: You can play or pause a video clip by clicking the Play / Pause icon or by pressing Space bar". Note: KeyFlow Pro supports a variety of playback features and a Timecode Viewer has been provided for user convenience. 2. Current Timecode: Displays the timecode of the frame at the current position of the playhead. Choose one of the three viewing options: Standard, Timecode or Frame number. 3. Timecode Viewer: Choose View > Show Timecode Viewer (or press Control-T). 4. Playback Speed: Supports the J-K-L playback with speeds up to 16x normal speed (1x, 2x, 4x, 8x, 16x). Note: You can view a video frame by frame by using the left and right arrow keys. You can also hold down Shift -Left or Right Arrow keys to move forward or backward 10 frames at a time. 5. Duration: Displays the length of the video clip. 6. Adjusting Volume: Click and drag from side to side to adjust the volume, and click once to mute. 7. Solo / Mute: Isolate audio tracks for the video with multi-track audio (Only when preview file is encoded with audio Pass Through.). 8. Continuous Playback: Toggle (On/Off) Continuous Playback. You can set Continuous Playback as the default in Preferences as below. 9. Set Poster Frame: Position the playhead at the frame where you want to change the poster frame, then click the icon. 10. Export Still Image: Position the playhead at the frame where you want to export to Still Image, then click the icon. (JPG, PNG, or TIFF) 15
 / Search only Selected Category (Off) Search filter by File Type Search")

 and phrase searches using quotation marks ( ).")

 between quotation marks ( ).")
16 Searching for Media Assets The Search Box supports inquiries by Title, Tags, and Extension. Search include Sub Category (On) / Search only Selected Category (Off) Search filter by File Type Search within the desired range by selecting a particular Project/Group or by selecting All Media. Note: KeyFlow Pro supports various advanced search options such as Boolean Search, Annotation Search, Location Search, Metadata Search, and Path Name in Source Location. KeyFlow Pro supports Boolean (AND, OR) and phrase searches using quotation marks ( ). AND search: Search for media which includes both A and B. Do one of the following: A B A and B A AND B OR search: Search for media which includes either A or B. Do one of the following: A B A or B A OR B Phrase( ) search: Search for media which perfectly corresponds to words (phrases) between quotation marks ( ). A is B Note: KeyFlow Pro cannot perform both AND and OR searches at at the same time. For phrase searches, you must use a pair of quotation marks ( ). NOT search isn't currently supported. 16
 particular media assets or the entire project/group. Any files deleted from KeyFlow Pro will not affect the external location of the media.")
 to manage the tags you entered in the current Library.")
17 Organizing Media Assets You can change the general info (filename, tags, color) of the media asset and the Project/Group. Changing filenames in the Info tab does not change the source filename. Also, you can delete(move to Trash) particular media assets or the entire project/group. Any files deleted from KeyFlow Pro will not affect the external location of the media. Entering Tags You can enter in multiple tags to one or more media assets at a time. Auto-complete enables easy and quick tagging. Note: Choose Mark > Show Tags Editor (or press Control-G) to manage the tags you entered in the current Library. You can enter tags beforehand and if Automatically add new tags is on, tags entered from Tags section on the Info tab will be automatically added to the Tags Editor. (Note: in this case, the tags are saved in local database and therefore cannot be shared with a user on the network.) 17
 cannot be moved to a Live Folder.")
 as reference files.")


 or both the source file and")

18 Moving Media Assets You can easily drag and drop media assets from one Project (or Group) to another. Note: The media assets in a Project (or Group) cannot be moved to a Live Folder. However, media assets in Live Folders can be dragged-and-dropped into a Project (or Group), and will exist in both locations. If the Live Folder is deleted from the list, they will remain in the Project (or Group) as reference files. If you d rather have the media assets only in the Live Folder, right click and choose Unlink from Project. Deleting Media Assets To delete the media assets, do one of the following: After selecting media assets to delete, choose Media > Move to Trash (or press Command-Delete). After selecting media assets to delete, right-click and choose Move to Trash. Drag and drop media assets to Trash on the Sidebar. Deleted media assets are safely moved to the Trash and by Empty Trash, database related to media assets will permanently be deleted. Note: Be careful! Any copied source file imported into KeyFlow Pro Library using Copy to library will be deleted by Empty Trash along with it's relevant metadata. For media imported using Leave files in place, you will have the option to delete only the assets (it's relevant metadata) or both the source file and metadata. If you select Remove Asset option, only the relevant metadata is deleted and the source file remains intact. However, if you select "Delete Source File and Asset, you must be very careful because both the source file and related metadata will be permanently deleted. This action cannot be undone. If needed, you can select specific media assets to restore before emptying the Trash, only if the project/group in which the restored media assets are located exists. And, the media assets in Live Folders can only be deleted from the Finder. 18


19 Dragging and Dropping to Other Applications Media assets can easily be sent to any application by simply dragging and dropping. Photoshop Final Cut Pro X Note: Only possible if media is online. 19


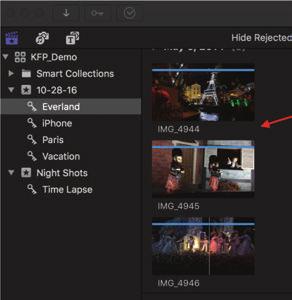
20 Annotations Annotations feature enables you to add markers, keywords and favorites based on timecode to a single video or audio clip. To begin, click the Annotations tab in the Preview view mode. The marker can be added to a specific frame, the keyword and favorite can be added within a selected range between an "In" and "Out" point. Annotations are compatible with other applications such as Final Cut Pro X, Final Cut Pro 7, Premiere Pro CC and Numbers by exporting in XML or CSV format. Markers How to add a Marker: 1. Add Marker: Position the playhead where you want to place the marker, then add a marker by clicking the marker icon or by pressing M. 2. Marker Window: Enter the marker. Multilingual and multiline text are supported. Press "Option-Return" to separate paragraphs. 3. Marker Timecode: Indicates the timecode location of the current marker. 4. Save Marker: After entering the marker, click "Done" or press the Return key. How to edit a Marker: 5. Edit Marker: Double click the marker in the Annotations tab or right-click and select "Edit Annotation." After editing a marker, click "Done" or press the Return key to save any changes. How to delete a Marker: 6. Delete Marker: After selecting marker in the Annotations tab, right-click and select "Delete Annotation" or press the Delete key. 20


21 Keywords How to add a Keyword: 1. Set Range In: Position the playhead where you want the keyword selection to start, click Set Range In" or press I. 2. Set Range Out: Position the playhead where you want the keyword selection to end, click Set Range Out or press O. 3. Set Clip Range: Sets the range selection to the entire clip. Click Set Clip Range" or press X. (press Option-X to Clear Selected Range) 4. Add Keyword: After selecting the keyword range, click "Add Keyword" or press KK. 5. Keywords Window: Enter the Keywords. (in tags, not in sentences.) 6. Keyword Timecode: Indicates the timecode duration of the keyword range. 7. Save Keywords: After entering the keywords, click "Done" or press the Return key. How to edit a Keyword: 8. Edit Keyword: Double click the Keyword in the Annotations tab, or right-click and select "Edit Annotation." After editing a keyword, click "Done" or press the Return key to save any changes. How to delete a Keyword: 9. Delete Keyword: After selecting keyword in the Annotations tab, right-click and select "Delete Annotations" or press the Delete key. Note: Choose Mark > Show Keyword Editor or press Control+K to set Keyword Shortcut Keys to add Keywords quickly. You can set up to 9 shortcut keys, Control-1~9. Keyword shortcut keys are for frequently used keywords to quickly enter them in with simple shortcuts. Similar to Final Cut Pro X's Keyword Editor. To delete the Keyword, press Control+0. 21
 4.")


22 Favorites How to add a Favorite: 1. Set Range In: Position the playhead where you want the favorite selection to start, click "Set Range In" or press I. 2. Set Range Out: Position the playhead where you want the favorite selection to end, click "Set Range Out or press O. 3. Set Clip Range: Set the range selection to the entire clip. Click Set Clip Range" or press X. (press Option-X to Clear Selected Range) 4. Add Favorite: After selecting the favorite range, click "Add Favorite" or press F. 5. Favorite Window: Enter the name of the Favorite. 6. Favorite Timecode: Indicates the timecode duration of the Favorite range. 7. Save Favorite: After entering the Favorite, click "Done" or press the Return key. How to edit a Favorite: 8. Edit Favorite: Double click the Favorite in the Annotations tab or right-click and select "Edit Annotation, or press FF. After editing, press the Return key or click "Done" to save any changes. How to delete a Favorite: 9. Delete Favorites: After selecting Favorite in the Annotations tab, right-click and select "Delete Annotations" or press the Delete key. Note: You can selectively mark sections within a clip as Favorite ( ) and send them to Final Cut Pro X directly using drag-and- drop. You can then use the sort options to show only specified portions of a long clip. Tips for Annotations Copy and Paste Annotations: In the Annotations tab, select the annotations (markers, keywords, and favorites) you want to copy and paste them into another asset. The copied annotations can be pasted into one asset at a time, and the timecode range of all of the selected clips must match. Annotate Audio with Waveform: KeyFlow Pro generates a waveform (AIFF and WAV), and allows the annotating of audio files. 22


 will be searched")


23 Searching for Annotations Annotations are searchable via the following methods: - Searching for specific Annotation within a single video clip Within the search box in the Annotations tab, specific Annotation(marker or keyword) will be searched within the single clip. - Searching for video clips using a specific Annotation By selecting "Annotations" in the MEDIA section on the Sidebar, all videos that contain the Annotation will be searched. Use the main search box to then search Annotations across the whole Library. 23


24 Exporting Annotations You can export Annotation search results in XML and CSV format by using the Export Menu in the top left of the Annotations tab. Without searching, KeyFlow Pro will export all the Annotations. Note: You can assign colors to Annotations for additional organization. Enter Annotation and right-click to choose color. Annotation is searched by choosing color filter on top menu. Color filtering and search within result are supported. 24


25 Sending to Other Applications (1) Final Cut Pro X To send Annotations to Final Cut Pro X, right-click then choose either Send to > Final Cut Pro X or Export > Final Cut Pro X XML. - Send/Export multiple video clips to Final Cut Pro X at once - Export an Annotation search result from a single video clip to Final Cut Pro X Annotations sent to Final Cut Pro X are recognized as Markers and Keywords as shown below. Note: All annotations entered in KeyFlow Pro can be sent to Final Cut Pro X by using the drag-and-drop feature. See more details on page


26 (2) Final Cut Pro 7 To send Annotations to Final Cut Pro 7, right-click then choose either Send to > Final Cut Pro 7 or Export > Final Cut Pro 7 XML. - Send/Export multiple video clips to Final Cut Pro 7 at once - Export an Annotation search result from a single video clip to Final Cut Pro 7 Annotations sent to Final Cut Pro 7 are recognized as Markers and Duration Marker(Keywords and Favorites) in Final Cut Pro 7 as below. 26


27 (3) Premiere Pro CC To send Annotations to Premiere Pro CC, right-click then choose Export > XML for Premiere Pro CC. - Export multiple video clips to Premiere Pro CC at once - Export an Annotation search result from a single video clip to Premiere Pro CC Annotations sent to Premiere Pro CC are recognized as Comment Markers(Markers) and Comment Markers with Duration(Keywords and Favorites) in Premiere Pro CC. 27


28 (4) Numbers Exporting a CSV file is only available in the Annotations tab. It can export Annotations (all or search results) from a single clip. Possible to edit and print in 3rd-party application which supports Exported CSV file format. (e.g. Apple Numbers, Microsoft Excel, etc.) 28

.")


29 Metadata KeyFlow Pro helps users to easily and conveniently organize and manage Custom Metadata Groups by using drag and drop methods. User-defined Metadata can be created to add to these Custom Metadata Groups (Built-in EXIF, TIFF, IPTC, Dublin Core, Final Cut Pro X, and RED Metadata). Organizing Custom Metadata Group Click 'Metadata' tab in the Inspector, and choose 'Edit Metadata View' from the Metadata Groups. The Metadata View window will appear Selecting Metadata Group: Select Custom Metadata Group from Metadata View Groups. 2. Selecting Metadata Properties: Select one of the metadata EXIF, TIFF, IPTC, Final Cut Pro X, RED, Dublin Core or User Defined. 3. Adding Metadata Field: Drag and drop selected Metadata Field to Custom Metadata Group. Note: To delete a Metadata Field from the Custom Metadata, simply drag it out of the list. 4. Adding Custom Metadata Group: If needed, you can create multiple Custom Metadata Groups. 29


30 Creating User-Defined Metadata Field Choose User Defined from Properties on the top-right of the Metadata View window and click "+" in the bottom to create new fields. After inserting User-defined Metadata, click "OK" button to save. Then drag and drop it to your Custom Metadata Group to add. You can manage media assets through User-defined Metadata as shown below. 30


")


31 Advanced Search using Metadata If you want to search using specific metadata, select which metadata you want and add it to a search condition as shown below. Select from Menubar KeyFlow Pro > Preferences (or shortcut key Command-,) and move to Search pane. Press Properties and select Metadata properties to be included in search condition. You can search for Media Assets using Editor names as shown below. If checked, it is possible to search by path name in source location (Reference type) Editor Metadata Field of User Defined is selected as search condition. 31


32 Workflow Automation KeyFlow Pro allows for User-defined Workflows by utilizing a combination of various Workflow actions. Created Workflows can be applied to specific Projects or selected media assets. This Workflow Automation enables users to prevent repetition of the same tasks. Creating a User-defined Workflow If you click the Workflows icon in the Toolbar section on top of the Main window, a Workflow window will appear as shown below. Input a workflow name. Press + button to set workflow conditions. Press + button to set workflow actions. Press + button to create user defined workflow. For example, creating a Copy to Storage workflow: Possible to change sequence of workflow actions by Dragging. (Note: Since it performs in order, results may vary according to the sequence of actions.) 32


 (2) Applying to the Media")


33 Applying the Workflow (1) Applying to the Project Apply created workflow to the Project by Drag and Drop. Then, workflow will automatically run when you import Media to the Project. (Note: This cannot be applied to the Live Folder.) (2) Applying to the Media Assets Select the Media Assets, then right-click to select a workflow from the Run Workflow context menu. The selected workflow will be automatically applied to the selected Media Assets. This can be applied in both the Projects and the Live Folders. Note: You can monitor the process of workflows in real time. Monitoring Workflows Monitoring background jobs 33


 features.")
 can be removed from the Role Editor.")
34 Interacting with Final Cut Pro X KeyFlow Pro works seamlessly with Final Cut Pro X. You can send Media Assets - including Tags, Annotations, and Final Cut Pro X clip metadata (roles, notes, scene, reel, take, camera angle, and camera name) - directly from KeyFlow Pro to Final Cut Pro X by dragging and dropping Media Assets, and share current working Projects seamlessly in a single Event by dragging and dropping Project between Final Cut Pro X and KeyFlow Pro. The free FCP X Agent plug-in can then export clip or timeline (incl. metadata edits) back to KeyFlow Pro. Adding Final Cut Pro X Clip Metadata In KeyFlow Pro, you can add a clip s metadata (such as Roles, Notes, Scene, Reel, Take, Camera Angle, and Camera Name) before sending to Final Cut Pro X. KeyFlow Pro also provides Assign Roles and Edit roles (with Role Editor ) features. This allows you to create new video and audio roles you need and conveniently assign them in KeyFlow Pro. Note: Existing roles except the default five (Video, Titles, Dialogue, Music, Effects) can be removed from the Role Editor. If you have already assigned the roles to some Media Assets, the existing roles can be added back to the Role Editor when selecting a Media Asset in the search results window. 34

 On-the-fly Project Sharing In KeyFlow Pro, there are two ways to send media assets to Final Cut Pro X: using")


35 The clip s metadata entered in KeyFlow Pro are fully integrated with Final Cut Pro X. Note: Final Cut Pro X clip metadata can only be sent from KeyFlow Pro to Final Cut Pro X. (Currently, vice versa is not supported.) On-the-fly Project Sharing In KeyFlow Pro, there are two ways to send media assets to Final Cut Pro X: using Drag-and-Drop or choosing Send to > Final Cut Pro X. With Live Folders, you can easily share Final Cut Pro X Projects between Final Cut Pro X and KeyFlow Pro by dragging and dropping. The metadata and annotations in KeyFlow Pro can be sent to Final Cut Pro X when dragging and dropping media assets. You can also drag-and-drop clips from Final Cut Pro X to a Live Folder, where it will be automatically stored as FCPXML. In addition, multicam clips, compound clips, and synchronized clips are supported. Each displayed icon will indicate the type of the clip. Projects, events, and even libraries can be shared seamlessly between KeyFlow Pro and Final Cut Pro X. You can drag-and-drop a Project stored in a Live Folder into an existing Final Cut Pro X Event. The Project will automatically be stored in a Live Folder as FCPXML. Only one FCPXML file can be dragged and dropped at a time. Note: If a file name is duplicated when dragging and dropping a Project from Final Cut Pro X to KeyFlow Pro, both files are kept with automatic numbering. To backup the Final Cut Pro X Library itself, import it to KeyFlow Pro by using the Leave Files in Place option. It will be stored as a FCPBUNDLE (.fcpbundle) in KeyFlow Pro Project. Use the Open (or Open with) option by right-clicking the file to open the Final Cut Pro X library in KeyFlow Pro. 35


36 Exporting to KeyFlow Pro Final Cut Pro X can export a single clip or a whole timeline to KeyFlow Pro with an FCPX Agent plug-in. It supports the integration of Tags, allowing Finder and KeyFlow Pro to detect and apply Tags from Final Cut Pro X. Installing FCPX Agent You can download the FCPX Agent from the Plug-in page at Press the button to download the FCPX Agent. Drag and drop the FCPX Agent into the Applications folder. Launch Final Cut Pro X and choose File > Share > Add Destination. Double-click Export File or drag-and-drop into Destinations to add on to the list. 36

 The Send to KeyFlow Pro")


37 Press Other from Open with menu and select installed FCPX Agent from Applications folder. Change the destination name. (ex: Send to KeyFlow Pro) The Send to KeyFlow Pro option is added to the Share menu. Using the Send to KeyFlow Pro option from the Share menu can export either a single clip or a whole timeline into KeyFlow Pro. You can add tags (keywords) from Final Cut Pro X and send them through the Share option as well. All of the attributes associated with the project or clip are sent to the Final Cut Pro X metadata in KeyFlow Pro X. 37


38 Click the Library List to choose a desired Library. Designate the actual storage location of the exported media and manage externally. A pop-up window will automatically appear to set the basic Project path during the first launch of the FCPX Agent. After selecting Library, choose the Project to import media from. Note: Live Folders are not available. You can check the option to send only FCP XML files. QuickTime movies and FCP XML are exported at the same time by default. The Project designated as the Default Library will receive all media unless changed. Set the Store to default path. If you don t set a storage location, the media will be saved inside the Library. A green check mark appears when a clip or an entire timeline is sent to KeyFlow Pro completely. Once you have exported, you will be able to verify QuickTime movies and FCP XML files inside the Project in KeyFlow Pro. To verify the entered metadata information shared during the export, select the Final Cut Pro X Metadata Group in the Metadata tab on the right. The metadata fields marked with a star (!) cannot be retrieved from Final Cut Pro X. This metadata can only be sent from KeyFlow Pro to Final Cut Pro X. The rest of the metadata fields cannot be retrieved from KeyFlow Pro. This metadata can only be sent from Final Cut Pro X to KeyFlow Pro. 38


, choose KeyFlow Pro > Preferences (or press")


39 Sharing Libraries KeyFlow Pro can operate as either a server or client - or both. When users connect to a shared server library as a client, they can search, preview, download, upload, annotate and edit metadata on the server library. Client users can quickly switch between shared or server libraries anytime, making KeyFlow Pro the perfect solution for local media management on an internal network. Media collaboration in small workgroups has never been easier. Configuring Shared Libraries To Share the Library, first confirm that the Host Server options allow sharing. In KeyFlow Pro(Host Server), choose KeyFlow Pro > Preferences (or press Command -, ) and click Library pane Setting server sharing option: Check options for Library sharing. (See more details about these three options on page 7.) 2. Adding accessible user account: Create an account which can access Shared Library. It will be automatically added to list of all users. 3. Adding general user account: Create a general user account. Drag and drop to accessible user list to give access. In Server, click to change sharing options easily and quickly at any time. 39
.")
 If multiple Libraries are available on server, you can select the ones you want and connect remotely. Check a Library to connect.")
40 Connecting to Shared Library If Shared option is checked on the Server, other Client Users can connect to the Shared Library remotely. Connecting to the shared Library is as follows: File > Connect to Shared Library (or press Command-K). When Connect to Shared Library window appears, as shown below, enter server address and user account information. Click icon and easily select Bonjour network user. (Note: Click only once. Depending on network condition, it may take a while to appear a list.) If multiple Libraries are available on server, you can select the ones you want and connect remotely. Check a Library to connect. (Note: Possible to select several Libraries. Connected Libraries are listed in Library list of client. One Library at a time can be opened. If this is checked (by default), the user-defined metadata fields on the server will be retrieved and added to your user-defined metadata list. Click OK to immediately open the shared Library. Note: KeyFlow Pro supports various Networks such as Bonjour, Wi-Fi, LAN, VPN, etc. If using a static IP address or a set router port forwarding to KeyFlow Pro server, you can access the main server from the outside. For example, if you can set a VPN, your team will all be working remotely from everywhere via KeyFlow Pro. In this case, KeyFlow Pro works as a media management and logging solution. If you set one Mac as a server that holds a single shared KeyFlow Pro library, they will all be able to view existing media assets, add new metadata, download and even upload new files to the server from remote locations over the internet. Uploading media using Copy to library is only available when both a folder where the shared library is located and a shared storage are mounted on the client. However, previewing media assets, adding/modifying metadata fields/annotations, and downloading media assets are always available, even if the volumes are not mounted on the client. 40


41 Active Sessions When sharing a Library, you can see all connected users in real-time with the Active Sessions. By default, 5 client users can connect to the server simultaneously without additional purchase. Note: Two or more devices cannot be connected to the server with the same ID simultaneously. When connecting to the server from a second device, the user can choose which connection to keep active. For example, in the case below, an alert box pops up. Click OK to disconnect the previous device and connect the new device to the server automatically. In-App Purchases More concurrent client user licenses can be bought through the In-App purchase in Preferences. All prices will be converted into the local currency. 41

42 Working with Shared Libraries Using shared storage Since shared storage is always mounted to both Server and Client, the location remains the same and media always stays online. Not using shared storage If you do not use shared storage, media will stay offline until both the shared storage and the volume path where the shared library is located are mounted to the Client. Note: The point is that the volume path must be same between Server and Client. If the mounted volume path does not match, the media assets will appear offline even if the volume is mounted on the Client. Mounting shared network volume to client 1. In Client Mac's Finder, open System Preferences and click Sharing. 2. Activate File Sharing and click + button to add folder where KeyFlow Pro Library is located. 3. Click + button to set user accounts and permission as needed. (To upload media to server, Read & Write permission is required.) 4. In Client Mac's Finder, choose Go > Connect to Server (or press Command-K). Then, use AFP, SMB or NFS file sharing protocol and enter server address. By entering user account info and allowing access, the shared network volume will be mounted in Finder. Note: Generally the shared storage is mounted with the same path on both Server and Clients, then KeyFlow Pro can automatically find the shared library s location. In this case, a folder that contains the shared library on the Server doesn t need to be shared via a network. 42
 will bring media online. (If the media on the server is online.) Operations possible in Client Library depend whether or not the media is online.")
 Open media, Reveal in Finder, Send to Final Cut Pro X, Send to Final Cut Pro 7, use menu options related to Export, etc.")
 Media Metadata editing, Annotation editing, Move to Trash (Only if \"Editable\" option is ON in shared library) If a volume path where the shared library is located is mounted to the")
 To upload media from a hard disk, do one of the following: Choose File > Upload Files to Shared Library Library Name (or press Command-I). Click the Upload button on the left of the Toolbar.")
43 After the shared network volume is mounted, click the 'Auto Search' button (Magnifying Glass) in the Library Information. Auto Search button If the shared Library location is found successfully. Running Refresh (or Command-R) will bring media online. (If the media on the server is online.) Operations possible in Client Library depend whether or not the media is online. If media is online, users can do the following: Search, preview and download media in the shared Library Media Metadata editing, Annotation editing, Move to Trash (Only if Editable option is ON in shared library) Open media, Reveal in Finder, Send to Final Cut Pro X, Send to Final Cut Pro 7, use menu options related to Export, etc. Share with external applications using drag-and-drop If media is offline, users can do the following: Search, preview and download media in the shared Library (Only if the Media is still online on the server) Media Metadata editing, Annotation editing, Move to Trash (Only if "Editable" option is ON in shared library) If a volume path where the shared library is located is mounted to the Client, the client user can then upload media using Copy to library option to the shared library. (Setting Creatable permission on the server is required.) To upload media from a hard disk, do one of the following: Choose File > Upload Files to Shared Library Library Name (or press Command-I). Click the Upload button on the left of the Toolbar. Press + icon on the bottom left corner of the Sidebar, then choose Upload Files to Shared Library Library Name. In Finder, drag and drop media into KeyFlow Pro directly. (Either folder or individual file is supported.) Upload media window will appear as shown below. The options of the upload media window can be used in the same way as the Import media options. 43


44 Using Live Folders on shared storage In a shared environment, the KeyFlow Pro library should be stored into the Server s local hard disk for the optimal scanning performance of the Live Folders. In Server, you can set Auto Scan Interval for Live Folders as shown below. When Live Folders are being scanned, Auto Scan is in standby status. After all Live Folders have been scanned, the Auto Scan will begin after the premeditated interval time. If you choose the Disable Auto Scan option in the server, you can manually rescan a selected Live Folder as needed. If a client adds or changes Media Assets in the Live Folder, they must perform a Request Rescan to let the server detect the revisions. Then, the server will rescan the Live Folder requested to be scanned. Note: As the Auto Scan interval begins counting at the completion of all Manual Scans, the Auto Scan may be in standby status if Manual Scans are performed frequently or if the chosen interval is too long. Renaming or moving folders affects many subfiles, so it is recommended that you avoid excessive altering of Live Folders as much as possible. A Live Folder will appear offline if its location has been changed or a top folder has been renamed. Please note that if you delete a Live Folder from the list and then add it again, the previously entered metadata will be lost. Do not add the top level folder of shared storage as a Live Folder, as it can cause system load-related performance and stability issues. 44

.")

45 Switching Libraries As shown below, if you click the Library List button, a list of connected Local Libraries and Shared Network Libraries appear. This icon indicates a Local Library Library List button Current connected Library Click this icon to switch to another Library. This icon indicates a Shared Network Library. Simply click Connect (Plug) icon on the Library List in order to switch to another Library. Opening Local Libraries In order to connect to local libraries not listed in the Library List, choose File > Open Library (or press Shift-Command-O). The newly imported Library will be added to the Library list. Disconnecting Libraries If you want to delete a specific Library from the Library List, click the x icon as shown below. Click x icon to delete this Library from the Library List. This will not delete the actual Library, but clears it from the Library List. You can add the Library to the Library List by opening or connecting the Library you want at any time, if needed. 45


 Click the New button and choose Smart Folder.")

46 Additional Features KeyFlow Pro provides various additional features for user convenience. Smart Folders Smart Folder is the ability to search desired media asset and categorize automatically by combining several search condition. Smart Folders contain media files from the full Library which are set to user specified conditions. To create a new Smart Folder, do one of the following: Choose File > New Smart Folder. (or press Shift-Command-S) Click the New button and choose Smart Folder. Press the + button on the bottom-left of the Sidebar and choose New Smart Folder. A New Smart Folder window will appear allowing you to customize your desired parameters. You can create multiple Smart Folders. To alter them, simply double-click to re-name or change the sorting parameters. You can also change the order of Smart Folders in the list by dragging to your own desired placement. 46


 Select the Project in which imported Media will be located.")

47 Watcher You can set Watch Folders on the Finder lever in order to import any media placed within them to a specific project automatically. To set a Watcher, choose KeyFlow Pro > Preferences and click the Watcher button. To connect from 3rd-party systems, KeyFlow Pro offers Export sample Plist function. After exporting the sample plist file, fill out the Watch Folder Sample.plist to comply with the format, and then apply it to the Watch Folder. Click + icon to add Watch Folder. By default, Watch Interval detects Media every 10 seconds and imports it into KeyFlow Pro. Users can change this setting. Click the + icon on the bottom-left to add a new Watch Folder. Select if you need to import Plist file from a 3rd-party system. Designate the actual storage location of imported Media and manage as External Media. (Media stored inside the Library by default.) Select the Project in which imported Media will be located. Click the OK button to set the Watch Folder. You can set and manage all the various Watch Folders you create. You can set the Watch Interval time. Files placed in Watch Folders are automatically imported from KeyFlow Pro, it will automatically detect Media and import to the Project in user defined Library. (Note: Media in Watch Folder is not copied, but is MOVED and imported into the Library. Therefore, after the process is finished, Watch Folder remains empty.) 47
 type only.")
48 Batch Relink When files are moved to the different volume or folder, batch relink will update the media location path. Note: Batch Relink will work for referenced file (imported using Leave files in place option) type only. To do a Batch Relink, choose File > Relink, then select a new location that need to be relinked. After searching for matching files, Check media to relink window will appear as shown below. You can select a file you want to relink By default, KeyFlow Pro automatically selects the first file among the matched files. After selecting a file you want to relink, choose Relink button on the bottom right corner. Then, the location of the media will be updated to the new location and the media will be changed to Media Online. Note: In order to perform the Batch Relink, the file name and file size must match. The Batch Relink cannot be applied to the Live Folders. 48
Anchor User Guide. Presented by: Last Revised: August 07, 2017
 Anchor User Guide Presented by: Last Revised: August 07, 2017 TABLE OF CONTENTS GETTING STARTED... 1 How to Log In to the Web Portal... 1 How to Manage Account Settings... 2 How to Configure Two-Step Authentication...
Sync User Guide. Powered by Axient Anchor
 Sync Powered by Axient Anchor TABLE OF CONTENTS End... Error! Bookmark not defined. Last Revised: Wednesday, October 10, 2018... Error! Bookmark not defined. Table of Contents... 2 Getting Started... 7
Premiere Pro CC 2018 Essential Skills
 Premiere Pro CC 2018 Essential Skills Adobe Premiere Pro Creative Cloud 2018 University Information Technology Services Learning Technologies, Training, Audiovisual, and Outreach Copyright 2018 KSU Division
Sync-N-Link X. Contents. Preparing Clips for Syncing
 Sync-N-Link X Sync-N-Link X takes away the time-consuming chore of synchronizing dailies or rushes by processing an Event of clips with matching SMPTE/EBU Timecode. Sync-N- Link X looks for audio whose
XtoCC/Project X₂7. Quick-Start Guide... Before exporting XML for XtoCC translation Workflow Options... 3
 XtoCC/Project X₂7 XtoCC (also called Project X₂7) allows you to take your Final Cut Pro X event clips and/ or project(s) directly to Adobe Premiere Pro CC or CS6, Adobe Audition CC, Adobe After Effects
Tabbing Between Fields and Control Elements
 Note: This discussion is based on MacOS, 10.12.6 (Sierra). Some illustrations may differ when using other versions of macos or OS X. The capability and features of the Mac have grown considerably over
GRS Enterprise Synchronization Tool
 GRS Enterprise Synchronization Tool Last Revised: Thursday, April 05, 2018 Page i TABLE OF CONTENTS Anchor End User Guide... Error! Bookmark not defined. Last Revised: Monday, March 12, 2018... 1 Table
Click New Project from the Premiere Pro Welcome screen, or select File > New Project.
 Multi Cam How to guide 1. Create a project Click New Project from the Premiere Pro Welcome screen, or select File > New Project. In the New Project dialog box, enter a name for the project, and click OK
Intermediate Training
 Intermediate Training The material in this handout is taken directly from the Picasa Website. It was decided to add all the information in one place so it could be viewed at one time. However, what is
Adobe Prelude CS6. Jump-start your production
 Adobe Prelude CS6 Jump-start your production Adobe Prelude CS6 software provides a unified interface for ingest and logging workflows, allowing you to work faster, stay organized, and streamline your production
MovieSlate + KeyClips User Guide
 MovieSlate + KeyClips User Guide Organize your Final Cut Pro X footage Log footage with MovieSlate for ios. Send log data to KeyClips for macos which generates XML for Final Cut Pro X to auto-create sequences,
imovie: Digital Storytelling
 1 imovie: Digital Storytelling *** imovie s interface with terminology is located on the final page *** 1. Getting Started a) Document your activities by using the provided digital camera b) Using a USB
QUICK GUIDE FOR STARTING A NEW PREMIERE ELEMENTS PROJECT
 QUICK GUIDE FOR STARTING A NEW PREMIERE ELEMENTS PROJECT 1. Create a folder on the DATA DRIVE (or your external HD) for your project. You can do this by either holding CONTROL while clicking in the open
Editing & Color Grading 101 in DaVinci Resolve 15
 Editing & Color Grading 101 in DaVinci Resolve 15 1. Exploring Resolve Exploring Resolve The Media Page The Edit Page The Fusion Page The Color Page The Fairlight Page The Deliver Page The Processing Pipeline
Final Cut Pro X (FCP X) Chapter Notes
 Chapter Notes") Final Cut Pro X (FCP X) Chapter Notes Chapter 1 Introduction Fn (for F keys, top row) Editing is storytelling. It s choosing from a sometimes vast array of video and audio clips, and assembling them into
Final Cut Pro X (FCP X) Chapter Notes Chapter 1 Introduction Fn (for F keys, top row) Editing is storytelling. It s choosing from a sometimes vast array of video and audio clips, and assembling them into
COPYRIGHTED MATERIAL. Using Adobe Bridge. Lesson 1
 Lesson Using Adobe Bridge What you ll learn in this lesson: Navigating Adobe Bridge Using folders in Bridge Making a Favorite Creating metadata Using automated tools Adobe Bridge is the command center
DSS User Guide. End User Guide. - i -
 DSS User Guide End User Guide - i - DSS User Guide Table of Contents End User Guide... 1 Table of Contents... 2 Part 1: Getting Started... 1 How to Log in to the Web Portal... 1 How to Manage Account Settings...
Apogee MetaRecorder. User s Guide v1.0.1
 Apogee MetaRecorder User s Guide v1.0.1 Table of Contents Getting Started Quickly Welcome to MetaRecorder Navigating in MetaRecorder In Depth: Scenes View In Depth Markers View In Depth Settings View Sharing
SeeSnake HQ User Guide
 SeeSnake HQ User Guide SeeSnake HQ Version 1.53.85.1426 23 May 2010 About SeeSnake HQ 3 Digital Technology 3 Installation and Updates 5 Windows XP 5 Windows Vista 5 Windows 7 5 The Home Window 6 Home Toolbar
Basic Video Editing in Final Cut Pro X
 Basic Video Editing in Final Cut Pro X 10.2.1 May 19, 2015 Gary Roll, Post Production Specialist, CAPS Media v20150519.1 1 of 13 1. Plan what you want to do 2. Get organized before you start 3. Gather
imovie The imovie Screen Monitor Window Shelf Home Play Full Screen Playhead Play Fast Forward Rewind Clip Viewer Timeline Design Panels Volume
 The imovie Screen Monitor Window Shelf Playhead Home Play Full Screen Rewind Play Fast Forward Camera Mode Edit Mode Clip Viewer Timeline Volume Project Trash Design Panels 2004 Teaching Matters, Inc.-Page
OFFICIAL USER MANUAL 1
 OFFICIAL USER MANUAL 1 Contents: Getting Started with Musician Video Maker 3 Launching And Activating Musician Video Maker 3 Beta Tester Users 5 Start Mode And Demo Mode 6 Importing Your Video Footage
CinePlay! User Manual!
 CinePlay User Manual 1 CinePlay! User Manual! CinePlay is a professional Mac media player complete with timecode overlays, markers, masking, safe areas and much more. It is ideal for dailies, portfolios,
Importing a V-Station HD Project into Adobe Premiere Pro CS 5, CS 6, CC7
 A FutureVideo Tech Brief Importing a V-Station HD Project into Adobe Premiere Pro CS 5, CS 6, CC7 V-Station HD can output a project s content video files, the edit decision lists, and logs that can be
11 EDITING VIDEO. Lesson overview
 11 EDITING VIDEO Lesson overview In this lesson, you ll learn how to do the following: Create a video timeline in Photoshop. Add media to a video group in the Timeline panel. Add motion to still images.
imovie 08 Basics USF College of Education Laptop Initiative EDU 252, Website:
 imovie 08 Basics USF College of Education Laptop Initiative EDU 252, Email: laptoplounge@coedu.usf.edu Website: http://fcit.usf.edu/laptop/ imovie 08 is a completely redesigned version of the video editing
Apple Pro Training Series: Final Cut Pro X (ISBN-13: ) Updates and Errata for Final Cut Pro (release date Oct 23, 2012)
 Updates and Errata for Final Cut Pro (release date Oct 23, 2012)") The Apple Pro Training Series book "Final Cut Pro X" by Diana Weynand is based on Final Cut Pro X v10.0.0 or v10.0.3 depending on the print date. The currently available book does not introduce features
The Apple Pro Training Series book "Final Cut Pro X" by Diana Weynand is based on Final Cut Pro X v10.0.0 or v10.0.3 depending on the print date. The currently available book does not introduce features
Warp Speed Editing in Final Cut Pro 10.4
 Warp Speed Editing in Final Cut Pro 10.4 1. Preparing Media Using Camera Archives Using Folder Names Using Finder Tags 2. Launching FCP X Launching with the Keyboard Opening Specific Libraries Finder Library
PDF Expert. User Guide Readdle Inc.
 PDF Expert User Guide 2017 Readdle Inc. Contents Chapter 1. Overview 6 Chapter 2. Main menu 9 Chapter 3. Getting files from 12 Mac or PC via itunes 12 Mail app 13 Dropbox 14 Other web storages 16 Other
Editing and Finishing in DaVinci Resolve 12
 Editing and Finishing in DaVinci Resolve 12 1. Introduction Resolve vs. Resolve Studio Working in the Project Manager Setting up a Multi User Login Accessing the Database Manager Understanding Database
emam and Adobe Premiere Panel Guide
 emam and Adobe Premiere Panel Guide Version 3.8 April, 2017 Notice The content in this document represents the current view of Empress Media Asset Management, LLC as of the date of publication. As Empress
Finder windows To open a new Finder window, click the Finder icon in the Dock, then select File > New Window.
 https://support.apple.com/en-us/ht201732 Mac Basics: The Finder organizes all of your files The Finder in OS X provides access to your files, folders, and drives, and helps you to keep them organized.
Digital Video. Part II: Introduction to Editing and Distribution
 Digital Video Part II: Introduction to Editing and Distribution Contact Information The University of Utah Student Computing Labs Macintosh Support mac@scl.utah.edu We Will Cover History of video editing
org How to Import and Edit with Premiere Pro school Uploading Files Determine what kind of camera you used to film for your project.
 j tech org school Uploading Files How to Import and Edit with Premiere Pro Determine what kind of camera you used to film for your project. This document has been written to accommodate the JVC and CanonHD
twisted wave twisted wave [an introduction]
![twisted wave twisted wave [an introduction]](/thumbs/86/94307689.jpg "twisted wave twisted wave [an introduction]") twisted wave information www.twistedwave.com $80 free 30 day trial mac only updated frequently 2 versions available (OSX [more powerful] & ios [more portable]) OSX & ios are different purchases [different
twisted wave information www.twistedwave.com $80 free 30 day trial mac only updated frequently 2 versions available (OSX [more powerful] & ios [more portable]) OSX & ios are different purchases [different
Publishing Electronic Portfolios using Adobe Acrobat 5.0
 Step-by-Step Publishing Electronic Portfolios using Adobe Acrobat 5.0 2002, Helen C. Barrett Here is the process we will use to publish a digital portfolio using Adobe Acrobat. The portfolio will include
Libraries. Multi-Touch. Aero Peek. Sema Foundation 10 Classes 2 nd Exam Review ICT Department 5/22/ Lesson - 15
 10 Classes 2 nd Exam Review Lesson - 15 Introduction Windows 7, previous version of the latest version (Windows 8.1) of Microsoft Windows, was produced for use on personal computers, including home and
QromaTag for Mac. User Guide. v1.0.5
 QromaTag for Mac User Guide v1.0.5 About QromaTag v1 QromaTag for Mac is a new way to create and embed industry standard photo metadata into your digital images using Natural Language Tagging. Unlike traditional
DVD Production I: Introduction to idvd
 DVD Production I: Introduction to idvd Assemble your movies and still images Before you create your DVD, assemble your materials and check that your movies are in the correct format for idvd. All movies
2018 imovie High Sierra
 2018 imovie High Sierra 1 Create a Movie Open imovie. Select the Projects button from the top menu. Click Create New. Next, Click Movie. You will see a sidebar of libraries and events, browser window with
For today, choose Format: NTSC Rate: Use: DV-NTSC Anamorphic (North American, widescreen)
") Final Cut Pro Final Cut Pro is a sophisticated video-editing program made by Apple. It is the editing software of choice for multimedia journalists using Apple computers, and is comparable to Adobe's Premiere
Final Cut Pro Final Cut Pro is a sophisticated video-editing program made by Apple. It is the editing software of choice for multimedia journalists using Apple computers, and is comparable to Adobe's Premiere
PUB. DIE A. Canon XF Utility. Instruction Manual. Macintosh. Version 1.2
 PUB. DIE-0408-000A 1 C Y P O Canon XF Utility Instruction Manual Macintosh Version 1.2 Table of Contents 02 03 Introduction 03 About Canon XF Utility 03 Conventions in the Manual 04 Running XF Utility
Use the Apple menu to change settings, get Mac OS X software, open recent items, and restart or shut down your computer.
 Welcome to Mac OS X Aqua makes using your Mac easier than ever. Its color, depth, and motion guide you through your tasks, while the Finder and Dock provide easy access to your computer and network. Aqua
OpenDrive Web User Guide
 OpenDrive Web User Guide 1 Contents Logging in 3 Files and Folders.4 Download a Folder....5 Folder/File Properties 6 Create a New Folder...7 Sharing Files and Folders..8 Sharing Files..9 Editing a File...
Articulate Engage 2013 Tutorial
 How to Access Engage 1. By Launching Engage Directly o You can open Engage directly from the desktop by clicking on the green Engage Icon, which is shown in the top right corner of this manual. 2. By Launching
End User Manual. December 2014 V1.0
 End User Manual December 2014 V1.0 Contents Getting Started... 4 How to Log into the Web Portal... 5 How to Manage Account Settings... 6 The Web Portal... 8 How to Upload Files in the Web Portal... 9 How
Vendor: Adobe. Exam Code: 9A Exam Name: Adobe Premiere Pro CS5 ACE Exam. Version: Demo
 Vendor: Adobe Exam Code: 9A0-154 Exam Name: Adobe Premiere Pro CS5 ACE Exam Version: Demo QUESTION NO: 1 You are working on project that originated on film. You are going to convert your video edits back
5.2. Click these tabs to jump to the Table of Contents, Index or start of each chapter.
 5.2 Click these tabs to jump to the, or start of each chapter. Click this button to advance to the next page. Click this button to return to the previous page. (Since this is the starting page, the [Back]
Getting to Know Final Cut Pro X
 Getting to Know Final Cut Pro X Open Final Cut Pro X on the computers by going to the dock on the right hand side of the right monitor. Single click on Applications. Next, single click on the Final Cut
Premiere Pro CC Getting Started
 Premiere Pro CC Getting Started File Management File management might be an odd place to begin, but correct file structure is important in Premiere Pro to keep your work neat and tidy, and stop the risk
Compressor 3.5 Review Questions
 Compressor 3.5 Review Questions Lesson 1 1. What Compressor window displays currently encoding batches? 2. What Compressor window contains the Batch Template Chooser? 3. What do you call a setting once
Office 365: . Accessing and Logging In. Mail
 Office 365: Email This class will introduce you to Office 365 and cover the email components found in Outlook on the Web. For more information about the Microsoft Outlook desktop client, register for a
Digital Video Act II Introduction to Editing and Distribution. University of Utah Student Computing Labs Macintosh Support
 Digital Video Act II Introduction to Editing and Distribution University of Utah Student Computing Labs Macintosh Support mac@scl.utah.edu More classes This class is a series Act I last week Introduction
GETTING STARTED 8 December 2016
 GETTING STARTED 8 December 2016 About Platform... 4 Browser support... 5 Registration Registering as a Teacher... 6 Registering as a Student... 6 Registering as School... 6 Registering as Municipality
1 ZoomBrowser EX Software User Guide 5.0
 1 ZoomBrowser EX Software User Guide 5.0 Table of Contents (1/2) Chapter 1 Chapter 2 Chapter 3 What is ZoomBrowser EX? What Can ZoomBrowser EX Do?... 4 Guide to the ZoomBrowser EX Windows... 5 Task Buttons
Using Metadata with the FS-5 and Final Cut Pro Matt McEwen
 Using Metadata with the FS-5 and Final Cut Pro Matt McEwen Metadata is becoming an important part of modern video production. With the advent of tapeless acquisition devices such as the FS-5, which are
Apple Compressor 4.1 Detailed Video Training Outline Chapter 1 - Get Started
 Apple Compressor 4.1 Detailed Video Training Outline Chapter 1 - Get Started 01.01 Welcome An overview of this entire training How to get started New features Explaining hardware acceleration 01.02 Learn
Digital Video Editing Using imovie
 Digital Video Editing Using imovie This is an introductory tutorial into basic digital video editing. Participants will learn how to transfer video from tape to the computer, plus basic editing techniques
APPLE IMOVIE HD TUTORIAL
 APPLE IMOVIE HD TUTORIAL O V E R V I E W Movie HD is consumer-level digital video editing software for Mac OS. You can use imovie to edit the footage you film with digital video cameras and HD video cameras.
Oracle Cloud. Content and Experience Cloud Android Mobile Help E
 Oracle Cloud Content and Experience Cloud Android Mobile Help E82091-01 Februrary 2017 Oracle Cloud Content and Experience Cloud Android Mobile Help, E82091-01 Copyright 2017, Oracle and/or its affiliates.
 Page 1 of 6 Mac OS X keyboard shortcuts Summary Learn about common Mac OS X keyboard shortcuts. A keyboard shortcut is a way to invoke a function in Mac OS X by pressing a combination of keys on your keyboard.
Scan to PC Desktop Professional v7.0 Orientation Guide
 Scan to PC Desktop Professional v7.0 Orientation Guide Maximizing Your Productivity with Scanning and Your Xerox WorkCentre Pro Multifunction Device Topics Included Scanning to the Desktop Scanning to
Update & : The Easy Guide to Final Cut Pro X
 Update 10.0.6 & 10.0.7: The Easy Guide to Final Cut Pro X This short update has been written to outline specific changes between the latest releases of Final Cut Pro X, versions 10.0.6 and 10.0.7, and
EDITING GUIDE (EDIT SUITES)
") PREMIERE PRO CC (VERSION 2015.2) EDITING GUIDE (EDIT SUITES) Version 3.3 (FEB 2016) PREMIERE PRO CC EDIT GUIDE - La Trobe University 2015 latrobe.edu.au 2 What do you want to do? 3 1. Back up SD card footage
PREMIERE PRO CC (VERSION 2015.2) EDITING GUIDE (EDIT SUITES) Version 3.3 (FEB 2016) PREMIERE PRO CC EDIT GUIDE - La Trobe University 2015 latrobe.edu.au 2 What do you want to do? 3 1. Back up SD card footage
USER MANUAL. Version April 2013 USO RESTRITO
 USER MANUAL Version 2.1 - April 2013 Copyright EVS Broadcast Equipment Copyright 2011-2013. All rights reserved. Disclaimer The information in this manual is furnished for informational use only and subject
Figure 1 Add Media panel
 How to import video There are four basic methods for adding media to your projects: capturing from tape or live sources, importing files from other types of storage, adding from the Organizer workspace,
Editing and Effects in DaVinci Resolve 12.5
 Editing and Effects in DaVinci Resolve 12.5 1. Working with the Project Media Working with the Project Media Importing the Project Selecting a Capture Drive Relinking Media 2. Exploring the Edit Page The
Oracle Cloud. Content and Experience Cloud ios Mobile Help E
 Oracle Cloud Content and Experience Cloud ios Mobile Help E82090-01 February 2017 Oracle Cloud Content and Experience Cloud ios Mobile Help, E82090-01 Copyright 2017, 2017, Oracle and/or its affiliates.
Final Cut Pro X for Final Cut Pro 7 Editors. White Paper September 2011
 for Editors White Paper September 2011 2 Contents Page 2 Page 4 Page 5 Page 8 Page 9 Page 11 Page 14 Page 15 Contents Introduction Getting Started Projects Events, Source Media, and Render Files Interface
COMMUNITIES USER MANUAL. Satori Team
 COMMUNITIES USER MANUAL Satori Team Table of Contents Communities... 2 1. Introduction... 4 2. Roles and privileges.... 5 3. Process flow.... 6 4. Description... 8 a) Community page.... 9 b) Creating community
Creative Media User Guide.
 Creative Media User Guide. Adobe Premiere Pro CC2015 Adobe Premiere Pro CC 2015 User Guide Type: Video editing Difficulty: Intermediate to Advanced Operating system: Mac or PC (Mac only in the creative
Premiere Pro Manual Basics - Toolbars, Options and Panels
 Premiere Pro Manual 01 - Basics - Toolbars, Options and Panels 2017 1st edition This Premiere Pro Manual is one of an introductory series specially written for the Arts and Humanities Students at UEA by
ilovehue.net FROM FCP TO RESOLVE Mathieu Marano
 FROM FCP TO RESOLVE Mathieu Marano mat@ilovehue.net www.ilovehue.net Table of Contents Purpose Prepare your FCP Project Compatible media Good practice Cleaning the timeline Media Manager Receiving a graded
Operators Upgrade Notes
 Media Composer Software Operators Upgrade Notes Paul Sampson paul@paul-sampson.ca Table of Contents INTRODUCTION...3 TERMINOLOGY CHANGES...4 CUSTOM PROJECT SIZES...5 DISPLAY AND MONITOR CHANGES...6 SELECTING
Covering the Basics. Lesson 1
 Lesson 1 Covering the Basics This lesson demonstrates a few fundamentals of Mac OS X (Panther) to prepare you to work with Final Cut Express 2. It shows you how to view the contents of your hard drive
Getting Started. Microsoft QUICK Source 7
 Microsoft QUICK Windows Source 7 Getting Started The Windows 7 Desktop u v w x u Icon links to a program, file, or folder that is stored on the desktop. v Shortcut Icon links to a program, file, or folder
Premiere Pro CS6 Help Guide
 Premiere Pro CS6 Help Guide This help book is designed as a visual guide to introduce you to some of the basic operations of the Adobe workflow and help you answer basic editing questions. For a more help,
for For Windows Only USER MANUAL
 for For Windows Only USER MANUAL 1 44601 Fremont Blvd., Fremont, CA 94538, USA Tel: +1.510.440.9901 Fax: +1.510.440.1270 www.arcsoft.com Copyright 2010 ArcSoft, Inc. All rights reserved. ArcSoft, the ArcSoft
5.2. Click these tabs to jump to the Table of Contents, Index or start of each chapter.
 5.2 Click this button to advance to the next page. Click this button to return to the previous page. (Since this is the starting page, the [Back] button cannot be used.) Click these tabs to jump to the,
The folder Icon allows you to create a folder for placing export settings for file management and organization.
 EXPORT When the EXPORT tab is selected, on the right side is the Batch Monitor and on the left is the Export Settings. We will describe the Export Settings first, then the Batch Monitor. The number of
Tidy Up 3. Tidy Up 3. User manual
 Tidy Up 3 www.hyperbolicsoftware.com Tidy Up 3 User manual Please read this manual carefully before using Tidy Up. Hyperbolic Software is not responsible for any damages directly or indirectly caused by
AN INTRODUCTION TO OUTLOOK WEB ACCESS (OWA)
") INFORMATION TECHNOLOGY SERVICES AN INTRODUCTION TO OUTLOOK WEB ACCESS (OWA) The Prince William County School Division does not discriminate in employment or in its educational programs and activities against
INFORMATION TECHNOLOGY SERVICES AN INTRODUCTION TO OUTLOOK WEB ACCESS (OWA) The Prince William County School Division does not discriminate in employment or in its educational programs and activities against
ADOBE DRIVE 4.2 USER GUIDE
 ADOBE DRIVE 4.2 USER GUIDE 2 2013 Adobe Systems Incorporated. All rights reserved. Adobe Drive 4.2 User Guide Adobe, the Adobe logo, Creative Suite, Illustrator, InCopy, InDesign, and Photoshop are either
Colligo Engage Outlook App 7.1. Connected Mode - User Guide
 7.1 Connected Mode - User Guide Contents Colligo Engage Outlook App 1 Benefits 1 Key Features 1 Platforms Supported 1 Installing and Activating Colligo Engage Outlook App 2 Checking for Updates 3 Updating
College of Pharmacy Windows 10
 College of Pharmacy Windows 10 Windows 10 is the version of Microsoft s flagship operating system that follows Windows 8; the OS was released in July 2015. Windows 10 is designed to address common criticisms
User Guide. BlackBerry Workspaces for Windows. Version 5.5
 User Guide BlackBerry Workspaces for Windows Version 5.5 Published: 2017-03-30 SWD-20170330110027321 Contents Introducing BlackBerry Workspaces for Windows... 6 Getting Started... 7 Setting up and installing
(1) XDCAM Browser. Version 2.0. Help Sony Corporation
 XDCAM Browser. Version 2.0. Help Sony Corporation") 4-261-699-15(1) XDCAM Browser Version 2.0 Help 2010 Sony Corporation Table of Contents Overview... 12 Operating Window Configuration... 13 [Explorer] window... 13 [Preview] window... 13 [Offline Media]
4-261-699-15(1) XDCAM Browser Version 2.0 Help 2010 Sony Corporation Table of Contents Overview... 12 Operating Window Configuration... 13 [Explorer] window... 13 [Preview] window... 13 [Offline Media]
GETTING STARTED WITH CERF
 GETTING STARTED WITH CERF Copyright 2018. Lab-Ally LLC. All Rights Reserved. Step 1: Download the Software To gain access to CERF, you will first need to download our client software to any machine on
Camtasia Studio 5.0 PART I. The Basics
 Camtasia Studio 5.0 Techsmith s Camtasia Studio software is a video screenshot creation utility that makes it easy to create video tutorials of an on screen action. This handout is designed to get you
Tiger Store 2.6 Release Notes
 Fixed Known Issues...................... 2 Upgrading to Version 2.6.................. 2 Best Practices.......................... 3 New Known Issues...................... 6 Unresolved Known Issues..................
Desktop Client USER GUIDE. Version 2. Strategic Vision, Inc.
 Desktop Client USER GUIDE Version 2 Strategic Vision, Inc. Table of Contents Welcome Desktop Client Interface................... Audio and Webcam Settings................. Tool Overview........................
GOOGLE APPS. If you have difficulty using this program, please contact IT Personnel by phone at
 : GOOGLE APPS Application: Usage: Program Link: Contact: is an electronic collaboration tool. As needed by any staff member http://www.google.com or http://drive.google.com If you have difficulty using
Windows Movie Maker. Panes (Movie and. Menu Bar. Tool Bar. Monitor. Rewind. Play. Storyboard/Timeline. Playhead. Audio. Microphone Playback
 Menu Bar Panes (Movie and Tool Bar Monitor Rewind Play Storyboard/Timeline Playhead Audio Microphone Playback Zoom In/Out 2004 Teaching Matters, Inc.-Page 1 Importing Video (Transfer the footage from the
PDF Expert for ipad User guide
 PDF Expert for ipad User guide 2011 Readdle Inc. 2 Contents Introduction Chapter 1: Copying documents to PDF Expert USB file transfer using itunes File Sharing Saving attachments from Mail and other ipad
The imovie work space and using imovie in the Mac lab
 The imovie work space and using imovie in the Mac lab Identify the icon Labuser on the desktop this is where you need to save your movies while you are working on them. They are too big to save on the
Working Efficiently in Lightroom 3 (Intermediate/Advanced)
") Overview The focus of this series of two workshops is on improving the efficiently of your Lightroom (LR) workflow. Comfortable working knowledge of the program, specifically the library and develop modules,
Overview The focus of this series of two workshops is on improving the efficiently of your Lightroom (LR) workflow. Comfortable working knowledge of the program, specifically the library and develop modules,
NETWORK THE HOME 10 FOLDERS APPS
 NID-7006 NAXA NID Tablet User s Guide Table of Contents GETTING STARTED 4 CONNECTING TO A WIRELESS NETWORK 4 USING THE TOUCHSCREEN 4 USING THE HOME SCREENS 5 USING THE NAVIGATION ICONS 6 USING THE ALL
INCITE PRODUCTION WORKFLOW
 Inc. Rue des Voisins 30, 1205 Geneva, Switzerland Tel +41-22-3219585; Fax+41-22-3219584 Email : Support@incite-tech.com System Description INCITE PRODUCTION WORKFLOW The MAM is the core of the system using
Compatibility with graphing calculators 32 Deleting files 34 Backing up device files 35 Working with device screens 36 Capturing device screens 36
 Contents Introduction to the TI Connect Window 1 TI Connect Window 1 Opening the TI Connect Window 2 Closing the TI Connect Window 4 Connecting and disconnecting TI handheld devices 4 Using Task Shortcuts
Instructor: John Aden FINAL CUT PRO X WORKSHOP
 Instructor: John Aden FINAL CUT PRO X WORKSHOP Introduction: (10 MIN) Your name, where you work, how did you hear about Open Media Foundation, any relevant experience, why do you want to learn Final Cut