PCCW EasyWatch Web User Guide. Detailed Version 1.1
|
|
|
- Jeffrey York
- 5 years ago
- Views:
Transcription
1 PCCW EasyWatch Web User Guide Detailed Version 1.1
2 TABLE OF CONTENTS 1. Introduction Login/Logout From BizNetvigator Portal From EasyWatch Home Page Installing Plug-in Features for General Users View Camera Camera View Mode Camera View Mode Camera View Mode Camera View Mode Camera Status Pan/Tilt Digital Zoom Ad-hoc Recording Recording Archives Show Archive (Show All) Search Sorting Download Play Delete Register Mobiles Enter Mobile Number Generate WAP Push Message Change PIN Features for Administrator Users Recording Setting Alert and Preference Schedule/Continuous Recording Motion Detection Recording Assign Camera Name Camera Company Create Group Join Group Unlink Group LIST OF FIGURES Figure 1 Login Page... 2 Figure 2 EasyWatch Home Page <Temporary, TBC>... 3 Figure 3 1-Camera View... 6 Figure 4 2-Camera View... 7 Figure 5 4-Camera View... 8 Figure 6 9-Camera View... 9 Figure 7 Pan/Tilt Control Figure 8 Digital Zoom EasyWatch Web User Guide (Detailed Version) 1.1 ii
3 Figure 9 Digital Zoom Panel Figure 10 Ad-hoc Recording (Start) Figure 11 Ad-hoc Recording (Stop) Figure 12 Recording Archives Figure 13 Select Start/End Date Figure 14 Type Of Recording in Recording Archive Page Figure 15 Camera Selections in Recording Archive Page Figure 16 Download Archive Figure 17 Prompt to Download file Figure 18 QuickTime player Figure 19 Play Archive Figure 20 the Archive played in Pop-up Window Figure 21 Delete Archive Figure 22 Prompt to delete archive Figure 23 Delete all Archive Figure 24 prompt to delete all archive Figure 25 Delete All Archive Figure 26 Delete Checked Figure 27 prompt to delete checked Figure 28 Register Mobile Figure 29 Mobile Already Assigned By others Figure 30 Invalid Mobile Numbers Figure 31 generate WAP Push Figure 32 Messages for Confirming the WAP Push Figure 33 Changes PIN Figure 34 Change PIN Page Figure 35 PIN Not Match Figure 36 Recording Setting Figure 37 Continuous/Schedule Recording Figure 38 Deactivated Continuous/Schedule Recording Figure 39 Continuous/Schedule Recording In Progress Figure 40 Add Once-Off Schedule Figure 41 prompted to delete Schedule Figure 42 Add Daily Schedules Figure 43 prompted to delete Schedule Figure 44 Add Weekly Schedules Figure 45 prompted to delete Schedule Figure 46 Add Monthly Schedules Figure 47 prompted to delete Schedule Figure 48 Set Motion Detect Area Figure 49 Confirm Window Completed Figure 50 Set Window Complete Figure 51 Have Motion Detection Recording Always On Figure 52 Have Motion Detection Recording Only in Specific Times Figure 53 Add Once-Off Schedule Figure 54 prompted to delete Schedule Figure 55 Add Daily Schedules Figure 56 prompted to delete Schedule Figure 57 Add Weekly Schedules Figure 58 prompted to delete Schedule Figure 59 Add Monthly Schedules Figure 60 prompted to delete Schedule Figure 61 Assign Cameras Figure 62 Name Cameras Figure 63 Create Group Figure 64 Join Group Figure 65 Unlink Group EasyWatch Web User Guide (Detailed Version) 1.1 iii
4 LIST OF TABLES Table 1 Error Table for Register Table Table 2 WAP Push Generation Table 3 PIN Changes EasyWatch Web User Guide (Detailed Version) 1.1 iv
5 1. Introduction This document is to describe the user guide of Customer Portal for the PCCW Easy Watch platform. This User Guide is made for those Subscribers required to access the PCCW EasyWatch system. This document describes the web portal operations and the input requirements for each operation. EasyWatch User Guide v1.1 1

6 2. Login/Logout 2.1. From BizNetvigator Portal Step 1: User can log in to the PCCW BizNetvigator by visiting the link: Figure 1 Login Page To Login, user should enter valid Netvigator username and password in Customer Login Box. Step 2: User can click the button to go to EasyWatch Portal. EasyWatch User Guide v1.1 2

7 2.2. From EasyWatch Home Page User can also login directly to EasyWatch Home Page by visiting the link: Figure 2 EasyWatch Home Page For Login, user should select Business EasyWatch and enter valid Netvigator username and password. Click Login to proceed. The user may login by: 1. Selecting either he/she is a Business EasyWatch user 2. Inputting his/her username and password in the fields provided 3. Hitting the Login button EasyWatch User Guide v1.1 3

8 3. Installing Plug-in For the initial access to the PCCW EasyWatch platform, the web browser may prompt or permission to install a new plug-in for Viewing Camera. Permission request depends on the Internet security settings of the user s PC or notebook. If the highest security level is set, the computer may prohibit any installation and execution attempt. The plug-in has been registered for certificate and is used to display the video in the browser. Users may click on Install to proceed. If the web browser does not allow the user to continue to install, check the Internet security option and lower the security levels or contact your IT or networking supervisor for help. EasyWatch User Guide v1.1 4
9 4. Features for General Users 4.1. View Camera View Camera page is the first page the user sees after he/she logs in. User able to select and view the camera in View Camera Page. To View Camera, User may: 1. Select Camera from The selections within this pull-down will be the names of the cameras associated with the account. Upon selecting a camera, the camera stream should be started. User can switch to another camera by selecting another camera in this pull-down. 2. When Streaming Timeout (60 minutes), user may click This button is to re-start a stream when the stream has stopped due to time-out. 3. After Viewing, user may click to end a streaming session. There are four type of camera view: One-Camera View Two-Camera View Four-Camera View Nine-Camera View EasyWatch User Guide v1.1 5

10 Camera View Mode Figure 3 1-Camera View For 1 Camera View Mode, User may perform below functionality to the camera: View Camera Refresh Pan, Tilt and Zoom Ad-hoc Recording Stop a streaming EasyWatch User Guide v1.1 6

11 Camera View Mode Figure 4 2-Camera View For 2 Camera View Mode, User may perform below functionality to the camera: View Camera Refresh Pan, Tilt and Zoom Ad-hoc Recording Stop a streaming EasyWatch User Guide v1.1 7

12 Camera View Mode Figure 5 4-Camera View For 4 Camera View Mode, User may perform below functionality to the camera: View Camera Refresh Stop a streaming EasyWatch User Guide v1.1 8

13 Camera View Mode Figure 6 9-Camera View For 1 Camera View Mode, User may perform below functionality to the camera: View Camera Refresh Stop a streaming EasyWatch User Guide v1.1 9
 or default camera names (as defined by system).")
14 Camera Status Below the Camera available is a table of camera available to user as well as showing the camera status of a camera. The Camera Table is a list of all cameras that is relevant to the account and shall list the cameras via camera names (as defined by user) or default camera names (as defined by system). With each Camera listing, there would have the following status icon: For when Motion Detect triggers recording For when Ad-Hoc triggers recording For when Continuous recording For when Schedule recording For when viewing by other user EasyWatch User Guide v1.1 10

15 Pan/Tilt Figure 7 Pan/Tilt Control If the Selected Camera Support Pan/Tilt, it allows user to navigate the orientation of the camera view. User can navigate: Left Right Up Down Home EasyWatch User Guide v1.1 11


16 Digital Zoom Figure 8 Digital Zoom This feature allows users to open a digital zoom control window to specify the zoom factor for specified area in the camera view. Users can also move the white frame to select the area of the video that user wants to view. To perform Digital Zoom, start a Camera Stream by selecting camera. After clicking the button, the digital Zoom panel is displayed. Figure 9 Digital Zoom Panel Here is some option user can perform on the digital zoom panel: Disable digital zoom The checkbox selection allows users to disable/enable the digital zoom function. Zoom Factors The range of zoom factor is from 100% to 400%, users can select any integer factor inside this area. EasyWatch User Guide v1.1 12
 After started ad-hoc recording, the camera status table will display the camera status correspondingly.")
17 Hide Click on button can close the digital zoom control window Ad-hoc Recording Step 1: While viewing a camera, user may click button to perform ad-hoc recording. Figure 10 Ad-hoc Recording (Start) After started ad-hoc recording, the camera status table will display the camera status correspondingly. Step 2: While recording, user shall press button to stop ad-hoc recording. EasyWatch User Guide v1.1 13

18 Figure 11 Ad-hoc Recording (Stop) Step 3: View/Download the recorded file at Recording Archives Pages after pressed. The File names will include date and time information (yyyymmddhhmm), e.g Note: If user quit the current page or stop the streaming, it will not stop the ad-hoc recording. However, when the user selects that camera again, the stop button is shown and the ad-hoc recording can be stopped If user logout or session were terminated, the recording would be aborted Recording Archives In recording archives, the user may view and search for clips that have been previously recorded by the system Show Archive (Show All) When go the recording Archives pages, it will display all the recording archives by chronological order from latest to earliest. After the Search or any navigation in Record Archive, user may click for displaying all recording archives again. EasyWatch User Guide v1.1 14
 Date/Time range Upon selecting a date by select start date / select end date, the field will display the date in the format - <DD>/<MM>/<YYYY> EasyWatch User Guide v1.")
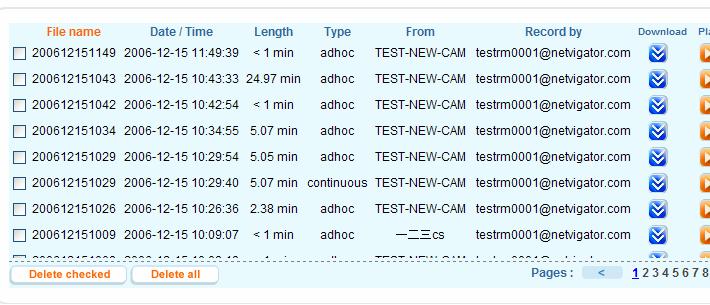
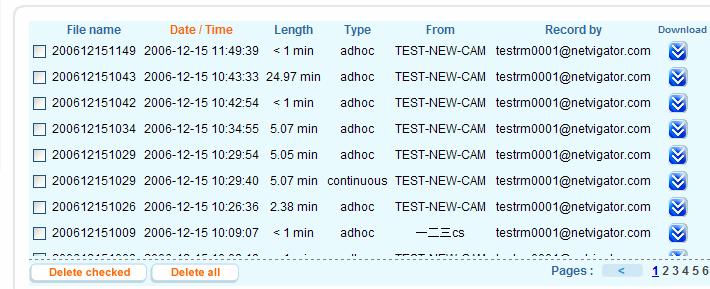
19 Figure 12 Recording Archives Search This function allows user to search recorded files by: 1) Recording type ad-hoc, motion-trigger, scheduled and continuous. 2) Date/Time range Upon selecting a date by select start date / select end date, the field will display the date in the format - <DD>/<MM>/<YYYY> EasyWatch User Guide v1.1 15

20 Figure 13 Select Start/End Date Step 1: Select Start/End Date, Time - There are two input box that allow users to input the from and to time. Hours Minutes Pull-Down menu with the selections AM and PM Step 2: Select Type This pull-down menu allows for the parameter of recording type in the search. Selections in this pull-down menu includes: All-Types of Recording (default) Ad-Hoc Recording Continuous Recording Schedule Recording Motion Detect Recording EasyWatch User Guide v1.1 16

 order from earliest to latest, while clicking again will result in latest to earliest.")
21 Figure 14 Type Of Recording in Recording Archive Page Step 3: Select Cameras This pull-down menu allows selecting which camera the recording is from in the search. Selections in this pull-down menu includes all names of cameras relevant to the account as well as the default selection All Figure 15 Camera Selections in Recording Archive Page Step 4: Search Click to perform search on the inputted criteria Sorting After Searching, each of the columns will have headings. The headings are able to click for corresponding sorting. Click once will show result in alphabetical or chronological (as appropriate) order from earliest to latest, while clicking again will result in latest to earliest. Sort By Filename: EasyWatch User Guide v1.1 17

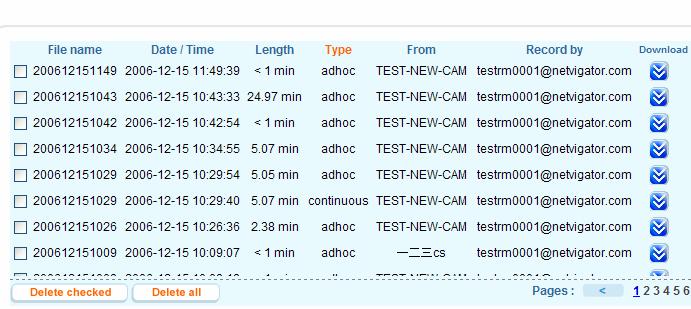
22 Date/Time: Length: Type: EasyWatch User Guide v1.1 18


23 From: Record By: Download User may download the file in recording Archive Page. Figure 16 Download Archive After click the button, browser will prompt user to download that archive. Downloaded format would be: 3GP, MPEG4 320X240, AMR Narrowband Mono, 8KHz EasyWatch User Guide v1.1 19


24 Figure 17 Prompt to Download file After Downloaded file, user can play the file by QuickTime Player, Real Player or 3GP compatible Player. Figure 18 QuickTime player Play User may play the file directly by the build-in Player. EasyWatch User Guide v1.1 20

25 User can click the player to play the file. button. After that a pop-up window will be displayed which will call up the QuickTime Figure 19 Play Archive Figure 20 the Archive played in Pop-up Window Delete User may delete the file permanently from EasyWatch Platform. There are 3 methods to delete file(s). 1. Delete one by one 2. Delete All in this page 3. Delete All checked EasyWatch User Guide v1.1 21

26 Delete One By One Figure 21 Delete Archive User can delete single file by clicking. User will be prompted to confirm delete archive. Figure 22 Prompt to delete archive Delete All in This Page Figure 23 Delete all Archive User can delete all the archive in current page by clicking. Use will be prompted to confirm delete all archive. EasyWatch User Guide v1.1 22


27 Figure 24 prompt to delete all archive Figure 25 Delete All Archive Delete All Checked Figure 26 Delete Checked User can delete checked archive by clicking. User will be prompted to confirm delete. Figure 27 prompt to delete checked EasyWatch User Guide v1.1 23

28 4.4. Register Mobiles Figure 28 Register Mobile For each user account, user may assign Up to 3 mobile numbers that are associated with it. A 4-digit PIN shall be defined for all 3 mobile numbers registered. This PIN applies to all the mobile phones access through WAP and 3G video calls. For 3G access the user can make a video call to the below number: After modifying the mobile numbers, a WAP push message is sent out. If user lost the WAP link, user can generate the WAP push again in the portal. An example of the WAP link format: Enter Mobile Number For each user account, user may assign Up to 3 mobile numbers that are associated with it. 1) When mobile phone is added, a WAP push message is sent to the phone that contains a WAP URL-link that directs the user to the WAP login page of EasyWatch platform, together with the Mobile Number entered. 2) While adding the mobile number, if the same mobile phone is also assigned to another user account (regardless whether it is the same FSA customer account or not), an alert will be shown EasyWatch User Guide v1.1 24


29 Figure 29 Mobile Already Assigned By others Figure 30 Invalid Mobile Numbers Mobile Number Entered Not started by 6 or 9 Entered the same Mobile Mobile assigned before Enter wrong PIN Table 1 Error Table for Register Table Message Please Enter Valid Mobile Number! Cannot Enter Same Mobile Number! Mobile Already assigned by Other! Register Fail, Invalid PIN! Generate WAP Push Message If user lost the WAP link, user can generate the WAP push again in the portal by clicking button. A Message will be displayed if the WAP Push is successfully generated. Figure 31 generate WAP Push EasyWatch User Guide v1.1 25

30 Figure 32 Messages for Confirming the WAP Push Mobile Number Entered WAP Push Generated WAP Push Fail Table 2 WAP Push Generation Message WAP Push Already Generated, Please Wait Cannot Generate WAP Push. Please Contact PCCW for Support Change PIN A 4-digit PIN shall be defined for all 3 mobile numbers registered. This PIN applies to all the mobile phones access through WAP and 3G video calls. By default, the PIN is To Change PIN, you can click. Figure 33 Changes PIN The Page will redirect to a page that that allow user to enter PIN. EasyWatch User Guide v1.1 26


31 Figure 34 Change PIN Page However if user enters wrong retype PIN, an Error message will be prompted. Figure 35 PIN Not Match Cases Input PIN didn t match PIN entered correctly Table 3 PIN Changes Message PIN Not match! Your PIN has been successfully updated. EasyWatch User Guide v1.1 27

32 5. Features for Administrator Users In addition to the functionalities for general users, the following functionalities are available for admin users: 5.1. Recording Setting Alert and Preference Admin User able to configure Alert Preference for all administrable cameras. User may: 1. Select Recording Snippets 2. Select the preference of alert when Storage Runout and Motion Detected. 3. Mobile Number and where EasyWatch Platform sends alert to. Figure 36 Recording Setting : User may select the recording duration per file for Motion Detected Recording, Continuous Record and Scheduled Recording. User may select 5 minutes, 10 minutes and 15 minutes options. EasyWatch User Guide v1.1 28

33 : User may select what type of alert to be received. /SMS can be selected as the alert. For two alert, you need to input appropriate Mobile / in Send Alert to, otherwise no Alert will be received Schedule/Continuous Recording Admin User can define a time & duration for system to do automatic recording of a camera as well as continuous automatic recording. Figure 37 Continuous/Schedule Recording When a scheduled recording happens, the EasyWatch system will establish a connection to IP-cam and record the video/audio stream. Each schedule is defined as follows: Date Start time End time Occurrence i. Once EasyWatch User Guide v1.1 29
34 ii. Daily iii. Weekly iv. Monthly Note that a recording is triggered at the start-time of an interval. If there are conflicts in the schedules, the system will start recording at the first hit till its schedule finishes. During this period, if there are other schedules that start, they will not trigger any other recording. Only when this schedule finishes, the next schedule s start-time will trigger the next recording. Scheduled recording clips are stored permanently in the system until users manually delete them. Alternatively, User can choose to turn on continuous recording. Once turn on, the Camera stream will be continuously recorded even if the user has logout EasyWatch Platform. Note that when recording quota is exceeded, the oldest clip will be deleted automatically and the recording will be end only user deactivated it Continuous Recording To Activate Continuous Recording, User need to: 1. Tick 2. Select 3. Click Deactivate Schedule/Continuous Recording To Deactivate Schedule/Continuous Recording, User need to: 1. Un-Tick 2. Click EasyWatch User Guide v1.1 30

35 Figure 38 Deactivated Continuous/Schedule Recording When Continuous/Schedule Recording starts, The Camera Status will be updated and show corresponding icons: Figure 39 Continuous/Schedule Recording In Progress Schedule Recording To Activate Schedule Recording, User need to: 1. Tick 2. Select 3. Choose,, or 4. Add Schedule 5. Click EasyWatch User Guide v1.1 31
36 Add Once-Off Schedule To Add Once-Off Schedule, User need to: Figure 40 Add Once-Off Schedule 1. Select 2. Select Date 3. Select Time To Delete, User need to: 1. Click button After that user will be prompted to delete schedule Figure 41 prompted to delete Schedule 2. Click OK in prompt Add Daily Schedule To Add Daily Schedule, User need to: Figure 42 Add Daily Schedules 1. Select 2. Select Time To Delete, User need to: 3. Click button After that user will be prompted to delete schedule EasyWatch User Guide v1.1 32
37 Figure 43 prompted to delete Schedule 4. Click OK in prompt Add Weekly Schedule To Add Weekly Schedule, User need to: Figure 44 Add Weekly Schedules 1. Select 2. Select Day of Week 3. Select Time To Delete, User need to: 1. Click button After that user will be prompted to delete schedule Figure 45 prompted to delete Schedule 2. Click OK in prompt Add Monthly Schedule To Add Monthly Schedule, User need to: Figure 46 Add Monthly Schedules 1. Select 2. Select Day of Month EasyWatch User Guide v1.1 33
38 3. Select Time To Delete, User need to: 1. Click button After that user will be prompted to delete schedule Figure 47 prompted to delete Schedule 2. Click OK in prompt Motion Detection Recording Admin User can define a motion trigger threshold in the camera to alert the EasyWatch Platform to perform recording when a motion is detected at the camera. Once the EasyWatch Platform receives the motion-trigger recording, EasyWatch system will start recording of that camera for the duration of the recording snippets. Motion-trigger recording clips are stored permanently in the system until users manually delete them. EasyWatch User Guide v1.1 34


39 Set Motion Detect Area Figure 48 Set Motion Detect Area 1. Click on button to add a new window. At most three windows can exist simultaneously. Use the mouse to click, hold, and drag the window frame to resize or the title bar to move. Click on the x at the upper right-hand corner of the window to delete the window. Remember to save in order to validate the changes. EasyWatch User Guide v1.1 35

40 2. Click on button to save the related window settings. A graphic bar will rise or fall depending on the image variation. A green bar means the image variation is under monitoring level and a red bar means the image variation is over monitoring level. When the bar goes red, the detected window will also be outlined in red. Going back to the homepage, the monitored window is hidden but the red frame shows when motion is detected. Figure 49 Confirm Window Completed Figure 50 Set Window Complete "Window Name" The text will show at the top of the window. Sensitivity This sets the endurable difference between two sequential images. Percentage This sets the space ratio of moving objects in the monitoring window. Higher sensitivity and small percentage will allow easier motion detection. The following figure shows the screen when is clicked. The monitoring window has been outlined in red and the graphic bar goes red since the Object is moving Have Motion Detected Recording On. User can select the Camera Motion Detection active time. There are two options: 1. Always On The Motion Detected is always active. EasyWatch User Guide v1.1 36

41 Figure 51 Have Motion Detection Recording Always On EasyWatch User Guide v1.1 37

42 2. Only in Specific Times. The Motion Detection is active at specific time only. User can define a schedule for Motion Detection active. Similar to Schedule recording, there are 4 type of motion detection schedule: Once-off, Daily, Weekly and Monthly. Figure 52 Have Motion Detection Recording Only in Specific Times Add Once-Off Schedule To Add Once-Off Schedule, User need to: Figure 53 Add Once-Off Schedule 4. Select 5. Select Date 6. Select Time To Delete, User need to: EasyWatch User Guide v1.1 38
43 5. Click button After that user will be prompted to delete schedule Figure 54 prompted to delete Schedule 6. Click OK in prompt Add Daily Schedule To Add Daily Schedule, User need to: Figure 55 Add Daily Schedules 3. Select 4. Select Time To Delete, User need to: 7. Click button After that user will be prompted to delete schedule Figure 56 prompted to delete Schedule 8. Click OK in prompt Add Weekly Schedule To Add Weekly Schedule, User need to: Figure 57 Add Weekly Schedules 4. Select 5. Select Day of Week 6. Select Time EasyWatch User Guide v1.1 39
44 To Delete, User need to: 3. Click button After that user will be prompted to delete schedule Figure 58 prompted to delete Schedule 4. Click OK in prompt Add Monthly Schedule To Add Monthly Schedule, User need to: Figure 59 Add Monthly Schedules 4. Select 5. Select Day of Month 6. Select Time To Delete, User need to: 3. Click button After that user will be prompted to delete schedule Figure 60 prompted to delete Schedule Click OK in prompt Disable Motion Detection At All 1. Un-Tick 2. Click EasyWatch User Guide v1.1 40


45 5.2. Assign Camera Admin user may assign the access right of each user account to camera at Assign Camera Tab. Figure 61 Assign Cameras To Assign/Un-Assign Camera, you may: 1. Go to user section you are going to assign camera 2. Tick Cameras those camera that allow user to view. Un-Tick those camera that not allow user to view. 3. Click 5.3. Name Camera Admin user may edit the camera label. By default, each camera has a system label of BSNID -01, BSNID - 02, BSNID -03, etc. User may choose to edit a user label such as front-door, rear-door at Name Camera Tab. Then the user label of a camera is displayed on user view screen. To Name Camera, User can: 1. Go to Name Camera Tab EasyWatch User Guide v1.1 41

46 2. Enter/Delete/Update the Camera Label corresponding to that camera. Figure 62 Name Cameras 5.4. Company For User with multiple broadband lines, user may associate multiple broadband lines account. Once the Broadband line associated, the entire Camera List will be shared between two broadband lines Create Group To associate multiple broadband lines, admin user should generate a Group ID and corresponding pin through Company Tab. EasyWatch User Guide v1.1 42
47 Figure 63 Create Group To Create Group, User may: 1. Select 2. Enter Password and Retype Password 3. Click Join Group After Create Group, Admin user shall informs other FSA lines admin user to input the Group ID and pin to the Company Tab. After checking the ID and pin, the system can associate these multiple FSA lines. For subsequent user logins (WAP or 3G video call), if there is associated with the FSA lines, then all cameras belonging to the same group will be displayed in the camera list for user to select. EasyWatch User Guide v1.1 43
48 Figure 64 Join Group To Join Group, User may: 1. Enter Group ID 2. Enter Password 3. Click Unlink Group After Join Group, User may unlink the group and disassociate with the group. EasyWatch User Guide v1.1 44

49 Figure 65 Unlink Group To Unlink Group, User may: 1. Go to Company tab. 2. Click Note: For user who creates the group, when user unlinks the group, all group members will be disassociated and the group will be destroy. <End> EasyWatch User Guide v1.1 45
PCCW EasyWatch WAP User Guide Detailed Version 1.0
 PCCW EasyWatch WAP User Guide Detailed Version 1.0 EasyWatch WAP User Guide (Detailed Version 1.0) i TABLE OF CONTENTS 1. Introduction...1 2. Site Maps...1 3. Flows...2 3.1. Login... 2 3.1.1. Direct Login...
Avigilon Control Center Web Client User Guide
 Avigilon Control Center Web Client User Guide Version: 4.12 Standard PDF-WEBCLIENT-S-E-Rev2 Copyright 2013 Avigilon. All rights reserved. The information presented is subject to change without notice.
Astra Schedule User Guide Scheduler
 Astra Schedule User Guide 7.5.12 Scheduler 1 P a g e ASTRA SCHEDULE USER GUIDE 7.5.12... 1 LOGGING INTO ASTRA SCHEDULE... 3 LOGIN CREDENTIALS... 3 WORKING WITH CALENDARS... 4 CHOOSING A CALENDAR AND FILTER...
XIPLED Software User s Manual. For Firmware release V3.5.0.*
 XIPLED1080-36 Software User s Manual For Firmware release V3.5.0.* Product name: XIPLED1080-36 Release Date: 2014/10/02 Manual Revision: V02 Feature XIPLED1080-36 Live View All Series Camera/Video/Audio
ClassHub for Teachers. A User Guide for the Classroom
 ClassHub for Teachers A User Guide for the Classroom Table of Contents CLASSHUB TEACHER... My Class Settings... Class List... Using Views and Screen Peek... Actions... MIRRORING... Mirroring Actions...
1 P age NEXTIVA CALL CENTER. Supervisor User Guide. nextiva.com/support 2015 NEXTIVA, ALL RIGHTS RESERVED
 1 P age NEXTIVA CALL CENTER Supervisor User Guide nextiva.com/support 2015 NEXTIVA, ALL RIGHTS RESERVED 2 P age Creating Employees... 3 Creating an Employee... 3 Assigning Licenses to Employees... 7 Schedules...
RONA e-billing User Guide
 RONA e-billing Contractor Self-Service Portal User Guide RONA e-billing User Guide 2015-03-10 Table of Contents Welcome to RONA e-billing What is RONA e-billing?... i RONA e-billing system requirements...
Infinova 2217 Security Management System
 Infinova 2217 Security Management System Security Management System - Using Safari browser Client on Macintosh August 2014 Page 1 of 16 Sections 01 Configuring Web Client user in Security Management System
Oracle Communications Performance Intelligence Center
 Oracle Communications Performance Intelligence Center KPI Configuration Guide Release 10.2.1 E77501-01 June 2017 1 Oracle Communications Performance Intelligence Center KPI Configuration Guide, Release
Tellus EVV Introduction and Dashboard TRAINING REFERENCE GUIDE
 Tellus EVV Introduction and Dashboard TRAINING REFERENCE GUIDE REV: 03/18 Sponsored by Centric Consulting, LLC, and the State of Florida, AHCA TELLUS EVV System Training Reference Guide Table of Contents
Sun Java System Calendar Express Getting Started
 Login to Sun Java System Calendar Express Open browser, i.e.; Firefox or Internet Explorer. In the Address field key in siue.edu. Press Enter. Sun Java System Calendar Express Getting Started Enter your
InSite User Guide. InSite User Guide. InSite User Guide
 InSite User Guide InSite User Guide InSite is a website from which you can access and research legislative information. Your jurisdiction uses a software application called Legistar to help manage the
Altus Call Recording. Dashboard Admin User Guide. Document Version Maryland Way, Suite 300 Brentwood, TN Tel
 Altus Call Recording Dashboard Admin User Guide Document Version 1.3 5121 Maryland Way, Suite 300 Brentwood, TN 37027 Tel +1 615.465.4001 WWW.ALTUSUC.COM Table of Contents About This Document... 5 1.1
Oracle General Navigation Overview
 Oracle 11.5.9 General Navigation Overview 1 Logging On to Oracle Applications You may access Oracle, by logging onto the ATC Applications Login System Status page located at www.atc.caltech.edu/support/index.php
ENFORCER. DVRJavaView Software. User s Manual SECO-LARM. Version 0.3.9
 ENFORCER DVRJavaView Software User s Manual Version 0.3.9 SECO-LARM Table of Content 1. Overview...2 1.1 System Requirements...2 1.2 Software Limitation...2 2 Startup DVRJavaView Software...3 2.1 Main
DSS User Guide. End User Guide. - i -
 DSS User Guide End User Guide - i - DSS User Guide Table of Contents End User Guide... 1 Table of Contents... 2 Part 1: Getting Started... 1 How to Log in to the Web Portal... 1 How to Manage Account Settings...
CME E-quotes Wireless Application for Android Welcome
 CME E-quotes Wireless Application for Android Welcome This guide will familiarize you with the application, a powerful trading tool developed for your Android. Table of Contents What is this application?
FDM RMS User Guide. Basic Navigation & Use
 FDM RMS User Guide Basic Navigation & Use Revised: May 31, 2016 Contents Contents... 1 Administrator Contacts... 3 Introduction... 3 Overview... 3 1 Logging In... 4 1.1 Log in to Citrix... 4 1.1.1 Change
Wholesale Lockbox User Guide
 Wholesale Lockbox User Guide August 2017 Copyright 2017 City National Bank City National Bank Member FDIC For Client Use Only Table of Contents Introduction... 3 Getting Started... 4 System Requirements...
USER S MANUAL FOR UNDER VEHICLE INSPECTION SYSTEM PORTABLE AND IN GROUND UNITS
 USER S MANUAL FOR UNDER VEHICLE INSPECTION SYSTEM PORTABLE AND IN GROUND UNITS Revision Date Description Initials 0 2017 01 02 New template LR Index Chapter 1 INTRODUCTION... 3 Chapter 2 OPERATING INSTRUCTIONS...
Clearspan Web Interface Getting Started Guide
 Clearspan Web Interface Getting Started Guide RELEASE 22 March 2018 NOTICE The information contained in this document is believed to be accurate in all respects but is not warranted by Mitel Networks Corporation
Total Connect 2.0 Online Help
 Security Events Users Locations Video Hints for use. After logging in hit F11 to toggle full screen mode. Hover over icons for tool tip help. Upon the initial login, control panel data should be imported
Video Monitoring. Contents CHAPTER
 CHAPTER 13 This chapter describes how to view live and recorded video streams from security cameras configured in the Cisco Video Surveillance Manager (Cisco VSM) system. Using Cisco PAM, you can associate
Web-based Configuration. First, setup motion detection windows in the web-based configuration of the camera.
 How do I record motion using IP surveillance? To schedule video recording with motion detection, you must first enable this feature on the Internet camera. This can serve as a security device by recording
Portal Guidelines For Applicants
 Endeavour Fund Smart Ideas and Research Programmes Portal Guidelines For Applicants 2017 Endeavour Round September 2016 Contents Completing an Application in MBIE s IMS Portal... 1 Things you will need...
GpsGate BuddyTracker. User Guide. Version: Rev: A
 GpsGate BuddyTracker User Guide Version: 1.3.2 Rev: A Table of Contents 1 Introduction...3 2 Web Interface...4 3 Getting started...4 3.1 BuddyTracker Overview...4 3.2 Account Creation...5 3.3 Connecting
Microsoft OneDrive. How to login to OneDrive:
 Microsoft OneDrive The beauty of OneDrive is that is accessible from anywhere you have an Internet connection. You can access it from a Mac or Windows computer. You can even access it on your SmartPhone
Regions OnePass USER GUIDE. It s time to expect more. Regions Bank Member FDIC Revised
 Regions OnePass USER GUIDE It s time to expect more. Regions Bank Member FDIC Revised 051616 User Guide Table of Contents Section I. Regions OnePass Basics 3 What Is Regions OnePass? 3 Minimum Browser
FleetLocate v2.7 User Guide
 FleetLocate v2.7 User Guide User Guide v2.7 - FleetLocate: Fleet & Asset Intelligence Contents FleetLocate Fleet Intelligence v2.7 User Guide... 5 Map Tab... 6 Changing and Printing the Map View... 6 Bookmarks
KYOCERA Net Admin User Guide
 KYOCERA Net Admin User Guide Legal Notes Unauthorized reproduction of all or part of this guide is prohibited. The information in this guide is subject to change without notice. We cannot be held liable
Video Capture Card Manual
 Video Capture Card Manual 1. System Login System installation is completed, will generate desktop < DVR Surveillance System> icon, please double-click operation. Or choose Start -> All Programs -> DVR
Mirasys NVR. User s Guide
 Mirasys NVR User s Guide CONTENTS Contents... 2 Before you start... 3 Introduction... 6 Logging in... 9 User interface... 13 Navigator... 16 Cameras... 25 Video outputs... 41 Digital outputs... 46 Digital
Administrator Quick Guide
 1 Administrator Quick Guide Login Screen The first page employees will see when visiting their training site is the login screen. This is where employees must enter their username and password to access
Getting Started. Opening TM Control Panel. TM Control Panel User Guide Getting Started 1
 TM Control Panel User Guide Getting Started 1 Getting Started Opening TM Control Panel To open TM Control Panel (CP), perform the following steps: 1 In the browser address field, type https://cp.netmyne.net.
ibeam CONSTRUCTION CAMERAS
 OnSite PTZ OVERVIEW The OnSite PTZ camera streams live video from your job site and offers remote-control pan, tilt and zoom. The camera also uploads photos from one (or more) preset location(s), building
User Reference Guide
 LEARNING CENTRE http://lms.toyota.com.au User Reference Guide Page 1 Learning Centre User Overview Reference Guide Last Modified 23/07/10 2010 Toyota Institute Australia. All rights reserved. All brand
Avigilon Control Center Standard Web Client User Guide. Version 5.6
 Avigilon Control Center Standard Web Client User Guide Version 5.6 2006-2015, Avigilon Corporation. All rights reserved. Unless expressly granted in writing, no license is granted with respect to any copyright,
My Sysco Reporting Job Aid for CMU Customers. My Sysco Reporting. For CMU Customers (Serviced by Program Sales)
") My Sysco Reporting For CMU Customers (Serviced by Program Sales) 1 Accessing My Sysco Reporting... 2 Logging In... 2 The Reporting Dashboard... 3 My Sysco Reporting Process... 6 Generating a Report...
My Sysco Reporting For CMU Customers (Serviced by Program Sales) 1 Accessing My Sysco Reporting... 2 Logging In... 2 The Reporting Dashboard... 3 My Sysco Reporting Process... 6 Generating a Report...
BE Share. Microsoft Office SharePoint Server 2010 Basic Training Guide
 BE Share Microsoft Office SharePoint Server 2010 Basic Training Guide Site Contributor Table of Contents Table of Contents Connecting From Home... 2 Introduction to BE Share Sites... 3 Navigating SharePoint
An introduction for Calendar Editors (Note: Editors should use Internet Explorer 8, Firefox 3 or higher, or Safari)
") mycalendar An introduction for Calendar Editors (Note: Editors should use Internet Explorer 8, Firefox 3 or higher, or Safari) Accessing the Calendar as an Editor Go to the Calendar URL: http://www.healthsystem.virginia.edu/calendar
mycalendar An introduction for Calendar Editors (Note: Editors should use Internet Explorer 8, Firefox 3 or higher, or Safari) Accessing the Calendar as an Editor Go to the Calendar URL: http://www.healthsystem.virginia.edu/calendar
Workspace Secure Container for Mobile Devices
 Workspace Secure Container for Mobile Devices Version 1.1 Last Updated: April 24, 2014 2014 Verizon. All Rights Reserved. The Verizon name and logo and all other names, logos, and slogans identifying Verizon
TENVIS Technology Co., Ltd. User Manual. For H.264 Cameras. Version 1.0.0
 TENVIS Technology Co., Ltd User Manual For H.264 Cameras Version 1.0.0 Catalogue Basic Operation... 3 Hardware Installation... 3 Search Camera... 3 For Internet Explorer... 6 Playback Record Files... 9
eview Network Video Recorder User s Manual
 eview Network Video Recorder User s Manual Version 1.02 2010/02/09 Copyright 2010, All rights reserved. Contents 1. Starting / Closing...1 2. Monitoring...4 2.1. Monitoring Windows Layout...4 2.2. Full
Group Administrators
 Hosted VoIP Phone System Blue Platform Admin Portal Guide for Group Administrators Table of Contents 1 About this Guide... 6 2 Accessing the Hosted VoIP Phone System Admin Portal... 7 3 Hosted VoIP Admin
Health Messenger User Guide
 Health Messenger User Guide V 2.6 3/09/2018 USER GUIDE TABLE OF CONTENTS 1.0 GENERAL INFORMATION 1.1 System Overview 1.2 Support 1.3 Uploading Export Files 1.4 Minimum System Requirements 2.0 GETTING STARTED
Multi-NVR Manager. Quick Start Configuration Usage
 Multi-NVR Manager Quick Start Configuration Usage 2014. All rights are reserved. No portion of this document may be reproduced without permission. All trademarks and brand names mentioned in this publication
Remote Support 19.1 Web Rep Console
 Remote Support 19.1 Web Rep Console 2003-2019 BeyondTrust Corporation. All Rights Reserved. BEYONDTRUST, its logo, and JUMP are trademarks of BeyondTrust Corporation. Other trademarks are the property
End User Manual. December 2014 V1.0
 End User Manual December 2014 V1.0 Contents Getting Started... 4 How to Log into the Web Portal... 5 How to Manage Account Settings... 6 The Web Portal... 8 How to Upload Files in the Web Portal... 9 How
Data Management Unit, V3.1 University of Pennsylvania Treatment Research Center, 2010 Page 2
 Welcome to the Data Entry System User s Manual. This manual will cover all of the steps necessary for you to successfully navigate and operate the Data Management Unit s Web based data entry system. We
BroadCloud PBX Call Recording
 BroadCloud PBX Call Recording Dashboard Admin User Guide Document Version 1.1 9737 Washingtonian Boulevard, Suite 350 Gaithersburg, MD 20878 Tel +1 301.977.9440 WWW.BROADSOFT.COM BroadWorks Guide Copyright
CONTENTS. Login View Toggle Full Screen Camera Views Switching Cameras...2. Picture in Picture (PIP)... 3
... 3") Training Guide CONTENTS Login View... 1 Toggle Full Screen... 1 Camera Views... 2 Switching Cameras...2 Picture in Picture (PIP)... 3 Picture and Picture (PAP)... 4 POS Transactions on Live Camera Feed...
Training Guide CONTENTS Login View... 1 Toggle Full Screen... 1 Camera Views... 2 Switching Cameras...2 Picture in Picture (PIP)... 3 Picture and Picture (PAP)... 4 POS Transactions on Live Camera Feed...
Guide to User Interface 4.3
 Datatel Colleague Guide to User Interface 4.3 Release 18 June 24, 2011 For corrections and clarifications to this manual, see AnswerNet page 1926.37. Guide to User Interface 4.3 All Rights Reserved The
Agent Console. The Agent Console. The topics in this section provide information about the Agent Console.
 Agent Console The topics in this section provide information about the Agent Console. The Agent Console The agent logs into the workstation The agent is automatically logged in to Intradiem; the Agent
READ BEFORE USING THE EQUIPMENT EN
 DAR-04 Digital Audio Recording System & Digital Audio Recording Software INSTALLATION AND OPERATION MANUAL English PLEASE READ BEFORE USING THE EQUIPMENT EN 2.0 DAR-04 Digital Audio Recording System INTRODUCTION
Load Watch SM Distributed Resources System Operations Center
 DTE Energy Generator and Energy Monitoring Services Load Watch SM Distributed Resources System Operations Center Users Guide V.8 March 00 For Technical Support or Questions Call --5-5590 Log-in Screen
ibeam CONSTRUCTION CAMERAS
 ibeam CAMERA CONSOLE WEB PAGE User s Guide OVERVIEW Select from Photos, Live Stream and Timelapse tabs See the following pages for detailed menu instructions SHOW ALL CAMERAS HELP AND ACCOUNT OPTIONS CHOOSE
Using the VSOM Operator Pages
 CHAPTER 8 The VSOM Operator Pages provide access to features that video surveillance operators can use to view, record, search, and control video. This chapter describes the Operator Pages in detail. It
User Guide Revised 5/16/2011. Prerequisites. MUNIS Dashboard Link: https://munis.sysapps.unlv.edu:55000
 MUNIS Dashboard 2.1 User Guide Revised 5/16/2011 Prerequisites MUNIS Dashboard requires: Access via Windows Internet Explorer Installation of.net Framework 1.1 Installation of ActiveX Control MUNIS Dashboard
APPLICATION ADMINISTRATOR GUIDE
 APPLICATION ADMINISTRATOR GUIDE BrightSign Network Enterprise Edition Version 3.5 BrightSign, LLC. 16795 Lark Ave., Suite 200 Los Gatos, CA 95032 408-852-9263 www.brightsign.biz TABLE OF CONTENTS Introduction
User Guide Ahmad Bilal [Type the company name] 1/1/2009
![User Guide Ahmad Bilal [Type the company name] 1/1/2009](/thumbs/92/109182878.jpg "User Guide Ahmad Bilal [Type the company name] 1/1/2009") User Guide Ahmad Bilal [Type the company name] 1/1/2009 Contents 1 LOGGING IN... 1 1.1 REMEMBER ME... 1 1.2 FORGOT PASSWORD... 2 2 HOME PAGE... 3 2.1 CABINETS... 4 2.2 SEARCH HISTORY... 5 2.2.1 Recent
User Guide Ahmad Bilal [Type the company name] 1/1/2009 Contents 1 LOGGING IN... 1 1.1 REMEMBER ME... 1 1.2 FORGOT PASSWORD... 2 2 HOME PAGE... 3 2.1 CABINETS... 4 2.2 SEARCH HISTORY... 5 2.2.1 Recent
The Hong Kong University of Science and Technology frsip Web Portal User Guide
 The Hong Kong University of Science and Technology frsip Web Portal User Guide The HKUST IP phone system is enhanced to support many advanced features. This user guide walks through the most useful features
Hosted Voice End User Guide Version 1.0 April End User Guide
 Hosted Voice End User Guide Version 1.0 April 2013 End User Guide Contents 1 Introduction... 1 2 Introducing CommPortal... 2 2.1 Accessing and Logging In... 2 2.2 Using CommPortal... 2 2.3 Getting help...
SS200T3R Series NVR. Copyright Infinova. All rights reserved. Appearance and specifications are subject to change without prior notice.
 SS200T3R Series NVR Enterprise Class Network Video Recorder Preloaded Windows Based Video Management Software Data Security through Raid Array of Disc Technology Manages external devices along with video
Overview of Web Interface to CenturyLink B2B Gateway
 Overview of Web Interface to CenturyLink B2B Gateway Access and Password Policy for the Web Interface Like all Internet sites, the CenturyLink B2B web site requires an account containing both an identity
Power School Parent Portal User Guide
 Power School Parent Portal User Guide Preface Use this guide to assist you while navigating the PowerSchool Parent Portal. This guide is based on the PowerSchool Parent Portal online help, which you can
User Guide. Global Ethernet Services - Performance Report
 Global Ethernet Services - Performance Report User Guide Contents: Service Overview... 3 Service Features... 3 Access the Ethernet Performance Report... 4 Characteristics of the Performance Report... 6
CLEARVIEW KIT INSTALLATION GUIDE
 CLEARVIEW KIT INSTALLATION GUIDE Kit contents 1. Recorder with power supply 2. Camera Cables 3. Cameras 4. Mouse ** Display monitor and HDMI cable not included Remove recorder from the Kit and look over
Introduction to Cognos
 Introduction to Cognos User Handbook 7800 E Orchard Road, Suite 280 Greenwood Village, CO 80111 Table of Contents... 3 Logging In To the Portal... 3 Understanding IBM Cognos Connection... 4 The IBM Cognos
Performance Management Reporting User Guide for EPMR
 Performance Management Reporting User Guide for EPMR January, 2015 2015 by Cox Communications. All rights reserved. No part of this document may be reproduced or transmitted in any form or by any means,
Participant Training Guide
 http://secnet.cch.com March, 2010 Table of Contents Introduction...2 Objectives...2 Accessing...3 Home Page...4 Filings...5 Viewing Search Results...7 Viewing Documents...8 Record Keeping...9 Today s Filings...10
AvePoint Meetings Pro for ipad. User Guide
 AvePoint Meetings Pro 4.2.3 for ipad User Guide Issued April 2017 Table of Contents About AvePoint Meetings Pro for ipad... 3 Installing AvePoint Meetings Pro for ipad... 4 Getting Started... 5 Logging
Pro71600N3 NVR User Manual
 Pro71600N3 NVR User Manual User Information Admin User Name: Admin Password: IP Address: System Name: Table Of Contents 1. Menu Operation...4 1.1 Main Menu...4 2. Start & Shutdown System...5 2.1 Start
Hosted VoIP Phone System. Blue Platform. Call Recording. User Guide
 Hosted VoIP Phone System Blue Platform Call Recording User Guide Contents 1 Introduction... 5 2 Logging On... 6 3 Home Tab (Dashboard)... 7 3.1 First Look... 8 3.2 Calls by Category... 9 3.3 Frequent Callers...
Contents Contents. Chapter 1. Program Installation. Chapter 2. For the start of CMS. Chapter 3. Monitoring. Chapter 4. E-Map Mode
 CMS User's Manual Contents 0 Contents Chapter 1. Program Installation 1.1 PC specifications 1.2 Program Installation Chapter 2. For the start of CMS 2.1 Site Registration Setup (Network Camera Registration)
Exacq Mobile. User Manual 9.2. (Updated March 9, 2018)
") Exacq Mobile User Manual 9.2 (Updated March 9, 2018) www.exacq.com March 9, 2018 Contents ii Contents Introduction... 4 Installation...4 Web services... 4 Adding a web service...4 Activating and deactivating
Exacq Mobile User Manual 9.2 (Updated March 9, 2018) www.exacq.com March 9, 2018 Contents ii Contents Introduction... 4 Installation...4 Web services... 4 Adding a web service...4 Activating and deactivating
CyberSource Business Center
 CyberSource Business Center CS3-609-06-16-09 Copyright 2009 Harris Connect, LLC. all rights reserved. Reproduction in any form without the express written consent of Harris Connect, LLC. is strictly prohibited
PowerSchool Student and Parent Portal User Guide. https://powerschool.gpcsd.ca/public
 PowerSchool Student and Parent Portal User Guide https://powerschool.gpcsd.ca/public Released June 2017 Document Owner: Documentation Services This edition applies to Release 11.x of the PowerSchool software
VA DAP App Android Users Guide
 VA DAP App Android Users Guide Table of Contents Getting Started with the VA DAP App... 1 Installing the VA DAP App... 1 Logging into the App and Opening Components... 1 Logging out of the VA DAP App...
User Manual. perfectionlearning.com/technical-support
 User Manual perfectionlearning.com/technical-support 1 User Manual Accessing Math X... 3 Login... 3 Forgotten Password... 3 Navigation Menu... 4 Logout... 4 Admin... 5 Creating Classes and Students...
STC iq. State User QRG. v1.17.3
 STC iq State User QRG v1.17.3 Landing Page (Home) - State STC iq 1.17.3 The landing page (or Home) for State users provides a high-level summary of the status of all interface projects, and also provides
For information on troubleshooting common issues, see the Technical Support section in the online help.
 GIFTS Online Mobile GIFTS Online Mobile gives users a mobile version of their GIFTS Online system in order to easily access grant related information when it is not convenient to log into their main version
Hosted PBX Administrator Guide
 Hosted PBX Administrator Guide Table of Contents 1 INTRODUCTION... 1-1 1.1 PURPOSE OF THIS GUIDE... 1-1 1.2 OTHER GUIDES... 1-1 2 COMMPORTAL BUSINESS GROUP ADMINISTRATOR (BG ADMIN)... 2-1 2.1 ACCESSING
MyTeleMed iphone User Guide
 Table of Contents Log In 2 Incorrect Login Information 2 Registering your iphone 2 Main Menu 3 Messages 3 Compose a New Message 4 Message Recipients 4 Archiving Messages 4 Message Detail 5 Add Comments
HIP2P Network Video Camera Client Terminal User Manual
 HIP2P Network Video Camera Client Terminal User Manual Document version:5.1 Page 1 of 34 } Preface Thank you for using our company's products. The network video camera client terminal is used to implement
Digital Recorder End User Guide. Official UK distribution partner
 Digital Recorder End User Guide Official UK distribution partner 2 Installer Information Contents General Operation Mouse Operation Logging into the System Quick Menu PTZ Control 4 5 5 6 Playback Operation
ORACLE USER PRODUCTIVITY KIT USAGE TRACKING ADMINISTRATION & REPORTING RELEASE SERVICE PACK 1 PART NO. E
 ORACLE USER PRODUCTIVITY KIT USAGE TRACKING ADMINISTRATION & REPORTING RELEASE 3.6.1 SERVICE PACK 1 PART NO. E17383-01 MARCH 2010 COPYRIGHT Copyright 1998, 2010, Oracle and/or its affiliates. All rights
QST Mobile Application for Android
 QST Mobile Application for Android Welcome This guide will familiarize you with the application, a powerful trading tool developed for your Android. Table of Contents What is this application? Logging
NVR Management Software
 NVR Management Software Quick Installation Guide Ver. 1.0 User Interface Overview 1 Live Video This is the section where the live videos are displayed Menu Bar This is where all functions can be accessed
ASTRA USER GUIDE. 1. Introducing Astra Schedule. 2. Understanding the Data in Astra Schedule. Notes:
 ASTRA USER GUIDE 1. Introducing Astra Schedule Astra Schedule is the application used by Academic Space Scheduling & Utilization to schedule rooms for classes and by academic colleges, schools, and departments
Introduction to the SAM Student Guide 4. How to Use SAM 5. Logging in the First Time as a Pre-registered Student 5 Profile Information 7
 Contents Introduction to the SAM Student Guide 4 How to Use SAM 5 Logging in the First Time as a Pre-registered Student 5 Profile Information 7 Logging into SAM as a New User 9 Forgot Password 14 Grace
Security Management System Camera Configuration Axis IP Device (Stream Profile Support)
") Security Management System Camera Configuration Axis IP Device (Stream Profile Support) Introduction Security Management System software supports several video source makes and models. This includes IP
Security Management System Camera Configuration Axis IP Device (Stream Profile Support) Introduction Security Management System software supports several video source makes and models. This includes IP
Revision History. Name Date Description Version Daniel Lemieux January 09, 2007 Initial Document 1.0
 Ver 1.1 Table of content 1 The Base Concepts... 5 1.1 Accessing the site... 5 1.1.1 To Access the site... 5 1.2 Environment... 6 1.2.1 Identifying the different zones within the window... 6 1.3 Closing
Table of Contents. 2 P a g e A I M Q U I C K R E F E R E N C E G U I D E
 May 2017 Table of Contents Introduction... 3 Accessing the My ARKIVE Portal... 3 The Dashboard... 4 Accessing AIM... 4 Searching/Filtering Inventory... 5 Adding New Inventory. 9 Work Orders... 11 Adding
Central Management Software for NVR-915 / NVR-1615 CV5-M256
 Central Management Software for NVR-915 / NVR-1615 Table of Contents Chapter 1. Main Console... 4 1.1 Tool Bar... 4 1.2 NVR List... 5 1.3 Division List... 7 1.4 Group List... 9 1.5 PTZ Panel...11 1.6 Operation
Altus Call Center Supervisor Client. User Guide. Document Version 1.2
 Altus Call Center Supervisor Client User Guide Document Version 1.2 5121 Maryland Way, Suite 300 Brentwood, TN 37027 Tel +1 615-465-4001 www.altusuc.com Table of Contents 1 About This Document... 8 1.1
IP Centrex User Guide Release 2.1
 IP Centrex User Guide Release 2.1 2014 by Cox Communications. All rights reserved. No part of this document may be reproduced or transmitted in any form or by any means, electronic, mechanical, photocopying,
Install Application Start Download the Application
 Install Application Start Download the Application Apple Android Enter A cardholder will download the app from either the itunes app store or the Android Google Play Store. 6 Install Application Completion
Meeting Room Manager User Guide
 Meeting Room Manager User Guide Carnegie Mellon University 1 Contents Getting Started... 2 Getting an MRM account... 2 Initial Login... 2 Accessing MRM... 2 MRM Terminology... 3 Reservation... 3 Resources...
Pro7804N1 NVR User Manual
 Pro7804N1 NVR User Manual Pro7804N1 User Manual BW R6.indd 1 User Information Admin User Name: Admin Password: IP Address: System Name: Table Of Contents 1. Menu Operation...4 1.1 Main Menu...4 2. Start
COMMAND STATION PC SOFTWARE
 COMMAND STATION PC SOFTWARE MULTI-SITE MANAGEMENT SOFTWARE USER MANUAL Version 1.6 OpenEye Command Station Software Manual V 1.6 Manual Edition 34863AI - June 2018 2018, OPENEYE All Rights Reserved No