CitectSCADA Batch Tutorial
|
|
|
- Maud Norton
- 6 years ago
- Views:
Transcription

1 CitectSCADA Batch Tutorial Version Citect Pty Ltd 3 Fitzsimmons Lane Gordon NSW 2072 Australia
2 2 DISCLAIMER Citect Pty. Limited makes no representations or warranties with respect to this manual and, to the maximum extent permitted by law, expressly limits its liability for breach of any warranty that may be implied to the replacement of this manual with another. Further, Citect Pty. Limited reserves the right to revise this publication at any time without incurring an obligation to notify any person of the revision. COPYRIGHT Copyright 2004 Citect Pty Limited. All rights reserved. TRADEMARKS Citect Pty Limited has made every effort to supply trademark information about company names, products and services mentioned in this manual. Trademarks shown below were derived from various sources. CitectSCADA, CitectHMI/SCADA, CitectFacilities and CitectSCADA Batch are registered trademarks of Citect Pty. Limited. IBM, IBM PC and IBM PC AT are registered trademarks of International Business Machine Corporation. MS-DOS, Windows, Windows 98, Windows 2000, Windows XP and Excel are trademarks of Microsoft Corporation. dbase is a trademark of Borland Inc. General Notice: Some product names used in this manual are used for identification purposes only and may be trademarks of their respective companies. November 2004 Edition for CitectSCADA Batch Manual Revision 1.0.8
3 3 TABLE OF CONTENTS INTRODUCTION...4 BEFORE YOU START...4 PROJECT OVERVIEW...5 CREATING A NEW BATCH DATABASE (FULL TUTORIAL)...5 CREATING THE EQUIPMENT MODEL...10 LINKING TANKS, PIPES, VALVES AND UNITS...21 CONFIGURING PHASES (HEAD START TUTORIAL)...27 ASSIGNING PHASES TO UNITS...40 CREATING MATERIALS...50 CREATING A RECIPE (EXPRESS TUTORIAL)...57 APPROVAL FOR PRODUCTION...57 ADDITIONAL CONFIGURATION FOR TANKS...58 ASSIGNING USERS TO AREAS...61 CREATING OPERATIONS...63 CREATING A PROCESS ORDER AND CONTROL RECIPES EXECUTING BATCHES WHERE TO FROM HERE? CITECTSCADA BATCH VERSION 1.1 NOTES PASSWORD CONFIGURATION ITEMS NOT APPROVED FOR PRODUCTION...127
4 4 Introduction This tutorial is designed to step through the creation of a CitectSCADA Batch database, configuration of the Equipment Model (using the Equipment Editor), the creation of a Master Recipe (using the Recipe Editor) and finally the execution of Control Recipes on a Citect project (Batch_Example). Because it can take quite a few hours to complete this Tutorial two additional entry points have been provided. If you undertake the Full Tutorial, these entry points could be a good guide as to when to take a break. The Head Start Tutorial starts at the Configuring Phases section with a batch database that has all Area, Cells, Units, Tanks, Pipes and Valves configured. Most of this configuration is very straight forward and minutes can be saved by starting the Tutorial at this point. Starting at this point allows you to skip some fairly mundane configuration but still see how to configure Phases and assign Parameters to Tags. It is worthwhile to review the way Tanks, Pipes, Valves and Units are linked together (page 22) if you start at this point. The Express Tutorial starts at the Creating a Recipe section and probably reduces the time spent on the Tutorial by another 60 minutes. Starting here should make it possible to design a Recipe and execute it is less than an hour. After a Batch system has been initially configured and commissioned this will be the normal starting point for creating new Recipes.. Using an existing Citect project allows the Tutorial to concentrate mainly on CitectSCADA Batch. We are going to Batch Example as the Citect Project. After completing the tutorial you will have completed a simplified version of one of the Recipes in Batch Example. After restoring the full version of the Batch_Example batch database, you will be able to explore some of the more advanced features found in the this project such as interaction with Cicode forms, optional branching in a Recipe at run time, exporting Batch records to MS SQL Server/Crystal Reports and MS Access etc. 1 Before You Start The Tutorial requires that CitectSCADA Batch, Citect 5.50/6.0 are installed and the Batch_Example Citect has been restored along with the CtBInclude project that comes with it. There is a folder on the Tutorial CD called Batch_Tutorial in contains a word document called CitectSCADA Batch Installation.doc that provides instruction on how to install CitectSCADA Batch and restore the Head Start Tutorial backup or the Express Tutorial backup if required. Another Word document called Batch Example Installation Instructions.doc has instructions on how to restore the Batch_Example Citect Project and the CtBInclude Project. It also illustrates the use of the Citect Computer Wizard and the Batch Advanced Setup Wizard, both of which must be run before attempting to execute a Batch. Before commencing this Tutorial you should install Citect 5.50/6.0 and CitectSCADA Batch (that order) in if they are not already installed. You should also install the Head Start or Express Tutorial Batch database backup if you do not want to work through the full tutorial. Lastly, the Batch_Example and CtBInclude Citect Projects should be restored. The two documents mentioned above provided instructions on how to perform these tasks.
 Log into the CitectSCADA Batch Recipe Editor (RE) as a Batch Administrator (for example User ID 999 with")
5 5 2 Project Overview The Batch_Example project has three Tanks, two Pipes and two Units. Pipe 1 will be used to control access to Flow Meter 1 and Pipe 2 for Flow Meter 2. The first Recipe will be for Chocolate Milk 3 Creating a New Batch Database (Full Tutorial) Log into the CitectSCADA Batch Recipe Editor (RE) as a Batch Administrator (for example User ID 999 with password batch999). On the File menu click New. Type the name of the new Batch database (Batch_Tutorial).


6 6 Click the Browse button to choose a location for the database file. The standard location for SQL Server is C:\Program Files\Microsoft SQL Server\MSSQL$BATCH, where "$BATCH is the Batch instance of MSDE (Microsoft Database Engine) installed by CitectSCADA Batch. You can choose another location if you wish. Click OK to close the Get Path form and OK again to create the new database. The Recipe Editor will create the new database and restore an empty database structure to it using the default.bak backup that came with CitectSCADA Batch.

7 7 This is how the New project form should look after you click OK in the Get Path form. After the new Batch database has been created you will be asked to log in as shown below. Log in with User ID 999 and password batch999


8 8 If the password has expired you will be immediately asked to enter a new password and confirm it by typing it in a second time. If this happens change the password to batch998. When you click Save to save the new password you will be asked for a User ID and password. Remember to use the OLD password. At the completion of this process you will have an empty Batch database called Batch_Tutorial. Note that three default Users are created including Batch Administrator. It is a good idea to create a second user with Supervisor Rights for use if you happen to get locked out of User ID 999. If you updated Default.bak after installing CitectSCADA Batch this has already been done and you can skip to page 11. Select the Users branch, right click and choose New from the menu.
 and add the User to the")


9 9 Create a user with User ID 111 and password batch111 (easy to remember) and add the User to the Supervisor Group. Note that the requirement to change the password at the next login is set to false. When you click Save a User ID and password will be requested. This should be User ID 999 with password batch999 of course.

.")
10 10 With the second Supervisor configured it will be possible to recover User ID 999 should the account become locked. 4 Creating the Equipment Model Start the CitectSCADA Batch Equipment Editor (EE). There is no requirement to login to the Equipment Editor.

11 11 Select Areas, right click and choose New from the menu. Complete the New area form as shown then click Save.


12 12 Expand the Areas branch by clicking on the + symbol to the left. The expanded branch looks like this. To add a Cell select Area 1, right click and choose New from the menu.


13 13 Complete the New cell form as shown and click Save. Expand the Area 1 to reveal Cell 1. To add a Unit, select Cell 1, right click and choose New from the menu.


14 14 Complete the New unit form as shown below and click Save. Repeat for Unit 2 (optional for this tutorial).

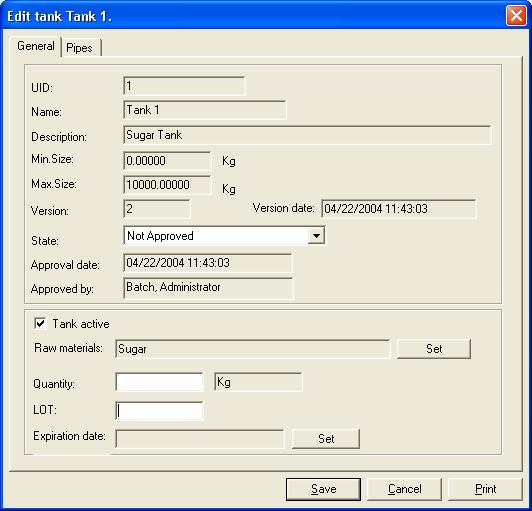
15 15 The next step is to create three Tanks. To do this, select the Tanks branch, right click and choose New from the menu. Complete the New tank form for Tank 1 as shown below and click Save.
16 16 Repeat this for Tanks 2 and 3 as shown on the next page.

17 17 The next items of equipment to be configured are Pipes. Select the Pipes branch, right click and choose New from the menu. Complete the New pipe forms for Pipe 1 and Pipe 2 as shown below. The Citect Tags Pipe1 and Pipe2 are configured in the Batch_Example Citect Project and are used to animate the busy state (true/false) on Citect Pages where required.

18 18 The next items of Equipment Model to configure are Valves. Select the Valves branch, right click and choose New from the menu.

19 19 Complete the New valve forms for Valves 4, 5, 6 and 7 as shown below. Note that in the Batch_Example Citect project the Tags BE_Valve4, BE_Valve5, BE_Valve6 and BE_Valve7 do not directly control physical valves. They are internal status bits used by PLC logic to control the physical valves in the plant subject to any plant or safety interlocks that may be required. These valves can be used to detect when a Unit has gained the access to a Pipe and often play an important part the PLC Phase logic. When the PLC logic for a Phase that needs to use a shared Pipe (actually a flow meter in this case), it should wait for the Valve associated with the Unit to which the Phase Logic belongs to be turned on the Batch Engine.

20 20 All elements of the Equipment Model have now been created. It is now necessary to configure any relationships that exist between the Tanks, Pipes, Valves and Units. Based on the model used in the Batch_Example Citect project, the relationships are as follows. Material A Material B Material C Tank 1 Tank 2 Tank 3 Pipe 1 Pipe 2 Valve 4 Valve 5 Valve 6 Valve 7 Unit 1 Unit 2 Product 1 Product 2 For an explanation of what these relationships mean see the Word document (BatchExample_x.xx.doc which can be found in the OtherFiles directory of the Batch_Example Citect project. There is also a PowerPoint in this directory that illustrates how Pipes are reserved and released.

21 21 5 Linking Tanks, Pipes, Valves and Units To assign Valves 4 and 5 to Units1, select the Unit 1 branch, right click and choose Edit from the menu.

22 22 Click the Valves tab, click Add valve button, click the icon for Valve 4 then click OK. Repeat this for Valve 5.

23 23 Use the same procedure to assign Valves 6 and 7 to Unit 2. The next step is to assign Valves to Pipes. Select the Pipe 1 branch, right click and choose Edit from the menu.

24 24 Click the Valves tab click the Add valve button, click the Valve 4 icon and click OK. Do the same for Valve 6. Valves for Pipe 2 should be assigned as follows.

25 25 To complete this part of the configuration, Pipes 1 and 2 should be assigned to Tanks 1, 2 and 3 as appropriate. Select the Tank 1 branch. Right click and choose Edit from the menu. Now select the Pipes tab, click the Add pipes button, click the Pipe 1 icon and click OK.

26 26 Repeat for Tanks 2 and 3 as shown on the next page.
27 27 6 Configuring Phases (Head Start Tutorial) If you are starting the Head Start Tutorial here you must first restore the partially configured CitectSCADA Batch database as described in at the beginning of this document under the heading Before You Start. Phases are blocks of PLC Logic that control Batch equipment. A typical Phase involves opening a valve path, waiting for a flow meter to measure a preset quantity of liquid the closing the valves and signaling completion. For this tutorial some of the Phases in the Batch Example project will be configured. Phase Description FM1 Addition The addition of sugar or flavouring though Flow Meter FM1 Release Release Pipe 1 after FM1 Addition FM2 Addition The addition of milk though Flow Meter 2 FM2 Release Release Pipe 2 after FM2 Addition Agitator On Off Turn the agitator on or off Drain Drain the unit at the completion of a Batch Time critical and safety related functions of a Phase are implemented in PLC logic. The Batch Engine (BE) uses the information contained in Control Recipes to Start Phase Logic at the appropriate time passing any Parameters to the Citect Tags. The BE monitors Tags that are referenced in Transitions, and detects when Transition logic evaluates as true. When a Transition becomes true the BE moves on to the next Phase or Phases. The BE also logs and Report Parameters to the database. For example the FM1 Addition Phase will write the scaled set point for the Material to the PLC and start the Phase Logic. When PLC detects that Flow Meter 1 has measured the required

28 quantity of Material it stops the flow of Material and sets a Citect Tag to tell the BE that the job is done. To create a Phase, select the Phases branch, right click and choose New from the menu. 28 Enter details of the FM1 Addition Phase as shown below. In the Parameters section click the New button and add the first Parameter and enter the details for the 00_Start Parameter as shown below.

29 NOTE: The numeric prefix for the Parameter names was originally intended to provide a sort order for the Tags. The SubType also does this. The Parameters are sorted but SubType and then by Parameter name. The SubType controls the order in which the Batch Engine processes the Parameters. 29 Click the Set Value button for the 00_Start Parameter to set the value to 1. This becomes the default value when designing Recipes. This bit should always be set to a value of 1 so it it worthwhile to set the default.
30 30 Proceed with the remaining parameters as follows. Note the additional information for the Set Point to indicate a scaled ingredient. The Recipe Editor will scale the Set Point value to the Batch size when creating Control Recipes later on. Because the value of the Set Point different in each instance there is no benefit is setting a default value.

31 31 It is probably best to leave the default value at 0 to force the Recipe designer to choose Tank 1 or Tank 2. The value of 0 is appropriate for this parameter so that the bit will be turned off in the PLC. When all 4 Parameters have been entered that Phase form will appear as shown below.
32 32 Repeat the procedure for the FM2 Addition Phase omitting the 20_Tank_1or2 Parameter. Take care to complete the extra information (checkboxes) for 10_SetPoint Parameter for FM2 Addition, indicating that it is a scaled ingredient.
33 33 Next create the FM1 Release Phase. Note that the 10_Release Parameter is a special Release data type. Note also the value is set to 1 and the Ingredient addition checkbox is checked. When a Pipe is made Busy it is reserved for an Ingredient (Material) and the same Ingredient has to be specified when releasing it.
34 34 The 20_Completed Parameter should be left with a value of 0 as it will be used to reset the Completed bit in the PLC.
35 35 Add the FM2 Release Phase in a similar way to FM1 Release, remembering to make the value of the 10_Release Parameter 1 and to check the Ingredient Addition checkbox.
36 36
37 37 The next Phase to be created is the Drain Phase.
38 38 Set the default to 1 to open the Drain Valve. If the fail safe condition is Off (which may well be the case here) it may be better to set the value to 0. This will ensure that the valve will remain closed unless the Recipe Designer explicitly sets the value to 1 in the Recipe.

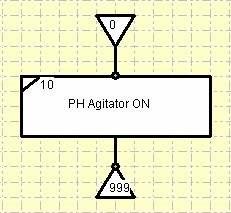
39 39 Finally add the Agitator On Off Phase.
40 40 7 Assigning Phases to Units Now that the Equipment, Phases and Parameters are configured the next step is to assign Phases to Units and Citect Tags to Phase Parameters on each Unit. When creating Control Recipes later, this information allows the late binding of parameters to specific Citect Tags for a Unit. The Master Recipe references Parameters by Parameter Name only and can therefore be applied to any Units to which the Phases have been assigned. When the tutorial is completed you can use the Master Recipe Overview and Control Recipe Overview to confirm that Tags are not assigned until the Control Recipe is created. First the status of all Phases must be changed to Approved for Production in the Recipe Editor. Log into the Recipe Editor as a Batch Administrator (e.g. 999/batch999), select the Drain Phase branch, right click and choose Edit from the menu and change Status from Not Approved to Approved for Production then click the Save button. You will be required to enter a User ID to change the state and again to save the changes.


41 41 Repeat this procedure for all Phases, FM1 Addition, FM1 Release, FM2 Addition, FM2 Release, Drain and Agitator On Off. Items that are not Approved for Production appear in red in the Recipe Editor and Equipment Editor. IMPORTANT: The Equipment Model is configured in the Equipment Editor but ALL status changes (approval etc) and done in the Recipe Editor. Now return to the Equipment Editor Select the Unit 1 branch, right click and choose Edit from the menu.

42 42 Click on the Unit phases tab for Unit 1 and then click Add Phase, click the FM1 Addition icon then click OK. If the Add Phase button is disabled, you are probably still in the Recipe Editor.

43 43 Proceed to add all the remaining Phases (FM1 Release, FM2 Addition, FM2 Release, Drain and Agitator On Off) using the same procedure. When completed as shown below click the Save button. The same should be done for Unit 2 although this can be left until after the tutorial if you wish. The final task in the Equipment Editor is to assign Citect Tags in the Unit Phase and Other Information tabs. Staying for the moment on the Unit Phase tab, select the first parameter and click the Config tags button.

44 44 It is possible to either type in n a Citect Tag or to search the variable.dbf file for the Citect project (Batch_Example) for a Tag. The second method saves typing and reduces the chance of errors. To select a Tag from varirable.dbf click the Citect Project button then the Get Citect Path button to locate the directory in which the Citect is located and click OK.


45 45 From the list of Citect Projects, select Batch_Example and click OK.


46 46 The location on the Citect directory will remain the same for the rest of the Equipment Editor session or until changed. The Search button is used as follows to find the required Tag. Check the Name checkbox; enter the first few characters of the Tag followed by % (the SQL Server wildcard character) and click Search.

47 47 The last step in to select the Tag and click OK.

48 48 The Unit1PhaseFM1Addition_Start Tag has now been assigned to FM1 Addition Phase Parameter 00_Start. Repeat these steps for all other Phase Parameters. Note that the Release Parameters do not have Tags as they are internal to the Batch Engine. When all Phase Parameters have been entered, click Save to complete the process. You will be prompted for a User ID and password.


49 49 Again this has to be repeated for Unit 2 but it can be left until after the tutorial. There are also some useful Tags that can be assigned in the Other Information Tab but this can also wait until after the tutorial if you wish. The basic configuration of the Equipment Editor is now complete.
 and two products (chocolate milk and strawberry milk).")

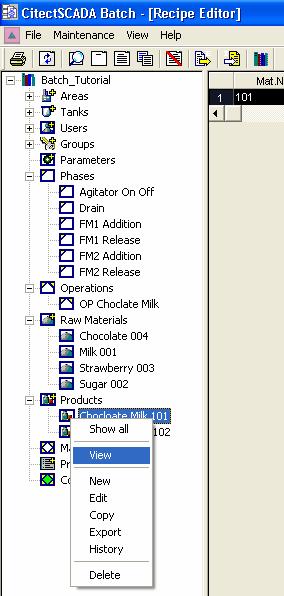
50 50 8 Creating Materials Before a Recipe can be created, the Materials must be configured. We will define four ingredients (sugar, milk, chocolate and strawberry) and two products (chocolate milk and strawberry milk). In the Recipe Editor, select the Raw Materials Branch and choose New from the menu. Enter the details for Milk as shown below. When creating a Material it must be saved in the Not Approved state. Do the same for sugar, strawberry and chocolate as shown in the list below. Now open each Material in Edit mode change its Status to Approved for Production and Save it.

51 51 To create the Chocolate Milk Product, select the Products branch, right click and choose New from the Menu. Enter the basic information for Chocolate Milk as shown below. If the End Product checkbox in unchecked, the Product will be available for selection as a Raw Material for multi-step Batches.
52 52 To add Milk as a Material, click the Add Material button on the New Product form then the Search button on the Get Material form, click the Search button again on the Materials form to display the list of Materials, Select the Material then click OK.


53 53 Now enter 75 for the quantity in the Get Material form and click OK. Repeat the procedure for Sugar and Chocolate and Save the Product.
54 54 The Standardize button can be used to force the total to be 100 but it is not needed in this case. Do the same for Strawberry milk.

55 55 The list of Ingredients and quantities for each Product is the Bill of Materials (BOM) for the Product. IMPORTANT: Before creating Recipes you should Print out the Product form for each Product so that you can easily look up the Materials and Quantities for each Recipe. To do this, select the Product branch, right click and choose Edit or View from the Menu. Alternatively double click the Product branch to open the Product form in View mode. With the Product form open, click the Print button.
56 56
57 57 9 Creating a Recipe (Express Tutorial) If you are starting the Express Tutorial here you must first restore the partially configured CitectSCADA Batch database as described in at the beginning of this document under the heading Before You Start. 9.1 Approval for Production Before creating a Recipe, all items used in the Recipe must be Approved for Production and you should assign at least one User to Area 1. The Phases have already been approved so that they could be assigned to Units. For those starting the Express Tutorial, this has already been done, please skip to page 69. Log in to the Recipe Editor as a Batch Administrator (e.g. 999/batch999) and view the various lists to check whether they are approved or not. Items that are not Approved for Production are highlighted in red.
58 58 You will see that the Area 1, Cell 1, Units 1 & 2 and Tanks 1, 2 & 3 need to be approved. To approve Unit 1, select the Unit 1 branch, right click and choose Edit from the menu. Change the State from Not Approved to Approved for Production the click the Save button to save the change. You will prompted for a User ID and password twice, once when changing the Status and again when saving the change. You should now go on to approve Area, Cell, Unit 2 and Tanks 1, 2 and 3 as well as all Raw Materials and Products. 9.2 Additional Configuration for Tanks When approving Tanks, you should also check the Active checkboxes.
59 59 It is also a good idea to assign Materials to each Tank at this time as shown.

60 60
61 Assigning Users to Areas First select a User, right click and choose Edit from the Menu.


62 62 With the User form open, click on the Groups Tab and click the Add button. The User may already be assigned to a Group but not an Area. In this case Add the Group again and assign an Area. The Group assigned without an Area can then be deleted. Now select Operator from the list. If there was more than one Area defined you would also need to select an Area, but Area 1 is already selected in this case.
 to Area 1 and the Supervisor Group. 9.4 Creating Operations It is now time to create some Operations that use the Phases we have created.")
63 63 Multiple Areas can be added if there is more than 1 Area. You should also assign Area 1 to User ID 999 (Batch Administrator) to Area 1 and the Supervisor Group. 9.4 Creating Operations It is now time to create some Operations that use the Phases we have created. Select the Operations branch, right click and choose New from the Menu.

64 64 Click the Header button, type in the Name of the Operation and click OK then Save the Operation and re-open it.


65 65 Every Operation must have a Start and End element. To create a Start element, click on the appropriate icon and position the element at the top of the work area by clicking at the desired location. Notice that the Start Element icon on the toolbar is disabled after a Start Element has been created. The must be one and only one Start Element and End Element for each Operation.


66 66 All elements in an Operation have a Sort Number which is used to control the order it which Phases, Operations etc appear in the Batch Viewer and in the Overview print out. It is best to leave gaps in the Sort Numbers so that elements can be inserted without needing to change other Sort Numbers much as used to be the case in Basic programs. The number 0 is a good choice for the Start Element and 999 for the End Element as the Sort Number has three digits. Next create an End Element at the bottom of the work area.


67 67 To change the Sort Number for the End Element, double click on the element change the number to 999 can click OK. Our recipe calls for Sugar to be delivered from Tank 1 while Milk is being delivered from Tank 3. To do this we need to begin a Simultaneous Sequence.


68 68 Click on the Beginning of simultaneous sequence icon then use the mouse to trace out a rectangle in a location not far below the Start Element. We now want to draw a Link between the Start Element and the new Simultaneous Sequence Element. Click on the Link icon then click on the bottom of Start Element, move the mouse to the middle of the Simultaneous Sequence Element and click to draw the Link then right click to terminate the Link.


69 69 Next we want add an FM1 Addition Phase to add Sugar. To do this click on the Phase icon and draw the outline of a rectangle where the Phase should appear.

70 70 Next, double click the new Phase rectangle to select and configure the Phase. In the Phase form click the Select button and choose the FM1 Addition Phase.

71 71 IMPORTANT: If you draw a new Operation and save it without selecting an Operation the Select button will be disabled when you re-open the project and it will be necessary to delete and re-draw the Operation.
72 72 At this point the Parameters for the Phase are listed. To enter the 10_SetPoint parameter, select the row and click the Configurate button. On the Raw Material form click the Set button to the left of the Raw Materials field. The Get Material form will appear Click search button on this form to show the Materials form. Click the Search button on this form to see the list of Materials, select Sugar then click OK.

73 73 The illustration below shows the forms that appear while searching for and selecting a Material, the most recent form in on top. IMPORTANT: The Materials form lists no Materials when first opened. To see the entire list, leave the Search text empty and click the Search button. Click OK on the Get Material Form. Now set the Quantity.

74 74 IMPORTANT: The Quantity can be entered at Operation or Master Recipe level. If the Quantity is entered here you will need to refer the print out for the Product to check the Quantity for each Material. The advantage of entering the Quantity here is that if the Operation is changed at a later date the correct Quantities will be preserved. The Material ID/Name cannot be changed in the Master Recipe however so it must be specified in at Operation Level. The 10_SetPoitnt Parameter is now configured.


75 75 Now set the 20_Tank_1or2 Parameter to a value of 1 following sequence below.

76 76 The PH Sugar Addition Phase is now configured. Click OK to return to the main work area.
, and click the end point (top, center of the PH Sugar Addition Phase.")

77 77 Next we need to add a link between the Simultaneous Sequence Element and the PH Sugar Addition Phase. Click the Link icon, click the start point (left hand, bottom of the Simultaneous Sequence Element), and click the end point (top, center of the PH Sugar Addition Phase. Don t forget to right mouse click to terminate the Link. We now need to set up a Transition to detect when the required quantity of sugar has been delivered. The Phase logic in the PLC accepts the 10_SetPoint Parameter and opens the required valves. When the correct quantity is measured by Flow Meter 1, the PLC Phase Logic shuts the valves and sets the Tag that tells the Batch Engine the Phase has completed. The Transition should monitor this Tag and wait for it to be set to 1. IMPORTANT: It is recommended that after configuring a Phase with Phase Parameters, the Operation should be Saved and re-opened. This causes the Parameters to be named after the instance of the Phase (in this case PH Sugar Addition) rather than the generic name (FM1 Addition) when creating Transitions.


78 78 Select the Transition icon; click a location below the PH Sugar Addition Phase position the Transition in the correct location.
79 79 Double click on the Transition and set the Name and Sort Number.

80 80 To set the Transition condition click on the gray raised rectangle below the header area and set the transition as shown below. The value of the comparison (1) should be entered.
81 81 When the recipe is executed, the Batch Engine will find Sugar in Tank 1 via Pipe 1 and will reserve Pipe 1 for Sugar. The next Phase is to release Pipe 1 from Sugar. Click the Phase icon and draw a rectangle below the PH Sugar Addition Phase then double click the new Phase and enter the basic information shown below.

82 82 Now click the Select button, click the FM1 Release Phase and click OK.

83 83 With the 10_Release Parameter selected, click the Configurate button, then click the Set Material button in the Parameter form followed by the Search button in the Get Material form. Finally select Sugar as the Material and click OK on the Materials, Get Materials and Parameter forms.

84 84 Note that we want to set the 20_Completed Parameter to 0 so there is no need to change it.
85 85 It is now time to add Links between the Sugar Addition Phase and the Transition and between the Transition and the Sugar Release Phase. Remember to use right click to terminate each Link. The Operation now looks like this, with the three basic elements for Sugar addition in place.

86 86 We now want to repeat these three elements for Chocolate (in series, below the Sugar Phases) and Milk (in parallel to the right of Sugar and Chocolate). The following images show the various forms that must be completed and the final result. It is important to remember that the Sugar and Chocolate Phases are based on the Flow Meter 1 Addition and Release Phases and the Milk Phases are based on Flow Meter 2 Phases.
87 87 IMPORTANT: After you add the Chocolate Addition Phase a second set of FM1 Addition Parameters is added. The Parameters are initially named after FM1 Addition NOT Chocolate Addition which can lead to confusion when configuring the subsequent Transition. For this reason, it is recommended that you Save the Operation configuring each Addition Phase to that when you re-open the Operation the Parameter Names are more meaningful. Notice in that when configuring the Transition for Sugar we selected 99_Completed.FM1 Addition. In the example below this has now become 99_Completed.PH Sugar Addition and we can now select 99_Completed.PH_Choclate Addition.
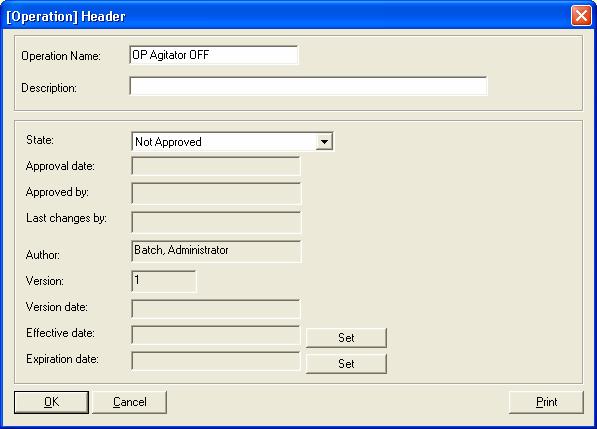
88 88

89 89 When adding Phases for Milk, remember to use the FM2 Addition and FM2 Release Phases.
90 90

91 91 We now want to insert an End of Simultaneous Sequence element and complete the Links to the End Element.. Remember to use right click to terminate each Link. First click on the End of Simultaneous Sequence icon and draw the element below the existing Phases.


92 92 Next complete the Links as shown and Save the Operation. Remember to use right click to terminate each Link.
 icon at the top left, you")

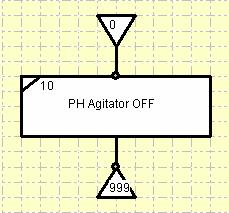
93 93 To save the Operation, click the Save (floppy disk) icon at the top left, you will be required to enter a User ID and password. We will now create an Agitator ON Operation.
94 94
95 95 Then an Agitator OFF Operation.
96 96

97 97 The last Operation required is the Drain Operation.
98 98 Before adding the Transition as shown below, Save and re-open the Operation so the Phase instance name is used in the Parameter Name. While this is not essential in this case, it is good practice.
99 99
100 100 Notice that the Transition uses a less than comparison for the Unit Level, if an equals comparison was used, the Parameter could pass through the value without ever equaling it. Now add a Close Drain Phase.

101 101 The Operation looks like this when completed. Next, the four Operations must be Approved for Production so that they can be used in a Unit Procedure. Select the Agitator OFF Operation, right click and choose Edit from the Menu.

102 102 Before Saving the Operation click the Verify button to confirm Operation has no errors that can be detected by the Recipe Editor. Operations cannot be Verified while their Status is Approved for Production. Save the Operation with the Status changed to Approved for Production.


103 103 Proceed to Approve the remaining Operations. Unit Procedures are created within a Master Recipe. To create a Master Recipe, select the Master Recipes branch. Right click and choose New from the menu.

104 104 Click the Header button enter the basic details of the Master Recipe and click OK.

105 105 Create and number Start and End elements as shown, click on the Unit Procedure icon and draw a Unit Procedure.


106 106 Double click the new Unit Procedure to open the Unit Procedure work area, click the Header button and complete the details shown below.


107 107 Add a Start Element, click the Operation icon and draw an Operation Box. Double click on the new Unit Procedure enter the basic details in to for the Unit Procedure then click the Select button, choose the Agitator ON Operation and click OK.


108 108 The next Unit Procedure is for Chocolate Milk.

109 109 After selecting the Chocolate Milk Operation all the Parameters for will appear. Select one of the Materials and click the Configure button. Observe that the Quantity for the Product is shown so that it can be compared to the value entered for the Parameter.

110 110 Add the Agitator OFF Operation.

111 111 Lastly add the Drain Operation.

 to return the Master Recipe being careful not to")
112 112 Now add an End Element, change its Sort Number to 999 and draw the necessary links. Click the gray Unit Procedure Close box (top right of the window) to return the Master Recipe being careful not to click red Recipe Editor close box.


113 113 Complete the Mater Recipe Links and Save the Master Recipe. Re-Open the Master Recipe double click the Chocolate Unit Procedure then the Chocolate Operation and temporarily change the Chocolate quantity to

, open the Header, change the Status to Approved for")
114 114 Return Master Recipe, open the Header and Click the Verify button. An error message appears indicating the Chocolate quantity is not correct. The Recipe Editor verifies Quantities to 5 decimal places. Close the Master Recipe without saving it.. Now open the Master Recipe again (in Edit mode), open the Header, change the Status to Approved for Production, close the Header and Save the Master Recipe.
.")
115 Creating a Process Order and Control Recipes To use a Master Recipe a Process Order and one or more Control Recipes must be created. When a Process Order is created, the size of the Order is specified and it is targeted to a particular Cell. When Control Recipes are created, they are targeted to one or more Units (within the Cell). If the Quantity specified is larger than the capacity of the Unit, multiple Batches are created. The Recipe Editor takes into account the Minimum and Maximum Batch Size for the Unit when doing this. One Process Order can be used to create Control Recipes for a number of Units. Another important process that happens when a Process Order is created is that the Tag Names for the Phase Parameters (and Global Parameters) are used to make the Control Recipe Unit specific. During the creation of Control Recipes Quantities are scaled to the Batch size. First, confirm that the Master Recipe is Approved for Production.

116 116 Click on the Process Orders, right click and choose New from the Menu.

117 117 Complete the New Order form as shown below and Save it. Expand the Process Orders branch, select , right click and choose New Control Recipe from the Menu. Complete the basic information for the Control Recipe form as shown below.

118 118 Click on the Assign Unit button and select Unit 1 and check the Main unit in Recipe checkbox. Batches will be sized according to the capacity constraints of this Unit. When the Batch or Batches are Released in the Batch Scheduler, they will also be assigned to this Unit.

119 119 Now click the Create button and observe that 3 Batches have been created.
 the Master Recipe Overview and the Control Recipe")

120 120 Click the Save button to Save the Batches. At this point it is instructive to view (and even print out) the Master Recipe Overview and the Control Recipe Overview. Observe that the Control Recipe is scaled to the Batch size and that specific Tags have been assigned to the Parameters. One last step remains to execute the Batches; they must be Transferred to the Batch Scheduler. Select Control Recipes, right click and choose Show All from the Menu.
 communicates with the plant via Citect Tags and must run in conjunction with a Citect Project. The Citect Project to be used in this case is Batch_Example.")
121 121 Click each Control Recipe (to select it), click Transfer then Close the Control Recipes form. The Control The Control Recipes are now available for Release in the Batch Viewer. 12 Executing Batches The Batch Engine (BE) communicates with the plant via Citect Tags and must run in conjunction with a Citect Project. The Citect Project to be used in this case is Batch_Example. If this Project has not already been restored refer to the Word document Batch Example Installation Instructions.doc which can be found in the Batch_Tutorial folder on the CD. Be sure to also run the Citect Computer Setup Wizard and the Batch Advanced Setup Wizard as described in this document. Batches are executed by the Batch Engine (BE), The Batch Engine uses information from the Batch database to load Parameters at the appropriate times and evaluate Transitions. The BE loads Parameters at the start of a Phase and spends most of its time waiting for Transitions to occur. Important Notes:- 1. The Batch_Example Project uses a particular version of CTBInlcude (Citect Batch Include Project). A backup of this project can be found in the OtherFiles folder in the Batch_Example folder, there is also a Word document that provides more detailed information about Batch_Example. 2. If you have a Citect key plugged into the PC and it has no Batch License, the Batch Engine will not start in Demo mode but will start in licensed mode with 0 Units. The result is that no Batches will run. You must either uses a key that has a CitectSCADA Batch license of it or have not key at all so that both Citect and CitectSCADA Batch will run in demo mode.
 as shown, click on it so that it displays in colour.")

122 3. Check the Users icon at the top left of the Citect Cell page. If it is grayed (disabled) as shown, click on it so that it displays in colour. This will toggle a flag to set the Batch Scheduler in a mode (on Page Entry) to substitute the Citect Operator login for the Batch Operator login. The Citect startup Cicode logs in as the Citect Operator. 122
123 Start the Batch_Example project, compiling it first if necessary. During start-up there may be warning messages if there is now protection key. Both Citect and the Batch Engine will start in demo mode if there is no key (see Note 3 above). 123 When Citect has started, the screen should appear as shown. Click the Scheduler button to go to the Batch Scheduler. Select the first Batch and click the Release button.

124 124 Notice that Unit 1 is now green, indicating that it has a Batch assigned to it.

125 125 Double click the same Batch and Start it. Click the Back button to return to the Batch Scheduler then Double click on the green Unit 1 icon at the top left to view the status of the Batch Phases.

126 126 You can now observe the progress of the Batch in the Batch Scheduler, the Batch Viewer, the Citect Cell page or the Citect Batch Diagnostics page. 13 Where To From Here? To proceed from here, it is recommended that you read the documentation that comes with Batch_Example and examine the Batch_Example database after restoring it in the Recipe Editor. To create a Strawberry Recipe, copy the Chocolate Operation make the appropriate changes to the Operation and Save it. You can then create a new Master Recipe using the same Operations but substituting the Strawberry Operation for the Chocolate Operation. 14 CitectSCADA Batch Version 1.1 Notes Some new features introduced in CitectSCADA Batch Version 1.1 will cause CitectSCADA Batch to behave differently than id described in the document. Fortunately the changes were made to improve usability so they should not cause any problems Password Configuration This feature is viewed by right clicking on the new Configuration branch, selecting Edit and click the Password Configuration tab.

127 127 This reveals a matrix to control the circumstances under which the Recipe Editor and Equipment Editor will request User ID and Password. For this Tutorial it can be seen that all such requests have been disabled Items Not Approved for Production In Version 1.1, items that are not Approved for Production are highlighted in red, making it easier to recognise items that need to be Approve for Production before they can be used (see next page).
Version 5.5. Using Accumulators. Citect Pty Ltd 3 Fitzsimmons Lane Gordon NSW 2072 Australia
 Version 5.5 Using Accumulators Citect Pty Ltd 3 Fitzsimmons Lane Gordon NSW 2072 Australia www.citect.com DISCLAIMER Citect Pty. Limited makes no representations or warranties with respect to this manual
Version 5.5. CitectSCADA Pocket. Citect Pty Ltd 3 Fitzsimmons Lane Gordon NSW 2072 Australia
 Version 5.5 CitectSCADA Pocket Citect Pty Ltd 3 Fitzsimmons Lane Gordon NSW 2072 Australia www.citect.com DISCLAIMER Citect Pty. Limited makes no representations or warranties with respect to this manual
Version 5.5. Multi-language Projects. Citect Pty Ltd 3 Fitzsimmons Lane Gordon NSW 2072 Australia
 Version 5.5 Multi-language Projects Citect Pty Ltd 3 Fitzsimmons Lane Gordon NSW 2072 Australia www.citect.com DISCLAIMER Citect Pty. Limited makes no representations or warranties with respect to this
Vijeo Citect Customization and Design Study Guide
 Vijeo Citect Customization and Design Study Guide Version 7.30 Schneider-Electric Pty (Australia) Ltd 78 Waterloo Road Macquarie Park NSW 2113 Australia DISCLAIMER Schneider Electric makes no representations
SCADA Expert Vijeo Citect 2015 Programming with Cicode Study Guide
 SCADA Expert Vijeo Citect 2015 Programming with Cicode Study Guide 2015 Schneider-Electric Pty (Australia) Ltd 78 Waterloo Road Macquarie Park NSW 2113 Australia DISCLAIMER Schneider Electric makes no
SCADA Expert Vijeo Citect Architecture and Redundancy Study Guide
 SCADA Expert Vijeo Citect Architecture and Redundancy Study Guide 2015 Schneider-Electric Pty (Australia) Ltd 78 Waterloo Road Macquarie Park NSW 2113 Australia DISCLAIMER Schneider Electric makes no representations
Administration. Training Guide. Infinite Visions Enterprise Edition phone toll free fax
 Administration Training Guide Infinite Visions Enterprise Edition 406.252.4357 phone 1.800.247.1161 toll free 406.252.7705 fax www.csavisions.com Copyright 2005 2011 Windsor Management Group, LLC Revised:
Apptix Online Backup by Mozy User Guide
 Apptix Online Backup by Mozy User Guide 1.10.1.2 Contents Chapter 1: Overview...5 Chapter 2: Installing Apptix Online Backup by Mozy...7 Downloading the Apptix Online Backup by Mozy Client...7 Installing
License Manager Client
 License Manager Client Operations Guide NEC NEC Corporation of America November 2010 NDA-30899, Revision 6 Liability Disclaimer NEC Corporation of America reserves the right to change the specifications,
SIMATIC Automation License Manager Manual 02/2008 A5E
 s Contents SIMATIC Automation License Manager Product Overview 1 Installation 2 Working with the Automation License Manager 3 Glossar Index Manual 02/2008 A5E02128430-01 Safety Guidelines This manual contains
Quickstart Guide for Khronos Replay. Welcome to Khronos, your historian companion.
 Khronos Historian Replay and Analysis Tools Quickstart Guide for Khronos Replay Welcome to Khronos, your historian companion. This Guide will take you through the basic steps required to install, setup
Using LaunchPad. Contents. Section 1-7. This section: Describes how to use LaunchPad to run your access control programs.
 Section 1-7 Using LaunchPad This section: Describes how to use LaunchPad to run your access control programs. Describes how to change your login name and password Describes how to add new operators. Describes
Template Summary. AT_Reactor_C2_Summary_R01. Accord Template Summary. Reactor 1 Configuration 2 : AT_Reactor_C2. Revision: R01 20 th Feb 2017
 Accord Template Summary AT_Reactor_C2_Summary_R01 Document: System: Function: Accord Template Summary. Reactor 1 Configuration 2 : AT_Reactor_C2 8 Stage Reactor Revision: R01 20 th Feb 2017 AT_Reactor_C2_Summary_R01
Expedient User Manual Getting Started
 Volume 1 Expedient User Manual Getting Started Gavin Millman & Associates Pty Ltd 281 Buckley Street Essendon VIC 3040 Phone 03 9331 3944 Web www.expedientsoftware.com.au Table of Contents Logging In...
TAG MANAGER User Guide
 TAG MANAGER User Guide NLIS-Australian Edition Version 1.01 24/07/2013 IMPORTANT! This User Guide must be read in conjunction with Reader, prior to use. Copyright Aleis Pty Ltd 2013 A1064AUS Aleis Pty
HDI HP-GL/2 Driver for AutoCAD Getting Started
 HDI HP-GL/2 Driver for AutoCAD 2000 Getting Started Océ-Technologies B.V. Trademarks Products in this manual are referred to by their trade names. In most, if not all cases, these designations are claimed
IT Essentials v6.0 Windows 10 Software Labs
 IT Essentials v6.0 Windows 10 Software Labs 5.2.1.7 Install Windows 10... 1 5.2.1.10 Check for Updates in Windows 10... 10 5.2.4.7 Create a Partition in Windows 10... 16 6.1.1.5 Task Manager in Windows
Expense Management Asset Management
 Expense Management Asset Management User Guide NEC NEC Corporation November 2010 NDA-31136, Revision 1 Liability Disclaimer NEC Corporation reserves the right to change the specifications, functions, or
Accord Builder. User Guide
 User Guide Document: V 3.6 User Guide R01 V3.6 User Guide R01 Page 1 of 110 Table of Contents 1 Introduction... 7 2 General Summary and Definitions... 8 2.1 Accord Platform and Plant... 8 2.2 PLC Control
SIMATIC. Process Control System PCS 7 Advanced Process Functions Operator Manual. Preface. Security information 1. Overview 2. Material management 3
 Preface Security information 1 SIMATIC Process Control System PCS 7 Advanced Process Functions Operator Manual Operating Manual Overview 2 Material management 3 Material lot management 4 Storage location
Termination Payout Calculator
 Termination Payout Calculator User guide System requirements Installation Getting started & logging in Changing your password Users Searching Importing termination records Exporting (CSV or for the Tax
NetSupport ServiceDesk Product Manual Version 3.10
 NetSupport ServiceDesk Product Manual Version 3.10 Manual COPYRIGHT (C) 2013 NetSupport Ltd. All rights reserved. The Information in this document is subject to change without notice. NetSupport Ltd. reserves
Working with Mailbox Manager
 Working with Mailbox Manager A user guide for Mailbox Manager supporting the Message Storage Server component of the Avaya S3400 Message Server Mailbox Manager Version 5.0 February 2003 Copyright 2003
For additional information, please consult the Read-Me and Help documentation or contact Electro-Voice or Dynacord technical support.
 Quick Start Guide Hello, and welcome to IRIS-Net software. We want you to get the most from your IRIS-Net projects and encourage you to explore the additional Read-Me and Help documentation provided with
Overview Training Manual
 Overview Training Manual Version 6.00 Citect Pty. Ltd. 3 Fitzsimons Lane GORDON NSW 2072 PO Box 174 PYMBLE NSW 2073 AUSTRALIA Telephone: 61 2 9496 7300 Fax: 61 2 9496 7399 DISCLAIMER Citect Pty. Ltd. makes
Oracle is a registered trademark of Oracle Corporation and/or its affiliates. Other names may be trademarks of their respective owners.
 Primavera Portfolio Management 9.0 What s New Copyright 1999-2011, Oracle and/or its affiliates. The Programs (which include both the software and documentation) contain proprietary information; they are
Table of Contents. User Manual
 USER MANUAL 5.0 Table of Contents Introduction... 2 Features and Benefits... 2 Overview... 3 Standard User... 3 Administrator... 3 Unconnected... 3 Connect or Connected... 4 Configuration... 5 Settings...
The Examiner. Proctor System Editor User s Guide. The Examiner Proctor System Editor. Page The Examiner Corporation All rights reserved
 Page 1 The Examiner Proctor System Editor User s Guide 2009 The Examiner Corporation All rights reserved Page 2 The Examiner Proctor System Revised: 1 July 2009 Applies to: Software release 3.1.5 Introduction
AXI-INVOICER for USERS MANUAL
 AXI-INVOICER for USERS MANUAL 2009 AXION CONTROL SYSTEMS Pty Ltd Phone: +61 3 9555 3355 Web: www.axioncs.com Revision_01.00 2009 Axion Control Systems Pty Ltd Page i of iv Email: axibatch@axioncs.com 2009
 Trend Micro Incorporated reserves the right to make changes to this document and to the products described herein without notice. Before installing and using the software, please review the readme files,
User Guide. Rev Dot Origin Ltd.
 User Guide Introduction to the EasyTac File Explorer...1 Using EasyTac to read drivers' cards with a card reader...2 Using EasyTac to read VU files from a download device...3 Using EasyTac to download
Oracle User Productivity Kit Content Player
 Oracle User Productivity Kit Content Player Oracle User Productivity Kit Content Player Copyright 1998, 2012, Oracle and/or its affiliates. All rights reserved. Oracle and Java are registered trademarks
Function. Description
 Function Check In Get / Checkout Description Checking in a file uploads the file from the user s hard drive into the vault and creates a new file version with any changes to the file that have been saved.
COMOS Material Management. Operation COMOS. Process COMOS Material Management Operation. Trademarks 1. Introduction. Definitions 3
 COMOS Material Management Operation COMOS Process COMOS Material Management Operation Operating Manual Trademarks 1 Introduction 2 Definitions 3 Creating material in COMOS 4 Importing material from external
Virtual CD TS 1 Introduction... 3
 Table of Contents Table of Contents Virtual CD TS 1 Introduction... 3 Document Conventions...... 4 What Virtual CD TS Can Do for You...... 5 New Features in Version 10...... 6 Virtual CD TS Licensing......
SMEC ASSET MANAGEMENT SYSTEM PMS Version 5.5. System Administrator s Guide
 SMEC ASSET MANAGEMENT SYSTEM PMS Version 5.5 System Administrator s Guide January 2015 PREPARATION, REVIEW AND AUTHORISATION Revision # Date Prepared by Reviewed by Approved for Issue by 1 21-Jan-2015
Version NaViSet Administrator 2. Quick Start Guide English
 Version 2.0.61 NaViSet Administrator 2 Quick Start Guide English NaViSet Administrator 2 Quick Start Guide English 1 ABOUT NAVISET ADMINISTRATOR 2... 3 1.1 SYSTEM REQUIREMENTS... 4 1.1.1 Supported Display
Oracle Utilities Smart Grid Gateway Adapter for Echelon
 Oracle Utilities Smart Grid Gateway Adapter for Echelon User's Guide Release 2.0.0 Service Pack 9 E23539-04 May 2013 Oracle Utilities Smart Grid Gateway Adapter for Echelon User's Guide Release 2.0.0 Service
GUARD1 PLUS Manual Version 2.8
 GUARD1 PLUS Manual Version 2.8 2002 TimeKeeping Systems, Inc. GUARD1 PLUS and THE PIPE are registered trademarks of TimeKeeping Systems, Inc. Table of Contents GUARD1 PLUS... 1 Introduction How to get
ROCK-POND REPORTING 2.1
 ROCK-POND REPORTING 2.1 Installation and Setup Guide Revised on 09/25/2014 TABLE OF CONTENTS ROCK-POND REPORTING 2.1... 1 SUPPORT FROM ROCK-POND SOLUTIONS... 2 ROCK-POND REPORTING OVERVIEW... 2 INFRASTRUCTURE
PROMISE ARRAY MANAGEMENT ( PAM) USER MANUAL
 USER MANUAL") PROMISE ARRAY MANAGEMENT ( PAM) USER MANUAL Copyright 2002, Promise Technology, Inc. Copyright by Promise Technology, Inc. (Promise Technology). No part of this manual may be reproduced or transmitted
PROMISE ARRAY MANAGEMENT ( PAM) USER MANUAL Copyright 2002, Promise Technology, Inc. Copyright by Promise Technology, Inc. (Promise Technology). No part of this manual may be reproduced or transmitted
LiveNX Upgrade Guide from v5.1.2 to v Windows
 LIVEACTION, INC. LiveNX Upgrade Guide from v5.1.2 to v5.1.3 - Windows UPGRADE LiveAction, Inc. 3500 Copyright WEST BAYSHORE 2016 LiveAction, ROAD Inc. All rights reserved. LiveAction, LiveNX, LiveUX, the
The following instructions cover how to edit an existing report in IBM Cognos Analytics.
 IBM Cognos Analytics Edit a Report The following instructions cover how to edit an existing report in IBM Cognos Analytics. Navigate to Cognos Cognos Analytics supports all browsers with the exception
Using BlueStep Backup
 Using BlueStep Backup BlueStep Backup Your data is an invaluable resource. To protect and store critical digital documents and files, BlueStep Technologies offers the ideal technological solution - BlueStep
SWCS 4.2 Server Manager Users Guide Revision /22/2012 Solatech, Inc.
 SWCS 4.2 Server Manager Users Guide Revision 39 10/22/2012 Solatech, Inc. Contents Introduction... 5 Installation... 5 Installing on a server with the Solatech Window Covering Software... 5 Running the
AdminTools. Quick Start Guide. Software for instruments and devices. JSC "Energomera"
 AdminTools Software for instruments and devices JSC "Energomera" Quick Start Guide 2017 Table of contents 1.PRE-STARTING PROCEDURE... 3 Program installation... 3 Program run... 3 2.PROGRAM INTERFACE...
Primavera Portfolio Management 9.1 Bridge for Microsoft Office Project Server 2007 Users Guide
 Primavera Portfolio Management 9.1 Bridge for Microsoft Office Project Server 2007 Users Guide Last printed: 7/28/2011 11:37:00 PM Last saved: 7/28/2011 11:37:00 PM ii Primavera Portfolio Management Bridge
8 MANAGING SHARED FOLDERS & DATA
 MANAGING SHARED FOLDERS & DATA STORAGE.1 Introduction to Windows XP File Structure.1.1 File.1.2 Folder.1.3 Drives.2 Windows XP files and folders Sharing.2.1 Simple File Sharing.2.2 Levels of access to
CONTENTS. p r e m i u m e d i t i o n 2008
 Install Guide CONTENTS Basics... 1 Server Install... 3 Workstation Install... 9 Workstation Offline Components Install... 11 Appendix: Installing Runtime SQL Server 2005...14 p r e m i u m e d i t i o
Arcserve Backup for Windows
 Arcserve Backup for Windows Agent for Sybase Guide r17.0 This Documentation, which includes embedded help systems and electronically distributed materials, (hereinafter referred to as the Documentation
Windows user guide for version 3.3
 1 Windows user guide for version 3.3 2 Contents 1. Installation...4 1.1. How to install BABEL on your Windows desktop...4 2. Getting started...5 2.1. First run...5 2.2. Password setup...5 2.3. Key import...5
FCWnx 7.7 Upgrade Manual
 FCWnx 7.7 Upgrade Manual P/N 460645003A 09AUG11 Copyright Disclaimer Trademarks and patents Intended use FCC compliance Certification and compliance 2011 UTC Fire & Security. All rights reserved. This
COMOS. Lifecycle 3D Integration Operation. COMOS PDMS Integration 1. Material management 2. COMOS 3D viewing 3. References 4.
 1 Material management 2 COMOS Lifecycle COMOS 3D viewing 3 References 4 Operating Manual 03/2017 V 10.2.1 A5E37098336-AB Legal information Warning notice system This manual contains notices you have to
What s New in Cognos. Cognos Analytics Participant s Guide
 What s New in Cognos Cognos Analytics Participant s Guide Welcome to What s New in Cognos! Illinois State University has undergone a version upgrade of IBM Cognos to Cognos Analytics. All functionality
Quick Start Guide AUTODOC HSE
 AUTODOC HSE Quick Start Guide Table of Contents Step 1: What do you want to do?... 4 AutoDoc HSE s core functions... 5 Choose your outcome... 5 What next?... 6 Step 2: Installing AutoDoc HSE... 7 Before
Administrator s Guide
 Administrator s Guide 1995 2011 Open Systems Holdings Corp. All rights reserved. No part of this manual may be reproduced by any means without the written permission of Open Systems, Inc. OPEN SYSTEMS
Preface 1. Main Management System 2. Contact Information 3 SIPLUS CMS. SIPLUS CMS4000 X-Tools - User Manual Main Management System.
 4000 X-Tools - User Manual - 03 - Main Management System Preface 1 Main Management System 2 Contact Information 3 4000 X-Tools User Manual - 03 - Main Management System Release 2011-09 Release 2011-09
Manual. Software Protection. TwinCAT 3. Version: Date:
 Manual Software Protection TwinCAT 3 Version: Date: 1.7 2018-10-25 Table of contents Table of contents 1 Foreword... 5 1.1 Notes on the documentation... 5 1.2 Safety instructions... 6 2 Introduction...
APDM. Accounts Payable InstaDocs
 DSD Business Systems Sage 100 Enhancements APDM Accounts Payable InstaDocs Version 6.00 2 A/P InstaDocs Information in this document is subject to change without notice. Copyright 1993-2018, DSD Business
LEAD Documentation. User Manual Aimereon Aimereon, Inc.
 LEAD Documentation User Manual 2018 Aimereon Aimereon, Inc. This page is intentionally left blank. Table of Contents 3 1. Welcome 7 1.1 Request an Account... 8 1.2 Manage Your Account... 11 2. Dashboard
Version Operator Orientation. TIMMS Client. A guide to using the TIMMS System. Training & Navigation Notes
 Version 7.2.4 Operator Orientation TIMMS Client A guide to using the TIMMS System Training & Navigation Notes Disprax Pty Ltd 2015 WHAT IS TIMMS? TIMMS Stands for: Total Industry Management and Marketing
Creating an ArborCAD filter from Excel.
 ArborCAD Help File Windows systems only Creating an ArborCAD filter from Excel. This help file assumes you have your tree survey data in an Excel sheet. The ArborCAD filter is a special file which holds
Lasso Continuous Data Protection Lasso CDP Client Guide August 2005, Version Lasso CDP Client Guide Page 1 of All Rights Reserved.
 Lasso CDP Client Guide August 2005, Version 1.6.8 Lasso CDP Client Guide Page 1 of 32 Copyright Copyright 2005 Lasso Logic, LLC. All Rights Reserved. No part of this publication may be reproduced, stored
USER GUIDE Time and Attendance User Administration Human Capital Management Suite
 USER GUIDE Time and Attendance User Administration Human Capital Management Suite Ormed Information Systems Ltd. Version 1.2 (January 2015) What s Inside What s Inside...1 Introduction...2 Procedures...3
Getting Started With the Cisco PAM Desktop Software
 CHAPTER 3 Getting Started With the Cisco PAM Desktop Software This chapter describes how to install the Cisco PAM desktop client software, log on to Cisco PAM, and begin configuring access control features
ACTIVANT STANPAK. PDA Updater for Palm OS. Version 6.0
 ACTIVANT STANPAK PDA Updater for Palm OS Version 6.0 This manual contains reference information about software products from Activant Solutions Inc. The software described in this manual and the manual
Oracle Utilities Smart Grid Gateway Adapter Development Kit
 Oracle Utilities Smart Grid Gateway Adapter Development Kit User's Guide Release 2.1.0 Service Pack 2 E41628-02 April 2014 Oracle Utilities Smart Grid Gateway Adapter Development Kit User's Guide Release
Windows 2000 / XP / Vista User Guide
 Windows 2000 / XP / Vista User Guide Version 5.5.1.0 September 2008 Backup Island v5.5 Copyright Notice The use and copying of this product is subject to a license agreement. Any other use is prohibited.
ControlLogix OPC Driver Agent Help OPC Server Driver Agent for ControlLogix Controllers
 ControlLogix OPC Driver Agent Help OPC Server Driver Agent for ControlLogix Controllers Version 9 CONTROLLOGIX OPC DRIVER AGENT HELP For ControlLogix Programmable Controllers Version 9 Copyright 1994-2017,
DISCLAIMER Whilst every effort has been made
 PUBLISHED BY Gallagher Group Limited Kahikatea Drive, Private Bag 3026 Hamilton, New Zealand www.gallagherams.com Copyright Gallagher Group Limited 2011. All rights reserved. Patents Pending. MyScale Pro
Unicon TM CL Series Software REFERENCE MANUAL
 Unicon TM CL Series Software REFERENCE MANUAL Trademarks The following items are trademarks or registered trademarks of Kaba Mas in the United States and/or other countries. Unicon Windows, Windows 2000,
Using Attributes. Engineering Design Technology Sacramento City College. Using Attributes 1
 Engineering Design Technology Sacramento City College 1 Objectives Assign attributes to blocks. Edit attributes defined for existing blocks. Create a template file for the storage of block attribute data.
Announcing IQLink v3.9.6
 IQLink ATC Controller Configuration Utility Announcing IQLink v3.9.6 Quixote Traffic is pleased to announce the release of Version 3.9.6 of the IQLink Utility Software. IQLink is used to configure Quixote
Data Import Guide DBA Software Inc.
 Contents 3 Table of Contents 1 Introduction 4 2 Data Import Instructions 5 3 Data Import - Customers 10 4 Data Import - Customer Contacts 16 5 Data Import - Delivery Addresses 19 6 Data Import - Suppliers
Welcome to FertiCom JEPOL Help
 Welcome to FertiCom JEPOL Help We have tried to provide you with a complete overview of the FertiCom program. If you cannot find the answer to your question here, just click on the Customer Service link
 Multiuser Engineering in the TIA Portal TIA Portal V15 https://support.industry.siemens.com/cs/ww/en/view/109740141 Siemens Industry Online Support Warranty and Liability Warranty and Liability The Application
Cobra Navigation Release 2011
 Cobra Navigation Release 2011 Cobra Navigation - Rev.0.2 Date: November 27 2012 jmaas@flowserve.com Page 1 of 34 Contents Contents 1 Revision History... 5 2 Introduction.... 6 3 Cobra Login... 7 3.1 Initial
Ishida Label Editor USER GUIDE
 Ishida Label Editor USER GUIDE ISHIDA CO., LTD Copyright 2000 Ishida Co. Ltd., Japan Copyright 2000 Interface Translation Ltd., New Zealand No part of this manual may be reproduced or transmitted in any
DANGER indicates that death or severe personal injury will result if proper precautions are not taken.
 Preface Overview 1 SIMATIC Process Control System PCS 7 Advanced Process Functions Operator Manual Operating Manual Material management 2 Material lot management 3 Storage location management 4 Parameter
LiNC-NXG for Windows 8 Professional, Windows 7 Professional, Vista Business Edition and XP Professional
 LiNC-NXG for Windows 8 Professional, Windows 7 Professional, Vista Business Edition and XP Professional Installation Guide for LiNC-NXG 33-10067-001 REV: C PCSC 3541 Challenger Street Torrance, CA 90503
Siemens Controls. SAP interface COMOS. Platform SAP interface. Trademarks 1. Introduction. Technical prerequisites 3
 Trademarks 1 Introduction 2 COMOS Platform Operating Manual Technical prerequisites 3 Basic concepts of the COMOS SAP Interface 4 General settings 5 XML scheme for the data exchange 6 SAP Maintenance module
CITO2 Installation & User Instructions
 CITO2 Installation & User Instructions DD 56107 Stoneridge Electronics Ltd 1. Installation...4 1.1. System Requirements...4 1.2. Installing CITO2...4 1.3. Uninstalling CITO2...4 2. Starting and closing
Unicon TM CL Series Software REFERENCE MANUAL
 Unicon TM CL Series Software REFERENCE MANUAL Trademarks The following items are trademarks or registered trademarks of Kaba Mas in the United States and/or other countries. Unicon Windows, Windows 2000,
40. Sim Module - Common Tools
 HSC Sim Common Tools 15021-ORC-J 1 (33) 40. Sim Module - Common Tools Table of Contents 40.1. Drawing flowsheets and adding tables to flowsheets... 2 40.1.1. Drawing units... 2 40.1.2. Drawing streams...
Document # Rev. C 4/10 Cencon 4 Getting Started Guide
 Page 1 KABA MAS Cencon 4 Getting Started Guide Kaba Mas Welcome Kaba Mas, part of the world-wide Kaba group, is the world's leading manufacturer and supplier of high security, electronic safe locks. Its
Style Report Enterprise Edition
 INTRODUCTION Style Report Enterprise Edition Welcome to Style Report Enterprise Edition! Style Report is a report design and interactive analysis package that allows you to explore, analyze, monitor, report,
Audit Trail for The Raiser s Edge
 ATP 2.10.6 Audit Trail for The Raiser s Edge development@zeidman.info www.zeidman.info UK: 020 3637 0080 US: (646) 570 1131 Contents Overview... 3 Versions... 3 Audit Trail Free... 3 Audit Trail Basic...
Restoring Exchange Server 2003 with Arcserve Version 1.01
 Restoring Exchange Server 2003 with Arcserve Version 1.01 Need to Know TM Exchange server holds all the email messages for network users. Arcserve software can backup the Exchange data for recovery. There
Table of Contents. A. Introduction...2. B. General Description...2. C. Features...3. D. Before Using the Security Application Program LOCK...
 v1.00 Table of Contents A. Introduction...2 B. General Description...2 C. Features...3 D. Before Using the Security Application Program LOCK...4 E. Introduction to the Security Application Program LOCK...5
Victaulic Tools for Revit
 Victaulic Tools for Revit User Manual Revit 2016, 2017, 2018 Table of Contents Introduction Section 01 Licensing Page 3 Section 02 Pipe Tools (Pipe / Duct Splitting) Page 4 Section 03 Pipe Tools (Pipe
Print Audit 6. Print Audit 6 Documentation Apr :07. Version: Date:
 Print Audit 6 Version: Date: 37 21-Apr-2015 23:07 Table of Contents Browse Documents:..................................................... 3 Database Documentation.................................................
MCLAN 2 UGB V1.0.5.UK.05. Software version : MCTC software : 1.14 or higher Manual revision : 0.5 Date : September 2014.
 MCLAN 2 UGB029-1014 V1.0.5.UK.05 Software version : 1.0.5 MCTC software : 1.14 or higher Manual revision : 0.5 Date : September 2014 Corporate Office 724.584.5500 l Instant Access 24/7 (Parts and Service):
Beijer Electronics Data Collector. Manual. English MAEN826B,
 MAEN826B, 2009-10 Beijer Electronics Data Collector Manual English Foreword Beijer Electronics Data Collector Manual Foreword Beijer Electronics Data Collector is used to save trend and alarm data logged
Boomerang System Administrator Manual
 Boomerang System Administrator Manual SG001-0003-01-B2.doc Page 1 of 43 Table of Contents INTRODUCTION...4 BOOMERANG CLIENT...5 FILE...6 3.1. Logout...... 6 3.2. Exit... 6 VIEW...7 4.1. Sensors events
for Q-CHECKER Text version 15-Feb-16 4:49 PM
 Q-MONITOR 5.4.X FOR V5 for Q-CHECKER USERS GUIDE Text version 15-Feb-16 4:49 PM Orientation Symbols used in the manual For better orientation in the manual the following symbols are used: Warning symbol
COMOS Material Management. Operation COMOS. Process COMOS Material Management Operation. Trademarks. Introduction. Definitions
 COMOS Material Management Operation COMOS Process COMOS Material Management Operation Operating Manual Trademarks 1 Introduction 2 Definitions 3 Creating material in COMOS 4 Importing material from external
Ethernet MBX Driver Help Ethernet MBX Driver for Modbus TCP Networks
 Ethernet MBX Driver Help Ethernet MBX Driver for Modbus TCP Networks Version 9 ETHERNET MBX DRIVER HELP Ethernet MBX Driver for Modbus TCP Networks Version 9 Copyright 1994-2017, Cyberlogic Technologies
The Connector. Version 1.2 Microsoft Project to Atlassian JIRA Connectivity. User Manual
 The Connector Version 1.2 Microsoft Project to Atlassian JIRA Connectivity User Manual Ecliptic Technologies, Inc. Copyright 2008 www.the-connector.com Page 1 of 86 Copyright and Disclaimer All rights
Password Changer User Guide
 Active@ Password Changer User Guide Copyright 1999-2017, LSOFT TECHNOLOGIES INC. All rights reserved. No part of this documentation may be reproduced in any form or by any means or used to make any derivative
Welcome In this chapter
 1 Welcome In this chapter Welcome to ProWORX NxT 2.10 2 Installing ProWORX NxT 3 Starting ProWORX NxT 5 Authorizing ProWORX NxT 8 Customer support 11 ProWORX NxT User s Guide Welcome to ProWORX NxT 2.10