F454. User manual.
|
|
|
- Paul Martin
- 5 years ago
- Views:
Transcription


1
2
3 Contents Quick guide 4 How I connect to the Web Server 4 Change the user image 6 Change the background of the My favourites page 9 Change the mail to which the notifications arrive Change the access password 5 Change the OPEN password 8 Recover the password of your profile Switch on a light and adjust a dimmer Move the rolling shutter up/down 5 Display the message in the answering machine 7 General information 9 Functionalities 9 Connection mode 9 Local connection 9 Remote connection 9 Differences between user and administrator 0 Identification page 0 Home page Favourites 6 Systems 6 Rooms 7 Settings 7 Controls your MyHOME system 8 Lighting 8 Automation 40 Temperature control 4 Video door entry system 5 Burglar-alarm 56 Energy Management 58 Scenarios 67 Settings 68 Systems 69 OPEN Authentication 69 IP ranges 70 Video Streaming 70 Diagnostic 7 Users 7 Account 7 7 Notifications 74 Profile and Background 75 Account safety 75 Date and time 76 Language 76 Answering machine 77 Energy 78 Tariffs 78 Consumption goals 78
4 Quick guide How I connect to the Web Server Quick guide. Enter the Web Server IP address in the browser address bar (default for the local connection), or the address of your ADSL line (remote connection).. Press to access the identification page. The error in the security certificate (certificate issued for a different web site) is due to the fact that the address varies because the user can customise it. It is therefore impossible to obtain a valid certification for all the IP addresses Select your user profile. In this manual the functions reserved for the administrator colour and accompanied by the icon. will be shown in a different 4. Enter the password (ask the administrator for the access passwords, if they have not been supplied). 5. Press to make the login. 6. Press, if you are administrator. 4
5 7 7. Now enter the administrator password. Quick guide It is now possible to control the various devices (lights, shutters, cameras, etc.) thanks to a Web interface made up of customised pages (by means of a Software). 5
6 Change the user image. Select the user for which you want to change the image.. Enter the password (ask the administrator the access passwords, if he has not supplied them).. Press to make the login. Quick guide 4 4. Press Settings. 6

7 Select Users. 6. Select Profile and Background. 7 Quick guide 7. Press to select the image you desire as user from your device Identify the image you prefer and select it (suggested 9 x 5 pixel 7 dpi). 7

8 Press OK to confirm the selection of the image. 0. Press My favourites to display the new user image. Quick guide. Press to exit. 8
9 Change the background of the My favourites page. Select the user for which you want to change the My favourites background image.. Enter the password (ask the administrator the access passwords, if he has not supplied them).. Press to make the login. 4 Quick guide 4. Press Settings. 9

10 Select Users. 6. Select Profile and Background. Quick guide 7 7. Press to select the image you desire as background from your device Identify the image you prefer and select it (suggested 500 x 000 pixel 7 dpi). 0
11 Press OK to confirm the selection of the image. 0. Press My favourites to display the background image entered. Quick guide
12 Change the mail to which the notifications arrive. Select your user profile.. Enter the password (ask the administrator the access passwords, if he has not supplied them).. Press to make the login. Quick guide 4 4. Press Settings.
13 Select Users. 6. Select Notifications. 7 Quick guide 8 7. Enter the mail address where you want the notifications arrive. 8. Press OK to confirm Press to save the settings you have changed.
14 0 0. Press to activate the notifications. After few seconds the device switch off and restart in minutes. After pressing OK a loading message appears. When the device is available again, the identification page appears where you can identify yourself again. Quick guide 4
15 Change the access password. Select your user profile.. Enter the password (ask the administrator the access passwords, if he has not supplied them).. Press to make the login. 4 Quick guide 4. Press Settings. 5
16 Select Users. 6. Select Account. 7 Quick guide Enter the new access password. a visual identifier will show you the password security level by means of the number of small squares (from to ) and the colours red (low security), yellow (medium security) and green (high security). 8. Repeat the new access password. 9. Press OK to confirm. 0 0 Press to save the settings you have changed. 6

17 . Press to activate the notifications. After few seconds the device switch off and restart in minutes. After pressing OK a loading message appears. When the device is available again, the identification page appears where you can identify yourself again. Quick guide 7

18 Change the OPEN password. Press to access as administrator. Quick guide. Enter the password.. Press to make the login.. Press Settings. 8
 and the colours red (low security), yellow (medium security) and green (high security).")
19 Select System. 5. Select Open Authentication Quick guide 6. Enter the new OPEN password. a visual identifier will show you the password security level by means of the number of small squares (from to ) and the colours red (low security), yellow (medium security) and green (high security). 7. Repeat the new OPEN password. 8. Press OK to confirm. Press to enable HMAC authentication; if enabled the icon is displayed. This setting guarantees a high security. When connecting with MyHOME_Web portal with dynamic IP mode, only the authentication with OPEN password can be used. 9

20 9 9 Press to save the settings you have changed. Quick guide 0 0. Press to activate the notifications. After few seconds the device switch off and restart in minutes. After pressing OK a loading message appears. When the device is available again, the identification page appears where you can identify yourself again. 0
21 Recover the password of your profile. Select your user profile / administrator profile.. Press to reset the password if you have forgotten it. Quick guide 4. Enter your address where you will receive an containing the authentication code to recover the password. 4. Press to send. The address where the authentication code will be sent must be that configured in the user profile.

22 In your box, open the message containing the code which the system has sent. 5 Quick guide Enter the authentication code received via mail. 6. Enter the text which appears, to show that you are not a robot. 7. Press to continue. Now create a new password.
23 Switch on a light and adjust a dimmer. Select your user profile.. Enter the password (ask the administrator the access passwords, if he has not supplied them).. Press to make the login. 4 Quick guide 5 4. Press Systems. 5. Press Lighting.

24 Press to select the light/dimmer on which to react. 7. Switch the light/dimmer on and off with the and icons. 8. Press and to adjust the intensity of the dimmer. Quick guide 4
.")
25 Move the rolling shutter up/down. Select your user profile.. Enter the password (ask the administrator the access passwords, if he has not supplied them).. Press to make the login. 4 Quick guide 5 4. Press Systems. 5. Press Automation. 5

26 Press to select the rolling shutter on which to react. 7. Raise/lower the rolling shutter with the and icons. Quick guide 6
27 Display the message in the answering machine. Select your user profile.. Enter the password (ask the administrator the access passwords, if he has not supplied them).. Press to make the login. 4 4 Quick guide 5 4. Press Systems or when there is a new answering system message a visual indication ( ), appears. In this case press it to go directly to point Press Video door entry. 7

28 Press Answering machine. 7. Press to display the message not read message; read message. Quick guide Press to play the message audio and the sequence of images. 9. Press to scroll the image sequence. 0. Press to delete the message.. Press to download the sequence images and the audio recorded in.wav format in a single file. You can set some answering system parameters (welcome message, image sequence number etc...) in the Settings/Answering system section administrator only). 8
29 SCS AI ETHERNET SCS AV F454 General information Functionalities The Web Server F454 lets you connect to your home-automation system simply using a Tablet or a PC and a local (data network) or remote connection (internet network). In this way is now possible to control the various devices (lights, shutters, cameras, etc.) thanks to a Web interface made up of customised pages (by means of a Software). Video control Burglar alarm Lighting F454 Temperature control Energy Management Video door entry system Use the Scenarios, Lighting and Automation scenarios to control the lights and rolling shutters of your home or office and make scenarios saved in a scenario module. Use the Burglar-alarm, application to manage the control unit and the zones of your burglaralarm system and display the events detected. You can also, interacting with the Video door entry application connected to the cameras and entrance panels of your video door entry system, receive images (you can alter the quality, zoom and framing) and display and/or receive the messages (audio and images) recorded by the associated entrance panel (answering system) via . Use the Temperature control, application to control the temperature of your home and, thanks to the Energy Management, application, supervise the loads (washing machine, cooker etc.) and display your home s consumptions. Connection mode Automations Local connection If the tablet or PC are already connected in network the connection is made by entering the Web Server IP address (default ) in the browser navigation bar. At this point you can access the identification page and enter Login and the user or administrator Password. Remote connection The connection is made from a tablet or PC already connected to the Internet, by entering the IP address of your ADSL line in the browser navigation bar (check that the Modem Router is correctly configured). At this point you can access the identification page and enter Login and the user or administrator Password. 9
30 Differences between user and administrator You can access the start page in two different ways, as user or as administrator. In the administrator mode, as well as the user functions you can: Reorder the objects in the rooms, dragging them by means of drag and drop. Set the account, the notifications and the background images of the preferred profile and page, for all the users. Set the address to use to send notifications to the users. Make system settings. Set the Language. Configure the answering system. Set the parameters for the energy management system. In this manual the functions reserved for the administrator colour and accompanied by the icon. will be shown in a different Identification page You must connect to the web server to access the identification page and display the start page.. Enter the Web Server address.. Press to access the identification page. The error in the security certificate (certificate issued for a different web site) is due to the fact that the address varies because the user can customise it. It is therefore impossible to obtain a valid certification for all the IP addresses. The browser loads the identification page. Minimum browser requirements for correct display of the Web pages: Mozilla Firefox ver. 8, Google Chrome ver. 4, Safari ver. 8 or Android Browser ver. 4 are required. 0
, the first identification. Press if you want to identify yourself as administrator or as user.. 4. Press to scroll between the users and select the user required. 5.")
31 User Icon Administrator Icon The user page is the default identification page. If the configuration contains just one user (i.e. the administrator page will be the administrator page directly. ), the first identification. Press if you want to identify yourself as administrator or as user.. 4. Press to scroll between the users and select the user required. 5. Enter the password (ask the administrator the access passwords, if he has not supplied them). 6. Press to make the login. 7. Press to reset the password if you have forgotten it. Recover your password. Insert your address, you will receive an authentication code.. Press to send. The address where the authentication code will be sent must be that configured in the user profile.


32 4 5. Enter the authentication code received via mail. 4. Enter the text which appears, to show that you are not a robot. 5. Press to continue. Now create a new password.
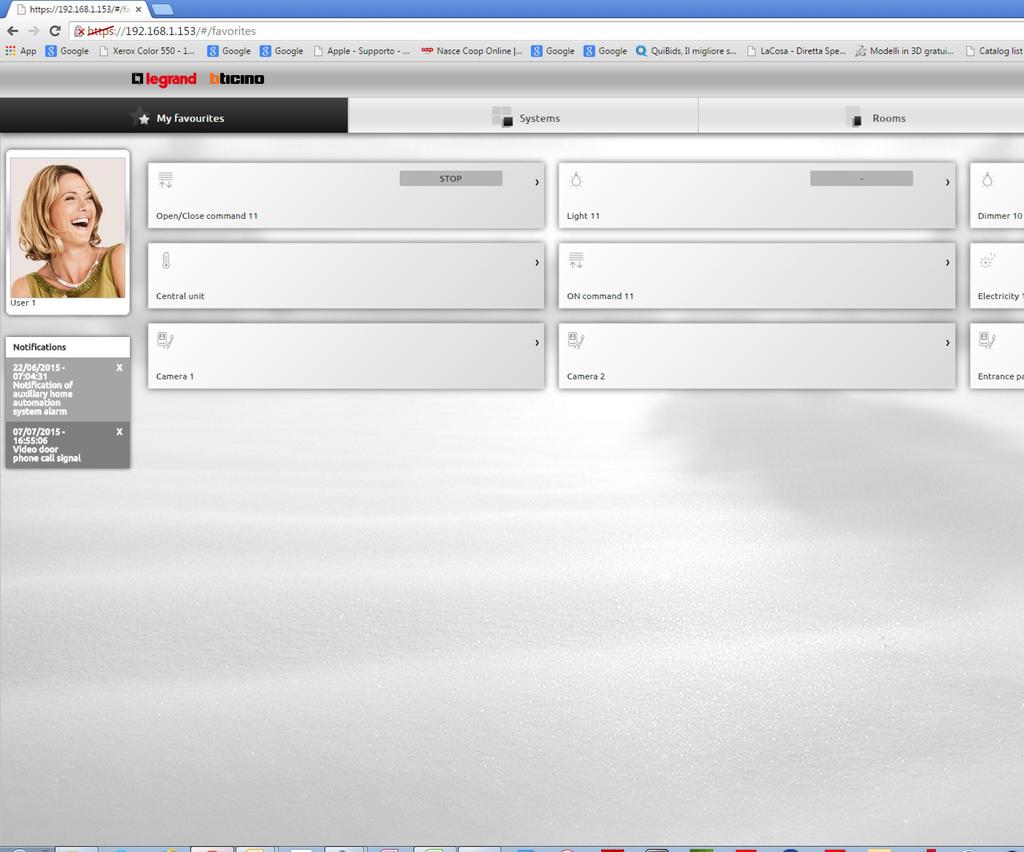
33 Home page After you have identified yourself the start page appears, divided into 4 sections, where you will find all the tools to manage your house-automation system. On the basis of how your installer has configured the design you will find the most commonly used objects in the My favourites, section, divided by the system to which they belong in the Systems section and inside the room where they are installed in the Rooms section. You can also customise some functions (depending on how you have identified yourself) in the Settings section User card.. Favourites.. Systems. 4. Rooms. 5. Notification bar. 6. Quit the start page. 7. Settings. 8. Object area. 9. notifications. Notification bar In this zone you can identify various types of notification which will keep you up to date about the state of your system: Icon Burglar-alarm alarm notification Burglar-alarm control unit status Answering system message notification Notification UPnP IGD configuration enabled (administrator only) Meaning Indicates that there has been an alarm on the system. Press to display the list of alarms notified by the burglar-alarm system. Indicates that the burglar-alarm system is ON/OFF. Press to access the management of the burglaralarm system. Indicates that there are one or more messages in the video door entry answering system. Press to access the video door entry answering system. Indicates that the Web Server port autoconfiguration function, for remote connection of the pages, is active. Press to display the status of the configuration of the individual ports.

.")
34 UPnP IGD If your installer has enabled the UPnP IGD function for the automatic configuration of the router ports for remote access to the web pages via software, on first access a alerting message appears:. Press to continue. From this moment the automatic configuration function of the router ports for remote access to the web pages is active. A specific alert signals that the configuration of at least one router port has been successful administrator only). You can also display the status of the configurations of the individual ports from the Settings > Systems > UPnP IGD status (menu administrator only). A green dot signals the correct port configuration. A red dot signals that the configuration has not been successful. A specific alert signals the correct configuration of at least one router port. Contact your trusted installer to increase the security and disable the function. 4

35 notifications If configured in the Settings section you can display the notifications sent via following some events which have happened on the system.. Press the notification received.. Displays the sent by the system. Press to delete the notification. 5
36 Favourites In this section you can control your system by means of the most commonly used objects previously set via software from your installer. Using drag and drop you can reorder the objects as you wish. Systems In this section you can control your system by means of the objects grouped in the systems to which they belong. 4. Press to open the system section.. Press to scroll between the systems and select the system required.. Press the desired system. 4. Press the objects to control your MyHOME system. 6

, you can configure different parameters.")
37 Rooms In this section you can control your system by means of the objects positioned by your installer via software, in the representation of the rooms of your home. The administrator can reorder them in the page as he pleases. 4. Press to open the room section.. Press to scroll between the rooms and select the one wanted.. Press the desired room. 4. Press the objects to control your MyHOME system. Settings You can configure some of your web server parameters in this section. On the basis of the data entered in the identification page and thus on the type of access (user or administrator ), you can configure different parameters.. Press to open the setting section.. Press to edit the parameters. 7

.")

38 Controls your MyHOME system Lighting To switch a single light or a group of lights ON and OFF and adjust their intensity and manage timed switchings on. Press Systems in the home page and then press Lighting. SINGLE LIGHT/LIGHT TIMED AT PREFIXED TIMES This command switches a single light ON and OFF and lets you set the switching-on time. Switch the light ON and OFF with the and icons. Press and to set a switching-on time (,,, 4, 5, 5 min/0.5, 0 sec). GROUP This command can switch a set of lights and dimmers ON and OFF at the same time. Switch the lights ON and OFF at the same time with the and icons CUSTOMISABLE TIMED LIGHT This command switches a light ON for the time set. Switch the light ON and OFF with the and icons. Press to enable the switching-on on time; if it is enabled the icon is displayed. Set the hour, minutes and seconds with the and icons. STAIRCASE LIGHT This command activates the video door entry Staircase light function. Press to activate the function. 8

39 0 LEVEL DIMMER/00 LEVEL DIMMER This command switches a light ON and OFF and adjusts it with a light intensity dimmer. If the installed dimmer is a 0-level type you will have an adjustment up to a maximum of 0 levels, if the installed dimmer is a 00-level type the adjustment will be on 00 levels. Switch the dimmer ON and OFF with the and icons. Press and to adjust the dimmer intensity. Press and to set a switching-on time (,,, 4, 5, 5 min/0.5, 0 sec). 9


40 Automation You can manage all the control units of your MyHOME system, such as rolling shutters, blinds, motorised curtains, controlled sockets, irrigation system etc. in a simple way. Press Systems in the home page and then press the Automation card. OPEN/CLOSE AND UP/DOWN COMMAND These controls let you open and close the curtains, rolling shutters etc. by just pressing the icon. Depending on the installer programming, the system may function in two different ways: secure mode: the opening and closing movement takes place as long as the corresponding icon ( / or / ). The icon changes status presenting the indication of the movement ( / or / ). The system stops automatically when the icon is released. normal mode: the opening or closing movement takes place on pressing the corresponding icon ( / or / ) once. During the movement the icon changes status presenting the icon; to stop the movement press the icon. Examples in secure mode. While the icon is pressed the control unit opens, and on releasing it it closes.. While the icon is pressed the control unit opens, and on releasing it it closes. Examples in normal mode. Press the icon to start opening the control unit. To close it press the icon Press the icon to start opening the control unit. To close it press the icon. 40


.")
41 ON COMMAND This command works like a pushbutton; the door lock is activated while the icon is pressed and is deactivated on releasing it. If this controls a video door entry system door lock, the activation time is fixed by the door lock configuration. Press to activate an electric door lock. ON/OFF COMMAND This command lets you switch a control unit ON and OFF (e.g. fan, irrigation etc.). Press to access the control unit, (the icon changes status ). To switch off press (the icon changes status ). CONTACT This command gives a synchorised view of the status of a contact connected to the system. The active icon indicates the contact status: = contact open display. = contact closed display. 4


42 ADVANCED OPEN/CLOSE AND UP/DOWN COMMAND Some automation commands have an advanced mode that, in addition to the normal functions, gives the possibility of displaying the opening level and of defining it using percentage values. To check if an advanced type actuator is installed contact your installer Open/rise the shutter/rolling shutter in basic mode.. Close/lower the shutter/rolling shutter in basic mode.. Define the percentage value (in 0% steps) of the opening of the shutter/rolling shutter. 4. Display the percentage value of the opening of the shutter/rolling shutter. 5. Confirm the setting. Example of advanced command. Press to move the rolling shutter to a 0% open position.. Display the percentage.. Confirm; the shutter will move to the desired position. GROUP This command lets you activate several control units at the same time. For example just pressing once you can switch all the home fans ON/OFF or raise/lower all the rolling shutters. You can also create advanced groups of control units. The movement activates on pressing, to lock it you must press. 4


43 Temperature control You can control and adjust your heating and air conditioning system, altering the temperature zone by zone, as you require at the time. Press Systems in the home page and then press Temperature control. It displays the list of Systems, of the uncontrolled zones (if there are any), the external sensors (if there are any) and the air-conditioning system (if there is one). Warning: The temperature control can only be managed if the Remote control function has been activated on the control unit. TEMPERATURE CONTROL CENTRAL UNIT. Press to display your temperature-control system.. Press to display the control unit status.. Press to select the control unit mode of operation. With this operation set the system mode of operation: Summer = Cooling; Winter = Heating Press to select the control unit mode of operation. You can select the operation of your system. For example you can select one of the weekly programs or set a fixed temperature for all the zones. 4
 the system in Frost protection or Heat protection until the date and time set.")
44 OFF mode This mode lets you switch off the zones of your system. Holiday mode This mode lets you keep (in the case of long absences, such as holidays) the system in Frost protection or Heat protection until the date and time set. At the end the weekly program chosen will be set. Weekday mode This mode allows you to control the amplifiers and the sources of the Sound System. The program is run until the date and time set after which the weekly program chosen will be reset. 44

45 Manual mode This mode lets you set a constant temperature in all the zones of your system. Weekly mode This mode lets you run your system automatically following the programming set on the control unit; depending on your needs the programs set in the control unit can differentiate the temperatures over 4 hours and for every day of the week. Antifreeze or Thermal protection mode You can decide to place one or more zones or the whole system in Frost protection mode (or heat protection for the Summer). In Frost protection a minimum temperature of 7 is maintained (default temperature). In Heat protection a maximum temperature of 5 is maintained (default temperature). Caution: the temperature values can be set differently in the temperature control unit (e.g. 0 for Frost protection and 0 for Heat protection). 45
 This mode lets you run the manual mode on all the zones for a set time.")
46 Scenario mode This mode lets you select a scenario from the 6 summer or 6 winter scenarios; your system will work automatically following the scenario set. Timed mode (4-zone control unit) This mode lets you run the manual mode on all the zones for a set time. 46
.. Press to display the zone details.. Press to select the zone mode of operation.")
 and the speed of the fan-coil fan.. Press to display the zone details.")
47 ZONE (99-ZONE CENTRAL UNIT) The zone can display the zone name, the temperature measured, the mode of operation and the sensor status (-, -, -, 0, +, +, +).. Press to display the zone details.. Press to select the zone mode of operation. ZONES WITH FAN-COIL FUNCTION (99-ZONE CENTRAL UNIT) The zone can display the zone name, the temperature measured, the mode of operation, the sensor status (-, -, -, 0, +, +, +) and the speed of the fan-coil fan.. Press to display the zone details.. Press to set the speed of the fan-coil fan. 47
 or OFF the Web Server cannot make any adjustment. Act directly on the sensor knob to change the setting.")
 The zone can display the zone name, the temperature measured, the mode of operation, the sensor status (-, -, -, 0, +, +, +) and the")
48 THE THERMAL SENSOR The sensor local offset is the adjustment of the knob on the sensor in each zone of your temperature control system. If the sensor is in (frost/heat protection) or OFF the Web Server cannot make any adjustment. Act directly on the sensor knob to change the setting. ZONE (4-ZONE CENTRAL UNIT) The zone can display the zone name, the temperature measured and the sensor status (-, -, -, 0, +, +, +).. Press to display the measured temperature. ZONES WITH FAN-COIL FUNCTION (4-ZONE CENTRAL UNIT) The zone can display the zone name, the temperature measured, the mode of operation, the sensor status (-, -, -, 0, +, +, +) and the speed of the fan-coil fan.. Press to display the zone details.. Press to set the speed of the fan-coil fan. 48
 If the system has sensors which only measure the temperature (uncontrolled zones) you can display the temperature they measure.")

49 EXTERNAL PROBES If the system has external radio sensors you can display the temperature they measure. UNCONTROLLED ZONES (4 AND 99 ZONES) If the system has sensors which only measure the temperature (uncontrolled zones) you can display the temperature they measure. BASIC AIR CONDITIONING The basic-mode air conditioning lets you manage the splitters in your system via the commands already entered by software. If a temperature sensor is associated to the splitter the Web Server can display the temperature measured in the room. 4. Press to display your air-conditioning system.. Press the splitter you want to control.. Press to select the program. 4. Select the program to run on the splitter. 49

50 ADVANCED AIR CONDITIONING With the advanced mode you can manage the splitter as if it were directly from your remote control. 4. Press to display your air-conditioning system.. Press the splitter you want to control.. Press to select the splitter mode. 4. Select the mode to run on the splitter. OFF mode This mode lets you switch the splitter OFF. 50


51 Heating mode. Press to select the temperature in the range set via software.. Press to select the speed from those set in the software.. Press to select the swing activation/deactivation. Cooling Mode Fan Mode 5


52 Dry Mode Auto Mode Warning: The control functions depend on the type of splitter installed on the system and the configuration made via software. Group of commands This mode lets you control several AC units with just one action.. Press to display your air-conditioning system.. Press the group of commands to perform.. Press to perform the commands. 5


53 Video door entry system You can manage the CCTV and video door entry answering system functions in this section. Press Systems in the home page and then press Video door entry. Video control This lets you display the images from the entrance panels and cameras in the system. For the entrance panels you can also control the opening of the door lock and/or switching on the staircase lights.. Press Video control.. Press Entrance panel or Camera Press to edit the video brightness, contrast and colour settings or zoom the image. 4. Press to move the camera framing (check with your trusted installer if the system is compatible with the function). 5. Press to open the entrance panel door lock or switch the staircase lights ON. 6. Press to go to the next camera. 5

54 If the audio/video channel is occupied by another user, a black screen appears with the writing Service not available and the command is not performed. Wait for the channel to become free and try again. In the case of a call from the entrance panel, the connection will be broken. The CCTV function is not available if the video door entry answering system is recording a message. Service not available 54


55 Answering machine This lets you display images and voice messages from the entrance panel, saved by the Web Server. Check with your trusted installer if the system is compatible with the function.. Press Answering machine.. Press to activate or deactivate the answering system answering system deactivated; answering system activated.. Press to display the message not read message; read message Press to play the message audio and the sequence of images. 5. Press to scroll the image sequence. 6. Press to delete the message. 7. Press to download the sequence images and the audio recorded in.wav format in a single file. You can set some answering system parameters (welcome message, image sequence number etc...) in the Settings/Answering system section administrator only). 55


56 Burglar-alarm You can control and manage the burglar-alarm system status. Press Systems in the home page and then press Burglar alarm. 4. Switch the burglar-alarm system ON/OFF. You will be asked for the burglar-alarm control unit user code and after a few seconds a sound message confirms that it has been entered and the icon will change status.. Displays some information on the alarm which has been given.. Opens the scenario section. 4. Activates/deactivates and displays the status of the zones. ALARM LOG Displays the type of alarm and other information.. Press to display the alarms Displays the type of alarm which has been given with the following information: type of alarm, zone where it was given and indication of date and time. There are four types of alarm: burglar alarm, tampering, panic and technical.. If necessary press to cancel the list of all the alarms. SCENARIO Activates the scenarios (simultaneous activation of several zones) set via software.. Press to switch the burglar alarm OFF (the zone activation/deactivation operation is only performed with the burglar alarm OFF).. Press to display the set scenarios. The scenario name and immediately afterwards the zones which form it appear in the description.. Select the scenario to be performed. 56


57 4. Press to confirm the notification Enter the burglar-alarm control unit user code. This operation is necessary every time the zones are activated/deactivated. After a few seconds, if the code is correct, a sound message will confirm. 57


58 Energy Management You can check the state of the power loads, display power consumptions/production and supervise the electrical system, by means of the Salvavita reset devices. Press Systems in the home page and then press Power management. SYSTEM SUPERVISION It lets you display and control the STOP&GO devices and check the correct operation of the loads in your MyHOME system. Stop And Go. Press to disable the automatic reclosing if the earth leakage trips. Stop And Go Plus. Press to disable the automatic reclosing if the earth leakage trips.. Press to disable the system check; doing this you can force the reclosing of the earth leakage without performing the check pressing.. Press to force the opening of the earth leakage, press to force the closing. 58
. 4. Press to confirm or to cancel.")

59 Stop And Go BTest 4. Press to disable the automatic reclosing if the earth leakage trips.. Press to enable the automatic test of the earth-leakage circuit breaker.. Using the and icons set the autotest frequency (number of days between one test and the next). 4. Press to confirm or to cancel. Load diagnostic It gives the possibility of checking on the display interfaces the correct operation of the load using the measurement of the earth leakage current absorbed by the same. The icon indicates that the load works correctly; the icon indicates that the load works correctly, but the earth-leakage current is close to the standard limits; the icon indicates that the earthleakage current exceeds the standard limits causing the Salvavita to open. 59

60 CONSUMPTION/PRODUCTION DISPLAY Can monitor the magnitudes of the power consumptions and production: electricity, gas, water, heating/cooling and sanitary hot water. Electricity Water Warm water Heating/Cooling Gas Global view It display the electricity consumed or produced by the system. On connecting the impulse counter to a water meter with impulse output, the system consumption/production can be displayed. Connect to a hot water meter or to the corresponding impulse output of a heat measurement control unit that can be found in the apartment user modules (in case of central heating). On connecting the impulse counter to a counter with heat impulse output the kilo calories/negative kilo calories detected on the Heating/Cooling system can be displayed (in thermal kwh). On connecting the impulse counter to a gas counter with impulse output the system consumption can be displayed. Displays the global consumption/production objectives which the user has set via the software by means of graphs and tables. Electricity. Press to display the electricity consumption/production information. Warning: This manual just describes the Electricity control, because the Web Server manages all the power controls equally. 60

61 Global view By means of this view you can display the consumptions of all the lines connected to the meters on the system, divided by monthly cumulative and instanteous Select the month and the year.. Selects whether to display the data in power or cost values.. Scroll to display other meters. 4. Indication of the total monthly consumption. 5. Indication of the instantaneous consumption. 6. Press to display the consumption data, objective and difference between the measured value and the prefixed objective of the specific line Scroll to display the consumptions in the month of interest. In this view you see the monthly consumption, the consumption objective set via the software and the difference between the two. If the value is lower than the objective it is shown in green, otherwise it is shown in red. 8. Press to display the detailed consumption/production information. 6


62 Press to display the data of the day/month/year. 0. Scrolls day/month/year.. Press to download the data displayed in.csv format.. Press to display the data in a table. 6
63 LOAD MANAGEMENT (WITH LOAD MANAGEMENT CONTROL UNIT). The load control unit can control the power used to prevent trips by the meter, excluding the loads (such as cooker, washing machine, microwave etc.) according to the priority set by your installer. 5. Enables and disables the load control by the control unit (*Note).. Display the instantaneous consumption.. Display the partial consumption. 4. Press to change from power display to cost display. 5. Zeroes the counters. 4 *Note: The system controls loads. It disconnects the loads respecting the configuration priorities. Enabling the load control means setting the basic priorities defined by the configuration. Disabling the control means setting the maximum priority on the actuator, i.e. to define that the actuator will be the last to disconnect when there is an overload regardless of the basic configuration. Notes: The workings shown below need advanced actuators. Load is connected and the control unit manages the trip priorities on the basis of the configuration of the objects. Load is connected and has been forced. The control unit manages the trip priorities on the basis of the configuration of the objects excluding this specific load which becomes the maximum priority load (forced), i.e. the last to disconnect when there is an overload. Load has been disconnected because of a power overload. 6

64 . Press to enter load management.. Press the load to manage. 64


65 EXAMPLE OF TEMPORARY FORCING OF LOAD. Press to disable the control unit load control.. Set the forcing time when the load remains momentarily out of the control unit s control.. Press to confirm. Now the load is out of the control unit s control for the prefixed time. 65

66 EXAMPLE OF FORCING OF LOAD DISCONNECTED FOLLOWING A POWER OVERLOAD. Press to force the reactivation of the load. Now the load is active but forced.. Press to bring it back under the control unit s normal management. 66
.. Display the instantaneous consumption.. Display the partial consumption.. Zeroes the counters. 4. Press to change from power display to cost display. 4. Press to enter load management.")
67 LOAD MANAGEMENT (WITHOUT LOAD MANAGEMENT CENTRAL UNIT) If the system does not have the load management control unit and uses advanced actuators, this application can check the load consumption (such as cooker, washing machine, microwave etc.).. Display the instantaneous consumption.. Display the partial consumption.. Zeroes the counters. 4. Press to change from power display to cost display. 4. Press to enter load management.. Press the load to manage. Scenarios You can activate the scenarios of your MyHOME system. Press Systems in the home page and then press Scenarios. SCENARIO MODULE SCENARIO. Press to activate a scenario saved on the scenario module. 67
, you can System OPEN Authentication IP ranges Video Streaming Diagnostic Users Account Email Notifications Profile and Background Account safety Date and time Language Answering machine Energy")

68 Settings Through the settings menu and on the basis of your profile (user or administrator access a series of more or less advanced parameters and settings. ), you can System OPEN Authentication IP ranges Video Streaming Diagnostic Users Account Notifications Profile and Background Account safety Date and time Language Answering machine Energy Tariffs Consumption goals Saving the settings Some settings require saving the data and rebooting the device:. Press to save the settings after the data has been entered. You can now make other customisations. Press to complete.. Press to activate the notifications. After few seconds the device switch off and restart in minutes. After pressing OK a loading message appears. When the device is available again, the identification page appears where you can identify yourself again. 68
. Enter the password which must be made up of from 5 to 9 numbers.")
69 Systems OPEN Authentication This page can be used to set the Login and the Password for access to the Web pages and to other Services. Select Settings > System > Open Authentication 4 Low security (OPEN password). Enter the password which must be made up of from 5 to 9 numbers. This type of setting does not guarantee high protection levels.. Re-enter the password to confirm.. Press to confirm. 4. As an alternative press to guarantee higher security High security (HMAC password) 5. Enter the password which must be made up of both numbers and letters and must be at least 5 characters and a maximum of 6. With this type of password some devices which cannot manage it might not work correctly. 6. An indicator will indicate the degree of security. 7. Re-enter the password to confirm. 8. Press to confirm. When connecting with MyHOME_Web portal with dynamic IP mode, only the authentication with OPEN password can be used. 69


70 IP ranges This page can be used to enter up to 0 IP address ranges with connection to the device enabled, without the need for entering the OPEN or HMAC password. Select Settings > System > IP ranges. Enter the first range of addresses.. Press to confirm and if necessary add another range.. Press to confirm. Video Streaming In this page you can set some security parameters for the video contents transmitted by the web server. Select Settings > System > Video Streaming. Press to enable the encrypting of the video contents; in this case the transmission will be slower but more secure.. Press to enable the protection of the video contents transmitted by the web server via password. This password must also be set on the application which requires the viewing of the images and will be the OPEN or HMAC password set previously. 70

71 Diagnostic In this page you can display some device parameters such as firmware and hardware version etc. and any faults. Select Settings > System > Diagnostic. Displays the parameters.. Press to update the data.. Displays any faults. 7


72 Users Account In this page you can set your user name and the access password required in the identification page. If you are administrator you can set these data for all the users. Select Settings > Users > Account 4 5. Select User.. Enter the name.. Enter the password (for administrator default admin ) which must be made up of a minimum of 8 characters and a maximum of 6, which must include at least one letter and a number. The system distinguishes between UPPER and lower case characters. a visual identifier will show you the password security level by means of the number of small squares (from to ) and the colours red (low security), yellow (medium security) and green (high security). 4. Re-enter the password to confirm. 5. Press to confirm. In this page you can set the configuration of the account to be used to send notification of events concerning the system. Select Settings > Users > . If the is from a very common provider (e.g. gmail) enter the mail and password directly. The account will be configured automatically.. Press to confirm.. Press to configure the account manually if the automatic configuration is not successful. 7


73 In this case enter all the necessary parameters manually; refer to your ISP Internet Service Provider to find them. 5. Press to confirm. To edit or delete existing data: Press to delete the existing mail. 7. Press to edit the existing mail. 8. Press OK to confirm. If you use a gmail account to automatically send the notification , gmail may consider it an unauthorised access by the web server. In this case you will receive a mail to indicate that the access has been blocked. To unblock this limitation you must modify the gmail account default settings, lowering the security level and enabling access by remote applications: ) press the link or type the address in the navigation bar of your browser ) in the window which appears activate the access for less secure apps We recommend that you create a mail account dedicated to this function. 7

74 Notifications In this page you can select the events which will generate the notifications and the address to which they will be sent. If you are administrator you can set these data for all the users. Select Settings > Users > Notifications 4. Select User.. If necessary edit the address which will receive the notifications.. Select the events which will generate the notifications 4. Press to confirm. If you have the MyHOME_Web service, the Web Server notifications are also sent to the portal itself. For a correct notification from the portal the Internet Service Provider (ISP) must support the communication on SMTP protocol (to third party server) not authenticated and not encyphered on port 5. Ask your ISP if it supports this type of communication. If it does not the following notifications from the system will not be guaranteed: burglar-alarm alarms (intrusion/tampering/technical); new video door entry answering machine messages; temperature control fault notifications; Stop and Go notifications. 74


75 Profile and Background In this page you can select the image which represents the user and the background image of the favourites page. If you are administrator you can set these data for all the users. Select Settings > Users > Profile and Background 4. Select User.. Select the image which represents the user (suggested 9 x 5 pixel 7 dpi).. Select the image to be used as favourites page background (suggested 500 x 000 pixel 7 dpi). 4. Press to confirm. Account safety In this page you can display the account security level Select Settings > Users > Account safety a visual identifier will show you the password security level by means of the number of small squares (from to ) and the colours red (low security), yellow (medium security) and green (high security). A series of tips to improve the account security is also shown. 75

76 Date and time In this page you can set the date, time and the local time zone. Select Settings > Date/time 4. Press and to set the date.. Press and to set the time.. Press to select the local time zone 4. Press to confirm. Language This page can be used to select the language for the control web pages and remote system management. Select Settings > Language. Select the language that will be used to display the Web pages.. Press to confirm. 76

77 Answering machine In this page you can activate and configure the Video door entry answering system function. Select Settings > Answering machine Check with your trusted installer if the system is compatible with the function. Press to activate the answering machine.. Press to activate the welcome message played by the entrance panel.. Select the number of photos that the video door entry entrance panel camera will take. You can choose from to 6 photographs. If the answering system option is active in the Notifications page, the images will reach the user as attachments to an message. 4. Press to hear the current welcome message. 5. Press to select a customised welcome message previously recorded by means of the software or an existing message with.wav extension recorded with frequency of 8000 Hz, 8 bit/sample and mono. 6. Press to reset the default message. 7. Displays the memory used by the answering system. 8. Press to confirm. 77


78 Energy Tariffs In this page you can set the tariffs to apply for the cost display of the consumptions and in managing the loads displayed in the Energy management page. Select Settings > Energy > Tariffs. Press to select the tariff.. Press and to set the tariff value on the basis of your supplier.. Press to confirm. Consumption goals In this page you can set the consumption objectives to apply for the cost display of the consumptions in the Energy management page. Select Settings > Energy > Consumption goals. Press to select the magnitude.. Press to select the line. 78

79 Press to enable the setting of the objectives. 4. Press to select the month on which the objective will be set. 5. Press and to set the value of the objective to reach. 6. Press to confirm. 79
80 Legrand SNC 8, av. du Maréchal-de-Lattre-de-Tassigny Limoges Cedex - France BTicino SpA Viale Borri, 00 Varese Legrand SNC reserves at any time the right to modify the contents of this booklet and to communicate, in any form and modality, the changes brought to the same.
F Basic gateway. Installation Manual.
 F455-0 035 94 Basic gateway www.homesystems-legrandgroup.com Contents Description 4 Warnings and recommendations 4 Main functions 4 Legend 4 Connection 5 Wiring diagrams 5 Configuration 6 Procedure with
MH201. Software Manual.
 www.homesystems-legrandgroup.com Contents Start Interaction with the device Device configuration Send the configuration 8 Receive the configuration 9 Firmware update 0 Request device info 0 Home page
F Installation manual.
 F459 003549 Installation manual www.homesystems-legrandgroup.com Index General information 4 Warnings and recommendations 4 Main functions 4 Description 4 Connections 5 Driver manager 6 Authentication
Video Display. User guide 03/11-01 PC
 Video Display User guide 5739 50 5739 51 03/11-01 PC Indice 1 Introduction and basic functions 5 General information 6 Your Video Display: use it now! 6 Video door entry function keys 7 Navigation keys
TiLocalDisplayNew. Software Manual 07/12-01 PC
 TiLocalDisplayNew Software Manual 07/12-01 PC 2 TiLocalDisplayNew Software Manual Contents 1. Hardware and Software requirements 4 2. Software update 4 3. Fundamental concepts 4 3.1 Function menus and
Video Display Eteris User guide 01GF-28W10
 349340 Video Display Eteris User guide 01GF-28W10 2 Contents 1 Introduction and basic functions 5 1.1 General information 6 1.2 Your Video Display: use it now! 6 1.2.1 Video door entry function keys 7
MH202. User guide.
 www.homesystems-legrandgroup.com Index Description of the 4 Use of the with Web pages from Personal computer 5 Base functions 7 Scenarios 7 Diagnostics 7 Functions reserved for the administrator user
F450. Gateway OpenBacnet. Software Manual.
 F450 Gateway OpenBacnet www.homesystems-legrandgroup.com Contents Start 4 Interaction with the device 4 Device configuration 5 Configure Menu 5 Send the configuration 7 Receive the configuration 8 Firmware
Temperature control unit
 Temperature control unit 5739 18/19 Installation manual Part. U3582A - 12/08-01 PC Contents 1 - Introduction 5 1.1 - Warnings and tips 5 1.2 - Contents of package 5 2 - Description of the Control unit
MyHOMEServer1. Installation Manual.
 www.homesystems-legrandgroup.com Contents General information 4 Warnings and recommendations 4 Function limits 6 Description 7 Wiring diagrams 8 Connections 8 Access to the system 9 Connection to the
LE09268AA. Classe 300X. Door Entry Quick App support Guide manual.
 LE09268AA Door Entry Quick App support Guide manual www.legrand.co.uk www.bticino.com General information 8 9 10 11 12 10:36 Tuesday, 22 April Download the Door Entry App Private camera Answering machine
Smarther X8000-X8000W
 X8000-X8000W www.bticino.com Contents Your Smarther, use it now! 4 Heat your home immediately (Boost) 4 Set the temperature 5 Manage several houses and several Smarther 6 General information 7 Symbols
Control TECHNICAL GUIDE 06
 Control TECHNICAL GUIDE 06 MH06CT/GB BTicino answers For all the technical or commercial information go to the BTicino site. www.bticino.it E-mail: bticino.international@bticino.it To send a free fax forward
Video Display Eteris. Installation manual 01GF-28W10
 349340 Video Display Eteris Installation manual 01GF-28W10 2 Video Display Eteris Contents 1 Introduction 4 1.1 Warnings and tips 4 1.2 Package content 4 Installation manual 2 Description 5 2.1 Main functions
HOMETOUCH HOMETOUCH flush mounted box Additional power supply. Rear view
 Description Front view 7 Touch Screen for the management of all MyHOME_Up functions, that can be integrated with the video door entry system, to be used as connected internal unit. To use the home automation
CLASSE 300 THE CONNECTED VIDEO INTERNAL UNIT
 THE CONNECTED VIDEO INTERNAL UNIT The X13E video internal unit allows you to transform every home into a connected home, which can be easily controlled in the home and at a distance using a smartphone.
User guide 06/10-01 PC
 User guide 06/10-01 PC 2 LegrandSchedulerConfig User guide Index Description of the 4 1. Use of the with Web pages from Personal computer 5 2. Base functions 7 2.1 Scenarios 7 2.2 Diagnostics 7 3. Functions
05/16-01 PC Monobloc Audio Digital Entrance Panel. Installer manual
 05/16-01 PC 343100 Monobloc Audio Digital Entrance Panel Installer manual 2 Contents Monobloc Audio Digital Entrance Panel 1 Introduction 4 1.1 Warnings and recommendations 4 2 Description 5 2.1 Main functions
TiSecurityPolyx user manual
 Version 1.0 06/08 - CT TiSecurityPolyx user manual Software for the configuration of the 3485 Burglar Alarm Unit CONTENTS 1. Hardware and Software requirements 4 2. Installation 4 3. Basic concepts 8
Smarther X8000-X8000W
 X8000-X8000W www.bticino.com Contents Your Smarther, use it now! 4 Heat your home immediately (Boost) 4 Set the temperature 5 Change operating mode of the Smarther (heating/cooling) 6 Manage several houses
Virtual Keypad App Help Last update: 2017/02/02
 Virtual Keypad App Help 16461 Last update: 2017/02/02 Table of Contents Virtual Keypad App Help Center... 1 Managing Your App Account... 2 Using Your App... 3 System in Alarm... 4 Contacting Your Security
L4561N Stereo Control. Installation manual.
 L4561N Stereo Control www.legrand.com Stereo Control Contents Stereo Control 1 Introduction 4 1.1 Warnings and tips 4 1.2 General description 4 2 Installation 5 2.1 Wiring diagram 5 3 Configuration 7 3.1
Page 2 of 7 How do you recognize a successful connection? After successful connection the app will show the Main Dashboard automatically. Main Navigat
 Page 1 of 7 What can you do with the Eaton xcomfort App? With this App you can easily control & visualize your xcomfort Smart Home installation. Which functionality does the App offer? The functions are
User instructions. By-me automation module for video door entry unit.
 User instructions By-me automation module for video door entry unit. Contents CONTENTS 1. The By-me module 1 2. Description 2 3. Main menu 2 3.1 Settings 3 3.1.1 Home automation system settings 3 Time
TiSferaDesign. Instructions for use.
 www.homesystems-legrandgroup.com Contents Software update 4 Fundamental concepts 4 Start screen and pushbuttons/menus for the selection of the functions 5 Connecting the devices to the PC 6 Update the
BMSO1001. Virtual Configurator. User guide 01/10-01 PC
 BMSO1001 Virtual Configurator User guide 01/10-01 PC 2 Virtual Configurator User guide Content 1. Hardware and Software requirements 4 1.1 Hardware requirements 4 1.2 Software requirements 4 2. Fundamental
Table of Contents. Chapter 1 Introduction Chapter 2 Quick Install... 7
 AVA-88 WELCOME Congratulations on purchasing the AVA-88. The AVA-88 integrates multiple complicated control, automation and internet protocols into one simple plug-and-play device. It is a central controller
Installation manual ihc-miirf
 rev.: 5 02-1/2017 1 / 43 Contents Contents...1 1....3...4 3. The initial launch of the application - Setup Guide...5 3.1 elan...6 3.2 Rooms...7 3.3 Units...8 3.4 Scenes...9 3.5 Cameras...10 3.6 Intercom...11
Legrand Access System Software USER GUIDE
 Legrand Access System Software USER GUIDE Introduction The Legrand Access System Software package is part of a series of tools developed by Legrand to manage building access control in the tertiary sector.
DVR RANGE ENGINEER MANUAL
 INSPIRE DVR RANGE ENGINEER MANUAL Contents Hardware Inspire DVR range Connections Connecting a mouse Connecting keyboard Connecting PTZ cameras Connecting Keyboard/PTZ Alarm connections Using front panel
DELÉGO. Wherever you are, you will never be far from the things you love.
 DELÉGO Wherever you are, you will never be far from the things you love. 1 the home automation control by ekinex delégo enables smart management in every room of your home or area of your workplace. An
SEAVDOMUS User guide. Index
 Index Introduction... 2 1. Installing SEAV DOMUS... 4 1.1 Activating DomusBox... 4 1.2 Drawing the environments in DomusWeb... 5 1.3 Connecting DomusBox to the devices... 10 1.4 Configuration of a new
Supplementary operating instructions for your air curtain system Controller TMC 500
 Supplementary operating instructions for your air curtain system Controller TMC 500 (Translation of the original) Serial number: Year: Please quote this number when contacting customer service! Date 08.04.2016
U.motion KNX Server Plus, Touch 10 U.motion KNX Server Plus, Touch 15
 U.motion 10 15 Art. no. MTN6260-0410 MTN6260-0415 04/2014 VERSION 1.0.1 www.schneider-electric.com GENERAL INFORMATION Schneider Electric SAS If you have technical questions, please contact the Customer
Installation manual ihc-mairf
 rev.: 6 02-215 / 2016 1 / 46 Contents Contents...1...3...4 3. Installing the application on a smartphone with OS Android...5 4. The initial launch of the application - Setup Guide...6 4.1 elan...7 4.2
Vandal-resistant entrance panel. Installer manual RA00054AA_I_EN01PC-12W16
 308040 Vandal-resistant entrance panel Installer manual RA00054AA_I_EN01PC-12W16 2 Contents Vandal-resistant entrance panel 1 Introduction 4 1.1 Warnings and recommendations 4 1.2 What s in your box 4
Connecting to your Caravan or Motorhome
 Welcome to Swift Command This document will show you how to connect the Swift Command App to your Caravan or Motorhome and then explain the key features and their operation. Control your lighting and adjust
Technical Manual Nova: Cabinet Security Management System (CSMS)
") Technical Manual Nova: Cabinet Security Management System (CSMS) KP_nova_TM_160501_EN 1 Publication May, 2016, Keyprocessor BV Paasheuvelweg 20 1105BJ Amsterdam, The Netherlands www.keyprocessor.com/nova
Technical Manual Nova: Cabinet Security Management System (CSMS) KP_nova_TM_160501_EN 1 Publication May, 2016, Keyprocessor BV Paasheuvelweg 20 1105BJ Amsterdam, The Netherlands www.keyprocessor.com/nova
ETHM-2. Ethernet Module. SATEL sp. z o.o. ul. Schuberta Gdańsk POLAND tel
 Ethernet Module ETHM-2 Firmware version 1.0 ethm2_en 09/08 SATEL sp. z o.o. ul. Schuberta 79 80-172 Gdańsk POLAND tel. + 48 58 320 94 00 info@satel.pl www.satel.pl SATEL's goal is to continually improve
Operating Manual. Version 7.3.4
 Operating Manual Version 7.3.4 March 2011 Index Page 1. Installation instructions 4 1.1 System requirements 4 1.2 Installation procedure 4 1.3 Meitav-tec USB adaptor installation 7 2. Open Maxinet and
Flatwall. Aesthetic value and functional integration for home automation
 Flatwall Aesthetic value and functional integration for home automation 2 MyHOME FLATWALL Index 2-13 General features 14-33 General rules for installation 34-39 Catalogue MyHOME FLATWALL 240-270 2 MyHOME
App Instructions. Quick Start Guide. works with the Google Assistant
 App Instructions s Quick Start Guide works with the Google Assistant 1 OVERVIEW The Modern Forms App enables control of WiFi equipped Modern Forms Smart Fans. Log in with your existing Facebook Account,
HOME SECURITY KIT. USER MANUAL SMART PROTECTION WITH THE ALL-IN-ONE SOLUTION. SMART WINDOW SENSOR SMART POWER SOCKET SMART MOTION SENSOR SMART IP CAM
 HOME SECURITY KIT. SMART PROTECTION WITH THE ALL-IN-ONE SOLUTION. SMART WINDOW SENSOR SMART POWER SOCKET SMART IP CAM SMART MOTION SENSOR USER MANUAL SL-900100/900111 HOME SECURITY KIT A/B SHORT INSTRUCTION
Commercial in Confidence. Operation Manual. For TCP/IP with SIP Digital (700) System The Seasons Series. Indoor Monitor
 System The Seasons Series. Indoor Monitor") Operation Manual For TCP/IP with SIP Digital (700) System The Seasons Series Indoor Monitor Remark Please follow the user manual for correct installation and testing, if there is any doubt please call
Operation Manual For TCP/IP with SIP Digital (700) System The Seasons Series Indoor Monitor Remark Please follow the user manual for correct installation and testing, if there is any doubt please call
CLASSE 300. Connected Video. Door Entry Systems
 Connected Video Door Entry Systems The new X13E video internal unit allows you to transform every home into a connected home, which can be easily controlled in the home or remotely using a smartphone.
Instruction Book (Web browser for System maintenance engineer)
") Air-conditioner Network System Centralized Controller AG-150A GB-50ADA-A GB-50ADA-J Instruction Book (Web browser for System maintenance engineer) Contents 1 Introduction... 1 1-1 Terms Used in This Manual...1
Air-conditioner Network System Centralized Controller AG-150A GB-50ADA-A GB-50ADA-J Instruction Book (Web browser for System maintenance engineer) Contents 1 Introduction... 1 1-1 Terms Used in This Manual...1
Vandal-resistant entrance panel
 308040 LE05231AC-01PC-17W41 www.bticino.com Contents Vandal-resistant entrance panel Introduction 5 Warnings and recommendations 5 What s in your box 5 Description 6 Front view 6 Back view 7 Installation
1. CONTROL OF THE LIVING ENVIRONMENT WITH ENTIALIVING SYSTEM 4 2. LIGHTING CONTROL WITH ENTIALIVING SYSTEM 5
 User manual KAZALO 1. CONTROL OF THE LIVING ENVIRONMENT WITH ENTIALIVING SYSTEM 4 2. LIGHTING CONTROL WITH ENTIALIVING SYSTEM 5 3. TEMPERATURE CONTROL WITH ENTIALIVING SYSTEM 6 4. SHADING CONTROL WITH
IdeaTab A1000L-F. User Guide V1.0. Please read the Important safety and handling information in the supplied manuals before use.
 IdeaTab A1000L - UserGuide IdeaTab A1000L-F User Guide V1.0 Please read the Important safety and handling information in the supplied manuals before use. file:///c /Users/xieqy1/Desktop/EN UG/index.html[2013/8/14
Introduction. MyAir5 User Guide
 User Guide Introduction... 3 Mode Page... 4 Zones Page... 10 Plans Page... 13 Setup Page... 17 Constant Zones... 19 Android Tablet... 20 Smart Phone Control Quick Setup Guide... 21 Network Troubleshooting...
LUXORliving System manual Version 1
 LUXORliving System manual Version 1 2018-04-18 Contents 1 General 3 2 System 4 3 Installation 5 4 Start-up 7 4.1 Establish a connection 7 4.2 Configuration with LUXORplug 10 4.3 Programming with LUXORplug
APP Setup Guide. Connect to your home or business from anywhere in the world. RINS1721-3
 APP Setup Guide Connect to your home or business from anywhere in the world. RINS1721-3 Contents Introduction... 3 Connect to your home or business from anywhere in the world... 3 Get your Control Panel
Uponor Smatrix Wave PLUS R-167 INSTALLATION AND OPERATION MANUAL HELP AND TUTORIAL
 Uponor Smatrix Wave PLUS U@home R-167 INSTALLATION AND OPERATION MANUAL HELP AND TUTORIAL 09 2015 I Table of contents I Installation and configuration... 3 What is inside your U@home package?...3 U@home
NVR Equipment WEB Operation Guide ISSUE V1.1 DATE
 NVR Equipment WEB Operation Guide ISSUE V1.1 DATE 2018-05-15 About This Document About This Document Purpose This document describes how to use the web management system for NVR and the cameras managed
Premium INSTALLATION AND USER GUIDE ENGLISH TAHOMA BOX. - INSTALLATION AND USER GUIDE. Rev A _01-16
 Premium INSTALLATION AND USER GUIDE ENGLISH - INSTALLATION AND USER GUIDE TAHOMA BOX Rev A _01-16 www.somfy.com TaHoma, connected homes the Somfy way! Remotely control and manage the devices in your home
Air-conditioner Network System Centralized Controller AG-150A AG-150A-A GB-50ADA-J
 Air-conditioner Network System Centralized Controller AG-150A AG-150A-A GB-50ADA-A GB-50ADA-J Instruction Book (Web browser for System maintenance engineer) Contents 1 Introduction...2 1-1 Terms Used in
Application description. KNX Push-button module 1gang. KNX Push-button module 2gang
 Application description KNX Push-button module 1/2gang Electrical/mechanical data: see the operating instructions for the product Order number Product designation Application programme TP product Radio
TENVIS Technology Co., Ltd. User Manual. For H.264 Cameras. Version 1.0.0
 TENVIS Technology Co., Ltd User Manual For H.264 Cameras Version 1.0.0 Catalogue Basic Operation... 3 Hardware Installation... 3 Search Camera... 3 For Internet Explorer... 6 Playback Record Files... 9
HOME AUTOMATION. MY-HAND, the whole house under your control with one single instrument.
 TELECO AUTOMATION SRL - Via dell Artigianato, 16-31014 Colle Umberto (TV) ITALY TELEPHONE: ++39.0438.388511 FAX: ++39.0438.388536 - www.telecoautomation.com This document is the property of Teleco Automation
The following device commands are used most frequently: Lock/Unlock device O - O O. Reset screen password O - O - Factory reset + Initialize SD Card
 10 Device management Administrators can install apps on an activated device using device commands and check the profiles settings. Moreover, they can update, delete, or re-install apps installed on users'
Small and Medium Building New and Renovation Prescription Assistance Complete Solution
 Small and Medium Building New and Renovation Prescription Assistance Complete Solution 1 1) Introduction... 3 2) Control/Automation of the building... 4 2.1) Control interfaces... 4 2.1.1) Commands by
SAMSUNG ALL-IN-ONE SECURITY SYSTEM
 Quick Start Guide KIT MODEL SDH-B74041/SDH-B74081 DVR MODEL SDR-B74301 SAMSUNG ALL-IN-ONE SECURITY SYSTEM Thank you for purchasing the Samsung DVR Security System. Follow the simple steps in this guide
V-CUBE Meeting 5. User Manual V-CUBE, INC. 2015/09/01
 V-CUBE Meeting 5 User Manual V-CUBE, INC. 2015/09/01 This document is the user manual for the V-CUBE Meeting 5 (or 'Meeting'), a web conferencing system. Revision history Revision date Details 2015/09/01
Home Monitoring and Control service provided by Verizon Online LLC
 Home Monitoring and Control service provided by Verizon Online LLC A separate subscription to Verizon FiOS TV is required for use with FiOS TV service. About This Manual This manual is designed for online
Application description
 Manufacturer Berker Motion detector Application description KNX motion detector module comfort 1.10m KNX motion detector module comfort 2.20m ETS KNX motion detector module comfort 1.10m ETS KNX motion
Configuring and Managing the IP Camera
 CHAPTER 3 The Cisco Video Surveillance IP Camera provides configuration windows that you use to configure and manage the IP camera. This chapter explains how to access the configuration windows, describes
AMBIFLEX MF626 - USER GUIDE
 AMBIFLEX MF626 - USER GUIDE CONTENTS Page No Product Overview 2 Features 3 Standby Display 4 User Facilities 5 Status Display Mode 6 Measured Temperatures 6 Time Channel Information 7 What is happening
Legrand Access point manager User manual
 Access point manager User manual Version 4.0.1 www.legrand.fr Table of contents 1 / Introduction 7 2 / Access point manager installation 8 2.1 / Mode integrated in controller 8 2.2 / Standalone mode 8
SRP SMART ENERGY SAVER STUDY
 SRP SMART ENERGY SAVER STUDY Setup Guide January 2018 WELCOME!... 2 SRP SMART ENERGY SAVER STUDY OVERVIEW... 2 STEPS TO COMPLETE... 2 1. EQUIPMENT INSTALLATION OVERVIEW... 3 THERMOSTAT... 3 LOAD CONTROLLER
UWP 3.0 WEB APP INSTRUCTION MANUAL. Sep. 18
 UWP 3.0 WEB APP INSTRUCTION MANUAL Sep. 18 Index Index... 2 Updated version... 7 Introduction... 8 General description... 8 System architecture... 9 Main features...10 Compatible systems (M2M)...10 Installation
WHICH PHONES ARE COMPATIBLE WITH MY HYBRID SMARTWATCH?
 GENERAL SET-UP & APP o WHICH PHONES ARE COMPATIBLE WITH MY HYBRID SMARTWATCH? o Your Hybrid smartwatch is compatible with Android(TM) phones and iphone(r), specifically with Android OS 4.4 or higher, ios
BlackVue C App Manual
 BlackVue C App Manual BlackVue C App Manual Contents Connecting to BLACKVUE CLOUD... 3 (A) Create an account... 3 (B) Register your dashcam with your account... 3 (C) Connect your BlackVue dashcam to a
SKY l SYS DVR USER S MANUAL TABLE OF CONTENTS. Skydreamers Systems DVR Page 1
 TABLE OF CONTENTS Main System Application (Control) SERVER Startup Screen 6 Login/Logout/Shutdown 7 Control Screen 7 Setup 7 System Power Management 8 Auto Switching Interval 8 E-map 8 TV-Out 8 On-screen
GAMMA instabus Application Program Description. July CO Colour Touch-Panel
 Use of the application program Product family: Product type: Manufacturer: Name: Order no.: Name: Order no.: Display Display units Siemens UP 588/12 Colour Touch Panel UP 588/13 Colour Touch Panel (AC
Brivis Touch. Owner s Manual
 Brivis Touch Owner s Manual Congratulations on purchasing a Brivis Touch Comfort Controller. This intelligent Controller can be used with a range of Brivis heating and cooling products. The Brivis Touch
Smile Room Connect System Installation Instructions
 Smile Room Connect System Installation Instructions MU1H-0635GE51 R1016 Smile Room Connect SRC-10 Installation Instructions EN Table of Contents 1 Safety instructions... 4 1.1 Intended use... 4 1.2 Electric
USER S MANUAL. DAS-G01 The Power of Tomorrow
 USER S MANUAL DAS-G01 The Power of Tomorrow Richmond Heights 2018 0 USER S MANUAL DAS-G01 The Power of Tomorrow Richmond Heights 2018 Page 1 USER'S MANUAL TABLE OF CONTENTS Page # 1.0 GENERAL INFORMATION...
Domotica 2.1 Quick reference guide
 Domotica 2.1 Quick reference guide revision 1.8 Follow Domotica on Facebook at address: http://www.facebook.com/domoticaingegni and click on to be always up to date on Domotica news Follow Domotica on
FutureNow FNIP-6x2AD
 FutureNow FNIP-6x2AD Installation Manual rev 20.02. 6 Channel DIN Rail Mountable Smart Dimmer with Local Inputs OVERVIEW The FN485-6x2AD is used for switching and dimming up to six lighting loads that
CATALOGUE D45 High performance door entry system
 CATALOGUE 2011 D45 High performance door entry system 2 INDEX General features 4 Devices 10 Software 18-19 Solution for multi-storey buildings 20 Solution for a building complex 21-22 Compatibility with
Application description. Motion detector KNX- BCU
 Application description Motion detector KNX-BCU Electrical/mechanical data: see the operating instructions for the product Order number Product designation Application programme TP product Radio product
HD NVR User Manual. High-Definition Network Video Recorder. Model : HD NVR 1 st Edition : 13 Nov nd Edition : 28 Dec Thank You!
 High-Definition Network Video Recorder HD NVR User Manual The picture & functions & supplied items might differ according to the specification and model. Contents of this user manual are protected under
Din Rail Universal Module 8 inputs / 8 outputs IO88E01KNX
 Din Rail Universal Module 8 inputs / 8 outputs IO88E01KNX Product Handbook Product Description: Din Rail Universal 8 in / 8 out Module Order Code: IO88E01KNX Document Version: 1.1 Date: 22/07/2011 1/64
Sygonix Home Starter Kit
 App Instruction Manual Sygonix Home Starter Kit Item No. 1597114 www.conradconnect.de Contents Conrad Connect... 4 Symbols... 4 Core functions... 5 App to device communication... 6 App Installation...
ECO PDU Power Distribution Unit
 ECO PDU Distribution Unit PE6108/PE6208/PE8108/PE8208 ATEN has developed a new generation of green energy power distribution units (PDUs) to effectively increase the efficiency of data center power usage.
Dryer. M720 Programming and Operation Manual. July 15, 2015 Revision 1.51
 Dryer M720 Programming and Operation Manual July 15, 2015 Revision 1.51 Contents 1 Important Safety Information 1 1.1 FOR YOUR SAFETY - CAUTION!............................. 1 2 Control Overview 2 2.1
Zivif Security Camera
 Zivif Security Camera Quick Installation Guide (RH and RS Series) Support and downloads: www.zivif.com CONNECTION OVERVIEW Wifi / SD onboard storage (supported models only) Wired Camera Router Modem Global
ArdiTrack Demo Kits: Installation Guide (Rev 3 12/2014)
") ArdiTrack Demo Kits: Installation Guide (Rev 3 12/2014) Please read this guide before installing. System Diagram ( ArdiTech Demo Site Example): Product overview: 2.4G Technology with Cloud based monitoring
ArdiTrack Demo Kits: Installation Guide (Rev 3 12/2014) Please read this guide before installing. System Diagram ( ArdiTech Demo Site Example): Product overview: 2.4G Technology with Cloud based monitoring
FCU-4 FAN COIL CONTROLLER
 FCU-4 FAN COIL CONTROLLER BACnet Enabled Description The FCU-4 is designed to provide complete control of fan coil units. The FCU-4 incorporates all the inputs and outputs to ensure that this advanced
EN TECHNICAL MANUAL. Technical manual for programming Serial Bridge Art
 EN TECHNICAL MANUAL ON 1 2 3 4 5 6 Technical manual for programming Serial Bridge Art. 20003101 www.comelitgroup.com INDEX Accessing the device for the first time... 2 Description of the interface... 3
2 WIRE video door entry system
 CLASSE 00 AM Audio handset with additional keys WIRE video door entry system 7 Description WIRE audio handset for wall mounted or table-top installation (with specific support to be purchased separately).
GAMMA instabus Application Program Description. November CO Touch-Panel
 Use of the application program Product family: Product type: Manufacturer: Name: Order no.: Name: Order no.: Display Display units Siemens UP 588/2 Colour Touch Panel (AC 230 V) 5WG 588-2AB2 UP 588/22
Samsung SmartThins Wifi ET-WV525. Samsung SmartTings Wifi Pro ET-WV535. User Manual
 Samsung SmartThins Wifi ET-WV525 Samsung SmartTings Wifi Pro ET-WV535 User Manual English (USA). 02/2018. Rev.1.0 www.samsung.com Table of Contents Getting started 3 Read me first 4 About SAMSUNG Connect
Measurement, Metering & Display via e communicants sustainable savings
 sustainable savings Measurement, Metering & Display via e communicants WEB SERVER 32 Cat.No 261 78: User Manual (Smartphone) v1.1 1 WEB SERVER 32 Cat.No 261 78 User manual (for Smartphone) version 1.1
Centralized Controller Model: AG-150A
 Air-conditioner Network System Centralized Controller Model: AG-150A Instruction Book (Web browser for System maintenance engineer) Contents 1 Introduction... 1 1-1 Terms Used in This Manual...1 1-2 Computer
INSTALLATION MANUAL for the Application ihc-mirf
 INSTALLATION MANUAL for the Application ihc-mirf Contents Introduction 3 Installing the application on a mobile phone 3 Settings 4 Control 12 Introduction The applications ihc-mirf (for mobile phones with
Ref. 1717/31 (White) Ref. 1717/33 (Black)
 Ref. 1717/33 (Black)") Mod. 1717 DS1717-020 LBT20144 IP 7 TOUCHSCREEN MONITOR Ref. 1717/31 (White) Ref. 1717/33 (Black) COMPLETE USER MANUAL The information contained in this manual has been carefully collected and checked;
Mod. 1717 DS1717-020 LBT20144 IP 7 TOUCHSCREEN MONITOR Ref. 1717/31 (White) Ref. 1717/33 (Black) COMPLETE USER MANUAL The information contained in this manual has been carefully collected and checked;
Video recorders DX Series
 Page: 1 AHD DVR cameras, analog, IP CMS Program Manual How to install and use the client program to the DVR Page: 2 Contents of this handbook This manual describes how to install and use the CMS program
Ctrack Online User Guide
 Fleetstar Online A Guide to Winter Maintenance Reporting v1.1 Ctrack Online User Guide Title: Ctrack Online Quickstart Guide Date: 18/07/2013 Version: 1.0 Table of Contents 1. Ctrack Online Introduction...
Portal User Guide. Best practice tips and shortcuts Icon Legend Informational notes about functions. Important warnings about a function
 Portal User Guide Tips Best practice tips and shortcuts Icon Legend Notes Warning Informational notes about functions Important warnings about a function Your Portal https://www.clientaxcess.com Your Portal