Kobold. Shoe Modeling Tutorial 01: Model and animate a red high heel shoe. Software: CINEMA 4D R14
|
|
|
- Buck Sullivan
- 5 years ago
- Views:
Transcription
1 Kobold Chara teranimation Shoe Modeling Tutorial 01: Model and animate a red high heel shoe Software: CINEMA 4D R14

2 Shoe Modeling Tutorial 01: Model and animate a red high heel shoe Welcome back to Kobold Charakteranimation Tutorials! Today we are going to model a red high heel shoe. Let us start by saying that you will need to invest a good amount of time to make your shoe look good and if you don t, well your shoe will look accordingly. You will need: - CINEMA 4D R14-1 JPG image of a high heel shoe - a fully rigged character 1.- For today s approach we will need a good picture of a high heel shoe. So, first open up a search engine such as google and under pictures type: sarenza twitter_pic2. Download and save this picture on your computer. We want to redraw the side of the shoe inside CINEMA 4D using the Create Polygon Tool. For that purpose, we will need to load this picture as our background picture. 2.- Start CINEMA 4D R14. 2

3 When working with 2D objects, please do so in the front view. Otherwise you might end up placing the points of the Polygon somewhere unexpected in space. 3.- Inside the Editor Window Menu go to=> Cameras=> Left. We will use the picture we downloaded to redraw the shape of the shoe. 4.- Inside the Editor Window Menu go to=> Options=> Configure. The corresponding Attributes-Manager appears on the right=> choose the Back tab=> next to Image there is a field + 3 dots=> click on them to browse for the picture of the red shoe. Make sure the option Show Picture is activated. 5.- Let s start redrawing the outline of the shoe CLOCKWISE. Do not stop to move or delete points- you can do that once you finished. Make sure to close the Polygon at the end by joining the last and the first point (just click on the last point again). To create the Polygon you can go to the Main Menu=> Mesh=> Create Tools=> Create Polygon. You create the points of just by clicking into the editor window. The result can look something like this: 3


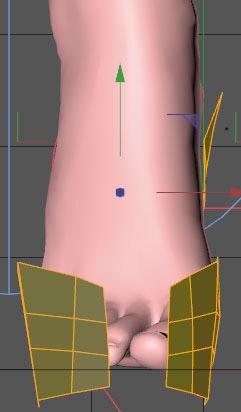
4 It is always important to keep a good order and naming our objects correctly is an important part of it. 6.- Inside the Objects-Manager double click on the Polygon Object and name it: Shoe_R The R at the end of an object defines the orientation: We are creating the right shoe for our character. 7.- We also need to move our character s foot into the correct position for wearing a high heel shoe. Women practically walk on their toes when using high heels. In addition, we moved the knee forward to create an interesting pose: It is very likely that our shoe outline is not proportional with our character s foot. 7.-Let s adjust the size choosing the Scale Tool in Model Mode + holding the shift key to avoid messing up the original proportion. We need to come as close as possible to the size of our character s foot. 8.- Tweak, move & rotate the points + edges to adjust our outline to the right part of your character s foot. Sometimes you may need to enable Axis Modification. If you don t know how, please read up in CINEMA 4D s help section. Be patient. This takes a while but the more effort you put into this part the less corrections you will have to make later on. Here some screenshots that will give you a better idea of what your shoe outline should look like (more screenshots on the next page): 4
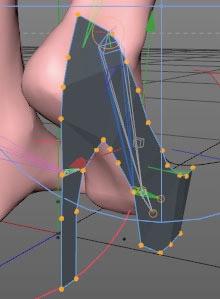


5 5

6 We still need the left side of our shoe. Don t worry- you will not need to go through the moving and rotating again. However, we still need to subdivide our shoe shape using the knife Tool. Try avoiding triangles when doing this as much as you can. They don t work well in CINEMA 4D. 9.- You can find the Knife Tool here=> Main Menu=> Mesh=> Create Tools=> Knife. In Point-Mode click on your first point and then drag to the point opposite of it to create the subdivision: 10.- Now we can mirror the shoe. Inside the Objects-Manager select the shoe object. In Polygon-Mode select all of the polygons, right click inside the Editor-Window=> a menu appears=> choose Mirror. Inside the Attributes-Manager of the Mirror Tool choose the World Coordinate System, Mirror Plane= ZY, Value =0 and then click on Apply. The original Polygonobject should not be located at X=0cm or else it won t be mirrored Select only the new polygons and move them along the Y axis as close as possible to the shape of your character s foot. Some additional moving, rotating of points + edges will be necessary (more screenshots on the next page): 6


7 7
. It will help us see if we are closing our Polygon holes correctly plus we will need it later on anyways. We will show you once how to close a polygon hole.")
8 This looks pretty good already! Our following undertaking will consist of closing the holes between the 2 sides of the shoe Let s first put a HyperNURBS object into the scene. (Main Menu=> Create=> NURBS=> HyperNURBS). It will help us see if we are closing our Polygon holes correctly plus we will need it later on anyways. We will show you once how to close a polygon hole. Then you can apply it to the rest of your shoe Inside the Objects-Manager, maintain the shoe object selected. We will close the following area: 14.- Main Menu=> Mesh=> Create Tools=> Create Polygon. To make our lives easier we will activate snapping Press the key V and a circular menu appears=> go to Snap=> enable: Enable Snap Vertex Snap You need to enable each option individually. Click outside the menu to close it. 8


9 16.-Zoom in to view the area you want to close. In Polygon Mode: Start with the top right edge. Move close to it with the mouse- once a highlighted white point appears click on it. Close the rectangle CLOCK- WISE. Remember to close the polygon at the end by clicking on the first point again at the very end: Let s check if we closed our polygon hole correctly Inside the Objects-Manager=> make the shoe a child object of the HyperNURBS object. If you did it wrong then your shoe will look something like the screenshot on the right. 9


10 If you did it right your heel will look as on the screenshot on the right. You can see that all the edges of the polygon are completely closed and connected to the polygons on its sides. Important: Inside the Objects-Manager=> Don t forget to take the shoe object out of the HyperN- URBS object to continue working. Once you are done closing all the polygon holes your shoe will (or at least should) look somewhat like this (more screenshots on the next page): 10


11 We are pretty far along the process so don t give up! 11


12 18.- We need to smoothen the aspect of the polygons with the help of a HyperNURBS object. However, we want to exclude the heel because its shape is much more edgy. For this purpose, let s select only the polygons of the heel and freeze the selection=> Main Menu=> Select=> Set Selection Now we need to set the weighting- everything but the heel should be affected by the HyperNURBS=> Main Menu=> Mesh=> Transform Tools=> Weight HyperNURBS. Inside the corresponding Attributes-Manager: Mode=Set, Strength = 100%, Interactive Minimun=0% and Interactive Maximum=100%. Click on Set. 12

13 Inside the Objects-Manager a Weighting Tag will appear next to the shoe object. If you click on it then the corresponding weights will be visible in the Editor Window. 20.-Inside the Objects-Manager make the shoe object a child object of our HyperNURBS. 21.-The area highlighted with a white circle is not finished yet. Simply turn the HyperNURBS momentarily off to edit the shoe object. (Note: You can deactivate the HyperNURBS object by clicking on the green check mark next to it inside the Objects Manager. It will turn into a red cross.) In Point Mode move the points of this area inwards then activate the HyperNURBS object again until it looks good. We may still have some parts where the foot shines through the shoe. First, we will give our shoe thickness and if the foot still shines through, then we need to select the corresponding area (in Polygon, Edge or Point-Mode) and pull the area outwards until no skin is visible anymore. First, we will give the shoe thickness Main Menu=> Simulate=> Cloth=> Cloth NURBS. Inside its Attributes-Manager=> Object Tab=> Thickness = 3cm. 13


14 Name the ClothNURBS Shoe_R Inside the Objects-Manager make HyperNURBS a child object of the Cloth NURBS. We want to add a seam to our shoe and this is quickly done: To further work on the polygons of the shoe we need to temporarily turn off both the Cloth NURBS and HyperNURBS Inside the Objects Manager simply click on the green check mark next to the Cloth NURBS and the HyperNURBS. They will turn into red crosses. 14
 make the following")
 visible: Inner Offset = 2cm,")
15 25.- Inside the Objects-Manager select the shoe object. In Edge Mode and using Loop Selection (Main Menu=> Select=> Loop Selection) make the following selection: 26.- Main Menu=> Mesh=> Create Tools=> Bevel. Inside its Attributes-Manager make both tabs (Options and Tool) visible: Inner Offset = 2cm, Subdivision=0. Var.=0%, Create N-gons DEACTIVATED, Type=Linear, Realtime Update ACTIVATED, click on Apply. 15
 to select the newly subdivided ring of polygons: 28.")

16 27.- In Polygon Mode and with the Live Selection Tool activated use the Ring Selection Tool (Main Menu=> Select=> Ring Selection) to select the newly subdivided ring of polygons: 28.- Select the Extrude Tool (Main Menu=> Mesh=> Create Tools=> Extrude). Go to the corresponding Attributes-Manager and give the Offset a negative value = -2cm. Then Apply the modification: 16

17 Finally, we are done modeling our shoe! All we need now is a material to apply on our high heel shoe. Even though we are going to create a pretty simple and straightforward material do not underestimate the power of materials! Ok, enough talking. Let s get back to work. Creating the Material for the shoe 29.- First you need to make sure that the Material Manager is open. It should be at the bottom of the page. If you cannot find it then open it again. Main Menu=> Window=> Material Manager Inside the Material Manager s Menu go to=> Create=> Shader=> Danel Double click on the new material to open the Material Editor=> on the left you can see the different channels=> select Diffuse (by clicking on the text)=> double click on the rectangle with a color (it is white by default) and choose a red color. We used: R=189, G=4 and B=4=> ok. In the same channel turn down the Illumination to 40%. Deactivate the following channels by clicking on the check mark (it will then disappear): -Specular 1 -Specular 2 -Specular 3 Select the Reflection channel and copy the following values: Intensity=2% Edge Intensity=20% Falloff=5% You can now close the Material Editor window. 17

18 Apply the new material to the shoe by dragging and dropping it onto the Cloth NURBS object inside the Objects Manager. You can add a Floor object + lights to your scene to give it the final touch. Render in CINEMA 4D s render view: Animate your Shoe 1.- You need to make your shoe object including ClothNURBS and HyperNURBS a child object of the foot joint (the joint that controls the movements of your human character). If you are using our Animation Room (by Kobold Charakteranimation) then you need to make the shoe object a child object of the joint rfoot rotation (slave). Just type in that name inside the Object Managers search bar to find it. Your shoe will now follow the foot s moves- it is attached to the foot. 18


19 There may be extreme positions where your foot s skin shines through the shoe. We can fix this by making these critical areas invisible. 19
 and freeze the selection=> Main Menu=> Select=> Set Selection.")


20 2.- Select all the polygons of the critical area (usually the heel + toes) and freeze the selection=> Main Menu=> Select=> Set Selection. We will create a material which transfers the property of inivisibility. 3.- Material Manager=> Create=> New Material. Double click on the new material to open its Material Editor. On the left side activate the Alpha Channel. Next to Texture, click on the black arrow=> a menu appears=> choose Color. 20


21 4.- Click on the white rectangle and the Color Properties will become visible, choose R,G & B= With the polygons of the heel + toes selected, drag the new material onto this selection inside the Editor Window. Render. Now the critical area is invisible. If it isn t you might have to activate Mix Textures on your feet s material tag. We hope you had fun and are looking forward to your next visit! To be the first to know about a new tutorial we recommend you join us on Facebook. Kobold Charakteranimation Are you interested in professional character design and animation but you didn t venture to embark on this complex topic? We offer a Morph Room (over 600 Morphs!) and an Animation Room (Inverse and Forward Kinematic included) NATIVE in CINEMA 4D Studio. We are about to release our Recording Room where you will use the kinect to control the character s motion. 21
Shade tutorial: Shoes for Poser.
 Shade tutorial: Shoes for Poser www.oscillator.se/3d Notes Welcome to the Shade tutorial: Shoes for Poser. This is my first tutorial for Shade. I was inspired by the friendly and generous people at Shader
This is the opening view of blender.
 This is the opening view of blender. Note that interacting with Blender is a little different from other programs that you may be used to. For example, left clicking won t select objects on the scene,
In Wings 3D: Basic Pants
 Modeling for Poser In Wings 3D: Basic Pants Cyberwoman 2010; illustrations by Cyberwoman with the cooperation of Sydney G2. Do not reproduce or redistribute without permission. This tutorial will show
Blender Lesson Ceramic Bowl
 Blender Lesson Ceramic Bowl This lesson is going to show you how to create a ceramic looking bowl using the free program Blender. You will learn how to change the view, add, delete, scale and edit objects
Basic Blender Commands This is just a partial list of Blender commands. Please visit the Blender.org website for more details.
 Basic Key Commands Basic Blender Commands This is just a partial list of Blender commands. Please visit the Blender.org website for more details. TAB key- Toggles between edit mode (vertex editing) and
How to Create a Simple Animation Using MAYA
 How to Create a Simple Animation Using MAYA Jennifer Soltz July 29, 2011 0 Table of Contents Introduction Safety Information. 2. 3 What you need Materials Overview Diagram. 4. 4 Instructions Setup Modeling
Chapter 3- Creating & Editing Objects
 Working with Basic Meshes Chapter 3- Creating & Editing Objects Now that we know how to move around in Blender, let s start doing some basic building and shaping. In this chapter we will talk about creating
ARCHITECTURE & GAMES. A is for Architect Simple Mass Modeling FORM & SPACE. Industry Careers Framework. Applied. Getting Started.
 A is for Architect Simple Mass Modeling One of the first introductions to form and space usually comes at a very early age. As an infant, you might have played with building blocks to help hone your motor
Character Modeling IAT 343 Lab 6. Lanz Singbeil
 Character Modeling IAT 343 Lab 6 Modeling Using Reference Sketches Start by creating a character sketch in a T-Pose (arms outstretched) Separate the sketch into 2 images with the same pixel height. Make
3DS MAX to MARVELOUS DESIGNER WORKFLOW
 3DS MAX to MARVELOUS DESIGNER WORKFLOW 1) OPEN RIGGED MODEL This document goes through all steps necessary to use Marvelous Designer (MD) as a cloth simulation tool for characters rigged, animated and
CGS 3220 Lecture 13 Polygonal Character Modeling
 CGS 3220 Lecture 13 Polygonal Character Modeling Introduction to Computer Aided Modeling Instructor: Brent Rossen Overview Box modeling Polygon proxy Mirroring Polygonal components Topology editing Procedural
Full Screen Layout. Main Menu Property-specific Options. Object Tools ( t ) Outliner. Object Properties ( n ) Properties Buttons
 Outliner. Object Properties ( n ) Properties Buttons") Object Tools ( t ) Full Screen Layout Main Menu Property-specific Options Object Properties ( n ) Properties Buttons Outliner 1 Animation Controls The Create and Add Menus 2 The Coordinate and Viewing
Object Tools ( t ) Full Screen Layout Main Menu Property-specific Options Object Properties ( n ) Properties Buttons Outliner 1 Animation Controls The Create and Add Menus 2 The Coordinate and Viewing
UV Mapping to avoid texture flaws and enable proper shading
 UV Mapping to avoid texture flaws and enable proper shading Foreword: Throughout this tutorial I am going to be using Maya s built in UV Mapping utility, which I am going to base my projections on individual
4) Finish the spline here. To complete the spline, double click the last point or select the spline tool again.
 Finish the spline here. To complete the spline, double click the last point or select the spline tool again.") 1) Select the line tool 3) Move the cursor along the X direction (be careful to stay on the X axis alignment so that the line is perpendicular) and click for the second point of the line. Type 0.5 for
1) Select the line tool 3) Move the cursor along the X direction (be careful to stay on the X axis alignment so that the line is perpendicular) and click for the second point of the line. Type 0.5 for
An Introduction to Maya. Maya. Used in industrial design, CAD, computer games and motion picture effects. The ambition is what get
 An Introduction to Maya Gustav Taxén gustavt@nada.kth.se 2D1640 Grafik och Interaktionsprogrammering VT 2006 Maya Used in industrial design, CAD, computer games and motion picture effects Special focus
Detailed Table of content. 3D View by tools - Header. 3D View by tools - Header detailed
 3D View by tools - Header Detailed Table of content...1 Introduction...16 Header...16 All Modes - View Menu...17 All Modes - Navigation Menu...24 All Modes, all Object types - Show / Hide...29 Object Mode
NURBS Sailboat on Ocean (Modeling/Animation)
") Course: 3D Design Title: NURBS Sailboat Blender: Version 2.6X Level: Beginning Author; Neal Hirsig (nhirsig@tufts.edu) (April 2013) NURBS Sailboat on Ocean (Modeling/Animation) The objective of this PDF
Course: 3D Design Title: NURBS Sailboat Blender: Version 2.6X Level: Beginning Author; Neal Hirsig (nhirsig@tufts.edu) (April 2013) NURBS Sailboat on Ocean (Modeling/Animation) The objective of this PDF
Mount Points Mount Points is a super simple tool for connecting objects together and managing those relationships.
 Mount Points Mount Points is a super simple tool for connecting objects together and managing those relationships. With Mount Points, you can simply drag two objects together and when their mount points
Beginners Guide Maya. To be used next to Learning Maya 5 Foundation. 15 juni 2005 Clara Coepijn Raoul Franker
 Beginners Guide Maya To be used next to Learning Maya 5 Foundation 15 juni 2005 Clara Coepijn 0928283 Raoul Franker 1202596 Index Index 1 Introduction 2 The Interface 3 Main Shortcuts 4 Building a Character
3D Modeling Course Outline
 3D Modeling Course Outline Points Possible Course Hours Course Overview 4 Lab 1: Start the Course Identify computer requirements. Learn how to move through the course. Switch between windows. Lab 2: Set
Mastering Truspace 7
 How to move your Truespace models in Dark Basic Pro by Vickie Eagle Welcome Dark Basic Users to the Vickie Eagle Truspace Tutorials, In this first tutorial we are going to build some basic landscape models
Basic Blender Commands This is just a partial list of Blender commands. Please visit the Blender.org website for more details.
 Basic Key Commands Basic Blender Commands This is just a partial list of Blender commands. Please visit the Blender.org website for more details. TAB key- Toggles between edit mode (vertex editing) and
5 Subdivision Surfaces
 5 Subdivision Surfaces In Maya, subdivision surfaces possess characteristics of both polygon and NURBS surface types. This hybrid surface type offers some features not offered by the other surface types.
Creating a Snowman Scene
 Creating a Snowman Scene By: Shane Trautsch Blender 2.72 What you will learn Basic Modeling Particle systems sculpting Materials and Textures Lighting Creating a Snow By now, you have created a snowman.
Key 3D Modeling Terms Beginners Need To Master
 Key 3D Modeling Terms Beginners Need To Master Starting your 3D modeling journey is an exciting and rewarding experience. As you begin to learn and practice, there are essential terms you need to know
Spring 2011 Workshop ESSENTIALS OF 3D MODELING IN RHINOCEROS February 10 th 2011 S.R. Crown Hall Lower Core Computer Lab
 [1] Open Rhinoceros. PART 1 INTRODUCTION [4] Click and hold on the Boundary Lines in where they form a crossing and Drag from TOP RIGHT to BOTTOM LEFT to enable only the PERSPECTIVE VIEW. [2] When the
Textures and UV Mapping in Blender
 Textures and UV Mapping in Blender Categories : Uncategorised Date : 21st November 2017 1 / 25 (See below for an introduction to UV maps and unwrapping) Jim s Notes regarding Blender objects, the UV Editor
lundi 7 janvier 2002 Blender: tutorial: Building a Castle Page: 1
 lundi 7 janvier 2002 Blender: tutorial: Building a Castle Page: 1 www.blender.nl this document is online at http://www.blender.nl/showitem.php?id=4 Building a Castle 2000 07 19 Bart Veldhuizen id4 Introduction
COS 116 The Computational Universe Laboratory 10: Computer Graphics
 COS 116 The Computational Universe Laboratory 10: Computer Graphics As mentioned in lecture, computer graphics has four major parts: imaging, rendering, modeling, and animation. In this lab you will learn
Autodesk Fusion 360: Model. Overview. Modeling techniques in Fusion 360
 Overview Modeling techniques in Fusion 360 Modeling in Fusion 360 is quite a different experience from how you would model in conventional history-based CAD software. Some users have expressed that it
Transforming Objects and Components
 4 Transforming Objects and Components Arrow selection Lasso selection Paint selection Move Rotate Scale Universal Manipulator Soft Modification Show Manipulator Last tool used Figure 4.1 Maya s manipulation
Chapter 3- Creating & Editing Objects
 ` Chapter 3- Creating & Editing Objects Edit Mode- Mesh Editing Object Mode After you have created a mesh, you can go into Edit mode (Tab key or Mode option in window) and change its shape. In edit mode,
Walk Cycle with Symbols
 Walk Cycle with Symbols STEP 1 Assuming you have your character all rigged and ready to go, double click on the character to get into the master symbol to see all the layers that make up all of the character
COS 116 The Computational Universe Laboratory 10: Computer Graphics
 COS 116 The Computational Universe Laboratory 10: Computer Graphics As mentioned in lecture, computer graphics has four major parts: imaging, rendering, modeling, and animation. In this lab you will learn
Mesh Modeling Vase and Flower
 Course: 3D Design Title: Mesh Modeling Vase and Flower Dropbox File: VaseAndFlower.zip Blender: Version 2.45 Level: Beginning Author: Neal Hirsig (nhirsig@tufts.edu) Mesh Modeling Vase and Flower In this
How to draw and create shapes
 Adobe Flash Professional Guide How to draw and create shapes You can add artwork to your Adobe Flash Professional documents in two ways: You can import images or draw original artwork in Flash by using
Max scene used to generate the image from the second pdf in this tutorial.
 Tutorial covers creating vector drawings from a 3ds max scene and methods for compositing these drawings back into a rendering. Rendering set up is based of the lighting set up from the mental ray/skylight/mr
2. Drag and drop the cloud image onto your desktop to be used later in the tutorial.
 Do the following tutorial. You will use the Earth Map image and Photo image below. 1. Copy the Earth Map image and paste it into photoshop. Open photoshop. Go to menu/file/new. Name it lastname-earth.
Reference Image. Source:
 Mesh Modeling By Immer Baldos This document is a tutorial on mesh modeling using Blender version 2.49b. The goal is to create a model of an elevator. This tutorial will tackle creating the elevator cart,
Introduction to Flash - Creating a Motion Tween
 Introduction to Flash - Creating a Motion Tween This tutorial will show you how to create basic motion with Flash, referred to as a motion tween. Download the files to see working examples or start by
Lesson 11. Polygonal Spaceship
 11 Polygonal Spaceship In this lesson, you will build and texture map a polygonal spaceship. Starting with a polygonal cube, you will extrude facets until you have a completed ship. You will then be able
V4A4HipHopMagic 2008, 2014 Elisa Griffin, all rights reserved
 V4A4HipHopMagic 2008, 2014 Elisa Griffin, all rights reserved Welcome to V4A4HipHopMagic!* This program is a free-standing application. To use the pose information in Poser you must own the Victoria 4
Point based global illumination is now a standard tool for film quality renderers. Since it started out as a real time technique it is only natural
 1 Point based global illumination is now a standard tool for film quality renderers. Since it started out as a real time technique it is only natural to consider using it in video games too. 2 I hope that
An Approach to Content Creation for Trainz
 An Approach to Content Creation for Trainz Paul Hobbs Part 6 GMax Basics (Updates and sample files available from http://www.44090digitalmodels.de) Page 1 of 18 Version 3 Index Foreward... 3 The Interface...
Photography by Christina Sizemore. Mudbox Hotkeys
 Digital Sculpting with Mudbox FIG 2.12 Digital Images Are Composed of a Pixel Grid. Each Pixel Stores Information Like Color and Transparency. Mudbox Uses Digital Images as Stencils and Stamps and Creates
House Build Tutorial NAME: GRADE: ARTD 240 3D Modeling & Animation Deborah Ciccarelli, Assistant Professor
 ARTD 240 3D Modeling & Animation Deborah Ciccarelli, Assistant Professor NAME: GRADE: House Build Tutorial Goal: Create a model of a house by referencing drafts of a front and side elevation. Follow the
3ds Max Cottage Step 1. Always start out by setting up units: We re going with this setup as we will round everything off to one inch.
 3ds Max Cottage Step 1 Always start out by setting up units: We re going with this setup as we will round everything off to one inch. File/Import the CAD drawing Be sure Files of Type is set to all formats
Quick Tips to Using I-DEAS. Learn about:
 Learn about: Quick Tips to Using I-DEAS I-DEAS Tutorials: Fundamental Skills windows mouse buttons applications and tasks menus icons part modeling viewing selecting data management using the online tutorials
Getting Started with ShowcaseChapter1:
 Chapter 1 Getting Started with ShowcaseChapter1: In this chapter, you learn the purpose of Autodesk Showcase, about its interface, and how to import geometry and adjust imported geometry. Objectives After
Learning Autodesk Maya The Modeling & Animation Handbook. Free Models From Turbo Squid Value US $ Official Autodesk Training Guide
 Free Models From Turbo Squid Value US $239.00 Official Autodesk Training Guide Learning Autodesk Maya 2008 The Modeling & Animation Handbook A hands-on introduction to key tools and techniques in Autodesk
A Guide to Autodesk Maya 2015
 A Guide to Autodesk Maya 2015 Written by Mitchell Youngerman Table of Contents Layout of Toolbars...pg 1 Creating Objects...pg 2 Selecting & Deselecting Objects...pg 3 Changing Perspective... pg 4 Transforming
Character Modeling COPYRIGHTED MATERIAL
 38 Character Modeling p a r t _ 1 COPYRIGHTED MATERIAL 39 Character Modeling Character Modeling 40 1Subdivision & Polygon Modeling Many of Maya's features have seen great improvements in recent updates
Editing Polygons. Adding material/volume: Extrude. Learning objectives
 Learning objectives Be able to: use the Extrude tool to add volume to a polygon know what edge loops are and how to insert edge loops in a polygon cut edges in a polygon know multiple methods of sewing
Using Flash Animation Basics
 Using Flash Contents Using Flash... 1 Animation Basics... 1 Exercise 1. Creating a Symbol... 2 Exercise 2. Working with Layers... 4 Exercise 3. Using the Timeline... 6 Exercise 4. Previewing an animation...
SketchUp. SketchUp. Google SketchUp. Using SketchUp. The Tool Set
 Google Google is a 3D Modelling program which specialises in making computer generated representations of real-world objects, especially architectural, mechanical and building components, such as windows,
Actions and Graphs in Blender - Week 8
 Actions and Graphs in Blender - Week 8 Sculpt Tool Sculpting tools in Blender are very easy to use and they will help you create interesting effects and model characters when working with animation and
Modeling Technology Group
 Modeling Technology Group Hiroshi Hayashi David Ogirala Matt Nedrich Jeff Ridenbaugh Spencer Smith Saba Bokhari John Gray Charles Hellstrom Bryan Linthicum Polygon Models (part-1) What are polygons? -
Adobe Flash CS3 Reference Flash CS3 Application Window
 Adobe Flash CS3 Reference Flash CS3 Application Window When you load up Flash CS3 and choose to create a new Flash document, the application window should look something like the screenshot below. Layers
Project 9. Render a Kitchen
 Project 9 Render a Kitchen Creating a kitchen in 3D is one of those projects that help a lot in improving our skills. Since a kitchen can be created without having to resort to complex modeling skills,
Box Modeling a Character Model Maya 2013
 2007-2013 Michael O'Rourke Box Modeling a Character Model Maya 2013 Concept When modeling a polygon character model, it can be faster to create a symmetrical model at first by working on only one half
3D Studio Max Lesson 1.1: A Basic Overview of 3DSMax's Main Tool Bar
 3D Studio Max Lesson 1.1: A Basic Overview of 3DSMax's Main Tool Bar Introduction In this tutorial, we'll just be taking a look at parts of the environment of 3D Studio Max version 4.26, and helping you
Maya 2014 NURBS Modeling Tutorial Airship
 Maya 2014 NURBS Modeling Tutorial Airship Airships have captured human imagination for centuries and are featured prominently in books, film and video games. As an introduction to modeling with NURBS (non
Glass Gambit: Chess set and shader presets for DAZ Studio
 Glass Gambit: Chess set and shader presets for DAZ Studio This product includes a beautiful glass chess set, 70 faceted glass shader presets and a 360 degree prop with 5 material files. Some people find
Lesson 1: Creating T- Spline Forms. In Samples section of your Data Panel, browse to: Fusion 101 Training > 03 Sculpt > 03_Sculpting_Introduction.
 3.1: Sculpting Sculpting in Fusion 360 allows for the intuitive freeform creation of organic solid bodies and surfaces by leveraging the T- Splines technology. In the Sculpt Workspace, you can rapidly
A Guide to Processing Photos into 3D Models Using Agisoft PhotoScan
 A Guide to Processing Photos into 3D Models Using Agisoft PhotoScan Samantha T. Porter University of Minnesota, Twin Cities Fall 2015 Index 1) Automatically masking a black background / Importing Images.
Cinema 4D R19 (SP2) Change List Cinema 4D / BodyPaint 3D Service Release
 Change List Cinema 4D / BodyPaint 3D Service Release") Cinema 4D R19 (SP2) Change List Cinema 4D / BodyPaint 3D Service Release 19.053 ANIMATION Fixed a stability issue with polygon reduction and the Skin object Fixed an animation issue when interpolating
Cinema 4D R19 (SP2) Change List Cinema 4D / BodyPaint 3D Service Release 19.053 ANIMATION Fixed a stability issue with polygon reduction and the Skin object Fixed an animation issue when interpolating
How to start your Texture Box Project!
 How to start your Texture Box Project! Shapes, naming surfaces, and textures. Lightwave 11.5 Part One: Create Your Shape Choose Start, Programs, New Tek, Lightwave and Modelor (the orange one). 1.In one
Google SketchUp. and SketchUp Pro 7. The book you need to succeed! CD-ROM Included! Kelly L. Murdock. Master SketchUp Pro 7 s tools and features
 CD-ROM Included! Free version of Google SketchUp 7 Trial version of Google SketchUp Pro 7 Chapter example files from the book Kelly L. Murdock Google SketchUp and SketchUp Pro 7 Master SketchUp Pro 7 s
MODELING EYES ESTIMATED TIME REQUIRED
 MODELING EYES This tutorial will teach you how to model a pair of realistic-looking eyes and insert them into the head of a character. ESTIMATED TIME REQUIRED 30 Minutes LEARNING GOALS In this tutorial,
The Villa Savoye ( ), Poisy, Paris.
, Poisy, Paris.") Learning SketchUp Villa Savoye This tutorial will involve modeling the Villa Savoye by Le Corbusier Files needed to complete this tutorial are available in Mr. Cochran s Web Site The Villa Savoye (1929-1931),
Learning SketchUp Villa Savoye This tutorial will involve modeling the Villa Savoye by Le Corbusier Files needed to complete this tutorial are available in Mr. Cochran s Web Site The Villa Savoye (1929-1931),
1st Point. 2nd Point. hold shift & drag along Y. Splines
 Splines STEP 1: open 3DS Max _ from the Command Panel under the Create tab click on Shapes (note: shapes are really Splines) _ under Object Type click on Ellipse STEP 2: Expand the Keyboard Entry tab type
Inventor 201. Work Planes, Features & Constraints: Advanced part features and constraints
 Work Planes, Features & Constraints: 1. Select the Work Plane feature tool, move the cursor to the rim of the base so that inside and outside edges are highlighted and click once on the bottom rim of the
Mesh Modeling Dice Boolean
 Course: 3D Design Title: Mesh Modeling Dice - Boolean Dropbox File: Dice.zip Blender: Version 2.41 Level: Beginning Author: Neal Hirsig (nhirsig@tufts.edu) Mesh Modeling Dice Boolean In this tutorial,
Basic Texturing Tutorial by Gary Wu
 Basic Texturing Tutorial by Gary Wu This tutorial will teach you how to use basic shaders as textures on your models. In this example, we will be using a pumpkin model. The first step assumes you have
Create a Rubber Duck. This tutorial shows you how to. Create simple surfaces. Rebuild a surface. Edit surface control points. Draw and project curves
 Page 1 of 24 Create a Rubber Duck This exercise focuses on the free form, squishy aspect. Unlike the flashlight model, the exact size and placement of the objects is not critical. The overall form is the
Chapter 20- Springs, Screws and Gears
 So far, we see that Blender has many features that are found in almost all 3D computer programs like the ability to extrude along paths, subtract and add meshes through Boolean expressions and now we will
Create an Adorable Hedgehog with Basic Tools in Inkscape Aaron Nieze on Sep 23rd 2013 with 5 Comments
 Create an Adorable Hedgehog with Basic Tools in Inkscape Aaron Nieze on Sep 23rd 2013 with 5 Comments Tutorial Details Software: Inkscape Difficulty: Beginner Completion Time: 2 hours View post on Tuts+
Planets Earth, Mars and Moon Shaders Asset V Documentation (Unity 5 version)
") Planets Earth, Mars and Moon Shaders Asset V0.4.4 Documentation (Unity 5 version) Charles Pérois - 2015 Introduction 2 Table des matières 1. Introduction...3 2. Release Notes...4 3. How to Use...6 1. Set
Planets Earth, Mars and Moon Shaders Asset V0.4.4 Documentation (Unity 5 version) Charles Pérois - 2015 Introduction 2 Table des matières 1. Introduction...3 2. Release Notes...4 3. How to Use...6 1. Set
Modeling a Gear Standard Tools, Surface Tools Solid Tool View, Trackball, Show-Hide Snaps Window 1-1
 Modeling a Gear This tutorial describes how to create a toothed gear. It combines using wireframe, solid, and surface modeling together to create a part. The model was created in standard units. To begin,
3D Character Creation for the Unreal Game Engine Using Adobe Fuse
 3D Character Creation for the Unreal Game Engine Using Adobe Fuse Developed by: Gaming Research Integration for Learning Laboratory (GRILL ) DISTRIBUTION A: Approved for public release; distribution unlimited.
Module 2 Review. Assemblies and Rendering. Why Use Assemblies. Assemblies - Key Concepts. Sketch Planes Sketched Features.
 Module 2 Review Assemblies and Rendering EF 101 Modules 3.1, 3.2 Sketch Planes Sketched Features Extrude, Revolve Placed Features Hole, Fillet, Chamfer, Shell, Rect. Pattern Drawing Views Base, Ortho,
TRAINING SESSION Q2 2016
 There are 8 main topics in this training session which focus on the Sketch tools in IRONCAD. Content Sketch... 2 3D Scene Background Settings... 3 Creating a new empty Sketch... 4 Foam with cut out for
Unit 68: 3D Environments
 Unit 68: 3D Environments 1. Various different industries make good use of 3D Environments to create quality and professional products. A prime example of this is the gaming industry, which has been impacted
1. Open up PRO-DESKTOP from your programmes menu. Then click on the file menu > new> design.
 Radio Tutorial Draw your spatula shape by:- 1. Open up PRO-DESKTOP from your programmes menu. Then click on the file menu > new> design. 2. The new design window will now open. Double click on design 1
Chapter 4- Materials and Textures
 Chapter 4- Materials and Textures Materials and textures are what change your model from being gray to brilliant. You can add color, make things glow, become transparent like glass or make them look like
Tutorial 2: Particles convected with the flow along a curved pipe.
 Tutorial 2: Particles convected with the flow along a curved pipe. Part 1: Creating an elbow In part 1 of this tutorial, you will create a model of a 90 elbow featuring a long horizontal inlet and a short
Chapter 9- Ray-Tracing
 Ray-tracing is used to produce mirrored and reflective surfaces. It is also being used to create transparency and refraction (bending of images through transparent surfaceslike a magnifying glass or a
Lesson 1 Parametric Modeling Fundamentals
 1-1 Lesson 1 Parametric Modeling Fundamentals Create Simple Parametric Models. Understand the Basic Parametric Modeling Process. Create and Profile Rough Sketches. Understand the "Shape before size" approach.
3D Modeling and Design Glossary - Beginner
 3D Modeling and Design Glossary - Beginner Align: to place or arrange (things) in a straight line. To use the Align tool, select at least two objects by Shift left-clicking on them or by dragging a box
Bonus Ch. 1. Subdivisional Modeling. Understanding Sub-Ds
 Bonus Ch. 1 Subdivisional Modeling Throughout this book, you ve used the modo toolset to create various objects. Some objects included the use of subdivisional surfaces, and some did not. But I ve yet
Chapter 4- Materials and Textures
 Chapter 4- Materials and Textures Materials and textures are what change your model from being gray to brilliant. You can add color, make things glow, become transparent like glass or make them look like
First Animated Model Yellow Submarine
 Course: 3D Design Title: First Animated Model Yellow Submarine Blender: Version 2.6X Level: Beginning Author; Neal Hirsig (May 2012) First Animated Model Yellow Submarine Most of you are perhaps too young
Using LightWave s Motion Blur to Achieve a Hand Drawn Line Effect:
 Using LightWave s Motion Blur to Achieve a Hand Drawn Line Effect: Cellshader, Unreal, and the use of gradients along with other plugins have given us some great cell painted cartoon and comic book effects,
Graphical Editors used at CSC/Nada earlier. Main competitors. What is Maya? What is Maya? An Introduction to Maya. Maya
 DH2640 Grafik och interaktionsprogrammering DH2323 Datorgrafik och interaktion NA8740 Datorgrafik och användargränssnitt An Introduction to Maya original slides by Gustav Taxén Lars Kjelldahl lassekj@csc.kth.se
Spiky Sphere. Finding the Sphere tool. Your first sphere
 Spiky Sphere Finding the Sphere tool The Sphere tool is part of ShapeWizards suite called MagicBox (the other tools in the suite are Pursuit, Shell, Spiral). You can install all these tools at once by
WAYLAND FREE PUBLIC LIBRARY 3D Design and Printing Tutorial: Create a Keychain
 WAYLAND FREE PUBLIC LIBRARY 3D Design and Printing Tutorial: Create a Keychain Welcome! In this tutorial we will be creating a 3D printed keychain. You will personalize this name tag with text to make
Adobe InDesign CS6 Tutorial
 Adobe InDesign CS6 Tutorial Adobe InDesign CS6 is a page-layout software that takes print publishing and page design beyond current boundaries. InDesign is a desktop publishing program that incorporates
User Interface Introduction... 4 User Interface - Main Menu... 5 User Interface - Tool Bar... 6 File Handlers... 7 Edit Controls... 8 Indicators...
 User Interface Introduction... 4 User Interface - Main Menu... 5 User Interface - Tool Bar... 6 File Handlers... 7 Edit Controls... 8 Indicators... 10 Lights... 12 Pixel Shader... 14 User Interface - Scene
Text Page 1 Chris Shaw
 Text 101 www.fridgemonsters.com Page 1 Chris Shaw Copyright and Terms of Use Please leave all references to FridgeMonsters intact in the documentation and code examples. 1. Except as otherwise provided,
LOOSE FITTING CLOTHES
 LOOSE FITTING CLOTHES Begin by opening the basic box modeled figure 0-BasicFigure.blend. He s at https://users.soe.ucsc. edu/~yonge/05_homework_resources/. This exercise uses some retopology techniques