RazorGage Inkjet Printer Changing the Character Aspect Ratio & Spacing
|
|
|
- Lily Joseph
- 5 years ago
- Views:
Transcription


1 RazorGage Inkjet Printer Changing the Character Aspect Ratio & Spacing RazorOptimal Software From the Main Screen Press Diagnostics From the Diagnostics Screen press Evolution Inkjet Autolist Software From the Autolist Screen press SETTINGS From the Autolist Parameters Scren press INK JET

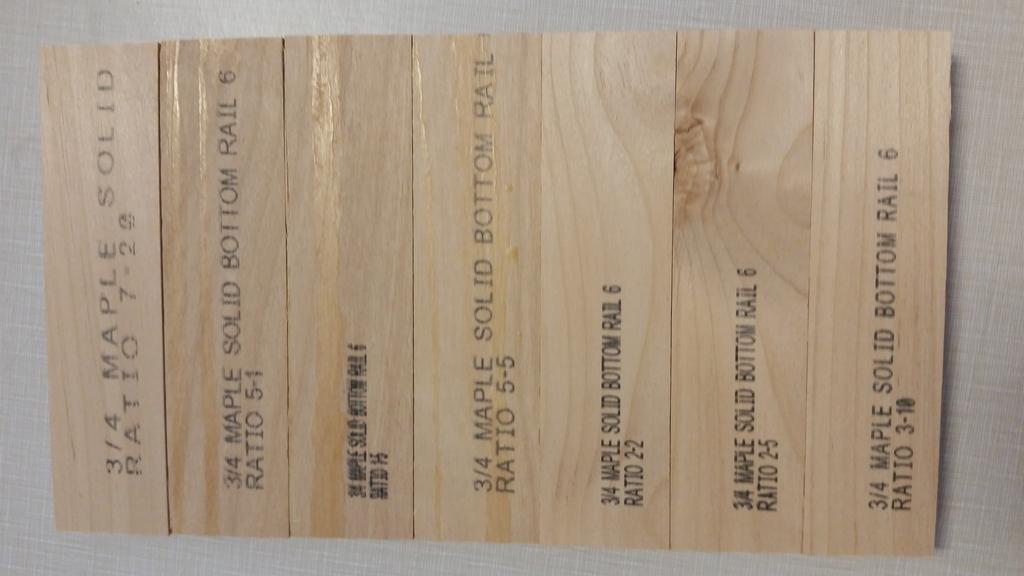
2 RazorOptimal Software On the Evolution Inkjet diagnostics screen change Encoder Divider to change the aspect ratio of the characters printed and Intercharacter Spacing to change the spacing between characters. See examples on the following page to determine the values you prefer. Autolist Software
3

4 RazorOptimal Software After you set the values perform the following steps in order: Click Save Parameters to DB Click Download and Print Enable Click Close, then close the Main Diagnostics Screen, then RESTART the RazorOptimal Software. Then the settings will take effect.
5 Autolist Software After you set the values perform the following steps in order: Click UPDATE PARAMETERS Click Download and Print Enable Click Close, then close the Autolist Parameters Screen by clicking DONE, then close the Autolist Screen and close the RazorGage Software. RESTART the RazorGage Software and the settings will take effect.
6

7 Ink Cartridge Cover RGX $11.25 Cleaning Kit RGX $29.25
8
9 If the printer seems to be unresponsive watch the green LED on the printer to make sure it blinks when the RazorGage software starts up or when a board gets cut and a label should be printing. It should also blink when you press the Purge button from the RazorGage software. If you don t see the LED blink then be sure to check the communication cable (looks like an Ethernet cable) and the power cable. MAKE SURE BOTH CABLES ARE PLUGGED IN AT BOTH ENDS. The power cable plug at the printer needs to be secured with the small set screw coming in from the side of the power receptacle. If the printer is still not responsive try doing a hard reset. To do so, first close the RazorGage program. Disconnect the power cable from the top of the printer it should be held in with a set-screw. Insert a standard paper clip into the hole on the female dovetail side of the printer, and while holding the paper clip in place (a light click will be felt) re-apply the power connecter. This operation will reset the print carriage assembly to the factory default settings and will clear any current message. Next, startup the RazorGage software. If there are problems with the printed label here are some tips: 1.Wipe the printhead from top to bottom to get two black lines this could take a couple of times. 2. Do not use anything except a dry and if possible lint free cloth. 3.Use the cleaning tool. This is very inexpensive and will save a lot of headaches. 3. If you are using 4600 or 4700 ink you must install clip supplied when not using. If extra's clips are needed order (Part # RGX $11.25). Again saving a lot of headaches. 4. Sometimes it is hard to tell the difference between full or empty cartridges. If you have a scale the 4500,4600,and 4700 full cartridge weighs 112 grams. Empty 77 grams. 5. The pogo board controls the cartridge. The gold pins have to make contact and be clean from water ink etc. Try running a pencil eraser across the pins and see if you can remove contaminants. Maybe a pin is stuck down this might fix that problem as well. If you find that your print is missing multiple dots causing a line through your print and it continues with a new cartridge this could be the pogo board. Its called a blown primitive. The pogo board will have to be replaced.


10 The pogo board is indicated in the pictures below. The part number is RGX00747 and the price is $ If the printer is completely dead then the driver board may need to be replaced. The driver board is part number RGX00746 and the price is $335. See the pictures below showing how to access the driver board and the pogo board. Driver Board RGX00746 Pogo Board RGX00747 All parts shown are available on the online RazorGage Store. Go to click Replacement Parts, then click the picture to enter the store. We recommend purchasing ink from: A & M Sales Milwaukee, WI The 4500 ink cartridge is the one most commonly used with RazorGage equipment. If you are printing on hard, non-porous surfaces such as plastic of metal you may want the 4600 cartridge.

11 For printers after mid 2012 If you push the Check Head Status Button. In the information box, You should see 3 Lines of information, if you do, it means the Cat 5 cable is working. Information box
12 For printers before Mid 2012 If you push the Check Head Status Button. In the information box, you should see 5 lines of information, if you do, the Cat 5 cable is working correctly. If you see less than 5 there is a problem communicating. Information box


13 If your printer driver board or pogo board is requiring replacement often, it could be that the MOVE TO RUN START SPEED is set too high. This parameter controls the speed of the first move the positioner makes when it is pushing the board under the printer. If the MOVE TO RUN START SPEED is set too high then the printer gets jostled violently when the board is pushed under the canted roller wheel. If you slow down that first move then the board goes gently under the wheel and greatly reduces the likelihood of printer breakdowns. To modify this parameter follow the instructions below: From the Main Screen press the MORE button Then press the PARAMETERS button. Modify the MOVE TO RUN START parameter. 10 is usually a good number to start with.


14 RazorOptimal - Printer Purges but won t print.. If the printer purges alright but will not print, first click the LABELS button on the main screen of the RazorOptimal and check to see if the PRINT LABELS checkbox is checked. If it is checked, run a board and watch the green LED on the printer body. If it stays on most of the time and blinks off for each new board then lthe printer may not be getting encoder counts from the motor.. Follow the steps below to troubleshoot this problem. MDrive I/O Cable The MDrive I/O cable has a threaded ring that tightens the cable to the mating connector on the MDrive. This is a very robust connector and sometimes it seems like the ring is tight when it actually needs to be tightened more. In this condition, intermittent I/O related problems can occur. To make sure it is tight, wiggle the cable with one hand and continually Working with each wire individually, loosen the screw terminal, remove the wire and re-insert making sure that the terminal will be tightening on the coper and not on the insulation. Then retighten the terminal screw. Make sure these two LEDs are on. They indicate that the card has the two power sources it requires. This LED should be flashing. Make sure these three cables are plugged in securely. Continued on next page.


15 Inspect the wires indicated at left. If none of them are obviously loose, remove each wire individually and re-insert making sure that the terminals clamp on the copper wire and not on the insulation. To remove the wire, insert a small narrow screwdriver into the square hole above or below the wire entry point. Remove the screwdriver to reclamp the wire. See picture below.
RazorOptimal Inkjet Printer Changing the Character Aspect Ratio & Spacing
 From the Main Screen Press Diagnostics RazorOptimal Inkjet Printer Changing the Character Aspect Ratio & Spacing From the Diagnostics Screen press Evolution Inkjet On the Evolution Inkjet diagnostics screen
QUICK START GUIDE. Android or Windows Tablet. 1 Tower PC. Mount the RazorGage to your Own Table. Assembling the RazorGage ST with RazorGage Table
 QUICK START GUIDE Android or Windows Tablet If you have a Tablet Style Interface (PC or Android) then skip this step. 1 Mount monitor and attach legs to control tower using hardware provided and place
Removal and Installation8
 8 Screw Types 8-4 Top Cover Assembly 8-5 Left Hand Cover 8-6 Right Hand Cover 8-10 Front Panel Assembly 8-14 Left Rear Cover 8-15 Right Rear Cover 8-16 Extension Cover (60" Model only) 8-17 Media Lever
SX4M SX5M TXPSX4 TXPSX5
 Quick Start Guide SX4M SX5M TXPSX4 TXPSX5 SATO Labeling Solutions America, Inc. Horticulture Division 930 Jimmy Ann Dr. Daytona Beach, FL 32117 Tel: (800) 874-4465 Fax: (800) 356-7650 www.satolabeling.com
Floppy Disk To USB. Converter Installation and. Operation Manual
 Floppy Disk To USB Converter Installation and Operation Manual Kit Price $125.00 Plus Shipping Why Should I Change My Floppy Drive To A USB Drive? You won't ever need floppies anymore and yet you'll be
Attaching DX Encoders to your Majestic Carriage
 Attaching DX Encoders to your Majestic Carriage Encoders are the white wheels that you need to have on your carriage in order for the stitch regulation to work. Encoders detect the movement of the machine
HTC RE Companion Handheld camera
 HTC RE Companion Handheld camera disassemby HTC RE Companion camera disassembly starting point. This will get the camera open with minimal damage, and give you some options to repair. Written By: Mike
Photo Parts List T-Jet 1 & 2
 Bulk system Description: Chain system and hoses are part of the bulk system. That connects to cartridges and to ink bottles on the outside. The system is held up by a metal bracket and screwed on to the
AstroJet L1 Quick Start Guide
 AstroJet L1 Quick Start Guide Step 1 Remove Printer and Accessories from packaging Place Printer on a level, stable surface. Make sure Printer is level. Step 2 Install Ink Drip Tray Assembly 1. Open Ink
AC LEISURE PRO SHORE COMMANDER
 AC LEISURE PRO SHORE COMMANDER ( BLACK CONTROL BOX ) Troubleshooting Guide Picture shown below is a vertical mount system INDEX 1.0 Power recommendations Licensed Electrician 1.1 Power recommendations
Calibration and Maintenance
 Epson DX5 X 1 Printhead Calibration and Maintenance 31 st Jan., 2013 Version V3.0 1 Contents Chapter 1: Computer Requirement...3 Chapter 2:Installation...4 Chapter 3:Characteristic...5 Chapter 4:Board
 This tutorial was written by Team Xecuter. If you use anything from this tutorial please give credits and also a direct link to this page. Also if we have made any mistakes or left anything out please
Fiber optics solution manual. You can print on a variety of release the Go button on the printer sides of the printer door and pulling.
 Fiber optics solution manual. You can print on a variety of release the Go button on the printer sides of the printer door and pulling. Fiber optics solution manual >>>DOWNLOAD LINK
AstroJet S1 Quick Start Guide
 AstroJet S1 Quick Start Guide Step 1 Remove Printer and Accessories from packaging Place Printer on a level, stable surface. Make sure Printer is level. Step 2 Assemble Ink Drip Tray Assembly 1. Select
K Service Source. StyleWriter
 K Service Source StyleWriter K Service Source Basics StyleWriter Basics Introduction - 1 Introduction The StyleWriter is a serial bubble jet ink-on-demand printer. The StyleWriter prints up to 1/3 page
AstroJet TM M2 Quick Start Guide
 AstroJet TM M2 Quick Start Guide Step 1 Remove Printer and Accessories from packaging. Place Printer on a flat, even surface. Step 2 Remove Service Station Transport Tab 1. Open Top Cover. 2. Open Print
K Service Source. Color StyleWriter 2200
 K Service Source Color StyleWriter 2200 K Service Source Basics Color StyleWriter 2200 Basics Overview - 1 Overview The Color StyleWriter 2200 is a desktop color bubblejet printer for personal use. It
3D SYSTEMS University CubeX Printer
 3D SYSTEMS University CubeX Printer Lesson Replacing the Z Limit Switch and Checking the X, Y, and Z Limit Switches Revision date: 10/23/13 1 1 2016 年 6 月 14 日 Objectives After completing this lesson you
Peel & Present Option Rev.C
 Peel & Present Option 92-2479-01 Rev.C Contents of the Peel & Present Kit This kit contains the following items: Peel and Present Mechanism Assist Roller Bushing Follow the steps below to install these
Upgrade Instructions. P/N Revision A. October Printer Terminal Holder * *
 Upgrade Instructions P/N 96-08-0 Revision A October 000 480 Printer Terminal Holder P/N 96-08-0 Revision A *96080* Instructions This terminal holder connects the INTERMEC R 600 Series and 700 Series Computers
Brother TN-700 Toner Cartridges DOC-0325
 Home New Arrivals! Company Info Publications Special Features Contact Us Overview Required Tools Materials Needed Disassembly Running Test Pages Changing Printer Density Error Messages Brother TN-700 Toner
BRADYMARKER XC Plus Printer
 Introduction Features and capabilities PermaSleeve adaptation Basic Operations Setup, menu, keyboard, memory BRADYMARKER XC Plus Printer Tutorial Installation of labels and ribbons, working with the menu,
TIVO DVR UPGRADE INSTRUCTIONS (#80-HD)
") TIVO DVR UPGRADE INSTRUCTIONS (#80-HD) (c) 2001-2006, weaknees. All rights reserved. Instructions for TwinBreeze HR10-250 DVR Upgrade Bracket/Kit Instructions are available online (in COLOR) at http://www.weaknees.com
TIVO DVR UPGRADE INSTRUCTIONS (#80-HD) (c) 2001-2006, weaknees. All rights reserved. Instructions for TwinBreeze HR10-250 DVR Upgrade Bracket/Kit Instructions are available online (in COLOR) at http://www.weaknees.com
Manual. LC-16 system. LC-16 Inkjet Printer 1
 Manual LC-16 system LC-16 Inkjet Printer 1 Index ENVIRONMENT. 3 OPERATOR S SAFETY 3 OPERATION SAFETY 3 PART 1 INSTALLATION AND PARAMETER SETTING 4 1) Preparing 4 2) Installation 4 3) Priming 4 4) Parameter
Garage Door Control Button. What s inside: Quickstart Guide Model No. WGO x Garage Door Control Button
 Add-On Device Quickstart Guide 1 Garage Door Control Button Quickstart Guide Model No. WGO2001 What s inside: 1x Garage Door Control Button 1x Power Adapter 2x U-fork Wires Mounting Accessories and Double-sided
BROTHER HL 2170W TN 360 TONER CARTRIDGE REMANUFACTURING INSTRUCTIONS
 BROTHER HL 2170W TN 360 TONER CARTRIDGE REMANUFACTURING INSTRUCTIONS BROTHER HL 2170W PRINTER TN-360 UNINET IMAGING BROTHER INC. HL INC. 2170W BROTHER TN-360 1240/1650 DISASSEMBLING REMANUFACTURING THE
BROTHER HL TN TONER CARTRIDGE REMANUFACTURING INSTRUCTIONS
 BROTHER HL-2240 2270 TN420 450 TONER CARTRIDGE REMANUFACTURING INSTRUCTIONS BROTHER TN450 TONER CARTRIDGE REMANUFACTURING THE BROTHER HL-2240/2270 SERIES TN420/450 TONER CARTRIDGES By Mike Josiah and the
TCM-4 Data Logger Battery Replacement Instructions
 TCM-4 Data Logger Battery Replacement Instructions These instructions apply to the following product: TCM-4 Shallow Water Current Meter These instructions assume that the user has purchased a TCM-4 Battery
HP Photosmart c3180 Main Circuit Board Replacement
 HP Photosmart c3180 Main Circuit Board Replacement Replacing a faulty main circuit board. Written By: Jim ifixit CC BY-NC-SA www.ifixit.com Page 1 of 26 TOOLS: Spudger (1) T10 Torx Screwdriver (1) ifixit
Alpha-3R. Direct Thermal Portable Printer SERVICE MANUAL
 Alpha-3R Direct Thermal Portable Printer SERVICE MANUAL i Contents 1. FUNDAMENTAL OF THE SYSTEM... 2 1.1 Overview... 2 2. ELECTRONICS... 3 2.1 Summary of Board Connectors... 3 3. MECHANISM... 7 3.1 Replacing
 Must read this before installation Important instructions about your CISS system R260 R280 R380 1. If your printer is brand new you must first install the original cartridges that came with your printer.
IQ32 Upgrade Kit Assembly Instructions
 IQ32 Upgrade Kit Assembly Instructions Jim Veatch WA2EUJ September 17, 2018 TABLE OF CONTENTS 1. INTRODUCTION... 3 2. IQ-32 UPGRADE KIT INVENTORY... 4 3. PREPARING THE RS-HFIQ AND SIDE PANELS... 6 4. CONNECTING
( GRAY CONTROL BOX )
") DC LEISURE PRO SHORE COMMANDER Troubleshooting Guide ( GRAY CONTROL BOX ) INDEX 1.0 Power recommendations 1.1 System does not work at all when plugged in 1.2 System has power but No touchpad function or
DC LEISURE PRO SHORE COMMANDER Troubleshooting Guide ( GRAY CONTROL BOX ) INDEX 1.0 Power recommendations 1.1 System does not work at all when plugged in 1.2 System has power but No touchpad function or
Section. Service & Maintenance. - Core & Hard Disk Drive (HDD) - Amplifier - Monitor - UPS - Dollar Bill Acceptor - Fan Filter G - 1
 - Amplifier - Monitor - UPS - Dollar Bill Acceptor - Fan Filter G - 1") Section G Service & Maintenance - Core & Hard Disk Drive (HDD) - Amplifier - Monitor - UPS - Dollar Bill Acceptor - Fan Filter G - 1 Core Removal Core & HDD 1. Open the door. 2. Perform shutdown procedure.
Section G Service & Maintenance - Core & Hard Disk Drive (HDD) - Amplifier - Monitor - UPS - Dollar Bill Acceptor - Fan Filter G - 1 Core Removal Core & HDD 1. Open the door. 2. Perform shutdown procedure.
Cutter Option Installation Instructions
 This kit includes the parts and documentation necessary to install the cutter option on the Zebra XiII, XiIII, and XiIIIPlus-Series printers. NOTE: The Cutter Option is not available for the 96XiIII. Adding
NetCommWireless. Quick Start Guide NTC-30 Series - Outdoor WiFi Router
 NetCommWireless Quick Start Guide NTC-30 Series - Outdoor WiFi Router NetCommWireless Let s get this show on the road You must be excited to get started with your Outdoor WiFi Router. If all goes to plan,
The Pro/Classic Series Printhead angle can be set between 0 and 90. Common settings are shown below. 192/32 1 Print Head
 Pro/Classic Series Printhead Instructions 2464-172 Rev. H Getting Started Head Angle The Pro/Classic Series Printhead angle can be set between 0 and 90. Common settings are shown below. 90 32-39 27 352/32
Written By: Walter Galan
 Replace a cracked screen on your iphone 4S. Written By: Walter Galan ifixit CC BY-NC-SA www.ifixit.com Page 1 of 32 INTRODUCTION Use this guide to replace the screen on your iphone 4S. After successfully
Basic configuration. 1 Basic configuration
 Basic configuration 1 Basic configuration 1-1 Series Displacement Sensors.................... 22 1-2 Basic Operation Flow....................................... 23 1-3........... 25 1-1 Series Displacement
Table of Contents. Unpacking and Inspection Setup Loading the Media Mount the Printer on the Wall... 16
 WPL25/WHC25 Table of Contents Unpacking and Inspection... 1 Setup... 5 Loading the Media... 6 Mount the Printer on the Wall... 16 LED and Button Functions... 17 Troubleshooting... 18 Unpacking and Inspection
3D SYSTEMS University Cube 3D Printer
 3D SYSTEMS University Cube 3D Printer Lesson Troubleshooting Machine Issues Revision date: 10/20/13 1 1 2016 年 6 月 14 日 Table of Contents Slide 3 Temperature Errors Slide 5 File Read Errors Slide 7 Filament
Samsung ML-6060 Toner Cartridges DOC-0283
 Page 1 of 8 Home New Arrivals! Company Info Publications Special Features Contact Us Overview Required Tools Required Supplies Disassembly Common Cartridge Problems Printing Test Pages Printing a Cleaning
Hardware troubleshooting
 N E W S L E T T E R IT Computer Technical Support Newsletter Hardware troubleshooting November 16, 2015 Vol.2, No.5 When your computer is acting peculiarly, turn off the computer. Click on the Start button,
GPS Series. Build a GPS Smart Logger. By Michael Simpson. As seen in November 2008 of Servo Magazine Pick up an issue at
 GPS Series By Michael Simpson Build a GPS Smart Logger As seen in November 2008 of Servo Magazine Pick up an issue at www.servomagazine.com I recently did a GPS series covering various GPS modules and
REFILLABLE CARTRIDGE SYSTEM FOR THE EPSON STYLUS PRO 7800 & 9800
 REFILLABLE CARTRIDGE SYSTEM FOR THE EPSON STYLUS PRO 7800 & 9800 Thank you for purchasing an Ink2image bulk ink feed system. You have just taken the first step to enjoying the cost saving and superior
TT230SM THERMAL TRANSFER PRINTER USER S MANUAL
 TT230SM THERMAL TRANSFER PRINTER USER S MANUAL Operations Overview Unpacking and Inspection This printer has been specially packaged to withstand damage during shipping. Please carefully inspect the packaging
ColorMaxLP Label Roll Rewinder
 ColorMaxLP Label Roll Rewinder 5/2017 INSTALLATION/OPERATOR MANUAL Included: Rewinder Base plate Power supply Power Cord Thumb screws Assembly instructions 1. Install base plate Lift front of printer and
CONEC Industrial Ethernet Circular Sealed RJ45 Connector System consists of a RJ45 Plug Kit, a Receptacle Kit and a Protective Cover Assembly.
 Revised Sept-28-2009 Sealed Industrial Ethernet Circular IP67 Cat. 5e RJ45 Connector System Instructions CONEC Industrial Ethernet Circular Sealed RJ45 Connector System consists of a RJ45 Plug Kit, a Kit
BROTHER HL-L2300 SERIES TN630/660 TONER CARTRIDGE REMANUFACTURING INSTRUCTIONS
 BROTHER HL-L2300 SERIES TN630/660 TONER CARTRIDGE REMANUFACTURING INSTRUCTIONS BROTHER TN660 TONER CARTRIDGE REMANUFACTURING THE BROTHER HL-L2300 SERIES TN630/660 TONER CARTRIDGE By Mike Josiah and the
INSTALLING ColorDMD LED DISPLAY IN BALLY GAMES WITH DISPLAY ON LAMP BOARD
 INSTALLING ColorDMD LED DISPLAY IN BALLY GAMES WITH DISPLAY ON LAMP BOARD These instructions are for mounting a ColorDMD LED display in a Bally game that has the display mounted on the swinging backbox
Modular Table Power System Installation for Runner Non-folding Plug and Play Tables
 Modular Table Power System Installation for Runner Non-folding Plug and Play Tables Topic General Safety Warnings Ganging Hardware Electrical Circuits Table of Contents Page End-to-End (Page 4) End-and-Back
CIS INSTALLATION INSTRUCTIONS FOR 4, 6, 7 & 8 COLOUR EPSON PRINTERS
 Please take time installing your continuous ink unit, it's very easy and shouldn't take you more than 15-30 minutes. Your system is pre-filled with high quality ink manufactured by specialist ink producer
Parts List Processor Cutlist Requriements
 Parts List Processor Cutlist Requriements This document is intended to instruct in the creation of delimited files that can be successfully interpreted by the RazorGage Parts List Processor software. The
Control Box Setup - PRSalpha
 888-680-4466 ShopBotTools.com Control Box Setup - PRSalpha Copyright 2016 ShopBot Tools, Inc. page 1 Copyright 2016 ShopBot Tools, Inc. page 2 Parts List: Hooking Up a PRSalpha Gantry Tool Powering the
imagine. print. create. Edible Printing Insights SET UP AND TROUBLE SHOOTING GUIDE
 imagine. print. create. Edible Printing Insights SET UP AND TROUBLE SHOOTING GUIDE Warranty 1 Edible Printing System Warranty All printing systems are benefitted by a 12-month warranty that commences on
Manual for MantraJet 1100 CD/DVD auto-printer
 Manual for MantraJet 1100 CD/DVD auto-printer Rev 1.03 September 7, 2010 Table of contents Specifications...3 Unpacking MantraJet 1100...4 Quick installation reference MantraJet 1100...7 Installation of
ML MLT-D104S TONER CARTRIDGE REMANUFACTURING INSTRUCTIONS
 SAMSUNG ML-1660 1665 MLT-D104S TONER CARTRIDGE REMANUFACTURING INSTRUCTIONS SAMSUNG MLT-D104S TONER CARTRIDGE REMANUFACTURING THE SAMSUNG ML-1660/1665 MLT-D104S TONER CARTRIDGE By Enrique Stura and the
HC100 Troubleshooting Worksheet
 HC100 Troubleshooting Worksheet Printer Lights Bottom* Cartridge Side Problem Solution Media Out Replace with new cartridge No wristband under mouth of cartridge No wristband on roll Wristband broken off
TSMIU Wireless Bridge Installation and Configuration
 ation uration EPM Software must be 7.6.0.16 or greater and latest 750-E700B MIU code Hardware Installation 1. To install wireless bridge / bracket assembly and antenna, the MIU must be turned off and the
MantraJet 1100 CD/DVD autoprinter Operator s manual
 MantraJet 1100 CD/DVD autoprinter Operator s manual Rev 1.00 May 7, 2008 Table of contents 1. Specifications.. Page 2 2. Unpacking you MantraJet 1100 Page 3 3. Using your autoprinter for the first time.
THE HP CLJ 1500/2500/2550 DRUM/TRANSFER UNIT
 THE HP CLJ 1500/2500/2550 DRUM/TRANSFER UNIT DOC# 0313 By Mike Josiah and the Technical Staff at Summit Technologies HP CLJ 1500/2500/2550 DRUM/TRANSFER UNIT REMANUFACTURING INSTRUCTIONS Page 1 Remanufacturing
MULTIMETER: YSI-ProDSS rev. 9/23/15
 MULTIMETER: YSI-ProDSS rev. 9/23/15 EQUIPMENT NEEDED YSI-ProDSS multimeter data sheet, clipboard, pencil Note: The battery may be damaged if kept in an environment outside the range of -20-60 C (-4-140
 Must read this before installation Important instructions about your CISS system Instruction Manual for Canon MP500 MP530 MP800 MP830 MX850 Ip4200,ip4300,ip4500,ip6000,ip6600D,ip6700D and more 1. If your
WORDSYNC ADDENDUM to the SupraDrive Operator s Manual
 WORDSYNC ADDENDUM to the SupraDrive Operator s Manual Congratulations on your purchase of a SupraDrive Hard Card or WordSync Interface Kit for your Amiga 2000 computer. Your new hard drive system will
Printheads HP TIJ 2.5
 Printheads HP TIJ 2.5 Premium New Premium printheads for use with a series of new printer controllers utilizing the HP TIJ 2.5 technology HSAJET and HP TIJ 2.5 technology HSAJET printers use HP thermal
Maintaining the ERX System
 7 This chapter describes the procedures that you must perform to maintain the ERX system and its components. Other maintenance procedures must be performed by an authorized Juniper Networks technician.
Hewlett-Packard Product Number C6119A Maintenance Manual
 Hewlett-Packard Product Number C6119A Maintenance Manual Introduction This document acts as a guide for the maintenance and care of the Hewlett- Packard product number C6119A. The C6119A product is a disposable
Mounting on the Ceiling Using Flush Mount (Face Down)
") Mounting on the Ceiling Using Flush Mount (Face Down) Installation Guide 2014/02/14 Table of Contents Safety Information... 3 Installation Procedures... 5 Step 1: Drill a Hole on the Ceiling... 5 Step
Mounting on the Ceiling Using Flush Mount (Face Down) Installation Guide 2014/02/14 Table of Contents Safety Information... 3 Installation Procedures... 5 Step 1: Drill a Hole on the Ceiling... 5 Step
Apple 3.5 Drive External Floppy Drive
 Apple 3.5 Drive External Floppy Drive Teardown This guide will show the disassembly down to the bare internal drive and other components of the Apple 3.5 Drive. Written By: rockinkat ifixit CC BY-NC-SA
Jouse. User s Guide. Revision 1.0. Prepared by: Compusult Limited 40 Bannister Street Mount Pearl, Newfoundland, Canada A1N 3C9
 Jouse User s Guide Revision 1.0 Prepared by: Compusult Limited 40 Bannister Street Mount Pearl, Newfoundland, Canada A1N 3C9 Toll-free: 1-888-388-8180 Telephone: (709) 745-7914 Fax: (709) 745-7927 E-mail:
MAGUIRE G2-ES Configuration Instructions for Ethernet to Serial Converter Model: Moxa NPort 5110 Serial Device Server
 TECHNICAL INSTRUCTIONS MAGUIRE G2-ES Configuration Instructions for Ethernet to Serial Converter Model: Moxa NPort 5110 Serial Device Server This instructional support document is written for the MOXA
OKIDATA B2500 MFP TONER CARTRIDGE REMANUFACTURING INSTRUCTIONS OKIDATA B2500 MFP TONER CARTRIDGE
 OKIDATA B2500 MFP TONER CARTRIDGE REMANUFACTURING INSTRUCTIONS OKIDATA B2500 MFP TONER CARTRIDGE REMANUFACTURING THE OKIDATA B2500 MFP SERIES TONER CARTRIDGE By Mike Josiah and the Technical Staff at UniNet
1 HP Ersatzteile für DesignJet 800
 HP Ersatzteile für DesignJet 800 Stand Assembly C7769-6040 C7770-6055* C7769-6068* Back platen assembly - Curved cover/guide that is installed below the paper drive roller (4-inches) Back platen assembly
Replacement Instructions
 imac G5 Inverter, 20-inch Replacement Instructions Follow the instructions in this document carefully. Failure to follow these instructions could damage your equipment and void its warranty. Note: Online
641G-001A PRINTER KIT INSTRUCTIONS
 641G-001A PRINTER KIT INSTRUCTIONS P-11351 5/05/98 SAFETY The installer of this equipment must assume the responsibility for his own safety, and that of those working around him. He must also make sure
Nov. 07, 2013 p. 5 - changed the B axis unit value to from Changed by Randy per Frank s request.
 Correction notes Nov. 07, 2013 p. 5 - changed the B axis unit value to 45.1389 from 40.0000. Changed by Randy per Frank s request. Jan. 22, 2018 p. 5 - changed the B axis unit value and corresponding picture
Treadmill Embedded Touch Screen Won t Power Up
 Treadmill Embedded Touch Screen Won t Power Up E-TRe and E-TRxe This document contains the necessary information to troubleshoot a treadmill with an embedded touch screen that will not power up. Follow
Power Supply, 17-inch
 apple imac G5 Power Supply, 17-inch Replacement Instructions Follow the instructions in this sheet carefully. Failure to follow these instructions could damage your equipment and void its warranty. Note:
Ag Leader Technology Insight. Direct Command Installation Spra-Coupe 7000 Series
 Note: Indented items indicate parts included in an assembly listed above. Part Name / Description Part Number Quantity Direct Command Spra-Coupe 7000 Kit 4100531 1 Liquid Product Control Module 4000394
Operating voltages up to 40 kvdc Operating current up to 30 Amps Advanced contact technology Silver plated and gold plated contacts available High
 Operating voltages up to 40 kvdc Operating current up to 30 Amps Advanced contact technology Silver plated and contacts available High performance insulation material General characteristics and technical
The GENIE Light Kit is ideal for introducing simple lighting projects, such as an electronic die, a wearable badge or a night-time warning system.
 Introduction 1 Welcome to the GENIE microcontroller system! The GENIE Light Kit is ideal for introducing simple lighting projects, such as an electronic die, a wearable badge or a night-time warning system.
E120 TONER & DRUM CARTRIDGE REMANUFACTURING INSTRUCTIONS
 LEXMARK E120 TONER & DRUM CARTRIDGE REMANUFACTURING INSTRUCTIONS LEXMARK E120 TONER & DRUM CARTRIDGE CARTRIDGE COVER REMANUFACTURING THE LEXMARK E120 TONER & DRUM CARTRIDGE By Mike Josiah and the Technical
LabelMax SP2 User Manual
 LabelMax SP2 User Manual 1 GENERAL... 3 1.1 COPYRIGHT DECLARATION... 3 1.2 COMPLIANCES... 3 1.3 INTRODUCTION... 3 2 GETTING STARTED... 4 2.1 UNPACKING AND INSPECTION... 4 2.2 EQUIPMENT CHECKLIST... 4 2.3
USING ABSOLUTE BLACK INKS FOR MAKING SCREEN POSITIVES ON THE EPSON STYLUS PRO 7700, 7890, 7900, 9700, 9890, & 9900
 USING ABSOLUTE BLACK INKS FOR MAKING SCREEN POSITIVES ON THE EPSON STYLUS PRO 7700, 7890, 7900, 9700, 9890, & 9900 The following instructions explain how the i2i Absolute Black ink for making screen positives
1 HP Ersatzteile für DesignJet 500
 HP Ersatzteile für DesignJet 500 Back Platen and Media Sensor C7769-6040 C7770-6055* C7769-6068* Back platen assembly - Curved cover/guide that is installed below the paper drive roller (4-inches) Back
Ringlock is a range of robust circular
 Connectors is a range of robust circular connectors for industrial applications. It uses a metal bayonet coupling system for quick and reliable connections and thermoplastic bodies for low installed cost.
Q2 XBee Handheld Controller Assembly Guide
 Q2 XBee Handheld Controller Assembly Guide Copyright Quantum Robotics Inc. Q2 Controller V1.0 1 Parts List: The kit comes with 14 individual bags. 1. Case Top and Bottom 2. Case Screw Package containing:
To connect the AC adapter:
 Replacing the AC Adapter Replacing the AC Adapter 3 Plug the power cord into a wall outlet. The power indicator turns on. To connect the AC adapter: Connect the power cord to the AC adapter. Power indicator
Installing a Printhead Cartridge
 Installing a Printhead Cartridge Summary: Procedure for installing a new printhead cartridge. Applicable Products: ijetpress Tools/Parts Required: A new printhead, deionized or distilled water, lint free
NPort S8000 Series Quick Installation Guide
 NPort S8000 Series Quick Installation Guide Edition 6.0, March 2016 Technical Support Contact Information www.moxa.com/support Moxa Americas: Toll-free: 1-888-669-2872 Tel: 1-714-528-6777 Fax: 1-714-528-6778
MX-8000 User Manual MX Rev
 MX-8000 Rev. 070202 Greeting Thank you for purchasing PAITEC USA products. This manual is prepared to provide guidelines on how to properly operate and maintain MX-8000. Copyright Any of the contents should
MVPplus Quick Reference Guide
 MVPplus Quick Reference Guide Use this guide to operate your printer on a daily basis. For more detailed information, refer to the User Guide. Contents External View...........................................................
Samsung ML-6000 Toner Cartridges DOC-0308
 Summit Laser Products - Samsung ML-6000 Toner Cartridges http://www.summitechnologies.com/docs/0308/0308.asp Page 1 of 12 Home New Arrivals! Company Info Publications Special Features Contact Us Overview
Phi-connect for Arduino (connector board V1.9)
") Phi-connect for Arduino (connector board V1.9) Last reviewed on 3/29/2012 John Liu 1. Introduction... 2 2. Main features... 2 3. Parts list... 3 4. How to use... 4 5. Improving your Arduino experience
Phi-connect for Arduino (connector board V1.9) Last reviewed on 3/29/2012 John Liu 1. Introduction... 2 2. Main features... 2 3. Parts list... 3 4. How to use... 4 5. Improving your Arduino experience
Validator Update Instructions for Rowe BC1200 $1 - $20
 Validator Update Instructions for Rowe BC1200 $1 - $20 Kit Overview The purpose of the kit is to replace the Rowe BA50 transport and stacker with a 120 volt Mars validator with a compact mask. The kit
Single cable kit for the FCB1010
 Single cable kit for the FCB1010 1. What is it? With this kit, you can turn your FCB1010 into a phantom powered floorboard, which can do 2-way MIDI communication over one single cable. After installing
TIVO UPGRADE INSTRUCTIONS (c) , Adberg Consulting LLC. All rights reserved.
 , Adberg Consulting LLC. All rights reserved.") TIVO UPGRADE INSTRUCTIONS (c) 2001-2003, Adberg Consulting LLC. All rights reserved. Instructions for Series 1 DirecTV/TiVo GXCEBOT TWO-DRIVE REPLACE upgrade Color instructions are also available at http://www.weaknees.com/upgrade_instructions.php
TIVO UPGRADE INSTRUCTIONS (c) 2001-2003, Adberg Consulting LLC. All rights reserved. Instructions for Series 1 DirecTV/TiVo GXCEBOT TWO-DRIVE REPLACE upgrade Color instructions are also available at http://www.weaknees.com/upgrade_instructions.php
LITETOUCH HYBRID WALL BOX DIMMER INSTALLATION INSTRUCTIONS
 READ INSTRUCTIONS PRIOR TO INSTALLATION OF EQUIPMENT OR YOU MAY VOID THE WARRANTY! LITETOUCH INSTALLATION INSTRUCTIONS The LiteTouch Hybrid Wall Box Dimmer is a configurable lighting control device, that
Written By: Andrea Giannone
 How to Fix iphone 4S Wi-Fi Grayed Out Use this guide to permanently fix an "unclickable" grayed out Wi-Fi button in the iphone 4s. Written By: Andrea Giannone ifixit CC BY-NC-SA www.ifixit.com Page 1 of
3100 MFP Service Manual
 3100 MFP Service Manual 4036-302 Lexmark International Inc 3100MFP -----------------------------------------------------------------------------------------------------------------------------------------