Choosing the Right QuickBooks Version
|
|
|
- Aubrey Thornton
- 5 years ago
- Views:
Transcription
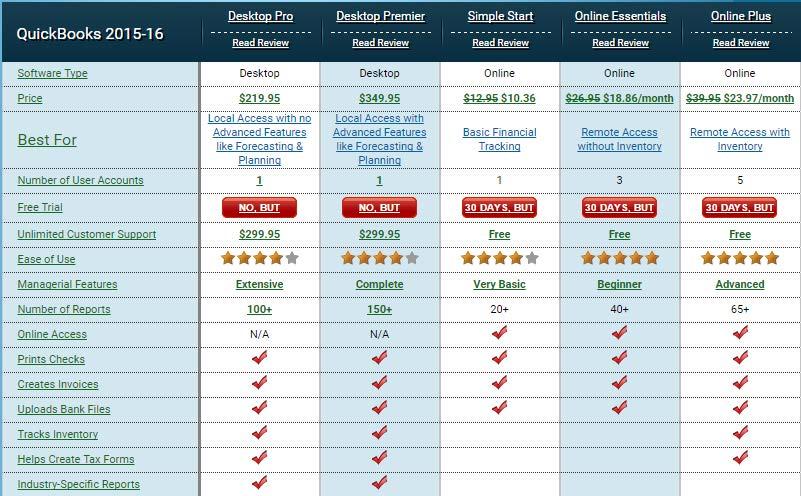
1 The differences in the two versions of QuickBooks can be seen when accessing the software, creating reports, processing invoices and more. Here are a few of the key differences: 1. Initial Fee QuickBooks Online offers a free 30 day trial, so there is no initial fee to try it out. The QuickBooks Desktop version requires the purchase of the software upfront. 2. Monthly Fee QuickBooks Pro Desktop 2015 is a one-time payment or you can get QuickBooks Pro Plus for an annual payment. On the other hand, QuickBooks Online requires a monthly subscription. 3. Internet Connection Because it is cloud-based, an Internet connection is required to use QuickBooks Online. On the other hand, QuickBooks Desktop can be accessed from the computer it is installed on regardless of Internet connection. 4. Automation Functions With QuickBooks Desktop, transactions (invoice, receipt, reports, etc.) must be processed manually. The online version has several automation features for things such as customer billing, reports, downloading bank transactions and more. 5. Remote Access Since QuickBooks Online is cloud-based, users can access QuickBooks reports wherever they have Internet access and from multiple devices. The QuickBooks Desktop version is linked to the computer it is installed on and therefore can only be accessed on-site. 6. Multiple Users QuickBooks Online allows for up to 25 simultaneous users whereas QuickBooks Desktop does not permit simultaneous access. 7. Customized Features The QuickBooks Desktop version has several customized features that are not available in the online version. This includes the ability to prepare 1099s, track mileage, and to budget and track expenses. In general, the desktop version allows more freedom to customize forms than QuickBooks Online. 8. Support The basic QuickBooks Desktop version does not come with support although you can pay for support by getting the Pro Plus edition. QuickBooks Online comes with free support. Choosing the Right QuickBooks Version Understanding the many differences between the desktop and online versions allows business owners to make an informed decision about what is right for their business. In general: QuickBooks Desktop is a good choice for: Businesses with a fixed office location Businesses that have a small number of people who need access Businesses that don t want a recurring monthly charge Businesses that don t want their books to be accessible online Businesses that want to explore customized features such as the ability to track budget and spending
2 QuickBooks Online is a good choice for: Businesses where people need to remote access the books Businesses where multiple people may need to access the books at the same time Businesses that are comfortable with a monthly fee and may benefit from the free support that the monthly fee offers Businesses that are comfortable with cloud computing where data is stored online and only accessible with an internet connection Businesses that want to explore automation
3

4 AN INTRODUCTION TO QUICKBOOKS ONLINE Getting Started Guide
5 Copyright Copyright 2015 Intuit Ltd. All rights reserved. Intuit Australia Intuit Australia is a company registered in Australia - ABN Trademarks 2015 Intuit Inc. All rights reserved. Intuit the Intuit logo, Lacerte, ProAdvisor, ProSeries and QuickBooks, among others, are trademarks or registered trademarks of Intuit Inc. in the United States and other countries. Other parties marks are the property of their respective owners. Version: 2.0 Notice to Readers The publications distributed by Intuit, Inc. are intended to assist accounting professionals in their practices by providing current and accurate information. However, no assurance is given that the information is comprehensive in its coverage or that it is suitable in dealing with a client s particular situation. Accordingly, the information provided should not be relied upon as a substitute for independent research. Intuit, Inc. does not render any accounting, legal, or other professional advice nor does it have any responsibility for updating or revising any information presented herein. Intuit, Inc. cannot warrant that the material contained herein will continue to be accurate nor that it is completely free of errors when published. Readers should verify statements before relying on them.
6 Table of Contents TABLE OF CONTENTS Introduction to QuickBooks Online... 3 Case Study... 4 Setting up QuickBooks Online... 5 Navigating QuickBooks Online Take the QuickBooks Online Tour Take the QuickBooks Online ipad/iphone Tour Company Setup Company Settings Manage Users Multiple Currencies Importing Your Data Customers Suppliers Chart of Accounts Products/Services Downloading Transactions: Linking your Bank Accounts Linking your Bank Accounts or Credit Cards for Automatic Bank Feeds Importing your Bank Transactions Setting up Bank Rules Creating and managing Quotes Creating Quotes Creating and Sending Quotes on a ipad/iphone Creating and Managing Invoices Creating Invoices Managing Invoices Creating Invoices on a ipad/iphone Customising Invoices
7 Table of Contents Receiving Payment Accept payments with PayPal app Before installing the PayPal App you need to Install the PayPal App Configure the PayPal App Manage the PayPal App settings Sending an invoice and receiving payment What your Customer sees Expense and Transfer entries Reconciling the PayPal Bank account Organise and Track Expenses Expense Transactions Bills Other Types of Supplier Related Transactions Capturing Expenses on a ipad/iphone Managing Bills Running Reports Profit & Loss / Balance Sheet Automated Reports Customising Reports Run reports on a ipad/iphone Audit Log QuickBooks Online Payroll Getting Support Providing Feedback
8 Company Setup INTRODUCTION TO QUICKBOOKS ONLINE QuickBooks Online is easy to use software designed for small business accounting. It lets your business track all of your income, expenses, and inventory. It automatically tracks your GST and lets you manage your business payroll. QuickBooks Online Accountant offers a new way of supporting and managing your business and may change the way that you run your consulting, bookkeeping or accounting practice. QuickBooks Online Accountant lets you easily work with and manage your business using QuickBooks Online. QuickBooks Online is cloud-based software. Secure - hosted securely by Intuit using bank level security Accessibility - anywhere, anytime access using an internet connection. Data entry automation get data into QuickBooks automatically using awesome features Unlimited Accountant Access easy to connect with your accountant Mobile businesses can access QuickBooks Online using their ios or Android devices. No more being tied to the desktop, enter data when and where you are No Desktop files no desktop files are required so no backups are required Other training resources can be found here: Videos: FAQs: 3


9 Company Setup CASE STUDY Introduction This story is about a new small business called North Shore Locksmith Jack Gordon, owner of North Shore Locksmith is a Locksmith by trade. Jack has been working as an apprentice contractor for 5 years and loves his job as a locksmith. He has always dreamed of starting his own business. His mates and family have given him lots of encouragement to get out on his own and start their new business. After months of planning, Jack has decided that now is the right time to start his new business. Jack has done his research and there aren t many locksmiths providing services in the North Shore. It is a great place to start a business. Jack is going to purchase a few assets like a professional Ryobi drilling machine, drill sets, padlock tools, key blanks, etc. After a reference from his bookkeeper Jack decided to sign-up to QuickBooks Online to keep on top of his books. To keep costs low, Jack will run the company on his own until he feels comfortable hiring his first subcontractor. To get started Jack is visiting his bookkeeper to help him get setup to manage his own books. 4

10 Company Setup SETTING UP QUICKBOOKS ONLINE QuickBooks Online is easy to setup and get going. It is so simple that you can have a business file setup in less than 20 minutes. There are several important steps to follow to make sure that you are setting up business files efficiently and accurately. Objectives After completing this chapter you should be able to: Setup a business file Setup basic settings Setup basic accounts Import list information Company File Setup There are several important steps to setup your company file. Getting setup correctly will also help you and your Bookkeeper or Accountant stay compliant with GST and payroll taxes. The day has finally arrived for Jack to start his new business, North Shore Locksmith. There is a lot to do, like setting up his business, leasing equipment and getting his systems setup to handle his new customers. Subscribing to QuickBooks Online In order to use QuickBooks Online your business or you must subscribe to the software. Your business can subscribe by visiting intuit.com.au and signing up for a free trial. Your accountant can setup a business file from the QuickBooks Online Accountant. Setup your Business File You can setup QuickBooks Online for your business with the free trial. 1. Visit intuit.com.au 2. Click Free Trial option 3. Enter your details and click Sign-up 5
11 Company Setup 4. Enter your business information as listed below. o Enter the company information including Company Name, Address and contact information o Click Save and Next. 6
12 Company Setup 5. In the Set Up QuickBooks step, QuickBooks Online asks for more information about your business company. It compares your business s business type with other companies using QuickBooks Online and optimizes the setup for you. Jack is a locksmith so you can enter Locksmith In the Your Industry field, enter Locksmith. A long list of industry types appear Choose Locksmith Services 7
13 Company Setup 6. The next field lets you tell QuickBooks Online what your business sells. QuickBooks Online can track the sale of products, services and other types of sales. Jack plans to sell products and services so select products and services option. 7. The next step is to choose the Company Type. North Shore Locksmith will be setup as a sole trader. This is not a required field, but you can choose the type of organization that you are setting up. 8. The next step is a question that asks; Do you want to import from QuickBooks for Windows or MYOB? North Shore Locksmith is a start-up business so they do not need to import data from another source. 8
14 Company Setup 9. The last step is to tell QuickBooks Online about your business s preferred payment methods. Select all the methods that apply. North Shore Locksmith will accept several different payment methods. Select Cash, Cheque, Credit card/debit card, Bank Transfer and PayPal. 10. Click Save and Next. 9

15 Company Setup QuickBooks Online completes the basic setup of your business s QuickBooks Online company file. The results of the setup are displayed in a graph. The graph displays information about businesses like yours using QuickBooks Online. In the right hand column of the Set Up QuickBooks window, you see a list of features and transactions that QuickBooks Online has enabled for your business. North Shore Locksmith is now setup! This completes the basic setup. 11. Click Save and next to complete the setup and go to the Home window. 10


16 Company Setup NAVIGATING QUICKBOOKS ONLINE QuickBooks Online (QBO) has been designed to be intuitive, fast and simple to use. The click and go navigation makes it easy for you to find what you need quickly so you spend less time doing your books and more time doing what you love. The user interface is simple and unified across all products and contains fewer secondary menus, which results in fewer clicks to find the desired information or functions. NOTE: QuickBooks Online works best in a Chrome browser, but it also works with Internet Explorer 10, Safari 6 or Firefox. It s useful to bookmark your login page and memorize your login username so it s easy to login anytime on your same computer, tablet or laptop device. TAKE THE QUICKBOOKS ONLINE TOUR Sign into QuickBooks Online at intuit.com.au. Enter your QuickBooks Online User ID and password and select Sign In. 11
17 Company Setup The Home Page displays a summary of key information and provides links to quick tips to help you get the most out of QuickBooks Online. The Company setting is located in the top right corner of your QuickBooks Online screen, and is accessed by clicking on the gears icon. To access the Help function, click on the question mark next to the company menu in the top right corner. 12
18 Company Setup The Global Navigation in the center of the screen gives you quick access to: Search Use this feature to quickly look up QuickBooks Online transactions by transaction number, date, or dollar amount. The Advanced Search feature allows you to combine your search terms. Quick Create Use this feature to quickly access the four key transaction types. Clicking on Show More expands the list to include all the available transactions. Recent Transactions Use this feature to display a list of your recently recorded transactions, each of which can be opened by clicking on the selection. 13

19 Company Setup The left-hand navigation bar provides access to your lists and all primary transactions. Home Home Page Customers Use this to create, import, edit and delete customers, Customer Money Bar shows the flow of money into the business Suppliers Use this to create, import, edit and delete Suppliers, Supplier Money Bar shows you flow of money out of the business. Employees Use this to create, edit and delete employees. You can also activate payroll from here Transactions This is a shortcut to the following: banking, sales, expenses and Chat of Accounts Reports This menu has four options: Recommended, Frequently Run, My Custom Reports and All Reports GST From the GST Centre, you can activate your GST tracking, create new taxes and tax groups, complete a BAS, view related reports, tax rates and record GST payments Apps Access featured applications and add-ons to QuickBooks Online from this page. TAKE THE QUICKBOOKS ONLINE IPAD/IPHONE TOUR QuickBooks Online works with iphone, ipad, and Android devices; you can have access to your business information, customers or suppliers wherever you have mobile access. MANAGE YOUR BUSINESS ANYWHERE Create and send professional invoices and quotes. Snap photos of your receipts and organise daily expenses as you go. Convert a quote to an invoice in seconds. Attach photos and notes to quotes, invoices, customers, and transactions. Receive overdue invoice notifications so you always know who owes you money. Track payments and record sales. Profit & Loss and Balance Sheet reports show how your business is doing. Customise tax rates for your business 14
 from")


20 Company Setup 1. You can download the free QuickBooks Online mobile app (specific to iphone, ipad, or Android) from the itunes store or Google Play. You can then simply login using your QuickBooks Online username and password. 2. Use your QuickBooks Online login credentials to sign-in to the app 3. The navigation on the ipad app is similar to QBO on the browser. There is a left and right hand side panel of options available by selecting the menu and plus buttons on the top left and right hand side of the screens respectively. For the iphone the plus sign is at the bottom of the screen. 15

21 Company Setup Left hand side panel on ipad: Right hand side panel on ipad: 16


22 Company Setup Left hand side panel on iphone Right hand side panel on iphone 17
23 Company Setup COMPANY SETUP The Company Settings feature is designed to allow you to customize QuickBooks Online to your specific business requirements and uses. It s important to define your Company Settings before you enter or upload transactions, so that your entries are uniform. Your settings can always be modified or changed based on your needs after the initial setup is completed. NOTE: The features and screen captures shown here are those available in QuickBooks Online Plus. Some features are not available in QuickBooks Online Simple Start or Essentials. COMPANY SETTINGS Company Settings are accessed by selecting the gear icon or company name in the top right corner of the screen. 18
24 Company Setup You can edit any of the company settings by clicking on the option and making your change. Once complete, click Done to update your information. MANAGE USERS You can give other users access to QuickBooks Online by selecting Manage Users in the Your Company section of the Company menu. 19
25 Company Setup To set up new users, select New in the upper right side of the screen. You will be asked to enter the name and address. When you create a new user, you can restrict or expand access as follows: An invitation with a link to your company file is sent automatically to anyone who you invite. New users must accept the invitation to gain access to your company file. 20
26 Company Setup QuickBooks Online users can invite up to two accounting professionals (for example, a bookkeeper and an accountant) to access their QuickBooks Online data for free, in all versions of QBO (SimpleStart, Essentials or Plus). To invite your accountant and/or bookkeeper to have access to your QBO data: Select Manage Users in the Company menu. Select Invite Accountant at the bottom of the screen. Enter the accounting professional s name and address. This action will generate an invitation, which includes a unique link to accept and gain access to your QuickBooks Online data using QBO Accountant. 21

27 Company Setup MULTIPLE CURRENCIES If you do business with foreign suppliers and/or customers, QuickBooks Online can be set up for multiple currencies. Simply select Currency Centre from the Settings section of the Company menu. This will open the Currency Centre. If you would like to activate multi-currency, click the Set up currencies button. When multicurrency is enabled, any foreign-denominated transaction will track three values: foreign currency amount, exchange rate, and the equivalent amount denominated in the home currency, Australian dollars. QuickBooks Online tracks fluctuating exchange rates, and it also calculates exchange gains and losses automatically. 22

28 Creating and Managing Invoices IMPORTING YOUR DATA If you are currently using QuickBooks desktop or another accounting software program, go to for the latest information on conversion options. To import a data file: Go to the Company Gear Icon Under the Tools heading Select Import Data. Then select the type of data you would like to import. 23

29 Creating and Managing Invoices CUSTOMERS TIP! To save time and insure your data is imported correctly and requires minimal cleanup, be sure to preview and reformat your data file to match the sample data file (see the Download a sample file hyperlink). To import your customer s data: Select Customers. Choose File and browse to select your customer.xls or.csv import file. Find and highlight the source import file, select Open or double-click on the import file name to select it. Once the import file is chosen, select Continue. Review the fields (columns from import file) to ensure they are matched correctly with QuickBooks Online fields for Customers. 24
30 Creating and Managing Invoices Note the green checkmark next to fields that QuickBooks Online has matched up with or mapped to the import file s columns. If necessary, change the mapping of any field, and select Continue. Make any desired or required (signified in red, if any) corrections to the information in the preview screen and then select the button to Import the records. NOTE: An Import Summary confirms the number of imported customers. 25
31 Creating and Managing Invoices SUPPLIERS To import your supplier data into your QuickBooks Online company file, follow the same process as above. Remember to select Suppliers when specifying the type of data and then pre-format and select your Supplier xls or csv file accordingly. CHART OF ACCOUNTS To import your Chart of Accounts data into your QuickBooks Online company file, follow the same process as above. Remember to select Chart of Accounts when specifying the type of data and then pre-format and select your Chart of Accounts.xlsx or.csv file accordingly. NOTE: It is important to import the Chart of Accounts data before importing the Product/Services data to insure your Product/Services data falls into the correct accounts and will minimize the need to reclassify or reassign your data after importing. PRODUCTS/SERVICES Products and Services are generally imported last, and as noted above, they can only be imported after the Chart of Accounts is set up. Please contact you Pro Advisor to set-up your Chart of Accounts. The procedure for importing Products and Services is similar to that of importing Customers and Suppliers. Again, match the fields and make any required changes to the mapping, click Continue. 26

32 Creating and Managing Invoices Make any desired or required (in red) changes and import the records. As with all imported lists, the Import Summary confirms the number of imported products and services. 27
33 Creating and Managing Invoices DOWNLOADING TRANSACTIONS: LINKING YOUR BANK ACCOUNTS You can save time and reduce errors by downloading your transactions directly from your bank and credit card accounts from a secure online connection. Once you have established a secure connection with your bank your transactions will automatically transfer or feed to your QuickBooks Online Company file. Alternatively you can elect to import your bank transactions manually, by downloading the data from your bank or credit card and then uploading the data files to your QuickBooks Online account. If you have set up automatic bank feeds, transactions are securely imported into the Downloaded Transactions feature automatically. Once these transactions have been imported, QuickBooks Online will instruct you to do the following: Automatically match these imported transactions with a transaction you have already recorded Record as a new transaction by allocating it to an account and a payee s name Recall how you managed a similar transaction previously. It will suggest to allocate it to the same account and payee again 28

34 Creating and Managing Invoices LINKING YOUR BANK ACCOUNTS OR CREDIT CARDS FOR AUTOMATIC BANK FEEDS 1. From the left-hand navigation bar select Transactions, then Banking. 2. Locate your financial institution by selecting it from the list or by typing its name and clicking Find. 3. Enter your user name and password to enable QuickBooks Online to automatically download your account transactions directly into your QuickBooks Online account. NOTE: If your bank or financial institution is not listed or if you prefer not to have your bank account linked, you may also download your transactions from your bank in a csv format and then upload them into QuickBooks Online manually. 29

35 Creating and Managing Invoices 4. Once connected, tick the bank accounts you want to connect to QuickBooks Online then choose the Account type from the QuickBooks Account drop down list provided. 5. Click on Connect to download the transactions 6. Once your transactions are securely downloaded, click I m done, let s go. 30

36 Creating and Managing Invoices IMPORTING YOUR BANK TRANSACTIONS An alternative to linking your bank accounts is to import bank transactions you have downloaded from your online banking system. 1. To do this, select Transactions then Banking and File Upload. Browse to locate the file to upload. Select Next. From the drop-down list of accounts in QuickBooks Online, select the appropriate bank account to which the file s transactions are to be compared and uploaded and choose Save. A message will appear indicating that your bank data has been saved. Click Finish. 31
37 Creating and Managing Invoices SETTING UP BANK RULES Bank Rules allows greater control of bank transactions as they are added to the QBO Company. Bank Rules can be defined via Money In or Money Out and the bank account the transaction it relates to (if you have more than one bank account). The transactions can be identified using separate conditions using Description, Bank Text, or Amount using the logic of Contains, Is Exactly or Doesn t contain. You can add up to five separate conditions allowing you to drill down in identifying specific types of transactions. Once the Bank Rule has identified the transaction you are able to allocate the Payee, Categorize it, apply a tax code, or apply a class and/or Location. In addition you can add a memo to the transaction. Create a new Bank Rule 1. Once in the Transaction Banking screen click on the upside down arrow next to Update. Select Manage Bank Rule 2. In the new window click on the box in the top right called New Rule 3. Enter a rule name, call it OfficeWorks 4. Select if this is for Money In or Money Out transactions, set it as Money Out 5. Select the banks account the rule will relate to, choose NAB Business Banking 6. Select the appropriate conditions to meet the rule. Set as Description Contains Officeworks 7. Then select the appropriate actions. Set Payee as Officeworks, Category as Office Supplies, and Tax Code as GST on Non Capital. At this stage you do have the option to split the transaction if you wish. 8. Optionally choose a Location and/or Memo. Set memo to read Added via Officeworks Bank Rules How to Match Transactions In the New Transactions section you will find all the downloaded or imported Transactions. To accept a Matched transaction click on the Match button at the end of the row under the Action column. You can also Split a transaction to allocate it against multiple categories. 32

38 Creating and Managing Invoices How to Add Transactions In the New Transactions section you will find all the downloaded or imported Transactions. To add a transaction click on the transaction which will allow you to allocate the type of transaction, the customer or supplier, the category, GST, the class, or the location, as well as add a memo to the transaction How to accept multiple transactions in batches To accept multiple transactions at the same time select the transactions you wish to action (either select individual transaction by clicking the tick box at the left, or select the tick box at the top to select all transactions), and then under batch actions select Accept Selected. Other batch actions include: o o Exclude Select Transactions will be excluded and not imported into QuickBooks online. Modify Selected Allows you to modify multiple transactions all at once. 33
39 Creating and Managing Invoices CREATING AND MANAGING QUOTES Quotes are easy to create and customise in QuickBooks Online. Before you create your first quote, double check your company is set up to account for GST, quantities, custom transactions and multi-currency. CREATING QUOTES Quotes can be easily accessed from the Create or Quick Create menu. To create an invoice: 1. Go to the Quick Create at the top of the QuickBooks Online screen or via the left-hand navigation panel. 2. In the Quick Create window, select Quote. Complete the on-screen quote, including selecting a customer, with the desired date, quote number, whether amounts are tax inclusive/exclusive/out of scope of GST, Products and Services of your choosing, the quantity, description and rate for each. 34

40 Creating and Managing Invoices Add more lines, if needed. Complete any other desired fields, such as the Discount or add a message to be displayed on the quote. If necessary, attach a document or any file by clicking on Attachments in the bottom left corner of the form. This can be used to store related documents for future references. Files sizes can go up to 25MB each. Select Save and Send to your customer their quote, click Save and Close to simply save the quote and return to the homepage or select Save and New to save the quote and create a new one. Once the customer agrees to your quote use the copy to invoice feature to convert the quote into an invoice. See highlighted cell in the above image. CREATING AND SENDING QUOTES ON A IPAD/IPHONE 1. To create an quotes on an ipad/iphone tap the plus sign and select quotes 2. Choose the customer, enter the relevant details for the quote and send the quote on the spot to your customer via 35

41 Creating and Managing Invoices 36
42 Creating and Managing Invoices CREATING AND MANAGING INVOICES CREATING INVOICES Invoices can be easily accessed from the Create or Quick Create menu. To create an invoice: Go to the Quick Create at the top of the QuickBooks Online screen or via the left-hand navigation panel. In the Quick Create window, select Invoice. Complete the on-screen invoice, including selecting a customer, with the desired date, invoice number, whether amounts are tax inclusive/exclusive/out of scope of GST, Products and Services of your choosing, the quantity, description and rate of each, and the GST code. Add more lines, if needed. Complete any other desired fields, such as the Discount or add a message to be displayed on the invoice. 37

43 Creating and Managing Invoices If necessary, attach a document or any file by clicking on Attachments in the bottom left corner of the form. This can be used to store related documents for future references. Files sizes can go up to 25MB each. Select Save and Send to your customer their invoice, click Save and Close to simply save the invoice and return to the homepage or select Save and New to save the invoice and create a new one. MANAGING INVOICES Open invoices can be found using the Search and Recent Transactions functions, as well as by running reports, but most often will be found in the Customer Centre by selecting Customers from the left-hand navigation bar. In the Customer Centre, choose Open Invoices from the Money bar to locate the customer you wish to record the payment for. QuickBooks Online will always offer the next logical step for this type of transaction. In this case, it is suggesting for you to receive payment for that customer. Choose Receive payment. Alternatively, the original invoice can be opened by clicking on the hyperlink in the listing, and then Receive payment can be selected at the top of the invoice. Invoices, whether open or paid, can also be found by selecting Transactions Sales from the left-hand navigation bar. 38

44 Creating and Managing Invoices CREATING INVOICES ON A IPAD/IPHONE To create an invoice on an ipad/iphone tap the plus sign and select invoice Choose the customer, enter the relevant details for the invoice and send the invoice on the spot to your customer via 39

45 Creating and Managing Invoices CUSTOMISING INVOICES You can customise your invoices to look how you want them including adding a logo, editing the font and more. This can be done by going to the Company Gears Icon Company Settings Sales Customise Customise Look and Feel. 40

46 Creating and Managing Invoices You can choose a template and accent colour, upload your logo, and specify columns, header, footer and more. This same customization window can be accessed at the bottom of an invoice by selecting Customise at the bottom of the invoice form. Tip: To copy invoices or creating recurring invoices use the functions at the bottom of an existing invoice. 41
47 Organise and Track Expenses RECEIVING PAYMENT To receive a payment: Go to the Quick Create at the top of the QuickBooks Online screen or via the lefthand navigation panel. In the Quick Create window, select Receive Payment. On the receive payment screen start by selecting the customer name Then complete the payment method field, reference no. (if any), Deposit to (bank account) and select the invoices you are receiving payment towards Complete the full or partial payment amounts in the Payment fields If necessary, attach a document or any file by clicking on Attachments in the bottom left corner of the form. This can be used to store related documents for future references. Files sizes can go up to 25MB each. Click on the Print option at the bottom of the Receive Payment page to print the payment to send a hard copy of the payment receipt. Seen images below. Click Save and Send to send over . The other option to receive payment is by selecting the customer from the left navigation bar and click on the Open Invoices on the money bar. Select the invoice you have received payment for and click on receive payment 42


48 Organise and Track Expenses 43
49 Organise and Track Expenses ACCEPT PAYMENTS WITH PAYPAL APP Intuit QuickBooks Online is enabling businesses to accept online invoice payments from their customers in an easy and convenient way by partnering with PayPal Australia Pty Ltd. Not only will the app allow for the processing of online payments, it will automatically import the data from the linked PayPal account into the QuickBooks Online file. What this means is that the PayPal app will REPLACE the need for using bank feeds connected to a PayPal account. If bank feeds for PayPal are already turned on, then prior to connecting up the PayPal App, the bank feeds need to be disabled. This will avoid any duplication of entries. The app can be accessed by going to the Intuit App website, apps.com Be sure to select the Regional setting as Australia, then search for PayPal. Click on the PayPal link. The video link under About provides a great overview of the app setup process and capabilities. BEFORE INSTALLING THE PAYPAL APP YOU NEED TO Have access as administrator to the QuickBooks Online file A PayPal business account. A personal account can be connected, but must be upgraded to PayPal Premier or Business in order to enable online invoice payments. To disable any existing PayPal bank feeds. NOTE: 1) Only one PayPal account can be connected up to one QuickBooks Online file at a time. 2) If bank feeds are reconnected to PayPal, then the app sync process will stop as a precaution against duplications. 44
50 Organise and Track Expenses INSTALL THE PAYPAL APP 1. Once in the PayPal section of apps.com, Click Get App Now 2. When prompted click on Sign In to QuickBooks Online using your existing credentials. 3. If there are multiple files connected to the QBO login, the business to which the app is to be installed in needs to be selected. A business with only the one file will be automatically transferred through to Step 4. 45
51 Organise and Track Expenses 4. Click Authorize to allow the Accept Payments with PayPal App to integrate with the selected QuickBooks Online company file. 5. Log into your PayPal account in order to give permission to the Accept Payments with PayPal App to integrate with your PayPal account. 46

52 Organise and Track Expenses 6. Click Grant Permission to allow Intuit and PayPal to work together. CONFIGURE THE PAYPAL APP Now that the app is installed and connected to the required QuickBooks Online file, the setup process needs to be completed. There are 5 simple steps to follow. 47
53 Organise and Track Expenses 1. Enable Customer Payments - Select Yes to allow customers to pay the invoice by Visa, MasterCard, American Express or their own PayPal account. 2. Import Customer Details - Select Yes to import in customer details from PayPal. Select No to not import in any Customer details. 3. PayPal Bank setup in QuickBooks - PayPal will create a default Bank type account in the Chart of Accounts called PayPal Bank. This account can be used or if there is an existing PayPal account already in the Chart of Accounts, this can be selected from the drop down list. 48
54 Organise and Track Expenses 4. Importing in past data - Up to 18 months of past data transactions can be imported in at this time. However, if there is an existing PayPal account in the file, and this account has already been reconciled, then select No Do not import past data in order to avoid duplications. 5. Account selection for transaction imports - Three accounts can be configured 1) Sales Transactions 2) PayPal fees 3) GST coding on Sales PayPal creates the accounts PayPal Income and PayPal Fees by default. Sales Transactions when the PayPal account is used not only for accepting customer payments, but also for other income activity, the PayPal sales will be imported to QuickBooks Online as Sales Receipts with line detail. The income received is processed against the PayPal Income account. 49
55 Organise and Track Expenses PayPal Fees PayPal fees are extracted out of the income received and are entered in QuickBooks Online as an expense. By default they will associate with the PayPal fees account and be processed as GST-free. GST coding on Sales The GST code selected as default will determine the GST coding on Sales receipt entries. Once satisfied with the account configuration, Continue to review. Take a moment to review the preference selection prior to making the final acceptance. 50
56 Organise and Track Expenses Click Connect to finish setting up the app. The Accept Payments with PayPal app is now set up. Transactions will be imported from your PayPal account into your QuickBooks Online account. If Invoice Payments has been enabled then you will now also be able to send invoices with a Pay Now button. MANAGE THE PAYPAL APP SETTINGS The Accept Payments with PayPal App can be configured at any time by selecting the Apps tab in your Company file and clicking on the My Apps tab SENDING AN INVOICE AND RECEIVING PAYMENT To ensure that invoices are enabled to be sent as Online Invoices, check that the Company Settings are configured correctly. Company Settings> Sales> Online Delivery Make sure Online Delivery is selected under options for invoices. 51
57 Organise and Track Expenses To create a Payments enabled invoice, open an existing invoice or create a new invoice. The invoice now displays with an additional field for Online Payment. In order to send an invoice with the Pay now feature, the PayPal checkbox must be selected. Invoices can be sent without the Pay now option, simply by unselecting the checkbox. 52


58 Organise and Track Expenses Complete the invoice and click Save and Send Then Send and Close to send the invoice. The Send screen allows another chance to modify the online payment selection, if needed. 53

59 Organise and Track Expenses WHAT YOUR CUSTOMER SEES Your customer will receive an with a link to view their online invoice. Clicking on View Invoice will open the invoice in a web browser. The invoice can also be opened on any mobile device. Once opened, a Pay now button is available. 54


60 Organise and Track Expenses Clicking on the Pay now button will go to a new screen where the Customer will be asked to select to either pay with a card or to sign into their PayPal account. All payments are processed with total security. 55

61 Organise and Track Expenses EXPENSE AND TRANSFER ENTRIES Expenses If the PayPal account is used to pay for other Expense transactions, these transactions are also imported into QuickBooks Online. As the system does not know what the expense is for, each expense entry is posted to a default expense account PayPal Uncategorised Expense. NOTE: These expenses will need to be manually edited to show the correct expense categorisation. The expense entry will be added to the PayPal Bank account as an expense transaction. Transfers When money is transferred out of PayPal to the nominated PayPal transfer account the bank deposit entry will be show up in the bank feeds as a deposit from PayPal. To process this entry, select Transfer and select the PayPal Bank Account. Create a Bank Rule to process future deposits received from PayPal. 56

62 Organise and Track Expenses RECONCILING THE PAYPAL BANK ACCOUNT When the customer pays the online invoice, a payment will be created in QuickBooks Online, deducting the amount of the payment against the outstanding balance of the invoice. The app will post any updates to your QuickBooks Online account automatically. The payment update can occur within 15 minutes of payment being received. Initially, the payment will register against the Undeposited Funds account. However, this will automatically change to the preferred account based on the app settings, PayPal Bank by default. The Reference no. field will be updated with the PayPal transaction ID. 57

63 Organise and Track Expenses A list of payments made using online invoicing, can be reviewed under Transactions > Sales list. Click the settings cog and enable the Source Column. Payments made through online invoicing will have a source of EInvoice, and a Payment Method of PayPal. The payment and the PayPal fee will both show in the PayPal Bank account as separate line entries. 58

 and/or item details (if using products and services, which are in turn linked to general ledger")
64 Organise and Track Expenses ORGANISE AND TRACK EXPENSES EXPENSE TRANSACTIONS To enter an expense transaction, select Quick Create (then select Show More to see all options), and then under Suppliers select Expense. In the Expense window itself, select the account the expense was paid from such as petty cash, a bank account or credit card account. Complete the detail of the expense transaction including the payee, the reference number, the date, whether the amounts are tax inclusive/exclusive/out of the scope of GST, etc. Define the expense by allocating it to the relevant account (if using general ledger accounts) and/or item details (if using products and services, which are in turn linked to general ledger accounts). Any additional fields such as a Memo can be completed, and you can also choose to add an Attachment (copy of the expense) for this expense. Click Save and Close or Save and New. 59

65 Organise and Track Expenses If necessary, attach a document or any file by clicking on Attachments in the bottom left corner of the form. This can be used to store related documents for future references. Files sizes can go up to 25MB each. The Expense transaction can also be accessed from the Transactions menu in the left-hand navigation bar, by selecting the Expense submenu and then selecting Create New Expense in the top right corner. 60
66 Organise and Track Expenses BILLS Bills, available in QuickBooks Online Essentials and Plus, can be accessed in the Quick Create menu, under Suppliers. This is the quickest route to accessing bills, but they can also be accessed via the left-hand navigation bar from the Suppliers tab or the Transactions tab in the Expense submenu. OTHER TYPES OF SUPPLIER RELATED TRANSACTIONS Supplier Credit, Credit Card Credit, and Purchase Order can be accessed in the Suppliers section of the Quick Create menu. Purchase orders are also accessible from the Transactions Expense tab of the left-hand navigation bar by selecting Create New at the top right and then selecting Purchase Order. 61


67 Organise and Track Expenses CAPTURING EXPENSES ON A IPAD/IPHONE 1. To create an expense on an ipad/iphone tap the plus sign and select expense 2. If you have an printed invoice handy take a photo of it and attach it to the expense so need to keep hard copies 3. Enter the relevant details for the expense and save 62


68 Organise and Track Expenses MANAGING BILLS Open bills can be found by using the Search and Recent Transactions functions, as well as by running reports, but most often will be found in the Supplier Centre by selecting Suppliers from the left-hand navigation bar. In the Supplier Centre, select the unpaid section of the Money bar and then Make payment for that supplier. Or, the original bill can be opened by clicking on the hyperlink in the listing, and then Make payment can be selected at the top of the bill. Bills, whether open or paid, can also be found by selecting Transactions Expenses from the left-hand navigation bar. 63


69 Organise and Track Expenses Tip: To copy expenses or creating functions at the bottom of an existing invoice. See above. recurring expenses use the 64

70 Going Mobile RUNNING REPORTS To access Reports, click on Reports in the left-hand navigation bar. Scroll your mouse over each report s listing to view a sample preview of the layout. You can run the report immediately by clicking on it or you can customise it first before the report initially appears by clicking on the customise link. You can also search for a particular report by typing any part of the report name in the Search field. PROFIT & LOSS / BALANCE SHEET The two most frequently produced reports are the Profit & Loss and Balance Sheet. They are found at the top of the Recommended and All Reports sections of the Report Centre. Any reports you run regularly will be listed in the Frequently Run section for easy access. AUTOMATED REPORTS Using QuickBooks Online, you can have reports automatically sent by to yourself and others at regular times (e.g. 1st of the month). Any customised reports can be saved as part of a Report Group. 65

71 Going Mobile A Report Group can contain one or more reports. Highlighting the Report Group in My Custom Reports and selecting Edit will open the Report Group Settings window for this group, where the settings are created. 66
 can be set to be attached as Excel files, and the schedule of the email of the reports can be set as well.")

72 Going Mobile Here, the recipient(s) are specified, along with the subject line and the text of the . The report(s) can be set to be attached as Excel files, and the schedule of the of the reports can be set as well. The recipients do not have to be QuickBooks Online users and QuickBooks Online does not even have to be running for these reports to be sent on schedule. CUSTOMISING REPORTS You can customise a report, even when it is already on the screen, by selecting Customise in the top left corner of the report. Depending on the specific report, a number of areas are available to customise. These are grouped into key areas including: general, rows/columns, lists/numbers, and header/footer. 67
 you specify, with a subject line and a note. The report will appear both as an attachment and in the body of the email.")
73 Going Mobile After customising a specific report, select Run Report to display it with your changes. Your reports can be displayed on screen, printed, ed and even exported to Excel. Selecting will send the report to the recipient(s) you specify, with a subject line and a note. The report will appear both as an attachment and in the body of the . Exporting reports to Excel lets you make further modifications if desired. Reports exported to Excel are provided with the relevant formulas. You can save your customised report by selecting Save Customisations at the top of the report. Your report will be saved in the My Custom Reports section of the Report Centre, making it easy to access in the future. 68
74 Going Mobile RUN REPORTS ON A IPAD/IPHONE Keep a finger on the pulse of your business with running reports from your iphone/ipad. Select reports option from your left hand side navigation menu to run the P&L report. 69

75 Going Mobile AUDIT LOG The audit log feature allows you to keep a track of all activity transactions, logons, changes to settings, anything that is done within QBO. 1. Click on the company settings tab and select Audit Log under the Tools section 2. The audit log captures the date of activity, user, event, name of customer/supplier, date of the transaction like a payment, amount and a full history of what occurred giving you full visibility of your account 70

76 Getting Support QUICKBOOKS ONLINE PAYROLL One of the most useful features in QBO is payroll. Our payroll application is a fully featured payroll solution and powered by KeyPay who are one of our ecosystem partners. Payroll is easy to use and also offers employees a self-service portal to download payslips, change their details and apply for leave. KeyPay also is SuperStream compliant and automates quarterly super payments. To setup payroll 1. In the Navigation pane on the left hand side click Employees. 2. Towards the top right of the screen click on Turn on Payroll 3. Fill out the mandatory fields a. Name (leave as what is pre-populated) b. ABN c. Contact Name d. Contact Address (leave as what is pre-populated) e. Standard Hours per day f. How often do you process pay rums? N.B. The Standard Hours Per day is used help predict leave liability and to report on leave liability, it is also used when employees apply for leave. 71

77 Getting Support 4. Also choose whether to allow my employees to edit their details through the self-service portal. Setup Employees Once you have setup Payroll the next step is to setup the employees. There are two options you can setup the employees individually or do a bulk upload via a CSV files. To setup a Single Employee 1. To setup a Single Employee on the main payroll screen click on Add Employee 72
78 Getting Support 2. Enter the Tax File Number, click Next 3. In the New Employee Details screen you must enter a. Start Date b. First Name c. Surname d. Date of Birth e. Residential Address f. Residential Suburb g. Postal Details (if different from Residential Details.) Click Next 4. When on Tax File Declaration screen select the Employment Type as Full Time. Click Next N.B. From the information provided in the Tax File Declaration QBO Payroll will determine the tax scale. Whilst QBO Payroll does not automatically lodge the payroll declaration for you; you can download a Tax File Declaration report and then upload it to the ATO ECI interface. For the report to be successful you must leave the Date Reported To ATO field empty. 73

79 Getting Support 5. On the Pay Run defaults screen you must set a. The employee is paid b. Update the following to the Leave Allowance Template i. Primary Pay Category (Permanent Ordinary Hours) ii. Pay Schedule iii. Primary Location iv. Notification Click Next 6. The next screen Locations allows you to setup cost centers to track hours against different parts of the business. N.B. There is no correlation between Locations in Quickbooks Online and Locations in QBO Payroll at the moment. 7. Journal entries that are transferred between QBO Payroll and Quickbooks Online do identify QBO Payroll locations allowing allocation to the correct Location or Class in Quickbooks Online. 74

80 Getting Support 8. The Bank Accounts screen allows you to enter the employee s bank account details. You can also split the amount between multiple bank accounts based upon percentage or fixed amounts. 9. Choose the superannuation fund the employee wishes to pay their superannuation into, and enter their member fund. Superannuation Fund details can be searched for by ABN, SPIN or SMSF. You can choose to pay between multiple superannuation funds based on percentage or fixed amount. 75


81 Getting Support 10. If you wish to allow the employee to use the self-service portal click on the Enable Self Service, enter the employee address. An account will be created for the employee and an sent to them with the details of setting up the password and how to access the Self Service Portal. 76

82 Getting Support Setup a Pay Run Once you have setup QBO Payroll and employees, you are ready to create a Pay Run. A Pay Run only needs to be configured once; it will then automatically run each period as configured. 1. From the main payroll screen click on New Pay Run 2. On the Pay Run screen select the Pay Schedule, enter the date for the Pay Period Ending and the Date pay run will be paid. Click Create. 77


83 Getting Support 3. The next screen will then show you a summary of the pay run including, all employees in that run, their earnings, tax, and superannuation figures. 4. By clicking on the individual employee line you can expand the details. Here you can see Leave Accrued and add Notes For This PayRun. In addition by clicking on the Actions button you can make numerous adjustments, such as Add Earnings, Take Leave, Adjust PAYG, Adjust Leave and Exclude from pay run. 78

84 Getting Support 5. Once you have completed any adjustments you can hide the full details of the employee by clicking on the summary line at the top. Before you complete the pay run look for any warnings. To see the details of the warning click on it. 6. In this scenario there is a warning regarding ABA files. QBO Payroll will not automatically pay your employees, but it can create an ABA that you can upload to your bank to pay multiple employees at the same time. To setup ABA file click on the warning about ABA details have not been provided for this business, then click on Fix This. On the ABA Details screen click on Add. 7. Fill out the required details and click Save. Check for any other warnings and deal with them appropriately. QBO Payroll will automatically inform you of situations such as when an employee has requested more leave than they are entitled to. 79

85 Getting Support 8. To finish this pay run click on Finalise Pay Run and select Date Paid, click Finalise. 9. One the pay run has been finalised, it is locked. You can Unlock it and make changes but this should be done before any payments are made. Also once the pay run is finalised you can run any reports you need, Download ABA file so it can be uploaded to the bank and Send Pay Slips N.B. Once the pay run is completed journals are automatically posted to QBO and the relevant accounts. 80
86 Getting Support GETTING SUPPORT There is lots of support available for QuickBooks Online when you need it. To access online help, select the question mark icon in the top right corner of the QuickBooks Online screen. Here you can type in your question to get an answer. You can also ask fellow users a question by clicking on Ask Community. If you prefer to chat to our Care team, click on Chat. This will launch a live chat session so you can chat with one of our care team members. Alternatively, you can send us an by clicking on . 81


87 Getting Support PROVIDING FEEDBACK We love hearing your feedback on using QuickBooks Online both good and bad. To provide us with your feedback, click on Feedback in the Your Company section of the Company menu. Here you can provide product feedback and suggestions. This link allows for a screenshot of the page in question. We hope you found this Getting Started Guide useful. If you are an accounting professional, refer to the Getting Started Guide for QuickBooks Online Accountant for accountant specific information. For additional information, please visit: NOTE: If you require additional support, your QuickBooks Online subscription gives you access to technical experts Monday to Friday 8:30 to 18:30 AEST. 82
AN INTRODUCTION TO QUICKBOOKS ONLINE. Getting Started Guide
 AN INTRODUCTION TO QUICKBOOKS ONLINE Getting Started Guide Copyright Copyright 2014 Intuit Ltd. All rights reserved. Trademarks 2014 Intuit Inc. All rights reserved. Intuit the Intuit logo, Lacerte, ProAdvisor,
AN INTRODUCTION TO QUICKBOOKS ONLINE. Getting Started Guide
 AN INTRODUCTION TO QUICKBOOKS ONLINE Getting Started Guide Copyright Copyright 2014 Intuit Ltd. All rights reserved. Intuit Canada Trademarks 2014 Intuit Inc. All rights reserved. Intuit the Intuit logo,
QUICKBOOKS ONLINE FUNDAMENTALS SERIES. Part 1 Introducing Intuit QuickBooks Online Accountant
 QUICKBOOKS ONLINE FUNDAMENTALS SERIES Part 1 Introducing Intuit QuickBooks Online Accountant Copyright Copyright 2016 Intuit, Inc. All Rights Reserved. Trademarks 2016 Intuit Inc. All rights reserved.
Sage One Accountant Edition. User Guide. Professional user guide for Sage One and Sage One Accountant Edition. Banking. Invoicing. Expenses.
 Banking Invoicing Professional user guide for and Canadian Table of contents 2 2 5 Banking 8 Invoicing 15 21 22 24 34 35 36 37 39 Overview 39 clients 39 Accessing client books 46 Dashboard overview 48
Lesson 9 Reports in QuickBooks
 Q U IC K BOOKS 2016 STUDEN T GUIDE Lesson 9 Reports in QuickBooks Copyright Copyright 2016 Intuit, Inc. All rights reserved. Intuit, Inc. 5100 Spectrum Way Mississauga, ON L4W 5S2 Trademarks 2016 Intuit
Getting Around QuickBooks Online
 QuickBooks Online Student Guide Chapter 2 Getting Around QuickBooks Online Chapter 2 Chapter 2 Now that you ve finished your company setup in QuickBooks Online, you re ready to get started. It s a good
Banking in QuickBooks Online
 QuickBooks Online Student Guide Chapter 6 Banking in QuickBooks Online Chapter 2 Chapter 6 The Banking page is where you connect your accounts and download transactions. This is sometimes known as bank
Reports in QuickBooks
 QuickBooks Online Student Guide Chapter 11 Reports in QuickBooks Chapter 2 Chapter 11 In this chapter, you ll learn how QuickBooks helps you find information in your business. Lesson Objectives In this
Published by Reckon Limited
 Projects Workbook Published by Reckon Limited All Rights Reserved Copyright Reckon Limited Copyright No part of these materials may be reproduced, stored in or introduced into a retrieval system, or transmitted
Using reports to analyse your business
 Using reports to analyse your business Using reports to analyse your business 2 Using reports to analyse your business Your MYOB company file stores lots of information about the key areas of your business,
Quick Books Online Training
 Quick Books Online Training Kathy Dise Cindy Gill Mary Rossi Link to sample QBO company: https://qbo.intuit.com/try23/samplecompany/validated?sku=7&bc=qbp-t39 Page 1 What Version of Quickbooks is right
L E S S O N 1 Lesson objectives
 L E S S O N 1 Lesson objectives To gain an overview of the course and the topics to be covered To know how QuickBooks works and how you can get around in QuickBooks To learn common business terms used
Supplemental Guide. Module 1: Getting Started
 QUICKBOOKS ONLINE CE R T I FICATION COURSE Supplemental Guide Module 1: Getting Started Copyright Copyright 2015 Intuit, Inc. All rights reserved. Intuit, Inc. 5601 Headquarters Drive Plano, TX 75024 Trademarks
Published by Reckon Limited
 Invoices Workbook Published by Reckon Limited All Rights Reserved Copyright Reckon Limited Copyright No part of these materials may be reproduced, stored in or introduced into a retrieval system, or transmitted
How to convert QuickBooks Desktop data to QuickBooks Online
 The Accountant s Guide to Moving Clients Online How to convert QuickBooks Desktop data to QuickBooks Online Confidently complete the migration process with these practical, step-by-step visual instructions.
BUSINESS SYSTEM PLUS (MODULAR)
") BUSINESS SYSTEM PLUS (MODULAR) PC APPLICATION System setup The system provides full business Accounting, CRM, Organizer and Inventory control support typically needed for a small business. The system can
BUSINESS SYSTEM PLUS (MODULAR) PC APPLICATION System setup The system provides full business Accounting, CRM, Organizer and Inventory control support typically needed for a small business. The system can
QuickBooks Online Student Guide. Chapter 1. New Company Setup
 QuickBooks Online Student Guide Chapter 1 New Company Setup Chapter 2 Chapter 1 Lesson Objectives In this chapter you ll learn how to set up a new company in QuickBooks Online. Whether your business has
/ 1. Online Banking User Guide SouthStateBank.com / (800)
") / 1 Online Banking User Guide SouthStateBank.com / (800) 277-2175 01242018 Welcome Thank you for using South State s Online Banking. Whether you are a first time user or an existing user, this guide will
/ 1 Online Banking User Guide SouthStateBank.com / (800) 277-2175 01242018 Welcome Thank you for using South State s Online Banking. Whether you are a first time user or an existing user, this guide will
QuickBooks Online Student Guide. Chapter 1. New Company Setup
 QuickBooks Online Student Guide Chapter 1 New Company Setup Chapter 2 Chapter 1 Lesson Objectives In this chapter you ll learn how to set up a new company in QuickBooks Online. Whether your business has
/ 1. Online Banking User Guide SouthStateBank.com / (800)
") / 1 Online Banking User Guide SouthStateBank.com / (800) 277-2175 06132017 Welcome Thank you for using South State s Online Banking. Whether you are a first time user or an existing user, this guide will
/ 1 Online Banking User Guide SouthStateBank.com / (800) 277-2175 06132017 Welcome Thank you for using South State s Online Banking. Whether you are a first time user or an existing user, this guide will
Copyrights and Trademarks. Copyrights and Trademarks. Accounting Getting Started Guide 1
 Copyrights and Trademarks Copyrights and Trademarks Accounting Getting Started Guide 1 Copyrights and Trademarks Copyright 2002-2018 by Us. We hereby acknowledge the copyrights and trademarks of all terms
QuickBooks 2010: The Basics
 QuickBooks 2010: The Basics Student Workbook For QuickBooks Pro and Premier ecourse By Holly Fullingim COMPUTER TRAINING CENTER 3506 S. EXPRESSWAY 77 SUITE A HARLINGEN, TEXAS 78552 (956) 428-7777 QUICKBOOKS
User's Guide. Alpha Five Accounting. Accounting Made Easy. Version 3.0. Copyright BetaSoft LLC - All Rights Reserved
 User's Guide Alpha Five Accounting Copyright 1995-2002 BetaSoft LLC - All Rights Reserved Accounting Made Easy Version 3.0 Alpha Five is a trademark of Alpha Software Corp. i ii Table of Contents INTRODUCTION...1
Express365 Accounting User Manual
 Express365 Accounting User Manual August 05 Latest Update: 9 th October 08 P a g e 46 For information about customer support, please visit our homepage at http://www.express365.com.my on the World Wide
PACS. Installation & Going Live. User Guide. pacs1.4
 PACS Installation & Going Live User Guide pacs1.4 Tribal SchoolEdge Level 1, 17 Madden Grove RICHMOND VIC 3121 Support Centre: Web: https://support.schooledge.com.au/ Email: support.schooledge@tribalgroup.com
NCLTEC Accounting User Manual
 NCLTEC Accounting User Manual Latest Update: Feb 6, 0 For information about customer support, please visit our homepage at http://www.ncltec.com on the World Wide Web. Copyright 05 NCL Energy Technology
Get Ready to Save Time and Money on Your Practice Management!
 Get Ready to Save Time and Money on Your Practice Management! TABLE OF CONTENTS Why BarBooks? About... 1 Best Features... 1 Start Using BarBooks Quick Start Guide... 1 Icon Guide... 2 Choose a Subscription...
Table Of Contents Version 3.6.6
 Table Of Contents Version 3.6.6 Release Notes: Version 3.6.6... 3 Overview... 3 Reports... 3 Receipts... 3 Supplier Invoices Paid... 3 Employee Accrued Entitlements Liability... 4 Roadworthy Report...
USER GUIDE. Concur Expense Management System
 Concur Expense Management System DOCUMENT CONTROL Procedure Concur Expense Management System Procedure Number Date of Issue 22 July 2016 Last Reviewed 22 July 2016 Version 6.0 Next Review 22 July 2017
User Guide. Last Updated: 8 March Page 1 of 99
 User Guide Last Updated: 8 March 2018 Page 1 of 99 Table of Contents... 1 Introduction... 5 EInvoicing / ETransaction... 5 Financio Connect... 5 User & Business Entity... 5 Signing Up... 6 Sign Up... 6
input, adjust, and delete General Journal understand the Chart of Accounts, how it works, transactions
 Lesson Objectives Lesson 1: Introduction The objective of this lesson is to introduce you to the basic operation of QuickBooks Premier. Upon successful completion of this lesson, you should know how to:
1
 www.clearbooks.co.uk 1 Content Clear Books Demo 1. Customising your Dashboard 2. Setting up for the first time A) Details B) Toggle Features C) Reporting Periods D) Adding a new user E) Invoice Themes
Cashbook. User Guide. User Guide
 Cashbook User Guide User Guide MYOB New Zealand Ltd WEBSITE www.myob.co.nz Copyright MYOB Technology Pty 1988-2010 All rights reserved. Trademarks MYOB is a registered trademark and use of it is prohibited
Bank Reconciliation in Sage One. Sage One Partner Edition. Getting started
 Bank Reconciliation in Sage One Sage One Partner Edition Getting started 1 Contents Introduction Introduction... 2 Signing Up... 7 Logging In... 7 Common Question... 8 Business & Billing Settings... 10
Professional Editions Setup Guide
 Professional Editions Setup Guide FOR TAX YEAR 2017 V 1 1 Table of Contents Click on any title to navigate directly to that section. Download and Install Download Installation File from Practice Manager
Accounts Payable MODULE USER S GUIDE
 Accounts Payable MODULE USER S GUIDE INTEGRATED SOFTWARE SERIES Accounts Payable MODULE USER S GUIDE Version 3.1 Copyright 2005 2009, Interactive Financial Solutions, Inc. All Rights Reserved. Integrated
Release Notes. MYOB AccountEdge Pro v16.5 MYOB AccountEdge Network Edition v16.5
 Release Notes MYOB AccountEdge Pro v16.5 MYOB AccountEdge Network Edition v16.5 AccountEdge has all the features you are familiar with, as well as new additional functions to make managing your business
The chances are excellent that your company will
 Set Up Chart of Accounts and Start Dates The chances are excellent that your company will have been operating, if only for a short time, prior to the time you start using QuickBooks. To produce accurate
Bank Reconciliation in Sage One 1
 Bank Reconciliation in Sage One 1 Contents Introduction Introduction... 2 Your evolving role as the Sage One Accountant... 3 What are Bank Feeds?... 3 Cashbook and Accounting how bank reconciliation works
New Features... 4 Add-on Modules Cheat Sheet... 15
 1 2 Table of Contents New Features... 4 Favourites option... 4 New Icons... 4 Windows theme integration... 5 Forms Assistant... 6 Forms designer enhancements... 7 User Access Report... 8 User Notifications
DIGITAL AND MOBILE BANKING USER GUIDE
 DIGITAL AND MOBILE BANKING USER GUIDE 2018 First Tennessee Bank National Association operating as First Tennessee Bank and Capital Bank. Member FDIC. NEW 04/18 USER GUIDE GETTING STARTED 3 Logging in with
Invoice Ninja Documentation
 Invoice Ninja Documentation Release 4.0.1 Hillel Coren Dec 25, 2017 Basic Features 1 Introduction 3 2 Clients 9 3 Invoices 15 4 Payments 21 5 Recurring Invoices 25 6 Credits 29 7 Quotes 33 8 Tasks 39
ecorner Stores Plus CloudShops
 ecorner Stores Plus CloudShops Quick Start Guide ecorner Pty Ltd Australia Free Call: 1800 033 845 New Zealand: 0800 501 017 International: +61 2 9494 0200 Email: info@ecorner.com.au The information contained
QuickBooks Online Certification Bootcamp: May 23 &
 QuickBooks Online Certification Bootcamp: May 23 & 24 2018 Eastern Time Wednesday, May 23, 2018 Track 1 Eastern Time Wednesday, May 23, 2018 Track 2 10:45 AM 11:00 AM 11:00 AM 11:30 AM 11:30 AM 11:45 AM
QUICKBOOKS EXPORT FILE: Manual. avfuel QUICKBOOKS EXPORT FILE MANUAL
 avfuel QUICKBOOKS EXPORT FILE MANUAL 1 INDEX Overview... 3 Initial Setup... 6 Avfuel Hub Item Names For Mapping Transaction Pro Importer Advanced Feature - Importing One File TPI Import Wizard Program
Also included in this workbook is a unit on basic bookkeeping principles and rules for double-entry bookkeeping and the accounting equation.
 Preface Computerised Accounting using MYOB AccountRight Plus v19 This workbook has been written to cover all the basic information on how to use MYOB AccountRight [Standard, Plus, Premier and Enterprise]
CIT Enterprise Edition Setup Guide FOR TAX YEAR 2016
 CIT Enterprise Edition Setup Guide FOR TAX YEAR 2016 Thank you for choosing TaxAct CIT Enterprise Edition. We look forward to helping make this your best tax season ever! Remember, TaxAct s dedicated Professional
Getting Started. AccountEdge. AccountEdge Plus. AccountEdge Plus Network Edition
 Getting Started AccountEdge AccountEdge Plus AccountEdge Plus Network Edition Mamut Software Ltd 90 Long Acre Covent Garden London WC2E 9RZ 0800 032 5616 United Kingdom Website www.visma.co.uk 2017 Acclivity
Microsoft Dynamics GP. RapidStart Services
 Microsoft Dynamics GP RapidStart Services January 31, 2013 Copyright Copyright 2013 Microsoft. All rights reserved. Limitation of liability This document is provided as-is. Information and views expressed
2 New Company Setup OBJECTIVES:
 2 New Company Setup In Chapter 2 of Accounting Fundamentals with QuickBooks Online Essentials Edition, you will learn how to use the software to set up your business. New Company Setup includes selecting
Part 2: How to convert QuickBooks Desktop data to QuickBooks Online. The Accountant s Guide to Moving Clients Online
 The Accountant s Guide to Moving Clients Online Part 2: How to convert QuickBooks Desktop data to QuickBooks Online Confidently complete the migration process with these practical, step-by-step visual
QuickBooks Basics Level III
 Page1 QuickBooks Basics Level III Part VII Handling the Money Payments and deposits Recording Customer Payments If a payment is received at the time of the sale, QuickBooks automatically records the customer
BBVA Compass Spend Net Payables
 User Guide BBVA Compass Spend Net Payables User Guide Vault Services Table of Contents Introduction 2 Technical Requirements 2 Getting started 3 Sign In 3 General Navigation 4 Upload/Create Payment 5
Part 2 PROCESSING TRANSACTIONS in MYOB
 April Part 2 PROCESSING TRANSACTIONS in MYOB 2.1 Getting Started In this chapter, we will discuss: how to load MYOB v15+ and the file containing the Chart of Accounts data file onto your computer; how
ecorner Stores Plus CloudShops
 ecorner Stores Plus CloudShops Quick Start Guide ecorner Pty Ltd Australia Free Call: 1800 033 845 New Zealand: 0800 501 017 International: +61 2 9494 0200 Email: info@ecorner.com.au The information contained
Corporate Online. Using Accounts
 Corporate Online. Using Accounts About this Guide About Corporate Online Westpac Corporate Online is an internet-based electronic platform, providing a single point of entry to a suite of online transactional
User s Guide. (Virtual Terminal Edition)
") User s Guide (Virtual Terminal Edition) Table of Contents Home Page... 4 Receivables Summary... 4 Past 30 Day Payment Summary... 4 Last 10 Customer Transactions... 4 View Payment Information... 4 Customers
User s Guide (Virtual Terminal Edition) Table of Contents Home Page... 4 Receivables Summary... 4 Past 30 Day Payment Summary... 4 Last 10 Customer Transactions... 4 View Payment Information... 4 Customers
AccountsIQ Tips and Tricks. Updated 20/10/2008. Purpose. 1. List and describe what heading and text will be containing in each of the Tip s and tricks
 AccountsIQ Tips and Tricks Updated 20/10/2008 Purpose 1. List and describe what heading and text will be containing in each of the Tip s and tricks 2. Outline what FAQ s will be released on the System
01 Transaction Pro Importer version 6.0
 01 Transaction Pro Importer version 6.0 PLEASE READ: This help file gives an introduction to the basics of using the product. For more detailed instructions including frequently asked questions (FAQ's)
Accounting Table of Contents
 Accounting Table of Contents Accounting Table of Contents 1 About Church Windows Accounting 4 Chart of Accounts Setup 6 Adding and Removing Accounts 7 Managing the Chart of Accounts 9 Detail tab 9 Balance
Contents. 1. How to Log into your AdminOnline System Forgotten your Password Changing your Password... 7
 Manual June 2017 Contents 1. How to Log into your AdminOnline System... 4 2. Forgotten your Password... 6 3. Changing your Password... 7 4. Online Registration Form... 8 5. Accounting... 9 5.1 How to Invoice
1
 www.clearbooks.co.uk 1 Content Clear Books Demo 1. Customising your Dashboard 2. Setting up for the first time A) Details B) Toggle Features C) Reporting Periods D) Adding a new user E) Invoice Themes
Canberra Institute of Technology
 Canberra Institute of Technology Accounting and Law Centre for Business Student s Name & CIT # Tutor s Name: Place a cross (X) if student s Card NOT sighted Subject: COMP 337 Setup and operate a computerised
ROAMpay TM. X4 User's Guide
 ROAMpay TM X4 User's Guide Last Modified: 06/14/2013 Contents 1 Activating ROAMpay X4 2 Using the System 2 Login 2 First-time Login 2 Default Settings 3 Retrieving Your Password 3 Online Sales 4 Saved
- 1 - Revision Date: 7/27/09
 Deposit Checks QuickBooks Module Documentation... - 2 - Installation... - 2 - Initial Setup... - 5 - Granting Permission... - 5 - Setting Up the Gateway Credentials... - 7 - Processing Transactions...
Checkbook HD for ipad
 Checkbook HD for ipad www.checkbookhd.com Contents Overview 3 Accounts 4 Set up a new account 4 Adjust an account balance 6 Keep track of your balance changes 6 Transactions 7 Add an expense 7 Add an income
Copyrights and Trademarks. Copyrights and Trademarks. Sage One Invoicing Getting Started Guide 1
 Copyrights and Trademarks Copyrights and Trademarks Sage One Invoicing Getting Started Guide 1 Copyrights and Trademarks Copyright 2002-2017 by Us. We hereby acknowledge the copyrights and trademarks of
Microsoft Dynamics GP Release Integration Guide For Microsoft Retail Management System Headquarters
 Microsoft Dynamics GP Release 10.0 Integration Guide For Microsoft Retail Management System Headquarters Copyright Copyright 2007 Microsoft Corporation. All rights reserved. Complying with all applicable
Certify User Guide CREATING & SUBMITTING EXPENSE REPORTS
 Certify User Guide CREATING & SUBMITTING EXPENSE REPORTS Copyright 2018 All Rights Reserved This version is current as of July 1, 2018 For continuously updated instructions, please visit our Help Center
Release Notes. AccountRight What s new? MYOB Licence Agreement
 Release Notes AccountRight 2013.2 These Release Notes explain how to upgrade your software if you are currently using AccountRight Basics, AccountRight Standard, AccountRight Plus or BusinessBasics. Do
Table of Contents *** IMPORTANT NOTE ***
 Table of Contents Using QuickBooks With E2 Pg. 2 Installing the Interface File Pg. 3 Conversion from QuickBooks Pg. 4 Settings in E2 for Sync Option Pg. 6 Settings in QuickBooks for Sync option Pg. 7 Transferring
User Guide for Consumer & Business Clients
 Online Banking from Capital City Bank User Guide for Consumer & Business Clients Revised September 2015 www.ccbg.com/upgrade Contents Overview... 4 Exploring the Home Page... 5 Menu... 6 Accounts... 7
Sage General Ledger User's Guide. May 2017
 Sage 300 2018 General Ledger User's Guide May 2017 This is a publication of Sage Software, Inc. 2017 The Sage Group plc or its licensors. All rights reserved. Sage, Sage logos, and Sage product and service
MYOB EXO ACCOUNTANT S ASSISTANT
 MYOB EXO ACCOUNTANT S ASSISTANT User Guide EXO BUSINESS M YO B ENT ERPRI S E S O L U T I O N S Important Notices This material is copyright. It is intended only for MYOB Enterprise Solutions Business Partners
My MessageMedia User Guide
 My MessageMedia User Guide Copyright and Trademark Statement 2011 MessageMedia All rights reserved. Apart from any use permitted under the Copyright Act 1968, no part of this publication may be reproduced,
WorkBook release note
 WorkBook version: 8.3.0 Release date: 01/10/2013 Author: René Praestholm rp@workbook.net DOWNLOAD AS PDF HIGHLIGHTS IN THIS RELEASE Collaboration Many new improvements added in collaboration between team
RELEASE NOTES: FEBRUARY 23, 2016
 RELEASE NOTES: 2.16.01 FEBRUARY 23, 2016 Highlights from this release Report Criteria Favourites Change Name on WO/LOT/INV with blend Save report criteria so you can run it the same way next time. Read
Keep It Easy Software Cloud User Manual
 Keep It Easy Software Cloud User Manual 2015 Keep It Easy Software 1 CONTENTS How to Login... 5 Functions... 5 System Preferences... 6 General... 7 Receipt Categories... 9 Expense Categories... 10 Service
My Sysco Reporting Job Aid for CMU Customers. My Sysco Reporting. For CMU Customers (Serviced by Program Sales)
") My Sysco Reporting For CMU Customers (Serviced by Program Sales) 1 Accessing My Sysco Reporting... 2 Logging In... 2 The Reporting Dashboard... 3 My Sysco Reporting Process... 6 Generating a Report...
My Sysco Reporting For CMU Customers (Serviced by Program Sales) 1 Accessing My Sysco Reporting... 2 Logging In... 2 The Reporting Dashboard... 3 My Sysco Reporting Process... 6 Generating a Report...
Security We keep your security a priority
 Welcome Welcome to Berkshire Bank s Business Solutions. With Business Solutions, you may access your accounts 24 hours a day, seven days a week anywhere an internet connection is available. This guide
NBT BANK MOBILE BANKING. How To Guide
 TABLE OF CONTENTS PERSONAL AND BUSINESS BANKING CUSTOMERS How to Enroll...3 Accessing and Using NBT Bank Mobile Banking...5 Welcome to the NBT Bank Mobile Banking Application...7 Using Mobile Deposit...8
Quick_Start_Guide_-_SB_v.3.9.doc. Table of Contents
 Table of Contents How to Use This Guide...3 System Requirements...3 Need Assistance?...4 Welcome...4 B-free Products...5 Overview...6 Step by Step Guide to B-free...8 Creating a Bank Account...9 Selecting
These Release Notes explain how to upgrade your software if you are currently using AccountRight Basics, AccountRight Standard or AccountRight Plus.
 Release Notes AccountRight 2013 These Release Notes explain how to upgrade your software if you are currently using AccountRight Basics, AccountRight Standard or AccountRight Plus. Do you use M-Powered
e-abbott 2017 User Manual Updated
 e-abbott 2017 User Manual Updated 8-25-2017 1 2017, Abbott USA. All rights reserved Information used in this document is subject to change without notice. No part of this document can be reproduced or
Customer Portal Step-by-Step: Create your MyActon Customer Portal Account
 How do I create a Customer Portal account? If you don t have a Customer Portal account, you can create one in a few steps: 1. Go to http://portal.actonmobile.com. Note: You can also access the portal by
MYOB PayDirect Mobile app user guide
 MYOB PayDirect Mobile app user guide Welcome to the MYOB PayDirect Mobile app 1 The new MYOB PayDirect Mobile app lets you take care of business while you re on the go We ve taken some of the great features
CHAPTER 3: DAILY PROCEDURES
 Chapter 3: Daily Procedures CHAPTER 3: DAILY PROCEDURES Training Objectives Actively participating during this chapter helps you to: Understand the different types of transactions and the procedures for
Version 7 & 8. Note for users of MYOB AccountRight Live : Please use version 9 of Act! Link for MYOB instead USER GUIDE
 Version 7 & 8 Link the following Act! software: Act! & Act! Pro 2008-2017 (v10.2-19.0) Act! Premium 2008-2017 (v10.2-19.0) (referred to as Act! in this guide) to the following MYOB software: MYOB AccountRight
Bank Reconciliation September 2016 P R E F A C E. This is the Bank Reconciliation reference guide for IQ Business & IQ Enterprise software systems.
 BANK RECONCILIATION P R E F A C E This is the Bank Reconciliation reference guide for IQ Business & IQ Enterprise software systems. The document will aid in understanding and configuration of the Bank
DebtView User Guide. User Guide v2.0. Receivables Management Services
 DebtView User Guide User Guide v2.0 Receivables Management Services May 19, 2006 CONTEXT Introducing DebtView... 3 What s featured in DebtView?... 3 DebtView System Requirements... 3 Internet Browser...
Using the Telstra T-Suite Management Console. Customer Administrator s Reference Manual
 Using the Telstra T-Suite Management Console Customer Administrator s Reference Manual June 2011 Registering With TMC Notice Pivot Path is a registered trademark of Jamcracker, Inc. Registered trademark
YOUR GUIDE TO BUSINESS ONLINE BANKING
 YOUR GUIDE TO BUSINESS ONLINE BANKING II Published by Murphy & Company, Inc. 360 Barrett Office Dr St. Louis, MO 630 www.mcompany.com 009-07 Murphy & Company, Inc. Microsoft, Microsoft Money, Windows and
The data files on the Data DVD were prepared using the Windows 7 operating CHAPTER ONE. Objectives. Getting Started. Data Files
 CHAPTER ONE Objectives After completing this chapter, you should be able to: use the QuickBooks data files on the Data DVD access QuickBooks data files update your QuickBooks company fi le understand the
Preparer s Editions Setup Guide
 Preparer s Editions Setup Guide FOR TAX YEAR 205 V 2.5 Thank you for choosing TaxAct Preparer s Editions. We look forward to helping make this your best tax season ever! Remember, TaxAct s dedicated Professional
work with the Session Date start and exit Sage 50 Accounting review the General Module linked accounts use the Help system
 Lesson 1: Introduction Lesson Objectives Sage 50 Premium Accounting 2016 Level 1 The objective of this lesson is to introduce you to the basic operation of Sage 50 Premium Accounting 2016. Upon successful
MySagePay USER GUIDE
 MySagePay USER GUIDE Contents 1.0 Welcome to MySagePay 3 1.1 Logging into MySagePay 3 1.2 What you will see 4 2.0 Settings 5 2.1 My Account 5 2.2 Settings 6 2.3 AVS/CV2 7 2.4 3D Secure 8 2.5 Restrictions
Harvard University HSA Guide
 Harvard University HSA Guide HOW DO I LOG ON TO HOME PAGE? 1. Go to www.benstrat.com/clientlink_harvard.php 2. Click the Benefit Strategies Secure Account Login link 3. Enter your username and password
What s New Guide Merchants
 Page 2 of 30 Table of Contents PURPOSE...4 MULTIPLE USER ACCOUNTS FEATURE...4 User Roles... 5 User Administration... 6 User Profile... 7 Changes to the Merchant Interface... 8 FAQs... 9 What is the pricing
SCHOOL ACCOUNTS 2017 QUICK START GUIDE
 SCHOOL ACCOUNTS 2017 QUICK START GUIDE Tel: +353 1 9603220 Mobile: +353 86 2329472 Company Reg No: 535403 Email: schools@odoherty.biz www.odoherty.biz VAT Reg No: IE3234776BH School Accounts 2016 INSTALLATION
Intuit QuickBooks Desktop Enterprise. Installation and Setup Guide
 Intuit QuickBooks Desktop Enterprise Installation and Setup Guide Copyright Copyright 2017 Intuit Inc. All rights reserved. First printing, September 2008 STATEMENTS IN THIS DOCUMENT REGARDING THIRD-PARTY