MyJohnDeere.com. How to Guide. For questions, please contact your Precision Ag Specialist. Brookings/Garretson Scott Krogstad Cell:
|
|
|
- Hector Osborne
- 5 years ago
- Views:
Transcription

1 MyJohnDeere.com How to Guide For questions, please contact your Precision Ag Specialist Milbank/Watertown Eric Severson Cell: Brookings/Garretson Scott Krogstad Cell: PA Manager Margo Sik Marshall/Tyler Amanda Hatletvedt Cell:
2 Table of Contents John Deere Data Policy... 3 How to create a MyJohnDeere.com Account... 4 Operations Center Overview... 5 How to add staff and partners?... 6 How do I edit permissions? How do I backup my APEX information to the Operations Center? How do I move data from the Operations Center to APEX? How do I use Field Analyzer? How do I edit data? How do I delete, send, or export fields? How do I create a prescription? How do I view and print a report? How do I print a map? How do I reprocess a file? How do I share a single file? How do I share all of my data with my agronomist? How do I access data from another Operations Center? How do I transfer files to a machine? How do I create setup data? How do I use Wireless Data Transfer? How do I use Remote Display Access? What is My Jobs and how do I use it? *Table of Contents and Section Titles are linked. Press and hold the control button and click on the section you would like to be linked to. 2
3 John Deere Data Policy Schuneman Equipment Co. MyJohnDeere.com is an online toolbox hosting applications and tools that customers and dealers can use to deliver a differentiated John Deere FarmSight experience. Before a customer can access the Operations Center on MyJohnDeere.com, they must first accept the user agreement and enable their data usage settings. 1) To access the Data Usage Settings, select Organization Preferences from the drop down menu by your name in the upper right-hand corner of the screen. 2) Select Data Usage. This page highlights the three types of data usage. a. Machine Data for John Deere Use b. Production Data to Provide You Services and for Anonymized Internal John Deere Use: In order to utilize the Operations Center this section must be left on. c. Anonymized Machine/Production Data for External Sharing 3
4 *To view John Deere s complete data policy refer to How to create a MyJohnDeere.com Account 1) Go to and click on Create New Account. 4


5 2) Follow the on screen prompts. Operations Center Overview MyJohnDeere Operations Center is the platform for products and services that improve machine uptime, logistics management, and agronomic decision making in a centralized location to help plan, run, and manage an operation. 1) After signing into your MyJohnDeere.com account, select the Operations Center from the dashboard. 5

6 2) The first page you will see within the Operations Center is the Map view page. This page can be customized by selecting the map layers button and choosing what you would like to view from the Map Layers pane. Available map layers include the following: a. Equipment (displays JDLink Enabled Machines) b. Location History (Monitor machines and operators remotely for current status and prior path traveled) c. Fields (View field boundaries) d. Weather (View precipitation intensity overlay and Five-Day Forecast) e. Jobs (View assigned Jobs) Adding Staff How to add staff and partners? 1) Select Organization from the tools menu list. 6


7 2) Select the plus sign to add a staff member. Next enter their address and assign their role by sliding the bar across the screen. (Select the question mark next to My Files or My Equipment to see the definition of each role.) 3) Click Send Invite. Adding Partners 7
8 1) From the home page, in the upper right-hand corner click on your organization name and select Organization Preferences from the drop down menu. 2) Select Settings and then Edit 3) Under the Support Partner Organization heading choose My Organization Supports Partners then click Save. 8
9 4) Next, from the Organization page select the Partners tab and press the plus sign. 5) Choose whether you would like to share data or request data. Then enter the partner s address and select Next. 9
 would you like your partners to access? c.")
10 6) You will be prompted to answer a series of questions defining the permissions you would like to either give your partner or request from your partner. The following questions are included: a. Would you like your partner to have access to your machine information? b. Which field information (if any) would you like your partners to access? c. What actions would you allow your partner to have?(i.e. sending files) 7) After reviewing the information click Send Invite. *If you are a trusted advisor, you will follow the same steps using the Request Information button. Editing Staff Roles How do I edit permissions? 1) Go to Organization under the tools menu. 2) Click on the name of the staff member whose role you would like to edit. 3) Select Edit Role 10
11 4) Make desired changes and click Save. 5) To view descriptions of the roles click the? Editing Partner Permissions 1) Go to Organization under the tools menu and select the Partners tab. 2) Click on the name of the partner whose permissions you would like to edit. 3) Select one of the three categories which you would like to edit. (Machine Optimization, Agronomic Decision Making, Work Collaborator) 11
12 4) Select Edit. 5) Make desired changes and click Save. How do I backup my APEX information to the Operations Center? 1) Verify that current Apex data is accurate to ensure a better experience once the data has been loaded in the Operations center. 2) Verify that you as the customer have created a MyJohnDeere account and have accepted the Deere Data Usage agreement. 3) Open Apex and click File. 12


13 4) Scroll down and click Backup/Restore this will open a dialog box. Select Ok 5) After hitting Ok, Apex will close and open the Backup and Restore feature. 6) Choose Backup and then Continue 13
 You will want to choose To give my data to my John Deere Dealer to upload for me If you want to hire Schuneman Equipment to complete this process for you.")
 After signing in, you will have the opportunity to inform Schuneman Equipment that you are uploading your data.")
14 7) This will take you to a screen asking Why are you creating a backup? 8) You will want to choose To upload my data to MyJohnDeere myself if you plan on completing the process yourself. 9) You will want to choose To give my data to my John Deere Dealer to upload for me If you want to hire Schuneman Equipment to complete this process for you. 10) Next you will choose Sign In to login to your MyJohnDeere account. 11) You will have to agree to connect your Apex to your MyJohnDeere account. 12) After signing in, you will have the opportunity to inform Schuneman Equipment that you are uploading your data. If you choose yes, you will need to enter your zip code and the phone number you would like to be contacted at. If you choose no, you will have a chance to enter a phone number for one of John Deere s call center technicians to call and give a free walk through of MyJD. 13) Open the Select Organization dropdown. Select the organization you wish to backup. 14) The first time this process is done, Full Backup will automatically be selected. Update Changes will come into use after the initial backup has been complete. 14

 Log into your MyJohnDeere.com account and open the Operations Center.")
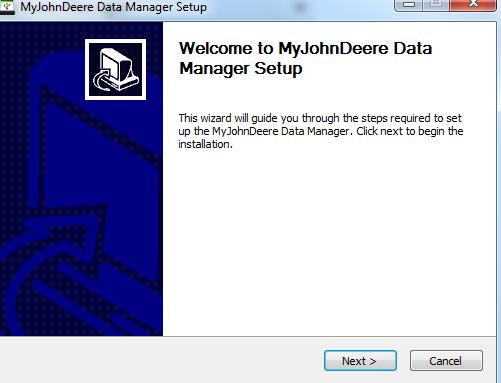
15 15) After selecting Continue a dialog box will appear informing you that the backup may take up to a few days before your data is viewable in MyJohnDeere.com. Select Start Backup to begin transferring data. 16) The account administrator will receive an once the data is available in MyJohnDeere.com Using MyJohnDeere.com Data manager 1) Log into your MyJohnDeere.com account and open the Operations Center. 2) Click on the tool menu ( ) and select MyJohnDeere Data Manager. 3) Select Download when the dialog box appears. 15
16 4) Follow the on-screen prompts to complete the installation. 16

17 17

 Log into your MyJohnDeere")
 Choose the file location you")
18 5) Open the MyJohnDeere Data Manager from your desktop or program list. 6) Log into your MyJohnDeere account when prompted. 7) Choose the file location you want to transfer from. (IE: Jump Drive) 18
19 8) Then select the files you would like to transfer. 9) Select the Upload button and leave the Data Manager open until the screen says Finished uploading. How do I move data from the Operations Center to APEX? 1) Open Apex on your computer. 2) Select Transfer button. 3) Select Activate Service and log-in with your MyJohnDeere account. 4) Then choose whether you want to automatically transfer files or manually transfer files. Most users will want to automatically transfer files. 19
 Select the Organization that you would like to select files from.")
20 5) If you chose to manually transfer files, click the Unload button 6) Select Unload files from MyJohnDeere.com 7) Select the Organization that you would like to select files from. 20
 After transferring files into APEX, go to the Unload button and unload you files. How do I use Field Analyzer?")
21 8) Then select the files that you would like transferred into Apex. 9) Select the Download button to transfer files. 10) After transferring files into APEX, go to the Unload button and unload you files. How do I use Field Analyzer? 1) In the Operation Center, click on the Field Icon on the left side. 2) Select the field you wish to view. 21


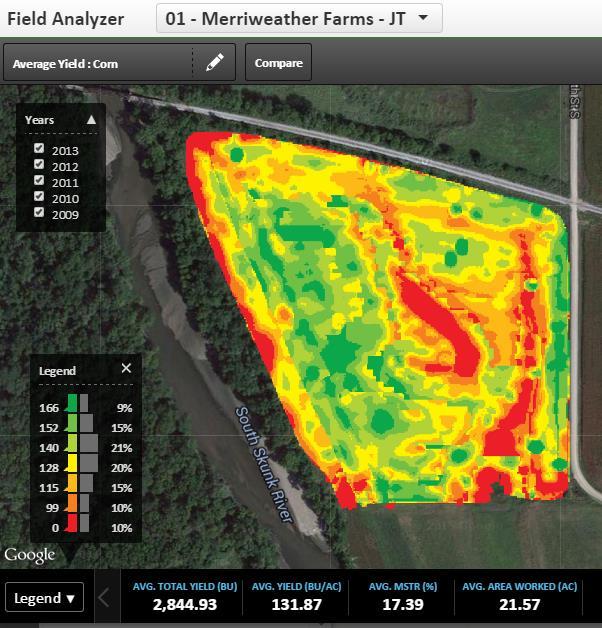
22 3) Click the field icon below the field information Schuneman Equipment Co. 4) This will bring up the field analyzer screen with several dropdown menues. 5) In the upper lefthand corner, select the map you would like to view and the map layer. 22

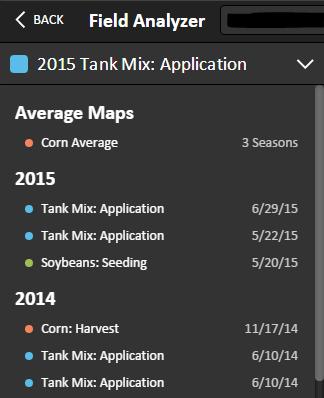
23 Comparison Maps You can compare your current map to another by selecting the Compare button at the top center of the page and choosing another map layer. (I.e. As applied planting and yield map comparison Average Maps and Difference Maps In addition to your standard map layers, you also have the ability to view Average Maps and Difference maps through the Field Analyzer. 1) Select the field you would like to view then choose average (from the dropdown menu) or difference and set parameters. 23
24 24
 Select the field you wish to view. 3) Click the icon below the field information. 25")
25 How do I edit data? 1) In the Operation Center, click on the Field Icon on the left side. 2) Select the field you wish to view. 3) Click the icon below the field information. 25
 Guidance Management- Lists the guidance lines available for the selected field.")
26 4) It will then allow you to select editing options for that field. 5) Boundary Management- Allows you to Create, Delete, or select an active boundary for the field. This will create a boundary around the field from a previous operation. 6) Guidance Management- Lists the guidance lines available for the selected field. 7) Merge and Unmerge- Allows you to merge and unmerge the current field to another field. 26
 Select the desired field(s) and choose from the following options: a. The first icon will export the selected information as a shapefile.")
27 How do I delete, send, or export fields? 1) In the Operation Center, click on the Field Icon on the left side. 2) Select the List icon. 3) Select the desired field(s) and choose from the following options: a. The first icon will export the selected information as a shapefile. 27
28 b. The second icon will send it to your selected insurance agent. c. The third icon will delete the field and all the information associated with it. How do I create a prescription? 1) Select the Field you would like to create a prescription for from the field view on the main page. 2) Select and in the upper right-hand corner of the information box select the drop down menu. 3) Choose Prescription Creator by Agrian 28

29 4) This button will link you to the Agrian site where you can create and edit your prescription. a. The site will prompt you to select a Client, Farm, Field, Boundary, and Map layer. b. Fill in the information and choose Next. c. Select the number of zones you want to use and click Update Map. d. Once you are satisfied with the map click Next and assign rates to each zone and click Save. This will send the newly created prescription to your Operations Center. You can find the new prescription under My Files. How do I view and print a report? 1) Click on the tools menu and select the Agronomic Report button. 2) Filter the report to show the information you want to print. (Application, Crop year, Date, Products, Variety) 6) Select the Print icon in the upper right-hand corner. How do I print a map? 1) Select the fields button on the left side of the screen. 29

 Select the map you would like to")
30 2) Click on the field that you would like to print. 3) Select the Field Analyzer button. 4) Select the map you would like to print from the available data. 30

31 5) Hit the Print button along the top right of the map. 6) Manipulate the image (zoom in or out) until it looks how you want your printed page to look. 7) Select Print in the upper right-hand corner. How do I reprocess a file? There are several situations in which you may need to reprocess a file. For example, if a file was shared with you from another operations center account it may need to be reprocessed before it appears with your other fields. Also, if the data looks inaccurate you may need to reprocess the file. 1) Select Files under the tools menu. 31
 Select the Reprocess button. How do I share a single file?")
 Place a checkmark in the box next to the file you would like to share and select the")
32 2) Place a checkmark in the box next to the file you would like to reprocess. 3) Select the Reprocess button. How do I share a single file? 1) Select Files under the tools menu. 2) Place a checkmark in the box next to the file you would like to share and select the Share button. 3) Choose the Organization you would like to share with and select Send. 32
33 How do I share all of my data with my agronomist? 1) Verify that you have partnerships enabled. (see How to add staff and partners for instructions) 2) Select My Organization from the main menu and go to the partners tab. 3) Click the name of your agronomist and verify that they have all of the necessary permissions. Recommended permissions: a. Machine Optimization; Agronomic Decision Making; Work Collaborator: Send Files to Machine, View Prescriptions, RDA (optional) 33
34 How do I access data from another Operations Center? Accessing another Operation Center in which I am a staff member 1) Verify with Operations Center Admin that you were given the correct permissions and added as a staff member to the account that you would like to access. 2) From your Operations Center, in the upper right-hand corner click on your name. 3) In the dropdown menu, select the operations center which you would like to access Accessing a Partner s Data 1) Verify that you have partnerships enabled. (Refer to how to set up partnerships for further instructions) 2) Verify that you have the correct permissions. 3) Go to the top of your page (above the main menu) and select Change from the black strip. 34
 Put a checkmark next to the file you d like to transfer and select Send to Equipment.")
35 4) Select the organization you would like to represent. How do I transfer files to a machine? 1) Select Files from the tools menu. 2) Put a checkmark next to the file you d like to transfer and select Send to Equipment. 3) Choose the machine you would like the file sent to and select Send. 35
36 Sending prescriptions to a customer s display 1) Verify that the producer and the agronomist are set up as partners with all of the correct permissions enabled. 2) Verify that both accounts have partnerships enabled. 3) Go to the top of your page (above the main menu) and select Change from the black strip. Choose the customer s operations center. 4) Once in the customer's organization, go to Files under the tools menu. 5) Select the Upload button and choose the prescriptions. 36
37 6) After uploading the prescription, select Send File to Machine. Schuneman Equipment Co. 7) Select the machine that you want the file sent to and click send. How do I create setup data? 1) Open Setup Builder list to manage setup files. a. Select tools icon b. Setup Builder link 2) Follow the on screen prompt and choose what kind of setup file you are creating 3) To create a setup file with Setup Builder, select Product Tab. a. Select All Drop-down (1) to choose the type of products to display from the Operations Center b. Select All Product (2) to select all product names or select individual Product Checkboxes (3) to select specific products to be included in your set-up data c. Selecting Add Products (4) will enable you to add a product not shown in your list 37
 to select all machine names or select individual Equipment Checkboxes (3) to select specific equipment name c.")
38 d. Use the Search (5) function to find a specific name in the product list 4) Select Equipment Tab. a. Select Drop-down (1) to choose the type of equipment to display from the Operations Center b. Select All Equipment (2) to select all machine names or select individual Equipment Checkboxes (3) to select specific equipment name c. Select Add Equipment (4) to add a piece of equipment not shown in your list d. Search (5) can be used to find a specific name in the equipment list 38
 to include")
39 5) Select Fields Tab. a. Select Field Name Checkbox (1) to include field in setup 39

40 b. To remove or select all fields, select Edit Boundaries and Guidance (2) from the above photo, to select or deselect all boundaries or guidance lines for all selected fields. This will include/exclude ALL boundaries and guidance lines from setup file c. To remove or select on a single field, select a field name and Pencil Icon (3) from the above photo, and uncheck boundary or guidance line to exclude a specific boundary or guidance line 40
 Check to ensure all Products (1), Equipment (2), and Fields (3) are displayed 7) Type the name of the setup file in File Name Box (4) and select Create File (5) 8) Once")
41 The Summary box will display all Product, Equipment & Field selections you have made. 6) Check to ensure all Products (1), Equipment (2), and Fields (3) are displayed 7) Type the name of the setup file in File Name Box (4) and select Create File (5) 8) Once the file is created, it can be found in My Files page of MyJohnDeere Operations Center 41
 2) Power on your display and navigate to the memory tab. a. Main Menu>GS3>GS3>Memory b.")
42 9) Send out the file using Wireless Data Transfer, , or download and save to a USB drive How do I use Wireless Data Transfer? 1) First, verify that you have all of the necessary components. (Please contact your Integrated Solutions Specialist) 2) Power on your display and navigate to the memory tab. a. Main Menu>GS3>GS3>Memory b. This will list the files on the bottom of the page should say Exported under the status once the file has been transferred. c. If a file was sent to you, navigate to the page below, select the imported file and hit apply. 42
 View your data in the Operations Center of your MyJohnDeere.com account. How do I use Remote Display Access?")

43 3) Select Data Transfer Settings and select to send data automatically. This will ensure that documentation data is sent when you change your field name. 4) View your data in the Operations Center of your MyJohnDeere.com account. How do I use Remote Display Access? Remote Display Access (RDA) enables JDLink users to view the operating John Deere display from a remote location. Before utilizing RDA, please verify that you have all of the necessary components by contacting Schuneman Equipment. For best performance, download the latest version of your browser directly from the provider site for your desktop or laptop computer, ipad, tablet, iphone or android phones. RDA requires cell signal strength to communicate with the MTG. Poor cell signal may cause slow connection to the display/screen change. 43
44 To verify your signal strength: 1) GreenStar Display: a. Select Main Menu > GS3 > Diagnostics. b. Select Network from drop-down list and go to page 2. c. View Signal Strength. 2) Generation 4 Command Center Display: a. Select Menu > System > Diagnostics Center. b. Select Network from left menu. c. View Signal Strength. Schuneman Equipment Co. Once the connection has been made, the operator in the cab will receive a message telling them you are asking for access to their display. The operator MUST confirm and grant access to you in order for you to view their display remotely. Using RDA via the JDLink App 1) To begin a RDA session, you must access either the JDLink website, the JDLink app or the Operations Center via myjohndeere.com website. a. JDLink App: You will use your myjohndeere.com username and password to sign into this application once you have downloaded it to your device. 2) Login to the app from your device and select the machine you would like to RDA with. 44
 Select the machine you would like to RDA with by")
 The drop-down arrow the right of the name will show the RDA icon and once clicked")
45 3) Select the Remote Display Access link on the left. Using RDA via the JDLink Website 1) Select the machine you would like to RDA with by highlighting the machine name and click on Update Now. 2) The drop-down arrow the right of the name will show the RDA icon and once clicked and give the capability to ask for access to a machines display. 45
 Go to www.myjohndeere.com and log into the website using your username and password. Select the Operations Center icon to access your personal machine information.")
46 3) When the machines display is connected, you will need to confirm that you would like to view the display using RDA. Connection time will depend on cell signal. Using RDA via MyJohnDeere.com 1) Go to and log into the website using your username and password. Select the Operations Center icon to access your personal machine information. 2) Click the equipment icon to the left and select the machine you would like to RDA with. 46


47 3) The machines location will appear on the map. Click the RDA icon (shown below) on the map to begin the RDA session with the machine. 47

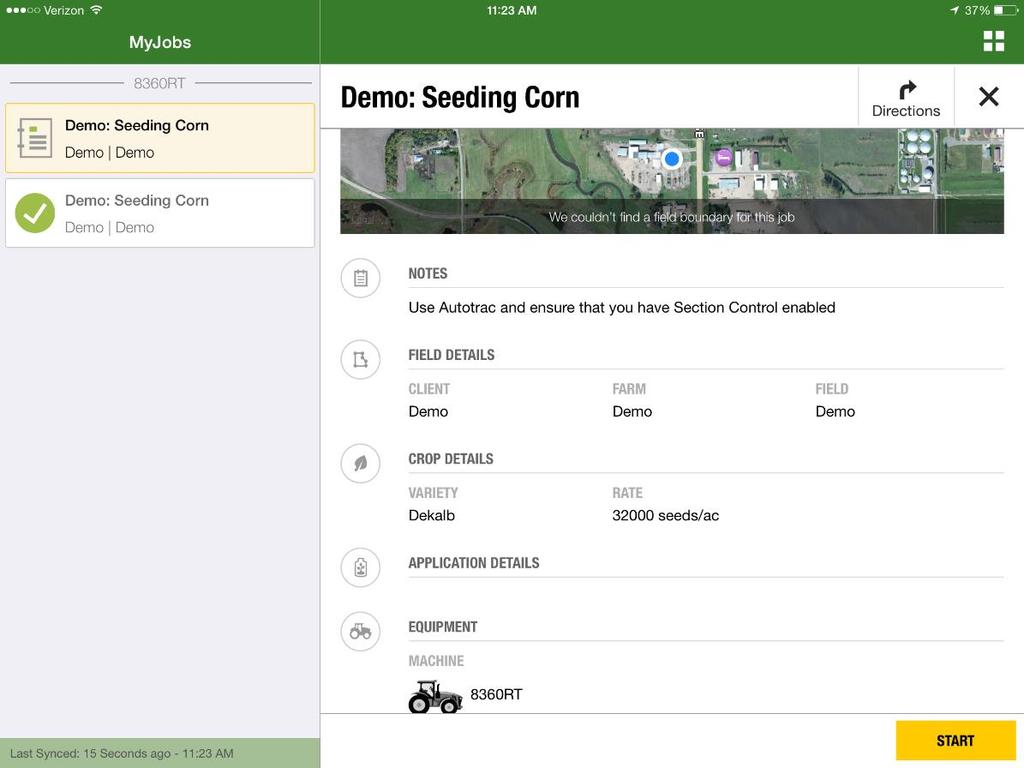
48 4) You can end the session at any time by clicking the End Session icon in the upper right corner. What is My Jobs and how do I use it? My Jobs allows a farm manager to create a job work flow for an operator. Jobs are created in MyJohnDeere Operations Center. To use and support jobs, the following minimum permissions are required for the operator under the Staff tab: My Files: Editor My Equipment: Subscriber Operator will need to download the My Jobs App from I tunes for ios devices. They will login to the App using their myjohndeere.com login. How to Create a Job 1) From the myjohndeere.com website click on the my jobs icon 2) To add a job- click on the Plus icon. 48

49 3) Use the drop down menus to select the task, products and field for the job. Add any additional information needed that you want to tell the operator. When info is complete click on Add button in the upper right-hand corner. 49
 You can select the information icon for more details; the arrow icon for driving directions; or the pencil icon to edit the job if not yet started. Once the job is started you cannot edit.")
50 Determining Job Status 1) From the Myjobs menu- click on the job. 2) It will state current status as Not Started, Started, Paused or Complete. 3) You can select the information icon for more details; the arrow icon for driving directions; or the pencil icon to edit the job if not yet started. Once the job is started you cannot edit. Viewing Job from MyJobs App 1) Log in the App with myjohndeere.com log in. 2) Select all jobs or by specific machine for example 8360RT. Your jobs will be listed on left hand side. 50

51 3) Select the job you are going to do to see the details. Press START to start the Job. This will change the status to Started. You will then have the option to Press COMPLETE when job is done. 51
52 52
MyJohnDeere.com. How to Guide. For questions, please contact your Integrated Solutions Specialist
 MyJohnDeere.com How to Guide For questions, please contact your Integrated Solutions Specialist Table of Contents John Deere Data Policy... 3 How to create a MyJohnDeere.com Account... 4 Operations Center
John Deere Operation Center Guide
 John Deere Operation Center Guide Navigating the Map: Add Equipment: Table of Contents: Creating a New Field: Drawing the Boundary: Creating a Job: Adding a Product: User Menu: Notification Center: Using
CLICK THE ARROW TO GET STARTED
 Apex to MyJohnDeere User GUIDE A guide to assist you through the process of backing up historical data on Apex and migrating it to MyJohnDeere Operations Center CLICK THE ARROW TO GET STARTED Apex to MyJohnDeere
Table of Contents. I. How do I register for a new account? II. How do I log in? (I already have a MyJohnDeere.com account.)
") Quick Start Guide If you are an App Developer, you can get started by adding a new app and configuring it to consume Deere APIs on developer.deere.com. Use this Quick Start Guide to find and try our APIs.
Quick Start Guide If you are an App Developer, you can get started by adding a new app and configuring it to consume Deere APIs on developer.deere.com. Use this Quick Start Guide to find and try our APIs.
TimberNavi Software Update
 TimberNavi Software Update On Machine Software Update 5.1.5 Release Notes Office Software Update 5.8.8 Release Notes Important Information Always check for office software updated in the TimberNavi support
Generation 4 Displays
 Software Update Generation 4 OS installation time: Approximately 20 minutes, with no existing data. Installation time will vary depending on the amount of existing data and the software version currently
DSS User Guide. End User Guide. - i -
 DSS User Guide End User Guide - i - DSS User Guide Table of Contents End User Guide... 1 Table of Contents... 2 Part 1: Getting Started... 1 How to Log in to the Web Portal... 1 How to Manage Account Settings...
MyJobConnect CLICK THE ARROW TO GET STARTED
 MyJobConnect CLICK THE ARROW TO GET STARTED MyJobConnect User Guide Menu MyJobConnect Overview Prerequisites First steps MyJobsManager MyJobs Settings Connection Information Frequently Asked Questions
Automated Crop Reporting Manual. Collecting and transferring data to JohnDeereAgent
 Automated Crop Reporting Manual Collecting and transferring data to JohnDeereAgent Agents are appointed by John Deere Insurance Company of Johnston, Iowa, which issues crop insurance products through its
End User Manual. December 2014 V1.0
 End User Manual December 2014 V1.0 Contents Getting Started... 4 How to Log into the Web Portal... 5 How to Manage Account Settings... 6 The Web Portal... 8 How to Upload Files in the Web Portal... 9 How
Nextiva Drive The Setup Process Mobility & Storage Option
 Nextiva Drive The Setup Process The Setup Process Adding Users 1. Login to your account and click on the Account icon at the top of the page (this is only visible to the administrator). 2. Click Create
JOHN DEERE Mobile Farm Manager WALK AROUND GUIDE For Android devices Android 3.0 (Honeycomb) and higher
 and higher") JOHN DEERE Mobile Farm Manager WALK AROUND GUIDE For Android devices Android 3.0 (Honeycomb) and higher CLICK THE ARROW TO GET STARTED John Deere Mobile Farm Manager A mobile application that puts customer
JOHN DEERE Mobile Farm Manager WALK AROUND GUIDE For Android devices Android 3.0 (Honeycomb) and higher CLICK THE ARROW TO GET STARTED John Deere Mobile Farm Manager A mobile application that puts customer
Anchor User Guide. Presented by: Last Revised: August 07, 2017
 Anchor User Guide Presented by: Last Revised: August 07, 2017 TABLE OF CONTENTS GETTING STARTED... 1 How to Log In to the Web Portal... 1 How to Manage Account Settings... 2 How to Configure Two-Step Authentication...
Note: To record with the ios App your Panopto server must be 4.3 or higher.
 ipad App Overview This documentation will show you how to use the Panopto ios application on an ipad To view the iphone specific documentation click here. Note: To record with the ios App your Panopto
For information on troubleshooting common issues, see the Technical Support section in the online help.
 GIFTS Online Mobile GIFTS Online Mobile gives users a mobile version of their GIFTS Online system in order to easily access grant related information when it is not convenient to log into their main version
TimberNavi 5 Software Update
 TimberNavi 5 Software Update On Machine Software Update 5.2.3 Release Notes Office Software Update 5.10.6 Release Notes Important Information UPDATE TO VERSION 5.2.3: 1. This version resolves a MyJohnDeere
Generation 4 CommandCenter
 Important Notes: When installing this software version Generation 4 OS 8.12.2500-17 the update may spend up to 25 minutes at the same percentage level (such as 82%) in the Installing Software stage. This
John Deere FarmSight. The future of farming is in your sight.
 John Deere FarmSight The future of farming is in your sight. John Deere FarmSight. Better farming is in your sight. John Deere FarmSight is a complete solution for your farm. It combines your equipment
UHarvest Slingshot Reports Introduction
 UHarvest Slingshot Reports Introduction UHarvest grain cart data can be saved to a Raven Slingshot account. Use Slingshot to review field reports, edit data, merge multiple job files into one report, and
FAQ AGRICULTURE. Connected Farm Solution: Office Sync. Working with mobile devices
 FAQ AGRICULTURE April 2014 Connected Farm Solution: Office Sync Office Sync, part of Trimble Connected Farm solution, allows you to send and receive data files wirelessly between the office and field.
TimberNavi 5 Software Update
 TimberNavi 5 Update On Machine Update 5.2 Release Notes Office Update 5.10.5 Release Notes Important Information Always check for Office updated on the TimberNavi support website in MyJohnDeere.com before
umapps Using umapps 6/14/2017 Brought to you by: umtech & The Center for Teaching & Learning
 umapps Using umapps Center for Teaching and Learning (CTL) 100 Administration Bldg., Memphis, TN 38152 Phone: 901.678.8888 Email: itstrainers@memphis.edu Center for Teaching and Learning Website 6/14/2017
Generation 4 Displays Software Update 18-1 Release Notes
 Software Update Generation 4 OS installation time: Approximately 20 minutes, with no existing data. Installation time will vary depending on the amount of existing data and the software version currently
PANOPTO: WEB MANAGEMENT INTERFACE
 Panopto's Web Management Interface offer's instructors the ability to manage and edit the recordings captured and uploaded using the Panopto desktop recorder. Access the Web Management Interface at http://panopto.nvcc.edu.
SecuriSync Get Started Guide for Windows
 SecuriSync Get Started Guide for Windows Intermedia Backup and File Sharing - SecuriSync SecuriSync is a file backup and sharing service. It allows you to: Back up your files in real-time to protect against
OneDrive for Business User Guide
 Contents OneDrive for Business User Guide About OneDrive for Business and Office 365... 2 Storing university information in the Cloud... 2 Signing in... 2 The Office 365 interface... 3 The OneDrive for
ShareSync Get Started Guide for Mac
 ShareSync Get Started Guide for Mac ShareSync Overview ShareSync is a file backup and sharing service. It allows you to: Back up your files in real-time to protect against data loss from ransomware, accidental
Generation 4 CommandCenter
 Important Notes: When installing to this software version Generation 4 OS 8.11.2456-13 the update may spend up to 25 minutes at the same percentage level (such as 82%) in the Installing Software stage.
Citrix Working Remotely Reference Guide
 Citrix is the remote access solution that can be used on Home PCs, Mac s, ipads and iphones and in DBR Visitor offices while traveling. Citrix allows individuals to connect securely and work remotely from
Sync User Guide. Powered by Axient Anchor
 Sync Powered by Axient Anchor TABLE OF CONTENTS End... Error! Bookmark not defined. Last Revised: Wednesday, October 10, 2018... Error! Bookmark not defined. Table of Contents... 2 Getting Started... 7
How to Connect to the CSH Virtual Desktop
 How to Connect to the CSH Virtual Desktop From Home (or anywhere you have an Internet connection) We recommend you print the section that applies to you 1. For Windows, print pages 2-16 2. For IOS Devices
GRS Enterprise Synchronization Tool
 GRS Enterprise Synchronization Tool Last Revised: Thursday, April 05, 2018 Page i TABLE OF CONTENTS Anchor End User Guide... Error! Bookmark not defined. Last Revised: Monday, March 12, 2018... 1 Table
HOW TO USE THE CONTENT MANAGEMENT SYSTEM (CMS) TABLE OF CONTENTS
 TABLE OF CONTENTS") HOW TO USE THE CONTENT MANAGEMENT SYSTEM (CMS) TABLE OF CONTENTS GETTING STARTED (LOGIN) 2 SITE MAP (ORGANIZE WEBPAGES) 2 CREATE NEW PAGE 3 REMOVE PAGE 6 SORT PAGES IN CHANNEL 7 MOVE PAGE 8 PAGE PROPERTIES
HOW TO USE THE CONTENT MANAGEMENT SYSTEM (CMS) TABLE OF CONTENTS GETTING STARTED (LOGIN) 2 SITE MAP (ORGANIZE WEBPAGES) 2 CREATE NEW PAGE 3 REMOVE PAGE 6 SORT PAGES IN CHANNEL 7 MOVE PAGE 8 PAGE PROPERTIES
Upgrading your QuickBooks Company File Once per file only
 Username: «User» License: «License_Number» Product: «Product_Number» This document walks you through upgrading your QuickBooks company file. If your file has already been upgraded, you may skip below to
ipad ereader User s Guide
 ipad ereader User s Guide MAY 2014 Table of Contents General information... 1 About Professional ebook... 1 About this Guide... 1 How does the Professional ebook System work?... 1 Where can I learn more
Schrole Cover Manual Table of Contents
 Cover User Manual Schrole Cover Manual Table of Contents Contents User Schrole Cover as a Cover (Relief) User... 3 Navigating around Schrole Cover... 3 Website Cover Dashboard... 4 Swapping Between Roles...
With the X35 there is the ability to use the new remote support feature on the monitor to request assistance. You can add the Horizon support app for
 Remote Support With the X35 there is the ability to use the new remote support feature on the monitor to request assistance. You can add the Horizon support app for Android or Apple devises and also download
DataCollect Administrative Tools Supporting DataCollect (CMDT 3900) Version 3.0.0
 Version 3.0.0") Administrator Manual DataCollect Administrative Tools Supporting DataCollect (CMDT 3900) Version 3.0.0 P/N 15V-090-00054-100 Revision A SKF is a registered trademark of the SKF Group. All other trademarks
Administrator Manual DataCollect Administrative Tools Supporting DataCollect (CMDT 3900) Version 3.0.0 P/N 15V-090-00054-100 Revision A SKF is a registered trademark of the SKF Group. All other trademarks
AGENT123. Full Q&A and Tutorials Table of Contents. Website IDX Agent Gallery Step-by-Step Tutorials
 AGENT123 Full Q&A and Tutorials Table of Contents Website IDX Agent Gallery Step-by-Step Tutorials WEBSITE General 1. How do I log into my website? 2. How do I change the Meta Tags on my website? 3. How
How to migrate data from Dropbox to OneDrive on Mac
 How to migrate data from Dropbox to OneDrive on Mac Overview To migrate data from Dropbox to OneDrive, there are a few steps involved. Firstly, you need to make sure Dropbox and OneDrive applications are
ShareSync Get Started Guide for Windows
 WHAT IS SHARESYNC? ShareSync Get Started Guide for Windows ShareSync is an enterprise-class cloud file backup and sharing service. ShareSync allows you to back up your files in real-time to protect against
How to Transfer Your Contact Information Into Microsoft Outlook 2010
 How to Transfer Your Contact Information Into Microsoft Outlook 2010 Your Contacts Exported To an Excel Spreadsheet (CSV Format ) Now Located on a Device or Computer Then To Outlook 2010 on an L&F Computer
GAINING ACCESS TO THE TxPHIN PORTAL
 The Texas Public Health Information Network (TxPHIN) is an online portal containing a collection of applications, such as the Health Alert Network and Document Sharing, which provide users with a range
Microsoft Office 365 OneDrive for Business User Guide
 Microsoft Office 365 OneDrive for Business User Guide Office of Information Technology Technology Integration Group Table of Contents Page About OneDrive for Business and Office 365 2 Storing University
How to migrate data from Dropbox to OneDrive on Windows *
 How to migrate data from Dropbox to OneDrive on Windows * * Important: These instructions are for Windows 10. Windows 7 may differ slightly (If you don t know what version you are using, refer to How to
GateKeeper Web Apps GateKeeper Version 3.5 June
 Title GateKeeper of document Web Agronomy Sub Setup heading & Quick i.e version Start xxx Guide GateKeeper Web Apps GateKeeper Version 3.5 June 2016 www.farmplan.co.uk 01594 545040 gatekeeper@farmplan.co.uk
Panopto. End-User Guide
 Panopto End-User Guide Table of Contents INTRODUCTION... 3 PROVISIONING A COURSE... 3 LOGGING IN... 7 NAVIGATION... 8 PREPARING TO RECORD... 9 CREATING A SIMPLE RECORDING (AUDIO AND VIDEO ONLY)... 10 CREATING
goremote.carolinas.org
 Detailed instructions for goremote.carolinas.org Section 1. Registering your account in the goremote portal To setup your access to goremote.carolinas.org, please follow these steps: Open a browser window
Exporting and Importing Data
 Exporting and Importing Data Upload as a Google spreadsheet You can save your data as a Google spreadsheet by tapping the share button in the bottom right corner of the home screen and then tapping Upload
Team Management. Coaches and Team Managers Guide
 Team Management Coaches and Team Managers Guide November 2015 Table of Contents Table of Contents Overview Audience About the Mobile App Examples Creating a Sport Ngin Account Accessing Team Center For
User Guide. BlackBerry Workspaces for Windows. Version 5.5
 User Guide BlackBerry Workspaces for Windows Version 5.5 Published: 2017-03-30 SWD-20170330110027321 Contents Introducing BlackBerry Workspaces for Windows... 6 Getting Started... 7 Setting up and installing
Office 365. Quick Start User Guide
 Office 365 Quick Start User Guide Contents What is Office 365?... 5 How to Sign In to Office 365... 5 To Sign Out when you are done... 5 Why Use Office 365?... 5 Office 365 Home Page... 6 Top right-hand
Yearbook Edition Software
 Yearbook Edition Software End User Guide Pixami, Inc. www.pixami.com Table of Contents 1 Introduction... 4 1.1 Configuration and Preparation... 4 1.2 Software System Requirements... 4 1.3 The Basic Steps...
MY MEDIASITE. https://mediasite.ecu.edu/ms/mymediasite
 MY MEDIASITE https://mediasite.ecu.edu/ms/mymediasite My Mediasite provides tools for managing your recordings. All faculty have access to My Mediasite and the ability to download the Desktop Recorder.
How to Set up Transformation Station
 How to Set up Transformation Station Transformation Station allows for the transfer of policy information directly into a company s website. The user name and password for the Company s website are stored
AT&T Global Network Client for Mac User s Guide Version 2.0.0
 Version 1.7.0 AT&T Global Network Client for Mac User s Guide Version 2.0.0 experience may vary. This document is not an offer, commitment, representation or warranty by AT&T and is subject to change..
Table of Contents Brainshark. All rights reserved.
 Table of Contents Administrator Reference Guide... 2 Introduction... 2 Topics... 2 Folders... 3 Manage Folders... 3 Edit Folder... 3 Edit Folder Properties... 3 Assign Folder Permissions (Viewer, Author,
Center for Faculty Development and Support. Google Docs Tutorial
 Center for Faculty Development and Support Google Docs Tutorial Table of Contents Overview... 3 Learning Objectives... 3 Access Google Drive... 3 Introduction... 4 Create a Google Document... 4 Upload
[SETUP DELEGATION IN GOOGLE APPS]
![[SETUP DELEGATION IN GOOGLE APPS]](/thumbs/88/117221691.jpg "[SETUP DELEGATION IN GOOGLE APPS]") Google allows for the delegation of email accounts between users. This will allow a user access to another user s inbox and enable the user to send mail as them. The following steps explain how to configure
Google allows for the delegation of email accounts between users. This will allow a user access to another user s inbox and enable the user to send mail as them. The following steps explain how to configure
Request Training Exercise
 Request Training Exercise Now that you have completed the online portion of training for Request, it is time to log into the Stage version of USA Staffing to practice what you have learned. Use this step-by-step
How to use OneDrive in the Cloud. Access OneDrive
 How to use OneDrive in the Cloud Access OneDrive 1. Log into my.scranton.edu 2. Select the envelope icon to access your Office 365 applications 3. In the left corner, click on the app launcher 4. Select
Introduction to Kaltura
 Introduction to Kaltura The Kaltura media content management system allows users to record, stream, and manage multimedia files. This industry-leading enterprise system offers many robust tools. This guide
Using Novell Filr App to Access CECHCloud on an ipad or iphone
 Using Novell Filr App to Access CECHCloud on an ipad or iphone About CECHCloud... 2 Installing and Configuring the Novell Filr App... 2 Navigating the Filr App... 4 Working with Files... 7 Viewing Files...
Gatekeeper Web Apps Gatekeeper Version 3.5 June
 Title Gatekeeper of document Web Viewer Sub Setup heading & Quick i.e version Start xxx Guide Gatekeeper Web Apps Gatekeeper Version 3.5 June 2016 www.farmplan.co.uk 01594 545040 Gatekeeper@farmplan.co.uk
Office 365. Exporting and Importing Safe and Blocked Senders List
 Office 365 Exporting and Importing Safe and Blocked Senders List Table of Contents Exporting Safe and Blocked Senders List... 3 Exporting Safe Senders List... 3 Exporting Blocked Senders List... 8 Importing
ARPA-E Energy Innovation Summit. A user guide for the official networking platform
 ARPA-E Energy Innovation Summit A user guide for the official networking platform GETTING STARTED Welcome to the ARPA-E Energy Innovation Summit, a members only networking application. This powerful app
Windows 8.1 User Guide for ANU Staff
 Windows 8.1 User Guide for ANU Staff This guide has been created to assist with basic tasks and navigating Windows 8.1. Further tips for using Windows 8.1 can be found on the IT Services website, or by
Partner Integration Portal (PIP) Installation Guide
 Installation Guide") Partner Integration Portal (PIP) Installation Guide Last Update: 12/3/13 Digital Gateway, Inc. All rights reserved Page 1 TABLE OF CONTENTS INSTALLING PARTNER INTEGRATION PORTAL (PIP)... 3 DOWNLOADING
Partner Integration Portal (PIP) Installation Guide Last Update: 12/3/13 Digital Gateway, Inc. All rights reserved Page 1 TABLE OF CONTENTS INSTALLING PARTNER INTEGRATION PORTAL (PIP)... 3 DOWNLOADING
RURAL ROAD RAM APP QUICK START GUIDE
 RURAL ROAD RAM Mobile App Quick Start Guide v3.0 1 RURAL ROAD RAM APP QUICK START GUIDE The following provides the setup instructions and basic user guidance for the Rural Road RAM mobile application.
Topic: Dropbox. Instructional Technology Services Dropbox Faculty Help. Dropbox Features: Minimum Requirements: Create a Dropbox Account
 Instructional Technology Services Dropbox Faculty Help Topic: Dropbox Dropbox is a free service that lets you save your documents, photos and videos. You can access your files anywhere using any computer,
Backing up Your ipad
 Backing up Your ipad November 2014 1 Table of Contents Introduction... 2 Backing up using icloud... 3 Accessing iwork files in icloud... Backing up using a computer... 10 Introduction This document has
Basic First Time ipad Setup
 Basic First Time ipad Setup SETUP GUIDE: This setup guide was created for Albany Creek State High school to be used only for the purpose of assisting school staff and students in setting up and configuring
Using MS OneDrive for Business
 Using MS OneDrive for Business OneDrive for Business is a perfect place to store all of your documents in the cloud. They will always be at your fingertips whether you are on a laptop, an IPad or your
 Setup Guide Revised: April 4, 2012 Developed by: www.discoverysoftware.com COPYRIGHT, DISCOVERY SOFTWARE LTD.: April 4, 2012: This material may not be copied or otherwise reproduced in any form, by any
SITE ADMINISTRATION.
 SITE ADMINISTRATION www.urbandalelibrary.org/wp-admin A P R I L 2 8, 2 0 1 1 HOW TO LOG IN Login as an admin: 1. In your web browser, go to www.urbandalelibrary.org/wp-admin Note: While in development,
Membership Portal Manual
 Membership Portal Manual Table of Contents Login... 4 Contact Tab... 6 Contact Information Dropdown...6 Features on the Contact Information Dropdown... 6 Account Information Dropdown...6 Features on the
This quick reference guide is designed for consumers of the Program Dashboard and provides details on how to: Log in
 This quick reference guide is designed for consumers of the Program Dashboard and provides details on how to: Log in Filter data using input controls Access the Dashboard Access Collibra/ Definitions Glossary
Hello, and welcome to the presentation NHSN Enrollment Instructions for Long Term Care Facilities.
 Hello, and welcome to the presentation NHSN Enrollment Instructions for Long Term Care Facilities. This presentation will provide long term care facilities with instructions for NHSN enrollment. My name
Vision-e 19 Gloria Lane Fairfield, NJ
 Version.0 Section Page 1.0 Manage User Licenses 3 1.1 Geocoding Your Records 4 1.2 Enabling Custom Objects 5 1.3 Create a Map 5 1.4 Import Report 6 1.5 Edit a Map 6 1.6 Clone a Map 7 1.7 Delete a Map 7
umapps Using umapps 6/13/2018 Brought to you by: umtech & The Center for Teaching & Learning
 umapps Using umapps Center for Teaching and Learning (CTL) 100 Administration Bldg., Memphis, TN 38152 Phone: 901.678.8888 Email: itstrainers@memphis.edu Center for Teaching and Learning Website 6/13/2018
What is CBAS web? Overview on CBAS web for Access Control Systems:
 What is CBAS web? CBAS web is a tool that can be used to program data to a CBAS system via the web. CBAS web can also be used to display a live feed of the CBAS system via the web. It should be understood
Introduction to Cognos Participants Guide. Table of Contents: Guided Instruction Overview of Welcome Screen 2
 IBM Cognos Analytics Welcome to Introduction to Cognos! Today s objectives include: Gain a Basic Understanding of Cognos View a Report Modify a Report View a Dashboard Request Access to Cognos Table of
SBCSC Staff BYOD (bring your own device) Instructions: 08/11/2016
 Instructions: 08/11/2016") SBCSC Staff BYOD (bring your own device) Instructions: 08/11/2016 Teachers and staff, use these instructions to get a personal device of yours attached to the SBCSC BYOD wireless network. Once connected,
SBCSC Staff BYOD (bring your own device) Instructions: 08/11/2016 Teachers and staff, use these instructions to get a personal device of yours attached to the SBCSC BYOD wireless network. Once connected,
AvePoint Online Services for Partners 2
 AvePoint Online Services for Partners 2 User Guide Service Pack 1 Issued June 2017 Table of Contents What s New in this Guide...4 About...5 Submitting Documentation Feedback to AvePoint...6 Browser Support
Checkbox 5.0 Permissions Guide
 Checkbox 5.0 Permissions Guide Welcome to the Checkbox permissions guide. This document will walk you through the process of configuring permissions within the Checkbox application. Contents: - What are
UFApps: Hands-on Exercises
 UFApps: Hands-on Exercises Module 2: Accessing UFApps In these exercises, we will cover: Accessing UFApps via the Full Receiver Accessing UFApps using the light version of the Citrix Receiver Exercise
Getting Started (New Accounts)
") Getting Started (New Accounts) 1. On any page with the menu, go to the faculty section and choose Faculty Website Access. 2. On the login page, make sure you are on Windows Login. Login with the username
Getting Started (New Accounts) 1. On any page with the menu, go to the faculty section and choose Faculty Website Access. 2. On the login page, make sure you are on Windows Login. Login with the username
The following instructions cover how to edit an existing report in IBM Cognos Analytics.
 IBM Cognos Analytics Edit a Report The following instructions cover how to edit an existing report in IBM Cognos Analytics. Navigate to Cognos Cognos Analytics supports all browsers with the exception
Enter your Appserv username and password to sign in to the Website
 Appserv Desktop Access Logging on from a Windows 10 Device Step 1. To sign in to the Appserv Desktop Access website, either enter the following address into the Microsoft Edge browser address bar, or click
Click anywhere to continue
 The Security Manager is used to create a means of managing the permission levels for all the users that will be working with the system. These users are assigned to Roles, for which permissions are defined.
Accessing the SIM PCMH Dashboard
 Accessing the SIM PCMH Dashboard Setting up Duo, Creating Your Level-2 Password, and Setting up Citrix Receiver to Log in to the Dashboard P R O C EDURAL GUID E Document File Name Accessing_the_SIM_Dashboard.docx
RIX Wiki User Guide 1
 RIX Wiki User Guide 1 Contents Logging into your Wiki... 3 Getting to know your Home Page...... 4 Wiki Control Panel... 6 Using the Wiki Control Panel Setup your Wiki... 7 Using the Wiki Control Panel
Pension & Benefits Research QUICK REFERENCE CARD
 Pension & Benefits Research QUICK REFERENCE CARD Logging in to Checkpoint. Launch your browser and enter the Checkpoint address in the browser location bar. http://checkpoint.tr.com The Checkpoint Login
AT&T Global Network Client for Mac User s Guide Version 1.7.3
 Version 1.7.0 AT&T Global Network Client for Mac User s Guide Version 1.7.3 experience may vary. This document is not an offer, commitment, representation or warranty by AT&T and is subject to change..
Instructions for Downloading the latest Software Enhancements (Updated July 22, 2005)
") Instructions for Downloading the latest Software Enhancements (Updated July 22, 2005) Section 1: Downloading Software from the Website to the Computer Page 2 Section 2: Downloading Software from the Computer
Instructions for Downloading the latest Software Enhancements (Updated July 22, 2005) Section 1: Downloading Software from the Website to the Computer Page 2 Section 2: Downloading Software from the Computer
Xton Access Manager GETTING STARTED GUIDE
 Xton Access Manager GETTING STARTED GUIDE XTON TECHNOLOGIES, LLC PHILADELPHIA Copyright 2017. Xton Technologies LLC. Contents Introduction... 2 Technical Support... 2 What is Xton Access Manager?... 3
Using the Vita Group Citrix Portal
 Using the Vita Group Citrix Portal Using the Portal Summary This document is will step you through using the Vita Group Citrix portal. This portal allows you to reset your password if it is expired, unlock
Getting Started with Soonr
 WWW.SOONR.COM Getting Started with Soonr A Quick Start Guide for New Users Soonr Inc. 12/19/2012 Revision 1.1 Copyright 2012, Soonr Inc., all rights reserved. Table of Contents 1 How Soonr Workplace Works...
Navigate to Cognos Cognos Analytics supports all browsers with the exception of Microsoft Edge.
 IBM Cognos Analytics Create a List The following instructions cover how to create a list report in IBM Cognos Analytics. A list is a report type in Cognos that displays a series of data columns listing
OneDrive for Business: Basics
 OneDrive for Business: Basics DRAFT 2015. All Rights Reserved. California State University, Bakersfield September 21, 2015 REVISION CONTROL Document Title: Author: File Reference: O365 OneDrive for Business