User manual March 2017
|
|
|
- Tyler York
- 6 years ago
- Views:
Transcription


1 User manual March 2017
2 Index 1. Log in 2. Projects 3. Account settings 4. Project dashboard 4.1 Project settings 5. Members 6. Models 6.1 Import 6.2 Export 7. Issues 7.1 Creating a new issue 7.2 Milestones 7.3 BCF Import / export 8. Viewer 8.1 Navigating in the viewer 8.2 The trees structures in the IFC models 8.3 Inspect 8.4 Issues in the viewer 8.5 Libraries in the viewer 8.6 Clipping 9. Mobile units 10. Notifications 11. Geo-location 12. API

3 1. Log in Open a webbrowser and go to to get to the homepage for bimsync. Click the link in the upper right corner that says "Sign in". Enter your username and password. If you have lost or do not have a username and password and can use the "I forgot my password" link. After this step you change the language of the user interface from the user settings.. For users in large organizations, there may be other ways to log on (for example, "single sign-on") if agreed between your organization and Catenda.

4 2. Projects The projects screen is the first screen you encounter after logging in to bimsync. It gives you a complete list of all projects you have access to, with thumbnails of the list of those that you have selected as favorites. You can mark a project as a favorite by clicking the star icon next to the project. Click a project to open it. For users in large organizations the projects screen may be based on more than a flat listing of projects if this has be agreed between your organization and Catenda.

5 3. Account settings On the "Account settings" page you can change your password, change your avatar picture and change the language. All of these are self-explanatory. At the moment bimsync is available in 6 languages: English, French, Spanish, Japanese, Dutch, Brazilian Portuguese, Norwegian and Danish. The "Account settings" page might look different if you are a member of a large organization that has agreed with Catenda to use a different solution.
6 4. Project dashboard The project dashboard presents an overview of the latest revisions, graphs showing progress of issues, the latest notifications, and the list of project members. The project dashboard gives you direct access to the pages behind the various reports. Click on a project member, model, revision or issue to go directly to the subpage for those objects. You can also open a selection of domain models in the viewer directly from dashboard. By clicking on "Settings" in the menu on the top left (where the name of the current project is shown) you come to the project's details/settings (4.1).
 by clicking on the image next to the project name and clicking \"Add image\".")
7 4.1 Project settings The project settings screen allows you to change the project name, description or the geolocation (via an interactive map). You can also upload a picture (.gif,.jpg or.png) by clicking on the image next to the project name and clicking "Add image". This image will also appear on the Project menu for your favourite projects and on the top left menu for some screen sizes.
8 5. Members The member page contains a list of participants who are associated with the project. The project owner can invite new participants by entering their address. You have the option to remove your own connection to the project. If you click the little envelope close username will addresses they appear. NB: If you leave a project, the project owner has to invite you for you to rejoin. Users in large organizations that have made an agreement with Catenda may find a more advanced user management system.
9 6. Models You access the models screen by clicking on "models" from the menu on the left. bimsync lets you configure the project as you like. The most common way is to create one model per domain like Architect, Structure, HVAC etc but feel free to use any structure you find useful. The screenshot below has several important aspects: Adds another model (container for ifc files) to the project Opens the given model in 3D view Opens the given model in details view to show all revisions. Let you open more than one model in one go. Select from the list (by dragging a selections) and click the 3D icon Shows a list of existing exports and lets you create new exports.
10 6.1 Import The model page shows us the domain models present in the project. By clicking on a domain model one can then click on "Import" and upload a new revision (Section 6.3). This is done by choosing an IFC file from your hard drive or Dropbox. When uploading you will be asked to enter a comment that describes this upload (brief explanation to the project participants about what is new in the revison being uploaded). Click "send" to start the upload process. When the process is complete bimsync analyzes the IFC file and generates the geometry in the background. For large models it can take some time before the file is ready to be worked on in the viewer. If you wish you can exit bimsync, geometry generation happens uninterrupted anyway. When importing is complete a notification will pop up in the menu bar in bimsync and additionally an will be sent to you stating that a new version is uploaded to a model for which you have access. For users in large organizations, there may exist tools for uploading many models simultaneously without user interaction.
11 6.2 Export The export screen gives you the option to download your model to your local hard drive. You can either download a single model, a merged IFC file consisting of the models you have selected, or a zip-file consisting of separate (not merged) models. You can also choose to bake into the exported IFC file(s) tags and properties (library contents, bsdd or user defined) that you have added using the viewer.
 as an visual aid for the project participants, indicating how many solved and unsolved issues there are in the project.")
12 7. Issues The issues screen provides an overview of all issues connected to the project, to your user, issues you have created yourself, and issues that are not assigned to anyone. It also shows a graph of the accumulated status ( burndown ) as an visual aid for the project participants, indicating how many solved and unsolved issues there are in the project. Clicking on an issue allows commenting, assigning to a specific user or changing the type of the issue. The available types are Error, Warning, Info and Unknown, in addition to the user defined types. It is possible to create several issue lists so that related issues are collected, and one can also connect issues to milestones. bimsync has various graphs that show the development of issues over time ->

13 7.1 Creating a new issue A new issue can be created from the issues-screen, or from the viewer (chapter 8.2). To create a new issue click the New issue button on the top right of the issues screen. Enter the subject and use the textbox for comments to provide further details. Choose the correct type for the issue and assign it to a specific user if you know who will be responsible for it. You can also add a picture from your harddrive. If you are on a mobile unit you can either use a stored picture or take a new one with the built-in camera. All screens are dynamic ( responsive ) and adapt to the screen size of the unit you are using.
14 7.2 Milestones A milestone consists of a set of issues and a deadline for when they have to be completed. You can connect issues to milestones, for instance to organise a list of things that has to be done before the next meeting in a construction project or actions that has to be taken in a FM-process.
15 7.3 BCF import / export bimsync is 100% committed to open standards, and we have based on that implemented export and import for BCF (BIM collaboration format). This means that the user can import and export issues from/to other software that supports this format (for instance Solibri, Navisworks and many others). Click the button captioned Import and select a BCF-file from the hard drive. You can for instance import a file with collision control data for the same model created in another software application. This way you can continue your workflow inside bimsync. In the same way you can click Export to export the issues in BCF format from bimsync. Both BCF format 1.0 and 2.0 are supported.
16 8. Viewer The viewer is like a workbench for bimsync. In the viewer you can visualize and enrich the models in the project as one (or separately if you prefer). You can add properties or link external information to the objects, and you can inspect them to get the important details. Click one of the buttons with the 3D caption in the Models screen to get to the viewer with the model on the corresponding row visible. Using the checkboxes on the left of the rows you can choose that all the selected models are visible initially in the viewer. In the following subchapters the powerful possibilities of the Viewer are explained.
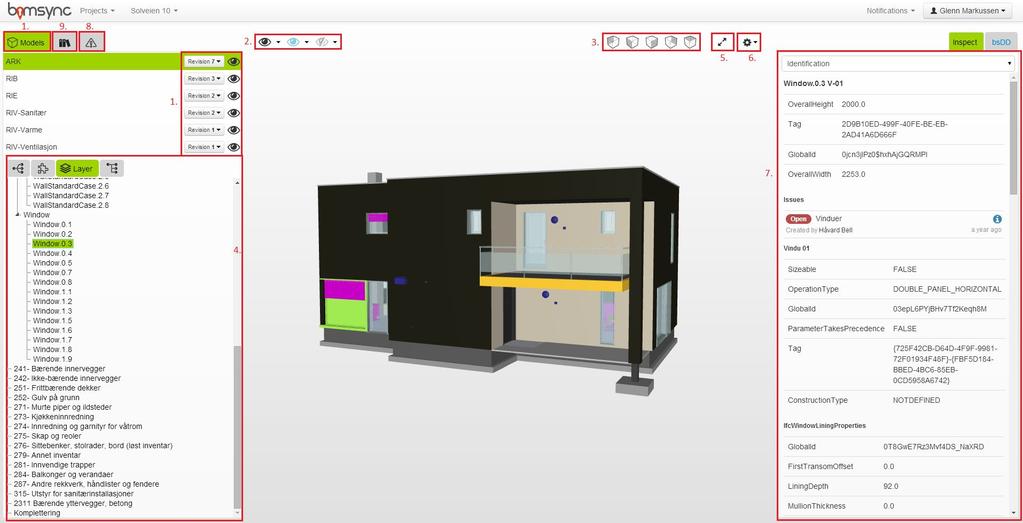
17 8.1 Navigating in the viewer The built in viewer of bimsync has a large range of functionality. The screenshot on the next page is divided into 8 parts to better explain the different functions. The basic controls for navigating in the viewer are: Right mouse button: Pan the camera vertically or horizontally. Left mouse button: Rotate the camera around the coordinate you point at. Mouse wheel: Zoom in or out. W,A,S,D or directional keys: walk forwards, slide left, slide right, walk backwards. E & Q: Rotate the camera left or right. PgUp & PgDown, R & F: Pan up or down. Delete & End, X & C: Move the camera up og down. Regarding the elements on the next page: 1. This is the revision selector, from here you can turn on or of a domain model in the viewer or choose which revision you want to look at. Click the black eye to turn on/off a model, or use the revision button to get a drop down where you can select the revision you want to work with. 2. There buttons will show make partially invisible, or hide the selected objects. Objects you select in the viewer will be colored green as seen in the screenshot on the next page. 3. These buttons activate predefined viewing points, the alternatives are: in front, behind, left, right and above. 4. This is the IFC tree (chapter 8.2). 5. This button shows or hides the side panels. 6. This button opens a panel for the the navigation settings. You can adjust the speed of camera movements, show or hide spaces in the model, or adjust the field-of-view of the camera. The last part can be useful for navigating narrow hallways or ventilation shafts. 7. This is the inspect page (chapter 8.6) 8. This is the viewers issue panel (chapter 8.3) 9. This is the libraries panel (chapter 8.5)
18


19

20 8.2 The tree structures in the IFC models In the left part of the viewer screen there is a panel for the tree structures ( trees ) that shows us where a selected object belongs in the model. There are 4 different trees: Containment, Component, Layer and Type. 1. The containment tree provides a hiarchical perspective on how the different IFC objects relate to each other. 2. The component tree privides a hiarchical perspective on the components that make up an object. 3. The layer tree provieds a hiarchical view of the layers in the model. 4. The type tree shows all the objects sorted by their type.
21 8.3 Inspect The inspect panel shows all the data for the selected object in the BIM. The top part has a dropdown that lets you navigate quickly to the desired part of the information. In addition to the information from the IFC models(s) it also shows issues related to the selected object. Clicking on a related issue brings you directly to the issue-view (chapter 8.4) with this issue selected. Selecting a bsdd/products/cobuilder tag presents a dropdown box that lets you either select all other objects with the same tag, or go directly to a web page with for instance information about the product that is tagged. Selecting two or more objects shows common properties, issues or tags.

22 8.4 Issues in the viewer Issues were explained in chapter 4, but when these are used in the viewer there are further opportunities. The viewer has a list of all issues that are open in the project. If you select an issue it will automatically move the camera in the 3D-model to the place where the issue is located. From there you can freely navigate in the model the same way as usual (chapter 7.4). To create a new issue in the viewer proceed like this: Navigate to the place in the model where you see the objects that you want to create an issue about. Click the triangle with an exclamation mark inside (upper left), then click the plus-button. You will then enter a menu like the one in the screenshot on this page. Automatically an image will be added based on what you see in the 3D-viewer. You can add simple drawings on top of the image or replace it with one from your hard drive. You have to add a subject for the issue and you can optionally add a further description about the issue. You can also assign the issue to a person if you know who will be responsible for its further progress. Click Create issue when you are done.

23 8.5 Libraries in the viewer The libraries function in the viewer, located on one of the tabs on the left part of the screen, can be used in several ways. Objects can be assigned a status code, product data, a link or something similar. The libraries are object libraries that are imported by the user using the libraries screen. In addition you can assign properties from the buildingsmart Data Dictionary. If the library has attributes they will be assigned to the correct IFC property set. To assign from a library to one or more objects you first select the object(s) from the 3D-model or the IFC tree. In the screenshot below a window is selected. After selecting a library you now have 3 options: select all content, select all content that is assigned, or select all content that is unassigned. The last two options filter the content of the library so that you get a better picture of what content has been assigned in the model. In the example below a library containing several statuses has been used to mark tag an object with how far in the production process the window currently is. To assign content to the object click the small below the selected content to directly assign this content to all the selected objects. The content that has been assigned to an object is shown on the inspect tab (chapter 7.7). All library content and attributes added in bimsync can be merged into the IFC-files if you choose to export the project (chapter 5).
24 User defined libraries are a simple and practical way of getting existing data into the BIM. They can be used to tag objects with information. User defined libraries can be uploaded as simple spreadsheets (csv). Noen standard bibliotekstyper i bimsync. Listen kan enkelt utvides ved behov. BuildingSMART data dictionary er aktivt for alle prosjekter og vises ikke i listen.

25 8.6 Clipping / sectioning bimsync has powerful support for clipping. The purpose is to create one or more planes and then only show what is on one side. That way we can look at the parts of the building you are interested in without having the view obscured. A clipping plane to either horizontally and vertically and thus create a sort of interactive top view or side view of the model. If you wish, you can also cut at a freely chosen angle. You can create up to 6 simultaneous cutting planes. You can create a cutting plane by first selecting a surface, for instance a wall. Then right-click and select "Add clipping plane". The model will then be clipped by a cutting plane that we can only see the outline of (screenshot below) and parallel to the surface we have chosen when we added the clipping plane. To move the clipping plane, hold the Shift button (the cutting plane then becomes directly visible, not just it outline) and you can select a cutting plane by left-clicking on it. You can move the clipping plane back and forth by holding the left mouse button down and drag it inward or outward. To remove the plane, right-click and select "Remove clipping planes". Another and often useful way to use clipping planes is to for instance choose a wall that is attached to a storey and then right click and select "Section top and bottom". This creates makes the creation of one cut plan on top of the selected object (the wall) and one beneath, which is often useful to see eg. one storey isolated. The planes created in this way moved and removed in the same way as conventional cutting plane

26 9. Mobile units The user interface in bimsync will automatically adapt to the screen size of the device you are using (responsive design). In addition to PCs bimsync is also available on tablets and mobile phones. On mobile units you can work with issues and upload photos. Only relatively modern units with WebGL (Android, ios, Windows Phone) supports the 3D viewer, but on older devices the other pages work without problems.
27 10. Notifications The notification system is useful for keeping track of what happens in the buildings and sites you want to keep track of. There is a megaphone icon that is visible in the menu bar on all screens. It tells you if there has been something new that is relevant for you - for example, if a new revision of a building is uploaded or if someone has assigned an issue to you. There is also a separate screen that lists the notifications. In addition, one can subscribe to alerts so you get this information even when you are not actively involved in bimsync.
 navigation and indoor navigation.")
28 11. Geo location The geolocation feature allows you to place the building in the world. There is also support in bimsync for "the campus guide," which allows for in-place (on-site) navigation and indoor navigation. Contact us if the project would like to take this into use.
 BCF API (coming soon) Several companies relies on bimsync to provide BIM functionality for their")
29 12. API bimsync has powerful APIs that allow external applications to use its functionality or exchange data. We have several APIs: - data API version 1 and 2 3D viewer API 2D viewer API (coming soon) BCF API (coming soon) Several companies relies on bimsync to provide BIM functionality for their applications. Catenda, the creators of bimsync, use the viewer and data APIs ourselves in several projects since it allows us to quickly create applications with BIM functionality. One example is the bygglett demo app where we showcase how building application permits can be made much more understandable by visualizing regulations and goverment rules: Contact us to learn more about what we can offer and how you can become an API client. See here for specific information about our API: <- the bygglett demo showing bimsync 3D viewer, government data and streamed 3D map data combined
BIMcollab. Don t let any issue slip away. User and Administrator Manual
 BIMcollab Don t let any issue slip away User and Administrator Manual Welcome to BIMcollab With BIMcollab we offer you an extra layer to successful BIM project-management. We hope you enjoy using it as
End User Manual. December 2014 V1.0
 End User Manual December 2014 V1.0 Contents Getting Started... 4 How to Log into the Web Portal... 5 How to Manage Account Settings... 6 The Web Portal... 8 How to Upload Files in the Web Portal... 9 How
DSS User Guide. End User Guide. - i -
 DSS User Guide End User Guide - i - DSS User Guide Table of Contents End User Guide... 1 Table of Contents... 2 Part 1: Getting Started... 1 How to Log in to the Web Portal... 1 How to Manage Account Settings...
SOLIBRI MODEL CHECKER
 SOLIBRI MODEL CHECKER Getting Started with Solibri Model Checker 2017 Copyright 2017 Solibri, Inc. WELCOME... 1 1. ABOUT SOLIBRI MODEL CHECKER... 1 Checking the Design... 1 Rule-based Analysis... 1 Communicating
BIMKEEPER INTRODUCTION AND MANUAL. Using Building Information Modeling to successfully manage real-estate
 BIMKEEPER INTRODUCTION AND MANUAL Using Building Information Modeling to successfully manage real-estate INTRODUCTION TO BIM Contents Introduction to BIM 2 BIM and IFC 3 Managing complexes 4 Navigating
TABLE OF CONTENTS CREATE AN ACCOUNT...3. TO LOG IN AproPLAN HOMEPAGE...5 ADMINISTRATION CONSOLE...6 PROJECT...7
 1 TABLE OF CONTENTS 1. CREATE AN ACCOUNT...3 2. TO LOG IN AproPLAN 3. HOMEPAGE...5 4. ADMINISTRATION CONSOLE...6 5. PROJECT...7 6. LIST...20 7. POINT CREATION...29 8. INSTALL ON MOBILE...31 9. INTRODUCTION
Introduction to Kaltura
 Introduction to Kaltura The Kaltura media content management system allows users to record, stream, and manage multimedia files. This industry-leading enterprise system offers many robust tools. This guide
Space Details. Available Pages. Confluence Help Description: Last Modifier (Mod. Date): ljparkhi (Aug 14, 2008)
: ljparkhi (Aug 14, 2008)") Space Details Key: confhelp Name: Confluence Help Description: Creator (Creation Date): ljparkhi (Aug 14, 2008) Last Modifier (Mod. Date): ljparkhi (Aug 14, 2008) Available Pages Quickstart Guide Working
Space Details Key: confhelp Name: Confluence Help Description: Creator (Creation Date): ljparkhi (Aug 14, 2008) Last Modifier (Mod. Date): ljparkhi (Aug 14, 2008) Available Pages Quickstart Guide Working
The Basics. As of December 12, 2016
 The Basics As of December 12, 2016 Accessing REDCap 1. To access REDCap, enter the URL into your internet browser: https://redcap.wakehealth.edu/ 2. Login using your Medical Center ID and password 3. FAQ
A User Guide. Besides, this Getting Started guide, you ll find the Zoho Campaigns User Guide and many other additional resources at zoho.com.
 A User Guide Welcome to Zoho Campaigns! This guide will help you create and send your first email campaign. In addition to sending an email campaign, you ll learn how to create your first mailing list,
Wordpress Training Manual
 The Dashboard... 2 If this is your first time logging in:... 2 How do I change my password or email address?... 3 Search Engine Optimization (SEO)... 4 SEO for Pages... 4 SEO for Images... 5 Managing Pages...
Welcome to the C3 Training Database, brought to you by the Construction Career Collaborative!
 C3 Training Database Contractor User Manual 12/06/2017 Welcome to the C3 Training Database, brought to you by the Construction Career Collaborative! The training database will help you keep track of your
User Guide. Kronodoc Kronodoc Oy. Intelligent methods for process improvement and project execution
 User Guide Kronodoc 3.0 Intelligent methods for process improvement and project execution 2003 Kronodoc Oy 2 Table of Contents 1 User Guide 5 2 Information Structure in Kronodoc 6 3 Entering and Exiting
GNOSYS PRO 0.7. user guide
 GNOSYS PRO 0.7 user guide Author Guido M. Re Date September 2016 Reviewer Chad Barksdale Date September 2016 3 Contents 1 Get Started 7 1.1 System Requirements...................................................
Getting Started Guide
 Getting Started Guide for education accounts Setup Manual Edition 7 Last updated: September 15th, 2016 Note: Click on File and select Make a copy to save this to your Google Drive, or select Print, to
Client Edition. Instructions for Use
 Client Edition Instructions for Use 2017 leanedit LLC 1 www.leanedit.com TABLE OF CONTENTS 1. Uploading a Video Page 4 2. Labeling a Video Page 5 3. Creating a Project Page 6 4. Editing a Video Page 8
Learn how to login to Sitefinity and what possible errors you can get if you do not have proper permissions.
 USER GUIDE This guide is intended for users of all levels of expertise. The guide describes in detail Sitefinity user interface - from logging to completing a project. Use it to learn how to create pages
Version Beta, pre-release. zspace Studio Users Guide
 zspace Studio Users Guide Version 1.0-2014 Beta, pre-release zspace.com zspace Studio Users Guide zspace is a registered trademark of zspace, Inc. All other trademarks are the property of their respective
NJUNS Users Guide.
 NJUNS Users Guide www.njuns.com The National Joint Utilities Notification system, NJUNS, is a national organization of member utilities formed for the purpose of improving the coordination of joint ventures.
Customer Helpdesk User Manual
 Customer Helpdesk User Manual TABLE OF CONTENTS 1 INTRODUCTION... 3 2 HANDLING OF THE PROGRAM... 3 2.1 Preface... 3 2.2 Log In... 3 2.3 Reset Your Password... 4 2.4 Changing Personal Password... 4 3 PROGRAM
CareCarma. It Starts With Family
 CareCarma It Starts With Family 3. INTRODUCTION 3. How can CareCarma Help You? 3. CareCarma Home Page 4. CareCarma CareCircle 4. CareCarma CareCircle Tools 5. Work on Different Plattforms 6. GETTING STARTED
BC6.3 User Guide (Part 1)
") BC6.3 User Guide (Part 1) Document Management and Searching C Sellar 27 May 2015 Version 1 BC-27769333 BC6.3 User Guide (Part 1) Document Management and Searching Executive Summary This is the BC User
BC6.3 User Guide (Part 1) Document Management and Searching C Sellar 27 May 2015 Version 1 BC-27769333 BC6.3 User Guide (Part 1) Document Management and Searching Executive Summary This is the BC User
1 A simplified view onto the documents and data stored on Business Collaborator
 HTML5 Interface User Guide 15 December 2015 Version 1.0 BC-27919001 This user guide is for the HTML5 interface in BC 6.4. 1 Introduction The HTML5 interface is Business Collaborator s next generation user
Start Here. Accessing Cisco Show and Share. Prerequisites CHAPTER
 CHAPTER 1 Revised: May 31, 2011 Accessing Cisco Show and Share, page 1-1 Cisco Show and Share Quick Start, page 1-4 Sign In to Cisco Show and Share, page 1-20 Set Your Personal Preferences, page 1-22 Accessing
SIGNATUS USER MANUAL VERSION 3.7
 SIGNATUS USER MANUAL VERSION 3.7 CONTENTS 1 INTRODUCTION... 3 1.1 Launching SIGNATUS... 4 1.1.1 Update your SIGNATUS License... 4 1.2 Main Menu... 6 2 SETTINGS OVERVIEW... 7 3 OPEN DOCUMENT... 8 3.1 Form
Info Input Express Network Edition
 Info Input Express Network Edition User s Guide A-61893 Table of Contents Using Info Input Express to Create and Retrieve Documents... 5 Compatibility... 5 Contents of this Guide... 5 Terminology... 7
COMMUNITIES USER MANUAL. Satori Team
 COMMUNITIES USER MANUAL Satori Team Table of Contents Communities... 2 1. Introduction... 4 2. Roles and privileges.... 5 3. Process flow.... 6 4. Description... 8 a) Community page.... 9 b) Creating community
Chat Activity. Moodle: Collaborative Activities & Blocks. Creating Chats
 Chat Activity The Moodle chat tool allows communication between instructors and students in real time. Unlike in discussion forums, which are a means for asynchronous communication, online chat sessions
DocuSign for Salesforce User Guide v6.1.1 Published: July 10, 2015
 DocuSign for Salesforce User Guide v6.1.1 Published: July 10, 2015 Copyright Copyright 2003-2015 DocuSign, Inc. All rights reserved. For information about DocuSign trademarks, copyrights and patents refer
Anchor User Guide. Presented by: Last Revised: August 07, 2017
 Anchor User Guide Presented by: Last Revised: August 07, 2017 TABLE OF CONTENTS GETTING STARTED... 1 How to Log In to the Web Portal... 1 How to Manage Account Settings... 2 How to Configure Two-Step Authentication...
CUMULUS WEB CLIENT USER ASSISTANCE 2014, CANTO GMBH. ALL RIGHTS RESERVED. Welcome!
 Cumulus is Canto s state-of-the-art Digital Asset Management solution. Cumulus makes it easy to quickly organize, find, share, and track all of your digital files: photos, logos, presentations, videos,
VIEVU Solution App User Guide
 VIEVU Solution App User Guide INTRODUCTION VIEVU Solution is the next generation, fully-hosted, cloud evidence management system. This guide describes how to operate the VIEVU Solution. Additional support
USER GUIDES OWNCLOUD WEB USER GUIDE. INTRODUCTION: This guide provides details on how to use owncloud via the web.
 USER GUIDES OWNCLOUD WEB USER GUIDE INTRODUCTION: This guide provides details on how to use owncloud via the web. SYSTEM REQUIREMENTS: Most web browsers WHAT YOU MAY NEED & OTHER CONSIDERATIONS: An Internet
Welcome to the C3 Training Database, brought to you by the Construction Career Collaborative!
 C3 Training Database How-To Guide Participating on a Project Specialty Contractor 12/06/2017 Welcome to the C3 Training Database, brought to you by the Construction Career Collaborative! The training database
Info Input Express Network Edition
 Info Input Express Network Edition Administrator s Guide A-61892 Table of Contents Using Info Input Express to Create and Retrieve Documents... 9 Compatibility... 9 Contents of this Guide... 9 Terminology...
UICapture Training Macintosh. Macintosh Panopto Recorder: Login
 UICapture Training Macintosh Before You Begin 1. (For individuals working on their own) If you do not have Panopto installed on your Mac, download and install it from the ITS Software Downloads page or
Development Application Online. HowTo guide for applicants
 Development Application Online HowTo guide for applicants Disclaimer While every reasonable effort has been made to ensure that this document is correct at the time of printing, the State of NSW, its agents
UICapture Windows Training Session. EXERCISE ONE - Windows Panopto Recorder: Login
 UICapture Windows Training Session Today s Session 1. UICapture Overview (PowerPoint) 2. Exercise (Hands On) 3. Individual Work Time Before You Begin 1. Plug in your microphone headset. 2. In a browser,
VisualPST 2.4. Visual object report editor for PowerSchool. Copyright Park Bench Software, LLC All Rights Reserved
 VisualPST 2.4 Visual object report editor for PowerSchool Copyright 2004-2015 Park Bench Software, LLC All Rights Reserved www.parkbenchsoftware.com This software is not free - if you use it, you must
A*STAR SRDB User Guide
 A*STAR SRDB User Guide Document Version: 5.0 Revised Date: 23 rd March 2010 Document name: ASTAR_UserGuide_5.0.doc Page 1 of 43 Revision History Date Version Author Review By Summary of Changes 9 th July
The walkthrough is available at /
 The walkthrough is available at https://downloads.openmicroscopy.org/presentations/2018/gbi-sydney / Description We will demonstrate a number of features of the OMERO platform using an OMERO server based
OpenTouch Conversation for PC
 User manual R2.1.1 8AL90631USAEed01 1542 1 OpenTouch Conversation for PC... 4 2 Start OpenTouch Conversation... 4 3 Homepage... 5 3.1 Change your photo or avatar... 6 4 Conversation Wall... 7 5 Favorites...
Vela Web User Guide Vela Systems, Inc. All rights reserved.
 The Vela Systems Web application is designed to enable the administration, management, and reporting of the Vela Field Management Suite, as well as give project teams the ability to collaborate on issues,
Version Beta, pre-release. zspace Studio Demonstration Script
 zspace Studio Demonstration Script Version 1.0-2014 Beta, pre-release zspace.com zspace Studio Demonstration Script zspace is a registered trademark of zspace, Inc. All other trademarks are the property
How to Use Voicethread
 How to Use Voicethread October 13, 2016 Julie K. Marsh Coordinator for Distance Education and Instructional Design Need Help? Contact Julie at 804-627-5308 or send an email to julie_marsh@bshsi.org Contents
GRS Enterprise Synchronization Tool
 GRS Enterprise Synchronization Tool Last Revised: Thursday, April 05, 2018 Page i TABLE OF CONTENTS Anchor End User Guide... Error! Bookmark not defined. Last Revised: Monday, March 12, 2018... 1 Table
OnCOR Silverlight Viewer Guide
 Getting Around There are many ways to move around the map! The simplest option is to use your mouse in the map area. If you hold the left button down, then click and drag, you can pan the map to a new
Kona ALL ABOUT FILES
 Kona ALL ABOUT FILES February 20, 2014 Contents Overview... 4 Add a File/Link... 5 Add a file via the Files tab... 5 Add a file via a conversation, task, or event... 6 Add a file via a comment... 7 Add
Wimba Pronto. Version 3.1. User Guide
 Wimba Pronto Version 3.1 User Guide Wimba Pronto 3.1 User Guide Welcome to Wimba Pronto 1 Top Wimba Pronto Features 1 What's New in Wimba Pronto? 3 Getting Started 4 Wimba Pronto System Requirements 4
DaDaDocs for Dynamics 365. A Guidebook for the DaDaDocs Integration for Dynamics 365
 DaDaDocs for Dynamics 365 A Guidebook for the DaDaDocs Integration for Dynamics 365 DaDaDocs for Dynamics 365 2 Table of Contents Getting Started Mini Toolbar Hyperlink Tool Text Checkmarks Signing Documents
Brianna Nelson Updated 6/30/15 HOW TO: Docs, Sheets, Slides, Calendar, & Drive. English
 Brianna Nelson Updated 6/30/15 HOW TO: Docs, Sheets, Slides, Calendar, & Drive English ABOUT Use this guide to write papers, create spreadsheets, give presentations, manage your time, and save your files
kalmstrom.com Business Solutions
 Kanban Task Manager for Outlook Manual Table of contents 1 INTRODUCTION...3 1.1 LANGUAGES...4 1.2 REQUIREMENTS...4 1.3 SYSTEMS...4 2 INSTALLATION OF KANBAN TASK MANAGER...6 2.1 INTRODUCTION...6 2.2 PROCESS...6
Dashboard Instructions
 Dashboard Instructions The instructions below provide a brief overview of some of the tools available to you as you navigate the COMPASS performance dashboard. The dashboard was created to provide Communities
Preferences Table of Contents
 Preferences Table of Contents My Profile... 2 Quick Profile Maintenance... 2 My Names... 3 My Addresses... 3 My E-Mail Addresses... 4 Personal Photo and Logo Maintenance... 4 My Documents... 6 My Phone
UICapture Training Windows. EXERCISE One - Windows Panopto Recorder: Login
 UICapture Training Windows Before You Begin 1. Make sure that you have a microphone connected to your machine before you start Panopto. 2. Open the folder on your computer s desktop called ICON Overview
edofe Management Toolkit
 edofe Management Toolkit A guide to effective edofe management for Directly Licensed Centres 1 2 Contents Section one: Setting up the correct infrastructure on edofe... 4 Creating a group... 4 Editing
Welcome to the Investor Experience
 Welcome to the Investor Experience Welcome to the Black Diamond Investor Experience, a platform that allows advisors to customize how they present information to their clients. This document provides important
Student Guide INTRODUCTION TO ONLINE RESOURCES
 Student Guide INTRODUCTION TO ONLINE RESOURCES Date: 08. June. 2017 By: Technical Support Team STUDENT GUIDE southwales.unicaf.org 1)Introduction...4 2)Student Panel (SIS)...4 2.1)Student Panel (SIS) Login...4
UICapture Windows Training Session. EXERCISE ONE - Windows Panopto Recorder: Login
 UICapture Windows Training Session Today s Session 1. UICapture Overview (PowerPoint) 2. Exercise (Hands On) 3. Individual Work Time Before You Begin 1. (For individuals working on their own) If you do
EQUELLA. Moodle User Guide. Version 6.2
 EQUELLA Moodle User Guide Version 6.2 Document History Document No. Reviewed Finalised Published 1 12/12/2013 13/12/2013 13/12/2013 December 2013 edition. Information in this document may change without
By: Ms. Fatima Shannag Ms. Essra Al-Mousa. Edited by: Khawlah Almutlaq
 By: Ms. Fatima Shannag Ms. Essra Al-Mousa 1 PowerPoint web app PowerPoint Web App is a limited version of PowerPoint, enabling you to display information through slide shows A PowerPoint presentation is
InformationTechnology
 dvanced Calling Features One of the benefits of running University voice service to Skype for Business is the opportunity to manage calls through a PC or laptop using the Skype application with a compatible
Student Guide. By UNICAF University
 vnhgfj Student Guide By UNICAF University 1 2 Table of Contents 1) Introduction... 5 2) Student Panel (SIS)... 5 2.1) Student Panel (SIS) Login... 5 2.1.1) Definitions... 5 2.1.2) Registration Email...
Wimba Pronto. Version 2.1. User Guide
 Wimba Pronto Version 2.1 User Guide Wimba Pronto 2.1 User Guide Welcome to Wimba Pronto 1 What's New in Wimba Pronto? 2 Getting Started 3 Wimba Pronto System Requirements 3 Creating a New Wimba Pronto
edofe Management Toolkit
 edofe Management Toolkit A guide to effective edofe management for Directly Licensed Centres 1 2 Contents Section one: Setting up the correct infrastructure on edofe... 4 Creating a group... 4 Editing
Sync User Guide. Powered by Axient Anchor
 Sync Powered by Axient Anchor TABLE OF CONTENTS End... Error! Bookmark not defined. Last Revised: Wednesday, October 10, 2018... Error! Bookmark not defined. Table of Contents... 2 Getting Started... 7
Getting Around. Welcome Quest. My Fundraising Tools
 As a registered participant of this event, you have a variety of tools at your fingertips to help you reach your goals! Your fundraising center will be the hub for managing your involvement and fundraising
User Guide. Version
 User Guide Version 0.19 2-11-2008 StormPro Max User Guide Page 1 of 69 5/10/2008 Table of Contents 1. Overview... 4 1.1 Definition of StormPro Max Terms... 4 2. Accessing StormPro Max... 5 3. Navigating
TEACHER PAGES USER MANUAL CHAPTER 6 SHARPSCHOOL. For more information, please visit: Chapter 6 Teacher Pages
 SHARPSCHOOL USER MANUAL CHAPTER 6 TEACHER PAGES For more information, please visit: www.customernet.sharpschool.com 0 TABLE OF CONTENTS 1. 2. 3. 4. 5. 6. 7. 8. 9. 10. 11. INTRODUCTION... 1 I. TEACHER PAGE
Revision History. Name Date Description Version Daniel Lemieux January 09, 2007 Initial Document 1.0
 Ver 1.1 Table of content 1 The Base Concepts... 5 1.1 Accessing the site... 5 1.1.1 To Access the site... 5 1.2 Environment... 6 1.2.1 Identifying the different zones within the window... 6 1.3 Closing
Contents Release Notes System Requirements Using Jive for Office
 Jive for Office TOC 2 Contents Release Notes...3 System Requirements... 4 Using Jive for Office... 5 What is Jive for Office?...5 Working with Shared Office Documents... 5 Get set up...6 Get connected
5.2. Click these tabs to jump to the Table of Contents, Index or start of each chapter.
 5.2 Click these tabs to jump to the, or start of each chapter. Click this button to advance to the next page. Click this button to return to the previous page. (Since this is the starting page, the [Back]
Partner Guide for bksblive (The Prince s Trust Account)
") Partner Guide for bksblive (The Prince s Trust Account) System requirements bksblive and associated software works in any web browser such as Internet Explorer, Mozilla Firefox, Google Chrome and Apple
Partner Guide for bksblive (The Prince s Trust Account) System requirements bksblive and associated software works in any web browser such as Internet Explorer, Mozilla Firefox, Google Chrome and Apple
CANVAS OBSERVER GUIDE
 CANVAS OBSERVER GUIDE This work is licensed under a Creative Commons Attribution-NonCommercial-ShareAlike License Table of Contents Introduction...3 What is the Observer role?...4 How can I use Canvas
User Guide. BlackBerry Workspaces for Windows. Version 5.5
 User Guide BlackBerry Workspaces for Windows Version 5.5 Published: 2017-03-30 SWD-20170330110027321 Contents Introducing BlackBerry Workspaces for Windows... 6 Getting Started... 7 Setting up and installing
INTERFACE & 16 YUUWAA ONLINE SERVICES...
 USER GUIDE Table of Contents INTRODUCTION... 3 SYSTEM REQUIREMENTS... 4 YUUWAA BACKUP... 5 Set Up Your First Backup... 5 Create Your Backup... 6 YuuWaa Online Backup... 9 Launch Your Backup... 11 YuuWaa
Design Review: Fundamentals
 Design Review: Fundamentals Understanding Autodesk Design Review Autodesk Design Review improves team collaboration and communication by using design information the way it is intended to be used by the
UICapture Macintosh Training Session
 UICapture Macintosh Training Session Today s Session 1. UICapture Overview (PowerPoint) 2. Exercise (Hands On) 3. Individual Work Time Before You Begin 1. (For individuals working on their own) If you
User s Guide. Valvova Oy
 User s Guide Valvova Oy June 21, 2017 CONTENTS Contents 1 Timeline 2 1.1 Program startup......................................... 3 1.2 Calendar............................................. 3 1.3 Go to
Beginner Workshop Activity Guide 2012 User Conference
 Beginner Workshop Activity Guide 2012 User Conference TUESDAY, MARCH 6 2:00PM 5:00 PM Beginner Training Workshop Attendees will learn the end user functions of OU Campus TM. They will learn how to log
Collaborate Ultra in D2L Brightspace Guide for Moderating and Presenting
 Collaborate Ultra in D2L Brightspace Guide for Collaborate is a web-based video conferencing system allowing participants to engage in twoway audio, multi-point video, interactive whiteboard, application
Epicollect5 Reference Guide
 EpiCollect5 is a free web-based tool that enables you to collect customized data (including location and media) on the web or in the field using a mobile device. You can create a data collection form that
UICapture Training Macintosh. EXERCISE One - Macintosh Panopto Recorder: Login
 UICapture Training Macintosh Before You Begin 1. Make sure that you have a microphone connected to your machine before you start Panopto. 2. Open the folder on your computer s desktop called ICON Overview
USER MANUAL. TapCRM TABLE OF CONTENTS. Version: 1.4
 USER MANUAL TABLE OF CONTENTS Introduction... 1 Benefits of TapCRM... 1 Prerequisites... 1 Installation & Configuration... 2 TapCRM Plug-in Installation... 2 Front Side Instructions... 9 Contact Us...
RECORD. Published : License : None
 RECORD Published : 2011-03-12 License : None 1 Record Activity 1. Introduction 2. Starting Record 3. Somebody Should Set The Title For This Chapter! 4. Overview of Record 5. Audio 6. Taking Photos 7. Video
Getting Started with BarTender
 Getting Started with BarTender MANUAL Contents Getting Started with BarTender 3 Installation 4 Choosing What to Install 4 Automation Editions (Automation and Enterprise Automation) 4 Installing BarTender
RIX Wiki User Guide 1
 RIX Wiki User Guide 1 Contents Logging into your Wiki... 3 Getting to know your Home Page...... 4 Wiki Control Panel... 6 Using the Wiki Control Panel Setup your Wiki... 7 Using the Wiki Control Panel
SiteAware Viewer. Quick Start Guide
 SiteAware Viewer Quick Start Guide Login Screen 1. Enter SiteAware provided username (an email address) and password 2. Click Login 3. Click Forgot Password to request a password reset 4. Sign Up option
Wimba Pronto. Version 2.0. User Guide
 Wimba Pronto Version 2.0 User Guide Wimba Pronto 2.0 User Guide Welcome to Wimba Pronto 1 What's New in Wimba Pronto 2.0 2 Getting Started 3 Wimba Pronto System Requirements 3 Creating a New Wimba Pronto
Computer learning Center at Ewing. Course Notes - Using Picasa
 1st January 2014 Computer learning Center at Ewing Course Notes - Using Picasa These course notes describe the content of the Using Picasa course. The course notes are based on Picasa 3. This course material
DESIGN TRANSFORMATIONAL IPAD APPS
 DESIGN TRANSFORMATIONAL IPAD APPS Thank you for participating in a workshop at MicroStrategy World 2019. If you missed or did not finish an exercise and want to complete it after the conference, use this
VA DAP App Android Users Guide
 VA DAP App Android Users Guide Table of Contents Getting Started with the VA DAP App... 1 Installing the VA DAP App... 1 Logging into the App and Opening Components... 1 Logging out of the VA DAP App...
Creators Basic Guide to Using UICapture (Mac)
") Creators Basic Guide to Using UICapture (Mac) Download the software from http://helpdesk.its.uiowa.edu/software/signin.htm After downloading the software and setting up an account with your local IT support,
Creators Basic Guide to Using UICapture (Mac) Download the software from http://helpdesk.its.uiowa.edu/software/signin.htm After downloading the software and setting up an account with your local IT support,
4. Fill in your information. Choose an address for your PBworks wiki. Be sure to choose For Education as your workspace type.
 Creating Your First Wiki with PB Works 1. Go to the PB Wiki Site: http://www.pbworks.com 2. Click Sign Up 3. Select the Basic Plan which is the free plan and includes 2 GB of storage space. 4. Fill in
kalmstrom.com Business Solutions
 Kanban Task Manager Single Manual 1 INTRODUCTION... 3 1.1 LANGUAGES...4 1.2 REQUIREMENTS...4 1.3 SYSTEMS...4 2 INSTALLATION OF KANBAN TASK MANAGER... 5 2.1 INTRODUCTION...5 2.2 PROCESS...5 2.3 FILES...8
Lab Assignment #1: Introduction to Creo ME 170
 Lab Assignment #1: Introduction to Creo ME 170 Instructor: Mike Philpott (email: mphilpot@illinois.edu) Date Due: One week from Start Day of Lab (turn in deadline 11pm night before next lab) Make sure
NVR Management Software
 NVR Management Software Quick Installation Guide Ver. 1.0 User Interface Overview 1 Live Video This is the section where the live videos are displayed Menu Bar This is where all functions can be accessed
Instructor Manual Contents
 Instructor Manual Contents Welcome to egrade Plus...1 The Roles Within egrade Plus...1 Master Course Instructor...1 Class Section Instructor...2 Navigating egrade Plus...2 Using the Universal Navigation
Creating Dashboard. Version: 7.3
 Creating Dashboard Version: 7.3 Copyright 2015 Intellicus Technologies This document and its content is copyrighted material of Intellicus Technologies. The content may not be copied or derived from, through
Creators Basic Guide to Using UICapture (Windows)
") Creators Basic Guide to Using UICapture (Windows) All of the University of Iowa General Assignment Classrooms (GAC) are equipped with the recording software known as Panopto Recorder on Windows and Mac.
Creators Basic Guide to Using UICapture (Windows) All of the University of Iowa General Assignment Classrooms (GAC) are equipped with the recording software known as Panopto Recorder on Windows and Mac.