Automation Engine 16 Commercial Print (Page) Workflow
|
|
|
- Ashlie Robinson
- 5 years ago
- Views:
Transcription
1 16 Commercial Print (Page) Workflow
2 Contents 1. Working with Pages About Pages The Pages View Adding Imposition Files to the Pages View Creating an Imposition Creating a Book Adding (PDF) Content Files to the Pages View Page Assignment Page Assignment via Naming Convention Approving and Rejecting Pages Working with Proofs About Proofs The Proofs View Marking Files As Proofs Approving Proofs Working with Plates About Plates The Plates View Task Status information Adding Plates Inks and Plates Variant Setup Variant Setup on Job level Variant Setup on Imposition or Book level Reapplying Use Cases Manipulating Plates Tasks for Page Imposition Workflows Add Marks To Imposition Adding Trim Marks Adding Rectangle Marks Adding Text Marks Adding Image Marks Adding Barcode Marks to Page Impositions Adding Asir Barcode Marks Add to Pages View Apply Creep Assign PDF Pages to RunList...45 ii
3 Contents 4.5 Change Imposition Layout Convert IMP File to Normalized PDF Convert Selection Create IMP File Settings Possible Workflows Create Imposition from JDF Layout Create Imposition from RunList Create PDF File from JDF RunList Create PDF File from RunList Create RunList Create RunList from PDF Create Sheet Report from IMP File Export IMP File to GRI File Sheets Mockup Tiling Export IMP File to JDF Layout Export IMP File to JDF Post-Press Cutting Saddlestitching Export IMP File to PDF File Export IMP File to PDF File Chain PDF step Mark as Proof step Export IMP File to PostScript File Export Imposition to JDF Layout Export Imposition to PDF File Export to PDF File Chain PDF Step Mark as Proof Step Import JDF Layout Sheets Import JDF Stripping Sheets Assembly Other Mark as Proof Print IMP File Proof IMP File (FlexProof) Publish Imposition on WebCenter Chain Publish Imposition on WebCenter Send RunList to WebCenter...82 iii
4 4.31 RIP IMP File to Screened and Unscreened Tiff File Review and Approval of Page Impositions using WebCenter WebCenter Setup Creating a New Project Adding Members to a Project Adding Approvers to the Project Saving a Project as a Template Configure Workflow Approval and Tunnel Clients Create a Workflow Approval and Tunnel Client WebCenter Sites Sending an Imposition from to WebCenter Preparing the Imposition Sending the Imposition to WebCenter Approving the Imposition in WebCenter Approving a Document About Page Lists Approving a Page List Sending a RunList / PageList to WebCenter Preparing a RunList Sending A RunList to WebCenter Checking the Approval Results in In the Pages and Proofs Views In the WebCenter View Possible Document Statuses Overruling the WebCenter Approval Integrating with Third Party Imposition Systems Workflows: The bigger picture Importing and Creating Impositions Exporting Impositions Workflows with Selection and the Convert Selection tasks The RunList Editor Setting Up the RunList Editor Creating a RunList Adding a Number of Placeholders Viewing the RunList Files Changing the Files' Extension Sorting the RunList's Files Submitting the RunList to a Workflow iv
5 1. Working with Pages Note: The concepts of Pages, Plates and Proofs only serve in page workflows (commercial printing). 1.1 About Pages The Pages View is extremely useful when working with impositions. The Pages View allows you to: 1. View, check and (re-)assign pages to imposition or books. If the Imposition file contains all pages, the Pages View can be used to simply check the presence and correct order of the pages. If there are pages missing, you can assign them by either selecting the (multi-page) file in the Page Gallery or individual pages in the Details pane, and drag them to the correct location in the Page List. 2. Generate proofs and follow up approval states. Both PDF and IMP files can be exported, exposed, proofed, etc. from the Pages View. The same tasks as in the Files View can be executed on both file types. 3. Upload and normalize PDF files. 4. Create impositions after templates. 5. Create books for later use in a new imposition. 1.2 The Pages View This view is only available in Job mode. It is only used in page workflows. The Pages View is divided into several panes. The top part of the view (the Page Gallery and the Details pane) displays both assigned and unassigned pages, the bottom part displays the impositions, layers and assigned pages. 5 1


6 1 1. The Page Gallery pane lists all incoming files, indicates the number of pages and the assignment status. 2. The Details pane displays thumbnails of the individual pages of the selected file. 3. The Imposition Gallery pane shows the imposition structure with its different books. It also allows you to create books that later will be used in an imposition. 4. The Layers pane shows the different layers of the selected imposition. You can rename layers, approve them, and set them empty or blank. Note: The Layers pane is only visible when the selected imposition or book contains more than one layer. 5. The Page List shows you which pages are assigned and which are not. For each page status information can be asked. 6. Click the Page List button to switch between thumbnail view or list view. You can view both the task status and the page status information. Simply right-click the columns Page Gallery and / or Imposition Gallery pane(s) and select both Task Status and Page Status. 6
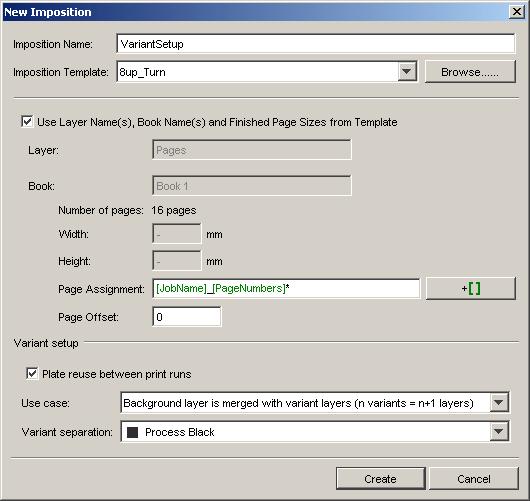
7 See Working with Pages on page 5 for more information. 1.3 Adding Imposition Files to the Pages View When you go to the Pages View for the first time, you will see that all panes are empty. To send an imposition file from the Files View to the Pages View: Select the IMP file and launch the Add to Imposition Gallery task on it. The imposition file will appear in the Pages View. If the imposition contains pages, the corresponding files will appear in the Page Gallery. Tip: When an IMP file is already present in the Imposition Gallery of the Pages View, launching the Add to Imposition Gallery task resynchronizes the IMP file. This can be useful when problems with non-matching SmartIDs occur Creating an Imposition To create a new imposition: 1. Right click the Imposition Gallery and select New Imposition, or click the New Imposition button. This opens the New Imposition dialog. 2. Enter the Imposition Name. 3. Select the appropriate Imposition Template from the list, or browse to the correct location. 4. By default, Use Layer Name(s), Book Name(s) and Finished Page Sizes from Template is selected, which makes the Width and Height parameters unavailable. Deselect this option if you want to overrule the template sizes Additional information on the number of books and pages of the selected template is displayed. If you want to automate the Page Assignment, insert the regular expression to use. You can include SmartNames. By giving a particular Page Offset, the pages will be assigned to the correct page slots. Select the correct Use case and Variant separation if necessary. Click Create. 7 1
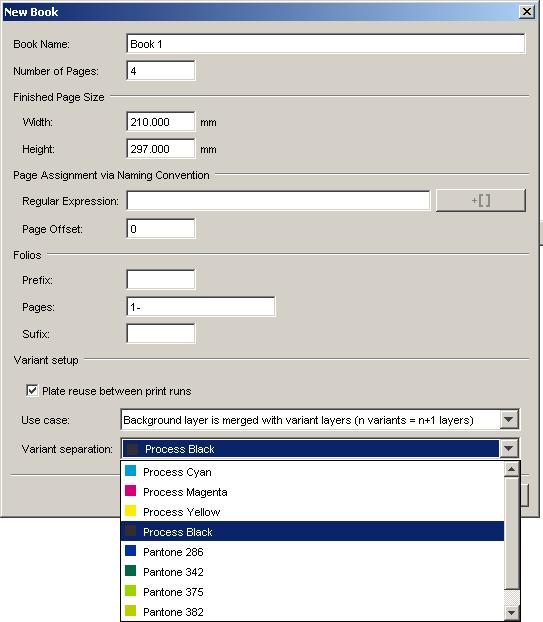
8 1 The imposition will appear in the Imposition Gallery Creating a Book To create a new book: 1. Right click the Imposition Gallery and select New Book, or click the New Book button This opens the New Book dialog. Enter the Book Name. Indicate the Number of Pages the new book should contain. Set the correct Finished Page Size. If you want to automate the Page Assignment, insert the regular expression to use. You can include SmartNames. By giving a particular Page Offset, the pages will be assigned to the correct page slots. Indicate the correct Folio numbering, if necessary. Select the correct Use case and Variant separation if necessary. Click Create. The book will appear in the Imposition Gallery. The properties of the book can be consulted or changed at any time by right-clicking the book and selecting Book Setup... Tip: Use the Create Imposition task to turn your book into an imposition. 1.4 Adding (PDF) Content Files to the Pages View When you go to the Pages View for the first time, you will see that all panes are empty. To add a PDF file to the Pages View: Select a PDF in the Files View and choose Add to Page Gallery from the pop-up menu. The PDF will appear in the Page Gallery, unnormalized. Note: The Add to Page Gallery option is only available if the selected file is not yet present in the Page Gallery of the Pages View. Right-click the Page Gallery and select Get Data and Normalize to browse to the correct PDF file. The PDF file will be copied to the root of the Job. After normalization your pages will automatically be added to the Page Gallery. Note: You can upload files that are already present in the job folder. In this case, the files will be left in their current location and will not be copied to the root folder of the Job. 8
9 Note: You will only be able to create a limited number of workflows that work in combination with the Add to Page Gallery: When a PDF file is selected you can use: Copy or Move File > Normalize PostScript / PDF / Illustrator 8.0 File > Add to Page Gallery Normalize PostScript / PDF / Illustrator 8.0 File > Add to Page Gallery Add to Page Gallery When a Normalized PDF File is selected you can use: Copy or Move File > Add to Page Gallery Add to Page Gallery Page Assignment Pages can be assigned to the Page List in different ways: Drag a (multi-page) file from the Page Gallery and drop it on the correct page in the Page List. Reader's spreads are automatically recognized and assigned correctly. Select one or multiple pages in the Details Gallery and drop them on the correct page(s) in the Page List. Selecting Replace Pages in the context menu of the Page List allows you to upload and normalize a PDF file which will be assigned automatically when the Normalize task finishes. If you don't want to replace the pages that have already been assigned, you can use Insert Pages. In this case, the new pages will be assigned, moving the 'old' pages to the next pages slots. Pages can also be assigned automatically, via a naming convention. Note: Within one Page List, pages can also be dragged to another location Page Assignment via Naming Convention In case the page number in the page list is encoded in the name of the incoming PDF files, can automate the assigning of these pages by using a regular expression. This regular expression can be composed from ordinary characters, SmartNames, wildcard characters and placeholder(s) for the page index. In case a regular expression for a certain book is defined, each incoming file that is added to the job containing this book is checked against this regular expression. If the file name conforms to this expression, it is assigned to the corresponding page slot(s). The regular expression can be specified on Job, imposition and book level. If automatic page assignment is enabled, it is indicated in the Page List of the Pages View. 9 1

10 1 The specified regular expression is automatically matched to an incoming file when its pages are created. The pages are assigned on the condition that the regular expression fully matches the *file name. Moreover, when the regular expression develops into just one page, all pages of the file will be assigned from this desired page onwards. if there are several situations in which the regular expression matches the file name, the first successful one (which leads to a page assignment) will be taken. if the imposition has more than one book or layer and the regular expression does not specify any, the first book or layer will automatically be selected. Note: Pages can only be assigned when the desired page slots are empty, not when they are blank. Previously assigned pages will not be unassigned / reassigned during page assignment via naming conventions. You can also specify a Page Offset. By default, the page offset is 0, which means that the first page will be assigned to the first empty page slot. These are the available wildcard characters:? stands for any character * stands for any sequence of characters (even empty) The are the available SmartNames that can be used to create the rule: 10 [BookIndex]: index of the book inside imposition (going from 1) [BookName]: name of the book [Folios]: folio number [ImpositionName]: name of the imposition [JobName]: name of the job [LayerIndex]: index of the layer inside book (going from 1) [LayerName]: name of the layer [PageNames].. A range of page names (folios, for example A,C-E,G)
11 The same rules as for [PageNumbers] are applicable, but now with folios. No prefix like in page numbers is assumed (for example, p12 means page with folio "p12", 01 means a page with folio "01"). [PageNumbers]: a range of page numbers (numbers are going from 1, for example 1-5,7,9-11) A page number can be just a number or a number preceded by "p". For example P23 stands for the 23rd page of the imposition. Page numbers can be separated by one or more commas (",") or ("-") to indicate a range. For example 10,p23-p37. Page ranges can be separated by one dash ("-"). For example indicates pages 10,11,12. If just one page is specified and the file has more than one page, the pages are assigned from the desired page onwards. If two pages are specified (for example p10_p13) but the file has the number of pages equal to the number of pages in a range between the given page numbers (for example, 4 pages for page numbers p10_p13), the given page numbers are assumed as a page range. [PageSlotId]: page slot id (product id) 1.5 Approving and Rejecting Pages You can approve or reject pages or files in different ways: select the file or page and click the approve or reject button in the tool bar. select the file or page, click right and select Approve/Reject... Then select the appropriate status in the pop-up dialog. 11 1

12 1 If you select Automatic as approval type, the approval state will automatically show the result of the approval task (Publish on Web). Choose Manual if you want to set the approval status yourself. Approve approves the selected object. Approve with warning makes it possible to add a comment in which you can indicate what modifications should be made or what should be kept in mind. The comment can be seen in the tool tip when moving the cursor over the warning icon in the Page List. Reject rejects the selected object. Note: Pages can be proofed as such (content proofs) or in their imposition context. Content proofs are more flexible, imposition proofs are more reliable. 12
13 2. Working with Proofs Note: The concepts of Pages, Plates and Proofs only serve in page workflows (commercial printing). 2.1 About Proofs Proofs are preferably made with the ImposeProof! functionality. 2.2 The Proofs View This view is only available in Job mode. It is only used in page workflows. The Proofs View consists of two panes that give a different view on the proof: 1. The Proof Sets pane, where the proof sets are listed. 2. The Details pane is a visual presentation of all proofs of the set. The Proof Sets pane shows you the names of the proof sets, both hard copy proofs and soft proofs, as well as the number of flats, pages, status, the date on which they were last modified and information about the kind of proof that has been made (Content proof if a file is proofed, or Imposition proof if an imp file is proofed). Thumbnails of the proofs can be viewed with the corresponding application, for example Acrobat for PDF proofs. 13 2

14 2 The Info button will open a properties file of that page (proof). See Working with Proofs on page 13 for more information. 2.3 Marking Files As Proofs Proof sets appear in the Proofs View after being 'marked as proof'. The Mark as Proof ticket has to be connected to an export ticket, for example the Export to PDF File ticket. Perform the following steps to make proofs appear in the Proofs View: 1. Select an imposition in the Pages (or Files) View. 2. Click right and select the Export Imposition to PDF File Chain ticket via New Task. 3. Specify the appropriate settings. 2.4 Approving Proofs Setting the approval status of the proof also sets the page state of the corresponding page. This is visible in the Pages View. Approval statuses can be set manually by an operator or via JDF. Please refer to the presentation on JDF for more information. 14
15 Pages can be proofed as such (content proofs) or in their imposition context. Content proofs are more flexible, imposition proofs are more reliable. The main properties of content proofs: Once a page has been proofed it can be moved or copied to any location in the imposition without loosing its proofing and approval status. The order of the pages in the imposition is not checked. The placing (offset and scaling) of the page in its window is not checked. The main properties of imposition proofs: Imposition proofs can only be made after the pages have been assigned to the imposition. Sheet Imposition proofs require large output devices and are harder to check since the pages are not in reading order. ImposeProof imposition proofs put the pages in reading order. This makes it easier to check the order and does not require large output devices. The safety of imposition proofs can sometimes hinder flexibility since the signature of the imposition is also stored and checked. Many times impositions are changed without a consequence for the pages. Reassigning a page degrades the existing imposition proofs to content proofs. Changing the impositions degrades the existing imposition proofs to content proofs. Approval on an imposition proof on a page slot, implies content approval on the page assigned to that slot and thus on all page slots to which this page is assigned. 15 2

16 2 Note: The validity of the proofs is being maintained (based on Smart IDs). When a page is changed, for example renormalized, the related proofs are rejected and get a note "Proof is outdated. The link between the page and the proof is broken, which means that the proof is no longer valid for that page. 16
17 3. Working with Plates Note: The concepts of Pages, Plates and Proofs only serve in page workflows (commercial printing). 3.1 About Plates The Plates View is a view that shows a whole range of details about all plates that are associated with a job. It includes advanced features for managing plates for jobs with multiple versions. It visualizes the corresponding flat for a selected plate along with all relevant sheet layout information (plate size, paper size, etc.). It makes it possible to expose or proof a set of plates with an ink & sheet selection preset according to the chosen plates. It shows progress and status information about each plate. It shows both the expected and the realized plates, so differences between planning and production can be detected. 3.2 The Plates View This view is only available in Job mode. It is only used in page workflows. Note: In a page workflow, the Job's inks are also used to create "expected" separations (and corresponding plates) in the Plates View. This means that an expected separation will be created for each ink and for each sheet. When the assigned pages contain inks that are not listed in the inks list, "unexpected" separations will be created. The Plates View makes it easier to manage the most important deliverables that prepress provides to the press room, plates. It gives an overview of the total number of plates that have to be output. It allows you to track the progress of a Job at a very detailed level. It allows you to easily detect discrepancies between the expected plate output and the supplied data. For example, when a sheet side is supposed to have only a black plate, but one of the supplied pages for that sheet side contains CMYK, this can be easily seen in the Plates overview. The same is true for the inverse situation (for example when an expected Pantone plate is not being realized). 17 3

18 3 See Working with Plates on page 17 for more information. 3.3 Task Status information The Status column is used for progress tracking. It indicates the status of the plate and offers a wide variety of statuses going from Waiting for pages till Plate approved. Every time an action takes place the status column will provide you with the latest information. Delivering: Waiting for pages appears when no pages have been assigned to this sheet side or when the separation has not yet been delivered. Delivered appears if all pages of a flat are delivered. This status only appears when the output prerequisite in the Imposition tab of the Job Setup dialog is set to When all pages are approved. Delivering gives an indication of how many pages have already been assigned to the sheet, and how many are still missing. Not delivered appears if a separation was expected, but is not present in this particular sheet and if there are no empty pages remaining for this sheet. Expected separations are those that are defined in the Inks tab of the Job Setup dialog. By default, this is CMYK. This status only appears when all pages of a flat have been delivered. Approving: Approving Pages can only appear as a status if the output prerequisite in the Imposition tab of the Job Setup dialog is set to When all pages 18
19 are approved. When the option is set to 'When no page is rejected', the status automatically switches from 'Delivering' to 'Ready for ripping'. Ready for ripping will appear if all pages of the sheet have been approved. In case not all pages have been approved, but ripping has been started, the following status icon will be shown: Ripping: Ripping Ripped implies that the rip task ended well. Ripped with warning Ripping failed Plate approval: Plate approved Plate approved with warning Plate rejected:in case new pages have been assigned to a rejected plate and the plate is ripped again, the following status icon will be shown: 3.4 Adding Plates An imposition cannot be added to the Plates View only. The Plates View is always linked to the Pages View.When an imposition is added to the Imposition Gallery of the Pages View, it is automatically added to the Plates View. Likewise, it is removed from the Plates View when the imposition is removed from the Pages View. Modifications in the Pages View (like adding and removing pages, approving or rejecting pages...) will usually have an effect on the Plates View. Modifications in the Plates View will not affect the Pages View. In a JDF workflow the Pages and Plates Views can be populated at the time of job creation if the JDF file contains the relevant information. 3.5 Inks and Plates Adding an imposition to the Imposition Gallery of the Pages View will also create the entries for the Plates View. 19 3
20 3 How the imposition was made is not important in this respect. It can be made interactively in FastImpose, by executing the Create Imposition task or by creating a New Imposition in the Imposition Gallery of the Pages View. All the columns of the Plates View will automatically be filled in. When no pages have been assigned to a sheet side yet the Pages View will show a list of plates that are expected. This list is based on the inks defined in the Job Setup of that job. When no inks are defined in the Job Setup, CMYK is assumed. When all the pages of a sheet side have been delivered, the list of plates for that sheet side will represent the inks of the pages on that sheet side. 3.6 Variant Setup Decisions on which separations are created, which unplanned plates will be created and how the separations are mapped to plates depend on "use case rules". Use case rules are applied when an imposition is synchronized for the first time and again when the user explicitly applies the selected use case to the job. A use case is selected on job level but can be overwritten on imposition level. This section contains the following topics: Variant setup on Job level Variant setup on Imposition or Book level Reapplying use cases You can select one of these "Use Case"s: 20
21 USE CASE 1 : No plate reuse between print runs (no background layer) In this case, there is a separation for every job ink, layer and side of a sheet. Each such separation creates a plate. All layers contain full-colored variants. The English and French versions share the same imposition characteristics but they are printed separately without the reuse of common plates. The files are supplied separately in CMYK. Result: the imposition has 2 layers for 2 variants. The number of plates created is 32: 4 flats x 4 inks x 2 layers. This is the default setting. USE CASE 2 : Background layer contains variant (n variants = n layers) In the example below, the variant ink is black. This means that C, M, Y (or all inks other than the variant ink) are taken from the background. The variant ink is taken only from variant layers. The bottom layer acts as a background layer and contains the common elements of all variants. Plates will be created for the non-variant inks of this layer and can be reused. For every other (foreground) layer, a plate will be created for the variant ink. Files are supplied as full CMYK. Result: there are 2 layers for 2 variants. The number of plates created is 20. Tip: You can opt for this use case if you don't have a FastVariant licence. In this case there's no need to split the incoming files. The English and French PDF file can be assigned to the corresponding layers of the imposition file, and as background layer one of the language files can be reused. USE CASE 3 : Background layer is merged with variant layers (n variants = n+1 layers) The English and French versions are printed with the same CMY plates. When the run length of the first variant is reached, only the black plate is changed. The files are supplied as one file with the common CMYK elements (images, logos...) This file goes into the background layer. 21 3
22 3 Per variant there is one file that contains only the changing black variants (usually just text). These file will be assigned to the language layers that lay on top of the background layer. Result: there are 3 layers for 2 variants. The number of plates created is 20: (4 inks + 1 ink) x 4 flats USE CASE 4 : Background layer is printed separately (n variants = n+1 layers) This case will be used when working with variants on a 5 color press. A complete preprint is done for the images and the black of the text is printed separately for both languages. The bottom layer acts as background layer and contains the common elements of all variants. For all inks of this layer plates will be created, which can be reused. For every other (foreground) layer, a plate will be created for the variant ink. Files are supplied as full CMYK, plus an additional ink for the text. However, this additional ink needs to be combined with the black ink. Result: there are 2 layers for 2 variants. The number of plates created is 20 and not 24 as would have been the case when 5 inks were used. The default selection of use cases is No plate reuse between print runs, which is defined on Job level (Job Setup Imposition tab). The same use case is selected when there is no definition on Job level. The list of variant separations is actually the list of job inks, which corresponds with the Ink Settings parameter of a job. In case a job contains no ink settings, Process CMYK inks are present. Note: When creating multilayer jobs in FastImpose, please make sure that the background layer is always the bottom layer in order to avoid incorrect output when handling variants in Variant Setup on Job level The Variant Setup option on Job level is available in: 22

23 New Job Check the Apply to Existing Impositions if you want to apply the use case to all impositions in the job. Note: The option "Apply to Existing Impositions is only available if there is an applicable imposition in the job. 23 3

24 3 Job Setup Check the Apply to Existing Impositions if you want to apply the use case to all impositions in the job. 24
25 Note: The option "Apply to Existing Impositions is only available if there is an applicable imposition in the job Variant Setup on Imposition or Book level When creating an imposition or book in the Pages View, one of the following dialogs will pop up: Note: Selecting a use case in the Book or Imposition Setup dialog overrules the selection on Job level (not just for a separation or variant, but for the whole imposition). This way, you can have two impositions following different use cases in one job. 25 3
26 3 26

27 3.6.3 Reapplying Use Cases Use cases can be reapplied in two ways. Settings can be changed on book or on imposition level. 27 3
28 3 Note: Selecting a use case in the Book or Imposition Setup dialog overrules the selection on Job level (not just for a separation or variant, but for the whole imposition). This way, you can have two impositions following different use cases in one job. 1. On Book level A use case can be reapplied on book level if the page list has not yet been turned into an imposition file. In this case the imposition level is not present in the Pages View. The Variant Setup option can be found in the Book Setup dialog. 28
29 29 3
30 3 Note: If the imposition has an IMP file associated with it, the Variant Setup is not present in the Book Setup dialog. As the use case has to be common for all books in the imposition, the use case is to be defined on the imposition level. 2. On Imposition level If the imposition level is present in the Pages View, the Variant Setup option can be found in the Imposition Setup dialog. 30

31 3.7 Manipulating Plates 1. Separations need to be exposed together 31 3

32 3 It is not uncommon that two separations need to be exposed together, because the supplied file is not correct. The file can be corrected interactively, but when it is simply a matter of combining two separations on the same plate, it can also be done here. Example: a file contains a designer ink Text which has to be exposed together with Black. This can be done by selecting one of the plates and selecting Add Separation... from the popup menu. 2. There are superfluous separations Sometimes a file contains inks for a special purpose that do not need to be exposed onto a plate for example a designer ink called dieshape. Such a plate can be hidden by selecting Hide from the pop-up menu. In the top right corner of the Plates View there is a toggle with which hidden separations can be shown. This operation can be reversed. When the Hidden separations toggle is on, select the hidden plate (separation?), right click and select Create Plate... from the pop-up menu to turn the separation into a plate. 3. Separations are named incorrectly Some MIS systems do not name spot colors (correctly). In the JDF file, a spot color could be named Spot1, but in reality a designer ink is required. The pages, however, do contain the correct designer ink. This leads to a situation in which there is an ordered plate which is not realized (Spot01) and a plate/separation which is there, but not ordered (Designer Xbed). 32

33 4. Tasks for Page Imposition Workflows We here describe task types that are used in page workflows only. All other tasks are described in the " Complete Manual", in its chapter "Tasks and Workflow Controls". 4.1 Add Marks To Imposition Use this task to add marks to impositions, plates or pages. This task can add marks at these three levels: page sheet section For example, you can add slug-lines to include text at sheet level or page level and collating marks for the entire section. The added marks will be included while exporting the output using the Export Imposition to PDF file task or the Export Imposition to JDF file task. Check Replace existing marks to remove the existing marks before adding the new marks. Note: Existing marks here include the marks defined in the JDF template. Use Add to compose the list of marks. You can choose from the following mark definitions: Trim Mark: Learn more in Adding Trim Marks on page

34 4 Rectangle: Learn more in Adding Rectangle Marks on page 36. Text: Learn more in Adding Text Marks on page 36. Image: Learn more in Adding Image Marks on page 40. Barcode: Learn more in Adding Barcode Marks to Page Impositions on page 41. When you have selected the type of smart mark, a Properties dialog will open where you can define appropriate settings Adding Trim Marks 1. In Add marks to imposition task, click on Add. Check Replace existing marks to remove the existing marks before adding the new marks. Note: Existing marks here include the marks defined in the JDF template. The Add mark dialog will open up. 2. Click on the Trim Mark icon. The Trim Mark Properties dialog opens. 34

35 3. Click the trim marks button located adjacent to the four corners around the page image to activate/deactivate the individual marks. Note: This right hand side of the page image is pointing outwards. 4. Give a Namewhich will be displayed in the Add marks to Imposition task panel. 5. Enter Lengthand Weight of the individual trim mark. 6. Set Offset which is the distance between the trim box of the page and the trim mark. 7. Choose Color for the marks. You can choose from: None : This is useful when enabling or disabling the trim marks using SmartNames. Registration: to choose all inks Darkest: choose this when you want a Color darker than Process Black. Black or Darkest Knockout 35 4
36 4 Note: When creep is applied, set trim marks will move depending on the creep settings of the individual pages Adding Rectangle Marks You can create Rectangle Marks at: page level sheet level section level. Most of the settings of adding a rectangle mark is similar as in Adding Text Marks on page 36. In the rectangle smart option, you can specify the intensity for the chosen color of the mark and its background. This is useful when building control strips using rectangles. 1. In Add marks to imposition task, click on Add. Check Replace existing marks to remove the existing marks before adding the new marks. Note: Existing marks here include the marks defined in the JDF template. The Add mark dialog will open up. 2. Click on Rectangle icon. Rectangle Mark Properties window will open where you can specify the mark settings. 3. Specify the settings as in Adding Text Marks on page Specify an intensity for the Color and Background Adding Text Marks You can create a text mark at: 36 page level sheet level section level.

37 1. In Add marks to imposition task, click on Add. Check Replace existing marks to remove the existing marks before adding the new marks. Note: Existing marks here include the marks defined in the JDF template. The Text Mark Properties dialog will open up. 2. Give a Name which will be displayed in the Add marks to Imposition task panel. 3. Give the specific content by: typing it in using SmartNames by browsing to the file with the intended text. Use the InkNames SmartName in the content to identify the individual printing plates. The text mark will be set for each plate and the SmartName will be replaced with the individual Ink name. 4. Select the level of the smart Mark. In the Attach to field, select from Sheet, Page or Section. 5. Select the Reference to your desired level. You can choose from Paper Plate Trim Box Bleed Box 37 4
 relative to the inner gray rectangle ( your reference rectangle). 7.")
38 4 The reference is the rectangle you will use as a reference to position your mark. 6. Set the Position tool to the precise location of the reference. The Position tool allows you to snap the blue rectangle (your mark) relative to the inner gray rectangle ( your reference rectangle). 7. Click on Size and Margins to define the size and margins of the text mark. You can specify the final dimensions of the mark in this window. The resulting mark will be positioned and rotated using the parameters from the Text Mark Properties dialog. a) Specify a height and width for the text mark. You can either choose Fixed and specify the dimensions or choose Fit to text. b) Set the Clip on level to limit the boundaries of your mark. You can choose to clip the mark at Plate, Paper or Mark levels. c) Select the Margins. These are extra margins on top of the text box height and width. Note: These margins are taken into account for positioning the mark and are included when creating background color. d) Set Alignment to position the text within text box. relative positioning when the SmartName [InkName] is used and multiple text lines are set on top of each other. The Size and Margins window will open up. 8. Choose the Orientation of the text and set the dimensions. Use the orientation mark to rotate your mark. 38
 Click on Collating Properties. The Collating Properties window will open. b) Select the Pattern and Direction of the collating mark from the symbols given.")
39 Specify a vertical and horizontal offset after positioning the mark relative to the reference rectangle. 9. If you have chosen Section in Step 4, you can use the text mark as a collating mark. Enable Use as collating mark. a) Click on Collating Properties. The Collating Properties window will open. b) Select the Pattern and Direction of the collating mark from the symbols given. Alternatively, use SmartNames. c) Specify the Offset which is the distance between two collating marks. d) Specify the Step which is the height of the collating mark. Note: You can pick any mark except a trim mark to be used as collating mark. Use the following settings for a standard collation mark. 39 4
 and use SmartName [Back] from the SmartName category Mark Information. Set afixed height and width for your mark in the S Size and margins window.")
40 4 Position: Place the top center of the mark attached to the top left of the Reference trim box. Set -back as horizontal offset. Enter a hyphen (-) and use SmartName [Back] from the SmartName category Mark Information. Set afixed height and width for your mark in the S Size and margins window. In the Collating Properties, use [Mark Height] as the collating step. Use SmartName [Mark Height] from the Mark Information category as Step Choose the saw tooth pattern. Select down as stepping direction Use vertical text Orientation. Select Registration as background color. Select Knockout as the mark color. 10.Select the Color which is the selection of the color for the text in the mark. Note: This value is ignored if you use the SmartName [InkName] in the Content field. 11.Select a Background Color which is the color of the rectangle within which the text mark is placed. Background color is the color of the rectangle surrounding your slug line, you can influence the dimensions of this rectangle using the Size and Margins dialog Adding Image Marks You can create image marks at: 40
41 page level sheet level section level. Most of the settings of adding a image mark are the same as in Adding Rectangle Marks on page In Add marks to imposition task, click on Add. Check Replace existing marks to remove the existing marks before adding the new marks. Note: Existing marks here include the marks defined in the JDF template. The Add mark dialog will open up. 2. Click on Image icon. Image Marks Properties dialog will open up. 3. Specify the settings as in Adding Text Marks on page 36. In the Image Marks Properties window, you can choose Mapped as a Color. 4. Specify an intensity for the Color and Background Color Adding Barcode Marks to Page Impositions You can create Barcode marks at: page level sheet level section level. 1. In Add marks to imposition task, click on Add. Check Replace existing marks to remove the existing marks before adding the new marks. Note: Existing marks here include the marks defined in the JDF template. The Add mark dialog will open up. 2. Click on Barcode icon. Barcode Marks Properties dialog will open up. 3. Specify most of the settings as in Adding Text Marks on page 36. Note: If you use Registration as the Color, the mark will appear in all the plates you have defined in the plates vieplates View. 4. Click on Select Barcode. This will result in Select Barcode window. 41 4

42 4 5. Specify Barcode Parameters. Note: You cannot choose the barcode type. The default is Code-128 Bar Width Reduction: Use this option to compensate for the ink spreading on the press.. Narrow Bar: Fill this in to change the default size of the bars. Magnification: Use this to make your barcode bigger or smaller than its default size. Add Barcode Text: Select No to remove the text located below the barcode Adding Asir Barcode Marks About Asir Barcodes Asir barcodes are used by Muller Martini collators to make sure books are correctly assembled. The barcodes make sure that the correct sections are assembled in the correct order. These assemblers can both assemble perfect bound as saddle stitched binding styles. Asir barcodes are Code 128 barcodes with special values containing the job ID, section number and the number of sections. Here is an example: Note: Often, multiple Asir barcodes are placed. This is done to increase the success rate of scanning them in dusty environments. Using Asir bar codes The SmartName [Asir code] can be used as content for a barcode mark in imposition workflows. Depending on what section (or sheet) the mark is placed, the SmartName results in a different value. Here is an example of a workflow that places an Asir barcode on each section: 42

43 The workflow starts on the imposition and the first Convert Selection step results in the sections. Then, for each section, the next Convert Selection step results in their pages. Then the Router helps to determine what page to select: the first or the last page of that section. Then the Add Marks To Imposition task adds marks to the selected page. It includes the barcode mark that places the Asir code. Learn more about placing barcode marks in Adding barcode marks to page impositions. 4.2 Add to Pages View The Add to Imposition Gallery task brings IMP files from the Files View into the Pages View. This task will especially be used in workflows or when working with Folder Access Points. The following workflows work in combination with the Add to Pages View ticket. On a PDF file: Copy or Move > Normalize PDF File > Add to Pages View Normalize PDF File > Add to Pages View Right-click the file in the Files View and select 'Add to Page Gallery' from the context menu. On a PDFSC file: Copy or Move > Add to Pages View Right-click the file in the Files View and select 'Add to Page Gallery' from the context menu. 4.3 Apply Creep Use this task to define compensation for 'creep'. When a publication is folded, the bulk of the paper causes the inner pages to extend beyond the outer pages. Creep defines by how much the edges of each inserted spread or signature extend beyond the edges of the one enclosing it. When used correctly Apply creep task will ensure that the pages are correctly aligned after folding. This task works for Perfect Bound as well as Saddle Stitched impositions. Set creep for each new Sheet in the case of Perfect Bound impositions. Apply creep across all sheets in the case of Saddle Stitched impositions. You can apply either outer creep or inner creep depending on the bleed. Use outer creep when there is enough bleed in the back of your pages. This will add bleed to the back of outer pages. 43 4

44 4 Use inner creep when there is not enough bleed in the back of your pages. This removes small strips from the back of inner pages for proper alignment. Creep is applied when exporting an Imposition or Plate to PDF or JDF using the Export Imposition to PDF file or Export Imposition to JDF file You can inspect the results of your Creep settings by using the "Open in Browser" function on an Imposition in the pages view or a Plate in the plates view. Using the Task 1. Go to Plates View and select the Imposition. If you are selecting Pages, go to Pages View and select Page Slots. 2. Specify a Creep Type. Choose from: None Inner Outer Alternatively, choose the relevant SmartName. Note: You need to create SmartNames with values None, Inner and Outer. You can create exceptions to the top level Creep Type for particular Sheets or Pages (like no creep). To do that: 44
45 Select the Page where you want exception to the general Creep Type. Right-click and start a new Apply Creep task. Attention: If you apply higher level creep after setting lower level creep settings made earlier will be overruled. Therefore, first create the higher level creep and then apply exceptions to lower levels. 3. Set the Distance per page depending on the expected shift. Note: You can calculate it as Pi/2 times the thickness of the paper. Note: The distance values gets converted to mm. For example: '0.01 in' the ticket will be returned as '0.254 mm'. 4.4 Assign PDF Pages to RunList Use this task to assign individual pages (for example revised pages, new pages) to an existing Imposition or RunList. You can add pages to a designated slot in a folio or index. The task uses : PDF files Pages Tip: Define SmartNames for Impositions, RunLists, PageSlots and Layers to be used in the Assign Pages to RunList task. This task is best suited in a workflow setting to update specific pages. For example, you can assign pages to an existing pagelist in WebCenter. Use this to automate the re-assigning of corrected pages and the corresponding WebCenter approval workflow. You can either assign a single Page or all the pages using this task. This task has two output pins for assigned and unassigned page slots when used in a workflow. 45 4

46 4 Page Slot Define the designated slot where the pages should be placed Folio Index Fill in the input field. Use a SmartName to indicate the page to be mapped. When you select a single page, it will be mapped to the corresponding page in the existing RunList. When left blank, the page index or folio of the pdf file is mapped onto the corresponding page slot in the runlist. Imposition: Give the name of the Imposition where you want the specific page or all pages to be reassigned. If you leave this on Auto, all Impositions for the current job or workflow (when you work without job context) will be considered for assigning the page/all pages. RunList: Give the name of the RunList in this field in which you want the specific page or all pages to be reassigned. If you leave this on Auto, all RunLists for the current job or workflow (when you work without job context) will be considered. Layers: If you have Layers, give the name of the Layer in this field in which you want the specific page or all pages to be reassigned. If you leave this on Auto, all Layers for the current job or workflow (when you work without job context) will be considered. Allow page Reassignment: Check this to allow to replacement of existing pages and blanks. The task assigns only empty page slots when this toggle is unchecked. Reassign: Use this control to protect pages against unwanted replacement. Choose from the drop-down options: 46 Always, even when approved. Always, except when approved

47 When rejected or approved with warning. When rejected. Never. Note: You cannot assign pages to a locked Imposition. Split your spreads before using this task. 4.5 Change Imposition Layout The Change Imposition Layout task allows you to change the way the imposition is positioned relatively to the paper and plate. This task is typically used when changes on the press need to be made. Since this task can run on impositions as well as sheets, it allows you to change full impositions as well as make exceptions on the sheet level. Since this task does not allow you to change the position of individual pages, it will typically not be useful when you want to change folding parameters. Changing the Plate Parameters The Plate tab allows you to define the plate sizes as well as the positioning of the sheet (paper) on the plate. If you do not want to change the Plate Size or Sheet Offsets, then leave these settings to the corresponding SmartNames. Changing the Sheet Parameters The Sheet tab allows you to define the sheet (paper) sizes and position your imposition on the sheet. 47 4

48 4 If you do not want to change the Sheet Size, Blank Offset or Backing Up method, then leave these settings to the default corresponding SmartNames. The Gripper Margin field allows you to redefine the gripper margin SmartNames for the selected sheet or imposition. The Backing Up drop-down list allows you to accommodate for a change in working method of your printing press. If you change a dual sided imposition into a single sided imposition, the content of the back side will be re-positioned on the front side for Work-and-Turn and Work-andTumble, it will be removed for Simplex. For Turn and Work-and-Turn, the positioning of the back content on the sheet is mirrored horizontally. For Tumble and Work-and-Tumble, the positioning of the back content is mirrored vertically. Note: The task will fail in these cases: 48 If you try to modify a single sided layout (Work-and-Turn, Work-and-Tumble or Simplex) into a dual sided layout (Turn or Tumble), there is no way to generate the content for the back. If you try to change a Work-and-Turn layout into a Work-and-Tumble layout or viceversa, it cannot make a distinction between the content of the front and back to apply the re-positioning.

49 4.6 Convert IMP File to Normalized PDF Use this task to convert your GRS impositions to Normalized PDF impositions. This convert the GRS imposition s template, marks and content to Normalized PDF, and adapts the imposition around it. Overwrite existing files This option determines what the task will do if it finds some of the imposition s files (mark files for example) already converted to Normalized PDF. Select the option to overwrite the existing Normalized PDF files with the new ones generated by the task. Leave it deselected to keep the existing Normalized PDF files. 49 4

50 4 Note: The remaining options are similar to those of the Export to Normalized PDF File task (see Export to Normalized PDF File). 4.7 Convert Selection In page workflows, you can use this task to change your selection in preparation of the next step in the workflow. For example, you can convert some of the layers from an Imposition from the Pages view to a PDF format for proofing before proceeding with the next task. You can convert these formats: PDF Page Runlist Layer PageSlot Imposition Plate into any of these output formats: PDF Page Runlist Layer PageSlot Imposition Plate This task is useful in a workflow when you need a certain file format to continue the flow. You can choose the output format of the task in the Output Format field. 4.8 Create IMP File The Create Imposition ticket makes it possible to create an imposition file simply by selecting an imposition template. The pages selected in the Files View will be automatically assigned to the template. 50

51 In the Pages View, the input will be a book to which you attach an imposition template Settings Select an Imposition Template you previously created in FastImpose. The pages will automatically be assigned to that template. An imposition file can also be used as a template. The pages assigned to that imposition will then be overwritten. Paper: you can either use the width / height from the template you selected, or specify an adapted paper size. Trim: you can either use the width / height from the pages, from the template, or specify an adapted trim size. Fill remaining pages with blanks: In case not enough pages have been selected to fill all pages of the template, the empty pages at the end will be filled with blank pages if this option has been selected. The task will not shrink the template. Extend Automatically: select this option to automatically generate extra sheets in the template if it doesn t have enough sheets for your imposition. 51 4
52 4 Note: To do this, your template must have at least one master sheet, and no more than one exception sheet. The task will generate the number of extra master sheets needed, and use the template s exception sheet if it fits the last sheet of your imposition better Possible Workflows What follows is an overview of all possible situations that can occur when creating impositions. Note: You can start by selecting either a number of files, or an entire folder. In both cases, situations 1 to 3 can occur. As far as the incremental workflow is concerned (see below), only situation 1 can occur when selecting a folder. Possible situations (and their message in the log window): 1. If the number of pages selected equals the number of pages in the selected template, the task will be processed correctly. 2. If fewer pages are selected than there are pages in the template, we call that a page 'underflow'. The task will end with a warning. Log message: Page x in page list remains empty.page underflow in AutoImpose: the template contains x pages, x pages remain empty. The task will be processed correctly if the Fill remaining pages with blanks toggle is selected. Log message: Page x in page list is made blank.page underflow in AutoImpose: the template contains x pages, x blanks are added. 3. If more pages are selected than there are pages in the template, we call that a page 'overflow'. Since the excess pages are not clipped, the task will end with an warning. Log message: Page overflow in AutoImpose: x excess pages, the template contains only x pages. You can also opt to assign your pages in different steps. Do not forget to check the 'Fill page list incrementally' toggle. 1. Select for example pages 1 & 4. The pages will be assigned to pages 1 & 4 of the template (and not to 1 & 2). The task will end with a warning if the 'Fill remaining pages with blanks' toggle has not been selected. Log message: Page underflow in AutoImpose: the template contains 4 pages, 2 pages remain empty. Page 2 in pagelist remains empty. Page 3 in pagelist remains empty. The task will be processed correctly if the 'Fill remaining pages with blanks' toggle has been selected. Log message: Page underflow in AutoImpose: the template contains 4 pages, 2 blanks are added. Page 2 in the pagelist is made blank. Page 3 in the pagelist is made blank. 52
, placed on page 1. 4.")

53 2. Suppose you want to overwrite page 1 of an imposition called Select page 1 again in Pilot and launch with the 1234.imp file as template. Log message: Adding file x to the page list. Page number 1 not free in template, overwritten by page (path), placed on page Create Imposition from JDF Layout This task enables to import a complete imposition including layout and page assignments into the Pages and Plates view. The input file for this task is a JDF Layout file, the output is an imposition object that you can see in the Pages view. Imposition Name: This output file name is also the one you will see in the Imposition Gallery. Page Root Path: Define here the path to the pages referred to in the JDF Layout file. Mark Root Path: Define here the path to the marks referred to in the JDF Layout file. Apply Color Mapping: Enable this option when you want to use the ink mapping scheme as is defined in the JDF file. This mapping can be viewed in Plates View: 53 4
54 4 Note: This option only works when the input JDF file contains a color mapping. The mapped inks will be visible in the Plates View after applying color mapping. However, the inks in the referenced input PDF files will remain the same as before. When you enable Apply Color Mapping in the Export Imposition to PDF file task, the color mapping from the Plates View will be exported to the output PDF file. Re-center pages on trim box: Use this option when you want to reposition the pages according to their trim box. Do not use this option when you want to leave the pages positioned relative to their media box. This behavior is according to the JDF specification. Note: Which mode to use depends on your imposition and page workflow. When in doubt, use this option and check the page positioning in the resulting imposition Create Imposition from RunList You can use this ticket in a workflow to create an Imposition from a RunList. This creates an IMP file from a RunList file. Settings 54

55 Imposition Name: You can use this name to identify the Imposition in the Imposition Gallery Template: You can browse to your JDF layout file here. Note: You can use SmartNames like npages, pageheight and pagewidth to make the selection of the Layout Template dependent on the RunList. Mark Root Path: You have to enter the path to the file with marks referred from the JDF layout. Fill remaining pages with blanks:you can enable this if you want to add blank pages when the layout contains more pages than the RunList. Remove RunList: You can enable this if you want to remove the RunList after it is included in the Imposition. Extend Automatically: Enable this to expand the number of sheets in the template to accommodate for all pages in the runlist. Assembly: Choose from : Saddle Stitch, Perfect Bound, Cut & Stack and Automatic. You can use SmartNames to select an Assembly provided your SmartNames are prepared using the localized assembly name. 55 4

56 4 Attention: All sheets in the template should contain equal number of pages. If Assembly is set to Automatic, the template should contain a minimum of 2 sheets to establish the numbering scheme. Numbering should be consistent across the template when there are more sheets than 2. If the imposition contains print groups of multiple sheets, the renumbering will be at the print group level as that is the logical fold-able unit. If the runlist has layers, individual layers will be handled independently while renumbering. Similarly, independent flats will be added. Optimize Sheet: When Extend Automatically is enabled, you can select and optimize sheets. When this option is set, the task removes the back side of the selected sheet and uses the front side for printing (Work & Turn or Work & Tumble printing depending on your template numbering). Select from : First Sheet, Second Sheet, One but last Sheet and Last Sheet. Note: The works only when the assembly is Perfect Bound or Saddle stitched. Note: Use Optimize Sheetonly when the sheets are filled up to 50 percent or less. You can view the results of this task in the Imposition Gallery Create PDF File from JDF RunList This task uses JDF RunLists to combine individual PDF (one-up) files into one multipage PDF file. You send the JDF RunList to the task, and define where to find the individual PDFs. You can create JDF RunLists using the Split Pages task, or The RunList Editor on page 109. The RunList contains the file names of the files to be joined, their joining order and their original location. One Up Location: Define the location of the one-up PDFs. Choose one of the following options: 56

57 Select Defined in JDF if you want to use the location defined in the JDF RunList, Select Custom Location if you want to specify the one-ups' location yourself. Note: When you choose Custom Location, fill in the location of the Custom Folder. You can browse to it, enter a path or/and use SmartNames. Replace * in File Names By: If you created your RunList manually using the RunList Editor, you may have wildcards (*) in the file names of the PDFs to be joined. For example, the file names in your RunList may look like this: *_01.pdf, *_02.pdf, etc. By filling in the option Replace * in File Names By, you can define the part of the file name that the * matches. Note: The output PDF will not be normalized if: at least one input file is not normalized, at least two input files have different media or trim boxes. The XMP information of the individual PDFs will be merged into the multipage PDF Create PDF File from RunList The Create PDF File from RunList task can be used to create a multipage PDF file containing (a selection of) the pages of a RunList. This is typically done for content proofing purposes. You have the following options in this task: Number of Pages per File: This defines the maximum number of pages after which a new output file will be created. This number is a maximum. When multiple layers are selected, each layer will start with a new file. Apply Color Mapping: This will add and/or remove inks to/from the RunList pages to ensure that your proof will look the same as your sheet output. Note: This option will typically be used in combination with the Apply Color Mapping option in the Export Imposition to PDF File or the Export Imposition to JDF Layout tasks. If your RunList contains marks on page level (like trim marks, page numbers, etc), you can include these marks by selecting the Include page marks option. 57 4
58 4 Add to proofs view: You can optionally add your proof to the Proofs view after it's created. This will allow you to keep an overview of your proofs and ensure that the content of your proofs is consistent with the content of the pages in your Imposition. Note: In case an imposition was defined for the RunList, the trim box from the PageSlots in the imposition will be used. If no imposition was defined, the trim box of the RunList will be used instead. In case a media box was defined for the RunList, this media box will be used. In all other cases, the media box from the included pages will be used. Input and output formats Possible inputs for this task can be: An IMP file An imposition A RunList A PageSlot A layer A plate The output of this task is a PDF file Create RunList With the Create RunList task, you can create a new RunList from one or more uploaded file(s). When you use this task in a job context, the created RunList will be added to the imposition gallery in the pages view for this job. When this task is used in a workflow context, the created Runlist can be used as long as the workflow is running. After the workflow has completed, the created RunList will be removed. 58

59 Note: By default, the source files are not visible in the task window. To see these files, click View > Show Files >. If you want to add more source files, click: File > Select File. 1. Specify the Runlist Name. This name will be visible in the Pages view of the job when the task successfully finishes. If no name is specified, the name of the first source file will be used for this. Caution: If a RunList with this name already exists for this job, it will be overwritten. 2. Specify the Number of Pages in your RunList. If you want to specify the number of pages by specifying the number of pages in the folio ranges (see below), then leave this field blank. 3. If you want to use certain folios for the pages in your RunList, you can build these by clicking on the Folio Names button. The Folio Names dialog will prompt. 59 4
 Choose the desired Number Format for your folio. d) Choose the Number of Pages the folio will run. e) Choose the number of the first folio in the field Start at.")
60 4 4. You can add a new folio range as follows: a) Click on the default Folio Range and click Remove. b) Click on the Add button to add a new Folio Range. The Folio Name dialog will prompt. c) Choose the desired Number Format for your folio. d) Choose the Number of Pages the folio will run. e) Choose the number of the first folio in the field Start at. f) Determine the Prefix and Suffix of the Folio. g) Click Add to add the new folio to the Folio Names dialog list. 5. If all desired Folio ranges have been added, click OK. 6. Specify the vertical and horizontal Finished Page Size (the trim size) of you RunList. 7. You can choose to (de)select one or more of the following options: Unfinished Page Size: This option allows you to set the unfinished page size to be used by proofing and impositioning later on in your workflow. Bleed Box: This option allows you to set the page bleed box to be used by proofing and impositioning later on in your workflow. Art Box: This option allows you to set the art box to be used for page positioning later on in your workflow. For each of these options, you can click on Options... to select the offset values. 8. If you're using single sided printing, deselect the Mirror Page Boxes option. 9. You can specify the Layer Names if you want to create your RunList in multiple layers. For example, to handle language variants with plate reuse. For each comma-separated name, a new layer will be added to the RunList Create RunList from PDF Using this task, you can create a RunList from one or more selected PDF files. A RunList collects the pages from one or more PDF files sequentially to make one final JDF RunList (for example for an imposition). It contains the names of the files to be collected or joined, their collecting / joining order and their original location. Note: The source file(s) can be both normalized and non-normalized PDFs. 60


61 Using the Create RunList from PDF task will copy each page into the RunList. However, if you want to add Folio Names to the pages, change the Finished Page Size or change the Page Boxes, use the Create RunList task instead. Note: By default, the source files are not visible in the task window. To see these files, click View > Show Files >. If you want to add more source files, click: File > Select File. 1. Give a suitable name in the RunList Name field. You can use SmartNames for this. If this task is completed, the result can be seen in the Pages view when working in a job context. 2. If you have language variants, enable Plate reuse between runs. This enables the reuse of the image plates among the language variants. This option will consider each input file as a separate variant, if the number of pages in these files are equal. 61 4

.")
62 4 You should use this in combination with the Variant Separation settings in Job Setup. This will produce a RunList (with multiple layers, if plate reuse has been enabled). Plates will be reused for common images in these language variants. When you create an Imposition from a multilayer RunList, the system will take this into account when creating the plates in the Plates view Create Sheet Report from IMP File Use this task to output your imposition report as a PDF. Note: The report is created in FastImpose, when you make the imposition (you choose a report template). Report Units: You can choose to show the imposition s dimensions in either millimeters or inches in the report. Decimal Places: Choose how many decimal places you want in the dimensions. The report below uses millimeters and 3 decimal places. 62
63 4.16 Export IMP File to GRI File In the unlikely event that some editing is required, this task can export an IMP file to a.gri file that can be opened in PackEdge Sheets 63 4

64 4 Print Mode Select the Press Sheet button to create a.gri file and select the appropriate radio button in the Output Area field to specify the output format. Select One Up to create output of a user-definable size, containing one page per output page. Select Spread to create output of a user-definable size, containing a printer's spread per output page. Front/Back This is only available when Press Sheet is selected. Select the appropriate option to indicate which side of the sheets you want to expose: Front, Back, Both or Both, but reversed. Output Files You can choose how many output files to generate. When Press Sheet is selected, you can generate: One (output file) per Press Sheet Side, One per Press Sheet, All Press Sheets in one file. You can also choose to Reverse Sheet order to generate the sheets in reverse order. When either One Up or Spread is selected, you can generate: 64 One (output file) per Proof Sheet Side, One per Proof Sheet, One per Section, One per Booklet, One per Book.
65 Sheets This is only available when Press sheet is selected. Select the sheets you want to expose by checking the appropriate boxes. If you want to select all sheets, check the file. Layers Check the trim boxes box to expose the trim boxes layer, so that you will be able to see where the sheets will be trimmed. Check the Marks box to expose the layer containing all marks. Check the Pages box to expose the layer containing the pages. Output Area All outputs all elements, even those that are situated outside the plate. Plate outputs all elements within the plate format. Paper outputs all elements within the paper format. Zones outputs all elements within the signature format. Area growth: enter a positive or negative value in the input box to enlarge or reduce the output area formats mentioned above. Select the appropriate unit from the drop-down list. Pages This is only available when One Up or Spread is selected. Check the All toggle to select all pages. Enter the correct Range of pages. All pages in range prints only the pages indicated. Include front and back prints the selected pages and the corresponding front and back sides. Paper This is only available when One Up or Spread is selected. Specify the appropriate paper width and height. When nothing is entered, the size of the file is used when sent to an output device. Other Settings When a one-up is selected, you can enter a BackBleed value to be able to check the bleed in the spine of the book for one-up proofs. Checking the Show ImposeProof numbers box puts a page number on the recto side of the page. Check the Skip administrative cover box if you do not want to have a cover printed, containing administrative information about the job. Checking the Optimize for OutRight toggle makes sure that all pages are incorporated in the file. Note: All data that is outside the clipping masks will be clipped before being processed. This results in better performance and smaller files. 65 4


66 Mockup Check the elements you want to be visible on output and select the appropriate mockup color from the drop-down list to enhance visibility Tiling If the job is too big to fit the selected paper/plate size, it may be interesting to opt for a tiled output. The job will then be exported to a series of smaller pages/plates (tiles). Select No tiling if no tiled output is required. Deselect all toggles to obtain a tiled output, omitting tiles that contain only marks. To include these kind of tiles, select Allow mark-only tiles. Enter width and height of the tiles, and a certain amount of overlap. 66

67 4.17 Export IMP File to JDF Layout The JDF Export task converts IMP files to JDF files, referring to PDF pages. This task combines elements of the Export to PDF File tasks and the Export Imposition to GRI File task. JDF version: JDF 1.2 or JDF 1.3 Pages format: PDF or Normalized File. If you select 'Normalized File', all PDF related tabs will be greyed out. This task offers many tabs: The Output tab is identical to the Output tab of the Export to PDF File task. The Rasterize tab is identical to the Rasterize tab of the Export to PDF File task. The Compression tab is identical to the Compression tab of the Export to PDF File task. The Advanced tab is identical to the Advanced tab of the Export to PostScript task. The Sheets tab is identical to the Sheets tab of the Export Imposition to GRI task. The Mockup tab is identical to the Mockup tab of the Export Imposition to GRI task. 67 4
68 Export IMP File to JDF Post-Press This task creates JDF for cutting and saddlestitching devices, starting from an imposition file. The resulting JDF file will be interpreted directly by cutting machines (like for example Wohlenberg or POLAR-Mohr) and binding machines (like for example the Muller Martini Amrys SaddleStitcher or Heidelberg StitchMaster).The JDF capabilities of finishing equipment vary significantly depending on the supplier and the machine model. Contact your supplier for more information. The aim is to output in JDF all information that can be extracted from prepress and that serves to optimize the production workflow downstream. JDF Version: Select whether you want to generate a JDF version 1.2 or 1.3 file. Export JDF: Indicate what data should be included in the JDF file: cutting, saddlestitching or both. Maximum Trim: If the distance between the edge of the paper and the cut line is smaller than or equals the trim indicated then no cutting will take place Cutting The JDF file generated by the task contains a set of Cut Blocks that the cutting machine needs to cut out of a sheet of paper. 68

69 Sheets: allows you to indicate which sheets must be exported. Sheet Lay: determines how the paper is placed in the feeder.you should indicate the reference edge of the paper relative to the front side of the sheet as seen in FastImpose. Automatic: determines the Sheet Lay by looking at the location of the Side Guide mark. If there is exactly one side guide mark found its location is used. When there is no Side Guide or more than one Side Guide, the Sheet Lay cannot automatically be determined, and consequently an error will be generated. Not Automatic: allows the user to select one of the four corners of the paper as Sheet Lay. Cut Blocks: indicate where the cutting machine will have to cut, on the finished page size of each cell of the signature or on the unfinished signature.cutting on the finished page size of each signature cell is useful when individual elements are combined as flat work, for example postcards or posters. 69 4

70 4 Print: indicate which side will be printed first, front or back Saddlestitching The JDF file generated by the task contains the number of signatures that need to be bound, their size, overfold and number of pages. It also contains information for stitching and trimming. Saddlestitch Staple Shape: Crown, Overlap, Butted, ClinchOut, Eyelet Stitch Width Wire Gauge Wire Brand The Position boxes allow you to indicate the positions of the stiches.positions are measured starting from the trimmed side of the Registered Jog Edge. Stitches will be centered on these positions. Registered Jog Edge 70
71 The Jog Edge is the reference edge of the folded signatures. This is the side that is used to align the different signatures to. Automatic: the smallest of the FastImpose Head and Foot is used as Jog Edge. When the head and foot trims are equal, the FastImpose head is used as Jog Edge. FastImpose Head FastImpose Foot 4.19 Export IMP File to PDF File This task combines elements of the Export to PDF File task and the Export Imposition to GRI File task. See Export to PDF File and Export IMP File to GRI File on page Export IMP File to PDF File Chain This task chain ticket consists of the Export IMP File to PDF File on page 71 ticket, linked to the Mark as Proof on page 79 ticket. The result of the action is a PDF file that can be checked in the Proofs View. Note: This task is used only in page workflows. Depending on where the output file name is specified, in the PDF step or in the Proof step, a different naming mechanism for the Proof Sets is triggered PDF step 71 4
![4 When a task is launched from the Pages or Plates View, the default proof file name is proof_[file]. 4.20.2 Mark as Proof step The default proof set name is: Output file name. extension.](/docs-images/83/88076637/images/72-3.jpg "Use SmartMarks to build up the name or enter it manually. In the Details pane you'll see the original name of the file, including extra information on trim boxes, side, etc. 4.")
72 4 When a task is launched from the Pages or Plates View, the default proof file name is proof_[file] Mark as Proof step The default proof set name is: Output file name. extension. Use SmartMarks to build up the name or enter it manually. In the Details pane you'll see the original name of the file, including extra information on trim boxes, side, etc Export IMP File to PostScript File This task combines elements of the Export to PostScript File task and the Export Imposition to GRI File task Export Imposition to JDF Layout Use this task to export an Imposition, RunList, Layer, Plate or Page item to JDF Layout and JDF Runlist format. This task will send an Imposition or a part of an Imposition to a workflow that requires JDF Layout as input. The JDF Layout contains a JDF RunList which you can use in the Join Pages task to produce a multipage PDF book for getting approval. Apply Color Mapping: You can enable this to export the layout file with the same color mapping as defined in the Plates view. 72

73 Check page status: You can use this option to check if the approval status of the pages is compliant with the Job setup settings. The task will fail if it is not compliant Export Imposition to PDF File This task exports Imposition, RunList, Layer, Plate and Page formats to PDF format. Number of Flats per File: You can use this option to specify how you want to split the output file. One sheet side of an Imposition is considered as a Flat. If you enter 0, the output will be one multipage file. If you enter 1, the output will be two PDF files containing front and back sides separately. For each sheet in the Imposition, there will be two PDF files like this. If you enter 2, the output will contain front and back side together in one PDF file with two pages. This will be the outcome for each sheet in the Imposition. Page Label: The page labels as they will appear in the output file(s). Note: You can here insert SmartNames from the categories Page Information and Plate Information. Apply Color Mapping: You can enable this to export the layout file with the same color mapping as defined in the Plates view. Check page status: You can use this option to check if the approval status of the pages is compliant with the Job setup settings. The task will fail if it is not compliant Export to PDF File Chain Note: This task is used only in page workflows. This task chain ticket consists of the Export to PDF File, linked to the Mark as Proof ticket. The result of the action is a PDF file that can be checked in the Proofs View. 73 4

74 4 Depending on where the output file name is specified, in the PDF step or in the Proof step, a different naming mechanism for the Proof Sets is triggered PDF Step When a task is launched from the Pages or Plates View, the default proof file name is proof_[file] Mark as Proof Step The default name of a proof set is: Output file name. extension. Use SmartNames to build up the name or enter it manually. The Details pane of the task mentions the original name of the file, including extra information on Trim Boxes, side, etc. 74

75 4.25 Import JDF Layout The JDF Imposition task handles JDF files generated by JDF compliant imposition programs. It imports the JDF layout into Esko native files. The JDF file is a low level JDF file, which means that the delivered imposition is a flat imposition and thus no longer editable. will handle this kind of JDF file as a GRx file. The JDF file contains two parts: 1. A page list, referring to PDF or PostScript files. 2. Geometrical layout info. The JDF Imposition task converts all PDF and PostScript files and creates 1 GRO file per sheet side. This ticket s tabs are identical to those in the 'Normalize PostScript/PDF/Illustrator 8.0 File' task. The Sheets tab differs a little from the Sheets tab of the 'Export Imposition to GRI File' task, but has the same functionality Sheets Indicate of which pages you want to import the JDF layout. For the front as well as the back sheets, you can either select all pages or choose for a range of pages Import JDF Stripping Concept In an MIS system, Customer Service Representatives create quotes for your customer. This calculation includes a lot of parameters: size of pages, number of pages, size of press sheet, which substrate, which press and folding machine, etc. 75 4

76 4 This high-level description of the product also includes a basic description of the imposition. Using JDF "Stripping", an MIS system can provide a prepress system with a rough description of the press sheet geometry. It is then up to the prepress system or operator to refine this data and add any still missing data. This task reads the JDF file and allows to add decisions on signatures and positioning. Several other imposition settings are not visible in this task because they are fixed in the JDF file (for example finished and unfinished page properties). The result of this task is an empty imposition (IMP) file. Part A JDF file can contain several Parts, for example its 'cover', 'pages', 'insert'. You here choose if you want to strip only a specific part (select its number) or 'All parts' (in which case only the tab 'Other' is available) Sheets These settings are read from the JDF file: Name: The name of the sheet. WorkStyle: The 'work style' for the specific sheets: Sheetwise, Work&Turn, Work&Tumble, etc. Paper: The dimensions of the paper on which will be printed. Press: The type of press on which the sheet will be printed. The Plate settings have to be set in this ticket:. 76 When no specific plate is selected, the values for the Master are taken into account, which is Auto in the example above. 'Auto' refers to the 'Auto' value in the tab 'Other'.


77 Master indicates that the same plate will be used as the one indicated on Master level. In the example below, the plate 'SheetFed-1030x750' will be used for both sheets: Assembly Type: This is read from the JDF file. Template: Select the correct template for this assembly type: Auto, nobinding, perfectbound, saddlestitch or browse to an *.ass file Other Auto Rules When 'Auto' is selected in the Sheets tab, you here indicate which Plate or Assembly template should be used. These names are typically defined via SmartNames. Click to open the list of available SmartNames. Choose a Category. Select one to read a short description at the bottom. Learn more in the chapter SmartNames. 77 4

78 4 Positioning of signatures Indicate how the signature should be positioned on the paper. Vertical Expert: Positions the signature so that the bleed margin coincides with the gripper in a 'turn' workflow. In case of a 'tumble' workflow, the signature is positioned in the center of the paper. Center in paper Use bottom of paper as origin. Horizontal Expert: In case of a horizontal positioning, this option is identical to the Center in paper option. Center in paper Use left side of paper as origin. Search for ProductID of plates Select this if you want the task to search for Plate Product IDs in the JDF. You can then use this Plate Product ID as a text or barcode mark on the plate. 78
 to PDF File task.")
79 4.27 Mark as Proof Note: This task is used only in page workflows. This task is used to make the proofs appear in the Proofs View. It can only be used in a workflow, for example in combination with the Proof (Imposition) to PDF File task. offers a ready-made Export Imposition to PDF File workflow ticket, which contains the export ticket, linked to the Mark as Proof ticket. The Proof Set Name will by default be indicated as [File].[File Type], but can be adapted with SmartNames or other text Print IMP File This task is a combination of the Print task and the Export Imposition to GRI File task Proof IMP File (FlexProof) This task is a combination of the Proof (FlexProof) task and the Export Imposition to GRI File task Publish Imposition on WebCenter Chain You can publish your Imposition to WebCenter using this task chain. You can then approve/ reject pages in WebCenter. The input of this task can be an Imposition or a RunList. If you want to approve the RunList before adding a layout you can use this task to publish a Runlist on WebCenter. 79 4


80 4 Your approval in the WebCenter is registered in the Pilot's Proofs view. You can proceed with these proofs in the workflows. This ticket has two subtasks(steps): Publish Imposition on WebCenter on page 80 Send RunList to WebCenter on page Publish Imposition on WebCenter Mockup In this tab, you can check the elements you want to be visible on output and select the appropriate mockup color from the drop-down list to enhance visibility. 80


81 Publish Allow Viewing and Annotating in WebCenter The files will be processed by and uploaded to WebCenter according to the settings for resolution and image processing. Resolution for non-images for linework and text etc.. can be set to either Optimal or Custom. Optimal: If you select this, will calculate the best resolution based on the size of the file. Custom: You can specify the required resolution. 81 4
82 4 For images, the maximum resolution available will be used. Anti-aliasing: You can enable this image correction option to relevant objects. Anti-Aliasing smoothes the staircase effect you get in the generated CTs of line art objects that need preprocessing. Allow Downloading in WebCenter You can select which kind of files you want to make available for downloading in WebCenter here: Input files PDF files for proofing. You have to choose which Ticket should be used to generate the PDF files. Note: If you select PDF files for proofing the viewing quality will be limited to the resolution of the PDF files for viewing Send RunList to WebCenter Destination You can select the WebCenter settings. Site: You can indicate to which site you want to upload the documents. The sites available are the ones defined in Configure. Project:You can indicate the name of the WebCenter project to which the imposition will be published. Tip: Use [JobName] as project name to map the jobs in to the projects in WebCenter. 82
83 Note: The project does not have to exist in WebCenter at upload time. If the project does not exist, it will be created in WebCenter. The person that does the upload needs to be Project Manager in WebCenter to be able to create a project in WebCenter over the upload. Folder: You can indicate in which folder the documents should be stored. Document Name: You can set the name of the published document and this setting allows to have documents published with a name which is different from the name of the published file. Document Description: You can enter a description about the document which will be available in WebCenter. Project Template: Here you can enter the Webcenter Project Template. You should have created this project template in WebCenter prior to using this ticket. User Name: Enter your WebCenter user name to gain access to the site. User name and password are used by WebCenter to check if the operator has the right to publish in the specified project. Password: Enter your WebCenter password to gain access to the site. Note: You can use SmartName in most of the fields. Approval The Approval tab allows you to select if and when the approval cycle should be started on WebCenter. Note: Make sure you have an approval cycle set up in WebCenter!You can do this by setting up an approval cycle in a project template, and creating your the project from this template. Select the Start the Approval Cycle option if you want the approval cycle to start automatically as soon as the file is uploaded to WebCenter. If the user you logged in with in the Destination tab has the Change Approval Setup permission in WebCenter, you can also set the approval Due date. You can choose: today, tomorrow, today + x days (then define the number of days in the x = field that appears), job due date, other... (then enter the due date or select it in the calendar). You can also select the hour at which the cycle should be completed (except when using job due date). 83 4
84 RIP IMP File to Screened and Unscreened Tiff File This task is a combination of the RIP to Screened Tiff File task and the Export Imposition to GRI File task. 84
85 5. Review and Approval of Page Impositions using WebCenter This chapter is specific on publishing page impositions to WebCenter. For all other generic documentation on integrating and WebCenter, we refer to Integrating with WebCenter. 5.1 WebCenter Setup In WebCenter, you need to set up a Project Template with Approvers. You will use this template in when sending impositions: it will allow you to create new WebCenter Projects (already containing your Approvers) as needed, directly from. Note: Alternatively, you can set up a WebCenter Project with Approvers in WebCenter, and send your impositions to it from. But then you will only be able to create new Projects from WebCenter and not from. 1. Create a new Project. 2. Add Members to the project. 3. Choose Approvers from within the Project s members. 4. Save the Project as a Template Creating a New Project 1. Log in to WebCenter as a user who is a Project Manager. 2. Click Projects. The Favorite Projects page is shown. 3. Click Create New Project at the top right of the page. 4. Choose Start from a Blank Project and click Continue. 5. Enter the name for the Project in the Project Name field. To make another user or user group the Project Manager for this project, select his or her name, or the group name, from the Project Manager list. If you want, enter a description in the Description field. To make the Project active, set the Status as Active. To specify an optional due date, click the calendar control at the end of the Due On field and select the desired due date. To set the due time, click the drop-down list box to the right of the calendar control. 85 5

86 5 Note: This is not the Approval Due Date. You will set the Approval Due Date when setting the Approval Cycle. To use a custom thumbnail, click Change and enter the complete path and file name in the associated field or Browse for it. To use the default thumbnail, leave that choice selected. 6. Click Create Project. The Project is created Adding Members to a Project 1. Once the project is created, click Members > Add Members. 86


87 This shows a list of the current WebCenter members. 2. Select the users or groups to add as members and click Continue. 3. Set the members permissions as desired. For Approval tasks, members need at least View permissions (selected by default). Note: The permissions you set here apply to all members you have just added. 4. Click Finish. 87 5
 must approve the document before it gets the approved")
88 5 5. Once the members are added, click Go back to the project Adding Approvers to the Project Approvers can be either regular users or they can be user groups. When you add a group as an approver, you must indicate whether: all the members of the group (select the group entry labeled as whole group) must approve the document before it gets the approved status, or whether the approval of a single group member (select the group entry labeled as one of group) will set the document to approved status. Note: You can only change (add or remove) Approvers when the Approval Cycle is stopped. 1. In the Project Page, click Approval. 2. Click Setup Approval. 3. Open the Add approver list, and select the individual users or the groups you want to add. Tip: Use Ctrl+Click to select multiple members. Note: The Project Manager is not automatically made an Approval User and must be explicitly added to the list of Approvers. 88
 Log out. b) Log back in with an Administrator user. c) Go back to your Project page. 2.")
89 5.1.4 Saving a Project as a Template Note: To save a Project as a Template, you need have Administrator permissions. 1. If the user you are logged in with is not an Administrator: a) Log out. b) Log back in with an Administrator user. c) Go back to your Project page. 2. In the More actions menu on the left, click Save as Template. 89 5

90 5 3. Enter the Template Name (different from your Project Name) and a Description. To use a custom thumbnail, click Specify New Thumbnail and enter the complete path and filename in the associated field or Browse for it. To use the default thumbnail, leave that choice selected. 4. Click Finish. The Template is created Configure Workflow Approval and Tunnel Clients When WebCenter and are not on the same LAN, this workflow approval and tunnel client will establish a bi-directional communication. Note: The Pilot needs to have the workflow approval client credentials to send messages to WebCenter. This is configured through Admin > Configuration > Workflow Approval Clients in WebCenter, and, in the case of, in Tools > Configuration > Web Sites in the Pilot. Attention: Configure the WebCenter account first so that it can be tested from within the workflow approval server. WebCenter and the workflow approval server must use the same user name and password! This is completely separate from a normal WebCenter user. Workflow approval clients may not log in to WebCenter. 90

91 Two manual configuration steps must also be performed outside of WebCenter to ensure proper communication between the workflow approval client and WebCenter systems that are not on the same LAN Create a Workflow Approval and Tunnel Client 1. Click Admin > Configuration > Workflow Approval and Tunnel Clients. 2. Click New Workflow Approval and Tunnel Client. 3. Enter the User Name and Password for the workflow approval client user. 4. Click Create. Note: If you have several, Nexus, or Odystar sites communicating with WebCenter, you need to create a separate Workflow Approval Client for each site. 5.2 WebCenter Sites This item serves to configure links from to WebCenter sites. read Website: Specify the web address of the WebCenter site. After you entered the WebCenter address, click Open... to check if the WebCenter site is up and running. If you are redirected to the login page, it means that the address is correct and that the site is up and running. Tip: Be aware that this address is also the address that will be included in the notification s when adding links to documents (approval cycle start ). You should therefore make sure that the address can be accessed from the outside. Make sure to not use an internal address, but one that you want your (external) users to use when they use WebCenter. WebCenter and are in the same LAN 91 5
92 5 Select this toggle if this is true. This will most likely be the case. Deselect this toggle if WebCenter and are remote. Note: How can you verify if these two systems are in the same LAN? They are in the same LAN when you can connect from WebCenter s application server, this is the system where JBOSS is installed, to an Job Folder with the credentials of the System Account (by default the user BGSYSTEM or the one you changed it to using the System Account page in the Server Web page). WebCenter's Approval Client: If WebCenter and are not in the same LAN, you first need to create an Approval Client in WebCenter. This is necessary to give Automation Engine permissions to listen to the approval messages that are stored in WebCenter. Tip: If the Approval Client does not exist yet, follow these steps: 1. In WebCenter, log in as Administrator. 2. Go to the Admin section. In Configurations, select Workflow and Tunnel Approval Clients. 3. Click the link New Workflow and Tunnel Approval Client". 4. Enter a User name and a Password for the client. Mind that this is also the user name and password that have to be entered when configuring the WebCenter site in. Fill out the client Name and Password and click the Check Connection button. This will check if the user can log on successfully. The Info button displays the following information: In case and WebCenter are not in the same local area network (LAN), the retrieval of the approval results is secured by a name and password. The name and password specified in must match the name and password specified in WebCenter by the WebCenter administrator. When clicking the 'Check' button, the WebCenter version will be checked and the name and password will be validated by WebCenter. Check Connection When you click this button, you should, after a few seconds, get a window saying Check OK". The software version of that WebCenter will also be mentioned. Note: The button will check the validity of the user name or password to connect to that WebCenter but not of your WebCenter s Approval Client. Note: When you connect to a secured WebCenter site (for example one that uses then you have to export its security certificate and import it on the server. If this is not done, publishing from to WebCenter will result in an error. Learn more on how to do this in the chapter Install SSL Certificates on the Workflow Production Server of the WebCenter documentation. 92
 you want to upload.")
93 Tip: After configuring a new WebCenter site, it is recommended to close your Pilot and start it again in order to see the updated list of WebCenter sites in your tickets. 5.3 Sending an Imposition from to WebCenter Preparing the Imposition 1. In the Files view, browse to the FastImpose imposition file (*.imp) you want to upload. Note: The imposition file must be part of a job. 2. Right-click it and select Add to Imposition Gallery from the context menu. When you switch to the Pages view, you can see your file in the Imposition Gallery. 3. If the imposition doesn't show the pages preview (as in the previous example), add them as follows: a) Click on the first page's file name in the Page Gallery. This shows the page's preview in the Details area at right. b) Drag this preview onto the first page of the imposition in the Page list area. c) Repeat this for the other pages of your imposition. 93 5
94 Sending the Imposition to WebCenter If your imposition contains several books, you must send the books one by one to WebCenter. Each book will be shown as a Page List in WebCenter. 1. In the Imposition Gallery, right-click the imposition (or the book) and select New Task > Prepare Imposition for WebCenter Workflow. If the Prepare Imposition for WebCenter Workflow task does not appear in the context menu, choose More Tickets and select the task in the Select Ticket dialog. 2. Modify the settings of the Prepare Imposition for WebCenter step (the first step in the workflow) if needed. 3. In the Send Imposition to WebCenter step, modify the settings of the Destination tab (you can use SmartNames where indicated by the SmartNames button): a) Select your WebCenter Site from the list. b) Enter the name to give to your Project. will create this project in WebCenter, from the Project Template you specify below. Note: You can also send your imposition to a Project already existing in WebCenter. In that case, you don t need to enter a Project Template. Note that this Project must have Approvers defined in WebCenter. c) If you want to send your imposition to a subfolder in the project, enter that Folder s name. If this folder doesn t exist in the template (or project), will create it. d) Enter the name to give to your imposition Document. This is the name that will be shown in WebCenter. For example you can use [ImpositionName]_[BookName]_[LayerName]. e) Enter the Project Template to use to create your WebCenter project. Important: This Project Template must be defined in WebCenter. See WebCenter Setup on page
 Enable Start the Approval Cycle. b) Select a Due date and time. 5.")

95 f) Enter the User Name and Password used to connect to your WebCenter site. You can use an Encrypted password or SmartNames. 4. Modify the settings of the Approval tab: a) Enable Start the Approval Cycle. b) Select a Due date and time. 5. Click the Launch button in the top left corner to upload the imposition to WebCenter. Note: If you don't start the Approval Cycle from, you will still be able to start it from WebCenter, and view the approval results in. For more information, see the WebCenter manual. 5.4 Approving the Imposition in WebCenter In WebCenter 7.1, you can: 95 5
96 5 Approve / reject documents sent from Odystar, Nexus or as regular documents (see Approving a Document on page 96). Approve / reject documents FastImpose impositions added to the Pages View in as regular documents or Page Lists (see About Page Lists on page 97 and Approving a Page List on page 97). When approving a Page List, you can: Approve / reject not only the whole multipage imposition but each individual page. Update and have version control not only on the whole multipage imposition but on each individual page. Note: Only FastImpose impositions that have been added to the Pages View in Automation Engine are recognized as Page Lists in WebCenter. Multipage files uploaded from within WebCenter, or from Odystar, Nexus, or even other documents will never be treated as Page Lists. Instead, they are considered regular multipage PDF documents. When approving a Document, you can: If you are an Approval User: Approve the document, Reject it, or leave it Pending to approve / reject it in the future. If you are a Project Manager: Approve or Reject the document, leave it Pending, or Force Approve / Force Reject it if you need to overrule the approval status granted by the approval users. Note: For more information about Forced Approval or Rejection, see the WebCenter manual Approving a Document Documents waiting for your approval are shown on My To Do List under My Work. If you are an Approval User, do the following to Approve or Reject a document: Note: You can also approve or reject documents in the Viewer. 1. Click Approve/Reject at the end of the Approval field in the document header. 2. Choose the desired Approval Status from the drop-down list: Approved indicates approval; Pending indicates future Approval or Rejection, and Rejected indicates disapproval. 96
97 3. Once you choose Approved or Rejected, you may not change the status later; a view-only version of the page will be shown showing the choice you picked. Only a Pending status allows future changes. If you want, you can add a comment in the Comment field. Submitted approvals and comments are shown on the Action History page. 4. Click Finish to change the status of the document. To cancel the changes, navigate to another page without clicking Finish. 5.5 About Page Lists What is a Page List document? Page Lists are a special type of multipage PDF documents in WebCenter that represent imposed books or magazines. As such they are an important tool for commercial printers. Page Lists are uploaded from a production server using the Pages View in the Pilot. Note: Only FastImpose impositions that have been added to the Pages View in Automation Engine are recognized as Page Lists in WebCenter. Multipage files uploaded from within WebCenter, or from Odystar, Nexus, or even other documents will never be treated as Page Lists. Instead, they are considered regular multipage PDF documents. Page List documents have two major advantages over other multipage PDF files: You can upload either the complete document, or specific pages only (for example, pages 6-12); individual pages can be approved or rejected in WebCenter (for example, you can approve pages 3, 5 and 7-16 of a 16-page Page List). Note: A multipage PDF file can only be approved or rejected as a whole. Working with Page Lists Page List documents are displayed as a single document in document lists. Click the Page List name to view its pages and details in the dedicated Page List views. Note: Page Lists cannot be downloaded Approving a Page List In order to approve your imposition as a Page List in WebCenter, you need to first login to WebCenter as an approver, then navigate to the document (Page List) to approve, in the project created from. You can also access this Page List from the link in the approval notification , if you received one. Make sure you have the correct permissions to approve documents in WebCenter. For more information, please see your WebCenter manual. 97 5
 In the Approval area in the sidebar on the right of the Viewer window, select the appropriate approval state (Approved, Rejected, Pending) from the list.")
98 5 You can choose from a number of different methods to approve the pages in a Page List: Use the WebCenter Viewer: a) In the Project, click on the Page List's thumbnail image. The Viewer opens, displaying the Page List. b) In the Approval area in the sidebar on the right of the Viewer window, select the appropriate approval state (Approved, Rejected, Pending) from the list. The Approval dialog opens in which you can add approval comments. c) Enter your comments, provide your password if required and click Commit. Note: You can approve / reject one page at a time, or all of the document s pages (using Apply to all pages). Use the Page Gallery view: a) In the Project, click on the Page List's name. The Document Details page appears. b) Select Page Gallery from the menu. c) Select the pages you want to approve and then click Approve/Reject. You can also use Approve/Reject all Pages. d) Enter your comments, provide your password if required and click Commit. Use the Page List view: a) In the Project, click on the Page List's name. 98
 Enter your comments, provide your password if required and click Commit.")

99 The Document Details page appears. b) Select Page List from the menu. c) Select the pages you want to approve and then select Approve/Reject from the gearbox menu. You can also use Approve/Reject all Pages. d) Enter your comments, provide your password if required and click Commit. Use the Approve/Reject link on the Document properties page to approve all the pages at once. a) Enter your comments, provide your password if required and click Commit. 5.6 Sending a RunList / PageList to WebCenter You can send a RunList from to WebCenter without having to create an Imposition. The resulting PageList will have pages in the right order. These pages are sent to after approval. In PageLists, information such as Sheet info is not available. Use this workflow if you want to send pages to WebCenter in the right order to get them approved. Note: Unlike sending impositions, you still need to position them afterwards. 99 5
100 5 The uploaded PageList in WebCenter takes the Sheet Name NoImposition. The Sheet Name and the Sheet Side will always be Preparing a RunList Context for the current task Run the Create RunList task on a multipage PDF file. Remember to enter a name for your RunList. If the Name field is left blank, the task uses the file name. Read more about the task settine in Create RunList from PDF on page 60. A RunList is created and shown in the Imposition Gallery. Switch to the Pages view to see the RunList and its pages Sending A RunList to WebCenter 1. In the Pages View, right-click the RunList and select New Task > Publish Imposition on WebCenter. 2. Modify the settings of the Publish Imposition on WebCenter chain task. Read more in Publish Imposition on WebCenter Chain on page Click the Launch button in the top left corner to upload the RunList to WebCenter. Note: If you don t start the Approval Cycle from, you will still be able to start it from WebCenter, and view the approval results in. For more information, see the WebCenter manual. The RunList will be uploaded to WebCenter. If approval is required the approval feedback is visible in page and proofs views. Note: In the pages view, the approval status is indicated in a color on top of the page. When you hoover over the page, the details of the approval becomes visible. 5.7 Checking the Approval Results in Automation Engine To view the status of documents in a WebCenter Approval Cycle in, you can use either: 100 the Pages View, the Proofs View,

.")
101 the WebCenter View In the Pages and Proofs Views Go to the Pages or Proofs View to view the approval status of each page of the imposition. In the Pages View: In the Proofs View: Note: When you try to expose a sheet that contains a rejected page, you will get an error in the Expose task and an error status in the Plates View. If you really need to expose the sheet anyway, you can overrule the WebCenter approval status from (see Overruling the WebCenter Approval on page 104) In the WebCenter View In the WebCenter View, you can view the approval status of the whole imposition

102 5 Important: You need to first set up the WebCenter View before you can view all the approved / rejected documents in the WebCenter project you created. 1. Right click the WebCenter View s background and choose Configure. 2. Enter the URL of your WebCenter site. 3. Enter the User name and Password used to connect to your WebCenter site. 4. In Project Name, enter the name of the WebCenter project you sent your imposition to. You can use SmartNames. Important: Make sure this matches the Project Name of the project you created (or used) when sending your imposition from to WebCenter. See Sending the Imposition to WebCenter on page To check that the information you entered is correct and that the WebCenter server is running, click the Retry Connection button at the bottom of the view. You can also use the link at the top of the view to open the web page of the WebCenter project. 6. Once you have checked that your configuration is correct, use the Save to Configuration button to save it. Once it is saved, you will be able to return to this configuration using the Load from Configuration button after any unwanted change. 7. Click the Show Documents button to view the documents in your WebCenter project. 102

103 Note: If at least one page of the imposition is rejected, the status of the whole imposition is Rejected Possible Document Statuses This icon... means that... the page and the original imposition layout have been approved by all approvers. Note: The imposition layout can be approved even if some of its pages are rejected. the page has been approved by all approvers, but it may have changed the imposition layout, which needs to be checked (for example for a new page replacing a rejected one). the page or the whole imposition has been rejected by at least one approver. the page or the whole imposition has yet to be approved or rejected by at least one approver. When you hover on the top of a page in the Pages or Proofs View, you can see: the approval status, any comment entered, the date and time of the approval, 103 5


104 5 the WebCenter user who approved/rejected the page. 5.8 Overruling the WebCenter Approval After your imposition has been approved or rejected in WebCenter, you can still overrule the approval status of some of the pages in, if necessary. 1. In Pilot, go to either the Pages or the Proofs View and locate your imposition document. 2. You can either: Select a page of your document and use the and buttons in the View s toolbar to approve/reject the document without entering a comment. Right-click on a page of your document and choose Approve/Reject... to open the Approve/Reject dialog where you can enter a comment. 3. In the Approve/Reject dialog, select Manual as Approval Type. 104
105 4. Choose to either: Approve, Approve with warning, Reject the document. 5. Enter a Comment if you wish and click OK. Note: You can hover on the top of a page to view approval information, whether it has been approved/rejected automatically in WebCenter, or manually in
106 6 6. Integrating with Third Party Imposition Systems enables working with non-esko imposition systems. These tasks import or export industry standard file types to or from the Impositions in the Pages and Plates views. You can check or change (approval) statuses, assign pages and select elements for further processing or output in the Pages and Plates views in. 6.1 Workflows: The bigger picture You can find a schematic overview of how impositions can be created, processed and exported below. The tasks highlighted in green are new in 12. You can import populated or unpopulated impositions from applications that produces JDF layout file as its output. Some of the applications that can write a JDF Layout file are Kodak Preps, Litho Technics Metrix, Ultimate ImpoStrip, Dynagram Inpo2, Dynagram Dynastrip, Plato and Pandora. 6.2 Importing and Creating Impositions You can import the JDF Layout and use the Create Imposition from JDF Layout task to bring the Imposition to the Pages and Plates views in. If you start with a PDF file or a JDF Runlist, you can use the Create RunList task to create a Runlist in. Subsequently, you can use the Create Imposition from RunList task to create Imposition from this RunList. It is possible to separate the creation of a RunList and the creation of an Imposition from that Runlist in time. In some cases printers prefer to let the RunList be approved and corrected before they select the layout and create the Imposition. 106

107 You can achieve this by using two workflows. 1. Assemble the RunList and send it for approval. 2. Create the Imposition from the RunList and export it: Read more about the new importing and creating tasks in the Reference Guide: Create Imposition from JDF Layout on page 53 Create RunList from PDF on page 60 Create Imposition from RunList on page 54 General Remarks Note: File Compatibility JDF layout files: tests have been done with Preps, Metrix, ImpoStrip, InpO2, DynaStrip, Plato and Pandora. PDF files: Normalized as well as non Normalized files can be used in the Imposition workflows. However, third party rips and workflows do not support external images. Note: Thumbnails in the Pages and Plates views are only shown when the pages in the files contain thumbnails. If you have no thumbnails in your PDF files, you can speed up the system.you can also save some screen space by hiding the details pane and by switching to list mode. 6.3 Exporting Impositions You can use Export Imposition to JDF Layout task to send an Imposition or part of an Imposition to another workflow system or to a Rip that is compatible with JDF layout. The output is JDF layout containing a JDF runlist. You can create a runlist for the Join Pages task using this output. This allows you to create a multipage PDF file to send to your customer for approval. It can be used to drive the FlexRip when followed by the Import JDF Layout task
108 6 You can send an Imposition or part of an Imposition to a PDF Rip (for example Nexus Rip) using Export Imposition to PDF task. The output will be a PDF file containing the Imposition. More info regarding these exporting tasks in: Export Imposition to JDF Layout on page 72 Export Imposition to PDF File on page Workflows with Selection and the Convert Selection tasks Page, RunList, Layer, PageSlot, Imposition and Plate are abstract file types that do not correspond directly to a file. They can be used as entities in a workflow to route the elements you want to process through the workflow. For example, you can import an Imposition and preflight all the PDF files referred from that Imposition. The workflow below accepts a JDF Layout as its input, selects the PDF files referred in the JDF file and waits until all of them pass the preflight check before producing outputs as sheets to a PDF file. You need to convert the Selection to a PDF before Preflight. Read more about Convert Selection task in Convert Selection on page 50 the Reference Guide. 108
109 7. The RunList Editor The RunList Editor allows you to create and modify RunLists. A RunList is a file used to collect several files into one job folder, or to make one final PDF out of several smaller PDFs (for example for imposition). It contains the names of the files to be collected or joined, their collecting / joining order and their original location. You can use this for example with the Wait for Files (via JDF) task. If you want to collect a number of files with different file names, you can create a RunList referencing those files, and feed that RunList to the Wait for Files (via JDF) task. This tool is one of the client tools that you can download with the Server Web Page. Open this Server Web Page by entering of your server> or <name of your server>:9999 in the address field of your browser. You can find this tool in the section Client Apps, in the page Tools. 7.1 Setting Up the RunList Editor 1. Install the RunList Editor on your client machine (where the Pilot is installed): 2. On Windows: 1. Open an Explorer window and type the following in the address bar: \\Automation Engine Server Name\ 10.1 Windows Client (where Server Name is the name or IP address of your Automation Engine server). 2. Copy RunList Editor exe on your client machine. 3. Double-click the exe file to install the application. On Mac: 1. In Finder, go to Go > Connect to Server... (or use Command + K). 2. In the Server Address field of the Connect to Server dialog, type smb:// Server Name/ 10.1 Mac Client (where Server Name is the name or IP address of your server). 3. Copy RunList Editor dmg on your client machine. 4. Double-click the dmg file to install the application. Double-click the RunList Editor shortcut application. on your desktop to open the RunList Editor 3. Go to Edit > Preferences (on Windows) or RunList Editor > Preferences (on Mac) to open the Preferences window. 4. Connect the RunList Editor to your server: 109 7

110 7 a) b) c) d) e) In the Servers tab, click the In the pop-up that opens: button at the bottom of the Servers list. enter the User Name and Password you use to login to the Pilot, select Manual in the Browse Method list, enter your server s name or IP address in Server Address, fill in the Server Port used by your server. This is the port you defined in Configure for Shuttle communication (see Automation Engine Setup for Shuttle). f) Click the Add button. This adds a connection to your server in the Servers list. You should see a green dot if the connection was successful. 5. In the Units tab, choose the units to use when submitting to a workflow that has public parameters: a) Choose to define the Distance in Millimeter, Point or Inch. b) Choose to define the Resolution in Pixels Per Millimeter or Pixels Per Inch. c) Choose to define the Screen Ruling in Lines Per Millimeter or Lines Per Inch. 7.2 Creating a RunList 1. Go to File > New to create a RunList. You can also use Ctrl + N (Windows) or Command + N (Mac). This opens the following dialog: 110
 In the pop-up that opens, use the Browse... button to browse to your file.")
. Note: By default, the From 1 to.")
111 2. Add files to the RunList: a) Click the Add Pages button in the toolbar. b) In the pop-up that opens, use the Browse... button to browse to your file. c) Define which of the file s pages you want to add to the RunList (for example, if you want to add the pages 1, 2, 3 and 7, enter 1-3, 7 in Page range). Note: By default, the From 1 to... option is selected, selecting all pages. d) Click OK. This creates an entry for every file you add
112 7 You can see the RunList s total number of pages at the bottom of the dialog. Note: You can also drag and drop one or several file(s) into the dialog to add them to the RunList. By default, this adds all of the files pages, but you can double-click an entry to edit it. 3. If necessary, click the Add Blank Page button in the toolbar to add blank pages to the RunList. 4. You can also add a placeholder for a file that is not available yet: a) Click the Add Pages button. b) Type the file name in the pop-up s File Name field. c) Click OK. The RunList dialog will show an orange? icon, to indicate that you still have to provide a link to the file. 112
113 Tip: You can also create placeholders for several files that are not yet available. See Adding a Number of Placeholders on page 113. You can use Undo (Ctrl + Z (Windows) or Command + Z (Mac) or Redo (Ctrl + Shift + Z (Windows) or Shift + Command + Z (Mac) when creating or editing a RunList. To delete a RunList entry, select it and press Delete (Windows) or Command + BackSpace / Delete (Mac). You can use Ctrl + A / Command + A first to select all entries for deletion. To duplicate a RunList entry, select it and press Ctrl + D (Windows) or Command + D (Mac). 5. When you are done, go to File > Save (or use Ctrl + S (Windows) or Command + S (Mac) and give your RunList a name. RunLists are saved in the JDF format Adding a Number of Placeholders To create placeholders for several files that are not yet available: 1. Go to RunList > Auto Add... This opens the Auto Add Name Format dialog. 2. In Number of Pages, enter the number of placeholder entries to create. 3. Use the Prefix Text, Number Format and Suffix Text fields to define the name to give to the placeholders. The Number Format specifies the number of digits to use in the file name. For example, this format: generates the entries below: 113 7

114 7 While this format: generates those entries: 114
115 7.3 Viewing the RunList Files Context for the current task To view the pages grouped by file, click (Mac). and select RunList (Windows), or click To view each page individually, click (Mac). and select Page List (Windows), or click 115 7
116 7 7.4 Changing the Files' Extension Go to RunList > Change Extension... to change the extension of all your individual files at once. For example, you can use this to create the RunList from original InDesign files, then change the extension to PDF to use individual PDF files in your workflow. Note: If you don t have the files with the new extension at the location defined in the RunList, they will have an orange? icon. 7.5 Sorting the RunList's Files Select entries in the main dialog and go to RunList > Sort Selection By Name to sort them alphabetically. You can also drag the entries to reorder them. This updates the order of the RunList pages automatically. 7.6 Submitting the RunList to a Workflow Once your RunList is ready, you can submit it to an workflow of your choice. 116
.")
117 Attention: Make sure that: The RunList Editor is connected to your server (see Setting Up the RunList Editor on page 109). The workflow you want to submit your RunList to is a public ticket (see the chapter "Getting Started" in the AE Complete manual). The RunList and the individual files it references are accessible to the Automation Engine server (saved on an container). You have replaced any placeholders in the RunList by the actual files. 1. Go to File > Submit... This opens the following dialog: 2. Select the workflow you want to launch on your file in the Workflow list. 3. In Launch As, if you want you can change the name of your RunList before launching it into the workflow. 4. If you also want to submit the individual files referenced in the RunList, select their check boxes. For example, when submitting to a workflow starting with a Wait for Files (via JDF) workflow step: submit the referenced files along with the RunList from the RunList Editor, in the Wait for Files (via JDF) parameters, use [URL of Folder of Input] for Look in Folder. The referenced files will be copied to a temporary folder alongside the RunList, and picked up by the workflow step. 5. Click Launch
Imposing a job with inpo2 ATOM s wizard. Abstract from inpo2 User s Guide
 Imposing a job with inpo2 ATOM s wizard. Abstract from inpo2 User s Guide Imposing with inpo2 ATOM The inpo2 ATOM Wizard allows creating complete imposition layouts and assemblies in just a few clicks.
FastImpose. Reference Manual
 Reference Manual Contents 1. View 1.1 1.2 1. Modes... 6 Sheet List View Mode... 6 Sheet View Mode... 7 Page List View Mode...8 1.4 Page View Mode... 10 1.5 Sheet Report View Mode... 11 2. Toolbars...1
Automation Engine Products
 14.1 Products 08-2015 Contents 1. Products Basics... 3 1.1 The Products Concept... 3 1.2 Global Products and Job Products... 6 1.3 Products can have Multiple Parts... 7 2. Products Data Structure...9 2.1
Automation Engine 12.1 What s new
 Automation Engine 12.1 What s new printable version Dries Vandenbussche Product Manager Server Platforms 1 2 General Information System requirements Server Windows 2003 Server Windows 2008 Server No support
PREPS. Imposition Software Version 8.x. Quick Reference Guide. English
 PREPS Imposition Software Version 8.x Quick Reference Guide English Getting started: The User Interface Use this guide to start using the Kodak PREPS imposition software. For more information and instructions,
Release Notes English. Kodak UpFront graphics.kodak.com A-EN Rev B
 Release Notes English Kodak UpFront 4.0.1 739-00222A-EN Rev B graphics.kodak.com Copyright 2006 Kodak. All rights reserved. Creo, Kodak, UpFront and Preps are trademarks of Kodak. Adobe, Acrobat, Adobe
InDesign Style Sheet Panel https://helpx.adobe.com/indesign/using/paragraph-character-styles.html#styles_panel_overview
 1 REFERENCES Class Pintrest Pages: http://pin.it/juudswi Book Design http://pin.it/unyjblg InDesign http://pin.it/ukwmgix Saddle Stitch Mockups http://pin.it/op8pfxa Page Layout And Grid http://pin.it/ipt_ihg
FastImpose. User Manual
 User Manual Contents 1. Basic Concepts... 7 1.1 Standalone and Server...7 1.2 Starting up the program... 8 1.3 GRS versus PDF mode...9 1.4 1.5 1.6 1.7 1.8 1.3.1 Modes...9 1.3.2 References...10 1.3.3 Marks...10
PowerLayout Client. User Guide
 User Guide Contents 1. Introduction...3 2. Preparing your PowerLayout Client output... 4 3. Plate and Sheet settings...5 4. Grid Settings... 7 5. Output Settings...9 6. Open / save PowerLayout Client settings...
Your Guide to Print A quick guide to printing with Gemini...
 Your Guide to Print A quick guide to printing with Gemini... 2 Contents SECTION 1 Getting Started 4 SECTION 2 A-Z of Print Terminology 5 SECTION 3 Paper Sizes 6 SECTION 4 How to Prepare Artwork Files 7
Automation Engine. Getting Started
 Getting Started 05-2017 Contents 1. Installing Server and Clients... 4 2. Changing the Language used in the Pilot... 5 3. Starting or Updating the Pilot... 6 4. The Pilot's Main Window... 7 5. Concepts
User Manual Version 1.1 January 2015
 User Manual Version 1.1 January 2015 - 2 / 112 - V1.1 Variegator... 7 Variegator Features... 7 1. Variable elements... 7 2. Static elements... 7 3. Element Manipulation... 7 4. Document Formats... 7 5.
IMPOSER PRO. Imposition Software for Adobe Acrobat
 U s e r s G u i d e IMPOSER PRO Imposition Software for Adobe Acrobat Copyright 2005 by a lowly apprentice production, inc. All rights reserved. Trademark Information a lowly apprentice production, the
First-time experience?
 First-time experience? Introducing DynaStrip This start up document aims to demonstrate how easy it is to impose with DynaStrip, and how feature-rich the application is. For the best first-time experience,
Advanced Tutorial. Split for Proof. Sample. This tutorial is only a preview of the full advanced tutorial.
 Advanced Tutorial Split for Proof This Advanced Tutorial explains how to set up jobs with a Main flow and a Split for Proof flow. The Split for Proof flow allows you to make a 1-up or 2-up version of an
PDF I N S T R U C T I O N GUIDE
 PDF I N S T R U C T I O N GUIDE INTRODUCTION These instructions are to assist you with producing PDF files from both PC and Mac based application files. These instructions vary from other suppliers using
Link between Automation Engine and WebCenter
 Link between Automation Engine and WebCenter Griet Boterbergh Ruben Cagnie Bart Matté Contents 1. Introduction... 3 1.1 What to use when?... 3 2. Setup WebCenter link in Automation Engine... 3 2.1 Description...
Adobe InDesign CS6 Tutorial
 Adobe InDesign CS6 Tutorial Adobe InDesign CS6 is a page-layout software that takes print publishing and page design beyond current boundaries. InDesign is a desktop publishing program that incorporates
Q U A L I T Y PR I NT I NG
 Q U A L I T Y PR I NT I NG COMPANY A Guide to InSite and Automated Processing Quality Printing s guidelines for ensuring your documents are free of issues that may occur during file processing. PDF Specifications
DynaStrip 7.5.0b Release Notes February 19, 2014
 DynaStrip 7.5.0b Release Notes February 19, 2014 1. What's New in DynaStrip 7.5.0? 2. Requirements 3. Installation Procedures 4. O.S. Particularities 5. Corrections and Enhancements in Release 7.5.0 6.
-Position. Advanced Users Guide for I-Position version 5.1. The Smarter Alternative Imposing PDF & Postscript
 Advanced Users Guide for I-Position version 5.1 The Smarter Alternative Imposing PDF & Postscript -Position Impositioning for the ictp PlateWriter Series TM I-Position Advanced Users Guide, part no. G&J_51506
Up To 45% Off! Prinect Signa Station. Offer Valid Until. The industry standard for fast and flexible digital imposition.
 Up To 45% Off! Prinect Signa Station The industry standard for fast and flexible digital imposition. Offer Valid Until 21st March 2016 Watch Us On YouTube Saddle Stitch Perfect Bind Montage Loose Leaf
What is InSite Prepress Portal? Logging on and off. Getting help
 What is InSite Prepress Portal? The Kodak InSite Prepress Portal system is a web portal to the prepress environment that lets printers and their customers work with print jobs over the Internet. Prepress
Dynamic Panels. User Guide
 User Guide Contents 1. Introduction to... 3 2. Getting Started...5 3. Making a Panel Dynamic: Overview... 9 4. Working with BackStage / Automation Engine...10 5. Making Text Objects Dynamic... 11 5.1 Using
SETTING UP A. chapter
 1-4283-1960-3_03_Rev2.qxd 5/18/07 8:24 PM Page 1 chapter 3 SETTING UP A DOCUMENT 1. Create a new document. 2. Create master pages. 3. Apply master pages to document pages. 4. Place text and thread text.
Automation Engine. Workflows
 Workflows 04-2017 Contents 1. Workflow Basics...4 2. Building Workflows using the Workflow Editor... 6 2.1 The Workflow Editor Window... 6 2.2 2.3 2.4 2.5 2.6 2.7 2.8 The Workflow Editor Menus...7 The
JoUp Acrobat 7.0. Imposition software for Adobe Acrobat Professional. JoLauterbach Software GmbH Stolzingstraße 4a Bayreuth Germany
 JoUp Acrobat 7.0 Imposition software for Adobe Acrobat Professional JoLauterbach Software GmbH Stolzingstraße 4a 95444 Bayreuth Germany Phone: +49-921-730 3363 E-mail: info@jolauterbach.com Internet: https://jolauterbach.com
Sending image(s) to report Click Send Snapshot on any screen in Dolphin3D and choose the Send to Report option
 to report Click Send Snapshot on any screen in Dolphin3D and choose the Send to Report option") Dolphin 3D Reports Sending image(s) to report Click Send Snapshot on any screen in Dolphin3D and choose the Send to Report option Creating a report step by step 1. Generate the desired images in Dolphin3D
Dolphin 3D Reports Sending image(s) to report Click Send Snapshot on any screen in Dolphin3D and choose the Send to Report option Creating a report step by step 1. Generate the desired images in Dolphin3D
New, standard features of DesignMerge Pro!
 Layout & Imposition Options New, standard features of DesignMerge Pro! The latest release of DesignMerge Pro now includes a new set of Layout and Imposition features that can be used to streamline your
Programs We Support. We accept files created in these major design and layout programs. Please contact us if you do not see your program listed below.
 Prepress Guidelines HAMILTON GRAPHICS ~ PREPRESS DEPARTMENT Phone: (513) 737-1413 Fax: (513)-737-7483 E-mail: bberne@hamiltongp.com or ddodson@hamiltongp.com Our Prepress Department considers customers
Understanding Acrobat Form Tools
 CHAPTER Understanding Acrobat Form Tools A Adobe Acrobat X PDF Bible PDF Forms Using Adobe Acrobat and LiveCycle Designer Bible Adobe Acrobat X PDF Bible PDF Forms Using Adobe Acrobat and LiveCycle Designer
Release Notes English. Kodak UpFront graphics.kodak.com A-EN-Rev A
 Release Notes English Kodak UpFront 4.0.2 739-00312A-EN-Rev A graphics.kodak.com Copyright 2006 Kodak. All rights reserved. Creo, Kodak, UpFront and Preps are trademarks of Kodak. Adobe, Acrobat, Adobe
inpo2 Tutorial Also includes a lesson for Web Presses Version 5.0
 inpo2 Tutorial Also includes a lesson for Web Presses Version 5.0 Copyright 2006-2012 Dynagram. All rights reserved. inpo2 is a registered trademark of Dynagram. Adobe and Acrobat are either registered
Advanced Tutorial. This tutorial is only a preview of the full advanced tutorial.
 Advanced Tutorial Versioning - Sample This Advanced Tutorial explains how to use the Versioning Task Processor to create jobs which contain several different versions, and to choose the optimal set of
Submission Guidelines
 We have assembled the following guidelines to help you submit files that will move through our work flow quickly and efficiently. These guidelines are designed to help prevent common and easily avoidable
Numbers Basics Website:
 Website: http://etc.usf.edu/te/ Numbers is Apple's new spreadsheet application. It is installed as part of the iwork suite, which also includes the word processing program Pages and the presentation program
Variable Data Printing Esko DeskPack Front-end Example
 XXX Variable Data Printing Esko DeskPack Front-end Example September 2007 Copyright 2007 Esko-Graphics, Gent, Belgium All rights reserved. This material, information and instructions for use contained
PDF to Print File Preparation
 PDF to Print File Preparation Contents File Preparation Adobe InDesign to PDF... 1.1 Document setup and file preparation...1.1 Merrill PDF Preset for Adobe InDesign...1.1 Exporting to PDF from InDesign...1.2
8.25 x Standard Perfect Binding
 8.25 x 10.75 Standard Perfect Binding Instructions for Adobe Photoshop Learn More: www.adobe.com/photoshop 8.25 x 10.75 Standard Perfect Binding Page Count: 20 pages min, 384 pages max, multiple of 2 PDF
Ad Creation Guide. Table of Contents
 Ad Creation Guide Table of Contents BEST PRACTICES 2 INDESIGN USERS 4 QUARKXPRESS 4, 5, AND 6 USERS 5 QUARKXPRESS 7, 8, AND 9 USERS 7 DISTILLING 9 INDESIGN PRESET DETAILS 10 QUARKXPRESS PRINT STYLE DETAILS
TRAINING MODULE APOGEE PREPRESS 8.0 VERSIONING
 TRAINING MODULE APOGEE PREPRESS 8.0 VERSIONING This document is only a preview of the training module. If you would like to obtain more information about this training module, please contact your local
Creating Interactive PDF Forms
 Creating Interactive PDF Forms Using Adobe Acrobat X Pro for the Mac University Information Technology Services Training, Outreach, Learning Technologies and Video Production Copyright 2012 KSU Department
Automation Engine 16. Tasks and Workflow Controls
 16 Tasks and Workflow Controls 01-2017 Contents 1. Add Dynamic Marks...12 2. Add Ink Eaters...14 3. Add Marks to Imposition... 17 4. Add Margins...18 5. Add SmartMarks...19 6. Add to Pages View...21 7.
Press Ink Key Setting Software. KeySetter
 Press Ink Key Setting Software Contents Contents...1 1. Introduction...2 1.1 Overview...2 1.2 The Package...2 1.3 System Requirements...2 1.4 Before you Begin...2 2. Output Options...3 2.1 Outputting to
Trisoft InSite Web Portal
 Trisoft InSite Web Portal Welcome to the first phase in Trisoft Graphics rollout of InSite Web Portal. Although the evolution of our implementation will bring a number of additional features and services
GreenFolders User Manual
 GreenFolders User Manual Welcome! Welcome to GreenFolders the Electronic Records Management Solution. GreenFolders allows you to store and retrieve files with many easy-to-use features for working with
Impossible Solutions, Inc. JDF Ticket Creator & DP2 to Indigo scripts Reference Manual Rev
 Impossible Solutions, Inc. JDF Ticket Creator & DP2 to Indigo scripts Reference Manual Rev. 06.29.09 Overview: This reference manual will cover two separate applications that work together to produce a
FreeFlow Core, Version 3.0 SP1 February P Xerox FreeFlow Core Help
 FreeFlow Core, Version 3.0 SP1 February 2014 702P02463 2014 Xerox Corporation. All rights reserved. Xerox, Xerox and Design, and FreeFlow are trademarks of Xerox Corporation in the United States and/or
Automation Engine 12.2 What s new presentation. Dries Vandenbussche Product Manager Server Platforms
 Automation Engine 12.2 What s new presentation Dries Vandenbussche Product Manager Server Platforms Overview Support for DFE 4.0 (HP) New Dynamic Layout" " " Support for Dynamic Marks" " Extra flexibility
Welcome to CreateSpace. Please log in, or if you're a new user, create a new account.
 1 of 6 Welcome to CreateSpace. Please log in, or if you're a new user, create a new account. Book Help > Black & White Submission Requirements This guide is for ready to publish (print-ready) PDF file
Chapter 7 Inserting Spreadsheets, Charts, and Other Objects
 Impress Guide Chapter 7 Inserting Spreadsheets, Charts, and Other Objects OpenOffice.org Copyright This document is Copyright 2007 by its contributors as listed in the section titled Authors. You can distribute
Chapter11 practice file folder. For more information, see Download the practice files in this book s Introduction.
 Make databases user friendly 11 IN THIS CHAPTER, YOU WILL LEARN HOW TO Design navigation forms. Create custom categories. Control which features are available. A Microsoft Access 2013 database can be a
inpo2 Release Notes v May 20, 2014
 inpo2 Release Notes v. 5.0.3 May 20, 2014 1.What s New in inpo2 v. 5.0 2.Minimum System Requirements 3.inpO2 Licensing & Modules Structure 4.Installation 5.License Activation & Upgrade 6.Upgrade Compatibility
Forms/Distribution Acrobat X Professional. Using the Forms Wizard
 Forms/Distribution Acrobat X Professional Acrobat is becoming a standard tool for people and businesses to use in order to replicate forms and have them available electronically. If a form is converted
Introduction to Microsoft Office PowerPoint 2010
 Introduction to Microsoft Office PowerPoint 2010 TABLE OF CONTENTS Open PowerPoint 2010... 1 About the Editing Screen... 1 Create a Title Slide... 6 Save Your Presentation... 6 Create a New Slide... 7
Pyxis Imposed Features
 USER MANUAL Pyxis Imposed Features Application Logic When the Logic check-box is ticked, it is ticked by default (top centre of main window), Pyxis Imposed will attempt to automatically apply various
On the Web sun.com/aboutsun/comm_invest STAROFFICE 8 DRAW
 STAROFFICE 8 DRAW Graphics They say a picture is worth a thousand words. Pictures are often used along with our words for good reason. They help communicate our thoughts. They give extra information that
Press-Ready Cookbook Page Guidelines
 Press-Ready Cookbook Page Guidelines table of contents These instructions are for all pages of your cookbook: Title Page, Special Pages, Table of Contents, Dividers, Recipe Pages, etc. WHAT IS PRESS-READY?
USER MANUAL Page 0 of 107
 USER MANUAL 7.1 www.dgflick.com Page 0 of 107 Table of Contents 1.0. Introduction... 3 2.0. System Requirements... 4 3.0. Opening the Tool Box Getting Started... 5 3.1. Registration... 6 3.1.1. Online
Workflow automation Hot Tickets
 Tutorial Workflow automation Hot Tickets Software version: Asanti 3.0 Document version: March 20, 2017 This tutorial demonstrates how to use Digital printing Hot Tickets in Asanti. Download the Asanti
EssEntial indesign skills Brought to you By InDesign
 10 EssEntial indesign skills Brought to you By InDesignSkills 10 Essential InDesign Skills by InDesignSkills www.indesignskills.com Copyright 2014 Illustration: Henry Rivers Contents In this ebook you
DESKTOP PUBLISHING FOR PRINT PRODUCTION PRACTICAL
 DESKTOP PUBLISHING FOR PRINT PRODUCTION PRACTICAL M Scheme By, A.Paramasivam, Lecturer (SS) S.Marimuthu, Lecturer Department of Printing Technology Arasan Ganesan Polytechnic College Sivakasi Ex.No. 1
InSite Prepress Portal
 InSite Prepress Portal System Version 5.0 Customer Quick Start Guide English 731-00089G-EN Rev C Copyright Kodak, 2008. All rights reserved. Creo and ecentral are trademarks of Kodak. Adobe, Acrobat, Adobe
StitchGraph User Guide V1.8
 StitchGraph User Guide V1.8 Thanks for buying StitchGraph: the easy way to create stitch layouts for hardanger and other complex embroidery stitch types. StitchGraph is intended to allow you to create
Creating Page Layouts 25 min
 1 of 10 09/11/2011 19:08 Home > Design Tips > Creating Page Layouts Creating Page Layouts 25 min Effective document design depends on a clear visual structure that conveys and complements the main message.
inpo2 Release Notes v October 11, 2017
 inpo2 Release Notes v. 6.1.0 October 11, 2017 1.What s New in inpo2 v. 6 2.Minimum System Requirements 3.inpO2 Licensing & Modules Structure 4.Installation 5.License Activation & Upgrade 6.Upgrade Compatibility
Splash G630 Service Pack 5 Release Notes
 Splash G630 Service Pack 5 Release Notes Service Pack Contents Revised 10/9/02 The Splash G630 Service Pack 5 contains fixes for some problems with the G630 software. It includes all of the fixes from
Fiery Driver for Windows
 2017 Electronics For Imaging, Inc. The information in this publication is covered under Legal Notices for this product. 27 April 2017 Contents 3 Contents...5 Fiery Driver Updater...5 Create custom Fiery
Canon ImageRUNNER Advance: Printer Driver Settings from PC
 Canon ImageRUNNER Advance: Printer Driver Settings from PC Most of the functions for copying are also available at your computer in the print driver. To access the print driver when in a document: File
for Adobe InDesign Version 2.0 User Manual PLEASE NOTE:
 for Adobe InDesign Version 2.0 User Manual PLEASE NOTE: The only difference between FOLDRite Template Master version 1.0 and version 2.0 is compatibility with Adobe InDesign CS4. If you are not running
Release Notes Fiery PRO C-KM Color Server version 2.0
 Release Notes Fiery PRO 80 65-55C-KM Color Server version 2.0 This document contains information about the Fiery PRO 80 65-55C-KM Color Server version 2.0 software. Before using the Fiery PRO 80 65-55C-KM
Microsoft How to Series
 Microsoft How to Series Getting Started with EXCEL 2007 A B C D E F Tabs Introduction to the Excel 2007 Interface The Excel 2007 Interface is comprised of several elements, with four main parts: Office
CPM-200 User Guide For Lighthouse for MAX
 CPM-200 User Guide For Lighthouse for MAX Contents Page Number Opening the software 2 Altering the page size & Orientation 3-4 Inserting Text 5 Editing Text 6 Inserting Graphics 7-8 Changing the Colour
Automation Engine 16 Normalized PDF in Automation Engine
 16 Normalized PDF in Automation Engine 06-2016 Contents 1. Introduction...3 2. What Makes a Normalized PDF Special?... 4 3. Which Tasks Require PDF Normalization?...5 4. How do PDF Tasks Work with Normalized
This Tutorial is for Word 2007 but 2003 instructions are included in [brackets] after of each step.
![This Tutorial is for Word 2007 but 2003 instructions are included in [brackets] after of each step.](/thumbs/72/67280806.jpg "This Tutorial is for Word 2007 but 2003 instructions are included in [brackets] after of each step.") This Tutorial is for Word 2007 but 2003 instructions are included in [brackets] after of each step. Table of Contents Just so you know: Things You Can t Do with Word... 1 Get Organized... 1 Create the
This Tutorial is for Word 2007 but 2003 instructions are included in [brackets] after of each step. Table of Contents Just so you know: Things You Can t Do with Word... 1 Get Organized... 1 Create the
A publication of. Let it Bleed. When, where, why and how to use bleeds and create print ready PDF s so your print provider will love you.
 A publication of Let it Bleed When, where, why and how to use bleeds and create print ready PDF s so your print provider will love you. When Let it Bleed: Creating print ready PDF s with bleeds A bleed
Exporting PDF files from QuarkXpress 7.x
 Exporting PDF files from QuarkXpress 7.x This document covers creating the settings in Quark 7.x to export PDF files that are usable by Publication Printers. THIS DOCUMENT IS NOT INTENDED TO REPLACE THE
Acrobat X Professional
 Acrobat X Professional Toolbar Well Page Navigations/Page Indicator Buttons for paging through document Scroll Bar/box page indicator appears when using the scroll button to navigate. When you release
Advanced Tutorial. Separation Handling. Sample. This tutorial is only a preview of the full advanced tutorial.
 Advanced Tutorial Duration: You will need approximately three hours to complete the lessons in this Advanced Tutorial. Separation Handling Sample When :APOGEE Prepress processes a color job, the color
SAMPLE - NOT LICENSED
 Bill s Getting Started Guide for pdfdocs-4 Copyright 2014 Discovery Partners, Inc. Page 1 Create a new PDF: A) From MS-WORD: Choose this option to convert your Word document to PDF format and open in pdfdocs-editor.
Asanti Generic SD - Raster workflow
 Tutorial Asanti 3.0 - Generic SD - Raster workflow Software version: Asanti 3.0 Document version: March 21, 2017 This tutorial demonstrates how to use the Generic SD, configured for a Raster workflow (there
ONYX 12 Finishing Tools
 WHITE PAPER ONYX 12 ONYX 12 Finishing Tools ONYX 12 provides the ability to add bleed and grommets to any job. They are a part of the new Finishing tools. This document explains how to use bleed and grommets.
Using Microsoft Office 2003 Intermediate Word Handout INFORMATION TECHNOLOGY SERVICES California State University, Los Angeles Version 1.
 Using Microsoft Office 2003 Intermediate Word Handout INFORMATION TECHNOLOGY SERVICES California State University, Los Angeles Version 1.2 Summer 2010 Table of Contents Intermediate Microsoft Word 2003...
Microsoft Excel 2010 Tutorial
 1 Microsoft Excel 2010 Tutorial Excel is a spreadsheet program in the Microsoft Office system. You can use Excel to create and format workbooks (a collection of spreadsheets) in order to analyze data and
Exporting PDF files from QuarkXpress 7.x
 Exporting PDF files from QuarkXpress 7.x This document covers creating the settings in QuarkXpress 7.x to export PDF files that are usable by Publication Printers. This document is not intended to replace
Quick Specifications and Info for Print Books
 Quick Specifications and Info for Print Books Cover Specs and Info... 2 Black and White Interior Specs and Info... 4 Color Interior Specs and Info... 5 Most Common Print Errors... 6 1 Cover Specs and Info
Quite Hot 3. Installation... 2 About the demonstration edition... 2 Windows... 2 Macintosh... 3
 Quite Hot 3 Contents Installation.................................................................. 2 About the demonstration edition.............................................. 2 Windows................................................................
Automation Engine Chapter 'Digital Print Workflow'
 16.1 Chapter 'Digital Print Workflow' 01-2018 Contents 1. Intro...3 2. Devices (Digital Presses) (Pre-release)...4 3. Tasks related to Digital Printing... 6 3.1 Convert Colors for Digital Printing... 6
WebStudio User Guide. OpenL Tablets BRMS Release 5.18
 WebStudio User Guide OpenL Tablets BRMS Release 5.18 Document number: TP_OpenL_WS_UG_3.2_LSh Revised: 07-12-2017 OpenL Tablets Documentation is licensed under a Creative Commons Attribution 3.0 United
everything you need to know about Saddle Stitch Booklets SAIC SERVICE BUREAU
 everything you need to know about SAIC SERVICE BUREAU Saddle Stitch Booklets What is Saddle Stitching? A saddle-stitched bind is among the cheapest and most common methods of booklet binding. It is a soft
LinkMotion and CorelDraw 9, 10, 11, 12, X3, X4, X5, X6, X7 and X8:
 LinkMotion and CorelDraw 9, 10, 11, 12, X3, X4, X5, X6, X7 and X8: After you install LinkMotion software and set up all settings launch CorelDraw software. Important notes: Solustan s LinkMotion driver
CHAPTER 2 COPIER 2-1 BEFORE USING THE MACHINE AS A COPIER SPECIAL MODES BASIC PROCEDURE FOR MAKING COPIES
 CHAPTER COPIER This chapter provides detailed explanations of the procedures for using the copy function. BEFORE USING THE MACHINE AS A COPIER BASE SCREEN OF COPY MODE.............. -3 COPYING SEQUENCE......................
INTRODUCTION... 1 UNDERSTANDING CELLS... 2 CELL CONTENT... 4
 Introduction to Microsoft Excel 2016 INTRODUCTION... 1 The Excel 2016 Environment... 1 Worksheet Views... 2 UNDERSTANDING CELLS... 2 Select a Cell Range... 3 CELL CONTENT... 4 Enter and Edit Data... 4
Customer Release Notes Fiery Q5000 for DocuColor igen3, version 2.0
 Customer Release Notes Fiery Q5000 for DocuColor igen3, version 2.0 This document contains information about Fiery Q5000 for DocuColor igen3 server software version 2.0. Before using the Fiery Q5000 for
Creating & Sending PDF Files Using Piedmont s Print Driver. PageMaker PC
 Creating & Sending PDF Files Using Piedmont s Print Driver PageMaker PC Quick Overview for Creating New Documents Go to PageMaker and open the file that you want to send Go to the File menu - select Document
Customer User Addendum
 Customer User Addendum Fiery CS IC-310/Fiery CS IC-308/Fiery ES IC-415 This Customer User Addendum provides information about the Fiery CS IC-310/Fiery CS IC-308/Fiery ES IC-415 version 2.1 software. This
Working with Tables in Word 2010
 Working with Tables in Word 2010 Table of Contents INSERT OR CREATE A TABLE... 2 USE TABLE TEMPLATES (QUICK TABLES)... 2 USE THE TABLE MENU... 2 USE THE INSERT TABLE COMMAND... 2 KNOW YOUR AUTOFIT OPTIONS...
InSite Prepress Portal Quick Start Guide IPP 9.0
 InSite Prepress Portal Quick Start Guide IPP 9.0 Exported on 07/26/2018 Table of Contents 1 What is InSite Prepress Portal?... 4 1.1 Getting familiar with InSite Prepress Portal 9.0...4 1.2 Use a single
Fiery JDF Connector Workflow Collaboration. Installation Manual for Trueflow Suite Edition
 Fiery JDF Connector Workflow Collaboration Installation Manual for Trueflow Suite Edition Contents Preface...3 Displays Used in This Manual...3 Trademarks...3 Copyright...3 1. Installation of JDF Connector...4
Basic Concepts. Launching MultiAd Creator. To Create an Alias. file://c:\documents and Settings\Gary Horrie\Local Settings\Temp\~hh81F9.
 Page 1 of 71 This section describes several common tasks that you'll need to know in order to use Creator successfully. Examples include launching Creator and opening, saving and closing Creator documents.