SATO Online Services User s Manual May 19, 2017 Version 1.0
|
|
|
- Brittney Pierce
- 6 years ago
- Views:
Transcription
1 SATO Online Services User s Manual May 19, 2017 Version 1.0
2 Contents 1. Revision History Introduction Network connection (real-time) QR code connection (on-demand) Browsers SATO Online Services supports Operating Systems the SOS mobile application supports Initial Registration Registering your SOS account from your PC Signing up from your PC Logging into SOS and registering information about your organization (company) Logging in Registering information about your organization (company) Registering the location the printer is installed in Click the Registering information about the printer - Network connection (real-time) Displaying the serial number and association code on the printer Registering information about the printer - QR code connection (On-demand) QR Code Connection - (the SOS mobile application is supported only in Japan.) Installing the SOS mobile application and logging into it from a mobile terminal Handling a printer error Configuring periodic notification settings Registering information about the printer - SOS mobile application Functions Operable from Your PC Dashboard Top screen of Dashboard Details of Dashboard - Common Details of Dashboard - Overview tab Details of Dashboard - Details tab Details of Dashboard - Printer Log tab Details of Dashboard - Control Panel tab Details of Dashboard - Settings tab Details of Dashboard - Files tab Details of Dashboard - Asset Report tab Asset Management Asset Management - Total Usage tab Asset Management - Usage Information tab Asset Management - Device Information tab Upgrading the Firmware
3 5-4. Support & Feedback Notifications Top screen of Notifications Screen to configure notification settings Detailed notification configuration screen Manage Locations screen Account Settings Top screen of Account Settings Screen to edit an account Screen to configure display settings on Dashboard Admin Settings Top screen of Admin Settings Screen to edit your company information Screen to invite new coworkers FAQ If you forget your SOS login password
4 1. Revision History Version Date of Issue Revisions Version First edition. 3
5 2. Introduction SATO Online Services (called SOS hereafter) monitors all printers and performs proactive actions for operating status check and preventive maintenance of consumable parts, and it also determines causes of errors and allows for quick troubleshooting with IoT technology to largely minimize downtime due to printer errors Network connection (real-time) A network connection (real-time) connects the printers in the intra-network to SOS Cloud safely and shares printer usage status, settings, errors, and other information with SOS Cloud to enable comfortable use of printers QR code connection (on-demand) On an on-demand connection used with the QR code, you can read the QR codes of printers that indicate their usage, settings, and errors from mobile terminals (e.g., smartphones and tablets) in which the SOS mobile application is installed by linking SOS Cloud and the mobile terminals to ensure secure printer operation. Android and ios mobile terminals (smartphones and tablets) are supported. Please contact your local sato office seller for details about mobile application availability 2-3. Browsers for SATO Online Services Browsers that SATO Online Services can access Recommended browsers: Google Chrome (latest version), Internet Explorer 10, 11 or higher Operating Systems the SOS mobile application supports Android 4.4 or higher ios 9 or higher (iphone 5s or higher recommended) Please contact your selling for details about mobile application availability 4

6 3. Initial Registration 3-1. Registering your SOS account from your PC A single SOS account can be created per company or organization when using SOS. Be sure to read the SOS Terms and Conditions before registering Signing up from your PC Start up the PC, Click the [Sign Up] button on it. Please contact your local SATO office or seller for Sign up page. Enter the following items when the [Sign Up] screen appears: 1. Name Name of the registrant address of the registrant (ID used to log in). 3. Password Login password. 4. Password Confirmation Retype the login password again for confirmation. 5. Time zone (UTC) Dublin, Edinburgh, Lisbon, London. 6. Language English/Japanese 7. Phone Phone number of the registrant or the organization. 5
![Please read the SOS Terms and Conditions before using SOS. Click [Cancel] to cancel sign up. 1. Click SOS Terms and Conditions. 2. Read the SOS Terms and Conditions. 3.](/docs-images/77/75600390/images/7-1.jpg "Click [Do you accept SOS Terms and Conditions?]. 4. A check mark is displayed on the left side of [Do you accept SOS Terms and Conditions?]. 5. Click the [Next] 6. The [Login] screen should appear.")
![[Your account has been created successfully] will appear above the [Login] icon at this time.](/docs-images/77/75600390/images/7-2.jpg "* It will be assumed that you have agreed to the SOS Terms and Conditions when [Do you accept SOS Terms and Conditions?] is checked.")
7 Please read the SOS Terms and Conditions before using SOS. Click [Cancel] to cancel sign up. 1. Click SOS Terms and Conditions. 2. Read the SOS Terms and Conditions. 3. Click [Do you accept SOS Terms and Conditions?]. 4. A check mark is displayed on the left side of [Do you accept SOS Terms and Conditions?]. 5. Click the [Next] 6. The [Login] screen should appear. [Your account has been created successfully] will appear above the [Login] icon at this time. * It will be assumed that you have agreed to the SOS Terms and Conditions when [Do you accept SOS Terms and Conditions?] is checked. Provisional registration is ed to the entered address for identification after completing entry. Click the URL link in the to complete registration of the account within one hour after receiving the Logging into SOS and registering information about your organization (company) After registering your SOS account, log into SOS to register information about your company Logging in Click the URL link indicated in the for provisional registration. The login dialog appears. Click the [Login] button. Enter the password you specified for the address for your SOS account. If you forget your password, see the Q&A in this manual. 6
![Put a check mark in the box next to [Grant Permission] on the Authorize SOS Application dialog, and then click the [Authorize] button. Check the email address at the bottom of the dialog.](/docs-images/77/75600390/images/8-1.jpg "If the email address is different from the specified email during registration, click [this is not me] and log in again. 3-2-2.")
8 Put a check mark in the box next to [Grant Permission] on the Authorize SOS Application dialog, and then click the [Authorize] button. Check the address at the bottom of the dialog. If the address is different from the specified during registration, click [this is not me] and log in again Registering information about your organization (company) Enter information about your organization (company): 1. Company name Your company name (organization name). 2. Industry (pull-down list) Industry your company belongs to. 3. Address Last line of the address of your company. 4. City Name of the city your company is located in. 5. State Name of the state your company is located in. 6. Zip Code Postal code of the location of your company. * Use hyphens ex Country (pull-down list) Name of the country your company is located in. 8. Time Zone (pull-down list) (UTC) Dublin, Edinburgh, Lisbon, London. 9. Purchased From Shop you purchased the printer from. * The Purchased From field may be left blank. After filling in the fields, confirm that the information is correct. Click the [Next] button. When the Dashboard screen displays, the registration was successful. 7

![On the menu, click [Locations]. Click the [Add Location] button.](/docs-images/77/75600390/images/9-3.jpg "* When there is more than one printer, be sure to click [Add Location].")
9 Registering the location the printer is installed in Register the location the printer is installed in. On the menu, click [Locations]. Click the [Add Location] button. * When there is more than one printer, be sure to click [Add Location]. Fill in the fields for information about the location, and then click the [Save] button. For details about the fields, see the pages about Manage Locations in Section 4. Functions. 8


10 Click the registering information about the printer - network connection (real-time) Register information about the printer through a network connection (real-time). On the Dashboard screen, click the [Add A Printer] button. Click the [Add Real-Time Printer] button. Fill in the fields, and then click the [Add Printer] button. 1. Serial Serial number of the printer to register. * See Section below. 2. Association Code Authentication code for registration with SOS. * See Section below. 3. Printer Name Name for printer identification. 4. Location Location the printer is installed in. 5. Asset Management No. (For the asset management function, ask the seller that the printer was purchased from) Fill in the field when your organization has a unique numbering system to manage printers (optional). 6. Asset Acquisition Date (For the asset management function, ask the seller that the printer was purchased from) Date at which the printer you are registering is purchased. 7. Note 1 to 3 (displayed only when you have a full support pack contract) Note items * In the serial number and association code fields, write the number and code displayed on the printer. For how to display the number and code, see the subsequent section. 9


11 Displaying the serial number and association code on the printer This section describes how to operate the printer and shows screen samples. For details on printer operations, go to the manual available on our SOS website. (Search SATO ONLINE SERVICES) Power on the printer. The online screen is displayed. Check that a LAN or Wi-Fi network connection is established and the SOS icon is displayed. Press the key. The offline screen is displayed. On the offline screen, press the key. The Settings screen is displayed. On the Settings screen, press the ( ) keys to select Interface, and then press the key. On the Interface screen, press the ( ) keys to go down to Network Service Online Services with the key to select it. 10
 keys to select Real-Time, and then")


12 On the Online Services screen, press the ( ) keys to select SOS Mode. On the SOS Mode screen, press the ( ) keys to select Real-Time, and then press the key or key. Read the SOS Terms and Conditions, and then press the key to accept it. Go back to the Online Services screen. Press the ( Association, and then press the key. ) keys to select SOS * Prepare memo paper at hand. The 8-digit Serial Number and 12-digit Association Code are displayed. Write them down and transfer the number and code on the Add a Printer screen previously shown. After entering them, check that the icon appears at the top of the screen. If the icon does not appear, the printer may be disconnected from SOS Cloud. Check the network settings again. 11
13 Registering information about the printer - QR code connection (On-demand) Display the on-demand PIN registration screen on the printer. On the Settings screen for the printer, press the ( ) keys to select Interface, and then press the key. On the Interface screen, press the ( ) keys to go down to Network Services Online Services with the key to select it. On the Online Services screen, press the ( ) keys to select SOS Mode. On the SOS Mode screen, press the ( ) keys to select On-Demand, and then press the key or key. 12


14 The serial number of the printer will be displayed. After that, configure settings for SATO Online Services. Register information about the printer from SATO Online Services. On the Dashboard screen, click the [Add A Printer] button. Click the [Add On-Demand Printer] button. Enter the serial number of the printer, and then click the [Get Code] button. 13
 keys to set the PIN code to the printer. The printer screen displays the association code. * Use a PC for the operations below.")
![Fill in the fields, and then click the [Add Printer] button. 1. Serial Serial number of the printer (automatically input) 2. Association Code Association code mentioned above 3.](/docs-images/77/75600390/images/15-3.jpg "Printer Name Name for printer identification. 4. Location Location the printer is installed in. 5. Asset Management No.")
15 The PIN code will be displayed. Type it into the printer. Pressing the key on the screen displaying the serial number of the printer shows the screen to enter the PIN. Press the ( ) keys to set the PIN code to the printer. The printer screen displays the association code. * Use a PC for the operations below. Fill in the fields, and then click the [Add Printer] button. 1. Serial Serial number of the printer (automatically input) 2. Association Code Association code mentioned above 3. Printer Name Name for printer identification. 4. Location Location the printer is installed in. 5. Asset Management No. (Contact the local seller for availability of this function if not displayed) Fill in the field when your organization has a unique numbering system to manage printers (optional). 6. Asset Acquisition Date (Contact the local seller for availability of this function if not displayed) Date when the printer that is being registered was purchased. 7. Note 1 to 3 (Contact the local seller for availability of this function if not displayed ) Note items 14
16 4. QR Code Connection - (Please contact your local seller for availability) On an on-demand connection when the QR code is used, printer QR codes can be read. These codes indicate usage, settings, and errors from mobile devices (e.g., smartphones and tablets) in which the SOS mobile application is installed through linkage between SOS Cloud and the mobile terminals to ensure secure printer operation. The QR code connection (on-demand) has the following features: 1 Once a registered SOS account is available, information about printers can be periodically sent to the server (Periodic Update) and Dashboard status, printer settings, logged data, and consumable parts on SATO Online Services can be checked. 2 When using the Periodic Update service, notifications about when to replace consumable parts such as a thermal head and cutter can be received. 3 The contact for the error is indicated on printer LCD 4 Using the SOS mobile application, printers that can connect to SOS can be added. *1: QR code is a registered trademark of DENSO WAVE Incorporated Installing the SOS mobile application and logging into it from a mobile device On an on-demand connection, you need to install the SOS mobile application on your smartphone. Please contact your local seller for availability 15

![Enter your SOS account, and then tap the [Save] button to log in.](/docs-images/77/75600390/images/17-2.jpg "(For details on how to register your SOS account, see Registering your SOS account.")
![) Turn on [Always go to Web application when this application is opened] to automatically enter your ID and password from the next](/docs-images/77/75600390/images/17-3.jpg "startup. Once you log in, the menu screen is displayed. On the menu screen, select any of the functions listed below.")

17 Start up the SOS mobile application installed in the previous section. After the application starts up, agree with the SOS Terms and Conditions, and then set the country and language settings. Enter your SOS account, and then tap the [Save] button to log in. (For details on how to register your SOS account, see Registering your SOS account.) Turn on [Always go to Web application when this application is opened] to automatically enter your ID and password from the next startup. Once you log in, the menu screen is displayed. On the menu screen, select any of the functions listed below. To open Navigation, tap on the upper right side. Menu title Report A Printer Issue Contact Periodic Update Add Printer Printer Dashboard Description When a printer error occurs, the QR code for the error displayed on the LCD on the printer can be read. View the printer manual or contact the SOS desk. Read QR code for Periodic Update displayed on the printer. Register a printer with SATO Online Services. Check information about printers in the form of a list. 16


![While the message is displayed, press the keys to select [SOS], and then press the](/docs-images/77/75600390/images/18-4.jpg "key. The QR code to scan appears.")
![Start up the SOS mobile application, and then tap [Report A Printer Issue].](/docs-images/77/75600390/images/18-5.jpg "On the QR code scan screen on the printer, scan the QR code.")

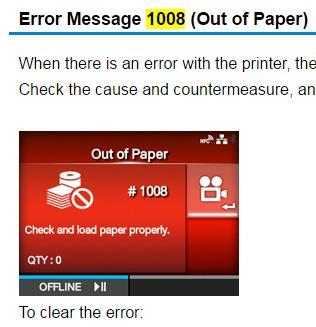
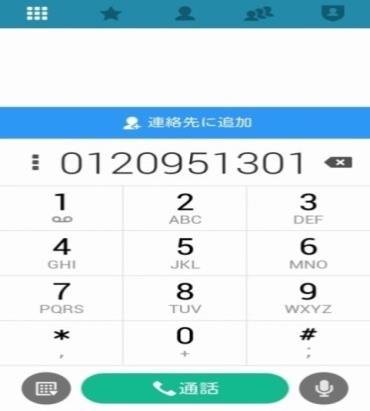
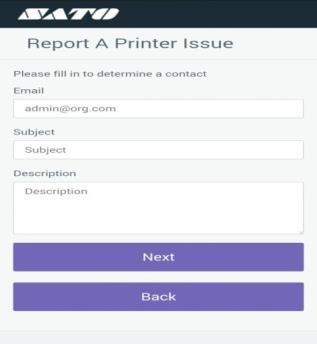
18 4-2. Handling a printer error When a printer error occurs, display the QR code for the error on the printer screen, read the QR code by using the SOS mobile application, and solve the error quickly. When an error occurs on a printer, the printer displays an error message on its LCD. While the message is displayed, press the keys to select [SOS], and then press the key. The QR code to scan appears. Start up the SOS mobile application, and then tap [Report A Printer Issue]. On the QR code scan screen on the printer, scan the QR code. After the QR code is scanned, information about the error is sent to SOS Cloud, and then the support options screen displays. Tap [Go to Troubleshooting] to display the help page for the error. Tap [Call] to display the phone number of the SOS desk. Tap [Mail] to display the inquiry form. 17
19 18

20 4-3. Configuring periodic notification settings You can set the paper feed length, cut count, or date setting to display a QR code on the screen of the printer when it is reached. Displayed QR codes are periodically checked and stored in SOS Cloud as information about the printer. The information is used to make notifications about the printer settings, amount of paper used, and reference of timing of consumable part replacement on the printer screen. On the Offline screen of the printer, navigate to Interface Network Service Online Services Periodic Notification to display the Periodic Notification screen. For details of the settings, see the description of the periodic notification menu in the online printer manual. When the count or date reaches the threshold specified for the notification setting, the Set the printer to the Offline status. A QR code is displayed as shown below. icon appears. Start up the SOS mobile application, and then tap Periodic Notification. On the QR code scan screen on the printer, scan the QR code. After scanning it, the information posted by the periodic notification to SOS Cloud can be sent. 19


![Select [Add On-Demand Printer]. The screen to scan the QR code is displayed. Scan the QR code displayed on the printer.](/docs-images/77/75600390/images/21-5.jpg "The PIN code is displayed. Enter it on the printer screen.")
21 4-4. Registering information about the printer - SOS mobile application By using the add a printer function in the SOS mobile application, you can register information about a printer. This is the same as described in Registering information about the printer - QR code connection (On-demand). When the printer is in the Offline status, navigate to Settings Interface Network Service Online Services. Check that SOS Mode is On-demand. Set the cursor to SOS Association Start, and press the key. The serial number of the printer is displayed. Start up the SOS mobile application, and then tap [Add A Printer] on the menu. Select [Add On-Demand Printer]. The screen to scan the QR code is displayed. Scan the QR code displayed on the printer. The PIN code is displayed. Enter it on the printer screen. After entering the PIN into the printer, the QR code for the association code is displayed. On the SOS mobile application, tap [Next]. The screen to scan the QR code appears. Scan the QR code. After scanning it, the dialog shown below appears. Fill in the fields, and then tap the [Add Printer] button. 20

22 5. Functions Operable from Your PC 1. Dashboard Displays a list of your printers and manage the printers from this list. Register printers not connected to SOS and manage them on Dashboard, too. You can also check the status of the printers connected to SOS and logged data. In addition, printer settings can be changed and test prints can be performed via Dashboard. 2. Asset Management Displays a list of your printers and statistics about their usage. You can also export reports in the PDF or CSV format. For information about how this function is provided, ask the local seller you purchased the printer from. 3. Firmware Upgrade Upgrade the firmware of all printers together. This function is displayed only for users who have administrator permission. 4. Support & Feedback Make a request for repair or inspection and make inquiries about printers and SOS at the SOS desk. (Please contact the local seller for availability of this function if not displayed) 5. Notifications Create alerts for printer errors posted to specified addresses. This function is displayed only for users who have administrator or manager permission. 6. Locations Manage the locations of your printers. This function is displayed only for users who have administrator or manager permission. * Users who have manager permission are only allowed to view this information. 7. Account Settings Specify the language settings and items to display on Dashboard per SOS account. 8. Admin Settings Manage users in your company and information about your company, and check logged SOS system operations. This function is displayed only for users who have administrator permission. 9. Logout Log out from SATO Online Services. 21

23 5-1. Dashboard Top screen of Dashboard Check the status of printers in the form of a list Search for a printer by keyword. 2. Add SOS-connectible printers. This function is displayed only for users who have administrator or manager permission. 3. Narrow down the selection of printers. You can specify Printer Status, SOS, or Model. 4. View a list of printers connected to SOS. Click the line of a printer to see detailed information about the printer. You can specify whether to show/hide the items on the list from the Account Settings screen. For details of the items, see the list on the next page. 5. View a list of printers not connected to SOS. The list is initially hidden. To show the list, check the [Display other device on Dashboard] checkbox on Dashboard settings of the Account Settings function. For details of the items, see the list on the next page. You can add other installed printers on the Asset Management screen. This function is available only for users who have a maintenance contract. 22
24 Printer Status Error SOS Printer Name Model Serial Location SOS Mode Item Firmware version Option Ribbon Near End Paper Near End Number of cuts Life Counter Life Counter for the last 3-month Head Usage Ratio Cutter Usage Ratio Platen Roller Usage Ratio Asset Management No. Asset Acquisition Date Note 1 Note 2 Note 3 Description This indicates the status of the printer. ONLINE, OFFLINE, POWERSAVE, or ERROR is indicated. This indicates the type of error when it occurs on the printer. This indicates the status connection to SOS. In on-demand mode, the date/time of the last update is indicated. This indicates the name of the printer specified when it is registered. This indicates the model name of the printer. This indicates the production number of the printer. This indicates the location the printer is installed in. This indicates mode of connection to SOS (e.g., real-time or on-demand). This indicates the version of firmware installed on the printer. This indicates a printer accessory. This is indicated when the remaining ink ribbon in the printer is low. This is indicated when the remaining paper in the printer is low. This indicates the number of times the printer cutter cut labels. This indicates the length the printer feeds paper to issue labels. This indicates the paper feed length for the last 3 months. This indicates the usage ratio of the print head. This indicates the usage ratio of the cutter of the printer. This indicates the usage ratio of the paper feed roller of the printer. This indicates the asset management number. This indicates the asset acquisition number. This is a note about the printer. You can change the name of this item on the Asset Management screen. This is a note about the printer. You can change the name of this item on the Asset Management screen. This is a note about the printer. You can change the name of this item on the Asset Management screen. 23

25 Details of Dashboard - Common Click the line of a printer connected to SOS on the top screen of Dashboard to display its detailed information screen. The detailed information screen displays the common header shown below to printers Edit and delete registered printer information. When the disable flag is set to the printer, all open cases are closed, and the printer will no longer be displayed on Dashboard. This is displayed only for users who have administrator permission. 2. To display Dashboard menu, click the tab corresponding to it. 24
26 Details of Dashboard - Overview tab On the Overview tab, check the usage of consumable parts in the printer and inquiries (cases) about the printer Check inquiries about the printer in the form of a list. Also, create new inquiries (cases). When the Support & Feedback function is not enabled, this block is not displayed. (Case is applicable if support and feedback function is available) 2. Check the usage (life counter) of consumable parts in the printer. For a replaced part, you can input a record about the replacement for management of part replacement. You can also change the count of its counter from that changed at the time of previous replacement. 3. Visually check the usage of consumable parts for the last 3 months. 25
27 Details of Dashboard - Details tab On the Details pane, check the printer settings and usage. 1. Check the printer settings in the form of a list. For description about the values of the settings, see the printer manual Check printer usage and whether there is an error for the printer Check network settings of the printer Check the location of the printer is placed at. 26
28 Details of Dashboard - Printer Log tab On the Printer Log pane, download operation logs sent from the printer to SOS Cloud and logs of commands sent from SATO Online Services to the printer Check operation/error logs sent from the printer to SOS Cloud. You can download logs with the CSV format Check logs of printer operations commanded from SATO Online Services. 27
29 Details of Dashboard - Control Panel tab On the Control Panel tab, issue commands to the printer from SATO Online Services. This tab is displayed only for users who have administrator or manager permission Acquire the label the printer issued last in the form of an image file. 2. Acquire a log file of data used for printer internal control. 3. Upload firmware update files to SOS Cloud. You can also upload a copy of the printer settings to SOS Cloud. 4. Command the printer to, for example, print test data, switch to ONLINE/OFFLINE, or restart. 28

30 Details of Dashboard - Settings tab On the Settings pane, check and change the settings of the printer. This tab is displayed only for users who have administrator or manager permission Switch between View mode and Edit mode. 2. Show all settings or hide all settings. 3. Output a text file for the settings. 4. View settings in View mode. Edit settings in Edit mode. 29
31 Details of Dashboard - Files tab On the Files pane, manage firmware files for the printer, image files sent from the printer, and other relevant files. This tab is displayed only for users who have administrator or manager permission Check firmware files provided by Sato. 2. Check and download firmware files uploaded on the Control Panel pane. 3. Check and download label files acquired on the Control Panel pane. 4. Check and download hexadecimal dump files acquired on the Control Panel pane. 5. Check and download a list of the settings output on the Settings pane. 30
32 Details of Dashboard - Asset Report tab (The tab is shown when Asset function is available) On the Asset Report pane, check information about asset management and statistics of printer usage Check information about the printer specified when it is registered Visually check the monthly or annual status of printer usage and printer errors. The following table provides descriptions of the displayed items. 31
33 Item Life Counter for the last month Number of cuts for the last month Life Counter for the past year Number of cuts for the past year Total number of errors for the past year Top 3 errors for the past year among all error types Number of non-consumable related errors for the past year Top 3 errors for the past year among non-consumable-related error types Part replacements information Description This indicates the length the printer feed labels in the last month. This indicates the number of times the printer cut labels in the last month by date. This indicates the length the printer feed labels in the last 2 years by month. This indicates the number of times the printer cut labels in the last 2 years by month. This indicates the number of errors that occurred on the printer for the past year by month. This indicates 3 types of errors that most occurred on the printer for the past year. This indicates the number of errors that occurred on the printer and not relating to a consumable part such as an out of paper error or out of ribbon error for the past year by month. This indicates 3 types of errors that most occurred on the printer for the past 1 year and not relating to a consumable part such as an out of paper error or out of ribbon error. This indicates usage of consumable parts. 3. Check inquiries about the printer. 4. Export information on the Asset Report pane as a PDF using the selected year/month as reference. 32
34 5-2. Asset Management The asset management function allows you to check the general status and usage of all your printers supporting SOS together. For how this function is provided, ask the local seller you purchased your printer from Asset Management - Total Usage tab Check statistics about usage of all your printers connected to SOS in the form of a graph or list. The statistics can be downloaded in PDF format On the report, check the following items: Preventive maintenance information: Printers with a consumable part nearing the end of its usable life are listed. The consumable part types subject to preventive maintenance are the head, platen roller, and cutter. Number of printers by category: The number of printers is displayed by life counter, duration of use, SOS Mode, or model Check the usage of the printers by month or year in time series. Total life counter: This indicates the total label feed length for printing. Total number of cuts: This indicates the number of times labels are cut. Total number of errors: This indicates the total number of printer errors. Total number of non-consumable related errors: This indicates the total number of errors that occurred on the printer and not relating to a consumable part such as an out of paper error or out of ribbon error. Total number of cases: This indicates the number of inquiries (cases) created. 33
35 3 3. Check printer usage by location in a simplified form. The displayed items are the same as those on the time-series report Asset Management - Usage Information tab On the Usage Information pane, check all printers in the form of a list. You can narrow down displayed data by location, SOS mode, or model, and the displayed data can be downloaded in the CSV format. See the table below for descriptions about the items. 34
36 Item Printer Name Model Serial Location SOS Mode Date and time of the last connection with SOS Duration of Printer Use Printer Life Counter Printer Usage Ratio Number of cuts Life Counter for the past year Life Counter for the last 3 months Life Counter for the last month Number of cuts for the past year Number of cuts for the last 3 months Number of cuts for the last month Number of errors for the past year Number of errors for the last 3 months Number of errors for the last month Number of non-consumable related errors for the past year Number of non-consumable related errors for the past 3 months Number of non-consumable related errors for the past month Number of cases for the month Number of cases for the 3 months Number of cases for the month Life Counter after the Last Head Replacement Head Usage Ratio Head Replacement Count Cut Count after Previous Cutter Replacement Cutter Usage Ratio Cutter Replacement Count Life Counter after the Last Platen Roller Replacement Platen Roller Usage Ratio Platen Roller Replacement Count Description This indicates the name of the printer specified when it is registered. This indicates the model name of the printer. This indicates the production number of the printer. This indicates the location the printer is installed in. This indicates mode of connection to SOS (e.g., real-time or on-demand). This indicates the date the printer had last communication with SOS on. This indicates the duration of time after the printer is installed. This indicates the total length the printer feeds paper to issue labels. This indicates the print length per day. This indicates the number of times the printer cutter cut labels. This indicates the print length for the past year. This indicates the print length in the last 3 months. This indicates the print length in the last month. This indicates the number of times the printer cutter cuts for the last year. This indicates the number of times the printer cutter cuts in the last 3 months. This indicates the number of times the printer cutter cuts in the last month. This indicates the number of errors that occurred on the printer for the past year. This indicates the number of errors that occurred on the printer for the past 3 months. This indicates the number of errors that occurred on the printer for the past month. This indicates the number of non-consumable related errors that occurred on the printer for the past year. This indicates the number of non-consumable related errors that occurred on the printer for the past 3 months. This indicates the number of non-consumable related errors that occurred on the printer for the past month. This indicates the number of cases created for the last year. This indicates the number of cases created in the last 3 months. This indicates the number of cases created in the last month. This indicates the print length after the last replacement of the print head. This indicates the ratio of the print length of the print head currently used to the print length at which print head replacement is recommended. This indicates how many times the print head is replaced. This indicates the number of times the cutter has cut since the last cutter replacement. This indicates the ratio of the cut count of the cutter currently used to the cut count at which cutter replacement is recommended. This indicates how many times the cutter is replaced. This indicates the ratio of the print length of the platen roller currently used to the print length at which platen roller replacement is recommended. This indicates how many times the platen roller is replaced. This indicates the number of times the cutter has cut since the last cutter replacement. 35
37 Asset Management - Device Information tab On the Device Information pane, check the settings, locations, and other information of all printers
38 1. The items of the Device Information pane are listed. For details of the items, see the manual of the printer. Item Asset Management No. Printer Name Model Serial SOS Mode Date of Last Update Date of Registration with SOS Asset Acquisition Date Disable Flag Date of Disablement Location Date of Installation to the Location Firmware version Option IP Address Bluetooth Enabled Wi-Fi Status RFID Enabled Printing Method Printing Speed Print Density Range Sensor Type Print Density Operation Mode Backfeed Note 1 Note 2 Note 3 Description This indicates the asset management number. This indicates the name of the printer specified when it is registered. This indicates the model name of the printer. This indicates the production number of the printer. This indicates mode of connection to SOS (e.g., real-time or on-demand). This indicates the date when information about the printer was last updated. This indicates the date when the printer was last registered. This indicates the date when the printer was acquired. Alternatively, this indicates the date when asset repayment has begun. This indicates whether the printer is used or not. This indicates the date when the printer was disabled. This indicates the location the printer is installed in. This indicates the date when the printer was installed in the location. This indicates the version of firmware installed on the printer. This indicates a printer accessory. This indicates the network IP address of the printer. This indicates whether Bluetooth is enabled on the printer. This indicates whether a Wi-Fi connection is established on the printer. This indicates whether the RFID function is enabled on the printer. This indicates whether the printing method is thermal transfer or direct thermal. This indicates the printing speed specified for the printer. This indicates the range of print density specified for the printer. This indicates the type of the print position detection sensor in the printer. This indicates the density specified for the printer. This indicates continuous print, tear-off, or another operation mode setting specified for printer. This indicates the Backfeed operation type specified for the printer. This is a note about the printer. You can change the name of this item on the Asset Management screen. This is a note about the printer. You can change the name of this item on the Asset Management screen. This is a note about the printer. You can change the name of this item on the Asset Management screen. 2. Click the [Change Item Name] button to change the name of the Note 1, Note 2, or Note 3. The names of items changed on the pane are applied not only to the Asset Management pane but also the Dashboard screen and other screens. 37

39 3. Edit and delete registered printer information. The items are the same as those for the Details of Dashboard - Common and they can be changed in the same manner as they were edited. 4. Download information about the printers searched for in the CSV format. 5. Register new information about other printers not connected to SOS. The registered information about the other printers is displayed on the Dashboard screen, asset management screen, and other screens. For the items you can register, see the item list on the previous page. 6. Register other printers together by uploading a CSV file. Click the [Download] button to download a sample file to register printers together. 38

40 5-3. Upgrading the Firmware Deliver firmware to (real-time) connected printers from SATO Online Services and upgrade it. Upgrade the firmware of more than one printer together. 1. Select printers whose firmware is to be upgraded. You can select printers connecting to SOS in real-time mode only. Other printers are grayed out and not selectable. Select printers and click the [Select Firmware] button. The next screen is displayed The printers whose firmware is to be upgraded are displayed. 2. Upload the new firmware to SOS. For details about the firmware, ask the SOS desk. 3. This indicates the standard firmware delivered from Sato. Standard firmware can be applied, but it cannot be deleted. Click Apply to apply it to the printer(s). 4. This shows the firmware uploaded from this screen. Click Apply to apply it to the printer(s). If you upload incorrect firmware or the firmware no longer necessary, you can click the [Delete] button to remove it. 5. This shows firmware clones (files in which print density setting and other settings are copied). Click Apply to apply it to the printer(s). You can remove firmware clones no longer necessary by clicking the [Delete] button. 39
41 5-4. Support & Feedback (It may not be available in your area, please contact your local seller.) On the Support & Feedback screen, check inquiries (cases) created so far and their details in the form of a list. You can also create a new case. There are two types of cases: open case (case currently being handled) and closed case (case already solved). Cases are separately displayed by type Narrow down cases displayed in the list by printer name or location. 2. Cases that are created by the user currently logged in that have not been solved are displayed in the form of a list. Click the [View Case] button for a case to check the details of the case. 3. Cases that are created by a user other than the user currently logged in that have not been solved are displayed in the form of a list. Click the [View Case] button for a case to check the details of the case. 4. This lists closed cases (cases for which a series of processing has been done and Close Case is selected on the details for it). Click the [View Case] button for a case to check the details of the case. 5. Create a new case. 40
![When you click the [View Case] button in the list of cases, the case details screen is displayed. Case Details screen 1 4 2 5 3 6 1. This shows description of the case inquiries. 2. This shows replies to inquiries about the case, if any.](/docs-images/77/75600390/images/42-1.jpg "For a case you created, when a reply is returned, it is posted to the registered email address. 3. Make a new reply to an inquiry about the case. 4. This shows details of the case. 5.")
42 When you click the [View Case] button in the list of cases, the case details screen is displayed. Case Details screen This shows description of the case inquiries. 2. This shows replies to inquiries about the case, if any. For a case you created, when a reply is returned, it is posted to the registered address. 3. Make a new reply to an inquiry about the case. 4. This shows details of the case. 5. The details are displayed only for a case whose status is open. This closes the case as solved. Once a case is closed, no reply can be made to inquiries for it and the case can only be referenced. 6. Click this to return to the list of cases. 41


43 5-5. Notifications On the Notifications screen, configure settings to post errors and other printer events to a specified addresses Top screen of Notifications On the top screen of Notifications, create and change new notification settings and check notification settings created by another user This button displays the screen to create a new notification setting. 2. Check, change, and delete a notification setting you created here. Click the line of a setting you want to check to see the details of the setting. To edit or delete a group, click the [Edit Group] or [Delete Group] button on the details of the setting pane. 42

![Click the [Duplicate] button to duplicate the same set of notification settings as your notification settings and choose the email delivery contact 5-5-2.](/docs-images/77/75600390/images/44-2.jpg "Screen to configure notification settings 1 2 3 1. Search for printers you want to handle. 2. Select target printers. You can select more than one printer at a time. 3. After selecting target printers, click this to move to the detailed notification configuration screen.")
44 3. Check a notification setting created by another user. Click the line of a setting you want to check to see the details of the setting. For notification settings you are not included in as an delivery contact, click the [Claim] button to add yourself as an delivery contact. Click the [Duplicate] button to duplicate the same set of notification settings as your notification settings and choose the delivery contact Screen to configure notification settings Search for printers you want to handle. 2. Select target printers. You can select more than one printer at a time. 3. After selecting target printers, click this to move to the detailed notification configuration screen. 43


45 Detailed notification configuration screen Click the [Rename] button to change the name of the notification configuration. 2. Click to select the types of errors to post a notification. You can only handle errors whose background is turned to black when clicked. The number in parentheses corresponds to the error code displayed on the printer. 44

46 The table below lists the types of errors that will post a notification. For details, see the printer manual. [1001] Machine error [1003] Parity error [1004] Overrun error [1005] Framing error [1006] Buffer overflow [1007] Head open [1008] Out of paper [1009] Ribbon end [1010] Media error [1012] Print head error [1013] USB R/W error [1014] USB memory full [1015] Cutter error [1016] Cutter cover open [1017] SBPL command error [1018] RFID tag error [1019] RFID system error [1020] Calendar error [1021] BCC check error [1022] Print head overheated [1023] NTP error [1024] Head density changed [1028] Gap not found [1035] I-mark not found [1046] EAP authentication error (EAP authentication failure) [1047] EAP authentication error (EAP timeout) [1050] Bluetooth module error [1058] CRC check error [1066] Paper jam error (on the CL4NX-J only) [1073] Non-RFID warning] (on the CL4NX-J only) [1075] NFC error [1076] Invalid command in NFC [1077] Barcode reader connection error [1078] Barcode reading error [1079] Barcode reading error 2 [1080] Barcode comparison error 3. Click the line to select alerts to post. Alerts available are references for the print head count, cutter cutting count, printer cleaning timing, and cutter replacement timing. The alert types are [Printer cleaning timing], [Cutter replacement timing], [Platen roller replacement timing], and [Print head replacement timing]. For those to be posted, a reference to make a notification about the print head or cutter can be added. 45

47 4. Click the line to select warnings to post. Paper Near End and Ribbon Near End are available. When it is detected that the paper or ribbon is running low, a warning is posted. 5. Move to the screen to choose users to which errors, alerts, and/or warnings are to be posted. On the screen, choose the users and click Update. The notification settings are then configured. 46
48 5-6. Manage Locations screen On this screen, manage the locations of printers Add a new location. The screen to add a new location is displayed. This is displayed only for users who have administrator permission. 2. The location currently registered is displayed. A user who has administrator permission can click here to edit or delete the location. The following items are displayed: Item Description Location Name Name of the location. Address Address of the location. City City of the location. State State of the location. Zip Code Zip code of the location. Country Country of the location. Time zone Time zone of the location. Department Department of the location. Sub Department Sub-department of the location. Service Partner *1 Name of the partner with the code specified for the company on the Admin Settings screen. Responsible Manager *1 User who has manager permission and is associated with the location on the Admin Settings screen. Responsible Employee *1 User who has employee permission and is associated with the location on the Admin Settings screen. *1. These items cannot be registered, change, or deleted on the Manage Locations screen. 47
49 5-7. Account Settings Change your user settings and settings for the items displayed on the top screen of Dashboard Top screen of Account Settings Check information about the user (account) currently logged in. Also, click the Change Details button to move to the screen to edit an account. 2. Check which items are displayed and not displayed in the printer list on the Dashboard screen. Click the [Change Details] button to move to the screen to configure display items and their order on Dashboard. 48
50 Screen to edit an account Edit your name, phone number, and other basic account settings. Also, specify the printer usage report transmission setting. The report is transmitted by default. If it does not need to be transmitted, uncheck the checkmark in the box. * The usage report is delivered to users who have administrator permission on the 2nd day of every month as an attachment with Location report, Usage report (in time series), and Use report (by location) in the PDF file format. 2. Change your avatar displayed on the top of the side menu. JPEG, PNG, and GIF images are supported. Upload an image file of a supported format. Note that uploading a file over several megabytes in size may cause SOS screens to be not displayed. 3. Change your login ID ( address). After your address setting is changed, a confirmation is ed to the address to confirm your account settings. Confirm the settings, and click the link in the to log in with a new login ID. 4. Change your login password. Enter a new password in the password field and the password confirmation field. 49
![5-7-3. Screen to configure display settings on Dashboard 1 4 2 3 5 1. Select [SOS devices] or [Other installed devices] for those you want to configure settings for.](/docs-images/77/75600390/images/51-1.jpg "You can specify what items to display. 2. Choose whether to show a list of [Other installed devices] on the top screen of Dashboard or not. OFF is selected by default. 3.")
 5.")
.")
51 Screen to configure display settings on Dashboard Select [SOS devices] or [Other installed devices] for those you want to configure settings for. You can specify what items to display. 2. Choose whether to show a list of [Other installed devices] on the top screen of Dashboard or not. OFF is selected by default. 3. The items are listed. Put a checkmark in the checkbox to display it. You can also set the display order (described later). 4. Click this button to save the settings. To set the default display order, click the [Revert to default] button. (When clicked, the configuration you set for the items is reset) 5. With these buttons, change the order in which the items are displayed in the list. To change the display position of an item, select the item and click any of the arrow keys (see the examples below). The display order set on the screen applies to the display order on the top screen of Dashboard. Clicking either double-arrow key moves the selected item to the top or end of the list. 50

52 5-8. Admin Settings On the Admin Settings screen, manage information for all users and common settings Top screen of Admin Settings
53 1. Check and edit the settings for your company. Click the [Edit Company Information] button to open the screen to edit the settings for your company. When you have received your partner code from us or our agent, enter it on this screen. 2. Edit or delete user settings. Click the [Add Coworkers] button to open the screen to invite new users to SOS. 3. Manage a list of users invited to SOS. Click the [Send Invitation Again] button to an invitation again. 4. Specify the permission setting to allow external printer control. Click [Reject] to disallow Sato and service partners from having printer control (for last label acquisition, hexadecimal dump acquisition, firmware upgrade, restart, print test, reset of the settings, status setting, and setting change). 5. System operation log is to show what kind of action is done in own company from all of user Screen to edit the company information Edit the company information (organization information). 1 1: *The partner code is separately issued by Sato or our agent when a contract is concluded, so it usually does not need to be input. When clicking the [Input of the partner code] button, the field to enter the partner code is displayed. Enter the partner code posted from Sato or our agent. After the partner code has been entered correctly, the name of the agent is displayed on the top screen of Admin Settings and service partner field of the company information. 52
54 Screen to invite new coworkers Enter the addresses of the users you want to invite. Specify multiple users by adding their names to a separate line for each user. 2. Assign permission to the users. You can assign [Administrator], [Manager], or [Employee]. 3. When [Manager] or [Employee] is assigned, the location that the user is responsible for must be specified. 4. an invitation to the specified address(es). 53


55 6. FAQ 6-1. If you forget your SOS login password On the log in screen for SOS, click the [Forgot password?] link. The screen to reset your password is displayed. Enter the address for the password you forgot on the Reset Password screen, and then click the Reset Password button. A prompt to reset your password is ed to the address. Click the link indicated in the . The screen to reset your password is displayed. (If you forget your address, contact your company administrator or SOS desk.) On the Update your password screen, enter a new password and click Update Password. The password will be updated. 54
Resource Center Getting Started Guide
 Resource Center Getting Started Guide Welcome to the Resource Center. The Resource Center is your source for exclusive business best practices assets. The Resource Center is where you will create an account,
Business Online Banking User Guide
 Business Online Banking User Guide Table of Contents Contents Overview... 2 Logging In... 2 Additional Login Information... 5 Home/Dashboard... 6 Top Line Tool Bar... 6 Bulletins... 7 Dashboard... 8 Accounts...
Quick Guide for Mynaportal
 Quick Guide for Mynaportal Introduction of Mynaportal and About This Guide Mynaportal is an online service managed by the government of Japan. You can apply to services online related to parenting by the
TechDirect User's Guide for ProSupport Plus Reporting
 TechDirect User's Guide for ProSupport Plus Reporting Notes, cautions, and warnings NOTE: A NOTE indicates important information that helps you make better use of your product. CAUTION: A CAUTION indicates
AvePoint Online Services for Partners 2
 AvePoint Online Services for Partners 2 User Guide Service Pack 1 Issued June 2017 Table of Contents What s New in this Guide...4 About...5 Submitting Documentation Feedback to AvePoint...6 Browser Support
TechDirect User's Guide for ProSupport Plus Reporting
 TechDirect User's Guide for ProSupport Plus Reporting Notes, cautions, and warnings NOTE: A NOTE indicates important information that helps you make better use of your product. CAUTION: A CAUTION indicates
DataCollect Administrative Tools Supporting DataCollect (CMDT 3900) Version 3.0.0
 Version 3.0.0") Administrator Manual DataCollect Administrative Tools Supporting DataCollect (CMDT 3900) Version 3.0.0 P/N 15V-090-00054-100 Revision A SKF is a registered trademark of the SKF Group. All other trademarks
Administrator Manual DataCollect Administrative Tools Supporting DataCollect (CMDT 3900) Version 3.0.0 P/N 15V-090-00054-100 Revision A SKF is a registered trademark of the SKF Group. All other trademarks
Accessing the SIM PCMH Dashboard
 Accessing the SIM PCMH Dashboard Setting up Duo, Creating Your Level-2 Password, and Setting up Citrix Receiver to Log in to the Dashboard P R O C EDURAL GUID E Document File Name Accessing_the_SIM_Dashboard.docx
Workspace MDM Management Site Manual
 Workspace MDM Management Site Manual 8. Appendix (Web site ver 8.1.1) 1 1 Appendix... 3 1.1 Function list... 4 1.2 Easy Setup procedure... 8 1.3 Input method of import data... 10 1.4 Details on CSV for
Sourcing. Supplier Maintenance and Company Administration Buyer User Guide
 Sourcing Supplier Maintenance and Company Administration Buyer User Guide Version 6.1 Ion Wave Technologies, Inc. 2002-2008 Table of Contents Table of Contents...2 Welcome to Supplier Maintenance and Company
Sony Xperia Configurator Cloud User Instructions
 Sony Xperia Configurator Cloud User Instructions This document is published by: Sony Mobile Communications Inc., 1-8-15 Konan, Minato-ku, Tokyo 108-0075, Japan www.sonymobile.com Sony Mobile Communications
Copyright Samsung Electronics Co., Ltd. All rights reserved.
 CONTENTS Copyright 2014 Samsung Electronics Co., Ltd. All rights reserved. It is subject to Apache License, Version 2.0 (hereinafter referred to as the "License"). You may not use this file except in compliance
USER MANUAL. TapCRM TABLE OF CONTENTS. Version: 1.4
 USER MANUAL TABLE OF CONTENTS Introduction... 1 Benefits of TapCRM... 1 Prerequisites... 1 Installation & Configuration... 2 TapCRM Plug-in Installation... 2 Front Side Instructions... 9 Contact Us...
Production Assistance for Cellular Therapies (PACT) PACT Application System User s Guide
 PACT Application System User s Guide") Production Assistance for Cellular Therapies (PACT) PACT Application System User s Guide Version 1.0 February 9, 2017 Version 1.0 TABLE OF CONTENTS 1.0 Getting Started... 1 1.1 Access to the Internet...
Production Assistance for Cellular Therapies (PACT) PACT Application System User s Guide Version 1.0 February 9, 2017 Version 1.0 TABLE OF CONTENTS 1.0 Getting Started... 1 1.1 Access to the Internet...
WF-6530 User's Guide
 WF-6530 User's Guide Contents WF-6530 User's Guide... 15 Product Basics... 16 Using the Control Panel... 16 Control Panel Buttons and Lights... 17 Status Icon Information... 18 Status Button Information...
BBVA Compass Spend Net Payables
 User Guide BBVA Compass Spend Net Payables User Guide Vault Services Table of Contents Introduction 2 Technical Requirements 2 Getting started 3 Sign In 3 General Navigation 4 Upload/Create Payment 5
OpenDrive Wordpress Plugin Guide
 OpenDrive Wordpress Plugin Guide Version 2.0.1 OpenDrive Online storage, backup and cloud content management Contents 1. Drive 3 1.1 Drive... 3 1.2 Working with files... 4 1.2.1 Work with a particular
TSS-7/TSS-10 7" and 10.1" Room Scheduling Touch Screens
 TSS-7/TSS-10 7" and 10.1" Room Scheduling Touch Screens Supplemental Guide Crestron Electronics, Inc. Crestron product development software is licensed to Crestron dealers and Crestron Service Providers
Samsung SmartThins Wifi ET-WV525. Samsung SmartTings Wifi Pro ET-WV535. User Manual
 Samsung SmartThins Wifi ET-WV525 Samsung SmartTings Wifi Pro ET-WV535 User Manual English (USA). 02/2018. Rev.1.0 www.samsung.com Table of Contents Getting started 3 Read me first 4 About SAMSUNG Connect
Copyright Samsung Electronics Co., Ltd. All rights reserved.
 Contents Copyright 2014 Samsung Electronics Co., Ltd. All rights reserved. It is subject to Apache License, Version 2.0 (hereinafter referred to as the "License"). You may not use this file except in compliance
AgentWorks Administrator and Manager User Guide - Release 12.5
 AgentWorks Administrator and Manager User Guide - Release 12.5 March 21, 2013 2012 MoneyGram InternationalAll rights reserved. Table of Contents Registration Overview... 2 1. Initial Log In AgentWorks
PrinterOn Embedded Agent for Samsung Printers and MFPs. Setup Guide for PrinterOn Hosted
 PrinterOn Embedded Agent for Samsung Printers and MFPs Setup Guide for PrinterOn Hosted Contents Chapter 1: Introduction... 3 Overview: Setting up the PrinterOn Embedded Agent... 4 PrinterOn service prerequisites...
ishipdocs User Guide
 ishipdocs User Guide 11/8/2016 Disclaimer This guide has been validated and reviewed for accuracy. The instructions and descriptions it contains are accurate for ishipdocs. However, succeeding versions
Administrator Guide. Find out how to set up and use MyKerio to centralize and unify your Kerio software administration.
 Administrator Guide Find out how to set up and use MyKerio to centralize and unify your Kerio software administration. The information and content in this document is provided for informational purposes
User Documentation. Administrator Manual.
 User Documentation Administrator Manual Proposal Software 1140 US Highway 287, Suite 400-102 Broomfield, CO 80020 USA Tel: 203.604.6597 www.proposalsoftware.com Table of Contents Open the WebPro Viewer...
Group Administrators
 Hosted VoIP Phone System Blue Platform Admin Portal Guide for Group Administrators Table of Contents 1 About this Guide... 6 2 Accessing the Hosted VoIP Phone System Admin Portal... 7 3 Hosted VoIP Admin
User Manual for ios. m-identity Protection Demo App v 2.5. Trusted Login, Trusted Message Sign and Trusted Web View
 m-identity Protection Demo App v 2.5 Trusted Login, Trusted Message Sign and Trusted Web View User Manual for ios (Powered by App Security Technology) Table of Contents Requirements... 3 1 Getting Started...
For information on troubleshooting common issues, see the Technical Support section in the online help.
 GIFTS Online Mobile GIFTS Online Mobile gives users a mobile version of their GIFTS Online system in order to easily access grant related information when it is not convenient to log into their main version
Dugan's Travels. Agent Website. User Guide
 Dugan's Travels Agent Website User Guide Lundy Innovations Ken Lundy, Sr. v1.2 1 v1.6 Table of Content Website Overview.................................................................... 3 Home Page -
Anchor User Guide. Presented by: Last Revised: August 07, 2017
 Anchor User Guide Presented by: Last Revised: August 07, 2017 TABLE OF CONTENTS GETTING STARTED... 1 How to Log In to the Web Portal... 1 How to Manage Account Settings... 2 How to Configure Two-Step Authentication...
USER GUIDE DISPATCH PORTAL RELEASE V5.42
 USER GUIDE DISPATCH PORTAL RELEASE V. 07 Table of Contents Introduction... Prerequisites... Login... Home Dashboard... Hubs... Routes... Create Routes... Jobs... Create Jobs... Cloning a Job... Job Status...
DMS Local. User Manual. For Projector Management V 1.01
 DMS Local User Manual For Projector Management V 1.01 2 Copyright Copyright Copyright 2018 BenQ Corporation. All rights reserved. No part of this publication may be reproduced, transmitted, transcribed,
Registering a Card and Creating an Account on
 Installing MyCardRules The MyCardRules App is available for both iphones and Android phones. To install MyCardRules: 1. Search for the app in the App Store or on Google Play. 2. Follow the instructions
MetaMoJi ClassRoom Administrator s Guide
 MetaMoJi ClassRoom Administrator s Guide Third Edition - ios is a trademark or registered trademark of Cisco in the U.S. and other countries and is used under license. - Apple and ipad are registered trademarks
Insight Pro Mobile App and Cloud Portal User Manual
 Insight Pro Mobile App and Cloud Portal User Manual July 2018 202-11916-01 350 E. Plumeria Drive San Jose, CA 95134 USA Support Thank you for purchasing this NETGEAR product. You can visit www.netgear.com/support
Payment Solutions MyCardRules. MyCardRules Mobile App. User Guide. Release 3.1
 Payment Solutions November 27, 2017 Installing MyCardRules... 2 Registering a Card and Creating an Account on MyCardRules... 2 Logging In to MyCardRules... 2 Registering a Card... 3 Creating an Account...
Remote Access Resources
 Remote Access Resources Windows 7 Windows 10 Firm Laptop Windows Windows Mac Computer Apple ipad Mac Computer Android Devices Apple ipad Remote Access Remote Access for Personal Computer (Windows) Quick
New in isupport v12.7
 New in isupport v12.7 In addition to continued enhancement of code quality, this release contains the following features: Social Client renamed to mysupport Email Processing Email Rules and Rule Groups
Sync User Guide. Powered by Axient Anchor
 Sync Powered by Axient Anchor TABLE OF CONTENTS End... Error! Bookmark not defined. Last Revised: Wednesday, October 10, 2018... Error! Bookmark not defined. Table of Contents... 2 Getting Started... 7
AgentWorks Administrator/Manager Functions Guide R10
 AgentWorks Administrator/Manager Functions Guide R10 11/21/2012 2012 MoneyGram InternationalAll rights reserved. Table of Contents 1. App Configuration... 2 2. Create Users... 4 3. Edit User Profile...
Insight Basic and Premium Mobile App and Cloud Portal User Manual
 Insight Basic and Premium Mobile App and Cloud Portal User Manual July 2018 202-11872-02 350 E. Plumeria Drive San Jose, CA 95134 USA Support Thank you for purchasing this NETGEAR product. You can visit
 Trend Micro Incorporated reserves the right to make changes to this document and to the product described herein without notice. Before installing and using the product, please review the readme files,
DSS User Guide. End User Guide. - i -
 DSS User Guide End User Guide - i - DSS User Guide Table of Contents End User Guide... 1 Table of Contents... 2 Part 1: Getting Started... 1 How to Log in to the Web Portal... 1 How to Manage Account Settings...
End User Manual. December 2014 V1.0
 End User Manual December 2014 V1.0 Contents Getting Started... 4 How to Log into the Web Portal... 5 How to Manage Account Settings... 6 The Web Portal... 8 How to Upload Files in the Web Portal... 9 How
Admin Mobile App (APP_102)
") Admin Mobile App (APP_102) Feature: eschoolplus Admin Mobile App Target Audience: Building Administrators Overview of eschoolplus Admin Mobile App Developed for ios and Android, the eschoolplus Admin Mobile
Admin Mobile App (APP_102) Feature: eschoolplus Admin Mobile App Target Audience: Building Administrators Overview of eschoolplus Admin Mobile App Developed for ios and Android, the eschoolplus Admin Mobile
Support Connect Overview and FAQ
 Support Connect Overview and FAQ Table of Contents Overview... 1 Getting Started... 1 Account Management... 2 Left-hand Navigation Pane... 3 FAQ: Web Browsers... 6 FAQ: Registration and Passwords... 6
Sentrol Cloud User s Guide Ver. 2.01
 Ver. 2.01 Copyright 2016 Nietzsche Enterprise Co., Ltd. All rights reserved Nietzsche Enterprise reserves the right to make changes and improvements to its products without notice. Contact Information:
DBT-120 Bluetooth USB Adapter
 DBT-120 Bluetooth USB Adapter Rev.2.1 (09/25/2002) 2 Contents Introduction... 5 Package Contents... 6 Installing Bluetooth Software... 6 Hardware Installation... 8 Introduction to Bluetooth Software...
Grandstream Networks, Inc. IPVideoTalk Cloud Conferencing System IPVideoTalk Portal User Guide
 Grandstream Networks, Inc. IPVideoTalk Cloud Conferencing System IPVideoTalk Portal User Guide IPVideoTalk Portal User Guide Index INTRODUCTION... 4 OVERVIEW... 5 SIGN UP... 5 SIGN IN... 6 DEFINITIONS...
A Guide for Customer Accounts
 A Guide for Customer Accounts Introduction This document contains set up and configuration guides for ODDS Customer Accounts. This manual helps to assist customers with the setup of their ODDS account,
CHI Easy Access: Register From on the CHI Network
 CHI Easy Access: Register From on the CHI Network Go to chieasyaccess.org and click "Register Now." You'll see the screen below. Your CHI Easy Access account is configured to use the same password you
GRS Enterprise Synchronization Tool
 GRS Enterprise Synchronization Tool Last Revised: Thursday, April 05, 2018 Page i TABLE OF CONTENTS Anchor End User Guide... Error! Bookmark not defined. Last Revised: Monday, March 12, 2018... 1 Table
BlackVue App Manual. Contents
 BlackVue App Manual Contents Connecting to BLACKVUE CLOUD... 3 (A) Create an account... 3 (B) Register your dashcam with your account... 3 (C) Connect your BlackVue dashcam to a Wi-Fi hotspot for Cloud
LE840/LE850. Printer Setting Tool Manual Technical Reference
 LE840/LE850 Printer Setting Tool Manual Technical Reference Table of Contents 1. INTRODUCTION 1 SUPPORTED PRINTERS... 1 FEATURES... 1 OUTLINE OF THE FUNCTIONS... 2 NOTATION... 2 SCREENS USED IN THIS DOCUMENT...
Time Recorder Manual
 Time Recorder Manual 1. Install Authentication software... 1 1.1 Install Fingerprint Authentication Software... 1 1.2 Install Finger Vein Authentication Software... 3 1.3 Install Hybrid Authentication
/ 1. Online Banking User Guide SouthStateBank.com / (800)
") / 1 Online Banking User Guide SouthStateBank.com / (800) 277-2175 06132017 Welcome Thank you for using South State s Online Banking. Whether you are a first time user or an existing user, this guide will
/ 1 Online Banking User Guide SouthStateBank.com / (800) 277-2175 06132017 Welcome Thank you for using South State s Online Banking. Whether you are a first time user or an existing user, this guide will
VMware AirWatch Chrome OS Platform Guide Managing Chrome OS Devices with AirWatch
 VMware AirWatch Chrome OS Platform Guide Managing Chrome OS Devices with AirWatch Workspace ONE UEM v9.4 Have documentation feedback? Submit a Documentation Feedback support ticket using the Support Wizard
WolkAbout IoT Tool Mobile Application v2.2. User Manual
 WolkAbout IoT Tool Mobile Application v2.2 User Manual 1 Table of Contents: Introduction 3 Account Registration 3 Mobile registration 3 Web registration 4 Mobile Application Installation and Configuration
owncloud Android App Manual
 owncloud Android App Manual Release 2.7.0 The owncloud developers October 30, 2018 CONTENTS 1 Release Notes 1 1.1 Changes in 2.7.0............................................. 1 1.2 Changes in 2.6.0.............................................
The following device commands are used most frequently: Lock/Unlock device O - O O. Reset screen password O - O - Factory reset + Initialize SD Card
 10 Device management Administrators can install apps on an activated device using device commands and check the profiles settings. Moreover, they can update, delete, or re-install apps installed on users'
core user guide business gateway TABLE OF CONTENTS BANKING > WEALTH > INSURANCE
 business gateway core user guide TABLE OF CONTENTS Getting Started... 2 Administration Approval... 8 Logging In... 2 Administration Report... 8 Electronic Report Delivery (ERD)... 17 Security Key... 2
MyCardUpdate User Guide Triple E Technologies, LLC
 MyCardUpdate User Guide Triple E Technologies, LLC Version 030316.02 Triple E Technologies, LLC P.O. Box 2677 Post Falls, ID 83877 Phone: 208.777.9300 Fax: 208.777.9304 2017 Triple E Technologies, LLC
Supra ekey 5.0. Quick Guide. Contents. Install the Supra ekey App. Requirements. Steps
 Supra ekey 5.0 Quick Guide These instructions provide a quick overview for how to install and use common features of the Supra ekey 5.0 app for Android and Apple products. Individual user experience may
ALL MEMBERS AND PAYEES
 Table of Contents Click a link to walk through a specific procedure. ALL MEMBERS AND PAYEES 1 GETTING STARTED How do I register? How do I log on? How do I update security questions? How do I retrieve/reset
/ 1. Online Banking User Guide SouthStateBank.com / (800)
") / 1 Online Banking User Guide SouthStateBank.com / (800) 277-2175 01242018 Welcome Thank you for using South State s Online Banking. Whether you are a first time user or an existing user, this guide will
/ 1 Online Banking User Guide SouthStateBank.com / (800) 277-2175 01242018 Welcome Thank you for using South State s Online Banking. Whether you are a first time user or an existing user, this guide will
DocAve Content Shield v2.2 for SharePoint
 DocAve Content Shield v2.2 for SharePoint User Guide For SharePoint 2007 Revision A Issued August 2012 1 Table of Contents Table of Contents... 2 About DocAve Content Shield for SharePoint... 4 Complementary
BlackVue C App Manual
 BlackVue C App Manual BlackVue C App Manual Contents Connecting to BLACKVUE CLOUD... 3 (A) Create an account... 3 (B) Register your dashcam with your account... 3 (C) Connect your BlackVue dashcam to a
Copyright Basware Corporation. All rights reserved. User Guide Basware Network
 Copyright 1999-2016 Basware Corporation. All rights reserved. User Guide Basware Network About Basware Network Support Documentation The following documentation is available for Basware Network users:
KYOCERA Net Admin User Guide
 KYOCERA Net Admin User Guide Legal Notes Unauthorized reproduction of all or part of this guide is prohibited. The information in this guide is subject to change without notice. We cannot be held liable
THE SMART WAY TO ANSWER YOUR DOOR USER MANUAL
 THE SMART WAY TO ANSWER YOUR DOOR USER MANUAL IMPORTANT PLEASE READ THIS MANUAL CAREFULLY BEFORE OPERATING THE SYSTEM AND RETAIN FOR FUTURE REFERENCE. All devices, with the exception of the External Siren
SalonVision Configuration Guide
 SalonVision Configuration Guide A Guide For SalonVision Live Data Integration I SalonVision Online Booking Configurations Table of Contents Part I Introduction 1 Part II Envision Setup 2 1 Setup Program
V-CUBE Meeting User Manual
 V-CUBE Meeting User Manual 2. Preparing for Meetings V-cube, Inc. 2013 V-cube, Inc. All Rights Reserved. Revision history Revision date Details 2013/09/10 - Added a folder feature to the storage functionality
User Guide for Consumer & Business Clients
 Online Banking from Capital City Bank User Guide for Consumer & Business Clients Revised September 2015 www.ccbg.com/upgrade Contents Overview... 4 Exploring the Home Page... 5 Menu... 6 Accounts... 7
Access and Setup Guide
 ss Access and Setup Guide Creating an Account with Duo and Setting up Citrix Workspace/Receiver to Log in to the Interactive Reporting Site BCBSM PGIP INTERACTI VE REPORTING Contents Introduction... 2
QL-1110NWB. Applications for Use with Computers. Applications for Use with Mobile Devices. Quick Setup Guide (English) NOTE
 NOTE") D00ZC6001 QL-1110NWB Quick Setup Guide (English) Thank you for purchasing the QL-1110NWB Label Printer! Read the Product Safety Guide first, then read this Quick Setup Guide for the correct setup procedure.
D00ZC6001 QL-1110NWB Quick Setup Guide (English) Thank you for purchasing the QL-1110NWB Label Printer! Read the Product Safety Guide first, then read this Quick Setup Guide for the correct setup procedure.
TinLof Technologies - PagePack / PageConnect Program Installation Guide *** Program must be installed on a PC (Non-Mac)
") TinLof Technologies - PagePack / PageConnect Program Installation Guide *** Program must be installed on a PC (Non-Mac) 1. Step 1 Open your Web Browser ( Google Chrome / Internet Explorer) 2. Step 2 Go
TinLof Technologies - PagePack / PageConnect Program Installation Guide *** Program must be installed on a PC (Non-Mac) 1. Step 1 Open your Web Browser ( Google Chrome / Internet Explorer) 2. Step 2 Go
CANVAS OBSERVER GUIDE
 CANVAS OBSERVER GUIDE This work is licensed under a Creative Commons Attribution-NonCommercial-ShareAlike License Table of Contents Introduction...3 What is the Observer role?...4 How can I use Canvas
SoftBank Settings Instruction Manual
 SoftBank Settings Instruction Manual Read Me Read Me...4 Using SoftBank Settings About This Application...7 Preparation for Using This Application...8 Starting This Application... About This Application
What s New. New and Enhanced Features in NetSupport DNA v4. Welcome Dashboard. Auto Discovery. Platform Support
 What s New New and Enhanced Features in NetSupport DNA v4 Welcome to NetSupport DNA version 4, the fresh approach to IT Asset Management. With any new release, the focus is not only on introducing innovative
User s Guide: Applied Functions
 User s Guide: Applied Functions Table of contents 1 Using Web Connection 1.1 Web Connection... 1-2 Web Connection...1-2 Operating environment...1-2 1.2 Operations required to use this function... 1-2 1.2.1
Fuji Xerox is not responsible for any breakdown of machines due to infection by computer virus or computer hacking.
 Administrator Guide Google and Android are either registered trademarks or trademarks of Google Inc. Microsoft, Windows, and Excel are either registered trademarks or trademarks of Microsoft Corporation
Using the isupport Customer Profile Screen
 Using the isupport Customer Profile Screen The Customer Profile screen (accessed via the Desktop menu) enables you to record customer information that can be used in all isupport functionality. Note that
Using the isupport Desktop
 Using the isupport Desktop Overview The isupport Desktop provides access to all isupport functionality, including customizable personal and shared dashboards with components for viewing and monitoring
Welcome to the Investor Experience
 Welcome to the Investor Experience Welcome to the Black Diamond Investor Experience, a platform that allows advisors to customize how they present information to their clients. This document provides important
MetaMoJi Share for Business Ver. 3 MetaMoJi Note for Business Ver. 3 Administrator s Guide
 MetaMoJi Share for Business Ver. 3 MetaMoJi Note for Business Ver. 3 Administrator s Guide Second Edition - ios is a trademark or registered trademark of Cisco in the U.S. and other countries and is used
NETGEAR genie Apps. User Manual. 350 East Plumeria Drive San Jose, CA USA. August v1.0
 User Manual 350 East Plumeria Drive San Jose, CA 95134 USA August 2012 202-10933-03 v1.0 Support Thank you for choosing NETGEAR. To register your product, get the latest product updates, get support online,
Trimble AllTrak Cloud. Getting Started Guide
 Trimble AllTrak Cloud Getting Started Guide Revision B_ENG [Type text] Contents Trimble AllTrak Cloud Account Activation... 6 Activation Email... 6 Activate your account... 6 Expired Activation... 6 Overview
OpenDrive Wordpress Plugin Guide
 OpenDrive Wordpress Plugin Guide Version 1.0.4 OpenDrive Online storage, backup and cloud content management Contents 1. Drive:... 3 1.1 Drive... 3 1.2 Working with files... 4 1.2.1 Work with a particular
V-CUBE Sales & Support. User Manual
 V-CUBE Sales & Support User Manual V-cube, Inc. 2013/12/20 This document is the user manual for V-CUBE Sales & Support. 2013 V-cube, Inc. All Rights Reserved. Revision history Revision date Details 2013/12/20
User Guide. Cloud Application P2 Cast ENGLISH
 User Guide Cloud Application P2 Cast W0415KZ7097 -PB ENGLISH VQT5L67-7(E) Contents Contents Chapter 1 Overview 3 Introduction... 4 About this guide... 4 Terms in this guide... 4 Precautions... 4 Notice
User Guide Advanced Authentication - Smartphone Applications. Version 5.6
 User Guide Advanced Authentication - Smartphone Applications Version 5.6 Legal Notices For information about legal notices, trademarks, disclaimers, warranties, export and other use restrictions, U.S.
Nasuni Mobile Access User Guide
 Using Nasuni Mobile Access, you can access data stored in the Nasuni Filer using mobile devices, including ios-based devices (such as iphone and ipad) and Android phones. You can perform tasks such as
Texas Division How to Login and Register for My IT Support and ServiceNow
 Texas Division How to Login and Register for My IT Support and ServiceNow Go to texas.mychiitsuppport.org. You'll see the screen below. My IT Support/ServiceNow is a national system and utilizes national
Grandstream Networks, Inc.
 Grandstream Networks, Inc. IPVideoTalk Cloud Conferencing System Table of Contents INTRODUCTION... 4 OVERVIEW... 5 Sign Up... 5 Sign In... 6 Tool Bar... 7 Portal Notifications... 8 DEVICES... 9 Link GVC320x
Copyright 2012 Jiransoft Co., Ltd. All rights reserved.
 Administrator Guide Copyright 2012 Jiransoft Co., Ltd. All rights reserved. No part of this publication may be reproduced or transmitted in any form or by any means without the express written consent
MDM Android Client x - User Guide 7P Mobile Device Management. Doc.Rel: 1.0/
 MDM Android Client 5.26.0x - User Guide 7P Mobile Device Management Doc.Rel: 1.0/ 2017-07-16 Table of Contents 1 Objectives and Target Groups... 9 1.1 Important information... 9 1.2 Third-Party Materials...
People. Processes. Integrating Globally.
 People. Processes. Integrating Globally. Course: isupplier for Suppliers Table of Contents Table of Contents Course Introduction...4 L1: Vendor Registration... 6 Register for isupplier using SteelTrack
Introduction. Package Checklist. Minimum System Requirements. Registering Your Product. More Help
 Introduction Keep a watch on your family, pet, home or office 24/7, even when you re not there. Creative Live! Cam IP SmartHD gives you a live update on your phone, wherever you are. Get activity alerts,
Crestron XiO Cloud Service
 Crestron XiO Cloud Service User Guide Crestron Electronics, Inc. Crestron product development software is licensed to Crestron dealers and Crestron Service Providers (CSPs) under a limited non-exclusive,
Salesforce Classic User Guide for Android
 Salesforce Classic User Guide for Android Version 36.0, Spring 16 @salesforcedocs Last updated: April 27, 2016 Copyright 2000 2016 salesforce.com, inc. All rights reserved. Salesforce is a registered trademark