Mini FPV Tricopter / Vtail / Quadcopter
|
|
|
- Florence Nash
- 5 years ago
- Views:
Transcription


1 Mini FPV Tricopter / Vtail / Quadcopter Frame Assembly Manual / Tips and Tricks Armattan Minis Website: Main Armattan Website (doesn t have minis): RCGroups Discussion Thread: Contact service@armattanminis.ca V05 Updated January 21 st, P a g e
2 Contents Frame Specifications:... 3 Recommended parts:... 3 Parts included in Tricopter / Quadcopter frame kit... 4 Tricopter Build... 5 Step 1:... 5 Step 2:... 6 Step 3:... 7 Step 4:... 8 Step 5:... 9 Step 6: Tricopter Tricks and Tips With the Armattan Mullet Acro FC: Starting PIDs Quadcopter Tuning Values Vtail Build Step Step Step Step Step Step Vtail Tricks and Tips With the Armattan Mullet Acro FC: Starting PIDs Throttle Calibration P a g e
3 Frame Specifications: 1.5mm Carbon Fiber Main Plate 1mm Carbon Fiber Top Plate 1mm G10 FPV camera plate 3mm Carbon Fiber Arms Custom 3D printed direct drive tail mechanism for tricopter 6061 Aircraft Grade aluminum Vtail adapter Option for various vibration isolation methods (or none for a speed racer) Small (30.5mm) or large (45mm) FC mounting Various lipo mounting locations (bottom recommended) Foldable Various motor size options (accepts 16x19 motors) Up to 6" props Mobius and GoPro capable Recommended parts: Cobra kV multirotor version 12A Armattan ESCs (18A 30 second burst) 6" props with 3S (1000mAh-2200mAh) OR 5" props with 4S (1000mAh-1800mAh) TGY-212DMH servo (tricopter) or similar Armattan Mullet Acro ImmersionRC 5.8GHz 600mW VTx with Cloverleaf PZ0420 (or cheaper knockoff equivalent CC1333) Pololu 12V step up (5V of VTx to 12V of camera) Mobuis (GoPro capable) 3 P a g e

4 Parts included in Tricopter / Quadcopter frame kit (subject to change, parts may not be exactly as pictured) 2 x 1.5mm CF Main Plate 2 x 1mm CF Top Plate 4 x 3mm CF Arm 1 x 1mm CF FPV Plate 4 x Blue Gimbal Bobbin 6 x M3 35mm Aluminum Standoff 4 x M3 12mm Nylon Standoff 8 x M3 5mm Nylon Bolt 12 x M3 Locknut 4 x M3 3mm Spacer 12 x M3 4mm Metal Bolt 1 x 3.18mm Shaft with C-Clip 2 x M2 Locknut 2 x M2 6mm Metal Bolt 2 x M2 8mm Metal Bolt 4 x M2 Nylon Nut 4 x M2 5mm Nylon Standoff 4 x M2 5mm Nylon Bolt 1 x Lipo Strap (not pictured) 1 x 3D Printed Tail Mechanism 12 x M3 12mm Metal Bolt 4 P a g e

5 Tricopter Build Step 1: Place gimbal bobbins in one main plate, lipo strap in the other. 5 P a g e


6 Step 2: Mount M2 Nylon hardware to FPV camera plate. Insert shaft with C-Clip into tail mechanism. Screw on servo arm with M2 metal hardware, using either the short or long bolts depending on size. The screw that usually goes into the servo through the servo arm ISN T used. 6 P a g e

7 Step 3: Using 10 x 10mm bolts, 10 x M3 locknuts, 2 x 3mm spacers (washers optional, but recommended on sliding slots for arms) assemble arms to main plates. Spacers go at the front of the main plates. Check arm orientation to match motor pattern, flip over if motor wires come out sideways. This includes the tail mechanism piece. 7 P a g e

8 Step 4: Assemble the 6 x 35mm metal standoffs to one top plate with 6 x 4mm metal bolts. Also install the 4 x 12mm nylon standoffs with 4 x 5mm nylon bolt. Slide FPV plate into either slot, depending on where you d like to mount it. 8 P a g e


9 Step 5: Squish the bobbins through the top plate. Don t be afraid to really squish them to get them in, they re built to be squished. 9 P a g e

10 Step 6: Install second top plate with 6 x 4mm bolts. 10 P a g e
11 Tricopter Tricks and Tips Use double sided servo tape between the servo and the arm along with a ziptie to ensure it doesn t move. When installing the servo (stick tape onto servo first), have the tail mechanism installed already. Flex it up a bit so that when you re putting the servo spline into the servo arm, the tape isn t touching the arm. Then align from above and push the servo onto the CF arm. If the servo or tail mechanism needs to be replaced, undo the bolts holding the small piece to the arm first and slide the entire mechanism backwards off the servo. In hard crashes, the gimbal bobbins can pull out of the main and top plates. To remove the chance of this happening, it s recommended to loosely put zipties through them to act as limiters in a crash. A small PDB (such as the Armattan mini PDB) is recommended. It makes the build much easier and adds minimal weight. CG location is at the middle of the hexagon cutout on the top plates. 11 P a g e


12 With the Armattan Mullet Acro FC: Ignore the prop directions in the Naze manual. Having all three props spin the same direction will limit the throw and therefore the rotation speed in a yaw direction. Instead, have the front two props counter rotate in the same way a quad does. The back prop can go either direction. Limit the servo throw to extend its life. The tail mechanism doesn t allow for full 180 degree movement. I use the following, but it will depend on your servo and configuration. Type set tri_unarmed_servo = 0 into the CLI to stop the servo from moving when not armed (not required, but nice to have). Set looptime to 2500 (in CLI, type set looptime = 2500 and don t forget save ) Starting PIDs (you may have to retune based on your setup) 3S: 12 P a g e

13 4S: 13 P a g e
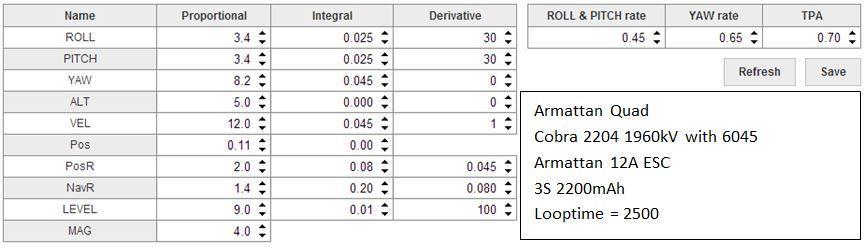

14 Quadcopter Tuning Values 14 P a g e
 onto one arm. Insert 4 x 12mm bolts through other arm and place 4 black nylon spacers on the bolts.")
15 Vtail Build Step 1: Follow tricopter build step 1 (bobbins and lipo strap) Step 2: Install landing gear (if purchased) onto one arm. Insert 4 x 12mm bolts through other arm and place 4 black nylon spacers on the bolts. 15 P a g e


16 Step 3: Slide on the second arm with the landing gear and screw onto Vtail adapter. Only catch the first thread or two, don t tighten the bolts all the way. Step 4: Use 2x12mm bolts and sandwich one arm between the plates, the other on top. Thread 2xM3 nylock nuts onto these two bolts and tighten fully. Then tighten the 4 bolts going into the Vtail adapter. This will flex the arms slightly, making them very resistant against flexing. 16 P a g e
.")
17 Step 5: Use 4x6mm bolts and screw two more arms onto the Vtail adapter, ensuring the motor pattern is correct. Step 6: Continue to build the remainder of the frame the same as the tricopter (above). 17 P a g e
18 Vtail Tricks and Tips All prop directions are OPPOSITE of a regular quad. Make sure your ESC connections reflect this. This is looking down on the quad. You can top mount the motors (pictures above are bottom mounted). This makes it so you don t need landing gear and protects the props better. You do lose a very very small and completely negligible amount of thrust doing this. As mentioned in the tricopter section, hard crashes can cause the gimbal bobbins to pull out of the main and top plates. To remove the chance of this happening, it s recommended to loosely put zipties through them to act as limiters in a crash. CG location is at the rear bobbins. 18 P a g e
19 With the Armattan Mullet Acro FC: The built in Vtail mixer on the Naze isn t the best. It will work fine, but flight characteristics might not seem natural. It is recommended to use the cmix function and set the mixer to custom and enter the following mix (copy enter segment into CLI and hit enter). Motor order is the same as a quad. cmix cmix cmix cmix mixer custom save Starting PIDs PID s for Cobra 1960kV, FC6045, 3S 2200mAh Lowering looptime to ~2500 is also recommended (matches the frequency of 400Hz ESCs, can be lowered even farther for faster ESCs). Throttle Calibration It is possible to calibrate all the ESCs at once through the Mullet, and is the recommended way to do so. This procedure should be done with PROPS OFF, as doing it incorrectly can cause all motors to go to max throttle. Begin by connecting the Mullet to baseflight configurator, do not plug the lipo in yet. Set mincommand to 2000 and save (either in CLI or the Configuration tabs). Then set mincommand to 1000, but don t save yet! Plug the lipo in, you should hear a single high tone (SimonK) or a series of high beeps (BLHeli). Save the mincommand at 1000, and your ESCs should do their respective tones. I lower mincommand to 950 after this as this is below the minimum throttle the Mullet sees from my radio (hovers around 975 in the Receiver tab). 19 P a g e
A B C D REV 1 SHEET 1 OF 1 1 G NO assy_011 DW TITLE SIZE C SCALE 9/17/2016 N 2 2 FG APPROVED CHECKED QA M Henri DRAW PHALANX A B C D
 4 A BPHALANX Greetings and good fortune be on you as you have aquired your new greatness. As you work through the assembly passages, please, READ THE DIRECTIONS! There are fine points covered that you
Assembly Manual. X Bolt FPV Racer Kit AZSZ2903
 Assembly Manual X Bolt FPV Racer Kit AZSZ2903 Product specifications are subject to change without notice. Due to ongoing development, the actual product may vary from images shown. This product contains
Manual. There is also a growing array of upgrades and customizations, both functional and cosmetic available from quadquestions.
 Manual Thank you for purchasing the QQ190 Falcon racing quadcopter and welcome to the QQ190 team. This manual details how to physically assemble the frame. There is a diverse array of electrical components
HQuad500 Frame Assembly Guide
 HQuad500 Frame Assembly Guide V1.0 June 2015 1 What s Included Kit Content Hardware Bag Content 2 HQuad500 Assembly 2.1 Arm & Motor Mount Sub Assembly 2.2 Landing Gear Step 1 2.3 Center Plates Sub Assembly
ARRIS X-Speed 250B Assembling Manual
 ARRIS X-Speed 250B Assembling Manual Thank you for purchasing the ARRIS X-Speed 250B FPV Racing drone. Be sure to read through the entire manual before starting your build. If you bought the ARRIS X-Speed
Q2 XBee Handheld Controller Assembly Guide
 Q2 XBee Handheld Controller Assembly Guide Copyright Quantum Robotics Inc. Q2 Controller V1.0 1 Parts List: The kit comes with 14 individual bags. 1. Case Top and Bottom 2. Case Screw Package containing:
SCREAMER 250 RACE PENTACOPTER
 SCREAMER 250 RACE PENTACOPTER USER MANUAL SPECIFICATIONS -Wheel base: 250mm -Frame weight: 260g -Flying weight: 610g (4S 1500mah lipo included) -Flight time: 3-5 mins(flight time reduces by using rear
Senrigan-GP-45 Brushless Gimbal Instruction Manual v1.2
 Senrigan-GP-45 Brushless Gimbal Instruction Manual v1.2 Page 1 of 16 Contents 1. Introduction...3 2. Check List...4 3. Equipment Required For Assembly...5 4. Assembly Steps Mechanism Parts...6 5. Assembly
IMP Concepts 3DR Iris Retract Carbon Edition Installation Instructions
 Revision IV IMP Concepts 3DR Iris Retract Carbon Edition Installation Instructions Complete Kit includes all required mechanical parts: Includes: Assembled Actuators & Extended Retract Legs, Wire Clips
THIS IS THE CURRENT FF USER GUIDE AS OF PLEASE DO NOT USE ANY PREVIOUSLY DATED VERSIONS
 THIS IS THE CURRENT FF USER GUIDE AS OF 05-04-2012 PLEASE DO NOT USE ANY PREVIOUSLY DATED VERSIONS INTRODUCTION: I compiled this guide from information posted on RCGroups.COM and from GoodLuckBuy.COM where
Make a Quadcopter using KK Flight Controller
 Make a Quadcopter using KK 2.1.5 Flight Controller 1 Typical Applications A quadcopter, also called a quadrotor helicopter or quadrotor, is a multirotor helicopter that is lifted and propelled by four
FPV racer Frame class:
 By FPV racer Frame class: Prop. size: Motor size: Power: Flight Cam: Material: 250 Up to 6" M3 or M2 attached motors of choice Up to 4S 1500 mah housed inside frame as optimum, depending on brand Tie-strap
Mikrokopter FPV Camera Mount. Assembly Manual
 Assembly Manual Introduction Thank you for purchasing the. The FPV Camera Mount is provided as a kit and requires assembly. The assembly of the mount can take up to 15-20 minutes for an inexperienced builder.
THIS IS THE CURRENT FF USER GUIDE AS OF PLEASE DO NOT USE ANY PREVIOUSLY DATED VERSIONS
 THIS IS THE CURRENT FF USER GUIDE AS OF 02-26-2012 PLEASE DO NOT USE ANY PREVIOUSLY DATED VERSIONS INTRODUCTION: I compiled this guide from information posted on RCGroups.COM and from GoodLuckBuy.COM where
STEP 1: MODULE MOUNTING / WIRING:
 VER1.0 PINOUT DIAGRAM: PORT 1 - INPUT 1 (S.BUS, PWM, PPM INPUT) PORT 2 - INPUT 2 (PWM MODE INPUT OR AUX OUTPUT DEFINED IN SOFTWARE) PORT 3 - OUTPUT 1 (S.BUS OUTPUT) PORT 4 - OUTPUT 2 (SERVO OUTPUT) PORT
Aeroxcraft VTR-GP Tilt/Roll Gimbal User Manual
 Aeroxcraft VTR-GP Tilt/Roll Gimbal User Manual Contents. Notes 2. Introduction 3. Installing GoPro camera 4. Connecting to a DJI Naza or Wookong 5. Installing HoverflyGimbal 6. Adjusting centre points
It can be used for fire observation, cable line patrol, construction monitoring, farm monitoring, andother applications requiring high mobility.
 UserManual SPARTACUSH680 Rev i s i on1. 0( 15hMay2014) SPARTACUS H680 The Spartacus H680 features full CNC machined, high performance carbon fiber construction. The design has been optimised, and the frame
VTX OSD Board USER MANUAL VERSION 1.0
 INNOVA V4 VTX OSD Board USER MANUAL VERSION 1.0 Please contact us if you need further assistance: Tech support: tech@furiousfpv.com Sales support: sales@furiousfpv.com Website: http://furiousfpv.com/ 1
Fantasea Blue Ray Tray (Cat. No. 2040, 2045, 2050) Instruction Manual
 Instruction Manual") Fantasea Blue Ray Tray (Cat. No. 2040, 2045, 2050) Instruction Manual For Illustration- Blue Ray Double Tray with Housing 1 The Fantasea Blue Ray Tray allows integrating different components in an underwater
Fantasea Blue Ray Tray (Cat. No. 2040, 2045, 2050) Instruction Manual For Illustration- Blue Ray Double Tray with Housing 1 The Fantasea Blue Ray Tray allows integrating different components in an underwater
Instructions for installing your QuiltCam on your Gammill quilt machine.
 Instructions for installing your QuiltCam on your Gammill quilt machine. The items include with your QuiltCam Items included in all packages: QuiltCam Control Box, See Figure 1 Power Supply, Figure 2 Video
INSPIRE 1 Quick Start Guide V1.0
 INSPIRE Quick Start Guide V.0 The Inspire is a professional aerial filmmaking and photography platform that is ready to fly right out of the box. Featuring an onboard camera equipped with a 0mm lens and
ColorMaxLP Label Roll Rewinder
 ColorMaxLP Label Roll Rewinder 5/2017 INSTALLATION/OPERATOR MANUAL Included: Rewinder Base plate Power supply Power Cord Thumb screws Assembly instructions 1. Install base plate Lift front of printer and
cytrynka PDB User Guide for power distribution board for zmr/qav/rcx 250 class copters
 cytrynka PDB User Guide for power distribution board for zmr/qav/rcx 250 class copters 1 Contents 1. Overview and future list 2. Installation 3. Hardware on board 4. Conversion board pins 5. Jumpers 5
If you are missing any of the following items, please contact Stanton Video immediately (602)
") RIGHT ANGLE FOCUS Jan 03 If you are missing any of the following items, please contact Stanton Video immediately (602) 493-9505 1. Right Angle Focus Servo 2. Servo End Cap 3. Lens Gears (32 pitch, 48 pitch,.6
RIGHT ANGLE FOCUS Jan 03 If you are missing any of the following items, please contact Stanton Video immediately (602) 493-9505 1. Right Angle Focus Servo 2. Servo End Cap 3. Lens Gears (32 pitch, 48 pitch,.6
Vac-U-Cam. R/C Camera Boat Hull Kit. Length: 22.5 in. Beam: 7 in. Draft: 2-3/8 in. Displacement: 4 lb.
 Vac-U-Cam TM R/C Camera Boat Hull Kit Length: 22.5 in. Beam: 7 in. Draft: 2-3/8 in. Displacement: 4 lb. A stable camera platform for use with digital cameras, or waterproof cameras up to 16 ounces. A 3-channel
3D SYSTEMS University CubeX 3D Printer
 3D SYSTEMS University CubeX 3D Printer Lesson Leveling the Print Pad and Print Tips, Setting the Z-Gap Revision date: 10/22/13 1 1 2016 年 6 月 14 日 Objectives After completing this lesson you will: Be able
How to assemble and disassemble Anafi
 How to assemble and disassemble Anafi Prerequisites The best way to repair ANAFI is to use Parrot official drones repair kit. You will need the cruciform as well as the Torx 5 (T5) in order to carry out
HGLRC F4 V6PRO (FC&VTX) Manual
 Manual") HGLRC F4 V6PRO (FC&VTX) Manual 1 Specifications CPU: STM32F405RGT6, dual open 8K MPU:MPU6000-SPI connection Built-in 5V/3A BEC output Direct welding ESC PDB Built-in current sensor Black box FLASH 16M
HGLRC F4 V6PRO (FC&VTX) Manual 1 Specifications CPU: STM32F405RGT6, dual open 8K MPU:MPU6000-SPI connection Built-in 5V/3A BEC output Direct welding ESC PDB Built-in current sensor Black box FLASH 16M
NANOMIND 110 USER MANUAL
 NANOMIND 110 USER MANUAL Highlights - MindRacer in nano size frame, running MindPX & PX4 flight stack - heavy lifter, maximum take-off weight up to 80 g - 5~7 minutes flight time - full modularized, stackable,
FALCON CP-90 FPV RACING DRONE BUILD GUIDE INSTRUCTIONS V1.0
 FALCON CP-90 FPV RACING DRONE BUILD GUIDE INSTRUCTIONS V1.0 INTRODUCTION The present guide was developed to show you how to build your personal Racing Drone. The model we will be assembling together is
Steltronic Universal LCD Mounting Bracket Assembly
 Steltronic Universal LCD Mounting Bracket Assembly Components necessary to build the bracket assembly A. Main Plate (1 required per pair of monitors) B. Slide Rails (2 required per pair of monitors) C.
MINDRACER USER MANUAL
 MindPX T h e U l t i m a t e Racer MINDRACER USER MANUAL Highlights - Ultra mini size, weight only ~6g - High performance F4 168MHz floating point processor, super fast throttle response - Support OneShot
KRONOS INSTALLATION INSTRUCTIONS
 INSTALLATION INSTRUCTIONS TABLE OF CONTENTS ENCLOSURE AND DONGLE ASSEMBLY 1 LIGHTED ENCLOSURES 2-10 2 SLIM ENCLOSURE 11-17 3 WIRED-ETHERNET DONGLE 18-25 4 REAR-OFFSET MOUNT 26-33 5 SIDE-MOUNT 34-41 6 SURFACE
Installing the Server into a Rack
 Installing the Server into a Rack Note These instructions apply to multiple models; illustrations may vary slightly. Rack Mount Kit Inventory Before installing the chassis on a standard 4-post rack, make
Overview. Connect the Flight Control Board and Receiver
 Overview This article only describes the methods for connecting the receiver and ESC to the flight control board. You may need to refer to other materials for installation of other devices. If conditions
Installation Instruction VCPRGBGM05 - rev1.5 RGB Interface Harness modification Navigation Radio
 Introduction The following instruction procedure is for the RGB interface to a GM 05 Nav Radio as part of the Webasto Product NAVCam Back-up Camera (VCP-0000220). In addition, an installer will need to
Setup Information Panosaurus May 3, 2011
 Setup Information Panosaurus 2.0 www.gregwired.com May 3, 2011 Please take the time to read all of the setup information to ensure success and ease of use of this tripod head. Much of the setup is a one
Assembly Manual for Mobile X-ray
 Suitable for Kodak 2000, Kodak 2100, Kodak 2200 and Trophy Elytis - 12 th January 2011 William Green Page 1 of 8 Printed 12/01/2011, 2:07:42 PM Mobile X-ray Parts List 1. 6 x M10 x 65mm UNB CAP Bolts 2.
X-RACER KL-EX90 INSTALLATION INSTRUCTIONS
 X-RACER KL-EX90 INSTALLATION INSTRUCTIONS FPV MODEL LIMITED Step 1:Check all the parts in case there s any missing. 1 x KL-EX90 Frame 4 x Dragonfly MC1105 7500kv Micro Class Racing Motor 1 x Flycolor RAPTOR
FlowPod Stabilizer / MonoPod / Low Mode
 FlowPod Stabilizer / MonoPod / Low Mode FlowPod Operating Manual Thank you for purchasing the versatile FlowPod, our patented stabilizer/support. The FlowPod offers several shooting options that will help
Atlatl FPV Video Transmitter
 Atlatl FPV Video Transmitter User Manual & Installation Guide V1.1 Contents Overview... 1 Features Specifications Warranty Pinout Diagram and Channel Table... 2 Installation Guide... 3 Functions... 6 Channel-Change
Hermit 145 V2 Micro brushless FPV quadcopter
 Hermit 145 V2 Micro brushless FPV quadcopter Hermit 145 V2 is a newly designed micro FPV quadcopter of only 158mm (Diagonal from motor center to motor center), its small size can make it fly in a relatively
Product Overview. Features
 APCF1 Model Tripod Product Overview The Ravelli APCF1 is a Professional Quality Carbon Fiber Tripod providing a solid base for high-end photographic equipment. This model is a mix of carbon fiber and magnesium
PowerBook G4 Aluminum 12" GHz Display Data Cable Replacement
 PowerBook G4 Aluminum 12" 1-1.5 GHz Display Data Cable Replacement Written By: Matthew Newsom ifixit CC BY-NC-SA www.ifixit.com Page 1 of 47 INTRODUCTION Replace a damaged display data cable to restore
DOWNLOADING THE APP FOR APPLE PHONES: DOWNLOADING THE APP FOR ANDROID PHONES: For Android Phones go to Google Play or the Android Store.
 DOWNLOADING THE APP FOR APPLE PHONES: DOWNLOADING THE APP FOR ANDROID PHONES: For Android Phones go to Google Play or the Android Store. For Apple Phones go to the app store and click GET. Make sure your
ROBOT LINE TRACKING MOUSE KIT C-9801
 ROBOT LINE TRACKING MOUSE KIT TOOLS you'll need Alimentation 4 batteries 1,5 V AA (not included) The mouse is a line follower robot that follows a black line (or any other color) on a white background
PowerBook G4 Aluminum 12" GHz Left Clutch Hinge Replacement
 PowerBook G4 Aluminum 12" 1-1.5 GHz Left Clutch Hinge Replacement Written By: Matthew Newsom ifixit CC BY-NC-SA www.ifixit.com Page 1 of 50 INTRODUCTION Replace a broken clutch hinge to make your display
Z-Truck (Vertical Moving) Z-truck Flag. Y-Truck (Horizontal Moving) FIGURE 1: VIEW OF THE Z-TRUCK. Flexshaft Assembly
 Z-truck Flag. Y-Truck (Horizontal Moving) FIGURE 1: VIEW OF THE Z-TRUCK. Flexshaft Assembly") Replacing the LCD Cable To remove and replace the LCD Cable you will need the following tools: #2 Phillips screwdriver (magnetic tip preferred) Socket wrench with 10mm socket Removing the Side Panel 1.
Replacing the LCD Cable To remove and replace the LCD Cable you will need the following tools: #2 Phillips screwdriver (magnetic tip preferred) Socket wrench with 10mm socket Removing the Side Panel 1.
INSTALLATION INSTRUCTIONS
 INSTALLATION INSTRUCTIONS 19 20 21 01 07 22 23 13 10 12 08 17 18 11 02 14 15 04 03 16 WELCOME PARTS LIST Thank you for purchasing this HealthPoint Technology Cabinet from Humanscale! Before you begin installing
CAMERA ASSEMBLY. Removal/Replacement of the Camera Box Assembly APR-CA. Install Camera Assembly. Remove Camera Assembly
 CAMERA ASSEMBLY Removal/Replacement of the Camera Box Assembly APR-CA REQUIRED TOOLS: 9/64 hex key Small flat-tip screwdriver Remove Camera Assembly camera 1. Locate the camera assembly underneath the
Flight Controller USER MANUAL VERSION 1.0
 PIKO F4 Flight Controller USER MANUAL VERSION 1.0 Please contact us if you need further assistance: Tech support: tech@furiousfpv.com Sales support: sales@furiousfpv.com Website: http://furiousfpv.com/
SF Studio Series Set-Up Instructions
 SF Studio Series Set-Up Instructions Teleprompter Parts Step #1 Remove the quick-release plate from your tripod head. Set the plate on a flat surface (table, desk, etc) with anti-skid pads on top & camera
Caution Notes. Features. Specifications. A3-L User Manual V1.0
 Caution Notes Thank you for choosing our products. If any difficulties are encountered while setting up or operating it, please consult this manual first. For further help, please don t hesitate to contact
A-100G6 - Basic frame assembly diagram
 doepfer System A - 100 Rack system A-100 G A-100G6 - Basic frame assembly diagram Parts: 1 Rail with lip, and with tapped hole strip inserted (with M3 threads). 2 Rail with lip, with three M3 hexagon nuts
Parts and Service Manual IMCO
 XXTREME ADVANTAGE Gimbal Parts and Service Manual IMCO 510 East Arrow Highway San Dimas, CA 91773 (800) 899-8058 (909) 592-6162 Fax (909) 592-6052 www.imcomarine.com email info@imcomarine.com TABLE OF
Dragonfly Pro USER MANUAL
 New vision of the world Shenzhen Simtoo Intelligent Technology Co., Ltd. West Industry Building A5, Park Road, Bao An District, Shenzhen, China 518000 TEL: +86 755 2373 2452 Web: www.simtoo.com Email:
Cannes Edition Product List
 Cannes Edition Product List Congratulations on your purchase of a DSLRProsCannes Edition Aerial Kit. Inside your Special Edition tough case you will find the following items with numbers that correspond
ZYX User Manual V Revision
 ZYX User Manual V.00 206.07.26 Revision Contents Warning and Disclaimer... 3 I. Product Introduction... 4 II. Product List... 5. Package Contents... 5 III. Mounting & Configuration... 6. Gimbal Controller
Experimental Procedure
 1 of 14 9/10/2018, 11:38 AM https://www.sciencebuddies.org/science-fair-projects/project-ideas/robotics_p028/robotics/obstacle-avoiding-robot (http://www.sciencebuddies.org/science-fair-projects /project-ideas/robotics_p028/robotics/obstacle-avoiding-robot)
Atlatl Mini FPV Video Transmitter V1.0
 Atlatl Mini FPV Video Transmitter V1.0 User Manual & Installation Guide [Type here] [Type here] Contents Overview... 1 Features Specifications Warranty Pinout Diagram and Channel Table... 3 Installation
20A 4 in 1 + CC3D FC. Connection diagram (To flight controller) Connection diagram 2 BATTERY GND VCC. black red. red yellow black.
 Connection diagram 2 BATTERY GND VCC. black red. red yellow black.") 4 in 1 + CC3D FC Connection diagram (To flight controller) Blue 1 Green 2 Yellow 3 White 4 Red 5 Black 6 6 5 4 Inputs 1~6 3 2 1 5V -Neg Top Botton Connection diagram 2 4 Brushless Motor 3 Brushless Motor
4 in 1 + CC3D FC Connection diagram (To flight controller) Blue 1 Green 2 Yellow 3 White 4 Red 5 Black 6 6 5 4 Inputs 1~6 3 2 1 5V -Neg Top Botton Connection diagram 2 4 Brushless Motor 3 Brushless Motor
Control Box Setup - PRSalpha
 888-680-4466 ShopBotTools.com Control Box Setup - PRSalpha Copyright 2016 ShopBot Tools, Inc. page 1 Copyright 2016 ShopBot Tools, Inc. page 2 Parts List: Hooking Up a PRSalpha Gantry Tool Powering the
Arduino Robots Robot Kit Parts List
 Arduino Robots Robot Kit Parts List (1) Metal Chassis (2) Push Button Activators (2) Servo Motors w/ Cross Wheels (2) IR Receivers (1) Control Board (1) Piezo Speaker (1) Dual-Sided Screwdriver (1) Cotter
xtablet T1600 Vehicle Holder Installation Guide
 This document will step you through setting up the T1600 Vehicle Holder installation and tips for a safe, clean and long lasting installation. Preparing to Mount the Vehicle Holder Warning : Dock mounting
Nerd transformation. For FPV the key criteria are the immersion experience taking the pilot to the cockpit.
 Introduction: David Bock Electrical and Electronic Engineer Specialization high power electronics for Electric Vehicle BMW EA-440 Electric Vehicle powertrain electronics pre-development 1 st RC Cars with
F-35 LIGHTNING FLIGHT CONTROLLER USER MANUAL VERSION 1.2
 F-35 LIGHTNING FLIGHT CONTROLLER USER MANUAL VERSION 1.2 Please contact us if you need further assistance: Tech support: tech@furiousfpv.com Sales support: sales@furiousfpv.com Website: http://furiousfpv.com/
Installing PRO/DGX or Pro Soloist MIDI interface. R Grieb 9/08/2017
 Installing PRO/DGX or Pro Soloist MIDI interface. R Grieb 9/08/2017 Please read these instructions before purchasing the MIDI interface, to make sure you are comfortable performing the necessary steps.
Written By: senordingdong
 Installation of the UniMac V4 adapter into the Apple imac Intel 17". This enables the usage of non OEM LCD panels, and offers an otherwise unavailable Full HD upgrade. This used for repair of the common
IBM. Rack Installation Instructions
 IBM Rack Installation Instructions Review the documentation that comes with your rack cabinet for safety and cabling information. When installing your server in a rack cabinet, consider the following:
KOMBINI DSHOT VERSION
 KOMBINI DSHOT VERSION Flight controller USER MANUAL Please contact us if you need further assistance: Tech support: tech@furiousfpv.com Sales support: sales@furiousfpv.com Website: http://furiousfpv.com/
13 MMC for PC Option Modules
 Part Number M.1300.8684 MMC for PC Option Modules Manual V3.0 The information in this document is also available in the MMC for PC Hardware Manual. 13 MMC for PC Option Modules 13.1 General The MMC for
2 x Dynamic Arms on 135 Post with C-Clamp
 Installation Guide AWMS-2-D13-C 2 x Dynamic Arms on 135 Post with C-Clamp COMPONENT CHECKLIST RANGE A AWM-LC Post Clamp B AWM-AD Dynamic Arm (x2) C AWM-P13 135 Post D AWM-FC C-Clamp CONTENTS C-Clamp Page
DIGITAL OBSERVATION GUARD LOW PROFILE PAN TILT KIT USER MANUAL
 DIGITAL OBSERVATION GUARD LOW PROFILE PAN TILT KIT USER MANUAL Version 2.1 June 4, 2013 0 Table of Contents Low Profile Pan Tilt Kit Description... 3 Low Profile Pan Tilt Unit Basic Operation... 4 Mounting
Form: Effective: 9/2007 Supersedes: /95
 DR 4500 & DR4500A Circular Chart Recorder Servo Plate Assembly Kit Replacement Instruction Assembly 30754975-50 (-Pen Model) Assembly 30754975-502 (2-Pen Model) Assembly 30754975-503 (Truline Model) Form:
Assembly Instructions Triton Enclosure for Poseidon With Data Acquisition November, 2007 V0.9 DSC Document #
 Assembly Instructions Triton Enclosure for Poseidon With Data Acquisition November, 2007 V0.9 DSC Document #7521002 Diamond Systems Corp. (650) 810-2500 www.diamondsystems.com This document describes how
the TS-520 Noise Blanker board to and making wiring changes to your SB-303 receiver!!!!
 The Kenwood TS-520 s Noise Blanker board, ID# X54-1080-10, can be installed in a Heathkit SB-303 receiver quite easily. The Noise Blanker board operates directly off of the SB-303 s 15VDC supply. Therefore,
First an explanation of the grades or densities of balsa wood is in order:
 Mysterion Materials List By Rod and Al Clark Wood First an explanation of the grades or densities of balsa wood is in order: Grade Ultra Density in lb/cu.ft -.. -.0.1 -.. -.. - + Contest grade balsa To
Mac Mini Mid 2010 SSD Installation
 Mac Mini Mid 2010 SSD Installation Replace your Mac Mini Mid 2010's hard drive for more storage space and an increase in speed. Written By: Dozuki System 2017 guides.crucial.com Page 1 of 15 INTRODUCTION
Maintenance. Every Flying Session:
 Maintenance Maintenance The Draganflyer series aircraft feature a direct drive system requiring minimal maintenance as compared to a tradition style helicopter with servo linkages, gears, drive shafts,
PowerBook G4 Aluminum 12" GHz Logic Board Replacement
 PowerBook G4 Aluminum 12" 1-1.5 GHz Logic Board Replacement Written By: irobot ifixit CC BY-NC-SA www.ifixit.com Page 1 of 32 INTRODUCTION This motherboard includes all ports except the DC-In board. TOOLS:
JIB EPT USER MANUAL. Please read this manual carefully before using the Alphatron JIB ETP unit! JIB & MOTORISED PAN AND TILT UNIT
 JIB EPT JIB & MOTORISED PAN AND TILT UNIT USER MANUAL EN Please read this manual carefully before using the Alphatron JIB ETP unit! Thank you for purchasing a Alphatron product The EPT head is developed
Written By: Walter Galan
 Replace a cracked screen on your iphone 4S. Written By: Walter Galan ifixit CC BY-NC-SA www.ifixit.com Page 1 of 32 INTRODUCTION Use this guide to replace the screen on your iphone 4S. After successfully
TG VR Gimbal User Manual V Accsoon. All Rights Reserved.
 TG20 360 VR Gimbal User Manual V1.0 20161209 www.accsoon.com E-mail: salse@accsoon.com 0 Disclaimers and Warnings Congratulations on purchasing you new VR Gimbal. Please read this manual and disclaimer
Series 1780 dynamometer and thrust stand datasheet
 Series 1780 dynamometer and thrust stand datasheet Typical use Inrunner and outrunner brushless motor characterization (0-100A) Propeller characterization (max 40 ) Servo testing and control Battery endurance
Installation and Assembly: 2 x 2 Video Wall Ceiling Mount for 40" - 55" flat Panel Displays
 Installation and Assembly: 2 x 2 Video Wall Ceiling Mount for 40" - 55" flat Panel Displays Model: DS-VWT955-2X2 EXTENSION COLUMN (SOLD SEPARATELY) COMPATIBILITY Display width must be a minimum of 36"
OSDoge. Setup handbook
 OSDoge Setup handbook Revision 1, January 8 2015 1 Table of Contents 1. Hardware Overview... 3 2. Hardware capabilities overview... 4 3. Connections overview... 5 4. Configuring power supplies... 6 1.1.
ARRIS Zhao Yun Pro User Manual. Content
 ARRIS Zhao Yun Pro User Manual Thank you for buying ARRIS Zhao Yun Pro 3-Axis brushless Gimbal. Each gimbal has been adjusted and tested before we send it out. For this gimbal, Most customers can plug
TIVO DVR UPGRADE INSTRUCTIONS (#80-HD)
") TIVO DVR UPGRADE INSTRUCTIONS (#80-HD) (c) 2001-2006, weaknees. All rights reserved. Instructions for TwinBreeze HR10-250 DVR Upgrade Bracket/Kit Instructions are available online (in COLOR) at http://www.weaknees.com
TIVO DVR UPGRADE INSTRUCTIONS (#80-HD) (c) 2001-2006, weaknees. All rights reserved. Instructions for TwinBreeze HR10-250 DVR Upgrade Bracket/Kit Instructions are available online (in COLOR) at http://www.weaknees.com
Red Pawz CMR280 User Manual
 Red Pawz CMR280 User Manual The Red Pawz CMR280 comes configured for FPV Racing. Configuration as follows: 1. A fully built and tested CMR280 frame made from CNC cut 3K carbon fiber. 2. Modular and removable
Planar Model A480-PL Professional Grade Home Cinema Conversion Lens System
 AKPro system with ATH1 transport shown Planar Model A480-PL Professional Grade Home Cinema Conversion Lens System USER MANUAL AND INSTALLATION GUIDE Including the UH480 Lens, ATH1 Transport and AKPro Projector
Shop Fox Fence Kit Installation Instructions:
 Shop Fox Fence Kit Installation Instructions: Please note this installation kit is designed solely for installation on a Shop Fox Classic Fence. Accurate Technology manufactures kits for other saw fences
Rack Installation Instructions
 Rack Installation Instructions Review the documentation that comes with your rack cabinet for safety and cabling information. When installing your server in a rack cabinet, consider the following: v Two
Phantom 2 Reference Guide
 Phantom 2 Reference Guide Contents Section 1: Operation and Preparing for Flight. 2 Transmitter introduction 2 Controlling the Drone 2 Turning on the Transmitter 3 Range Extender 3 Basic Drone Parts 4
QUICK START GUIDE (DIY)
") TYRO99 QUICK START GUIDE (DIY) Package included: 1 x 210mm frame kit 2 x 2206 2150KV brushless motor CW 2 x 2206 2150KV brushless motor CCW 1 x 4 IN 1 30A BLHeli_S ESC 1 x Customized F4 flight controller
TYRO99 QUICK START GUIDE (DIY) Package included: 1 x 210mm frame kit 2 x 2206 2150KV brushless motor CW 2 x 2206 2150KV brushless motor CCW 1 x 4 IN 1 30A BLHeli_S ESC 1 x Customized F4 flight controller
Building an Arduino-powered underwater ROV
 Building an Arduino-powered underwater ROV An ROV offers an entirely different way to use Arduino to explore a new world. This project is a bit different in two ways. First, there is quite a bit of mechanical
ipad Mini Wi-Fi Front Facing Camera Replacement
 ipad Mini Wi-Fi Front Facing Camera Replacement Replace the Front Facing Camera in your ipad Mini Wi-Fi. Written By: Andrew Optimus Goldberg ifixit CC BY-NC-SA www.ifixit.com Page 1 of 42 INTRODUCTION
Spreading Wings S900 User Manual
 Spreading Wings S900 User Manual 2016.01 V1.4 Disclaimer Thank you for purchasing the S900. Please visit the Spreading Wings S900 page on www.dji.com regularly to keep up to date with product information,
Installation Guide for DV8 Off-Road Tailgate-Mounted Tire Carrier (18-19 Jeep Wrangler JL)
") Installation Guide for DV8 Off-Road Tailgate-Mounted Tire Carrier (18-19 Jeep Wrangler JL) Installation Time: 1 Hour Tools Required Trim removal tool (plastic or wood to prevent scratches on the paint)
Installation Guide for DV8 Off-Road Tailgate-Mounted Tire Carrier (18-19 Jeep Wrangler JL) Installation Time: 1 Hour Tools Required Trim removal tool (plastic or wood to prevent scratches on the paint)
ZENMUSE H3-3D Gimbal. User Manual V DJI Innovations. All Rights Reserved.
 ZENMUSE H3-3D Gimbal User Manual V1.02 2014.06.09 www.dji.com 2014 DJI Innovations. All Rights Reserved. Warning & Disclaimer H3-3D gimbal is calibrated before delivery, no adjustment or modification to
OLPC XO-4 Touch Touchpad Controller Replacement
 OLPC XO-4 Touch Touchpad Controller Replacement This guide will walk through replacing a touchpad. Written By: Theodore Tsanakas ifixit CC BY-NC-SA www.ifixit.com Page 1 of 13 INTRODUCTION Use this guide