Ardusat Space Kits in the Classroom
|
|
|
- Griffin Sharp
- 5 years ago
- Views:
Transcription
1 Ardusat Space Kits in the Classroom
2 Resources


3 Why Arduino platform?


4 Real-world STEM application

5 Space Kit contents
6 Let s get started!!
7 Activity1BasicBlink & Activity2MorseCode

8 Activity3LuminTSL2561
9 Activity4A_TMP102

10 Activity4B_TMP102
11 Activity5GyroAccel9DOF
12 1 CA STEM Symposium October 30, 2015, Anaheim Convention Center Ardusat Space Kits in the Classroom Getting Acquainted with Arduino IDE & Sensors Hardware/Software Setup: Go to codebender.cc on Chrome browser (online code editor and Arduino IDE), this eliminates need to download and install Arduino software (perfect for Chromebooks) Login: TBA Password: TBA Connect Arduino UNO to computer/chromebook using USB cable Activity1BasicBlink 1. Insert one green (or red) LED into Arduino UNO with long leg in pin 13 and short leg in GND as seen in the picture below. 2. Open sketch called Activity1BasicBlink located in codebender dashboard by clicking on it. Read the lines of code in this sketch. 3. Upload sketch to Arduino UNO by pressing [Run on Arduino] button. Observe how LED turns on for 1 sec and off for 1 sec as specified in the code.
13 2 4. In the sketch change the value of the two delay( ) functions to make the LED blink as indicated in the chart below. Upload the sketch by pressing [Run on Arduino] button and observe the LED. Complete chart below. (NOTE: 1000 means 1000 millisecond or 1 second) Pattern of blinking Delay values Describe in words how blinking differs from default. On for 1 sec, Off for 1sec (default) On for 0.5 sec, Off for 0.5 sec On for 2 sec, Off for 0.2 sec On for 0.6 sec, Off for 1.8 sec On for 1 sec, Off for sec delay(1000), delay(1000) Not applicable Make LED appear to be continuously on but it s actually blinking at too fast a rate for our eyes to detect

14 3 Activity2MorseCode 1. Insert one green (or red) LED into Arduino UNO with long leg in pin 13 and short leg in GND as seen in the picture below. 2. Go back to codebender dashboard by clicking the codebender logo at the top left. Open sketch called Activity2MorseCode located in codebender dashboard by clicking on it. 3. Upload sketch to Arduino UNO by pressing [Run on Arduino] button. 4. Open serial monitor window by clicking [Serial Monitor] button located at top right. 5. Click [Connect] in the serial monitor window and select [Newline] from drop down menu. 6. Type a character in the blank text box and hit Send. Observe the LED flash the Morse code for that character, and also displays it in the serial monitor window. Refer to MORSE CODE CHART given below.

15 4 7. Type a 2 letter word in the serial monitor window and hit Send, have your group members guess your word by decoding the flashing LED using the MORSE CODE CHART (below), each person takes turns typing a word. LED flashing pattern use dots/dashes for short/long like MORSE CODE CHART given 2 letter word guess Did you guess the right word? MORSE CODE CHART 8. Now type a 2 digit number in the serial monitor window and hit Send, have your group members guess your number by decoding the flashing LED using the MORSE CODE CHART, each person takes turns typing a number. LED flashing pattern use dots/dashes for short/long like MORSE CODE CHART 2 digit number guess Did you guess the right number?
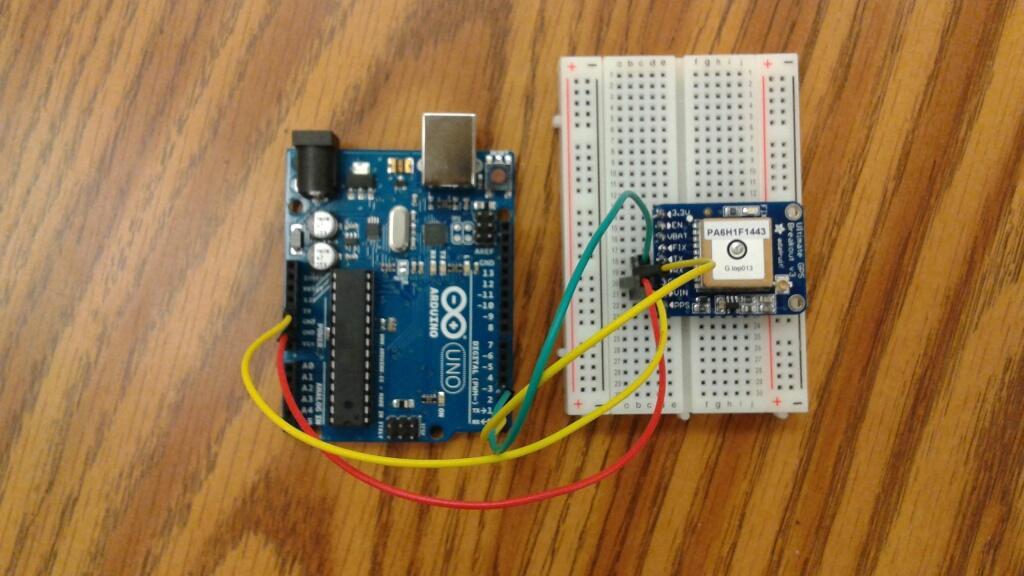
 > Luminosity Sensor TSL2561 GND 3.3V (red wire) > VCC A5 (green wire) > SCL A4 (blue wire) > SDA 2.")
16 5 Activity3LuminTSL Wire up the TSL2561 Luminosity Sensor to the breadboard and Arduino as shown in the picture below or follow this chart. Arduino > GND (black wire) > Luminosity Sensor TSL2561 GND 3.3V (red wire) > VCC A5 (green wire) > SCL A4 (blue wire) > SDA 2. Go back to codebender dashboard by clicking the codebender logo at the top left. Open sketch called Activity3LuminTSL2561 located in codebender dashboard by clicking on it. 3. If not already done, change the delay( ) value from 250 (0.25sec) to 1000 (1sec) in the very last line of code line # Upload sketch to Arduino UNO by pressing [Run on Arduino] button. 5. Open serial monitor window by clicking [Serial Monitor] button and click [Connect] to see the lux being recorded.
17 6 6. Record the lux under different conditions in this chart. Lux values fluctuate easily so record the median number. Condition Lux Room lights on as normal Hand covering sensor Flashlight pointing 90 degree straight down on sensor Flashlight pointing at 45 degree angle down on sensor Room lights off
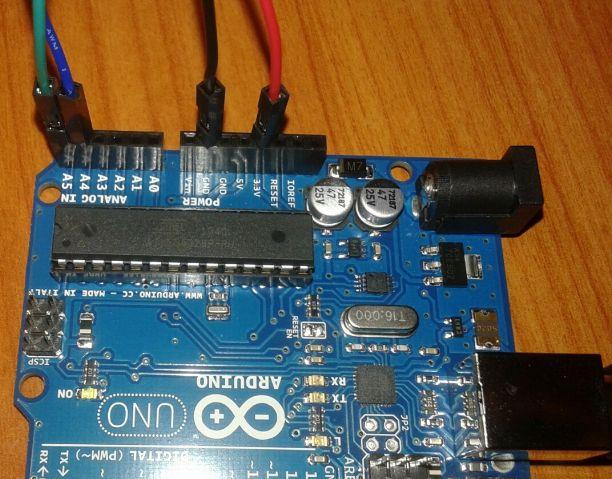
 > Temp Sensor TMP102 GND 3.3V (red wire) > VCC A5 (green wire) > SCL A4 (blue wire) > SDA GND (black wire) > ADD0 2.")
18 7 Activity4A_TMP Using the jumper wires, wire up the TMP102 Temperature Sensor to the breadboard and Arduino as shown in the picture below or follow this chart. Arduino > GND (black wire) > Temp Sensor TMP102 GND 3.3V (red wire) > VCC A5 (green wire) > SCL A4 (blue wire) > SDA GND (black wire) > ADD0 2. Go back to codebender dashboard by clicking the codebender logo at the top left. Open sketch called Activity4A_TMP102 located in codebender dashboard by clicking on it. 3. Upload sketch to Arduino UNO by pressing [Run on Arduino] button.
19 8 4. Open serial monitor window and click [Connect] to see the temperature being recorded, record the temperatures under different conditions in the chart. Wait for temp to stabilize for 5 straight readings. Action Temperature Celsius Nothing baseline temperature in room Breathe on the sensor with your breath (highest temp reached) Place index finger on sensor Place entire palm of hand on sensor Place hot or cold pack near sensor (if available)
20 9 Activity 4B_TMP With the Temp Sensor TMP102 already wired up, insert one green (or red) LED into Arduino UNO with long leg in pin 13 and short leg in GND 2. Go back to codebender dashboard by clicking the codebender logo at the top left. Open sketch called Activity4B_TMP102 located in codebender dashboard by clicking on it. 3. Look at the code lines What will happen when the temperature is greater than 85 F? (circle one) a. LED will turn off b. LED will flash c. LED will turn on d. none of these 4. Upload sketch to Arduino UNO by pressing [Run on Arduino] button. 5. Open serial monitor window, then click [Connect] to see temperatures being recorded. Warm up your hands and touch sensor to make the temperature go above 85 F. What happens to LED? (circle one) a. LED turns off b. LED flashes c. LED turns on d. LED explodes 6. Make one modification to the code to make the LED turn on when the temperature is below 85 F and turn off when above 85 F. Test it out by uploading your modified code by pressing [Run on Arduino] button. Does it behave as expected? What modification was made? 7. Put the code back to its original state. Make a second different modification to the code to make the LED turn on when the temperature is below 85 F and turn off when above 85 F. Test it out by uploading your modified code by pressing [Run on Arduino] button. Does it behave as expected? What modification was made this time? 8. Put code back to its original state. Add lines of code to the original code to make the LED blink when the temperature is greater than 85 F and turn off when below 85 F. (HINT: Refer back to sketch Activity1BasicBlink) Did it work? What had to be done to the code? Write the new lines of code you added here.
21 10 If it didn t work, open sketch called Activity4B_TMP102withBlink and run it. THIS PAGE INTENTIONALLY LEFT BLANK
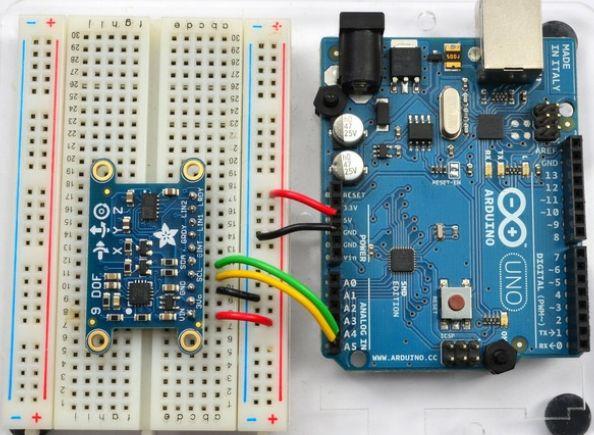
22 11 Activity5GyroAccel9DOF 1. Wire up the 9DOF sensor to the breadboard and Arduino as shown in the picture. 2. Go back to codebender dashboard by clicking the codebender logo at the top left. Open sketch called Activity5GyroAccel9DOF located in codebender dashboard by clicking on it. 3. Upload sketch to Arduino UNO by pressing [Run on Arduino] button. 4. Open serial monitor window by clicking [Serial Monitor] button, set baud rate to (instead of usual 9600), and click [Connect] to see the data being recorded. 5. Make the following movements to the sensor by moving the breadboard, which type of motion gets affected the most? Action Which type of motion is affected most? (roll, pitch, or heading) Rotating the sensor in a circular motion when it s resting flat on the table Tilting one short side of sensor up at an angle while the opposite end stays on table Tilting one long side of sensor up at an angle while the
23 12 other side stays on table THIS PAGE INTENTIONALLY LEFT BLANK
24 13 Workshop Feedback Survey: (case sensitive) Self Test 1. A written piece of code in Arduino IDE is called a. 2. Different sensors collect real time or delayed (circle one) data when they are connected to an Arduino and programmed with a piece of code. 3. The window allows data collected to be seen directly in real time, it also allows the user to determine if the code is working. 4. The time interval at which each data point is recorded is controlled by using the function. 5. When an airplane is taking off from the ground, pitch or roll (circle one) is the type of motion that is most affected. 6. When an airplane makes a U turn in mid air, pitch or roll (circle one) is the type of motion that is most affected. 7. Rate your knowledge and understanding of Arduino and sensors before doing this activity: Rate your knowledge and understanding of Arduino and sensors AFTER doing this activity: Propose one useful real life application for any of the sensors used in these activities.
This tutorial will show you how to take temperature readings using the Freetronics temperature sensor and an Arduino Uno.
 This tutorial will show you how to take temperature readings using the Freetronics temperature sensor and an Arduino Uno. Note that there are two different module types: the temperature sensor module and
Lab 2.2 Ohm s Law and Introduction to Arduinos
 Lab 2.2 Ohm s Law and Introduction to Arduinos Objectives: Get experience using an Arduino Learn to use a multimeter to measure Potential units of volts (V) Current units of amps (A) Resistance units of
Prototyping & Engineering Electronics Kits Basic Kit Guide
 Prototyping & Engineering Electronics Kits Basic Kit Guide odysseyboard.com Please refer to www.odysseyboard.com for a PDF updated version of this guide. Guide version 1.0, February, 2018. Copyright Odyssey
Halloween Pumpkinusing. Wednesday, October 17, 12
 Halloween Pumpkinusing Blink LED 1 What you will need: 1 MSP-EXP430G2 1 3 x 2 Breadboard 3 560 Ohm Resistors 3 LED s (in Red Color Range) 3 Male to female jumper wires 1 Double AA BatteryPack 2 AA Batteries
This is the Arduino Uno: This is the Arduino motor shield: Digital pins (0-13) Ground Rail
 Ground Rail") Reacting to Sensors In this tutorial we will be going over how to program the Arduino to react to sensors. By the end of this workshop you will have an understanding of how to use sensors with the Arduino
Reacting to Sensors In this tutorial we will be going over how to program the Arduino to react to sensors. By the end of this workshop you will have an understanding of how to use sensors with the Arduino
Robotics Adventure Book Scouter manual STEM 1
 Robotics Robotics Adventure Book Scouter Manual Robotics Adventure Book Scouter manual STEM 1 A word with our Scouters: This activity is designed around a space exploration theme. Your Scouts will learn
Objectives: Learn how to input and output analogue values Be able to see what the Arduino is thinking by sending numbers to the screen
 Objectives: Learn how to input and output analogue values Be able to see what the Arduino is thinking by sending numbers to the screen By the end of this session: You will know how to write a program to
StenBOT Robot Kit. Stensat Group LLC, Copyright 2018
 StenBOT Robot Kit 1 Stensat Group LLC, Copyright 2018 Legal Stuff Stensat Group LLC assumes no responsibility and/or liability for the use of the kit and documentation. There is a 90 day warranty for the
TA0139 USER MANUAL ARDUINO 2 WHEEL DRIVE WIRELESS BLUETOOTH ROBOT KIT
 TA0139 USER MANUAL ARDUINO 2 WHEEL DRIVE WIRELESS BLUETOOTH ROBOT KIT I Contents Overview TA0139... 1 Getting started: Arduino 2 Wheel Drive Wireless Bluetooth Robot Kit using Arduino UNO... 1 2.1. What
Embedded Workshop 10/28/15 Rusty Cain
 2 IC Embedded Workshop 10/28/15 Rusty Cain Set up for Workshop: Please Sign in on Sheet. Please include your email. While you are waiting for the Workshop to begin 1. Make sure you are connected to the
Note. The above image and many others are courtesy of - this is a wonderful resource for designing circuits.
 Robotics and Electronics Unit 2. Arduino Objectives. Students will understand the basic characteristics of an Arduino Uno microcontroller. understand the basic structure of an Arduino program. know how
Lesson 8: Digital Input, If Else
 Lesson 8 Lesson 8: Digital Input, If Else Digital Input, If Else The Big Idea: This lesson adds the ability of an Arduino sketch to respond to its environment, taking different actions for different situations.
mi:node User Manual Element14 element14.com/minode 1 User Manual V3.1
 mi:node User Manual Element14 element14.com/minode 1 Table of Contents 1) Introduction... 3 1.1 Overview... 3 1.2 Features... 3 1.3 Kit Contents... 3 2) Getting Started... 5 2.1 The Connector Board...
RoastLogger Arduino/TC4 driver installation for Windows 9/10/13 By John Hannon (JackH) at Homeroasters.org
 at Homeroasters.org") This procedure was written for the Arduino Uno board with the TC4 shield. Please check the Arduino site for software if you are using a different model. I have not tested it, but this procedure should
This procedure was written for the Arduino Uno board with the TC4 shield. Please check the Arduino site for software if you are using a different model. I have not tested it, but this procedure should
Phi-connect for Arduino (connector board V1.9)
") Phi-connect for Arduino (connector board V1.9) Last reviewed on 3/29/2012 John Liu 1. Introduction... 2 2. Main features... 2 3. Parts list... 3 4. How to use... 4 5. Improving your Arduino experience
Phi-connect for Arduino (connector board V1.9) Last reviewed on 3/29/2012 John Liu 1. Introduction... 2 2. Main features... 2 3. Parts list... 3 4. How to use... 4 5. Improving your Arduino experience
Arduino: Serial Monitor Diagrams & Code Brown County Library
 Arduino: Serial Monitor Diagrams & Code All projects require the use of the serial monitor in your Arduino IDE program (or whatever you are using to transfer code to the Arduino). Project 01: Monitor how
Quick Start by JP Liew
 Quick Start Page 1 of 8 Quick Start by JP Liew Thank you backing our Kickstarter project. Before we get underway with setting up your MicroView, you should make sure you have got everything you need. Unboxing
ISL RGB Sensor Tutorial By: Sabrina Jones
 ISL 25129 RGB Sensor Tutorial By: Sabrina Jones Overview The ISL29125 RGB sensor is a breakout board made to record the light intensity of the general red, green, and blue spectrums of visible light, that
Introduction to Arduino (programming, wiring, and more!)
") Introduction to Arduino (programming, wiring, and more!) James Flaten, MN Space Grant Consortium with Ben Geadelmann, Austin Langford, et al. University of MN Twin Cities Aerospace Engineering and Mechanics
Introduction to Arduino (programming, wiring, and more!) James Flaten, MN Space Grant Consortium with Ben Geadelmann, Austin Langford, et al. University of MN Twin Cities Aerospace Engineering and Mechanics
Create your own wireless motion sensor with
 Create your own wireless motion sensor with Arduino If you have a friend that has an alarm system in his or her home, I am sure you ve all seen these white motion sensors that are usually fixed above doors
Arduino IDE The Developer Kit library The JeeLib library for RFM12 transceivers
 SKU: 810011 The aim of this project is to build a hydrogen powered remote temperature sensor. It is based on the Arduino, Developer Kit fuel cell shield, Maxim DS18B20 1 Wire temperature sensor, and the
RS485 CO2 sensor etc. all of these functions for smart home are pre-programed
 Mini USB Micro SD card reader Uploader port Ext. temp sensors Ground loop, After heater, control Compressor control Time delay, bathroom boost RS485 LAN CO2 sensor etc. all of these functions for smart
CamJam EduKit Sensors Worksheet Five. Equipment Required. The Parts. The Passive Infrared Sensor
 CamJam EduKit Sensors Worksheet Five Project Description Passive Infrared Sensor In this project, you will learn how to wire and program a passive infrared sensor that detects movement near it. Equipment
Lab 01 Arduino 程式設計實驗. Essential Arduino Programming and Digital Signal Process
 Lab 01 Arduino 程式設計實驗 Essential Arduino Programming and Digital Signal Process Arduino Arduino is an open-source electronics prototyping platform based on flexible, easy-to-use hardware and software. It's
Documentation for Wifi-Enabled Data Logging - System Control By: Jesse Jenkins
 Documentation for Wifi-Enabled Data Logging - System Control By: Jesse Jenkins Code for this project is found on Github: https://github.com/hedronuser/metabolizer For getting started with Blynk, check
Make a Simple Weather Station Using Arduino
 Make a Simple Weather Station Using Arduino In this article, you will learn how to build your own weather station using the Arduino platform. This tutorial is based on the work from Steve Spence from Arduinotronics,
Elektor Uno R4 Installation & Test
 Elektor Uno R4 Installation & Test Prerequisites Elektor Uno R4 USB-A to micro-b cable Computer with Windows (XP or later), Linux or OSX (10.7 or later) Arduino IDE 1.6.7 or higher (not 1.6.8) We highly
VL-9S PRODUCT SHEET. VL-9S Switch Registers (Mechanical Reed Switch)
") VL-9S PRODUCT SHEET VL-9S Switch Registers (Mechanical Reed Switch) The VL-9S connects to registers providing a mechanical switch closure (such as a reed switch), for incremental pulse counting. Installing
VL-9S PRODUCT SHEET VL-9S Switch Registers (Mechanical Reed Switch) The VL-9S connects to registers providing a mechanical switch closure (such as a reed switch), for incremental pulse counting. Installing
Thanks for buying our product. Specialty of IM-2DT
 High Precision 2-Axis Digital Electronic Inclinometer IM-2DT User s Guide The contents of this manual could be different according to the software version and it can be changed without notice. Please use
A Hacker s Introduction to the Nokia N900
 A Hacker s Introduction to the Nokia N900 Introduction Welcome to the Hacker s Introduction to the Nokia N900. This guide is intended to help you begin connecting the N900 s builtin capabilities to information
3. The circuit is composed of 1 set of Relay circuit.
 Part Number : Product Name : FK-FA1420 ONE CHANNEL 12V RELAY MODULE This is the experimental module for a relay controller as the fundamental controlling programming. It is adaptable or is able to upgrade
Serial.begin ( ); Serial.println( ); analogread ( ); map ( );
; Serial.println( ); analogread ( ); map ( );") Control and Serial.begin ( ); Serial.println( ); analogread ( ); map ( ); A system output can be changed through the use of knobs, motion, or environmental conditions. Many electronic systems in our world
Control and Serial.begin ( ); Serial.println( ); analogread ( ); map ( ); A system output can be changed through the use of knobs, motion, or environmental conditions. Many electronic systems in our world
How to use the Zduino LEE Module with the Trainer Board
 How to use the Zduino LEE Module with the Trainer Board Note: If you are going to use the Arduino/Zduino module for this distance training workshop, please download the Arduino software: 1. Connections
GLONASS SHIELD USER MANUAL
 GLONASS SHIELD USER MANUAL 11 MARCH, 2013 THANK YOU FOR BUYING OUR PRODUCT! Congratulations! You have purchased our GLONASS/GPS Shield expansion board used to determine geographical coordinates and time
RedBoard Hookup Guide
 Page 1 of 11 RedBoard Hookup Guide CONTRIBUTORS: JIMB0 Introduction The Redboard is an Arduino-compatible development platform that enables quick-and-easy project prototyping. It can interact with real-world
EE 354 August 1, 2017 Assembly of the AT89C51CC03 board
 EE 354 August 1, 2017 Assembly of the AT89C51CC03 board The AT89C51CC03 board comes as a kit which you must put together. The kit has the following parts: No. ID Description 1 1.5" x 3.25" printed circuit
Lab 1: Introductory Project to Breadware
 1 Lab 1: Introductory Project to Breadware Exploration of Breadware s IoT Development Tools Overview The goal of this lab is to become familiar with the Internet of Things prototyping tools available in
EXPERIMENT 7 Please visit https://www.arduino.cc/en/reference/homepage to learn all features of arduino before you start the experiments
 EXPERIMENT 7 Please visit https://www.arduino.cc/en/reference/homepage to learn all features of arduino before you start the experiments TEMPERATURE MEASUREMENT AND CONTROL USING LM35 Purpose: To measure
Onwards and Upwards, Your near space guide Overview of the NearSys Two Sensor Temperature Array Figure 1. A complete Two Sensor Temperature Array
 The NearSys Two Sensor Temperature Array is a kit that permits a BalloonSat to measure two separate temperatures. When plugged into a flight computer like the BalloonSat Mini, the flight computer provides
Introduction to Arduino Diagrams & Code Brown County Library
 Introduction to Arduino Diagrams & Code Project 01: Blinking LED Components needed: Arduino Uno board LED Put long lead into pin 13 // Project 01: Blinking LED int LED = 13; // LED connected to digital
TA0013 ARDUINO RFID UNO STARTER KIT
 TA0013 ARDUINO RFID UNO STARTER KIT Overview TA0013 This Arduino Uno ultimate project kit includes comprehensive range of components to get you started in building and experimenting with Arduino projects.
Innovative Electronics for a Changing World INDEX
 Innovative Electronics for a Changing World INDEX 1. SYSTEM DESCRIPTION 2. BOARD CONNECTIONS terminals and indicators 3. CONNECTION DIAGRAM 4. START UP GUIDE and passwords 5. HOME PAGE 6. STATUS PAGE 7.
Introduction to Arduino Diagrams & Code Brown County Library
 Introduction to Arduino Diagrams & Code Project 01: Blinking LED Components needed: Arduino Uno board LED Put long lead into pin 13 // Project 01: Blinking LED int LED = 13; // LED connected to digital
One Grove Base Shield board this allows you to connect various Grove units (below) to your Seeeduino board; Nine Grove Grove units, consisting of:
 to your Seeeduino board; Nine Grove Grove units, consisting of:") GROVE - Starter Kit V1.0b Introduction The Grove system is a modular, safe and easy to use group of items that allow you to minimise the effort required to get started with microcontroller-based experimentation
GROVE - Starter Kit V1.0b Introduction The Grove system is a modular, safe and easy to use group of items that allow you to minimise the effort required to get started with microcontroller-based experimentation
PN532 NFC RFID Module User Guide
 PN532 NFC RFID Module User Guide Version 3 Introduction NFC is a popular technology in recent years. We often heard this word while smart phone company such as Samsung or HTC introduces their latest high-end
Figure 1. 6-Way JAMMA Switcher
 RiddledTV.com 6-Way, Single-Board JAMMA Switcher INSTALLATION GUIDE Figure 1. 6-Way JAMMA Switcher Features: Supports 6 JAMMA boards Only 1 JAMMA board is powered at a time. No external remotes required
Code&Drive First steps
 Code&Drive First steps Now that you have built the Code & Drive, you can set the Build&Code 4in1 board using any of the following software: Arduino IDE, Bitbloq or a visual programming software by blocks
MMA8452Q Accelerometer Breakout Hookup Guide
 Page 1 of 11 MMA845Q Accelerometer Breakout Hookup Guide CONTRIBUTORS: JIMB0 Introduction Freescale s MMA845Q is a smart, low-power, three-axis, capacitive micromachined accelerometer with 1 bits of resolution.
Manual. NB-IoT workshop. Sodaq Date: Author: Jan van Loenen
 Manual NB-IoT workshop Sodaq Date: 07-03-2018 Author: Jan van Loenen Unboxing 3 Installation 4 Arduino IDE 4 Add Boards 5 Libraries 6 Blink 7 NB-IoT 9 AT commands 10 All Things Talk 12 Sensors on the NB-IoT
Necessary software and hardware:
 Necessary software and hardware: Bases: First, remember that I m a French guy so my English is not perfect ;) If you see any mistakes, don t hesitate to tell me so I can correct them (my email is at the
AK-DS2482S-100. Reference manual. Copyright 2016 Artekit Italy All rights reserved
 AK-DS2482S-100 Reference manual Copyright 2016 Artekit Italy All rights reserved Contents About this document... 3 Revision history... 3 Contact information... 3 Life support policy... 3 Copyright information...
Rainbowduino Word Clock. By Russ Hughes
 Rainbowduino Word Clock By Russ Hughes (russ@owt.com) OVERVIEW This word clock is based on the NeoMatrix 8x8 Word Clock by Andy Doro from https://learn.adafruit.com/neomatrix-8x8-word-clock. Not having
EK307 Lab: Microcontrollers
 EK307 Lab: Microcontrollers Laboratory Goal: Program a microcontroller to perform a variety of digital tasks. Learning Objectives: Learn how to program and use the Atmega 323 microcontroller Suggested
Introduction To Arduino
 Introduction To Arduino What is Arduino? Hardware Boards / microcontrollers Shields Software Arduino IDE Simplified C Community Tutorials Forums Sample projects Arduino Uno Power: 5v (7-12v input) Digital
Adafruit Optical Fingerprint Sensor
 Adafruit Optical Fingerprint Sensor Created by lady ada Last updated on 2017-11-27 12:27:09 AM UTC Guide Contents Guide Contents Overview Enrolling vs. Searching Enrolling New Users with Windows Searching
KNJN I2C bus development boards
 KNJN I2C bus development boards 2005, 2006, 2007, 2008 KNJN LLC http://www.knjn.com/ Document last revision on December 5, 2008 R22 KNJN I2C bus development boards Page 1 Table of Contents 1 The I2C bus...4
Welcome to Apollo. For more information, please visit the website and select Apollo. Default Code
 Welcome to Apollo For more information, please visit the website and select Apollo Arduino Pins Default Code D49 LED Digital Pins digitalwrite digitalread pinmode Analog Pins analogread digitalread D33
Introduction to Internet of Things Prof. Sudip Misra Department of Computer Science & Engineering Indian Institute of Technology, Kharagpur
 Introduction to Internet of Things Prof. Sudip Misra Department of Computer Science & Engineering Indian Institute of Technology, Kharagpur Lecture - 23 Introduction to Arduino- II Hi. Now, we will continue
Lab-3: LCDs Serial Communication Analog Inputs Temperature Measurement System
 Mechatronics Engineering and Automation Faculty of Engineering, Ain Shams University MCT-151, Spring 2015 Lab-3: LCDs Serial Communication Analog Inputs Temperature Measurement System Ahmed Okasha okasha1st@gmail.com
Figure 1. A complete Temperature Sensor
 The NearSys Temperature Sensor is a kit that permits a BalloonSat to measure the temperature of the air, interior, or object the sensor itself is placed in contact with. When plugged into a flight computer
BaseCam 1.0 board Manual
 1 BaseCam 1.0 board Manual Introduction The BaseCam system is a simple way to create a powerful stabilization for small and medium cameras used on small remote controlled aircraft or in other applications
XL-80 spares list. Application note. Overview
 XL-80 spares list Overview This application note lists the system components for the XL-80 laser system. To order please contact your local Renishaw office at www.renishaw.com/contact Description XL-80
IME-100 ECE. Lab 4. Electrical and Computer Engineering Department Kettering University. G. Tewolde, IME100-ECE,
 IME-100 ECE Lab 4 Electrical and Computer Engineering Department Kettering University 4-1 1. Laboratory Computers Getting Started i. Log-in with User Name: Kettering Student (no password required) ii.
ipad How to use the ipad Getting Started with the basics FHS Gabriel Hill 3/31/2011
 2011 ipad How to use the ipad Getting Started with the basics FHS Gabriel Hill 3/31/2011 Contents at a Glance 1. How to start up your IPAD 2. How to connect and configure IPAD to the schools network 3.
Digital Pins and Constants
 Lesson Lesson : Digital Pins and Constants Digital Pins and Constants The Big Idea: This lesson is the first step toward learning to connect the Arduino to its surrounding world. You will connect lights
Beetle SKU:DFR0282. Contents. Introduction
 Beetle SKU:DFR0282 From Robot Wiki Beetle Contents 1 Introduction 2 Specification 3 PinOut 4 Tutorial o 4.1 Power o 4.2 Programming o 4.3 Example Code 5 Trouble shooting Introduction The Beetle is a minimalized
Don t Steal My BBC micro:bit Alarm!
 Description This is a simple tutorial demonstrating how to use the output pins on the BBC micro:bit and use the built in accelerometer to control a buzzer when the BBC micro:bit is moved. Learn how to:
PowerView. Hub. by LUXAFLEX WINDOW FASHIONs
 PowerView Hub by LUXAFLEX WINDOW FASHIONs quick start guide Table of Contents Kit Contents...3 Connections... 4 Home Automation Integration... 10 Troubleshooting... 11 The PowerView Hub interfaces with
USB Type A Female Breakout Hookup Guide
 Page 1 of 7 USB Type A Female Breakout Hookup Guide Introduction If you have a microcontroller that can act as a USB host, then you will need a way to plug in USB cables and devices. The USB Type A Female
T-Scratch Basics. Coding with IDE (Software)
") T-Scratch Basics Coding with IDE (Software) Learning Objective In this lesson you will learn: T-Scratch Bluetooth-Bluetooth Allow 2 T-Scratch modules to communicate with one another. Using T-Scratch s
T-Scratch Basics Coding with IDE (Software) Learning Objective In this lesson you will learn: T-Scratch Bluetooth-Bluetooth Allow 2 T-Scratch modules to communicate with one another. Using T-Scratch s
Bill of Materials: Turn Off the Lights Reminder PART NO
 Turn Off the Lights Reminder PART NO. 2209650 Have you ever woke up early in the morning to find out that the kids (or adults) in your home forgot to turn off the lights? I've had that happen a number
ipot Phase 1 1
 ipot Phase 1 Contents Introduction... 3 Step 1: Connect the Soil Humidity Hygrometer Moisture sensor... 5 Step 2: Connect DHT22 Humidity and Temperature sensor... 8 Step 3: Connecting OLED U8glib screen...
Parts List: Assembly Instructions:
 My Ride SERVICE MANUAl MyRide ASSEMBLY GUIDE 1.1 ASSEMBLY INSTRUCTIONS ASSEMBLING THE MYRIDE Parts List: Heavy Plate Stabilizer Fin - Right Stabilizer Fin - Left Stabilizer Fin - Large Middle Power Cord
Arduino Panel Meter Clock. By Russ Hughes
 Arduino Panel Meter Clock By Russ Hughes (russ@owt.com) OVERVIEW My father has been a lifelong Ham Radio Operator with a fondness for almost anything with a panel meter. After seeing the Trinket Powered
USER MANUAL NI 9755 NI Powertrain Controls CompactRIO NOx Sensor Module Kit
 USER MANUAL NI 9755 NI Powertrain Controls CompactRIO NOx Module Kit Contents Introduction... 1 System Diagram... 2 Hardware... 2 Powering the Hardware... 3 Wiring Harness... 5 Introduction The National
S3 Scratch Programming
 LOREM ST LOUIS IPSUM DOLOR ST LOUIS SCHOOL S3 Computer Literacy S3 Scratch Programming Dominic Kwok CHAPTER 1 Scratch After studying this chapter, you will be able to create a simple Scratch program upload
Sten-SLATE ESP Kit. Description and Programming
 Sten-SLATE ESP Kit Description and Programming Stensat Group LLC, Copyright 2016 Overview In this section, you will be introduced to the processor board electronics and the arduino software. At the end
INTRODUCTION HARDWARE
 Project Kit Table of Contents INTRODUCTION... 3 HARDWARE... 3 Hardware built-in micro:bit:... 3 Hardware included in this kit:... 4 CODE... 5 Pseudo Code:... 5 Coding Tools:... 5 Running Programs:... 8
micro:bit Lesson 1. Using the Built-in Sensors
 micro:bit Lesson 1. Using the Built-in Sensors Created by Simon Monk Last updated on 2018-03-02 05:46:13 PM UTC Guide Contents Guide Contents Overview Magnetometer Magnet Detector High-strength 'rare earth'
OrbBasic LESSON 1 Goto and Variables Student Guide
 OrbBasic LESSON 1 Goto and Variables Student Guide What is OrbBasic? OrbBasic is a programming language. A programming language is a list of instructions that tells a computer what to do. Although MacroLab
DLA. DMX512 Analyzer. DLA Users Manual SV2_00 B.lwp copyright ELM Video Technology, Inc.
 DLA DMX512 Analyzer DLA DLA-HH 1 Table Of Contents IMPORTANT SAFEGUARDS... 2 DLA OVERVIEW... 3 CONNECTION... 3 OPERATION... 3 HARDWARE SETUP... 4 DLA-HH (PORTABLE) LAYOUT... 4 CHASSIS LAYOUT... 4 DLA MENU
ArduCAM-M-2MP ESP8266 Evaluation Kit User Guide. Rev 1.1, March 2017
 ArduCAM-M-2MP ESP8266 Evaluation Kit User Guide Rev 1.1, March 2017 Table of Contents 1 Introduction... 2 2 Kit Content... 2 3 Features... 2 4 Pin Definition... 3 5 Wiring Diagram... 4 6 Getting Started
Draper Commissioner User Manual
 Draper Commissioner User Manual Table of Contents Table of Contents...I 1. Getting Started...1 1.1 Initial Startup...1 1.2 Draper Commissioner Startup...1 1.3 Top Panel...1 2. Configuration Screens...2
THIS IS THE CURRENT FF USER GUIDE AS OF PLEASE DO NOT USE ANY PREVIOUSLY DATED VERSIONS
 THIS IS THE CURRENT FF USER GUIDE AS OF 05-04-2012 PLEASE DO NOT USE ANY PREVIOUSLY DATED VERSIONS INTRODUCTION: I compiled this guide from information posted on RCGroups.COM and from GoodLuckBuy.COM where
DMX-K-DRV Integrated Step Motor Driver Manual
 Tu Sitio de Automatización! DMX-K-DRV Integrated Step Motor Driver Manual Table of Contents 1. Introduction... 4 2. Part Numbering Scheme... 4 3. Dimensions... 5 NEMA 11 DMX-K-DRV... 5 NEMA 17 DMX-K-DRV...
Quick Installation Guide Direct and Transfer Thermal Printer
 Quick Installation Guide Direct and Transfer Thermal Printer Overview The enclosed printer is currently comprised of two models: 203dpi (dots per inch) model 300dpi (dots per inch) model Unpacking 1. Remove
micro:bit Lesson 2. Controlling LEDs on Breadboard
 micro:bit Lesson 2. Controlling LEDs on Breadboard Created by Simon Monk Last updated on 2018-03-09 02:39:14 PM UTC Guide Contents Guide Contents Overview Parts BBC micro:bit Half-size breadboard Small
LIS3DH Hookup Guide. Introduction. SparkFun Triple Axis Accelerometer Breakout - LIS3DH SEN Required Materials
 Page 1 of 15 LIS3DH Hookup Guide Introduction The LIS3DH is a triple axis accelerometer you can use to add translation detection to your project. It would be classified as a 3DoF, or 3 Degrees of Freedom.
THIS IS THE CURRENT FF USER GUIDE AS OF PLEASE DO NOT USE ANY PREVIOUSLY DATED VERSIONS
 THIS IS THE CURRENT FF USER GUIDE AS OF 02-26-2012 PLEASE DO NOT USE ANY PREVIOUSLY DATED VERSIONS INTRODUCTION: I compiled this guide from information posted on RCGroups.COM and from GoodLuckBuy.COM where
Introduction... 1 System Diagram... 2 Hardware... 2 Powering the Hardware... 3 Wiring Harness... 5
 USER MANUAL NI 9756 NI Powertrain Controls USB NOx Module Kit Contents Introduction... 1 System Diagram... 2 Hardware... 2 Powering the Hardware... 3 Wiring Harness... 5 Introduction The National Instruments
BASIC Arduino. Part I
 BASIC Arduino Part I Objectives Introduction to Arduino Build a 1-60MHz DDS VFO prototype, breadboard and write Sketches, with Buffer amps to be designed, and PCB Using your own laptop Go on to build other
Sphero Lightning Lab Cheat Sheet
 Actions Tool Description Variables Ranges Roll Combines heading, speed and time variables to make the robot roll. Duration Speed Heading (0 to 999999 seconds) (degrees 0-359) Set Speed Sets the speed of
SPECIFICATION. Preliminary. TFT-LCD Monitor TITLE. Signature Date Prepared by Date
 SPECIFICATION TITLE TFT-LCD Monitor MODEL NAME IDS31-070W540DVA1E Signature Date Prepared by Date Please return 1 copy for our confirmation with your signature and comments Model :IDS31-070W540DVA1E Rev.
REQUIRED MATERIALS Epiphany-DAQ board Wire Jumpers Switch LED Resistors Breadboard Multimeter (if needed)
") Page 1/6 Lab 1: Intro to Microcontroller Development, 06-Jan-16 OBJECTIVES This lab will introduce you to the concept of developing with a microcontroller while focusing on the use of General Purpose Input/Output
Page 1/6 Lab 1: Intro to Microcontroller Development, 06-Jan-16 OBJECTIVES This lab will introduce you to the concept of developing with a microcontroller while focusing on the use of General Purpose Input/Output
Arduino UNO R3 ESP8266 Web Server Serial Port WiFi Shield ESP13
 Arduino UNO R3 ESP8266 Web Server Serial Port WiFi Shield ESP13 1. Pin Explanation G: GND 5V: 5V Power Output D:connecting to digital port(d2-d13)of arduino control board 1 Control Switch: to control the
Web Site: Forums: forums.parallax.com Sales: Technical:
 Web Site: www.parallax.com Forums: forums.parallax.com Sales: sales@parallax.com Technical: support@parallax.com Office: (916) 624-8333 Fax: (916) 624-8003 Sales: (888) 512-1024 Tech Support: (888) 997-8267
University of Hull Department of Computer Science C4DI Interfacing with Arduinos
 Introduction Welcome to our Arduino hardware sessions. University of Hull Department of Computer Science C4DI Interfacing with Arduinos Vsn. 1.0 Rob Miles 2014 Please follow the instructions carefully.
USER MANUAL EXPERIENCE INCREDIBLE PERFORMANCE V2.3
 USER MANUAL EXPERIENCE INCREDIBLE PERFORMANCE V2.3 CONTENTS 1 INTRODUCTION... 3 2 INTERFACE DESIGN... 4 2.1 Connectivity... 5 2.2 Analog Interface... 6 2.3 I 2 C Interface... 7 2.4 I 2 C Operations...
INDEX. Network Power Monitor NPM-R10-SNMP. Innovative Electronics for a Changing World. NPM-R10-SNMP Remote Network Power Monitor
 Innovative Electronics for a Changing World NPM-R10-SNMP Remote Network Power Monitor Optional relay board and GSM module INDEX 1. SYSTEM DESCRIPTION 2. SYSTEM BATTERY CONNECTIONS 3. SERIES CONNECTED BATTERIES
Arduino Smart Robot Car Kit User Guide
 User Guide V1.0 04.2017 UCTRONIC Table of Contents 1. Introduction...3 2. Assembly...4 2.1 Arduino Uno R3...4 2.2 HC-SR04 Ultrasonic Sensor Module with Bracket / Holder...5 2.3 L293D Motor Drive Expansion