Read this First...1 Safety...1 Declaration of Conformity (EU only)...1 About this manual...1. How this Help Works...3 Help Menu...3 User Guide...
|
|
|
- Erika Watts
- 5 years ago
- Views:
Transcription
1
2 Table of Contents Read this First...1 Safety...1 Declaration of Conformity (EU only)...1 About this manual...1 How this Help Works...3 Help Menu...3 User Guide...4 Meet your Document System...5 Introduction...5 System Overview...6 Operating Controls...8 Control Panel...9 Power Up...10 How to Operate the Touch Screen...12 Use a Web Browser...14 What is a Job?...15 Job List...16 Job Overview...17 High Capacity Document Feeder (HCDF)...19 MaxiFeeder...21 Side Exit...22 Catch Tray for Side Exit...23 High Capacity Vertical Stacker...24 Shut Down the System...25 Working with Jobs...26 Introduction...26 Use an Existing Job...26
3 Create a New Job...27 About Automatic Jobs...28 Create an Automatic Job...28 Create a Manual Job...29 Create a test mail set...39 Mail Sets...45 Change to Another Feeder Tray...49 Link Feeder Trays...50 Edit a Job...51 Save a Job...51 Delete or Move an Enclosure...52 Copy a Job...53 Delete a Job...54 Rename a Job...54 Lock a Job Loading the System...56 Document Orientation...56 Document Feed Trays...56 Adjust the Side Guides and Envelope Separation...63 Load Envelopes...64 Filling the Sealing Liquid Reservoir...65 Settings menu...66 Open the Settings Menu...66 Open the Settings Menu (Supervisor)...67 Supervisor Settings Menu...69 Connect the System to the Internet...83 Options for Connection...83 Set up a Wired Connection...84 Set up a Wireless Connection...86 Test the Connection...88
4 Reading...89 Introduction...89 OCR Code Description...90 BCR Code Description...93 OMR Code Description...97 Flex Reading Code Description Create Jobs with Reading Reading Settings Exit Selection with Reading Operator Maintenance Maintenance Schedule Clean and replace brushes Replace or Clean Moistening Cloth Calibrate Photocells Fault Finding Messages Clearing stoppages Operator Troubleshooting Troubleshooting Table Specifications Technical Specifications Hopper and Feeder Capacity Configuration Dimensions Document and Insert Specifications Envelope and Document Set Specifications maxifeeder Specifications Terminology Terminology...135
5
6 1 Safety Read this First 1 Ensure you have read and fully understood the safety requirements in the Safety Guide. Declaration of Conformity (EU only) The product presented in this guide meets the requirements of applicable directives. For more details refer to the Declaration of Conformity. Contact your authorized distributor for availability of this document. About this manual Disclaimer This Guide is published without any warranty. Improvements and changes to the online Guide necessitated by typographical errors, inaccuracies of current information, or improvements to programs and/or equipment, may be made at any time and without notice. Such changes will, however, be incorporated into new editions of the PDF Guide (if applicable). 1

7 Symbols 1 This manual uses the symbols listed below. This symbol... Indicates... WARNING: Indicates a human safety hazard. ATTENTION: A risk to the equipment or mail could result from an action you may perform. NOTE: A remark that explains different cases or specificities. TIP: Advice to help save you time when processing your mail. SUPERVISOR: Indicates that you have to use the supervisor menu to perform the procedure. Languages In the EU the user guide must be available in the national language(s) of the country where the system is delivered. Therefore, if the User Guide is not available in your country s language(s), contact your authorized distributor. Software The software used for the reading option is based in part on the work of the Independent JPEG Group. 2
![2 How this Help Works Help Menu The help button [?] gives access to help topics via a pull-down menu. 2 The contents of the help menu can be different for your situation.](/docs-images/95/123658881/images/8-0.jpg "The help menu can contain the following topics: Search; use the search engine to find a specific topic. User Guide; user instructions describing how to use the system.")
8 2 How this Help Works Help Menu The help button [?] gives access to help topics via a pull-down menu. 2 The contents of the help menu can be different for your situation. The help menu can contain the following topics: Search; use the search engine to find a specific topic. User Guide; user instructions describing how to use the system. FAQ's (option); when the system is connected to the internet, frequently asked questions are answered here (option). What can I do here; a list with relevant help topics related to the current screen. Remote assistance (option); online remote assistance for helpdesk guidance. Call the phone number that is displayed and follow the instructions of the support assistant. 3

9 User Guide 2 You can use this guide as follows: 1. Use the contents overview to browse the contents. When you are finished you can close the User Guide with the Close button. 2. To keep the topic from the User Guide active, you can use the Minimize button. When you click the active Help button, the User Guide is restored. 3. To search for topics; enter a keyword in the Searchbar and press the Search button. To navigate through the User Guide: Tap to select. Swipe up/down to scroll. Double tap to zoom. Pinch in/out to zoom in/out. See also How to operate the touchscreen. 4
10 3 Meet your Document System Introduction The system is a folding and inserting system for processing mail easily. The system: feeds documents folds the documents inserts the documents into envelopes seals the envelopes stacks the envelopes Automatic monitoring ensures the correct number of documents per envelope. The system can be operated by means of a user friendly interface. The settings of the system (type of documents, type of envelopes and the type of fold) are recorded in so called jobs. These jobs can be created by the operator. 3 Operator and supervisor You can use the system as operator and as supervisor. The supervisor has access to more settings than the operator. You can switch from operator to supervisor in every screen. When you switch to supervisor, you see immediately the result: extra tabs appear for the advanced settings. Also the side menu contains extra functions. 5


11 Page 6 Apr :40 Meet your Document System System Overview 3 6
12 The figure shows an overview of the system. Document Feeders (1) The Feeders are the feeding part of the system. There are two types of feeders: the automatic and the special feeder. The automatic feeder does not require any adjustments for the separation. From a feeder you can feed one or more documents (multi feed). The feeders have a double feed control (DFC). DFC detects if more documents are fed instead of one. You can link feeders. This means that two feeders can be linked as pairs. When the first feeder is empty, the system switches to the other feeder. Meanwhile the empty feeder can be refilled without stopping the system. The upper automatic feeder is equipped with a 'daily mail' function. You can use this feeder to process sets of documents that you cannot process automatically (stapled documents and sets with varying thickness). Collating Area (2) All documents of a document set are collated and aligned in the collating area. Divert area (3) The Divert area automatically throws out incorrect sets of documents. In this way the system does not need to stop. Correct sets will be transported to the Folder unit. Folder unit (4) The Folder unit folds the documents. The following fold types are possible (see Terminology): No fold V-fold C-fold Z-fold Double V-fold Inserter (5) After the documents are folded, the documents are transported to the inserter. The inserter inserts the documents into a waiting envelope. The inserter seals the envelope or not, depending on the settings. Automatic monitoring ensures the correct number of inserts per envelope. Present on Deck (6) The documents inserted (or not) can leave the inserter from the upper unit (present on deck). This can occur when: Clearing the machine; Making a test set; Depending on the reading code. Stacker (7) The documents inserted (or not) are transported to the stacker depending on the programmed job. The stacker automatically stacks inserted documents. Side exit (8) 3 7
13 The documents inserted are transported to the side exit depending on the programmed job. The side exit can be used for sorting and stacking of documents into the catch tray as well as transporting to a franking/mailing machine. Envelope Hopper (9) Envelopes that are placed on a stack by the user, are fed one by one into the system by the envelope hopper. 3 Operating Controls 8
 K - handle for manual transport of the envelope L - air plugs for cleaning the sensors M - handle for manual transport of the mail set")
14 A - High Capacity Vertical Stacker B - loc cover C - unlocking lever for loc D - power inlet, RS232 connector / USB / modem E - hand grip vertical transport cover F - document feed tray G - collator arm H - Divert area I - Folder unit J - Display (operator panel) K - handle for manual transport of the envelope L - air plugs for cleaning the sensors M - handle for manual transport of the mail set N - unlocking handles for rollers envelope track O - sealing liquid reservoir P - side cover (opened) Q - bellows for cleaning sensors R - thumb wheel for side guide adjustment S - side guides envelope feed tray T - lever for envelope separation adjustment U - envelopes support 3 Control Panel On/Off (B): The touch sensitive button in the upper right corner of the display switches the system on or off. If the system is not used for one hour, the system switches off to safe power. 9
15 Status LED (C): A status LED indicates the state of the machine, a green LED indicates that the system is switched on, a blinking red LED indicates the system is switched off. The display is a capacitive touch screen. To avoid permanent damage of the display, do not use sharp objects to operate the display. 3 Power Up To clean the display use a dry lint-free or microfiber cloth. If water is necessary to clean the screen, you should make your microfiber cloth slightly damp instead of putting the water directly on your screen. Never use large amounts of water, harsh chemicals, abrasive cloths or paper towels to clean the display. To start up the system: 1. Connect the system to the mains power supply. You can severely damage the machine if it is connected to the incorrect mains voltage. Before plugging in the machine, check if the local voltage is the same as the voltage mentioned on the type plate (A). 10
16 2. Press the on/off button next to the display B. 3 In case the system is unresponsive or fails to switch off, press and hold the touch sensitive power button for 10 seconds to switch off the system. 3. The touch screen shows the Job list screen. 11
 left, right, up or down. Tap and hold: touch the screen with your finger and hold it for two seconds.")
17 How to Operate the Touch Screen 3 You can operate the touch screen like a tablet: Tap : touch and release the screen with your finger. Swipe: touch the screen, hold it and move your finger(s) left, right, up or down. Tap and hold: touch the screen with your finger and hold it for two seconds. Pinch in/out: to zoom in/out. Tap 12

18 Swipe 3 Tap and hold 13

19 Pinch in/out 3 Use a Web Browser You can open a web browser in the user interface of the system. Use the web browser as follows: 1. Tap on the icon in the upper left corner of the screen to open the Web browser. 2. You can tap or swipe to navigate through web sites. Use the keyboard to type in the navigation bar of the browser or within web sites. If you work with a special keyboard for your language, you can switch the keyboard back to the version to type e.g. a web address. (see Localisation on page 71) 3. Tap the Minimize button to keep the Web Browser active. 14
20 4. Tap the Close button in the upper left corner of the screen to close the web browser. 3 What is a Job? If you have to process a lot of mail sets of the same type (for example bills), you can save the settings to a 'job'. The next time you just select the job and immediately start without defining any settings. The following settings are saved in a job: Envelope type/size; Sealing on/off; Which document feeders should be used, how many documents should be fed from each feeder and document height for each feeder; Feeder linking on/off; If BREs or insert cards should be included; Address position; Fold settings; Double feed control settings; Reading settings (option); Exit select settings; Batch Counter, defining the number of mail sets that the job must process. The job will automatically stop processing when this number is reached. 15
.")
21 Job List 3 When you start up the system, the Job list menu appears. 1. Open a web browser on page Help menu on page 3 3. Login, see Introduction on page 5 4. Side menu 5. Job list sorting The side menu contains the settings menu (see Settings menu operator on page 66). When you are logged in as supervisor, the settings menu is extended with advanced settings (see Settings menu supervisor on page 67). If you want more information on a job, select the job. With the [Job list] button you get back to the home menu. See also: Working with Jobs on page
 How to load envelopes and documents for this job The number of")
22 Job Overview 3 If you want more information on a job, select the job in the Job List menu. The touch screen shows the following information of the selected job: Job name Job settings (for example the document and envelope type) How to load envelopes and documents for this job The number of envelopes that have been processed with this job In this screen you can change the following settings: Counter settings (see Change the counter settings) Job settings (see Editing a job) Move documents between feeders (see Change to an other feeder tray) Link feeders (see Link feeder trays) Start the job or run a test run (see Performing a test run) If you tap the [i] button a summary of all information of the job is listed. 17
23 The following is a list of symbols or icons and their descriptions. 3 Main document. Shows the correct document orientation; A is the address. Daily mailfeature to manually insert mail-sets one by one into the system. NotificationNext to this symbol, a message appears, e.g. Sealing liquid low, empty feeder. Wired LAN connected Network connection is available via a network cable connection. Wireless LAN connected Network connection via Wi-Fi is available. INF switched on Franking (mailing) is possible. Envelope, sealing onenvelopes will be sealed. The symbol shows the correct envelope orientation. Feeder linkinglinking means that when one feeder is empty, the system automatically starts feeding documents from the other feeder. This symbol at the feeders shows if the feeders are linked. Document with reading Shows the correct document orientation; A is the address. Enclosure Wired LAN not connected Network connection is not available via a network cable connection. Wireless LAN not connected Network connection via Wi-Fi is not connected or out of range. INF switched off Franking (mailing) is not possible. Envelope sealing offenvelopes will not be sealed. The symbol shows the correct envelope orientation. When sealing is off, the flap of the envelope is closed but not moistened. Change feeder trayspossibility to change from one feeder tray to another. 18

24 Dfc/mail set thickness detectiondouble feed control and/or mail set thickness detection has been set to 'off'. By default the dfc/mail set thickness detection will be set to 'on' and the icon will not be shown. Exit settingthis icon shows what kind of exit setting has been set. 1x buttonafter tapping this button the system will create an example mail set. Job list buttonafter tapping this button the job list screen will be shown. Edit buttongives access for editing a job. Fold type This icon shows what kind of fold type has been set. Counter settingshows on what number the counter has been set. Start button Tapping this button runs the job. Stop buttonbutton to stop the system The current mail set will be completed and the system stops, being empty and ready for a new set. Save buttonsave the job or changes that have been made to a job. 3 High Capacity Document Feeder (HCDF) 19

25 3 The High Capacity Document Feeder (HCDF) is an option that can be delivered from factory. The High Capacity Document Feeder has a capacity for up to 725 sheets. The normal document feeder tray has a capacity of 325 sheets. For more information on the operation of the HCDF, refer to the topic on loading documents for the HCDF on page
, but also 'standard' documents up to 356 mm (14\") length can be processed with it.")
26 MaxiFeeder 3 The maxifeeder is a feeder that can be loaded with a high number of documents. This feeder is intended to be used for Business Reply Envelopes (BRE), but also 'standard' documents up to 356 mm (14") length can be processed with it. For more information on the operation of the maxifeeder, refer to the topic on loading documents for the maxifeeder on page 59. A license is required if you want to use the maxifeeder. 21

27 Side Exit 3 The system can be equipped with a side exit and catch tray. The side exit can be fitted instead of the envelope receiving tray. The side exit allows a conveyor or a franking system to be fitted in line with the system. The side exit can also be used with a catch tray to achieve vertical stacking. The catch tray is delivered with the side exit. 22
.")
28 Catch Tray for Side Exit 3 For stacking envelopes leaving from the side exit a catch tray can be mounted. You can select the catch tray in the Output settings tab of the job definition (see Exit settings). Instead of a catch tray at the left hand (LH) side of the system it is also possible to install a catch tray on the right hand (RH) side. To achieve this it is necessary to reverse the side exit from LH to RH. Contact your supplier for more information about this option. 23

29 High Capacity Vertical Stacker 3 The High Capacity Vertical Stacker can be used to stack filled envelopes. The vertical stacker can store up to 325 filled envelopes. In case you have a High Capacity Vertical Stacker, install it as follows on your system: 1. Move the stacker as indicated by the arrow. 2. Lift the stacker with the suspension hooks over the two rods (upper and lower) and lower it. 3. Connect the connector. 4. Adjust the side guides with wheel A until a margin of 3 to 5 mm is left between the envelopes and the side guides. 5. For small envelopes it can be necessary to remove the extensions B from the envelope support. 24
30 Shut Down the System 1. Press the [On/Off] button to shut down the system. In case the system is unresponsive or fails to switch off, press and hold the touch sensitive power button for 10 seconds to switch off the system. When the system is busy, it completes and inserts the current set, stops and will be shut down. 3 25
31 4 Working with Jobs Introduction 4 With the system you can process mail sets in the following ways: Using an existing job. Existing jobs are shown in the Job list and saved via the 'automatic' or 'manual' job creation process. How to use an existing job is described in Using an existing job on page 26. Automatic job: The system automatically picks one sheet from each filled feeder and processes them into mail sets. The automatic feature is described in About Automatic jobs on page 28. Manual job: various settings, not available in an Automatic job, can be set in a 'manual job. This includes the use of daily mail. Working with manual jobs is described in Create a manual job on page 29. Use an Existing Job If you want to use an existing job: 1. Open the job list. 2. Tap the icon of the job you want to use. 3. Load the feeders as shown on the display. 4. Tap [1x] to create an example mail set, see Example mail set. 5. Select an exit for the example mail set. 6. Check the example mail set. 26
32 7. If example mail set is OK: tap [Start].If the example mail set is not OK: adjust the address position or envelope stop position or check and re-adjust the job settings. If desired tap the counter button to set the counters. See Counter settings. 8. Tap [Start] to start the job. 9. Press the [Stop] button to finish the job. 10. Tap [Job list] to return to the job list. 4 Create a New Job To create a new job: 1. From the Job list menu, tap [New job]. 2. Choose [Automatic] or [Manual] to create a new job. 3. If you choose 'Automatic' follow the description as can be found in Create an Automatic job. 4. If you choose 'manual' follow the description as can be found in Create a Manual job. 27
33 About Automatic Jobs 4 You can save every automatically created job and edit it like any job. An Automatic job processes mail sets according to the following rules: The machine picks one sheet from each filled feeder; The picked documents will be folded (if necessary) and inserted into an envelope; Only the feeders that feed successfully will be selected; Only the Double Feed Control (DFC) of the upper feeder will be selected (this is done automatically). The following features are not supported with Automatic job processing. Linked feeders (the option where, if one feeder is empty, the system automatically continues using another feeder) Multiple sheet feeding (picking more than one sheet from a certain feeder) Daily mail Reading functionality No envelopes (use envelopes yes/no) Exit select If you want to use any of these features, you have to use Manual jobs to process the mail set. Create an Automatic Job Proceed as follows if you want to create an automatic job: 1. From the Job list menu, tap [New job]. 2. Tap [Automatic] to start an Automatic job. 3. Fill the envelope hopper, load your documents and tap [1x] to create an example mail set. 28

34 4. Make sure that the address position and the envelope stop position is correct. If not, adjust the address position and envelope stop position. 5. If necessary, tap the counter symbol to set the counters. See counter settings. 6. Tap [Start] to start the job. 7. Tap [Stop] to finish the job. Tap [Save] if you want to save the settings of the Automatic job to a new job. Create a Manual Job 4 Introduction Creating jobs manually is easy: the user interface guides you through the job definition with clear steps. These steps are: Define the mail set: envelope type, main document and optional enclosures. Define how to fold the document set. Define the exit of the system that should be used for this job. Create a Manual Job To create a job manually: 1. From the Job list menu, tap [New job]. 2. Choose [Manual] to define the job settings. Continue with the envelope settings (see Envelope). 29
![Mail Settings Envelope 4 1. Tap [Envelope]. 2. Select a predefined envelope or create a custom envelope.](/docs-images/95/123658881/images/35-0.jpg "optionally tap [Use envelope] to set the use of envelopes to 'off' if you want to Create a job without the use of envelopes. 3. Tap [Sealing] to switch it on or off.")
35 Mail Settings Envelope 4 1. Tap [Envelope]. 2. Select a predefined envelope or create a custom envelope.optionally tap [Use envelope] to set the use of envelopes to 'off' if you want to Create a job without the use of envelopes. 3. Tap [Sealing] to switch it on or off. By default the envelopes will be sealed. 4. Confirm the envelope settings with [OK]. Continue with the main document settings. 30
![Main document 1. Tap [Main document]. 4 2. Select a predefined document or create a custom document. 3. Change the [Number] to add more than one document from a feeder (multiple sheet feeding). 4. Optionally tap Daily Mail to set Daily Mail to 'on' or tap [Advanced] to set the DFC Settings.](/docs-images/95/123658881/images/36-0.jpg "5. Confirm the document settings with [OK]. Continue with the enclosure settings. Switch DFC on or off for feeders For every feeder you can switch the double feed control (DFC) on or off.")
36 Main document 1. Tap [Main document] Select a predefined document or create a custom document. 3. Change the [Number] to add more than one document from a feeder (multiple sheet feeding). 4. Optionally tap Daily Mail to set Daily Mail to 'on' or tap [Advanced] to set the DFC Settings. 5. Confirm the document settings with [OK]. Continue with the enclosure settings. Switch DFC on or off for feeders For every feeder you can switch the double feed control (DFC) on or off. To change the DFC settings: 1. Tap the job that you want the change the DFC settings for. 2. Tap [Edit]. 3. Tap the document that you want to change the DFC for. 31
![4. Tap [Advanced]. 4 5. Tap Double Feed Control to switch it on or off. 6. Tap Continue on double to switch it on or off.](/docs-images/95/123658881/images/37-0.jpg "If Continue on double is on, the machine will not stop if two sheets are fed instead of one. The document-set that contains the double sheets will be diverted. 7.")
![Confirm the settings with [OK] and continue with the document settings. Enclosure 1. Tap [Add enclosure]. 2.](/docs-images/95/123658881/images/37-1.jpg "Select a predefined document or create a custom document as your enclosure.")
37 4. Tap [Advanced] Tap Double Feed Control to switch it on or off. 6. Tap Continue on double to switch it on or off. If Continue on double is on, the machine will not stop if two sheets are fed instead of one. The document-set that contains the double sheets will be diverted. 7. Confirm the settings with [OK] and continue with the document settings. Enclosure 1. Tap [Add enclosure]. 2. Select a predefined document or create a custom document as your enclosure. If you want to remove an enclosure from the job, or change the order of the enclosures, see Delete or move an enclosure. 3. Change the [Number] for more than one document from a feeder. 32
![4. Confirm the enclosure settings with [OK]. Continue with the fold settings (see Fold settings). Fold Settings Default the machine suggests the most logical fold type. This fold type is highlighted.](/docs-images/95/123658881/images/38-0.jpg "However, you can select other fold types and change their settings. 1. Tap a fold type. 4 2. If necessary, tap [Settings] to change the fold settings. 3. Tap [>].")
38 4. Confirm the enclosure settings with [OK]. Continue with the fold settings (see Fold settings). Fold Settings Default the machine suggests the most logical fold type. This fold type is highlighted. However, you can select other fold types and change their settings. 1. Tap a fold type If necessary, tap [Settings] to change the fold settings. 3. Tap [>]. If you want to revert to the machine recommended fold type, switch [Use recommended fold] to On. Continue with the exit settings (see Exit settings). 33
39 Exit Settings 1. In Exit Settings the Fixed exit is selected by default Optionally tap the [Advanced] button to set the Advanced settings per job. 3. Tap [>]. Continue with Finish the job definition and start the job, or set the counter settings. Switch the mail set thickness detection on and off You can switch the mail set thickness detection to 'yes' (= on) or 'no' (= off). By default the mail set thickness detection is set to 'yes'. To change these settings: 1. Select the job that you want the change the mail set thickness detection setting for. If the job uses reading, you cannot switch on the Mail Set Thickness Detection (DFC) for the document set. With reading, the document set size can be different for every set. 2. Tap [Edit]. 3. Navigate to Exit settings. 34
![4. Tap [Advanced]. 4 5. Tap the 'Double Feed Control' button to switch it on or off. 6. Tap the 'Continue on double' button to switch it on or off.](/docs-images/95/123658881/images/40-0.jpg "If Continue on double is on, the machine will not stop if two sheets are fed instead of one. The mail set that contains the double sheets will be presented on deck. 7.")
40 4. Tap [Advanced] Tap the 'Double Feed Control' button to switch it on or off. 6. Tap the 'Continue on double' button to switch it on or off. If Continue on double is on, the machine will not stop if two sheets are fed instead of one. The mail set that contains the double sheets will be presented on deck. 7. Enter the 'Measurement area offset'. After the DFC detects the document set, it delays the thickness measurement. It starts measuring as soon as the offset has passed. 35
, the daily job counter: number of mail sets that have been processed using this job, after tapping [Start].")
41 Change the Counter Settings The counter settings are job related. 4 In the Counter submenu you can set the (daily) Job counter, the Stop counter and the Job total counter. The following will be shown in the Counter submenu: Job counter (as shown), the daily job counter: number of mail sets that have been processed using this job, after tapping [Start]. Stop counter/stop at value: set a number (of processed mail sets) after which the system stops processing. You can set from 5 through The system will continue processing mail sets until the job counter reaches the stop counter value. The system stops and can be restarted. When the processing of mail sets has been interrupted the system shows how many mail sets have been completed. This is shown at 'completed so far'. Job total counter: total number of mail sets that have been processed using this job. To reset/set the counters proceed as follows: 1. In the Job overview screen tap the counters button. 2. Tap the reset button for the daily job counter to set it to zero. 3. Tap the [on/off] button to set the Stop counter to on or off. If you set the Stop counter to on you can enter the Stop at value. Enter a value from 5 through

42 4. Tap the reset button for the Job total counter to set it to zero. If you set the Job total counter to zero the number history of this job will be lost Tap [OK] to go back to the job overview screen and tap [Start]. 37
43 Finish the Job Definition and Start the Job 4 When you have finished the exit settings, the touch screen shows an overview of the job settings. In this screen you can change the following settings: Move documents between feeders (see Change to an other feeder tray) Link feeders (see Link feeder trays) Change the counter settings (see Change the counter settings) When you are ready with these settings, proceed as follows: 1. Load the documents as indicated on the Job info screen. For more information regarding how to load documents refer to "Document Orientation on page 56". 2. Tap [1x] to create a test mail set (see Test mail set). 3. If desired, you can save the job (see Save a job). 4. Tap [Start] to start the job. 38
44 Create a test mail set Create a Test Mail Set Before starting an existing job or a new, manual created job, it is possible to create a test mail set. This test run is intended to validate the settings of the Inserting System: Check if the address is correctly positioned behind the envelope window. See Adjusting the Address position. Inspect and adjust the stop position of the envelope. See Adjusting the Envelope Insert fingers. Check the fold settings for one set. See Fold settings. When you tap the [1x] button, you can choose between test mail sets: Selected exit: creates one mail set that leaves the system at the defined exit. Use this option to test the complete process. Envelope stop position: separates one envelope and transports the envelope to the envelope stop position. Use this option to verify and adjust the envelope stop position. After a test mail set, the system asks if the mail set is ok or not ok. When you select not ok, you are guided through a wizard that helps you to find the cause. 4 39
![Adjust the Address Position Adjusting the address position is only possible after creating an example mail set (by using the [1x] button).](/docs-images/95/123658881/images/45-1.jpg "4 If the address on your mail is not correctly positioned behind the envelope window, change the address position as follows: 1. Choose a job and tap [1x]. 2.")
45 Adjust the Address Position Adjusting the address position is only possible after creating an example mail set (by using the [1x] button). 4 If the address on your mail is not correctly positioned behind the envelope window, change the address position as follows: 1. Choose a job and tap [1x]. 2. Tap Mail set not OK if asked if the mail set is correct. 3. Tap Address position not correct. 4. Change the address position: slide the position indicator to the correct position. 5. Tap the green button to create another example mail set or tap [OK] to confirm the settings. 40
. 4 2. Tap the 'Envelope stop position' button. 41")
46 Adjust the Envelope Insert Fingers To verify that the position of the fingers is correct: 1. Choose a job and tab [1x] (envelope only) Tap the 'Envelope stop position' button. 41

47 3. Lift the unlocking lever A of the upper unit and pull up the upper unit Tap the arrow to move to the next screen. 5. Follow the instructions on screen. 42
48 If the insert fingers are not correct, adjust the fingers as follows: 1. Loosen the knurled knob C on top of each finger Adjust each finger so that the tip enters about 5 mm (0.2 inch) into the envelope. 3. Re-tighten the knurled knob.the fingers can be moved sideways to the desired position. 4. Place the outer fingers D about 5 to 10 mm (0.2 to 0.4 inch) from the edges of the envelope. Check the position of the insert fingers when changing to a different type of envelope. 5. Tap the envelope button on the touch screen to fetch another envelope. 6. Make sure that the finger position is correct. If not, repeat the steps for adjusting the fingers. Verify the Insert Position This adjustment must only be checked in case of problems or when changing the envelope type. To verify the insert position: 1. Choose a job and tap [1x] (envelope only). 43

49 2. Lift the unlocking lever A of the upper unit and pull up the upper unit Follow the instructions on screen. 4. Tap the envelope button to fetch another envelope. 5. Make sure that the insert position is correct. If not, repeat the steps for adjusting the insert position. 44
50 Mail Sets Adjust the Separation of Special Feeders Adjust the separation of special feeders as follows: 1. Push knob A forward until it clicks Turn knob A counter clockwise to open the separation gap. 3. Place a document on the feeder tray and slide it into the system until it can go no further. 4. Turn knob A clockwise to get resistance. 5. Move the document to and fro. The separation is adjusted correctly when a slight resistance is felt on the document. Turn knob A counter clockwise again if the resistance was set too high. 6. Pull the knob A back again when ready. 45
51 Process a Mail Set with BRE or Inserts A mail set with BRE or insert consists of a main document (address carrier), a BRE or an insert and perhaps other enclosures. This set is inserted into an envelope From the Job list menu, tap [New job]. 2. Add the BRE as a (custom) enclosure. 3. Follow the job creation process (see Create a manual job on page 29). Process Mail Sets with Daily Mail To process mail sets with Daily Mail: 1. Create a Manual job and select [DailyMail] for your Main document. 2. Complete the job settings. 3. Tap [start] to start the job. A daily mail switch notification and instruction appears on the screen. 46
52 4. Turn down the left side guide A of the upper tray. Now you can see the Daily Mail handle B Move the handle B to the right to enable the Daily Mail function. 6. Turn side guide A upwards. 7. Place the document or document set in the feeder tray. The document or document set will be folded and inserted into the envelope as described in the selected job. 8. Place the next document or document set in the feeder tray. The system will keep running to process the inserted document or document set. 9. When finished with Daily Mail, tap [stop] to stop the job. 10. Set the Daily Mail handle B to the AUTO position to disable the Daily Mail and enable the automatic document separation. Create a Job with Custom Envelopes Makes sure that your custom envelopes fit within the specifications (see Envelope Specifications on page 133). 1. Create a Manual job and select envelope. 2. Tap [Custom]. 47
![3. Enter the envelope height. 4 4. Tap the [Flap] tab if you use open flap envelopes. 5. Select if you want to feed envelopes with flaps up (On) or with flap down (Off). 6.](/docs-images/95/123658881/images/53-0.jpg "Tap [OK] to save and close the envelope settings. 7. Complete the Fold Settings and Exit Settings to complete the job and tap [Save] to save the job.")
53 3. Enter the envelope height Tap the [Flap] tab if you use open flap envelopes. 5. Select if you want to feed envelopes with flaps up (On) or with flap down (Off). 6. Tap [OK] to save and close the envelope settings. 7. Complete the Fold Settings and Exit Settings to complete the job and tap [Save] to save the job. Follow the instructions as described in 'Create test mail set'. Create a Job with Custom Documents Makes sure that your custom documents fit within the specifications (see Document Specifications on page 132). 1. Create a Manual job and select a custom document as your main document or enclosure. 2. Tap [Custom] to create a custom document. 48
![3. Enter the height of the document. 4 4. Confirm the document settings with [OK]. 5. Complete the Fold Settings and Exit Settings to complete the job and tap [Save] to save the job.](/docs-images/95/123658881/images/54-0.jpg "Follow the instructions as described in 'Create a test mail set'. Change to Another Feeder Tray You cannot change the order of the documents in the mail set by changing feeders.")
54 3. Enter the height of the document Confirm the document settings with [OK]. 5. Complete the Fold Settings and Exit Settings to complete the job and tap [Save] to save the job. Follow the instructions as described in 'Create a test mail set'. Change to Another Feeder Tray You cannot change the order of the documents in the mail set by changing feeders. If you want to change the order of the mail set, see Delete or move an enclosure. If you want to move the main document or enclosures to another feeder tray: 1. Select a job from the Job list. 2. Tap the document that you want to move to another feeder tray. All available feeder trays are marked with a dotted box. 3. Tap the dotted box of the feeder tray where you want to move your document to. The new feeder tray is selected for feeding of the document. 4. Tap [Save] to save the feeder tray selection to the job. 49

55 Link Feeder Trays Link feeder trays as follows: 4 1. Select a job from the Job list. 2. Tap the feeder tray that you want to link to another feeder tray. The link symbol appears. 3. Tap the link symbol. The figure shows an example of linked feeders. 4. Tap [Save] to save the link to the job. When you want to un-link the feeders, tap the feeder trays and tap the un-link symbol. 50
56 Edit a Job To edit an existing job: 1. From the Job list menu, select a job you want to edit Tap [Edit]. When you tap [Edit], you enter the guided job flow that enables you to make the desired changes. 3. Make the changes you want to make. When you completed the job programming, tap [Save] to save the changes. 4. Tap [1x] to make sure that the Insert Position and Address Position are correct (see Verifying the Insert Position and Adjusting the Address Position). Save a Job When you have created a new job or edited a job, save the job as follows: 1. After you have completed the job definition, tap [Save]. 2. Enter the job name. 51
![3. If necessary, add a description to the job. The description is visible in the job list. 4 4. Tap [OK] to save the job. The job is added to the job list.](/docs-images/95/123658881/images/57-0.jpg "Delete or Move an Enclosure If you want to delete an enclosure in your job or change the order of the enclosures, proceed as follows: 1.")
![From the Job list menu, select a job you want to edit. 2. Tap [Edit]. 3. Tap and hold the enclosure you want to move or delete.](/docs-images/95/123658881/images/57-1.jpg "Now drag the enclosure to an other position. Or tap the waste bin to delete the enclosure from your mail set. 4.")
57 3. If necessary, add a description to the job. The description is visible in the job list Tap [OK] to save the job. The job is added to the job list. Delete or Move an Enclosure If you want to delete an enclosure in your job or change the order of the enclosures, proceed as follows: 1. From the Job list menu, select a job you want to edit. 2. Tap [Edit]. 3. Tap and hold the enclosure you want to move or delete. Now drag the enclosure to an other position. Or tap the waste bin to delete the enclosure from your mail set. 4. Tap the arrow buttons [>] to pass the other job definition steps and close the job editor. 52
58 5. Tap [Save] to save the changes. 6. Tap [1x] to make sure that the Insert Position and Address Position are correct (see Verifying the Insert Position and Adjusting the Address Position). Copy a Job To copy existing job settings to a new job: 1. Tap and hold the job in the Job list menu Tab [Copy]. 3. Enter the name of the new job and tab [OK]. 53
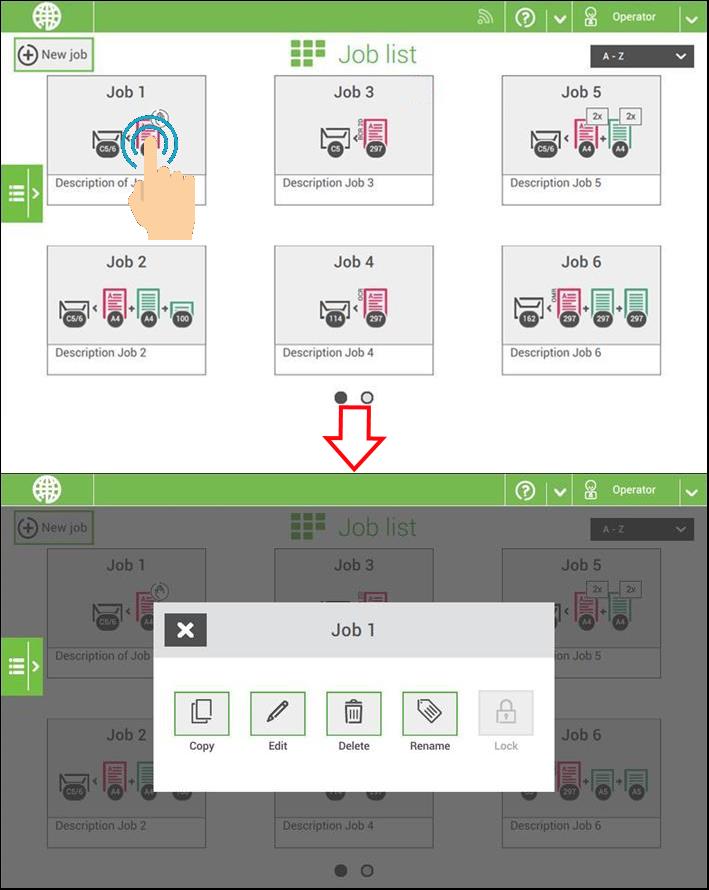
59 Delete a Job To delete an existing job: 1. Tap and hold the job in the Job list menu Tap [Delete]. 3. Tap [OK] to confirm. Rename a Job To rename a job: 1. Tap and hold the job in the Job list menu. 2. Tab [Rename]. 3. Enter the name of the new job and tab [OK]. 54
60 Lock a Job To lock an existing job: 1. Log on as supervisor. 2. Tap and hold the job in the Job list menu Tap [Lock]. 4. Tap [OK] to confirm. The job shows a lock in the job list. If the supervisor is logged on, the lock is open. If the operator is logged on, the lock is closed. The operator cannot edit, delete or rename the job, when the job is locked. 55
 Address carrier face down and trailing (top address) Enclosure face up Enclosure face down Document Feed")
61 5 Loading the System Document Orientation Document Orientation 5 The touch screen shows how to load documents and envelopes into the feeders. The table shows the meaning of the symbols: Address carrier face up and leading (top address) Address carrier face down and trailing (top address) Enclosure face up Enclosure face down Document Feed Trays Install the Document Feed Trays Place the document feeder trays in position: 1. Hold the document feeder tray slightly inclined as shown in the figure. 2. Place the front end of the document feeder tray underneath the two black rollers. 56
. 5. Let the document feeder tray rest on the machine.")
62 3. Move the document feeder tray upwards (lifting the black rollers), until it is possible to hook the feeder tray into place Move the document feeder tray towards the machine and move the hooks over the mounting points (on both sides). 5. Let the document feeder tray rest on the machine. Adjust the Side Guides To adjust the side guides it is best to remove the document feeder tray from the feeder as follows: 1. Push handle A downwards. 2. Lift the document feeder tray upwards to unhook it and then pull it out from the feeder. 57

63 3. Loosen the knob B half a turn Grab the side guides in the middle and push them apart as far as possible. 5. Put a small stack of documents between the side guides. 6. Grab the side guides in the middle and push them towards the documents.the space between the side guides and the documents should be such that the documents have just enough play to move freely. 7. Re-tighten knob B. 8. Remove the stack of documents. 9. Replace the document feeder tray (see Installing the Document Feeder Trays on page 56). Load Documents Fill the document feeder tray as follows: 1. Open the left-hand side guide A by turning it downwards. The feed rollers will automatically be lifted. 2. Place a stack of documents between the side guides. 58
64 3. Turn the left side guide upwards again. Document Separation The term Document separation refers to the adjustment required for separating the upper document from the rest of the documents in the stack. This prevents pulling too much documents from the stack at the same time. The document separation for the automatic feeders is set automatically; there are no manual adjustments needed. Feeders 3st can be special feeders. The document separation for special feeders must be adjusted manually. While special feeder trays fit in all positions, adjusting the separation is only possible when they are fitted on position 1 and 2. To adjust the separation of special feeders follow the instructions as described in Adjust the Separation of Special Feeders on page 45. maxifeeder 5 Adjust the maxifeeder Side Guides Adjust the side guides: 1. Take a stack of documents/bres and place them in the feeder tray. BREs with flap down and leading (top side pointing to system). 2. Adjust the side guides by turning the thumb wheel A such that the documents/bres just fit and can move without resistance. Too much play causes skewing. 59
65 Adjust the maxifeeder Document Separation When the maxifeeder is used at an automatic separation feeder, the separation is set automatically. The maxifeeder can also be used on a feeder position with a manually adjusted separation. To adjust, proceed as follows: 1. Remove the document feeder trays 2 and 3. 5 The lowest feeder is feeder Squeeze the two blue handles A and B and shift the feeding plate C as far as possible to the front. 3. Push knob D forward until it clicks. 4. Place a document/bre on the feeder tray and slide it in the system till the leading edge is not visible anymore. Turn knob D counterclockwise if the separation is set to narrow. 5. Push the document/bre between the rollers. 6. Turn knob D clockwise to get more resistance and counterclockwise if the separation is set to narrow. The separation is adjusted correctly when a slight resistance is felt on the document/bre. 7. Pull knob D back when ready. 8. Replace the document feeder trays 2 and 3. 60
 until documents/bres are underneath the rubber paper pullers.")
66 Load Documents (maxifeeder) When loading the maxifeeder, make sure that the document/bres are positioned parallel in relation to the feeding plate assembly to ensure correct feeding. The feeding plate assembly will be shifted up automatically (when the system starts processing) until documents/bres are underneath the rubber paper pullers. In case of long documents, use the feeding plate extension B to support the documents. 5 To load documents: 1. Squeeze the two blue handles A and B. 2. Shift the feeding plate assembly C to the rear position. 3. Loosen the stack of documents and place them in the feeder tray. BREs with flap down and leading (top side pointing to system). 61
67 High Capacity Document Feeder Adjust the Side Guides To adjust the side guides B: 5 1. Loosen knob D, which is located underneath the feeder tray, half a turn. 2. Put a small stack of documents between the side guides. 3. Rotate wheel E. The space between the side guides and the documents should be such that the documents have just enough play to move freely. 4. Re-tighten knob D. 62
. See Document Orientation how to place the documents in the feeder tray. 3. Release lever A.")
68 Load Documents (HCDF) To load the document feeder tray: 5 1. Pull down lever A. The feeder rollers C move up to filling level. 2. Place a stack of documents between the side guides (max. 725 sheets, 80 g/m²). See Document Orientation how to place the documents in the feeder tray. 3. Release lever A. Adjust the Side Guides and Envelope Separation Adjust the side guides and envelope separation as follows. 1. Rotate thumb wheel D to move the side guides C apart. 63

69 2. Put a small stack of envelopes between the side guides. 3. Move the side guides towards the envelopes. The space between the side guides and the envelopes should be such that the envelopes have just enough play to move freely. If the distance between the side guides is too large, the envelopes will twist sidewards, when transported into the machine Pull down small lever B to set the separation. 5. Insert one envelope up to the stoppers. The position of the envelope is flap down and trailing (bottom side of the envelope pointing to the system). 6. Return lever B. Load Envelopes Before you load the envelopes, make sure the envelope separation and side guides are correctly set as described in Adjusting the Side Guides and Envelope Separation on page Loosen the stack of envelopes and place the stack on top of the bottom envelope. 2. Shift the envelope support in or out. The top side of the envelope must touch the dotted line on the support. 3. Turn the envelope support to distribute the weight of the envelopes evenly on both sides. 64

70 Filling the Sealing Liquid Reservoir When you want to seal envelopes, the sealing liquid reservoir must be filled. Before you start the job, wait approximately 5 minutes for the brushes to moisten. If the liquid reservoir is almost empty the touchscreen shows a message to warn you that you should refill the reservoir. 1. Open the front cover A 5 2. Fill the reservoir B up to lip C with sealing liquid. 3. Close the front cover A 65

71 6 Settings menu Open the Settings Menu In the settings menu for the operator it is possible to edit the display settings and to set the localisation. If you want to view or edit any of the Operator Settings: 1. Go to the Job list and tap the side menu on the left side and select [Settings] Tap [Localisation] if you want to change the document standard, weight standard or the language. 66
![3. Tap [Display settings] if you want to: - set the 'Key' click to on/off - set the Volume - set the Backlight - set the Brightness To set the backlight and brightness, a test pattern is available as](/docs-images/95/123658881/images/72-0.jpg "a reference. 6 For more information on Open source licenses, see Open source licenses.")
72 3. Tap [Display settings] if you want to: - set the 'Key' click to on/off - set the Volume - set the Backlight - set the Brightness To set the backlight and brightness, a test pattern is available as a reference. 6 For more information on Open source licenses, see Open source licenses. Open the Settings Menu (Supervisor) Supervisor Settings are all settings that can be found under the Settings Menu when logged in as supervisor (pin code 2546). The following flowchart shows which subjects are available via the Supervisor settings menu. 67

73 If you want to view or edit any of the Supervisor Settings: 1. Login as Supervisor with pin code Go to the Job list and tap the side menu on the left side and select [Settings]. 68


74 Supervisor Settings Menu Configuration Configuration The Configuration menu contains the configuration information settings for the system. System Info The System info part of the Configuration menu shows the following information: Flex certificate - this option is used for reading Counter since last visit - the counter value since the last service visit Last error (description) - The last error and error description generated by the system 6 Software Overview The Software overview part of the Configuration menu shows the versions of the software that is present in the total system. 69
75 6 Licensed Options The Licensed options part of the Configuration menu shows the following information: Chip ID Serial number Installed options The installed options are enabled with license codes. These license codes, together with the identification number of the machine enable the relevant options. The enabled and available software options are displayed in this screen. Contact your dealer for information about these license codes. The system supports the following licensed options: Remote assistance Online help Advanced/Basic reading OMR 1 track BCR 1D BCR 2D OCR Flex reading Maxifeeder 70


76 Add a Licensed Option To add a licensed option: 1. In the Configuration, Licensed options screen, enter the license code Tap [Add].The system verifies the license key. If the license key has been verified successfully, the option is added to the system and can be used. Settings Settings The Settings menu contains the configuration settings for the system. Localisation Tap [Localisation] if you want to change the document standard or the language. 71

77 When you need a keyboard to enter e.g. a job name, you get a special keyboard in case of Russian, Czech and Katakana. But the keyboard has always a button to switch back to the keyboard. 6 Display Settings See the settings menu for the operator. Date-time Tap [Date/time] to set the: Date Time Date format; you can choose between three format to show the date: dd-mm-yyyy, mm-dd-yyyy or yyyy-mm-dd Time format; you can choose between a '12 hours' notation or a '24 hours' notation 72
![Production Settings Tap [Production settings] to define when envelopes should be cleared from the system.](/docs-images/95/123658881/images/78-2.jpg "Envelopes clearing after job selection: this setting defines if the envelopes should be cleared when you select a job. 'Ask' means that the system asks if you want to clear the envelopes.")
78 Production Settings Tap [Production settings] to define when envelopes should be cleared from the system. Envelopes clearing after job selection: this setting defines if the envelopes should be cleared when you select a job. 'Ask' means that the system asks if you want to clear the envelopes. Envelopes clearing after job edit: this setting defines if the envelopes should be cleared when you have edited a job. 'Ask' means that the system asks if you want to clear the envelopes. Job Settings 6 Job settings normally will be changed by a service engineer only. Therefore first consult the service organization before you change any settings. Changes to the job settings can result in malfunctioning of jobs. You can also define the job settings per job. Select a job from the Job list, tap Edit, navigate to the Exit settings, and tap Advanced. 73

79 6 The Job settings part of the Settings menu covers settings that improve the processing of jobs: Flap closer offset: to improve the sealing of specific envelopes you can delay or advance the moment of sealing. You enter the number of pulses. A minus value means the sealing is advanced, a plus value means the sealing is delayed. You can enter a number between -20 and 20. System output: mode 1 mode 2 Mode 1 focuses on the versatility of paper parameters (paper thickness; document length), i.e. correct operation under even extreme paper conditions. Mode 2 is the default mode, and focuses on high speed. Use Mode 1 with a paper thickness of 65 g/m2 or less, a document length of 12 inch (305 mm) or higher, and for situations where Mode 2 is not functioning properly. In all other cases use Mode 2. BRE with window: if the BRE has a window, set this setting to yes. Only available with Mode 2. Document offset (A in the figure): the extend to which documents are not overlapping in the vertical transport. In the vertical transport of documents fed by the various feeders, the documents are partially overlapping each other. This to make sure that the documents are properly aligned in the collator area. The default value is 50 mm (2.0 inch). The document offset can be varied between 20 mm (0.8 inch) and 250 mm (9.8 inch). 74
80 6 BRE offset: in the case of offset is yes, the last document that was added to the set is shifted from the rest of the set (offsetting, see below). Collator stop optimisation: if set to "off", the system does not show a message, when a collator stop change can improve the system output. Explanation of BRE offset: if a BRE is longer than the set fold but shorter than the envelope height, this BRE can get folded (A in the figure). Under certain conditions (see below) you can prevent the BRE from being folded. In the case of offset yes, the BRE is held back during a certain distance (B in the figure). This means that the trailing edge of the BRE leaves the collator last. The document is not folded. During the insertion into the envelope the documents of the set are aligned. 75
81 The conditions are: No multi-feed is used for the BREs. The document directly under the BRE must have a height of at least 60 mm (2.4 inch) more than the BRE. The height of the BRE is more than the set fold length. The folding mode is either V-fold or C-fold (no Z-fold). The BRE must be shorter than the envelope height. The whole BRE offset is based on friction between documents within a set. Therefore it is necessary to make use of these conditions to reduce the risk of bad transporting, folding and inserting. 6 It is possible to use the BRE offset for a BRE and an enclosure (card) in one set. The extra condition is that this enclosure is equal to or smaller than the set address fold and should be placed direct underneath the BRE in the set. Connectivity See Connect the system to the internet. 76

![System Test Use the [System test] to check if all motors, clutches and sensors are correctly connected.](/docs-images/95/123658881/images/82-1.jpg "The test briefly activates the actuators and clutches and measures the current. To run a system test: 1.")
82 License information License information shows information on the open source software that is used in the system. 6 Diagnostics Diagnostics The diagnostics menu contains the basic diagnostics functions available for a supervisor. System Test Use the [System test] to check if all motors, clutches and sensors are correctly connected. The test briefly activates the actuators and clutches and measures the current. To run a system test: 1. In the Settings menu, tap the [Diagnostics] tab. 2. Tap [System test]. 77
![3. Remove all documents and envelopes and close all covers before starting the diagnose. 4. Tap [Start test]. 5.](/docs-images/95/123658881/images/83-0.jpg "When the test is finished, the Status report is shown, showing a list of all problems found during diagnostics. If tests fail, contact your service organization.")
83 3. Remove all documents and envelopes and close all covers before starting the diagnose. 4. Tap [Start test]. 5. When the test is finished, the Status report is shown, showing a list of all problems found during diagnostics. If tests fail, contact your service organization. 6 Maintenance When too much paper dust is built up at the sensors a warning message will be displayed. To check the conditions of the photocells or to calibrate them follow the instructions as described in Calibrate photocells. Reading Reading The reading menu contains the configuration items for the reading functions. Because reading is optional, this menu is only available when there is at least one reading license present. For more information on the reading option, see Reading. 78

84 OMR Code Definition The Reading OMR code definition screen shows the configuration of the system for OMR. For every OMR code option, it shows if it is on or off. If it is on, the screen shows information on what the system does, when it reads a mark or no mark. BCR 1D Configuration Sheet 6 The Reading BCR 1D configuration sheet allows you to read a configuration sheet. The result is visible in this screen, but also in the BCR 1D code definition screen. See Reading a configuration sheet. 79
85 BCR 1D Code Definition 6 The BCR 1D code definition screen shows only information when a configuration sheet is read. It shows which codes are enabled and how they work. BCR 2D Configuration Sheet The Reading BCR 2D configuration sheet allows you to read a configuration sheet. The result is visible in this screen, but also in the BCR 2D code definition screen. See Reading a configuration sheet. 80

86 BCR 2D Code Definition The BCR 2D code definition screen shows only information when a configuration sheet is read. It shows which codes are enabled and how they work. Last Image 6 The Last image screen shows the result of the last code that the system read. The figure shows an example of the image of an OMR code. You can use this image to see if the read code fits within the reading window. When you click on the Information button of an image of OMR code, the screen shows a graphical representation of the marks read from the last OMR document (oscilloscope function). It shows the time-dependant OMR output voltage. 81
![History The History screen shows an overview of the jobs run. 1. Tap on the [History] tab to view the Job history. 6 2.](/docs-images/95/123658881/images/87-0.jpg "Tap on the [Today] pull down button if you want to view the jobs that are run 'Today', 'Last week' or 'All'. The history is displayed on the touch screen.")
87 History The History screen shows an overview of the jobs run. 1. Tap on the [History] tab to view the Job history Tap on the [Today] pull down button if you want to view the jobs that are run 'Today', 'Last week' or 'All'. The history is displayed on the touch screen. With [Save to USB], you save the history in CSV format to a USB drive. 82
88 7 Connect the System to the Internet Options for Connection Connect the system to the internet in one of the following ways: Wired connection with the gigabit ethernet connection: - Connect with DHCP (Automatic IP address) - Manual Configuration Wireless connection: - Search for SSID - Manually configure SSID In all cases, you can use proxy for the connection. 7 Log on as Supervisor to complete this procedure. 83
89 Set up a Wired Connection Set up a wired connection as follows: 1. Connect the system to a LAN with a network cable. The figure shows the LAN connector (B) Open the supervisor settings menu. 3. Tap the Settings tab, [Connectivity]. 84
90 4. Tap [LAN settings]. 5. Select Wired from the Connection type pulldown menu Set Automatically obtain IP address (DHCP) to Yes or No. If Yes, the system connects automatically to the LAN. If No, set up a connection manually. Enter the necessary details to setup a manual connection. 85
91 Set up a Wireless Connection Set up a wireless connection as follows: 1. Open the supervisor settings menu. 2. Tap the Settings tab, [Connectivity]. 3. Tap [LAN settings] Select Wireless from the Connection type pulldown menu. 5. Choose if you want to enter the SSID manually or if you want to search for a wireless network. If you want to search for a network, tap [Choose network]. 6. When you have entered the network details or selected a network from the search, tap [Connect] to connect to the network. 86

92 When the system connected successfully to the network, the screen shows Connected. 7 87
![Test the Connection When you have connected to a network, test the connection as follows: 1. Open the supervisor settings menu. 2. Tap the Settings tab, [Connectivity]. 3.](/docs-images/95/123658881/images/93-0.jpg "Tap [Test connections]. 7 4. Tap the [Test] button. The system tests the IP addresses that are defined at the LAN settings.")
93 Test the Connection When you have connected to a network, test the connection as follows: 1. Open the supervisor settings menu. 2. Tap the Settings tab, [Connectivity]. 3. Tap [Test connections] Tap the [Test] button. The system tests the IP addresses that are defined at the LAN settings. If the result is 'Not OK', make sure that the settings are correctly defined. 88
94 8 Reading Introduction Code Types The reading option allows the system to read special codes that are printed on the documents. The code contains information about the processing of the documents. The system can read the following code types: OCR: Optical Character Recognition; the system can scan an area of the document for page number information in the page "n of m" (n/m) format BCR 1D: One dimensional barcode BCR 2D: Two dimensional barcodes OMR: 1-track Optical Mark Recognition Flex 1-9: Optional translation to support non standard OMR and BCR coding Depending on the settings, the code tells the system if: The document set is complete Enclosures must be added to the set The system must stop The set is complete (no pages are missing) The envelopes are transported to the side exit or to the stacker The sheets with the printed code are placed in a feeder. Depending on the programmed code, the other feeders can be used as selective feeders to add enclosures. In case of a Z-fold, the address has to be printed on the last page of the set. With the other fold types, the first sheet of a set always contains the address. A full length code is printed on every sheet of a set. The code must appear at the same location on every page regardless of the actual code length. The code on the last sheet of the set contains the insert instruction. The other sheets carry the accumulate instruction. If the page n of m code is used with BCR or OCR, the set will be inserted when n equals m. 8 89
95 General Requirements for Printing Codes If you print documents for reading: Make sure the ribbon or toner quality is sufficient. Print the code in black on white background. Codes on the same sheet must have equal intensity. Print the code at the same position on every sheet. Be aware of "background noise". The reading function can be disturbed by: color changes on the form, background design and a logo or copy on the opposite side of the sheet that will bleed through. For matrix printers near letter quality (NLQ) printed characters are preferred to obtain maximum blackness (double strike). 8 For more information on how to print a reading code on your document, contact your service organization. OCR Code Description With OCR page n / m (page n of m) you can print human readable characters on your mail set, which can be read by the system, to insert your mail set. The system can recognize the characters in the so called n / m format. If the value of n is smaller than the value m the sheet will be accumulated, if the value of n is the same as the value of m the set will be inserted; m is the total number of pages and n is the current page. Some specifications for OCR page n / m: Supported fonts / font size Character size Supported layouts Print Quality Clear Area Color Background Print drift Times New Roman, Arial, Helvetica, Courier. Italic text will not be supported, bold not recommended. 12 point dotpitch n / m (n,space,/,space,m) Both n and m need to be in the text, n first. 600 dpi (preferable) 15 mm (minimal), around White +/- 2 mm (max.) 90
96 Positions Only one region of interest per job Only horizontal text (portrait) supported All text on the same line Example: 8 91
97 Position of the code on the document (example) 8 92


98 BCR Code Description Bar codes are used for mail sets that are processed in Document Systems. The bar codes tell the system if: The document set is complete The envelope should be sealed Enclosures should be added Etc. Barcode can be printed vertically and horizontally. Two types of barcodes are supported, 1D and 2D barcodes (depending on installed licenses). Supported 1D barcodes Code 39 Code Interleaved 2 of 5 Minimum line thickness of a bar: 0.25 mm (0.01 inch) The thickness ratio of thick bars versus thin bars: 2.2 Minimum width of the barcode: 5 mm (0.2 inch) The white area in the picture shows the limits where the code can be printed 93
 square max - Preferred print quality 600dpi - Print drift from page to page +/-2mm max - Colour background: White - Minimum white space 6.5mm (0.")
 min - Preferred print quality 600dpi - Print drift from page to page +/-2mm max - Colour background: White - Minimum white space 6.5mm (0.")
99 Supported 2D barcodes Datamatrix 8 - Minimum cell size 0.35mm (0.014 ) - Label size 30mm (1.18 ) square max - Preferred print quality 600dpi - Print drift from page to page +/-2mm max - Colour background: White - Minimum white space 6.5mm (0.26 ) - Datamatrix can be read in all directions. PDF Bar width 0.35mm (0.014 ) min - Preferred print quality 600dpi - Print drift from page to page +/-2mm max - Colour background: White - Minimum white space 6.5mm (0.26 ) Printing contrast The label must be strongly printed in black on white background for maximum contrast. Other light backgrounds may be acceptable, subject to test. 94
100 Position of the code on the document 8 BCR license types There are two BCR license types: Basic Advanced 95
101 BCR basic license For the BCR basic license the following functions are available: Page N of M: as long as N is below M, the document set is not complete. As soon as N=M, the set is complete and will be inserted into an envelope. Insert/Accumulate: defines when a document set is complete and must be inserted into an envelope. Customer ID: BCR uses the Customer ID code to complete a set. If the ID changes, the set is inserted. This is only possible with reverse reading. At least one basic commands is required. Page N of M can be used in combination with Customer ID as an integrity check. BCR advanced license 8 For the BCR advanced license the following functions are available: The basic functions (page N of M, insert/accumulate, Customer ID). Sheet sequence - Every sheet has a number, regardless of the document set it is part of. If a sheet is missing, an error is generated. Group sequence - Every document in a set has the same group number. If one document set is missing, an error is generated. Divert (Divert & Continue) - The set will be diverted and the system continues. Stop (Divert & Stop) - The set will be diverted and the system stops indicating error (FT1-RE1-000 Reading stop - Stop mark read). Selective feed - If the system reads the command, an enclosure from the enclosure feeder is added to the set. This function is printed on the last sheet of a set. It is also possible to add an enclosure from the versafeeder. Sealing control - Determines if envelopes are sealed or not. Present on Deck & Continue - The set leaves the system from the upper unit. The system does not stop processing. The envelopes are not sealed. Present on Deck & Stop - The set leaves the system from the upper unit. The system stops. The envelopes are not sealed. Exit selection - Determines if the envelope is transported to stacker or to the side exit. 96

102 OMR Code Description Position of the code on the document 8 Minimum line thickness of a mark: 0.2 mm (0.008 inch). Default the first mark from the top is set to: 100 mm (3.9 inch). This parameter is set in the job settings. The code must have a consistent number of marks on every page. The white area in the picture shows the limits where the code can be printed. OMR license types There are two OMR license types: Basic Advanced 97

103 OMR basic license For the OMR basic license the following functions are available: Start mark: indicates the start of the code. Insert/Accumulate: defines when a document set is complete and must be inserted into an envelope. Parity check: by adding a parity mark the reading code can be checked. The sum of the marks must be even. Safety Mark: is used as an extra security (only 1-track OMR). With skewed paper the reading head can miss part of the reading code. In these situations the safety mark is not read, and the system will give an error. The safety mark also indicates the end of the reading code. This mark must always be present on the document if it is part of the code definition. 8 The minimum code is one mark in one line (insert). However for reliability it is advised to use at least 2 marks. The first line is the start mark. A mark printed on the second line means insert. No mark on the second line means accumulate. 98
104 OMR advanced license For the OMR advanced license the following functions are available: The basic functions (Start, Insert, Parity, Safety). Divert (Divert & Continue) - The set will be diverted and the system continues. Stop (Divert & Stop) - The set will be diverted and the system stops indicating error (FT1-RE1-000 Reading stop - Stop mark read). Selective Feed (feeder 1-6 and the versafeeder) - If the system reads the command, an enclosure from the enclosure feeder is added to the set. This function is printed on the last sheet of a set. Exit control - Determines if the envelope is transported to stacker or to the side exit. Present on deck - The set leaves the system from the upper unit. The system does not stop processing. The envelope is not sealed. Present on deck and stop - The set leaves the system from the upper unit. The system stops. The envelope is not sealed. Sealing control - Determines if envelopes are sealed or not. If a mark is printed, the envelope is not sealed. Sequence Check - Sheets in a stack can accidentally get out of sequence or can be missing. This can be detected by the sequence check. Each sheet has a binary code that is a part of the reading code. Depending on the application one, two or three marks are used by sequence check. 8 99
105 OMR general remarks General remarks: In case of OMR the marks must always be used in the sequence as shown in the figure. 8 If a function is suppressed the following function will move upwards one line. The mark definition is a service setting. 100

106 An Example of OMR Code In the figure the legend for the following example is shown. In this example, a set of 8 sheets with one selective feed and three sequence check marks is shown. The first position is used for the start mark which must be printed on every sheet. The second mark position is used for the insert/accumulate command. A printed mark means insert, no mark means accumulate. Therefore the mark is printed on the last sheet of the set. Position 3 is reserved for selective feed from the enclosure feeder. Print a mark on position 3 when a selective feed from the enclosure feeder is required. The marks are printed on the last sheet of the set. Position 4, 5 and 6 are used for the sequence check marks. In this case a three mark sequence check is used. Flex Reading Code Description With "Flex reading" also non-standard codes and alternative document handling algorithms can be recognized. Flex reading can be activated by a system specific license code and by a customer specific setting that is saved in a physical dongle. With Flex three types of reading can be supported: OMR BCR 1D BCR 2D Depending on the license up to 9 Flex definitions can be used on the system. Creating a Flex job is similar like creating a OMR / BCR reading job
107 Create Jobs with Reading Create a BCR Job Create a BCR Job To create a job with BCR: 8 1. From the Job list menu, tap [New job]. 2. Choose [Manual] to define the job settings. 3. Select an envelope. 4. Tap [Main document]. 5. Tap [Custom]. 6. Enter the document size or select a standard type. 7. Tap the [Reading] tab. 8. Select the code type [BCR 1D] or [BCR 2D]. 9. Load a sample document in the feeder tray as indicated. 10. Tap [Verify] to find the barcode(s) on the sheet. If multiple barcodes are found you can select the correct barcode from the list. 11. Tap [OK] and follow the remaining steps to complete the job. 12. When you completed the job creation, tap [Save] to save job. If required the maximum number of sheets can be reconfigured. Refer to Reading Settings for more details on how to change these settings. 102
108 Read a Configuration Sheet If you want to set the code definition for BCR, use a BCR configuration sheet. The configuration sheet function is available when you are logged on as a supervisor on page 5. To read a configuration sheet: 1. Go to the settings menu for supervisor, see Opening the settings menu (supervisor). 2. In the settings menu, tap the [Reading] tab Tap [BCR 1D configuration sheet] or [BCR 2D configuration sheet]. 4. Tap [Read configuration sheet]. 5. Load the configuration sheet as indicated and tap [READ]. 103
109 6. Tap [Save] to save the new barcode definition. After reading a configuration sheet, jobs with BCR reading might have changed. These jobs are marked with an exclamation mark, verify the job settings before running the job. You can also read a configuration sheet when you create or edit a BCR job. The function is available in the side menu. Create an OMR Job To create a job with OMR: 8 1. From the Job list menu, tap [New job]. 2. Choose [Manual] to define the job settings. 3. Select an envelope. 4. Tap [Main document]. 5. Tap [Custom]. 6. Enter the document size or select a standard type. 7. Tap the [Reading] tab. 8. Select the code type [OMR]. 9. Configure the location of the OMR marks by setting the offset of the top and left side of the sheet. 10. Load a sample document in the feeder tray as indicated. 11. Tap [Verify] to read an example sheet to check the correct reading of the OMR marks. 12. If necessary adjust the position from top and from left side. Verify again with a sample sheet. 104
![13. Tap the information button to verify the read OMR marks. 14. Tap [OK] and follow the remaining steps to complete the job. 15. When you completed the job creation, tap [Save] to save job.](/docs-images/95/123658881/images/110-0.jpg "If required the maximum number of sheets can be reconfigured. Refer to Reading Settings for more details on how to change these settings. Create an OCR Job To create a job with OCR: 1.")
110 13. Tap the information button to verify the read OMR marks. 14. Tap [OK] and follow the remaining steps to complete the job. 15. When you completed the job creation, tap [Save] to save job. If required the maximum number of sheets can be reconfigured. Refer to Reading Settings for more details on how to change these settings. Create an OCR Job To create a job with OCR: 1. From the Job list menu, tap [New job]. 2. Choose [Manual] to define the job settings. 3. Select an envelope. 4. Tap [Main document]. 5. Tap [Custom]. 6. Enter the document size or select a standard type
![7. Tap the [Reading] tab. 8 8. Select the code type [OCR]. 9. Configure the location of the n / m characters by setting the offset of the top and left side of the sheet [1] and [2]. 10.](/docs-images/95/123658881/images/111-0.jpg "Configure the width of the n / m characters [3]. 11. Load a sample document in the feeder tray as indicated. 12. Tap [Verify] to check if the page n / m characters are read successfully. 13.")
111 7. Tap the [Reading] tab Select the code type [OCR]. 9. Configure the location of the n / m characters by setting the offset of the top and left side of the sheet [1] and [2]. 10. Configure the width of the n / m characters [3]. 11. Load a sample document in the feeder tray as indicated. 12. Tap [Verify] to check if the page n / m characters are read successfully. 13. Tap [OK] and follow the remaining steps to complete the job. 14. When you completed the job creation, tap [Save] to save job. If required the maximum number of sheets can be reconfigured. Refer to Reading Settings for more details on how to change these settings. Create a Flex Reading Job To create a job with Flex reading: 1. From the Job list menu, tap [New job]. 2. Choose [Manual] to define the job settings. 3. Select an envelope. 4. Tap [Main document]. 5. Tap [Custom]. 6. Enter the document size or select a standard type. 7. Tap the [Reading] tab. 106
112 8. Select the code type [Flex..]. Depending on the flex code type the OMR or BCR settings have to be configured Follow the remaining steps to complete the job. If required the maximum number of sheets can be reconfigured. Refer to Reading Settings for more details on how to change these settings. Reading Settings When you create a reading job for OCR, OMR, BCR 1D/2D or Flex reading, the following options can be set: 107
![8 Maximum number of sheets: use the [-] or [+] button to select the maximum amount of sheets in the set of documents.](/docs-images/95/123658881/images/113-0.jpg "Stop on sheet overflow: defines if the system should stop or not when a set exceeds the maximum number of sheets, as defined at the \"Maximum number of sheets setting\".")
113 8 Maximum number of sheets: use the [-] or [+] button to select the maximum amount of sheets in the set of documents. Stop on sheet overflow: defines if the system should stop or not when a set exceeds the maximum number of sheets, as defined at the "Maximum number of sheets setting". In case of on, the system stops when the number is exceeded. The incorrect set is diverted. After resetting the system, the final part of the set is also diverted and the system starts processing again. The diverted set should be checked by the operator. In case of off, the system does not stop when a set exceeds the maximum number of sheets. The incorrect set is diverted. The final part of the set is also diverted and then the system starts processing again. The maximum number of sheets in a set is 25. When the number of sheets exceeds 8 or 10, depending on the fold, the document can not be folded anymore. In this case, the maximum length of sheets is 148 mm for a C5/6 envelope. Also make sure that the fold is set to No fold. Ignoring this will certainly lead to stoppages. When the maximum number of sheets exceeds the programmed maximum number of sheets in a set, the system stops and error FT1-RE1-312 will be displayed. After removing the set and tapping the [Start] button, the system starts and repeats the process until an insert or divert mark is encountered. Error FT1-RE1-003 (final set part) will be displayed. 108

114 Stop on misread: defines if the system should stop or not when a code is misread. In case of on, the system stops after a misread. The incorrect set is diverted. After resetting the system, the final part of the set is also diverted and the system starts processing again. The diverted set should be checked by the operator. When Stop on misread is set to off, the system does not stop after a misread. The incorrect set is diverted. The final part of the set is also diverted and then the system starts processing again. After 5 misreads in a row, the system stops and an error code is generated. Reverse reading: (not applicable for OCR) With Reverse reading the decision of inserting a mailset is marked on the next set. For example with OMR the insert mark is printed on the first page of the set. The system will detect the end of a set by detecting the first page of the next set. For example in case of BCR using the Customer ID to complete a set. If the ID changes, the set is inserted. In case the feeder runs empty, the last set is still on the collator because the beginning of the next set could not be detected. In this case the feeder empty message contains an [Ignore] function. Tap [Ignore] and the set on the collator will be inserted. Because of the feeding and collating principle reverse reading has the following limitations: - The last mark of the code should be printed maximally 85 mm (3.3 inch) from the top. - Enclosures and selective enclosures cannot be handled. When a versafeeder module is added to the system configuration, enclosures and selective enclosures can be handled with reverse reading. Exit Selection with Reading 8 109
115 8 When you have a job with reading, more exit selection options are available: Fixed Exit: tap [Settings] to select which exit must be used for this job. If you select stacker, you can choose to let the system continue on the side exit if the stacker is full. Batching: tap [Settings] to define after what number of mail sets, the system must switch to the other exit. In case of a reading job, you can switch off that the system changes the exit on a reading mark. Thickness: depending on the thickness of the document set, the envelop exits to the stacker or the side exit. Tap [Settings] to define the exit when the mail set is thicker or thinner than the reference. The reference is the first document set. Sealing: depending on if the envelopes are closed (sealed) or open (not sealed), the envelope exits to the stacker or the side exit. This selection is only possible with reading: no mark (space) means sealed, a mark means not sealed. Reading: reading has two options: switch exit on mark and let the code define which exit is used. Switch exit on mark means that at every exit code the system changes the exit. If the code defines the exit, you define what happens if the exit code is read: exit code means stacker or exit code means side-exit. Weight: When using reading the size and weight of the mail set can be different per insert. In order to sort the filled envelopes based on weight, e.g. to stay within a certain postal tariff, the machine can sort the filled envelopes on weight and send them either to the side exit or the stacker. To enable weight sorting each item in the mail set needs to have a weight configured; the weight of the envelope, main document and possible enclosures have to be set. The machine sums up the total weight of used envelope and documents and compares it with a reference to determine to send the filled envelope to the side exit or the stacker. 110
116 9 Operator Maintenance Maintenance Schedule Disconnect the mains power supply before performing any maintenance. The user must not attempt to service the appliance beyond that described in this operator manual. All other servicing must be carried out by qualified service personnel only. Please contact your authorized distributor. Maintenance frequency Daily Weekly When necessary Maintenance Check the system functions. Keep the system in proper condition by removing dust, paper remains, etc. The machine is delivered with an extra set of brushes. To always have one clean set available, it is recommended to soak one set in water and use the other set. When dirty or saturated, clean the brushes of the envelope sealing or replace them (see Clean and replace brushes). When dirty or saturated, clean the moistening cloth or replace if necessary (see Replace moistening cloth). Clean feed and insert rollers as instructed by the Service Engineer. When the display warns about dusty sensors, clean the applicable sensors. After cleaning, always calibrate the photocells (see Calibrate photocells)

117 Clean and replace brushes When dirty or saturated, clean the brushes of the envelope sealing or replace them as follows: 1. Moisten the new brushes in water. 2. Remove the brushes one by one by pulling them down from the brush holder. 3. Replace the brushes. Make sure that the studs on the brushes are fitted in the corresponding holes in the brush holder. 9 Replace or Clean Moistening Cloth When dirty or saturated, clean the moistening cloth or replace if necessary. Proceed as follows: 1. Open the front cover A. 2. Remove the sealing liquid reservoir B from the system. 112

118 3. Remove the cover with moistening cloth D. 4. Remove clips C to remove the moistening cloth. 5. Clean or replace the cloth. 9 Calibrate Photocells When too much paper dust is built up at the sensors, a warning message is displayed. In that case, calibrate the photocells as follows: 1. Log in as supervisor. 2. In the settings menu, tap the [Diagnostics] tab. 3. Tap [Maintenance]. 113
119 4. Choose which photocells you want to calibrate. 5. Remove all documents and envelopes and close all covers before starting the calibration. 6. Tap [Calibrate photocells]

120 10 Fault Finding Messages Introduction There are three different types of messages: Indications Warnings Errors Indications 10 When you run a job, indications can appear like the ones in the example. 115
121 Warning message 10 When a warning message is shown, the screen shows the following information: An indication of the area in which the event occurred A warning description A suggested solution behind the arrow An event message number; use this number in case that you call support Tap the [i] button to view more information about the event. 116

122 When an error occurs the touch screen shows a screen with the following information: An indication of the area in which the error occurred An error description A suggested solution behind the arrow An event message number; use this number in case that you call support Tap the [i] button to view more information about the occurred error and about the possible actions to avoid the error from re-occurring. After solving the problem, tap [x] to reset the error (the error screen will disappear). Special Errors Reading errors (when reading is enabled) The document set is diverted. The operator must remove the document set and has to complete the set manually! Technical errors The display shows a message. The error cannot be solved by operating personnel and assistance of the service support is needed

123 Clearing stoppages Clear Stoppages 10 For clearing of stoppages, five system sections can be opened: A - loc, to reach the exit, sealing and inserting area B - side cover, to reach the lower envelope track C - Folder unit cover, to reach the folding area D - vertical transport cover, to reach the vertical transport and feeding area E - collator arm, to reach the collating area 118
124 Envelope Hopper When an envelope gets stuck in the envelope hopper, remove the envelope as follows: 1. Pull down small lever B. Pins C will come down. 2. Push lever A to the right and hold it. Pins C will go up. 3. Remove the stuck envelope. 4. Release lever A. 5. Make sure the separation setting is still correct (see Loading Envelopes). 6. Return lever B. 7. Tap [x] to reset the error and restart the job
125 Exit, Sealing and Inserting Area When a stoppage occurs in the exit, sealing and inserting area, remove the material as follows: 1. Lift the unlocking lever A of the upper unit and pull up the upper unit Remove all material. 3. Close the upper unit. 4. Tap [x] to reset the error and restart the job. 120
126 Lower Envelope Track When a stoppage occurs in the lower envelope track, remove the envelopes as follows: 1. Open the side cover. 2. Squeeze blue handles A to unlock the rollers of the envelope track. 3. Remove the envelope(s) from the lower envelope track. 4. Close the side cover. 5. Press the [Reset] button to reset the error and restart the job. If needed, envelopes can be transported manually to the insert table or lower envelope track by means of handle C. To transport a mail set manually, turn handle B
127 Folder unit When a stoppage occurs in the Folder unit, remove the documents from the Folder unit as follows: 1. Push the lower end of the locking handle A to open the Folder unit cover B. 2. Remove the documents from the Folder unit. 10 Use the delivered pin to turn the rollers. The pin is delivered in the spare parts bag. Remove the pin when finished. 3. Close the Folder unit cover. 4. Tap [x] to reset the error and restart the job. 122

128 Feeders When a stoppage occurs in the Feeders, remove the documents from the Feeders as follows: 1. Pull the vertical transport hand grip A upward to open the vertical transport cover B. 2. Remove the documents. 3. Close the vertical transport cover B: push the bottom side of the cover towards the system, and next the top of the cover. 4. Tap [x] to reset the error and restart the job

129 Collating Area When a stoppage occurs in the collating area, remove the documents from the collating area as follows: Lift and hold the collator arm A. 2. Remove the documents. 3. Lower the collator arm. 4. Tap [x] to reset the error and restart the job. Operator Troubleshooting To resolve problems: 1. Write down the event message number that is shown in the message on the screen. 2. Try to solve the problem by consulting the Troubleshooting Table. 3. Switch the inserter off and on again, to verify system operation. 4. When the error still occurs contact your service organization. When contacting the service organization, you will also be asked for the last error message and the software package version of the installed software. To determine the software package version, see Software overview. 124
130 Troubleshooting Table Symptom The system cannot be started after switching on. System stops with envelope at insert position (flap not open). Envelopes are double fed. Envelope stops skewed. Envelopes are fed irregularly. Possible cause System not connected to mains. Fuse is blown. A cover is opened. Envelopes stacked reversed in the hopper. Envelope flap sticks. Wrong envelope type used (not according to specifications or job settings). Envelope separation not correctly set. Envelopes not placed properly in the hopper. Side guides of the envelope hopper are set too wide. Hopper almost empty. Separation set too narrow. Side guides set too narrow. Envelope support not positioned correctly. Remedy Connect the system to the mains. Replace fuse below power switch. Close the covers. Check envelope feed adjustments. Place envelopes correctly in hopper. Store envelopes according to specifications. Change envelopes according to specifications. Adjust envelope separation. Check and replace if needed. Check side guides and adjust if needed. Refill hopper. Adjust envelope separation. Check side guides and adjust if needed. Reposition the envelope support. Reference Loading Envelopes on page 64 Envelope Specifications on page 133 Envelope Specifications on page 133 Loading Envelopes on page 64 # Loading Envelopes on page 64 # Loading Envelopes on page 64 # Loading Envelopes on page 64 # Loading Envelopes on page 64 # Loading Envelopes on page 64 # Loading Envelopes on page 64 #
131 10 Flap is wrinkled and sometimes not opened. Fingers are placed on top of the envelope. System stops while inserting (stoppage at the inserting point). Envelope not within specifications. Flap sticks. Flap curled. Separation set too narrow. Fingers adjusted too deep into the envelope. Envelope stops too early. Fingers not correctly adjusted. Inserted document too long for used envelope. Envelope throat incorrect. Envelope glued inside. Window not glued properly. Check specifications and change envelopes if needed. Store envelopes according to specifications. Envelopes stored or manufactured improperly. Adjust envelope separation. Check fingers position, adjust if needed. Check envelope stop position, adjust if needed. Check fingers position, adjust if needed. Check fold settings. Check envelope specifications. Eliminate faulty envelopes. Eliminate faulty envelopes. Envelope Specifications on page 133 Envelope Specifications on page 133 Envelope Specifications on page 133 Loading Envelopes on page 64 # Adjusting the envelope insert fingers Verifying the Insert Position Adjusting the envelope insert fingers Editing a job Envelope Specifications on page
132 Flap not sufficiently moistened. Water level low. Check water level, refill if needed. Filling the Sealing Liquid Reservoir Brushes dry. Check brushes, replace if needed by the extra soaked set. Clean and replace brushes Brushes dirty. Check brushes, clean if needed. Clean and replace brushes Moistening felt dry. Check the moistening felt, refill water tray if needed. Filling the Sealing Liquid Reservoir # Moistening felt dirty. Check the moistening felt, clean if needed. Replace or clean moistening cloth Brushes worn out. Replace brushes. Clean and replace brushes Moistening felt worn out. Replace moistening felt. Replace or clean moistening cloth Envelope not always ejected from sealer. Inserted document too big. Document not inserted deep enough. Check fold settings, adjust if needed. Check adjustment of envelope stop position and fingers. Editing a job Verifying the Insert Position 10 Sealing area dirty. Clean sealing area. Maintenance Schedule on page
133 No document fed. Feeder tray empty. Refill feeder tray. Loading documents standard feeder trays Loading documents maxifeeder on page 61 Loading documents High Capacity Document feeder on page 63 Loading documents versafeeder 10 Separation set too wide / too tight. Side guides set too narrow. Adjust the separation. Adjust the side guides. Adjusting the Separation of Special Feeders on page 45 Adjusting the Separation of the maxifeeder on page 60 Adjusting the Separation of the versafeeder Adjusting the side guides standard feeder trays on page 57 Adjusting the side guides maxifeeder on page 59 Adjusting the side guides High Capacity Document Feeder on page 62 Adjusting the side guides versafeeder 128
134 Skewed documents fed. Side guides set too wide. Adjust side guides. Adjusting the side guides standard feeder trays on page 57 Adjusting the side guides maxifeeder on page 59 Adjusting the side guides High Capacity Document Feeder on page 62 Adjusting the side guides versafeeder Double documents fed. Separation set too wide. Adjust the separation. Adjusting the Separation of Special Feeders on page 45 Adjusting the Separation of the maxifeeder on page 60 Adjusting the Separation of the versafeeder 10 Document set not correctly inserted. Address not readable from window Insert position not correct. Insert fingers not correctly positioned. Address position not correctly defined. Check insert position. Check insert finger position. Check address position. Verifying the Insert Position Adjusting the envelope insert fingers Adjusting the address position 129
135 11 Specifications Technical Specifications 11 Model Type Theoretical max. speed Power consumption Voltage tolerance Fuse Approvals DS-85i, FPi 5700, FD6406 Inserter system for medium office use inserts per hour, depending on application. 100V AC/50Hz/3.0 Amps. 115V AC/50/60Hz/3.0 Amps. 230V AC/50Hz/1.5 Amps. 100V: +6% / -10% 115V: +6% / -10% 230V: +10% / -10% 100/115 Vac: T 5.0 A, 125 V. Time lag, 5.0 Amps. rated current, 125 V. 230 Vac: T 2.5 A H, 250 V. Time lag, 2.5 Amps. rated current, high breaking capacity, 250 V. RED (Radio Equipment Directive) 2014/53/EU FCC certification conform 47CFR, part 15 CB Certificate conform IEC UL Listed I.T.E. (Information Technology Equipment) Conform UL-IEC , file E Conform NEN-EN-IEC and derivatives. 130
136 Noise Level Operating temperature Humidity 67,9 dba (with side exit) 69,6 dba (with HCVS) Measurements based on 1 sheet A4 in C5/6 envelope C-fold application (US equivalent: 1 sheet letter size in #10 envelope) (according to ISO 11202) Note: Noise level may vary depending on application. 10 C - 40 C (50 F-104 F) 30%-80% Hopper and Feeder Capacity Envelope hopper Document feeder tray High Capacity Document Feeder tray 325 envelopes (80 g/m²) 325 sheets (80 g/m²) 725 sheets (80 g/m²) 11 Configuration Dimensions 2 stations Height 630 mm (24.8") 3/4 stations 800 mm (31.5") 5/6 stations 970 mm (38.2") Width 420 mm (16.5") 420 mm (16.5") 420 mm (16.5") Length* 1480 mm (58.3") 1480 mm (58.3") 1480 mm (58.3") Weight 97.5 kg (175 lb) 87 kg (192 lb) 101 kg (223 lb) * Length: with side exit 1490 mm/58.7" with stacker 1660 mm/65.4" ** Height with stacker 745 mm/29,3" 131
137 Document and Insert Specifications 11 Paper quality Paper size Folding capacity Envelope sizes Envelope quality Minimum 60 g/m² (15 lb bond) Maximum 250 g/m² (62.5 lb bond), when folded max. 170 g/m² (42.5 lb bond) Booklets up to approximately 2 mm (0.08 inch)thickness, depending on stiffness Minimum width: 130 mm (5.1") Maximum width: 242 mm (9.5"), when folded 230 mm (9.1") Minimum length: 90 mm (3.5") Maximum length: 356 mm (14") V-fold - 10 sheets (max. 80 g/m²) C-fold/Z-fold - 8 sheets (max. 80 g/m²) Double V-fold - 4 sheets (max. 80 g/m²) Standard BRE (Business Reply Envelopes) Minimum 80 g/m² (20 lb bond) Maximum 120 g/m² (30 lb bond) 132
138 Envelope and Document Set Specifications Minimum size A 160 mm 6.3 B 90 mm 3.5 C 32 mm 1.25 D 10 mm 0.4 E - F 84 mm 3.3 G 60 g/m2 11 Maximum size 248 mm mm 6.38 B-32 B mm 2.9 A-12* A-0.47** B-6 B-0.2 * Booklets up to approximately 2 mm (0.08 inch) thickness, depending on stiffness ** When insert is more than 1 mm (0.04 inch): A-15 mm / A-0.6 inch 2.5 mm 0.1 Remarks: The specification of the paper handling equipment is often wider than that of the envelopes and documents handled. The condition of material handled will limit the specified environmental conditions. We recommend that materials to be handled are stored at a temperature of 20 C (68 F) with a relative humidity factor of 50%. If difference in temperature occurs between store room and mailing area, the material has to be stored near the machine at least 24 hours before use. Self-copying paper may cause rubber parts to wear quicker. The rubber used in this machine has the best resistance to Wiggins Teape material. 133
139 maxifeeder Specifications 11 Model Type Theoretical max. speed Power consumption Approvals Height Width Length Weight Noise level Operating temperature Humidity Feed tray capacity Document / BRE insert specifications Model MF-4 High capacity feeder see Technical Specifications of the inserter module Low voltage supplied by the inserter system. EMC Certificate conform EMC-Directive. FCC Certificate conform 47CFR, part 15. UL Listed I.T.E. (Information TechnologyEquipment), conform UL-IEC , file: E Conform NEN-EN-IEC and derivatives. 210 mm (8.3 inch) 285 mm (11.2 inch) 425 mm (16.7 inch) 5.05 kg (11.1 lbs) see Technical Specifications of the inserter module 10 C - 40 C (50 F-104 F) 30%-80% 1200 sheets A4 80 gr. 320x Business Reply Envelopes See Document Specifications on page 132 and Envelope Specifications on page

140 12 Terminology Terminology Term Address carrier Address position Description The address carrier is the document that carries the address of the person for who the mail-set is meant. The address must remain visible while enclosures are added and the document-set is folded. The fold type and selected envelope must ensure that the address is visible behind the window in the envelope. For personalized mailings there is always an address carrier present as long as envelope printing is not supported. Normally there is one address carrier. Automatic Automatic job Barcode Reading (BCR) Business Reply Envelope (BRE) Position of the address on the address carrier, measured from the upper left corner. The address position consists of a horizontal x coordinate, a vertical y coordinate, a horizontal width w and a vertical height h. The feature of an Inserting System to automatically determine its Job settings by measuring the sizes of documents and envelope. From all Feeders that are loaded one sheet will be taken. Based on the maximum document length (which is also the length of the documentset) and the length of the envelope the fold type is determined. A job that is created with the Automatic functionality. Barcode Reading is intended for reading and interpreting printed barcodes. The codes give information to the Inserting system about how to build-up and handle a set. Envelope included in outgoing mail-sets for addressee response purposes
141 C-fold Fold type in which a document-set is folded twice in which the folded flaps are on top of each other. This fold is illustrated in the picture below. 12 Clear Daily Mail Divert area Document Document-set Double Feed Control (DFC) Double parallel fold The position of both folds is adjustable. Synonym: Letter fold. The function of an inserting system in which all mail-sets in progress are finished and the document path is left empty. Capability of an inserting system to manually insert mail-sets one by one into the system, which are then inserted into an envelope. Optionally, depending on settings, additional enclosures can be added and the mail-set can be folded. This function is intended for small amounts of mail that each can have a different build-up. To avoid stoppages the Divert area diverts duplicate on faulty documents before folding them while the system is still running. A document is one of the components of a mail-set. A document can consist of one or more sheets. Documents can be divided into address carriers and enclosures. For personalized mailings there is always one address carrier and an optional number of enclosures. The document-set is the physical collection of address carrier and enclosure(s) that is under production in the Inserting System. The document-set is completed during production and is to be inserted in the envelope. The number of enclosures can range from 0 to the limit opposed by the number of available Feeders. Once the document set has been inserted into an envelope it is called mail set. Double Feed Control is the sensor that measures the thickness of a sheet to check if the inserting system does not accidentally take more sheets than intended. DFC sensors exist on Feeders (double sheet detection). Currently DFCs on Neopost inserting systems perform relative measurements, which means that they need a cycle to 'learn' the thickness of a sheet. Also the length of the document is measured so partly overlapping sheets will be detected. See double V-fold. 136
 Feeder linking The position of both folds is adjustable.")
142 Double V-fold The double V-fold is a type of fold where the document is first folded halfway and the resulting folded set is again folded halfway. This fold is illustrated in the picture below. Envelope Extended Folding Face down Face down leading Face down trailing Face up Face up leading Face up trailing Feeder(s) Feeder linking The position of both folds is adjustable. Synonym: double parallel fold. The envelope is the packaging of a mail set. Window envelopes are envelopes that have a transparent section through which the address on the address carrier can be read. Besides the normal top-closing window envelopes there are also bottom-closing envelopes. Option, makes bottom address applications and short folds possible. Situation in which the front of a sheet is facing downwards when placed in a document feeder. Situation in which the front of a sheet is facing downwards and the top of the sheet is closest to the separation unit in a document feeder. Situation in which the front of a sheet is facing downwards and the bottom of the sheet is closest to the separation unit in a document feeder. Situation in which the front of a sheet is facing upwards when placed in a document feeder. Situation in which the front of a sheet is facing upwards and the top of the sheet is closest to the separation unit in a document feeder. Situation in which the front of a sheet is facing upwards and the bottom of the sheet is closest to the separation unit in a document feeder. The (document) feeding part of the system. A Feeder is a Module for the input of documents to the inserting system. The Feeder separates documents sheet by sheet from the stack of documents in the feed tray. The ability to load two feeders with the same document type where the Inserting System automatically switches to a second feeder when the first feeder is empty and vice versa. In the mean time the first feeder can be refilled, so the inserting system can keep running without having to stop for refilling the feeders
143 12 Feed tray Flexcode OMR High Capacity Document Feeder (HCDF) High Capacity Vertical Stacker (HCVS) Insert Inserter Inserting system insert'n Frank / insert'n Mail (mailing machine) Job Job counter Letter fold Linking Loc Part of the feeder that contains the stack of documents. An OMR code for which the meaning of the OMR marks can be programmed in a dedicated way for a specific customer. This is normally used to support the OMR codes from other suppliers. Optional feeder with a capacity for up to 725 sheets. Optional stacker that is mounted on the exit of the system, to stack filled envelopes. An insert is the action of inserting a document-set into an envelope. For native speaking customers an insert is also a short, not to be folded document, usually an enclosure. An Inserter is the Module where the document-set is inserted into the envelope, the envelope is closed and if necessary sealed. The system of all the Modules that cooperate to perform the inserting function (accumulate document-set, fold and insert) and have a single point of control. Interface for the Neopost franking machine. A job is an actually produced collection of mail-sets based on a certain Job Definition at a certain point in time for a specific purpose. It consists of: The Job definition used for the production Information about the batch size The counter that registers the number of mail-sets that is produced as part of a specific job. See C-fold. See Feeder Linking. The Loc is the unit in the system that transports the envelope just after the document was inserted. It is called Loc (short for locomotive) as the early developments had a straight cover and a number of transportation rollers sticking out. This made it look like a locomotive from the side. In the current systems the loc also carries the brush holder and sealing rollers. 138
144 Maxifeeder Multifeed OMR OMR code definition Operator Optical Mark Recognition (OMR) Folder unit Reading error Reading marks Remote diagnostics Service engineer Single fold Stop counter Supervisor Test run Thickness detection Feeder with high capacity feed tray (e.g sheets A4 80gr). The feature of an Inserting System in which more than one sheet is taken from a Feeder. Optical Mark Recognition Standard 1-track OMR code definition. Specifies the amount of reading marks used and the functionality linked to each of them (how each should be interpreted). The person operating a document system. Optical Mark Recognition is intended for reading and interpreting printed codes. These codes are one or more black marks which are read from a document. These marks give information to the Inserting system about how to build-up and handle a set. The Folder unit can fold up tot 10 pages. Condition in which the system could not reliably read or interpret the OMR reading marks or barcode from a sheet. Marks added to documents containing finishing instructions that can be identified by a reading head and interpreted according to the used OMR code definition. The feature that makes it is possible to analyze a problem on an Inserting System from a remote location. Technical engineer whose task it is to resolve problems with systems in the field. Besides dealing with problems, service engineers are also responsible for preventive maintenance. See V-fold. Counter which sets the amount of envelopes to be filled. After filling this amount of envelopes the system will stop (even during a clear). Person who is responsible for the technical state of the machine. Normally a supervisor has access to programming functions, which are restricted for standard users. A test run is intended to validate the settings of the Inserting System: Inspect and adjust the stop position of the envelope. Check the fold settings for one set. Check if the address is correctly positioned behind the envelope window. Checks the thickness of the document set. If the thickness is less or more than the set value an error message is displayed

145 Tray V-fold Contains a stack of paper for a printer or inserter. This paper is supplied to the machine for further processing. A V-fold implies the document/set is folded once. The fold-position is adjustable. This fold is illustrated in the picture below: Vertical transport Z-fold Synonym: Single fold. The vertical transport section between feeders and collator. A Z-fold means that a document is folded twice in such a way that each folded flap is on a different size of the folded document, resulting in a Z-shape. This fold is illustrated in the picture below. 12 The position of both folds is adjustable. Synonyms: zigzag fold 140
6602 Series Inserters
 6602 Series Inserters 8/2007 OPERATOR MANUAL FIRST EDITION TABLE OF CONTENTS 1 Health, Safety and Environment... 4 1.1 Precautions and Safety Issues... 4 2 Functional Description... 7 2.1 Overview... 7
6404 Series Mid-Volume Inserter
 6404 Series Mid-Volume Inserter OPERATOR MANUAL 2/2012 Table of Contents 1 Read this First...1 Warning...1 About this manual...1 Safety...2 Country Specific Conditions...3 End of Life...4 2 Meet your Document
6402 Series Inserters
 6402 Series Inserters 5/2007 OPERATOR MANUAL FIRST EDITION TABLE OF CONTENTS 1 Health, Safety and Environment... 3 1.1 Precautions and Safety Issues... 3 2 Functional Description... 6 2.1 Overview...
6204 Series Low-Volume Desktop Inserter
 6204 Series Low-Volume Desktop Inserter 7/2012 OPERATOR MANUAL Table of Contents 1 Read this First...1 Warning...1 About this manual...1 Safety...2 Country Specific Conditions...4 End of Life...5 2 Meet
Read this First...1 Warning...1 About this manual...1 Safety...2 Country Specific Conditions...3 End of Life...4 FCC Classification...
 Table of Contents 1 2 3 4 Read this First...1 Warning...1 About this manual...1 Safety...2 Country Specific Conditions...3 End of Life...4 FCC Classification...5 Meet your Document System...6 Overview...6
TABLE OF CONTENTS ENGLISH
 TABLE OF CONTENTS 1 Health, Safety and Environment... 2 1.1 Precautions and Safety Issues... 2 1.2 Country Specific Conditions... 3 1.3 End of Life... 3 2 Functional description... 5 2.1 Overview... 5
OPERATOR MANUAL ENGLISH
 OPERATOR MANUAL ENGLISH 1 2 CONTENTS Section Page Section Page 1 Precautions 5 8 Extended PowerFold 1.1 Special national conditions 5 (Optional) 41 2 General 5 8.1 General 41 2.1 Understanding the machine
FORMAX Series Folder/Inserters OPERATOR MANUAL FIRST EDITION
 FORMAX 6600 Series Folder/Inserters OPERATOR MANUAL FIRST EDITION CONTENTS Section Page Section Page 1 Precautions 5 8.5 Feeding documents 39 1.1 Special national conditions 5 9 MaxiFeeder 39 2 General
Inserting system. FPi FPi FPi Title english Operator s Manual
 Inserting system FPi 5020 FPi 5040 FPi 5060 Title english Operator s Manual FPi 5000 Operator controls Operator controls Figure 9 10 11 1 2 3 4 5 6 7 8 19 14 13 12 20 18 17 16 15 2 21 21 24 23 22 2 Legend
OPERATOR MANUAL ENGLISH
 OPERATOR MANUAL ENGLISH 1 2 CONTENTS Section Page Section Page 1 Precautions 5 8.3 Cleaning the brushes 25 1.1 Special national conditions 5 8.4 Cleaning the moistening felt 25 2 General 6 8.5 Cleaning
FD 6102 Low-Volume Inserter
 FD 6102 Low-Volume Inserter Operator Manual 9/2011 First Edition TABLE OF CONTENTS 1 Health, Safety and Environment... 2 1.1 Precautions and Safety Issues... 2 1.2 Country Specific Conditions... 3 1.3
Read this First...1 Warning...1 About this manual...1 Safety...2 Country Specific Conditions...3 End of Life...4
 Table of Contents 1 2 3 Read this First...1 Warning...1 About this manual...1 Safety...2 Country Specific Conditions...3 End of Life...4 Meet your Document System...5 Power Up...5 Overview...5 Control
APPENDIX FOLDING AND INSERTING MACHINE SI 68
 APPENDIX FOLDING AND INSERTING MACHINE SI 68 MAXIFEEDER MF-2 OPERATOR MANUAL 1. FUNCTION The MaxiFeeder is intended to be used for Business Reply Envelopes (BRE), but also "standard" documents can be processed
6206 Series Low-Volume Desktop Inserters
 6206 Series Low-Volume Desktop Inserters 3/2013 OPERATOR MANUAL Table of Contents 1 2 3 Read this First...1 Warning...1 About this manual...1 Safety...2 Country Specific Conditions...3 End of Life...4
6204 Series Low-Volume Inserter
 60 Series Low-Volume Inserter 6/0 MAINTENANCE MANUAL 3 3 Appendix 3 Appendix...89 Recommended spare parts...90 Electrical diagrams...95 Product coding for CRM...35 Total view electronics 063....30 063.
Formax 6302 Inserter
 Formax 6302 Inserter Maintenance Manual Provided By http://www.mybinding.com http://www.mybindingblog.com 6302 Series Inserter 3/2006 MAINTENANCE MANUAL Part 1: General FIRST EDITION 062.2 Service Manual
MX-8000 User Manual MX Rev
 MX-8000 Rev. 070202 Greeting Thank you for purchasing PAITEC USA products. This manual is prepared to provide guidelines on how to properly operate and maintain MX-8000. Copyright Any of the contents should
User Guide. Incoming System IM-16
 User Guide Incoming System IM-16 3 MINUTESTOSET UP ANDDISCOVER Overview of the letter opener 1 3 2 4 5 9 6 8 7 1. Power cable 2. Extension arm 3. I/O button 4. Transport rollers 5. Pressure arm 6. User
Quick Installation Guide
 Quick Installation Guide Prior to installation This equipment must be installed on a piece of furniture or desk near a 220V power socket. Align the front of the machine with the edge of the desk in order
FORMAX Series Folder/Inserters OPERATOR'S MANUAL FIRST EDITION
 FORMAX 6000 Series Folder/Inserters OPERATOR'S MANUAL FIRST EDITION INTRODUCTION The Formax 6000 Series Folder/Inserters are designed to fold your documents, insert them into envelopes and seal the envelopes.
Setting up an Intermec PM43 printer with InterDriver version M-0 or newer
 Setting up an Intermec PM43 printer with InterDriver version 7.3.5 M-0 or newer Setting up a bar code printer with 7.3.5 M-0 Intermec drivers or newer 1 INITIAL PRINTER CONFIGURATION When the printer is
Loading paper and specialty media Learning about the printer. Stop all printer activity. 7 Back button Return to the previous screen.
 Quick Reference Use the 6 Stop or Cancel button To Stop all printer activity. Loading paper and specialty media Learning about the printer Using the printer control panel 0 Use the 9 To Display View the
User Guide. Set Up & Start Up Basic Copier Operations Key Operator Functions
 User Guide Set Up & Start Up Basic Copier Operations Key Operator Functions Toshiba America Business Solutions, Inc. 2006 Training and Dealer Development SET UP & START UP Turning the System On Turning
Android (A1000) Y4 Classrooms: User Guide
 Y4 Classrooms: User Guide") Android (A1000) Y4 Classrooms: User Guide Provided by the SDUSD Ed Tech Team i21 2014 Teachers - Version 3.25.2014 Table of Contents Basic Functionality... Navigation Tips... Taking a Screenshot... Finding
Android (A1000) Y4 Classrooms: User Guide Provided by the SDUSD Ed Tech Team i21 2014 Teachers - Version 3.25.2014 Table of Contents Basic Functionality... Navigation Tips... Taking a Screenshot... Finding
The Nureva Span ideation system. Installation guide. Single panoramic system
 The Nureva Span ideation system Installation guide Single panoramic system Important SAFETY WARNINGS Prior to the installation of this product, the installation instructions should be completely read and
QUICK INSTALLATION GUIDE
 QUICK INSTALLATION GUIDE Prior to installation This equipment must be installed on a piece of furniture or desk near a 220V power socket. Align the front of the machine with the edge of the desk in order
Getting started. JetScan 150. Currency scanner. User guide
 Getting started JetScan 150 Currency scanner User guide 1 Safety information, power specifications High voltage inside. Risk of electric shock. Turn power OFF and unplug power cord from machine before
Android (A7-40) Y5 Classrooms: User Guide
 Y5 Classrooms: User Guide") Android (A7-40) Y5 Classrooms: User Guide Provided by the SDUSD Ed Tech Team i21 2015 Teachers - Version 1.20.2015 Table of Contents Basic Functionality... Navigation Tips... Taking a Screenshot... Finding
Android (A7-40) Y5 Classrooms: User Guide Provided by the SDUSD Ed Tech Team i21 2015 Teachers - Version 1.20.2015 Table of Contents Basic Functionality... Navigation Tips... Taking a Screenshot... Finding
Version 1.0 August P DocuColor 7002/8002 Quick Start Guide
 Version 1.0 August 2009 701P49827 DocuColor 7002/8002 Quick Start Guide 2009 Xerox Corporation. All rights reserved. Xerox, Xerox Canada Ltd, Xerox Limited, and the sphere of connectivity design are trademarks
Quick Start Guide Notion Ink Design Labs Pvt. Ltd. 1
 Quick Start Guide 2014 Notion Ink Design Labs Pvt. Ltd. 1 2014 Notion Ink Design Labs Pvt. Ltd. 2 Contents 1. Caring for your device 2. Travelling with your device 3. Device layout 4. Keyboard case layout
Scroll through menus or move between screens and menu options. Increase the numeric value of an option or setting being displayed. Save settings.
 Quick Reference Learning about the printer Use the 5 Right arrow button To Scroll through menus or move between screens and menu options. Increase the numeric value of an option or setting being displayed.
CHAPTER 2 COPIER 2-1 BEFORE USING THE MACHINE AS A COPIER SPECIAL MODES BASIC PROCEDURE FOR MAKING COPIES
 CHAPTER COPIER This chapter provides detailed explanations of the procedures for using the copy function. BEFORE USING THE MACHINE AS A COPIER BASE SCREEN OF COPY MODE.............. -3 COPYING SEQUENCE......................
Printer Settings. Accessing Power Saver. Selecting Output Options. Phaser 5500 Laser Printer
 Printer Settings This topic includes: "Accessing Power Saver" on page 1-13 "Selecting Output Options" on page 1-13 "Preventing Access to Front Panel Settings" on page 1-14 "Accessing the Startup Page"
Reminder Text highlighted in this manner indicates operation precautions. Carefully read and observe this type of information.
 Introduction Thank you for choosing this machine. The bizhub 50/4/6 User s Guide [Enlarge Display Operations] contains details on the operation of the various functions available in the Enlarge Display
BAUM K20B KNIFE FOLDER UNIT INSTRUCTION MANUAL
 BAUM K20B KNIFE FOLDER UNIT INSTRUCTION MANUAL 2015 BAUMFOLDER CORPORATION All Rights Reserved BaumFolderCorp., 2015 Printed in U.S.A. TP10669 Warning Do not operate this machine without all guarding in
Zebra XiII-Series Printer Quick Reference Guide
 Zebra XiII-Series Printer Quick Reference Guide Contents Media and Ribbon Loading...67 Media Loading...67 Ribbon Loading...70 Operator Controls...72 Front Panel Keys...72 Front Panel Lights...72 Calibration...74
optimail Postage meter Installation Guide
 optimail Postage meter Installation Guide 2 optimail Installation Guide Commissioning overview The following overview lists the operating steps for using your optimail for the first time. You have to perform
AstroJet TM M2 Quick Start Guide
 AstroJet TM M2 Quick Start Guide Step 1 Remove Printer and Accessories from packaging. Place Printer on a flat, even surface. Step 2 Remove Service Station Transport Tab 1. Open Top Cover. 2. Open Print
Stop all printer activity. Note: A list of options is displayed once Stopped appears on the display. Return to the previous screen.
 Quick Reference Using the non-touch-screen printer model Learning about the printer Using the four-arrow-button printer control panel 0 Use the 3 4 5 To 9 8 7 4 7 ABC 3 DEF GHI 5 JKL 6 MNO PQR 8 STU 9
Ambir ImageScan Pro 930u. Quick Start Guide. High Speed Document Scanner with UltraSonic Misfeed Detection. Ver 1.0
 Ambir ImageScan Pro 930u TM High Speed Document Scanner with UltraSonic Misfeed Detection www.ambir.com Ver 1.0 Ambir ImageScanPro TM 930u Table of Contents Box Contents Installation and Setup Loading
Use the To. 4 Keypad Enter numbers, letters, or symbols on the printer. Stop all printer activity. 6 Indicator light Check the status of the printer.
 Quick Reference Learning about the printer Using the control panel Use the To 4 Keypad Enter numbers, letters, or symbols on the printer. 5 Stop or Cancel button Stop all printer activity. 6 Indicator
This handbook contains important security measures and product information, to help avoid accidents. Please
 MANUAL Attention: This handbook contains important security measures and product information, to help avoid accidents. Please make sure to read the manual carefully before using the device. Do not store
Installation guide. Double panoramic system. Triple panoramic system
 The Nureva Span ideation system Installation guide Double panoramic system Triple panoramic system October 2016 1 Important SAFETY WARNINGS Prior to the installation of this product, the installation instructions
fi-4120c Image Scanner
 P3PC-E007-01EN fi-4120c Image Scanner Cleaning and Maintenance 5 DAILY CARE This chapter describes how to clean the scanner. WARNING When cleaning the scanner, turn off the power, and unplug the AC cable
Reference Guide Brief explanations for routine operations
 Reference Guide Brief explanations for routine operations DCP-L2531DW / DCP-L2535DW / DCP-L2550DW / HL-L2395DW / MFC-L2710DW / MFC-L2713DW / MFC-L2715DW / MFC-L2716DW / MFC-L2730DW / MFC-L2750DW / MFC-L2751DW
Printing for Professionals
 Océ cm5/ cm5 Printing for Professionals User s Guide Enlarge Display Operations Introduction Thank you for choosing this machine. The Océ cm5/cm5 User s Guide [Enlarge Display Operations] contains details
5001 Letter Opener Operators Instructions
 5001 Letter Opener Operators Instructions 5001 Letter Opener 1 Operators Instructions Table of Contents Table of Contents... 2 SYMBOLS USED... 3 SAFETY TIPS... 4 1. GENERAL... 6 2. HOW TO USE... 6 3. IN
ImageScan Pro 800ix Series High-Speed ADF Scanner. Installation and Setup Guide. Installation and Setup Guide
 ImageScan Pro 800ix Series High-Speed ADF Scanner Installation and Setup Guide Installation and Setup Guide Box Contents: 1. Scanner 2. USB Cable 3. AC Adapter 4. Stacker Tray 5. Installation Guide 6.
Replacement Instructions
 imac G5 Inverter, 20-inch Replacement Instructions Follow the instructions in this document carefully. Failure to follow these instructions could damage your equipment and void its warranty. Note: Online
Reference Guide for the KODAK Picture Kiosk GS Compact. Software Version 2.0
 Reference Guide for the KODAK Picture Kiosk GS Compact Software Version 2.0 Eastman Kodak Company, 2008 Contents Product Overview... 4 Console... 4 605 Photo Printer... 5 Product Choices... 6 Startup and
Reference Guide Brief explanations for routine operations
 Reference Guide Brief explanations for routine operations HL-L6400DW HL-L6400DWT Brother recommends keeping this guide next to your Brother machine for quick reference. Online User's Guide This Reference
Océ DS10. Operator s manual
 Océ DS10 Operator s manual Océ-Technologies B.V. Trademarks Products in this manual are referred to by their trade names. In most, if not all cases, these designations are claimed as trademarks or registered
Reference Guide Brief explanations for routine operations
 Reference Guide Brief explanations for routine operations HL-L6300DW Brother recommends keeping this guide next to your Brother machine for quick reference. Online User's Guide This Reference Guide contains
MVPplus Quick Reference Guide
 MVPplus Quick Reference Guide Use this guide to operate your printer on a daily basis. For more detailed information, refer to the User Guide. Contents External View...........................................................
Operating Guide. OP101 Letter Opener. HASLER America s better choice. Mailing Systems And Solutions. An ISO 9001 Quality System Certified company
 Operating Guide Mailing Systems And Solutions HASLER America s better choice An ISO 9001 Quality System Certified company Table of Contents Table of Contents... 2 SYMBOLS USED... 3 SAFETY TIPS... 4 1.
Learning about the printer...5. Loading paper and specialty media...9
 Quick Reference Contents Learning about the printer...5 Using the printer control panel...5 Understanding the printer control panel light sequences...6 Loading paper and specialty media...9 Setting the
MODEL: MX-C300P MX-C300PL DIGITAL FULL COLOR PRINTER OPERATION GUIDE
 MODEL: MX-C300P MX-C300PL DIGITAL FULL COLOR PRINTER OPERATION GUIDE INTRODUCTION This manual describes MX-C300P/MX-C300PL Digital full color printer system. Where "MX-XXXX" appears in this manual, please
Manual for MantraJet 1100 CD/DVD auto-printer
 Manual for MantraJet 1100 CD/DVD auto-printer Rev 1.03 September 7, 2010 Table of contents Specifications...3 Unpacking MantraJet 1100...4 Quick installation reference MantraJet 1100...7 Installation of
Contents. Introduction
 Page 1 of 15 Contents Introduction Getting Started Your Device at a Glance Charging Assembling the Power Adapter Turning On/Off, Unlocking Setting to Sleep and Waking Up Inserting and Removing a microsd
User's Guide. Video Borescope. Models BR200 and BR250
 User's Guide Video Borescope Models BR200 and BR250 Introduction Congratulations on your purchase of this Extech BR200 (17mm camera head) or BR250 (9mm camera head) Video Borescope. This instrument was
Printing Your First Page. Attaching the Paper Support. Plugging in the Printer. Checking the Printer
 Printing Your First Page Attaching the Paper Support Checking the Printer Plugging in the Printer Installing the Ink Cartridges Installing the Printer Software Connecting the Printer 4011307 XXX-00 Attaching
1. Introduction P Package Contents 1.
 1 Contents 1. Introduction ------------------------------------------------------------------------------- P. 3-5 1.1 Package Contents 1.2 Tablet Overview 2. Using the Tablet for the first time ---------------------------------------------------
Aspera R7. User Manual
 1 Aspera R7 User Manual Contents Safety Information... 3 Appearance and Key Function... 5 Introduction... 6 Call Functions... 7 Notifications Bar... 8 Contacts... 9 Messaging... 9 Bluetooth and Wi-Fi...
Colour Set-up Version 7.1
 1 of 35 Colour Set-up Version 7.1 REVISION HISTORY Date Rev Description Author Approved 4/07/14 G Various updates including Win8. CW/FMC/DMG 26/05/15 G Updated to include ICC Profiles NM 2 of 35 Table
Table of Contents. Introduction 2 1. Intelligent Remote Control 2 2. Charging the Remote Control 3
 Table of Contents Introduction 2 1. Intelligent Remote Control 2 2. Charging the Remote Control 3 Getting Started 6 1. Activating the Remote Control 6 2. Selecting a Device 7 3. Operating a Device 8 4.
Phone Setup. Phone Hardware Installation. Install the Phone Battery. Phone Hardware Installation, on page 1 Phone Configuration Tasks, on page 15
 Phone Hardware Installation, on page 1 Phone Configuration Tasks, on page 15 Phone Hardware Installation Install the Phone Battery Before you can use your phone, you must install and charge the battery.
Quick Reference. ineo 3300P
 ineo 3300P Contents 1 Learning about the printer... 3 Using the printer control panel... 3 Understanding the printer control panel light sequences... 4 2 Loading paper and specialty media... 9 Setting
Product Parts Front view... 2 Rear view... 2 Inside the product... 3 Scanner parts... 3 Control panel... 4
 Table of Contents Product Parts Front view................................................................. 2 Rear view.................................................................. 2 Inside the product...........................................................
Removal and Installation8
 8 Screw Types 8-4 Top Cover Assembly 8-5 Left Hand Cover 8-6 Right Hand Cover 8-10 Front Panel Assembly 8-14 Left Rear Cover 8-15 Right Rear Cover 8-16 Extension Cover (60" Model only) 8-17 Media Lever
Contents. Introduction. Getting Started. Navigating your Device. Customizing the Panels. Pure Android Audio. E-Books
 Contents Introduction Getting Started Your Device at a Glance Charging Assembling the Power Adapter Turning On/Off, Unlocking Setting to Sleep and Waking Up Inserting and Removing a microsd Card Connecting
User s Guide ADS-2400N / ADS-2800W / ADS-3000N / ADS-3600W
 User s Guide ADS-2400N / ADS-2800W / ADS-3000N / ADS-3600W ADS-2400N ADS-2800W ADS-3000N ADS-3600W Version C ENG Brother Numbers IMPORTANT For technical help, you must call the country where you bought
QUICK REFERENCE. Connecting the Cables
 QUICK REFERENCE This Quick Reference contains supply loading and general care and maintenance procedures for the Monarch 9860 printer. For more detailed information, refer to the Operator s Handbook available
IdeaTab A1000L-F. User Guide V1.0. Please read the Important safety and handling information in the supplied manuals before use.
 IdeaTab A1000L - UserGuide IdeaTab A1000L-F User Guide V1.0 Please read the Important safety and handling information in the supplied manuals before use. file:///c /Users/xieqy1/Desktop/EN UG/index.html[2013/8/14
Version 2 May P Xerox 700 Digital Color Press. Quick Start Guide
 Version 2 May 2009 701P49421 Xerox 700 Digital Color Press 2009 Xerox Corporation. All rights reserved. Xerox, Xerox Canada Ltd, Xerox Limited, and the sphere of connectivity design are trademarks of Xerox
Installing the Printer Software
 4 Printing Your First Page Attaching the Paper Support 7 1 Checking the Printer 6 2 Plugging in the Printer 3 Installing the Ink Cartridges 5 Installing the Printer Software Connecting the Printer 4012581-00
Check the status of the printer. 7 USB port Connect a USB a flash drive to the printer. Note: Only the front USB port supports flash drives.
 Quick Reference Use the 6 Indicator light Check the status of the printer. Learning about the printer Using the printer control panel 7 USB port Connect a USB a flash drive to the printer. Note: Only the
Reference Guide Brief explanations for routine operations
 Reference Guide Brief explanations for routine operations HL-L2390DW DCP-L2550DW HL-L2395DW MFC-L2710DW MFC-L2730DW MFC-L2750DW MFC-L2750DWXL Brother recommends keeping this guide next to your Brother
User Guide. Video Borescope. Models BR200 and BR250
 User Guide Video Borescope Models BR200 and BR250 Introduction Congratulations on your purchase of this Extech BR200 (17mm camera head) or BR250 (9mm camera head) Video Borescope. This instrument was designed
Contents. Introduction. Getting Started. Navigating your Device. Customizing the Panels. Pure Android Audio. E-Books. Browsing the Internet
 Contents Introduction Getting Started Your Device at a Glance Charging Assembling the Power Adapter Turning On/Off, Unlocking Setting to Sleep and Waking Up Connecting to a Computer Navigating your Device
Datacard CR500 Instant Issuance System. User Reference Guide. July Rev B
 Datacard CR500 Instant Issuance System User Reference Guide July 2015 527495-001 Rev B Datacard CR500 User Reference Guide The CR500 Instant Issuance System Contents The CR500 Instant Issuance System The
Domino One-Pocket Currency Discriminator
 Domino One-Pocket Currency Discriminator H This manual contains important information on safety measures and operational features of the Kolibri Domino 1-pocket currency discriminator. Please read it carefully
StatMonitr Screen. Operating Your StatBroadcast. On Game Day (Mark V Model Surface RT)
") Operating Your StatBroadcast StatMonitr Screen On Game Day (Mark V Model Surface RT) Last Rev: July 11, 2015 StatBroadcast Systems Below is the quick start guide for operating your StatMonitr Surface tablet.
Operating Your StatBroadcast StatMonitr Screen On Game Day (Mark V Model Surface RT) Last Rev: July 11, 2015 StatBroadcast Systems Below is the quick start guide for operating your StatMonitr Surface tablet.
THE LEADER IN O FFIC E-BAS ED F O LDER/INS ERTER S Y S TEMS. Powerful Mailing Solutions at the Press of a Button M9000
 THE LEADER IN O FFIC E-BAS ED F O LDER/INS ERTER S Y S TEMS I N T R O D U C I N G M9000 Powerful Mailing Solutions at the Press of a Button THE M9000 HANDLES LOW TO HIGH VOLUME APPLICATIONS The M9000 provides
Complex mailroom processes made simple.
 Complex mailroom processes made simple. Over the years we have built up a reputation for quality and Why should you buy your equipment from My Mailing Room? outstanding customer service. We are fiercely
Initial Activities. Getting Started on Your Equipment
 IA1 2019 Field Staff 1. Surface Pro Tablets (AC Only) Assessment Coordinators will be using Surface Pro tablets for their work at home and in the schools. Throughout your time on NAEP, you might encounter
USER MANUAL ENGLISH 285-S COMPACT VALUE COUNTER
 USER MANUAL ENGLISH 285-S COMPACT VALUE COUNTER INTRODUCTION ENGLISH Thank you for purchasing the Safescan 285-S compact value counter, a product of outstanding ease-of-use and quality. We recommend that
User Guide OMS-200. version 1.1
 User Guide OMS-200 version 1.1 USER GUIDE Product version 1.1 Document version 1.1.0.2 Release date: April 2015 NEOPOST www.neopost.com Should you have any queries, suggestions or comments concerning these
Quick Reference. Understanding the Operator Panel. Understanding the operator panel lights. Quick Reference
 Quick Reference Understanding the Operator Panel The printer operator panel has two buttons and two lights. Lights indicate the status of the printer. Buttons are used to continue or cancel the current
DOWNLOAD PDF DELL VENUE 8 PRO 5830 MANUAL
 Chapter 1 : Dell Tablet Venue 8 Pro () Accessories - Adapter, Laptop Bag, Lid, External Hard Drive Dell Get user or pdf manual for your Dell Venue Pro. Search. Sign In. My Account. Place orders quickly
Dryer. M720 Programming and Operation Manual. July 15, 2015 Revision 1.51
 Dryer M720 Programming and Operation Manual July 15, 2015 Revision 1.51 Contents 1 Important Safety Information 1 1.1 FOR YOUR SAFETY - CAUTION!............................. 1 2 Control Overview 2 2.1
4 Keypad Lets you enter numbers, letter, or symbols. 5 Submit Lets you submit changes made in the printer settings
 Quick Reference Learning about the printer Understanding the printer control panel 1 2 3 4 7 1 @!. 2 A B C 3 D E F 4 G H I 5 J K L 6 M N O 7 P Q R S 8 T U V 9 W X Y Z * 0 # 6 5 Item Description 3 Sleep
VarioPrint Jobmanual
 Océ VarioPrint 2090 Jobmanual o VarioPrint 2090 3 4 A B C 5 2 D 6 1 7 Printer parts 1 2 3 4 5 6 7 Left front door Printer top left cover Output trays Upper output tray Finisher front door Paper trays Front
FEEDER SWAP Continuous operation is achieved by cascade feeding. If one feeder runs empty, another one takes over.
 EASY TO USE - EASIER THAN A PHOTOCOPIER LOAD N GO - NO OPERATOR TRAINING REQUIRED FULL COLOUR TOUCHSCREEN TECHNOLOGY LOW NOISE LEVEL - FOR ANY ENVIRONMENT FULLY ACCESSIBLE - ERGONOMIC DESIGN FEEDER SWAP
Reference Guide Brief explanations for routine operations
 Reference Guide Brief explanations for routine operations DCP-L2510D DCP-L2530DW DCP-L2537DW DCP-L2550DN MFC-L2710DN MFC-L2710DW MFC-L2730DW MFC-L2750DW Brother recommends keeping this guide next to your
3 Sleep button Enable Sleep mode or Hibernate mode. Notes:
 Quick Reference Use the To 3 Sleep button Enable Sleep mode or Hibernate mode. Indicator light color and its corresponding printer status Indicator light Printer status Off The printer is off or in Hibernate
QUICK REFERENCE. Using the Battery
 QUICK REFERENCE This Quick Reference contains supply loading information and general care and maintenance procedures for the Monarch Sierra Sport4 9493 printer. For more detailed information, refer to
Tablet PA752C. User Manual
 Tablet PA752C User Manual User Manual Notice Before operating the device, please read the safety precautions and user s guide carefully to ensure safe and proper usage. The descriptions in this user s
MICROLINE 320/390FB User Manual (English)
") MICROLINE 320/390FB User Manual (English) MICROLINE 320/390FB User Manual (English) English Table of Contents Note to Customers... E-2 Important Safety Instructions... E-3 Important Wiring Instructions...
MICROLINE 320/390FB User Manual (English) MICROLINE 320/390FB User Manual (English) English Table of Contents Note to Customers... E-2 Important Safety Instructions... E-3 Important Wiring Instructions...
BILL COUNTER OPERATION MANUAL PRODUCT #700012
 OPERATION MANUAL PRODUCT #700012 CONTENT 1) Illustration...1 2) Function Controls and Display...2 3) General Instruction...3 4) Safety Instructions... 3-4 5) Power Up...4 6) Counting Function...4-5 7)
OFFICEMATE 2D. User Manual. This manual provides detailed information on how to operate and maintain your Officemate 2D.
 OFFICEMATE 2D User Manual This manual provides detailed information on how to operate and maintain your Officemate 2D. Please read this manual before operating the machine in order to prevent any damage