OPERATING GUIDE FUTURA FUTURA PRO
|
|
|
- Helena Bryan
- 6 years ago
- Views:
Transcription


1 SOFTWARE OPERATING GUIDE FUTURA FUTURA PRO
2 vers. 5 Edition: January 2018 (c) 2016 SILCA S.p.A. - Vittorio Veneto reserves the rights to alter the information without prior notice, except when they affect safety. This document or any of its parts cannot be copied, altered or reproduced without written authorization from the Manufacturer. Keep the manual and look after it for the entire life cycle of the machine. The information has been drawn up by the manufacturer in his own language (Italian) to provide users with the necessary indications to use the key-cutting machine independently, economically and safely. IMPORTANT NOTE: in compliance with current regulations relating to industrial property, we hereby state that the trade-marks or trade names mentioned in our documentation are the exclusive property of authorized manufacturers of locks and users. Said trade-marks or trade names are nominated only for the purposes of information so that any lock for which our keys are made can be rapidly identifi ed.
3 INDEX 1 FUTURA MODELS - GENERAL INFORMATION...5 PROGRAM START... 6 CHOICE OF KEYBOARD... 8 CHANGE PROGRAM LANGUAGE... 8 MEASURING UNITS... 8 DROP-DOWN MENU SEARCHES STANDARD keys VEHICLE keys DIMPLE / TRACK keys FULL KEY SEARCHING TRASPONDER GUIDE DATA CARD/SERIE info Using a CUTTING DATA CARD CUTTING STANDARD fl at keys (cylinder and vehicle) Cutting DIMPLE/TRACK/TUBULAR keys and CUTTING SPEED COPY BY ORIGINAL FAVORITE S QUEUE OF JOBS STANDARD QUEUE OF JOBS OEM QUEUE OF JOBS (only with OEM CLIENT function enabled) OEM CLIENT function activation ENGRAVING OPTIONS INFO CALIBRATION STANDARD key clamp calibration DIMPLE/TRACK keys clamp calibration MOBILE TRACER 01T calibration STANDARD key Adapter calibration DIMPLE/TRACK keys Adapters calibration SETTINGS Zero-point Calibration (STANDARD key) Zero-point Calibration (DIMPLE/TRACK key) Options a General b Preferences STANDARD key c Preferences DIMPLE/TRACK key USE a ACCESS POINT mode (Wi-Fi connection between machine and Tablet) b ETHERNET with connection to LAN and router c TETHERING USB mode d LOCAL NETWORK mode MACHINE MAINTENANCE MACHINE UPDATE and REGISTRATION MACHINE REGISTRATION MACHINE SOFTWARE UPDATE Update by TABLET Update by USB PEN Update with LOCAL NETWORK connected to the internet Update with SRS Program (Silca Remote Service) APP UPDATE (Silca.apk and SilcaKeyboard.apk) BACKUP / RECOVERY USER SERIES CODE MAKER TRANSPONDER GUIDE...91
4 13 TOKEN AND UTP (Unlimited Token Plan) TOKEN APPLICATION ON THE MACHINE COPY BY ORIGINAL AND DATA CARD CUTTING FLOW (on Token version) CHANGING TABLETS FUTURA PROCEDURE TO CLEAR CACHE...102
5 1 FUTURA MODELS - GENERAL INFORMATION Futura PRO / Futura A machine for cutting/decoding keys with standard, laser and dimple cuts and cutting by Copy by original of cylinder and automobile keys with standard cuts. Futura PRO NA / Futura NA A machine (for the North American market) for cutting/decoding keys with standard, laser and dimple cuts and cutting by Copy by original of cylinder and automobile keys with standard cuts. Futura PRO JAPAN / Futura JAPAN A cutting machine (for the Japanese market) for cutting/decoding keys with standard, laser and dimple cuts and cutting by Copy by original of cylinder and automobile keys with standard cuts. Futura PRO AUTOMOTIVE / Futura AUTOMOTIVE Cutting machine for cutting/decoding vehicle keys (cars, motor bikes, trucks, bicycles and relative accessories, etc.) with standard and laser cuts. Cutting by Copy by original of vehicle keys with standard cuts. Futura PRO TOKEN / Futura TOKEN (Ch.13) Pay per use key-cutting machine run on tokens. Note: please check with Silca whether the token option is available on the version you require. FUTURA PRO ENGRAVING (Ch.6) Cutting machine for: - cutting/decoding keys with the following types of cuts: standard, laser and dimple, or cut by Copy from original for cylinder and vehicle keys with standard cuts. - engraving on keys (head or neck) or medals, by the special accessories provided. 5 - SW
6 PROGRAM START To start the program tap the icon on the Tablet screen. If the program does not start check the network settings/use (see Ch.7.3.4). FUTURA PRO Search Menu used to select a category of Series Searches. 6 The name of the machine model being used is shown. 2 - Copy by Original Menu used to make a copy of a key by means of a laser reader (standard edge cut keys only). 3 - Favourites Menu used to access a series of searches previously set up as favourites. 4 - Queue of jobs Menu used to run the job queue previously created by the search menu or optional OEM Client menu (optional - Ch.5.2). 5 - Options Menu used to set up the machine. 7 - Upgrades Menu used to update machine software. 8 - Info Menu showing machine details. 9 - Engraving Menu used to engrave keys (head or neck) and medals. 6 - SW
.")
7 FUTURA Search Menu used to select a category of Series Searches. 6 - Upgrades Menu used to update machine software. 2 - Copy by Original Menu used to make a copy of a key by means of a laser reader (standard edge cut keys only). 3 - Favourites Menu used to access a series of searches previously set up as favourites. 4 - Queue of jobs Menu used to run the job queue previously created by the search menu or optional OEM Client menu (optional - Ch.5.2). 5 - Options Menu used to set up the machine. 7 - Backup Recovery Menu used to save machine data and restore them when necessary. 8 - Info Menu showing machine details. 9 - Engraving Menu used to engrave keys (head or neck) and medals. 7 - SW


8 Machine ID: shows the name of the FUTURA PRO machine. Initial menu: tap the symbol to go back to the initial menu. Favourites: tap the symbol to view the data cards/series saved in the favorites menu. Copy by Original: tap the symbol for direct access to the Copy by Original menu. Search menu: tap the symbol for direct access to the Search menu. Information: tap the symbol to view information about the FUTURA PRO machine Turn off machine: tap the symbol to turn off the FUTURA PRO machine without affecting the software; wait until the green light goes out and then turn off the machine with the ON/Emergency push button. CHOICE OF KEYBOARD When the FUTURA program is started you are required to choose the type of keyboard you will use for entering data. SILCA Keyboard: smaller keyboard specially designed for the FUTURA program. ASUS Keyboard: standard Android Tablet keyboard. If you have chosen the Silca keyboard you can go back to Android by hitting the key on the Silca keyboard. CHANGE PROGRAM LANGUAGE The default program language is English. To change language go to the Options menu (Ch.7), select Settings -> Options -> General -> Language and choose the language you require. MEASURING UNITS All the values given in the program for the technical measurements of keys and clamps are expressed in hundredths of a millimetre (default) or thousandths of an inch, according to the measuring unit chosen from the Options menu. 8 - SW
9 DROP-DOWN MENU To view this menu on the Tablet scroll from left to right to open the list: Connect to: used to fi nd the Futura / Futura Pro machine, if there is a LAN connection or Wi-Fi ACCESS POINT. Reload page: used to reload the page if it is not properly viewed/activated. Restart Machine: used to restart the machine. Machine IP address: used to enter the Futura / Futura Pro IP address manually (default is ). Reset Axes: used to clear the axes on the machine. Machine Status: used to see connection status between the machine and Tablet. Change Keyboard: used to select and set the type of keyboard to be used (Silca or ASUS keyboard) Machine Registration: used to register the machine when the Tablet is connected to a Wi-Fi network with internet access. Update FUTURA: used to download new updates for the machine: by tablet connected to a Wi-Fi network with access to the internet (Ch.8.2.1). by USB PEN DRIVE and PC with access to the internet (Ch.8.2.2). Recovery tools: this function is protected by a password and is for the exclusive use of Silca personnel. In addition, the Silca App version installed on the Tablet is shown below. 9 - SW
. 2.2 VEHICLE keys This menu is used to restrict a search to the category of standard edge cut and track vehicle keys only (e.g.: HU66P - GT15R - YM28T2.")
. 2.")
10 2 SEARCHES When the Searches menu is opened, the following window appears: 2.1 STANDARD keys Menu used to make a search restricted to the category fl at keys only (e.g.: CS207 - YA31 - UL ). (FUTURA Automotive / FUTURA PRO Automotive versions are excluded). 2.2 VEHICLE keys This menu is used to restrict a search to the category of standard edge cut and track vehicle keys only (e.g.: HU66P - GT15R - YM28T2... ) 2.3 DIMPLE / TRACK keys This menu is used to restrict a search to the dimple/track category of keys (e.g. CS48 - IE15 - AB48... ). (FUTURA Automotive / FUTURA PRO Automotive versions are excluded). 2.4 FULL KEY SEARCHING This menu is used to make extended searches not restricted to categories. (FUTURA Automotive / FUTURA PRO Automotive versions are excluded). 2.5 TRASPONDER GUIDE The Transponder Guide contains all the transponder key copying solutions provided by Silca (Ch.11) SW
11 See example of STANDARD keys search flow: When you enter the STANDARD keys category the following window appears for you to enter the search parameters. SEARCH Parameters Code: enter the indirect key-cutting code. Card / Sn: enter the card number or serial number assigned by Silca. Key blanks: enter the Silca/Ilco key blank code or comparative. Key manufacturer: enter name of key manufacturer. Cuts: enter number of cuts for the key to be included in the search. Lock Manufacturer: enter the brand of lock to be included in the search. Lock system: enter the name of the lock system. Press Clear to delete the entered fi elds. After entering one or more parameters, tap the Search button to start the search. This operation will show the data relating to the lock systems found and information about the Silca/Ilco key blank, if applicable. Tap on the left-hand side of the page to re-open the Search Parameters window SW


12 See example of VEHICLE keys search flow: When you enter the VEHICLE keys category the following window appears for you to enter the search parameters. Tap VEHICLE MAKE ; a guided procedure appears to simplify your search. Enter the fi rst letters of the MAKE and select the one you require SW


13 Enter the fi rst letters of the VEHICLE MODEL and select the one you require. Select the YEAR. Select the CARD key to access the cutting data card SW

 associated to the selected card.")

14 2.6 DATA CARD/SERIE info To access the cutting card select the relevant line and tap the OPEN CUTTING CARD button. In the section of the window showingthe search results Order searches by tapping the arrow next to the relative fi elds. Select a series from those shown, or search for it on the next pages: Tap this icon to access the Transponder Guide (for vehicle keys). Select the Silca or User series: - Silca is the default icon for viewing Silca series. - tap User to view the existing user series (Ch.10) associated to the selected card. Tap the special fi eld to enter the Hook position: it is automatically saved when the keyboard is turned off. There are 3 folders on the right of the screen: INFORMATION: shows information about the lock make, applications and Silca/Ilco key blank. Info about a key can be viewed by tapping the fi eld relating to the key blank. APPLICATIONS: shows the applications for which this key blank is used: locks, cylinders, vehicle model,etc. CARD: shows information relating to accessories needed for cutting keys with the Futura / Futura Pro key-cutting machine SW

15 KEY BLANK To gain access to additional information regarding the Silca key blank simply tap on the following icon List of other Silca key blanks that can be used List of comparative key blanks List of Brand names linked to the Silca key blank SW
.")

 Note: this function is only available for two sided")
16 2.7 Using a CUTTING DATA CARD Example: The screen shows all the technical details relating to the selected cutting card (e.g. Card, SN, Profile, Series, Spaces, Depth, Cutting angle). Tap the key to go back to the previous screen. Tap to edit the way to view depths on the card: Fig. 1 Depths referring to the key axis Fig. 2 Depths referring to key back (i.e. the plate/bottom of the clamp) Note: this function is only available for two sided symmetrical keys (standard and vehicles) SW
.")

17 The list on the right contains the functions listed below: CODE: enter the indirect code for cutting the key. CUTS: this function is used to enter direct cuts. QUEUE OF JOB: If the cut is fi lled and correct you can save your job in Queue of Job by tapping the following icon (the job can then be done afterwards). Tap on Queue of Job to display the list of jobs available. DECODING: used to decode the cuts on the original key. ATTENTION: make sure the key to be decoded is clean. ATTENTION: anodised aluminium dimple/laser keys, plastic keys or any other key without electrical conductivity CANNOT BE decoded! For these types of keys digit the cuts directly or enter the indirect code if the SSN in use allows it. Tap Decoding : information appears regarding the position of the key in the clamp SW
18 SELECT ARTICLE: to solve installation difficulties encountered with symmetrical vehicle keys on side A or B of the standard clamp, the user may select the key blank before decoding the key. In this way the machine will indicate the best side of the clamp (C or D) on which to fit the key and can run the decoding operation successfully. To continue tap START and perform the operations described on the screen. At the end of the operation tap OK. To view the decoded measurements and the measurements read on the key, tap Decoded Values on the bottom of the screen. Then tap CUT to cut the key using the combination provided by the previous operation. Copy key with measurements read: after decoding a key the cuts can be verifi ed and compared to the keys original cuts. If the cuts Offset values are signifi cant, it s possible to cut the key by using the measurements just read (not the keys original cuts nominal values that are in the card) by inserting a check flag in the appropriate box. NOTE: when decoding standard keys, you must use the clamp side designated by the software as well as the stop position designated in order to decode the key properly. Use of other clamp positions or stop positions will result in a misread key. Once decoded, should you receive the message key blank not allowed or bad permutation, the key may not have been positioned properly. As a result the software will not recognize the key blank or the depths read will not correspond with any of the codes in the code series database. If you are sure that the proper card and key blank were used, reposition your key and try again SW


19 MANUAL CORRECTIONS: to enter manual adjustments in the relative fi elds for X axis and Y axis, activate the Use corrections fl ag, tap Save and then Close. Adjustments: from -30 to +30 hundredths of mm (+/- 118 thousandths of an inch) Close the window after it has shown an OK message. An icon indicates when the manual adjustment is active. Confi rm with Save SW


20 PARTIAL CUTS: used to make a search for correspondence with the code table (if applicable): enter the known cuts and tap Search. Cutting tree: function accessible only from Partial cuts and enabled only for Data cards/series with code tables available. Tap the Cutting Tree key to continue. - The list of keys shown in the cutting tree coincides with the list of keys shown in the Partial cuts window; however, here the keys are listed according to Groups, Code and Cuts in order to reduce to a minimum the number of key blanks to be used. - The box at the top of the screen shows the maximum number of key blanks to be used for all the possible cut combinations listed. - Each Group needs a new key blank to cover all the cut combinations it lists (work down from top). Select the group and/or single code and tap the QUEUE key to place them in the job queue. - Tap Close, OK, and then Queue of Job. - The jobs must be carried out in progressive order, starting from the key with the shallowest cuts to those with deeper cuts SW
 Mainly used for car keys where the cut edges are rounded to facilitate the movement of the blades when the key is put into the lock.")
21 CARD OPTIONS Cut type: alternative cutting methods can be chosen from Flat, Track, Normal, Normal Easy; NORMAL (M_NORMALE_FLAT_LFD) For conventional car and door keys. FLAT (M_PIANO_FLAT_LFD) Mainly used for car keys where the cut edges are rounded to facilitate the movement of the blades when the key is put into the lock. LASER (M_LASER_FLAT_LFD) Conjunction of the cutting angles is determined automatically by the machine, allowing cuts to be made with variable angles; this facilitates the smooth entry of the key into the lock, prolonging the working life of the key. NORMAL EASY (M_EASY_FLAT_LFD) Concerns traditional automotive and door lock keys, the edges of the cuts are removed (when possible) by a defi ned value of around 30 hundredths of a millimeter. Likewise even for the keys tip. Key blank dimension: used with the Use any clamp function. Depth removal step (for DIMPLE keys only): this value indicates the amount of material trimmed by the cutter at each passage (example expressed in hundredths of a millimetre) SW


22 With keys that have SYMMETRIC CUTS the following window would appear: INFO CARD: views information about the clamp, side and stop to be used, cutter and key blank. Tap the relevant icons to see images and part code. [Note]: tap Note (when shown) to view data card notes, i.e. further specifi c information relating to the position of the key or an accessory, etc SW

23 MEASUREMENTS: view information regarding the measurements of SPACES and DEPTH on the card SW

24 2.8 CUTTING STANDARD flat keys (cylinder and vehicle) To make a cut on the key, tap CUT : information is shown about the position of the key in the clamp. The following can be set: Use any clamp: if this function is enabled the key to be cut can be positioned on a clamp side different from default. The function is used to acquire the measurement of the key blank (stem width) in order to adapt cuts to the key blank being used. It is applied automatically only to keys with double symmetrical sides. ATTENTION: option valid for CUTTING only (NOT DECODING). NOTE: activating the Use any clamp allows the user to clamp the key in any jaw position (i.e. clamping the keys profile on side C or D) when cutting a key by code. Regardless of the jaw position used, the stop position designated by the software must be used. This function is only available when cutting two symmetrical sided standard keys. When this function is enabled cuts cannot be repeated on a key already cut. Pieces: indicates how many keys you wish to cut. Steps: used to edit the default number of passes during key cutting (max +2). The value is memorised once it has been edited SW
 For DIMPLE keys Cutting speed change (relates to carriage advancement). NOTE: the default value set by Silca is 100.")
. 1 2) For TRACK keys Steps: used to edit the default number of passes during key cutting.")
25 2.9 Cutting DIMPLE/TRACK/TUBULAR keys and CUTTING SPEED To make a cut on the key, tap CUT : information is shown about the position of the key in the clamp. 1) For DIMPLE keys Cutting speed change (relates to carriage advancement). NOTE: the default value set by Silca is 100. To change the Silca settings, tap the required value: - With a value of 110 (the carriages will advance at a speed 10% higher than the default setting). - With a value of 90 or 80 (the carriages will advance 10% or 20% more slowly than the default setting). 1 2) For TRACK keys Steps: used to edit the default number of passes during key cutting. The value is memorised once it has been edited. 2 The following can be set: Pieces: indicates how many keys you wish to cut. Press START to begin the procedure SW

 to be used for reading and cutting the key.")
26 3 COPY BY ORIGINAL Tap Copy by Original to start the procedure for copying an original key using the laser reader as an optic reader device. This operation can be used only for the types of keys cut on clamp 01V. The Copy procedure is divided into two steps: fi rst load the original key to be read into the clamp 01V, once the key has been read, remove the original and load the key blank to be cut. In the Left-hand Part of the screen: Select the clamp side (A-B-C-D) to be used for reading and cutting the key. Select the type of Stop involved ( ) - in the case of Stop 0 the gauge is used to align the key stop - with Stops ( ) a bar is used to align the stop with the key tip. The Distance fi eld is used when the stop selected is and there is an indication of the point at which the optic reader will start reading the original key. Normally this point equals Stop 0 which refers to the position of the gauge/key stop. Range [ 0 / -400 hundredths of mm] => insert only NEGATIVE value. NOTE: clean the optic reader carefully with the brush provided before starting the Copy by Original procedure SW

27 When the key has been read, the following can be set: Manual adjustments Manual adjustments can be made to Y and X only if strictly necessary. Positive value of Y: move cut closer to stop. Negative value of Y: move cut away from stop. Positive value of X: lower the cut. Negative value of X: raise the cut. Adjustments admitted: -30 to +30 hundredths of a millimetre. Press Save to confi rm. Pieces: indicates how many keys will be cut. Remove the key just read from the clamp and load the key blank to be cut, positioning with the same Stop and Clamp Side used during the reading process. Tap Copy to start key cutting. NOTE: the Copy by Original function will cut the key exactly as read if no manual adjustments are made. If you are copying a worn key and do not make manual adjustments, the cut key will be an exact duplicate of the original worn key. To copy a worn key back to OEM specifications you should use the Search function to identify the card or code series used for the original key. Once the proper card is opened, select Decoding on the right side of the card menu. This will measure the cuts based on the depth data used by the OEM and the software will make adjustments to the depths measured and cut the duplicate key back to OEM specifications SW


28 4 FAVORITE S The FAVORITES menu contains the data cards that have been selected in the Search menu (Standard keys, Vehicle keys, Dimple/Track keys). Saving data cards to the favorites menu will eliminate the time spent searching for frequently used cards. For each data card a description can be written in the special field in the User Note column. To select data cards to be included in the Favorite s menu tap the star symbol of the Search menu; the symbol will be highlighted in black. in the fi rst left-hand column To remove a data card in the Favorite s menu, tap the relevant star symbol, which will go back to white SW

29 5 QUEUE OF JOBS The Queue of Jobs collects all the jobs (the keys) the user prefers to do later. See on page 17 how to move a job in this Queue of Jobs. 5.1 STANDARD QUEUE OF JOBS Select one or more jobs using the Select All button, or tap the box. To see other job details, tap the single row. To delete the selected jobs, tap Delete Jobs. To edit the number of keys to be cut in the selected jobs, tap Modify Pieces. To start cutting the selected jobs, tap Start. ICON LEGEND Total number of keys to be cut Number of DIMPLE cuts already made Number of STANDARD cuts already made Number of ENGRAVINGS already done Identifi es DIMPLE cuts Identifi es STANDARD cuts Identifi es ENGRAVING Extra information 29 - SW

30 5.2 OEM QUEUE OF JOBS (only with OEM CLIENT function enabled) OEM jobs are copies of keys regulated by the manufacturer (OEM) through the OEM CLIENT function: the manufacturer provides the information needed to cut the key. the manufacturer confirms the number of copies to make. When users have been authorised by the manufacturer and enabled by Silca, they can use the OEM CLIENT function to request and/or receive the data needed to cut the key and save them in the special OEM QUEUE. The OEM QUEUE function will guide the user through all the operations required to cut the key in a controlled, easy way. According to the decision of the manufacturer, the jobs ordered may include: a job to engrave a code on the head or stem of a key blank. one or more cutting operations. The user must carry out all the jobs defined by the manufacturer and follow instructions to the letter. If an ENGRAVING job is included in the queue the user must have already created an ENGRAVING model with the same name and characteristics as the one proposed by the manufacturer. Otherwise no engraving job will be created. See the ENGRAVING section of the Software Guide (see Ch.6) OEM CLIENT function activation Users who wish to use the special OEM CLIENT function must make a request to both the manufacturer and Silca. Consult the Silca sales network for information regarding which manufacturers allow this function to be used. When users have been authorised by the manufacturer and have applied to be enabled by SILCA they must unlock the OEM CLIENT function on board the machine by downloading a specifi c software update for their own FUTURA cutting machine. After the software update, check that enabling has been activated by selecting the INFORMATION window and checking the ENABLE OEMs section (Fig. 3) SW
31 Fig. 3 IMPORTANT: for further details provided by each manufacturer about machine configuration and key cutting, consult the ONLINE HELP available in the OEM QUEUE -> OEM Management section SW

32 6 ENGRAVING The ENGRAVING function software comes free for all FUTURA PRO and FUTURA key-cutting machine models. The function is enabled by default. To disable and to hide certain engraving keys and fields, edit the parameter in the section: OPTIONS menu -> Settings -> Options -> Preferences DIMPLE/TRACK keys The ENGRAVING function requires the following accessories: Jaw 01E (code D748737ZB) Jaw 02E (code D748739ZB) Adapter for plane 4 (code D750763ZB) Cutter 18DW (specific for engraving) (code D748741ZB) 3 18DW The accessories are: STANDARD on the FUTURA PRO ENGRAVING version OPTIONAL for all other versions of FUTURA and FUTURA PRO Fig. 4 Select the ENGRAVING icon to enter the list of ENGRAVING MODELS created by the User SW


33 This makes it possible to: CREATE a new User Model MODIFY a User Model DELETE a User Model Tap New Model or Modify to enter the User Model Editor function. The ENGRAVING model defi nes all the parameters the machine requires to engrave a text on a key head or stem or on flat surfaces such as medals or metal plates. ATTENTION: objects MUST BE METAL, NOT STAINLESS STEEL. Materials such as wood, paper, plastic and ceramics cannot be engraved. Make sure the surface of the object to be engraved is flat SW
34 Model creation procedure: GENERAL PARAMETERS - Assign a Model Name - Select a clamp (default: 01R-01E-02E) - Select a cutter (default: 18DW) - Set engraving depth (default 10 hundredths of a millimetre) - Set Thickness for the key or object to be engraved (max 520 hundredths of a millimetre) - Select the PLANE on which to fit the object to be engraved, according to its dimensions Fig. 5 Fig. 6 PLANE WIDTH of the object to be engraved ENGRAVING AREA (L x H) 1 min 26 - max 32 mm 32 mm x 40 mm 2 min 20 - max 26 mm 24 mm x 36,5 mm 3 min 8 - max 14 mm 12 mm x 36,5 mm 4 min 14 - max 20 mm 18 mm x 36,5 mm PLANE 1 abcde ABCDE 40 mm mm Fig. 7 ENGRAVING AREA 34 - SW
35 PLANE 2 abcde ABCDE 36,5 mm mm Fig. 8 ENGRAVING AREA PLANE 3 36,5 mm ABCD 12 mm Fig. 9 ENGRAVING AREA PLANE abcde ABCDE ,5 mm 18 mm Fig. 10 ENGRAVING AREA TYPE OF OBJECT TO BE ENGRAVED (key or other) - Select SILCA key blank to choose a key blank similar to or the same as the SILCA one for which an example of an engraving Model has already been created. - Select Customised to choose the dimensions of a circular or rectangular object to be engraved SW
36 ROWS OF TEXT To add the rows of text for one side only (FRONT) or both sides (FRONT and BACK) of the object to be engraved. To align the text R or L or CENTRE (default) for every row. To remove the selected row of text. Select the TOKEN button to assign the type to the current row. The type of row may be a free text or a token. The token type cannot be edited directly by the User, but is assigned suitable value with a fi gure available in the context of the model s use. E.g: T [00] T [03] T [04] Replaced with an INDIRECT cutting CODE Replaced with the PROFILE fi eld for the lock system involved Replaced with the SERIES fi eld for the lock system involved Tokens are mainly used for OEM applications or the production of master key systems for which fi les containing special information are provided, as below: T [00] T [05] T [10] Replaced with the name or number of the key in a master key system Replaced with the number or name of a master key system Replaced with the Progressive Counter fi eld for a key in a master key system 36 - SW
37 Text T[00] T[01] T[02] T[03] T[04] T[05] T[06] T[07] Increase Function 1 Free text Replaced with an INDIRECT cutting CODE or Replaced with the name or number of the key in a master key system Used for special applications Replaced with customer Name assigned to a master key system Replaced with the PROFILE fi eld for the lock system involved Replaced with the SERIES fi eld for the lock system involved Replaced with the number or name of a master key system Replaced with the constant part of an INDIRECT cutting CODE Replaced with the variable part of an INDIRECT cutting CODE A progressive number is printed on the basis of the set parameters. The numerical sequence can be fi lled by zeros to maintain the width of the text unaltered. Example: Increase Function A sequence of progressive numbers linked to the set pieces is printed. Used to mark all the keys in sequence before cutting them. The numerical sequence can be fi lled by zeros to maintain the width of the text unaltered. Example: setting a quantity of 2 results in: To obtain this result, when 2 pieces are fi nished, repeat the operation until the required sequence is ended. T[09] T[10] T[11] T[12] Replaced with a note fi eld for a master key system Replaced with the Progressive Counter fi eld for a key in a master key system Used for special applications Used for special applications 37 - SW
![T[13] MULTILINE Employed to distribute a token (long text) over a number of lines by using token T13 twice or more.](/docs-images/74/71243570/images/38-0.jpg "Once a token has been selected from T00 to T12 indicate: the position of the fi rst character to be engraved the number of characters to be engraved")
: Position of fi rst character: 7 Number of characters: 6 Value to be engraved on")


38 T[13] MULTILINE Employed to distribute a token (long text) over a number of lines by using token T13 twice or more. Once a token has been selected from T00 to T12 indicate: the position of the fi rst character to be engraved the number of characters to be engraved Example: Token selected: T00 (indirect code - ABCD ) Position of fi rst character: 1 Number of characters: 6 Value to be engraved on key: ABCD12 To complete engraving of the indirect code on a second line (with token T13): Position of fi rst character: 7 Number of characters: 6 Value to be engraved on key: POSITIONING TEXTS WITHIN THE ENGRAVING AREA To MOVE the text area (right, left, up, down). Centre button for CENTRING the text area inside the engraving area. To make the height or width of the text area SMALLER or LARGER. Centre button for ROTATING the text area by increases of 90. To fi ne tune positioning and dimensions of the row of text, all the measurements viewed can be edited. ATTENTION: the RED area corresponds to a safety zone which must be out of the tool s reach. Each clamp plane (1, 2, 3 and 4) has a different area. The User Model Editor monitors the position of the rows of text so that they do not interfere with the safety zone SW


39 HOW TO USE AN ENGRAVING MODEL 1) From a CUTTING CARD A - Tap ENGRAVING to view: This window makes it possible to: - Select a User Engraving Model or Predefined SILCA from the list and then associate it permanently with the cutting card by tapping - Filter the list of models so that it contains only USER MODELS + models relating to key blanks linked to the current cutting card by tapping - Edit the selected Model by tapping - Edit the number of pieces - Temporarily edit the ENGRAVING DEPTH - Temporarily edit the rows containing a free TEXT fi eld - Temporarily edit the Increase Function parameters 39 - SW
![ATTENTION: the free text in a row and the Increase function parameters can be edited, but the modifications are not saved. ATTENTION: T[xx] tokens cannot be edited at this stage.](/docs-images/74/71243570/images/40-0.jpg "Go back to the User Model Editor to change rows with Tokens.")
40 ATTENTION: the free text in a row and the Increase function parameters can be edited, but the modifications are not saved. ATTENTION: T[xx] tokens cannot be edited at this stage. Go back to the User Model Editor to change rows with Tokens. ATTENTION: in the case of engravings created in an OEM job queue, many of the parameters listed above cannot be edited as the indications provided by the manufacturer must be observed. B - Tap QUEUE OF JOB with the ENGRAVING function enabled to produce: This screen is used to place either cuts or engraving in the queue, according to whether the user ticks the Cut and/or Engraving fi elds. Further details are described in the section above SW
 From JOB QUEUE Further details are described in the")
41 2) Tap ENGRAVING from the USER MODEL EDITOR. 3) From JOB QUEUE Further details are described in the section above SW
 7.")
.")
42 7 OPTIONS Options contains the following menus: Info Calibration Settings Machine maintenance Upgrades Backup/Restore User series Code Maker (optional - see ch.11) 7.1 INFO This window shows the main data for the Futura / Futura Pro machine (e.g. SW update version, serial number, number of keys cut, etc.). Tap the appropriate icon to view the FUTURA PRO SOFTWARE OPERATING GUIDE. ATTENTION: this function is not available for FUTURA SW


43 7.2 CALIBRATION Calibration includes: Clamp Standard keys Clamps Dimple/Track keys Mobile Tracer Standard key Adapter Dimple/Track key Adapter STANDARD key clamp calibration Tap START to begin calibration. Fit template Z3 into the 01V clamp, as illustrated SW


44 When the message Clean carefully the Optic Reader and key without removing it appears, lift the safety shield and carry out the required operations. Close the safety shield and press START to continue. At the end of the operation you are required to save the data entered. Tap Yes to confirm. The 01V clamp is calibrated only for Side A. Only Manual corrections of Y (spaces) e X (depth) can be entered on sides B, C and D. Positive value of Y: takes cut closer to stop. Negative value of Y: takes cut away from stop. Positive value of X: lowers the cut from the axis. Negative value of X: raises the cut from the axis. Adjustments: from -30 to +30 hundredths of mm (+/- 118 thousandths of an inch). Tap Save to confirm SW


45 7.2.2 DIMPLE/TRACK keys clamp calibration This menu contains a list of standard clamps and options for cutting these types of keys. Select the required clamp and tap START to begin calibration. Use the 02T tracer for calibrating the clamps. ATTENTION: to calibrate clamps with J jaws make sure the jaws are closed completely before proceeding SW

46 At the end of the operation you are required to save the data entered. Tap Yes to confi rm. MANUAL CORRECTIONS Y, X and Z axis manual corrections can be applied if necessary. Positive value of Y: takes cut closer to stop. Negative value of Y: takes cut away from stop. Positive value of X: moves cut to the right of the axis. Negative value of X: moves cut to the left of the axis. Positive value of Z: lowers the cut from the axis. Negative value of Z: raises the cut from the axis. Adjustments: from -30 to +30 hundredths of mm (+/- 118 thousandths of an inch) Tap Save to confi rm MOBILE TRACER 01T calibration ATTENTION: when calibrating the 01T mobile tracer make sure the 01J-02J jaws are completely closed before proceeding. - Lower the 01T mobile tracer and lock in place by turning the knurled knob clockwise. - Tap START to begin calibration and follow the instructions on the screen. - At the end of the operation you are required to save the data entered. - Tap YES to confirm SW
.")

47 7.2.4 STANDARD key Adapter calibration Adjustments to X (spaces) and Y (depths) can be made manually. Positive value of Y: takes cut closer to stop. Negative value of Y: takes cut away from stop. Positive value of X: lowers the cut from the axis. Negative value of X: raises the cut from the axis. Adjustments: from -30 to +30 hundredths of mm (+/- 118 thousandths of an inch). Tap Save to confi rm DIMPLE/TRACK keys Adapters calibration Positive value of Y: takes cut closer to stop. Negative value of Y: takes cut away from stop. Positive value of X: moves cut to the right of the axis. Negative value of X: moves cut to the left of the axis. Positive value of Z: lowers the cut from the axis. Negative value of Z: raises the cut from the axis. Adjustments: from -30 to +30 hundredths of mm) (+/- 118 thousandths of an inch). Tap Save to confi rm SW
 Zero-point Calibration")
 Tap START and follow")
48 7.3 SETTINGS The Settings menu contains: Zero-point Calibration (STANDARD key) Zero-point Calibration (DIMPLE/TRACK key) Options Network setting Zero-point Calibration (STANDARD key) Tap START and follow the instructions on the screen SW

49 At the end of the operation you are required to save the data entered. Tap Yes to confirm SW

50 7.3.2 Zero-point Calibration (DIMPLE/TRACK key) This operation requires the use of the 02T tracer. ATTENTION: make sure the jaws are completely closed before starting. Tap START and follow the instructions on the screen SW


51 At the end of the operation you are required to save the data entered. Tap Yes to confirm. NOTE: Remember to replace the 02T tracer with the proper cutter prior to attempting to cut a key to prevent damaging the 02T tracer SW
52 7.3.3 Options The Options menu contains: - General - Preferences STANDARD key - Preferences DIMPLE/TRACK key a General The following parameters can be modified: Measurement Unit (millimeters or inches) Language 52 - SW


53 Comparatives (comparative brands to visualize for key research) It s possible to pick and/or unpick brands that can be seen after a research of comparatives articles. In the comparative list Silca is activated by default. Reference Key Manufacturer After a key search the key to be duplicated will always (with exception*) be the Silca reference by default. ILCO can also be set as a reference by default. * keys that are not produced by Silca (copyright - obsolete - new keys) 53 - SW


54 7.3.3.b Preferences STANDARD key Cutting check: in simple terms MACS protection (Maximum Adjacent Cut Specifi cation). When enabled this function prevents the machine from accepting user input of direct cuts that would result in a combination of cuts not included in the data cards. Check installed key: when enabled this function checks whether the second side of the key is properly aligned in the clamp. Any alignment errors (taper) will be offset. This function is used only for keys with cuts on both sides. Use any clamp: if this function is enabled the key to be cut can be positioned on a clamp side different from default. The function is used to acquire the measurement of the key blank (stem width) in order to adapt cuts to the key blank being used. It is applied automatically only to keys with double symmetrical sides. ATTENTION: option valid for CUTTING only (NOT DECODING). Rectify key STOP: when enabled adjusts the key stop as per instructions on the screen. Minimum distance from stop: the range [50-90] (hundredths of a millimeter); thousandths of an Inch) Interval for parameters involved (in hundredths of a millimeter): X 0-99 Y H L SW

55 7.3.3.c Preferences DIMPLE/TRACK key Set preferences: used to enable or disable the use of the 01T mobile tracer. If the fi eld is not selected the 02T tracer is required, to be fi tted into the shaft for the decoding operations. Carriage speed at rapid: used to set the carriage speed for rapid movements; the pre-set value of 3000 is recommended by Silca. Enable engraving: used to enable the ENGRAVING function wherever required, at any point in the program SW
 3) TETHERING USB (for connecting tablet and machine via cable) 4) LOCAL NETWORK (LAN) (to connect the machine to the internet) MODE ACCESS TO INTERNET TABLET - MACHINE")
 In this mode the Tablet connects directly to the machine. The machine is set on this mode in our workshops.")
56 7.3.4 USE The machine can be set up in one of the 4 modes below: 1) ACCESS POINT through Wi-Fi (factory configuration) 2) ETHERNET with connection to LAN and router (to connect the machine to the internet) 3) TETHERING USB (for connecting tablet and machine via cable) 4) LOCAL NETWORK (LAN) (to connect the machine to the internet) MODE ACCESS TO INTERNET TABLET - MACHINE Connection Recommended ACCESS POINT NO Wi-Fi YES ETHERNET with connection to LAN YES via CABLE Wi-Fi YES TETHERING USB NO USB cable YES LOCAL NETWORK YES via Wi-Fi Wi-Fi a ACCESS POINT mode (Wi-Fi connection between machine and Tablet) In this mode the Tablet connects directly to the machine. The machine is set on this mode in our workshops. ACCESS POINT Fig SW


57 When the machine and Tablet are switched on the connection automatically activates in around two minutes; if not, check the Wi-Fi connection from your Tablet to see if the machine is included in the Wi-Fi networks that are found; the machine will appear as Silca-Futura_... If it is not connected pick Silca-Futura_... and input the password which correspond to the machine serial number (made up of 13 numbers) SW

58 The option to change the Wi-Fi channel is used in cases when the (point to point) communication cannot be properly connected since there are too many devices tuned to the same channel. It also permits the user to adapt to the rules and restrictions of Wi-Fi channel use in their country. To change the channel one must first be connected, select the new channel and then reboot the machine b ETHERNET with connection to LAN and router To connect the Futura / Futura Pro machine to the internet through your LAN: - Set the machine on ACCESS POINT and connect the tablet in Wi-Fi to the machine (factory configuration). - Connect your LAN ethernet cable to the machine (Fig. 12). ETHERNET with connection to LAN and router Ethernet cable Fig SW
. - the USB cable is connected to the Tablet and machine (Fig. 13).")
 Access Settings on the Tablet. 3) Set OFF to disable the Wi-Fi. 4) In the Tablet Settings tap the More.")
59 7.3.4.c TETHERING USB mode This method is used to connect the machine to a Tablet by means of a USB cable. Use the power cable provided with the Tablet. Attention! This control is active and can be selected only if: - the Tablet Wi-Fi network is disabled (OFF). - the USB cable is connected to the Tablet and machine (Fig. 13). - an Ethernet cable is not connected to the machine port. TETHERING USB USB cable Fig. 13 1) Connect the USB cable to the machine and Tablet (Fig. 13). Note: FUTURA has one USB port only. 2) Access Settings on the Tablet. 3) Set OFF to disable the Wi-Fi. 4) In the Tablet Settings tap the More... icon and select the item Tethering & Portable hotspot. 5) Tick USB Tethering or select ON to enable SW

60 When this item is enabled a green light on the machine will fl ash for a few seconds. It may take seconds for this to happen. Start the Silca Futura APP and open the drop-down menu. Select Connect to to find the machine. When the machine has been found, hit to select and establish connection. NOTE: if the Tablet and machine have been turned off, when turning on the USB connection must be made again, in the way described above, if you wish to work with the Tethering USB mode. NOTE: when the machine-tablet connection has been made, if necessary you can re-boot the tablet Wi-Fi connection to connect to the internet SW


61 7.3.4.d LOCAL NETWORK mode This mode is useful to connect the tablet and machine, sharing the internet access provided by the router. If this is required we suggest in any case using the Ethernet with connection to LAN confi guration, as described in Chapter b as it performs better. LOCAL NETWORK (LAN) Fig. 14 To access this method of use, go to the Options > Settings menu, select Network setting and hit the LOCAL NETWORK mode icon SW


62 Perform the following operations to activate this method: 1) FUTURA / FUTURA PRO CONNECTION TO A Wi-Fi ROUTER Pick the network to which you want to connect by tapping the SSID fi eld and then inserting the network s password. Tap Save to reboot the machine in Local Network. The machine should initially reboot with a fl ashing white and blue light, to then end with two flashing blue lights that indicate the connection to the local network was successful. If the inserted password was incorrect the machine would reboot in ACCESS POINT mode with an intermitted fl ashing blue light SW
 REBOOTING THE FUTURA S APPS Open the drop-down menu and select Connect to. 63 - SW")
63 2) CONNECTING TABLET TO A Wi-Fi ROUTER From the Tablet s Settings menu tap on the desired network to connect. 3) REBOOTING THE FUTURA S APPS Open the drop-down menu and select Connect to SW

64 Tap on Start Search in the following window. Tap on Silca-Futura in the following window to obtain a connection between the Futura s APPS Silca.apk and the machine. NOTE: the last mode setting will be automatically saved by the machine at each successive reboot; if the last set mode was LOCAL NETWORK and this mode is not recognized within a certain time frame the Futura / Futura Pro will automatically go to ACCESS POINT mode SW

65 7.4 MACHINE MAINTENANCE Digital Inputs This function is used to test operation of the digital inputs on the electronic board to which they are connected: screen micro, gauge position sensor, electrical contact, etc. To perform the test carry out the movement described for each item and check that the relative signal changes color from red to green. Digital Outputs This function is used to test operation of the digital outputs on the electronic board and relative devices connected to it. To perform the test tap ON on the screen SW


66 Motors This function is used to test operation of the 3 step motors for the X, Y and Z axes (at the moment the B axis is not used). To perform the test tap + for the axis involved. Note: The carriage must not reach and hit the end of its run. The Reset key homes the axes. NOTE: tap - only when the value shown in the Working position field is positive. Axis clearance sensor: the ring becomes green when activated. Cutter motors To perform the test tap the button for the motor to be tested: check that the cutter turns for 5 seconds. Optical Reader Perform the Optical reader threshold test to verify if the optical reader is active. - Tapping on the Read laser threshold switches the optical reader from - to SW

 then with the standard flat keys clamp calibration.")
67 - Perform the Optical reader threshold test only if encountering anomalies when reading and/or decoding keys. - Thoroughly clean the optical reader s glass, close the protective shield. - Tap on Optical reader calibration : - the green ball indicates that the optical reader is calibrated. - the red ball indicates that you must thoroughly clean the optical readers lens and re-calibrate the reader. ATTENTION: after the Optical reader calibration proceed with the machine zero points calibration (standard flat keys) then with the standard flat keys clamp calibration. Connections This function shows all the machine connections that are available. Log Files The Log fi le is requested by Silca when on board machine software anomalies are encountered. This function permits to create and save a log file: - on a USB key connected to the machine s USB port (Fig. 15). Note: FUTURA has one USB port only. - or directly to Silca s Server (with the FUTURA PRO machine connected to a local network) Wi-fi or LAN cable connection) SW

68 Fig Futura PRO Advanced Setting Function for Silca internal use SW
 on the Silca FUTURA web server.")
69 8 MACHINE UPDATE AND REGISTRATION 8.1 MACHINE REGISTRATION To download the machine software updates you must be registered on the SILCA WEB FUTURA server. This operation is required only on first access. After cutting at least 50 keys you are required to register the machine (only if not yet done) on the Silca FUTURA web server. If the machine is not registered now, the same message will appear every time Futura / Futura Pro is started. If the machine is not registered it will not be possible to download software updates. There are 4 ways to register: Method 1: Futura / Futura Pro machine with access to the internet Method 2: Futura / Futura Pro tablet with access to the internet Method 3: Using the Silca Remote Service (SRS) program Method 4: Using a browser on a PC/tablet connected to the internet 69 - SW
 and then tap Register and wait for a message communicating that the machine has been registered. Tap Close. NOTE: Tap to view the registration method for FUTURA PRO machines.")
70 Method 1 Futura / Futura Pro machine with access to the Internet - Start the FUTURA program; tap the icon OPTIONS -> Settings -> Registration - Enter the data into the fields shown (those with * are required) and then tap Register and wait for a message communicating that the machine has been registered. Tap Close. NOTE: Tap to view the registration method for FUTURA PRO machines. A message confi rming registration will arrive at the address given. Use your mail program to open the from Silca and click on Validating . At the end, tap Close and then Check to conclude the registration procedure on the Tablet SW


71 Method 2 Futura / Futura Pro tablet with access to the internet NOTE: the Tablet must be taken where there is a Wi-Fi connection with internet access. Connect a tablet to your local Wi-Fi network and connect to the internet to start the Silca FUTURA APP. Scroll from left to right to open the drop-down menu, as shown below. Tap Machine Registration. - If the serial number is not read, digit its thirteen numerical characters and press Check. - Enter the data into the fields shown (those with * are required) then tap Register SW
72 - A message confirming registration will arrive at the address given. Use your mail program to open the from Silca and click on Validating . - Go back to the Futura / Futura Pro machine and re-connect in ACCESS POINT mode. NOTE: when the machine is updated for the first time registration data will be transmitted by the Futura WEB server to the machine SW
73 Method 3 Using the Silca Remote Service (SRS) program Futura / Futura Pro machine and Tablet connected in ACCESS POINT mode Install the Silca Remote Service program on your PC. The program can be downloaded from the Silca website by selecting the Products menu -> Silca Key Programs -> SKP Modules -> Silca Remote Service. - Start the program and select the Futura / Futura Pro machine model, select the Next button and then Register : a dedicated web page will appear. - If the machine has not already been registered, enter the data in the relevant fi elds (fi elds marked * are required) and then tap Register. - A message will be sent to the given address to confi rm registration. Use your mail program to open the from Silca and click on Validating . The machine is now registered SW

 and then tap Check.")

74 Method 4 Using a browser on a PC/tablet connected to the internet Access any browser from your PC or Tablet and enter the following address: - Select the language in the top right-hand corner of the page. Enter the machine serial number (13 digits) and then tap Check. - Enter the data in the fields indicated (fields marked (*) are required), tap I agree, then Register and wait for the message confirming that the machine has been registered. - Confirmation of registration will be sent to the address indicated. - Use your program to open the received from Silca and click on Validating SW


 Update by TABLET 2) Update by USB PEN DRIVE 3) Update through LOCAL")

75 8.2 MACHINE SOFTWARE UPDATE Silca periodically releases Software and Data Updates for the machine. To check for new updates use one of the connection methods available. ATTENTION: Do not insert a USB modem sticks for the transfer of data in the machine USB port. NOTE: before starting, check that the machine is registered (shown on the Machine Registration screen - on the Tablet scroll from left to right to open the drop-down menu). Futura / Futura Pro can be updated in one of the following ways: 1) Update by TABLET 2) Update by USB PEN DRIVE 3) Update through LOCAL NETWORK 4) Update by SRS (Silca Remote Service) program Update by TABLET 1 2 Fig. 16 ATTENTION: Make sure there is no USB PEN in the Futura / Futura Pro machine USB port during updating. 1) Take the tablet to a place with a Wi-Fi network and internet connection and connect. 2) Start the Silca Futura APP and follow the instructions on the screen: - On the Tablet scroll from left to right to open the drop-down menu. - Tap Machine registration (Fig Enter the machine serial number (13 digits) and then tap Check. Fig SW
 and follow the guided procedure (if the tablet is not connected to a Wi-Fi network you will see a screen from which a Wi-Fi network can be selected).")
76 - On the Tablet scroll from left to right to open the drop-down menu - Tap Machine update ; the following screen will appear: Fig Click on the tablet image (Fig.10) and follow the guided procedure (if the tablet is not connected to a Wi-Fi network you will see a screen from which a Wi-Fi network can be selected). - When the new update has been downloaded you will be asked to re-start the machine so that the update will be applied automatically. - Press the Re-start machine button and wait a few minutes. The tablet will automatically connect to Futura / Futura Pro SW
 Select Machine update from the drop-down menu and tap the USB PEN image (Fig. 19). Insert the USB PEN DRIVE into the machine and follow the instructions on the screen. 1 Fig.")
. 2 Fig.")
77 8.2.2 Update by USB PEN This update procedure is used to update the Futura / Futura Pro machine using a PC connected to the internet and a USB PEN. 1) Select Machine update from the drop-down menu and tap the USB PEN image (Fig. 19). Insert the USB PEN DRIVE into the machine and follow the instructions on the screen. 1 Fig. 19 2) Insert the USB PEN DRIVE into a PC connected to the internet (Fig. 20). - Open the USB PEN DRIVE, click on the fi le FuturaUpgrade.exe and wait for the operation successful message to appear on the screen. - Remove the USB PEN DRIVE from the PC (safe hardware removal). 2 Fig. 20 3) Insert the USB PEN DRIVE into the special port on FUTURA PRO (Fig. 21). Note: FUTURA has one USB port only. Follow the instructions on the screen: tap the RE-START FUTURA button to re-start the FUTURA PRO machine. - Wait a few minutes until the white light flashes regularly. - Remove the USB PEN DRIVE from the machine (without turning it off). Wait for Futura / Futura Pro to re-start (regularly fl ashing blue light). - Start the FUTURA APP from your tablet. 3 Fig SW
 Cabled LOCAL NETWORK Connect the Futura / Futura Pro machine to the LOCAL network inserting the network cable to the machine Ethernet port (the machine must")

78 8.2.3 Update with LOCAL NETWORK connected to the internet LOCAL Wi-Fi NETWORK Connect the Futura / Futura Pro machine to the local Wi-Fi network (Attention: first set up the machine and then the Tablet in LOCAL NETWORK mode) Cabled LOCAL NETWORK Connect the Futura / Futura Pro machine to the LOCAL network inserting the network cable to the machine Ethernet port (the machine must remain in ACCESS POINT mode). Fig. 22 Fig. 23 ATTENTION: Make sure there is no USB PEN in the Futura / Futura Pro machine USB port during updating. To upgrade the FUTURA PRO machines software in manual mode, follow the steps indicated below. Fig. 24 NOTE: tap to view machine update methods. - Tap on Check for Updates to get a list of what will be downloaded with the update SW
.")
79 Fig Tap News to see information about the update to be installed on the machine. - Tap on Yes to start downloading. - When download is over, you will be asked to restart the FUTURA PRO machine (procedure run by the software). Follow the on-screen instructions SW
 QUICK update saves time as")
80 8.2.4 Update with SRS Program (Silca Remote Service) Fig. 26 Install the Silca Remote Service program on your PC. The program can be downloaded from the Silca website by selecting the Products menu -> Silca Key Programs -> SKP Modules -> Silca Remote Service The machine can be updated in the following ways: Method 1 (QUICK update) QUICK update saves time as it downloads only the files needed. ATTENTION: you need a blank FAT32/NTFS format USB PEN. - Fit a blank format FAT32/NTFS USB PEN into the Futura / Futura Pro machine and open the machine software; go to the Diagnostics menu -> Log File and press Save log fi le on the USB PEN. - Fit the USB PEN into the PC on which the SRS program is installed, go to the SRS program screen regarding QUICK update preparation and wait for the update fi le to be saved on the machine. If the machine is not registered you will be required to register using the special website page. - Ensure that the Futura / Futura Pro machine is off (red push button) and that the FUTURA APP on the Tablet is closed. - Fit the USB PEN into the machine USB port (on the rear of the machine - Fig. 15, page Start the FUTURA PRO machine and wait a few minutes until the white light fl ashes regularly. Remove the USB PEN (without turning off the machine). Wait for Futura / Futura Pro to re-boot (blue light flashing regularly). Start the Futura APP from your Tablet. ATTENTION: do not unplug or turn off Futura / Futura Pro during updating SW
81 Method 2 (TOTAL update) TOTAL update will download all the files on the machine Start the program and select the Futura / Futura Pro machine. ATTENTION: you need a blank FAT32/NTFS format USB PEN. - Enter the Futura / Futura Pro machine serial number into the SRS program screen regarding update preparation and then fit a USB PEN into the PC. Wait for the TOTAL update fi le to be saved on the USB PEN. If the machine is not registered you will be required to register using the special website page. - Ensure that the machine is off (red push button) and that the FUTURA APP on your Tablet is closed. - Fit the USB PEN into the machine USB port (on the rear - Fig. 15, page 68). - Start the Futura / Futura Pro machine and wait a few minutes until the white light fl ashes regularly. Remove the USB PEN (without turning off the machine). Wait for Futura / Futura Pro to re-boot (blue light flashing regularly). Start the Futura APP from your Tablet. ATTENTION: do not unplug or turn off Futura / Futura Pro during updating SW
82 8.3 APP UPDATE (Silca.apk and SilcaKeyboard.apk) After you updated the Futura / Futura Pro machine s software, when the program starts up, you may see the following screen indicating that a new version of the Silca.apk or SilcaKeyboard.apk is avaialble. Tap on Install and proceed with updating the APP. Fig. 27 Fig. 28 Close the application that is opened by tapping on screen (see Fig. 29). and dragging the Futura APP downwards off the 82 - SW
. Fig.")
83 Fig. 29 Select Downloads from the tablet Setting menu (Fig. 30). Fig SW
84 Select Silca.apk and tap on Install (Fig. 31). Wait for the update to finish. Do the same for upgrading the SilcaKeyboard.apk. Fig SW
. Also provided is the recovery (Restore User database) function always using the USB pen with the last fi le that was saved on it.")
85 9 BACKUP / RECOVERY This function permits to create and save a backup (backup User database) fi le in a USB pen that can be connected the machine s USB port (Fig. 15, page 68). Also provided is the recovery (Restore User database) function always using the USB pen with the last fi le that was saved on it SW

. To create the user series, tap User Series Management. Tap Add Series to import the new file.")
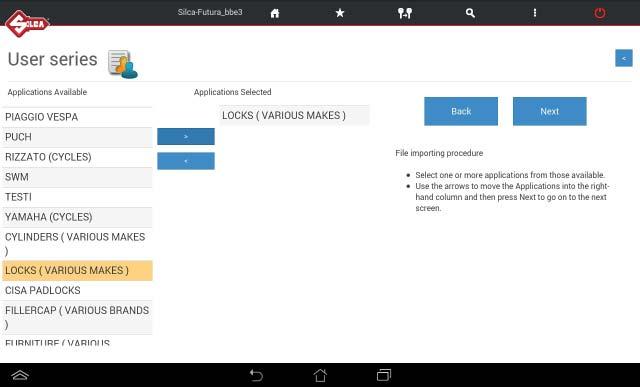
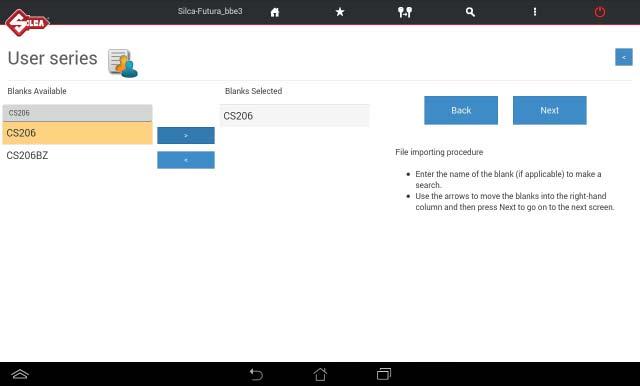
86 10 USER SERIES Function accessible from Options => User Series. This function is available to the user to import a code table in XML-Keso, CSV, TXT format, associating it to a data card and thereby creating a new user series. - Use a USB-PEN, FAT32/NTFS format, and copy onto it the fi le (or fi les) with the table to be imported. Note: the file must not be in a folder. - Insert the USB-PEN into the Futura / Futura Pro USB port (Fig. 15, page 68). To create the user series, tap User Series Management. Tap Add Series to import the new file. When the User Series exists and is selected/highlighted you can: - Tap the Edit key to vary certain parameters associated to the series. - Tap the Eliminate key to erase the selected series SW


87 - Follow the instructions on the Tablet page. During guided import you will be required to enter or select certain parameters to associate to the new series (e.g. Data card number, Profi le, Series, Makes, Applications and Key blank. - Tap Next to continue SW
88 88 - SW
.")
89 - Tap Import to import the file directly without editing. NOTE: only if necessary, before terminating table import you can edit certain parameters using the menu on the right (Operation on data in the table and/or Operations on columns). NOTE: tap to view information about the field. - After editing the parameters Operation on data in the table tap the Refresh key. - After carrying out operations in the columns, tap the Import button to start importing the files. At the end of the operations the following screen will appear: - Tap Save to save the new User series. - Tap Modify to make changes SW
90 11 CODE MAKER The Code Maker function (option to buy) is used to create a new data card with user-defi nable cutting parameters. An explanation of how to use the data card parameters is given in the User Data Card guided creation procedure. When the data card has been created the program proposes the creation of a User Series which also serves as a link to a personal code table. Note: new data cards can be created using the accessories, cutters and clamps listed below: Data cards for FLAT/STANDARD keys Clamp to be used: Cutter to be used: 01V or 01VJ 01F Data cards for DIMPLE keys Clamp to be used: Jaws to be used: Cutter to be used: 01R 01J-02J 05J-06J 01D - 02D - 03D - 04D - 05D - 07D - 13DW Note: Code Maker may use other accessories in the future SW


91 12 TRANSPONDER GUIDE The Transponder Guide contains all the transponder key copying solutions provided by Silca. Open the Transponder Guide MENU - the search window will appear. Enter into the fi elds the known information about the vehicle or transponder key to view data relating to identifi cation, copying, storage and the procedures provided by Silca: IMPORTANT: tap the column icon to learn the meaning of each column press the orange arrow to make a new search or go back Fig SW

92 Selet the required car model at the top of the window. The bottom part of the window will show detailed information about the different possibilities: Blue section - use one of the Silca keys indicated in the first 3 columns to create a clone of the original transponder key, i.e. a key ready for use. Green section - use one of the Silca keys indicated in the first 3 columns to get a key that can be programmed on the vehicle by diagnostics or manual procedure. If there is no solution with Silca keys, when programming by diagnostics or manual procedure, if available, the copy must be made from an original key. column indicating a Silca key blank complete with transponder or ORIGINAL column indicating a Silca key blank without transponder column indicating a Silca FLIP key blank without transponder Example Fig. 32 In this case the user may: Blue section => to clone the original key with RW devices - use HU101MH - use HU101TE or HU101FH with GTI transponder Green section => to programme a key on the vehicle with original diagnostics (sd = see dealer) - use HU101T17 - use HU101TE or HU101FH with GTI transponder programmed as ID63 or with T17 transponder Get further details or access manual programming procedures by hitting (see Fig. 32). Tap icon selected. to make a search in the key-cutting section to fi nd the data cards for the Silca key blank 92 - SW
93 13 TOKEN AND UTP (UNLIMITED TOKEN PLAN) Token machines are a new pay per use concept applied to Futura / Futura Pro machines which employ special tokens purchased by the customer as and when needed. There are 2 types of tokens: Token : digital coins whose value decreases every time a copy of a key is made. When the tokens are fi nished new ones must be purchased to continue using the keycutting machine. UTP (Unlimited Token Plan) : a special timed digital coin that allows the machine to be used freely (i.e. an unlimited number of keys can be cut) for a given period (a few months up to a year). At the end of the period new tokens must be purchased to continue using the key-cutting machine. NOTE: To apply for token recharge and/or a UTP package the machine must be registered (to register see Ch.8.1 MACHINE REGISTRATION ). Running Tokens and UTPs The following procedures apply when a newly recharged token or UTP package is used, according to the type of system on the machine. In use on the machine UTP New UTP System Duration of the UTP package in use is extended by adding the duration of the new one. Token Token The new tokens are added to those already in use. UTP Token The tokens will be operative when the UTP package expires. Token UTP The tokens will be operative when the UTP package expires. About tokens and UTPs One of the following two icons is situated in the top left-hand corner, close to the SILCA logo: The Tokens still available Days of use in the case of UTPs To view information about the tokens available/ used, tap To view the days still available in the case of UTPs, tap 93 - SW
94 When the icon (Token) and/or calendar (UTP) are green it means that the tokens or days are in excess of the minimum warning point in the Token => Settings menu When the icon (Token) and/or calendar are yellow it means that the tokens or days are below the minimum warning point in the Token => Settings menu When the icon (Token) and/or calendar are red it means that the tokens or days have expired or are about to expire. Extratoken If the customer has used up all the tokens or the UTPs have expired, SILCA provides the opportunity to cut keys for another 21 days. The tokens consumed will be counted during this period. A the end of the 21 days the machine will cease to cut keys and a new UTP package or tokens must be purchased from a SILCA distributor. If the customer purchases a pack of tokens those consumed during the ExtraToken period will be deducted. Example: Days Tokens Tokens consumed in the ExtraToken period: 280 Package purchased: 1500 tokens; When the package is installed the machine will have 1220 tokens at its disposal. If the customer purchases a UTP package the days used during the ExtraToken period will be deducted according to the following logic: the last day on which key-cutting took place is counted. Examples: (X = one or more keys cut) X One day will be deducted from the duration of the UTP package in question X X 10 days will be deducted from the duration of the UTP package in question X 20 days will be deducted from the duration of the UTP package in question No days will be deducted. Note: Futura Token / Futura Pro Token is sold without tokens. When the first key is cut a UTP is automatically activated free for one month. At the end of the month you will be informed on your Tablet that you have 3 weeks (21 days) your disposal to purchase the token solution that meets your needs, according to calculations regarding use of the machine. At the end of the 3 week period the machine will no longer cut keys. To continue using the machine contact a Silca distributor to purchase tokens or UTPs and set up the machine for the chosen mode ( Tokens or UTPs ) SW

95 13.1 TOKEN APPLICATION ON THE MACHINE TOKENS on the machine can be updated in the ways described below: Futura / Futura Pro machine with LOCAL NETWORK (LAN) connection: Select the Update menu in the Futura program and press Check Updates. If the Silca server has tokens ordered/available a message will appear with a request to download. The tokens will be downloaded automatically to the machine without the need to re-boot. When the tokens have been updated a message will appear to indicate whether a machine software update is available on the Silca Server. Futura / Futura Pro machine with ACCESS POINT connection: Use the SILCA REMOTE SERVICE program or take your Tablet to a Wi-Fi connection point with access to the internet. If an update is available on the Silca server the tokens ordered/available and the machine software update will be downloaded together in a single operation COPY BY ORIGINAL AND DATA CARD CUTTING FLOW (on Token version) Before each cutting operation by data card, by code or from an original, the Tablet shows the cost or token value of the chosen cutting operation. This information is not visible if a UTP package is used. COPY BY ORIGINAL COPYING BY CARD 95 - SW


96 At the end of the Copy by data card or Copy by original fl ow a window appears on your Tablet showing the cost of the operation (tokens consumed). This information is not visible if a UTP package is used SW
.")
97 Summary of TOKEN or UTP situation In the Options menu of the Silca Futura program tap Token and then Info to view a summary of the data and statistics relating to the token system. Real statistics are calculated according to the actual consumption of the tokens purchased (when normal tokens are used). Virtual statistics calculate average consumption of tokens when a UTP is in use. In this way customers can see how much they would have consumed in tokens if they had purchased individual tokens instead of the UTP option. Tap Settings to edit the following values: Token alert threshold (number): indicates the point in numbers of tokens at which special warning messages are activated. UTP threshold alert (days): indicates the point in number of days at which special warning messages are activated SW

98 Tap Log File to view the last operations carried out by the machine and saved in chronological order: token recharge; tokens consumed by a copy from the original; tokens consumed by a data card or code copy, etc SW
99 14 CHANGING TABLETS If a new Tablet is to replace the previous one, download/install the Futura APP. and the customized Silca Keyboard. Proceed as follows: 1) Connect the tablet <=> FUTURA in ACCESS POINT mode (Ch a). 2) Open the browser CHROME (the CHROME icon is in the APPS page ) and enter the following addresses: /Silca.apk to download the APP /SilcaKeyboard.apk to download the keyboard 3) Tap the center bottom Open all Apps screen icon 99 - SW
100 4) Select Downloads from the tablet Settings menu. 5) Tap on the 2 apps just downloaded for installation SW
 Search for Futura icon 3) Tap and hold (keep pressing) the Silca Futura application icon and drag it to the main screen.")
101 After you install the new FUTURA APP you should move the Silca FUTURA application icon screen: to the main 1) Tap the center bottom Open all APPS screen icon 2) Search for Futura icon 3) Tap and hold (keep pressing) the Silca Futura application icon and drag it to the main screen SW
 Entering the Android Tablet Settings. 2) Tap on APPS and then FUTURA. 3) Tap on Clear Cache.")
102 15 FUTURA PROCEDURE TO CLEAR CACHE Clearing the FUTURA APP Cache is recommended to improve the performance of the FUTURA APP. 1) Entering the Android Tablet Settings. 2) Tap on APPS and then FUTURA. 3) Tap on Clear Cache SW
OPERATING GUIDE FUTURA FUTURA PRO
 SOFTWARE OPERATING GUIDE FUTURA FUTURA PRO vers. 7 Edition: October 2018 (c) 2017 SILCA S.p.A. - Vittorio Veneto The Manufacturer declines any responsibility for possible inaccuracies in this document
FUTURA ONE FUTURA PRO ONE FUTURA ONE ABUS FUTURA PRO ONE ABUS
 SOFTWARE OPERATING GUIDE FUTURA ONE FUTURA PRO ONE FUTURA ONE ABUS FUTURA PRO ONE ABUS vers. 5 Edition: January 2018 (c) 2017 SILCA S.p.A. - Vittorio Veneto The Manufacturer declines any responsibility
OPERATING GUIDE FUTURA PRO ONE FUTURA PRO ONE ABUS
 SOFTWARE OPERATING GUIDE FUTURA PRO ONE FUTURA PRO ONE ABUS INDEX PROGRAM START...5 CHOICE OF KEYBOARD...6 CHANGE PROGRAM LANGUAGE...6 MEASURING UNITS...6 DROP-DOWN MENU...7 1 SEARCHES... 8 1.1 VEHICLE
FUTURA ONE FUTURA PRO ONE FUTURA ONE ABUS FUTURA PRO ONE ABUS
 SOFTWARE OPERATING GUIDE FUTURA ONE FUTURA PRO ONE FUTURA ONE ABUS FUTURA PRO ONE ABUS vers. 6 Edition: May 2018 (c) 2017 SILCA S.p.A. - Vittorio Veneto The Manufacturer declines any responsibility for
OPERATING GUIDE FUTURA EDGE
 SOFTWARE OPERATING GUIDE vers. 1 Edition: April 2018 (c) 2018 SILCA S.p.A. - Vittorio Veneto reserves the rights to alter the information without prior notice, except when they affect safety. This document
OPERATING GUIDE FUTURA PRO ONE FUTURA PRO ONE ABUS
 SOFTWARE OPERATING GUIDE FUTURA PRO ONE FUTURA PRO ONE ABUS vers. 1 Edition: October 2016 (c) 2016 SILCA S.p.A. - Vittorio Veneto reserves the rights to alter the information without prior notice, except
Copyright by Silca S.p.A All Rights Reserved. products quality.
 Futura Pro is the only electronic key cutting machine able to duplicate all types of residential and automotive keys (flat, cruciform, laser and dimple keys). * Keys cut with specific optional accessories.
FuturaPRO. Electronic Key Cutting Machine
 FuturaPRO Electronic Key Cutting Machine FuturaPRO The Next Generation The Ultimate Electronic Key Cutting Experience The original Futura electronic key cutting machine was the first machine on the market
Original instructions D446068XA vers. 3.0
 FLAT STEEL Operating Manual Original instructions D446068XA vers. 3.0 EN (c) 2016 SILCA S.p.A. - Vittorio Veneto This manual is written by SILCA S.p.A. All rights reserved. No part of this publication
5. Tools. Blue SHARK 123SHARK
 5. Tools 5.1 Edit DSD Presets 5.2 Machine Adjustments 5.3 Custom DSDs 5.4 DSD Specific Adjustments 5.4.1 Cut Styles 5.5 Decode 5.6 Special Function 5.7 Security 31 5.1 Edit DSD Presets The Tools section
* IMPORTANT * REGISTERING YOUR MACHINE
 * IMPORTANT * REGISTERING YOUR MACHINE Thank you for your purchase of the Keyline 994 Laser. Before continuing with machine setup and use, please complete the following; COMPLETE PRODUCT REGISTRATION FORM
to alter products designs s, dimensions or info to im mprove
 the products quality.headquarters, with express exclusion of any other court. Matrix Evo the products quality.headquarters, with express exclusion of any other court. Matrix Evo Matrix Evo is a key-cutting
Speed. Copyright by Silca S.p.A All Rights Reserved. the products quality.
 www.silca.biz Speed New, fast, compact, precise and userfriendly, Speed is perfect for key cutters who have just entered the key duplication business, but also for experienced Duplicating Centres that
HAVE A SILCA COPY COPY HAVE A SILCA COPY. Electronic Key Cutting Machines HAVE A SILCA COPY HAVE A SILCA COPY HAVE A SILCA COPY HAVE A COPY
 HAVE A HAVE SILCA A SILCA COPY COPY HAVE A COPY HAVE A SILCA C A SILCA COPY HAVE A COPY HAVE A HAVE SILCACOPY A COPY HAVE A COPY HAVE HAVE A SILCA A SILCA COPY COPY Electronic Key Cutting Machines SILCA
Operating manual D434731XA. vers. 2.0
 Operating manual D434731XA vers. 2.0 (c) 2008 SILCA S.p.A. - Vittorio Veneto This manual is written by SILCA S.p.A. All rights reserved. No part of this publication may be reproduced or used in any form
Triax A/T QUICK START GUIDE
 Triax A/T QUICK GUIDE Please read all instructions carefully before operating your Triax A/T Key Machine. 1. Preparation A. First remove the Triax A/T machine from its cardboard box and pallet. The machine
Copyright by Si. ilca S.p.A All Right. ts Reserved
 OMNIA Omnia epitomizes Silca s entire experience in duplicating bit and double bit (male and female), pump and central stop keys. Above-average performances and reliability make Omnia the most complete
Optika. The new key reading device from Silca!
 Optika Optika The new key reading device from Silca! Optika, the new key reading device from Silca, suggests in a reliable way the possible key blanks to make a copy. Optika can recognise the profiles
Copyright by Silc. ca S.p.A All Rights Reserved
 OMNIA MAX Omnia Max epitomizes i Silca s entire experience in duplicating bit and double bit (male and female), pump keys, adaptable gorges keys, central and rear stop keys and keys with vertical cuts.
Operating Manual D437248XA D437248XA
 Operating Manual Original Original Instructions Instructions D437248XA D437248XA Vers. Vers. 2.0 2.0 GB (c) 2010 SILCA S.p.a. Vittorio Veneto This manual has been drawn up by SILCA S.p.a. All rights reserved.
OPTIONAL Universal Loader D708097ZB D736245ZB
 OPTIONAL Universal Loader D708097ZB D736245ZB Automatic feeder Alimentatore automatico Automatisches Zuführmagazin Chargeur automatique Alimentador automático Alimentador automático Automatische toevoereenheid
Operating Manual Original Instructions D446001XA vers. 1.0
 Operating Manual Original Instructions D446001XA vers. 1.0 EN (c) 2016 SILCA S.p.A. - Vittorio Veneto This manual has been drawn up by SILCA S.p.A. All rights reserved. No part of this publication can
Unocode 399 * * * * The very best in code cutting or copying. Machine built to CE (European Community) safety standards.
 safety standards.") Unocode 399 Machine built to CE (European Community) safety standards. Unocode 399 Unocode 399 is a Silca electronic key-cutting machine for the duplication of flat keys for cylinders and cars. Unocode
Unocode 399 Machine built to CE (European Community) safety standards. Unocode 399 Unocode 399 is a Silca electronic key-cutting machine for the duplication of flat keys for cylinders and cars. Unocode
994 LASER QUICK GUIDE
 994 LASER Quick-Start Guide CONTENTS Machine set-up & password entry Jaw calibration Cut by code & decode How to replace the cutter & change the tracer Short form instructions Replacemente parts list IMPORTANT
* * g produced entirely to CE mark European standards. * Keys to be cut only with the 4 sided clamp provided
 illustrations in this document are for guidance only UC199 New electronic, compact and high precision key-cutting machine for single and double sided flat keys and cruciform* keys. * * * g produced entirely
Section 9 KEY MACHINES
 Section KEY This tion presents the current line-up of Ilco and Silca brand standard and specialty key machines. DUPLICATORS 008A - Manual The Mini-Mite manual duplicator is a lightweight, compact machine
UC199 UC199 Japan Operating Manual Original Instructions D441737XA vers. 2.0
 Japan Operating Manual Original Instructions D441737XA vers. 2.0 EN (c) 2012 SILCA S.p.a. Vittorio Veneto This manual has been drawn up by SILCA S.p.a. All rights reserved. No part of this publication
Operating Manual. Original Instructions D444460XA. vers. 3.0
 FUTURA ONE FUTURA ONE ABUS Operating Manual Original Instructions D444460XA vers. 3.0 EN (c) 2015 SILCA S.p.A. - Vittorio Veneto This manual has been drawn up by SILCA S.p.A. All rights reserved. No part
BD Laser User Guide * IMPORTANT * PLEASE READ THE FOLLOWING INSTRUCTIONS CAREFULLY AS IMPROPER USE MAY DAMAGE THE MACHINE AND VOID THE WARRANTY.
 BD Laser User Guide * IMPORTANT * PLEASE READ THE FOLLOWING INSTRUCTIONS CAREFULLY AS IMPROPER USE MAY DAMAGE THE MACHINE AND VOID THE WARRANTY. BD Laser arrives ready to use with jaws and cutters preinstalled.
Operating manual D424559XA. vers.5.0
 Operating manual D44559XA vers.5.0 ( ) 000 SILCA S.p.A. - Vittorio Veneto This manual has been drawn up by SILCA S.p.A. All rights reserved. No part of this publication may be reproduced or used in any
Operating Manual. Original Instructions D443236XA. vers. 7.0
 NA JAPAN Auto Auto Operating Manual Original Instructions D443236XA vers. 7.0 EN (c) 2015 SILCA S.p.A. - Vittorio Veneto This manual has been drawn up by SILCA S.p.A. All rights reserved. No part of this
HAVE A SILCA COPY COPY HAVE A SILCA COPY. Electronic Key Cutting Machines HAVE A SILCA COPY HAVE A SILCA COPY HAVE A SILCA COPY HAVE A COPY
 HAVE A HAVE SILCA A SILCA COPY COPY HAVE A COPY HAVE A SILCA C A SILCA COPY HAVE A COPY HAVE A HAVE SILCACOPY A COPY HAVE A COPY HAVE HAVE A SILCA A SILCA COPY COPY Electronic Key Cutting Machines SILCA
Windows user guide for version 3.3
 1 Windows user guide for version 3.3 2 Contents 1. Installation...4 1.1. How to install BABEL on your Windows desktop...4 2. Getting started...5 2.1. First run...5 2.2. Password setup...5 2.3. Key import...5
User Guide Instruction Manual
 User Guide Instruction Manual Please wear Safety Glasses at all times while operating this machine. DO NOT attempt to lubricate the machine. Clean only with a brush and or vacuum. Shield must be lowered
Futura IP. English. Futura IP Inst EN
 Futura IP 24809760 www.bpt.it EN English General Notes 212 161 29 Read the instructions carefully before beginning the installation and carry out the actions as specified by the maker; The installation,
Easy Scan Plus + Easy Scan Plus
 + Easy Scan Plus Silca Easy Scan Plus is the essential tool needed to offer customers a complete and efficient residential remotes duplication service. Easy to use and portable, it guides you through the
The ProtoTRAK Parasolid Converter Operating Manual
 The ProtoTRAK Parasolid Converter Operating Manual Document: P/N 28070 Version: 042216 Parasolid for Mills Compatible with offline and SMX ProtoTRAK Control models Southwestern Industries, Inc. 2615 Homestead
HAVE A SILCA COPY. Electronic Key Cutting Machines HAVE A SILCA COPY HAVE A SILCA COPY HAVE A SILCA COPY HAVE A COPY HAVE A SILCA COPY
 HAVE A SILCA COPYHAVE A SILCA COPY HAVE A SILCA C HAVE A SILCA COPY HAVE A SILCA COPY A SILCA COPY HAVE A SILCA HAVE A SILCA COPY COPY HAVE A SILCA COPY HAVE A SILCACOPY HAVE A SILCA COPY HAVE A SILCA
Epilog Laser Cutter Instructions (Only the Essentials)
") Epilog Laser Cutter Instructions (Only the Essentials) How to export a file for SKETCHUP put it on the server, open it in Illustrator, and Prepare it for the Epilog Laser Cutter 1. In Sketchup: Draw a
Epilog Laser Cutter Instructions (Only the Essentials) How to export a file for SKETCHUP put it on the server, open it in Illustrator, and Prepare it for the Epilog Laser Cutter 1. In Sketchup: Draw a
Ladybird Project - Vacuum Mould
 - Vacuum Mould Prerequisite Mould drawn and saved as STL file from Solidworks Focus of the Lesson On completion of this exercise you will have completed: Opening STL file Setting Machining Constraints
Networking the printer
 Networking the printer General networking Networking overview A network is a collection of devices such as computers, printers, Ethernet hubs, wireless access points, and routers connected together for
Service Calibrations 5
 5 Service Calibrations 5-3 ing the Service Calibrations Menu 5-4 1. Scan-Axis Calibration 5-7 2. Service Station Calibration 5-11 3. Accuracy Calibration 5-14 Carriage Height Calibration 5-18 Calibration
Manual for the Bellfires Wi-Fi box in combination with the Bellfires Gas app
 Manual for the Bellfires Wi-Fi box in combination with the Bellfires Gas app CONTENTS Page 1 Introduction... 5 2 Installation of the Wi-Fi box... 5 2.1 Components... 6 2.2 Connections receiver... 8 2.3
Introduction 1. Getting Started 9. Working with Virtual CD OPS 21
 Table of Contents Introduction 1 Foreword 3 What Virtual CD Option Pack Server Can Do for You 4 Virtual CD OPS Program License 4 Document Conventions 5 System Requirements 6 Technical Support 7 Getting
Working Copy For Review Purposes Only!
 Working Copy For Review Purposes Only! Version #1.5 08/29/06 Aaron Holland Up-dated D.Turnbull 10-18-2006 (MarkerSOP3.doc) Up-dated D. Turnbull 12-11-06 (MarkerSOP4.doc) Up-dated D.Turnbull 05-12-2008
Using Delcam Powermill
 Written by: John Eberhart & Trevor Williams DM Lab Tutorial Using Delcam Powermill Powermill is a sophistical tool path generating software. This tutorial will walk you through the steps of creating a
QL-1110NWB. Applications for Use with Computers. Applications for Use with Mobile Devices. Quick Setup Guide (English) NOTE
 NOTE") D00ZC6001 QL-1110NWB Quick Setup Guide (English) Thank you for purchasing the QL-1110NWB Label Printer! Read the Product Safety Guide first, then read this Quick Setup Guide for the correct setup procedure.
D00ZC6001 QL-1110NWB Quick Setup Guide (English) Thank you for purchasing the QL-1110NWB Label Printer! Read the Product Safety Guide first, then read this Quick Setup Guide for the correct setup procedure.
Android (A1000) Y4 Classrooms: User Guide
 Y4 Classrooms: User Guide") Android (A1000) Y4 Classrooms: User Guide Provided by the SDUSD Ed Tech Team i21 2014 Teachers - Version 3.25.2014 Table of Contents Basic Functionality... Navigation Tips... Taking a Screenshot... Finding
Android (A1000) Y4 Classrooms: User Guide Provided by the SDUSD Ed Tech Team i21 2014 Teachers - Version 3.25.2014 Table of Contents Basic Functionality... Navigation Tips... Taking a Screenshot... Finding
HomeTroller Zee Quick-Start Guide
 HomeTroller Zee Quick-Start Guide Congratulations on your purchase! Your HomeTroller Zee is ready to put you in control of your home. Please take a few minutes to read through this guide to familiarize
Copy. Welcome. Letter of warranty. Thanks for purchasing BulletHD BIKER PRO
 Copy Letter of warranty Welcome Thanks for purchasing BulletHD BIKER PRO Please read this instruction manual to ensure correct use of the product prior to use. Please keep this instruction manual in a
Be sure to read the attached "TO ENSURE SAFE AND CORRECT USE" prior to use. Otherwise, it may cause an unexpected accident or fire.
 CE6000 SERIES CUTTING PLOTTER SETUP MANUAL MANUAL NO.CE6000-UM-8M4 Preface Thank you for choosing this product. Carefully keep this manual in a handy location for quick reference as necessity prior to
HAVE A SILCA COPY COPY. Electronic Key Cutting Machines HAVE A SILCA COPY HAVE A SILCA COPY COPY HAVE A SILCA COPY HAVE A SILCA COPY HAVE A SILCA C
 HAVE A SILCA C HAVE A SILCACOPY HAVE HAVE SILCA A A SILCA COPY COPY Electronic Key Cutting Machines SILCA WORLD The main reason for the success of the Silca Group depends upon the fact that it is the only
Tutorial 1 Engraved Brass Plate R
 Getting Started With Tutorial 1 Engraved Brass Plate R4-090123 Table of Contents What is V-Carving?... 2 What the software allows you to do... 3 What file formats can be used?... 3 Getting Help... 3 Overview
1. Introduction P Package Contents 1.
 1 Contents 1. Introduction ------------------------------------------------------------------------------- P. 3-5 1.1 Package Contents 1.2 Tablet Overview 2. Using the Tablet for the first time ---------------------------------------------------
SKF Shaft Alignment Tool Vertical machines app
 SKF Shaft Alignment Tool Vertical machines app Flange mounted machines Instructions for use Table of contents 1. Using the Vertical shaft alignment app... 2 1.1 How to change the app language...2 1.2
Label Printer QL-810W/820NWB. Quick Setup Guide (English)
") Label Printer QL-810W/820NWB Quick Setup Guide (English) Label Printer QL-810W/820NWB Printed in China D00RPG001 Quick Setup Guide (English) Available Manuals Product Safety Guide This guide provides safety
Label Printer QL-810W/820NWB Quick Setup Guide (English) Label Printer QL-810W/820NWB Printed in China D00RPG001 Quick Setup Guide (English) Available Manuals Product Safety Guide This guide provides safety
MicroHAWK ID Demo Kit Setup Guide. P/N Rev A
 MicroHAWK ID Demo Kit Setup Guide P/N 83-9200057 Rev A Check Hardware and Connect the System The MicroHAWK ID Demo Kit contains the following items: 1. MicroHAWK ID-20, ID-30, and ID-40 Readers 2. Power
-Table of Contents- 1. Overview Installation and removal Operation Main menu Trend graph... 13
 Thank you for buying Data Analysis Software. In order to use this software correctly and safely and to prevent trouble, please read this manual carefully. Notice 1. No part of this manual can be reproduced
5 Axis Cutting Using Delcam Powermill Written by: John Eberhart DM Lab Tutorial
 5 Axis Cutting Using Delcam Powermill Written by: John Eberhart DM Lab Tutorial This tutorial covers how to setup a job for a Multi-Axis Toolpath specifi cally using the Robot. Note: You need to follow
Prototext 4. Why use Prototext 4
 Prototext 4 Prototext is a simple & affordable windows based program for custom engraving used with 2 & 3 axis CNC milling machines. Prototext has been used by machinists for over 15 years. Up till now
TopCon X5 Operator's Manual
 TopCon X5 Operator's Manual Part Number TOPCONX5-EN Rev.1.0 Copyright Topcon Precision Agriculture May, 2011 All contents in this manual are copyrighted by Topcon. All rights reserved. The information
Android SmartTV initial manual
 Android SmartTV initial manual This guide contains explicit steps to follow in activating the Android SmartTV and navigate through the android based menu. Table of contents 1. Remote control 2.Switch to
How to Make a Sign. Eagle Plasma LLC. Accessing the included step by step.dxf files
 Eagle Plasma LLC How to Make a Sign Accessing the included step by step.dxf files The following tutorial is designed to teach beginners, screen by screen, to create a simple sign project. In this lesson
Handbook. CLIÉ handheld basic operations. Exchanging and updating files/data using the HotSync operation. Entering text on your CLIÉ.
 A-BU6-100-11 (1) CLIÉ handheld basic operations Exchanging and updating files/data using the HotSync operation Entering text on your CLIÉ handheld Customizing your CLIÉ handheld (Preferences) Exchanging
Manual 3D planning software by System 180. Manual 3D planning software Status as of 06/2017 System 180 GmbH
 Manual 3D planning software by System 180 Page 1 of 20 Welcome! Thank you for choosing to use System 180's 3D planning software package. This 3D planning software package puts the following functions at
OPERATING INSTRUCTIONS:
 List OPERATING INSTRUCTIONS: Preparation For Installation, Product Identification Charging The Batteries ing And Adjusting The Lift Mounting Head s Brackets Mounting Clamps And Quick-Locking Arms Installation
HomeTroller S6 Quick-Start Guide
 HomeTroller S6 Quick-Start Guide Congratulations on your purchase! Your HomeTroller S6 is ready to put you in control of your home. Please take a few minutes to read through this guide to familiarize yourself
HEOS Extend QUICK START GUIDE
 HEOS Extend QUICK START GUIDE BEFORE YOU BEGIN Make sure you have the following items in working order: Router Internet Connection Apple ios or Android mobile device connected to your network STEP 1: UNPACK
Audio and video. entry panel FB00337-EN PROGRAMMING MANUAL MTMA/IP - MTMV/IP
 Audio and video entry panel FB00337-EN PROGRAMMING MANUAL MTMA/IP - MTMV/IP General warnings Important personal safety instructions: READ CAREFULLY! Installation, programming, commissioning and maintenance
Precision for People. SNAPFamily of Products
 Precision for People Family of Products The New Way to Measure Small Parts QVI measurement systems are designed to measure small, intricate parts right on the manufacturing fl oor. combines a high resolution
IP NETWORK CAMERA CMP-NWIPCAM20 CMP-NWIPCAM30
 IP NETWORK CAMERA CMP-NWIPCAM20 CMP-NWIPCAM30 ENGLISH INSTRUCTIONS Quick Installation Guide (please refer to the full English manual on CD for specifi c details) 1. Package contents 1 Internet Camera 1
LCD MONITOR TOUCH PANEL DRIVER OPERATION MANUAL. for Mac. Version 1.0 PN-L802B/PN-L702B/PN-L602B. Applicable models
 LCD MONITOR TOUCH PANEL DRIVER OPERATION MANUAL for Mac Version 1.0 Applicable models PN-L802B/PN-L702B/PN-L602B Contents Introduction...3 System Requirements...3 Setting up the Computer...4 Installing
da Vinci Jr.1.0 April 2016 da Vinci Junior 1.0w 3D Printer da Vinci Jr.1.0w Quick Guide HD23F1JW0N1
 da Vinci Junior 1.0w 3D Printer w Quick Guide P 1 Product Overview A: Filament movement area B: Feed module C: Detector D: Extruder E: Filament F: Print bed G G: SD card port (Storage format: FAT32) H:
GETTING STARTED WITH YOUR FIBER GUARDIAN
 GETTING STARTED WITH YOUR FIBER GUARDIAN GETTING STARTED WITH YOUR FIBER GUARDIAN The installation process can be divided into the following main steps: Preparing for installation Installing the unit in
Lionstracs Groove X-R
 Lionstracs Groove X-R Groove OS version 5.3 Installation & Upgrade Guide 31 October 2011 English Language documentation prepared by Corcyra Global in consultation with Lionstracs Table of Contents Warning
ND 7000 Demo. User s Manual. Digital Readout
 ND 7000 Demo User s Manual Digital Readout English (en) 11/2018 Contents Contents 1 Fundamentals...7 2 Software installation...11 3 Basic operation... 17 4 Software configuration... 43 5 Milling Quick
Roland CutChoice. Ver. 1 USER S MANUAL
 Roland CutChoice Ver. 1 USER S MANUAL Thank you very much for purchasing the Roland cutter. To ensure correct and safe usage with a full understanding of this product s performance, please be sure to read
Xerox Versant 3100 Press Stock Library Manager
 Software Version 8.0[0-9][0-9] Help Version 3.0 March 2016 2016 Xerox Corporation. All rights reserved. Xerox and Xerox and Design are trademarks of Xerox Corporation in the United States and/or other
Instruction Manual. Vimar By-web KNX Software for Apple mobile devices User Manual
 Instruction Manual Vimar By-web KNX Software for Apple mobile devices User Manual Vimar End-User License Contract Vimar end-user license contract VIMAR SPA located in Marostica (VI), Viale Vicenza n.
LYONESS V-TERM. Instruction Manual.
 LYONESS V-TERM Instruction Manual Installation of your access The Lyoness V-Term is a web-based interface, which you can open directly from your browser without the need to install any software. Requirements
ITL 950C. THE ITL 950C COMPUTER KEY MACHINE Operations Manual
 ITL 950C QRS BCD KLM THE ITL 950C COMPUTER KEY MACHINE Operations Manual ITL 950C Operating Manual TABLE OF CONTENTS INTRODUCTION PAGE * Table of contents 1 * Specifications 2 * Key Functions 3 OPERATION
1. Introduction P Package Contents 1.
 1 Contents 1. Introduction ------------------------------------------------------------------------------- P. 3-5 1.1 Package Contents 1.2 Tablet Overview 2. Using the Tablet for the first time ---------------------------------------------------
Software designed to work seamlessly with your CNC Masters machine. Made to work with Windows PC. Works with standard USB
 Software designed to work seamlessly with your CNC Masters machine Made to work with Windows PC Works with standard USB Clutter free interface. The software is engineered for the machine so you don t have
Conexis L1. Manual. The Secure, Keyless Smart Door Lock
 Conexis L Manual The Secure, Keyless Smart Door Lock Introduction Contents Installation Videos 3 Conexis L Smart Door Lock 4 Inside The Box 5 Removing Existing Handle and Cylinder 6 Measuring Your Door
 SW013 SW013C (Optional 2nd Camera) USER MANUAL WWW.SILENTWITNESS.CO.UK 1 Menu 4 About your SW013 5 Key functions 6 Installing the SW013 07-12 Menu options 13-14 Optional 2nd camera 15 Media playback 15
User Manual. Smart Lock. Please read this manual before operating your Smart Lock, and keep it for further reference. 40
 User Manual Smart Lock Please read this manual before operating your Smart Lock, and keep it for further reference. 40 I. Introduction Thank you for choosing the AKASO Smart Lock. The new Smart Lock uses
INNOV.NET PTY LTD. User guide
 User guide Version1 2016 0 Contents Compatibility... 1 What s in the package?... 1 Setup the RM Pro... 1 Meaning of the LED indicators... 2 Setup e-control on your smartphone... 2 Can I program a remote
Ctdigi.com. Instruction manual. Production by S & W Technology Labs
 Ctdigi.com Instruction manual Production by S & W Technology Labs I. Install app II. Guard camera Guard camera Introduction Accessory Sensor Scenario Guard 360 Introduction - Catalog - Install app Scenario
How to use the HTC Desire C mobile devices
 How to use the HTC Desire C mobile devices Orientation First, a quick overview of your primary buttons and areas of your phone. A B C D E F G H A) Headphone Jack B) Power Hold down to power your phone
4 TRANSFORMING OBJECTS
 4 TRANSFORMING OBJECTS Lesson overview In this lesson, you ll learn how to do the following: Add, edit, rename, and reorder artboards in an existing document. Navigate artboards. Select individual objects,
Digital display for EMCO milling machines
 Digital display for EMCO milling machines Input box 7 8 9 1 X Y Z HELP 4 5 6 1 2 3 0. - ESC 3 CE ENT R + R - 2 REF RST 1... Screen (working window, displays) 2... 5 soft keys (function depends on the respective
Quick Reference Guide
 PREMIUM THE HQ PRO-STITCHER WORKSPACE Quick Reference Guide This guide will help you through the learning curve of the user interface, finding commonly used features, and becoming familiar with new features
CONTASign Pro User Manual
 CONTASign Pro User Manual CONTASign PRO MANUAL v3.5 rev01 Page 1 of 51 CONTA-CLIP Contents Page No. 1. Main Window Layout 4 - Window Layout Customisation 5 - Window Configuration 6 2. Start Menu & Quick
INNOV.NET PTY LTD. User guide
 User guide 0 Contents Compatibility... 1 What s in the package?... 1 Add device... 2 Legend... 2 Meaning of the LED indicators... 2 Setup the RM Mini 3... 3 Setup e-control on your smartphone... 3 How
Operator s Manual. 3-D Scanning Probe. Warranty Safety Features Setup Operation. Please save this manual for future reference.
 Operator s Manual 3-D Scanning Probe Please save this manual for future reference. CAUTION: Read and follow all Safety Rules and Operating Instructions before using this product. LHR Technologies Inc.,
For EWay.com users. EWay Navigation. Accessing EWay. Logging in to EWay. Forgot Password or User ID. EWay Online Catalog Navagation B
 Reference reference guide. Accessing EWay 1. Launch your Web Browser. 2. Click in the Address fi eld. 3. Type www.eway.com. 4. Press the Enter key. Logging in to EWay 1. Enter your User ID in the fi eld
SAS Mobile BI 8.15 for Android: Help
 SAS Mobile BI 8.15 for Android: Help Welcome Getting Started How Do I Use the App? Check out the new features. View the videos: SAS Mobile BI for Android playlist on YouTube Use TalkBack? Learn the specialized
User Addendum User Box Scan support on the Fiery E C-KM Color Server, version 1.1
 User Addendum User Box Scan support on the Fiery E 10 50-45C-KM Color Server, version 1.1 This document describes installing software for User Box scan support on the Fiery E 10 50-45C-KM Color Server,
Getting Started ENGLISH CEL-SW9CA210
 Getting Started ENGLISH CEL-SW9CA210 Package Contents Before use, make sure the following items are included in the package. If anything is missing, contact your camera retailer. Camera Battery Pack NB-11LH*
Flex Focus 1202 Software Installation Procedure
 Flex Focus 1202 Software 4.6.6 Installation Procedure IMPORTANT: The installation procedure must be carried out only by B-K service personnel or their authorised representatives, who are aware of the hazards