Install & Configure Windows 10, Visual Studio, & MySQL Dr. Tom Hicks Trinity University
|
|
|
- Morgan Moore
- 5 years ago
- Views:
Transcription


1 Install & Configure Windows 10, Visual Studio, & MySQL Dr. Tom Hicks Trinity University Windows 10 Install 1] Push the Next Button. 2] Push the Install Now Button.

![Tom Hicks 2 P a g e 3] Check the I](/docs-images/93/111684603/images/2-1.jpg "Accept button. Push the Next Button.")
2 Windows-Database-Server-Installation-1.docx Dr. Tom Hicks 2 P a g e 3] Check the I Accept button. Push the Next Button. 4] Select the advanced Custom Install.
![Windows-Database-Server-Installation-1.docx Dr. Tom Hicks 3 P a g e 5] Select the disk.](/docs-images/93/111684603/images/3-0.jpg "Push the Next Button. 6] This does not take long if you are installing from an ISO.")
3 Windows-Database-Server-Installation-1.docx Dr. Tom Hicks 3 P a g e 5] Select the disk. Push the Next Button. 6] This does not take long if you are installing from an ISO. System will reboot.

![Tom Hicks 4 P a g e 7] I selected the](/docs-images/93/111684603/images/4-1.jpg "Use Express Settings option.")
4 Windows-Database-Server-Installation-1.docx Dr. Tom Hicks 4 P a g e 7] I selected the Use Express Settings option. 8] I selected the Use Express Settings option.


5 Windows-Database-Server-Installation-1.docx Dr. Tom Hicks 5 P a g e 9] Select your User Name and Password. Your image was configured with Username = student & Password = student 10] I have selected the Not Now Button.

![Remove Edge & Store From Task Bar 1] Unpin Microsoft Edge from the Task](/docs-images/93/111684603/images/6-1.jpg "Bar. 2] Unpin the Microsoft Store from the Task Bar.")
6 Windows-Database-Server-Installation-1.docx Dr. Tom Hicks 6 P a g e 11] Windows 10 is up and running. Remove Edge & Store From Task Bar 1] Unpin Microsoft Edge from the Task Bar. 2] Unpin the Microsoft Store from the Task Bar. Add Desktop Icons 1] Right-Mouse click on the desktop Select Personalize

7 Windows-Database-Server-Installation-1.docx Dr. Tom Hicks 7 P a g e 2] Select Themes 3] Scroll down until you find & push Desktop icon settings


8 Windows-Database-Server-Installation-1.docx Dr. Tom Hicks 8 P a g e 4] Select Add Computer, User's Files, Network, Recycle Bin, and Control Panel to the Desktop. Push the Apply Button. User Account Management Add & Modify Users 1] Right-Mouse Click on This PC Select Manage


![.. 4] Create this Admin account; use the password I gave you.](/docs-images/93/111684603/images/9-2.jpg "Check the boxes as shown above. Push the Create Button.")
9 Windows-Database-Server-Installation-1.docx Dr. Tom Hicks 9 P a g e 2] Click on Local Users and Groups to expand the offerings. 3] Right-Click on the Users folder Select New User... 4] Create this Admin account; use the password I gave you. Check the boxes as shown above. Push the Create Button. It is always a great idea to have two administrative accounts into your system.

![Tom Hicks 10 P a g e 5] Right-Mouse Click](/docs-images/93/111684603/images/10-1.jpg "on student Select Set Password use the")

10 Windows-Database-Server-Installation-1.docx Dr. Tom Hicks 10 P a g e 5] Right-Mouse Click on student Select Set Password use the password I gave you. 6] Push the Proceed Button 7] Set the Password Use the password I gave you. Granting Administrative Privileges


11 Windows-Database-Server-Installation-1.docx Dr. Tom Hicks 11 P a g e 1] Select the Groups from the panel on the left. Double-Click on the Administrators 2] Note that thicks, Administrator, and student are already administrators. Push the Add Button. 3] Add Admin. Push the OK Button.

![Tom Hicks 12 P a g e 4] Admin is instantly](/docs-images/93/111684603/images/12-1.jpg "an administrator. Push the OK Button.")
12 Windows-Database-Server-Installation-1.docx Dr. Tom Hicks 12 P a g e 4] Admin is instantly an administrator. Push the OK Button. Set The Date & Time 2] Set the date and time.
 2] Right-Mouse")
13 Windows-Database-Server-Installation-1.docx Dr. Tom Hicks 13 P a g e Name Your Computer 1] Name your computer Cloud-1, Cloud-2, Cloud-3, (as directed) 2] Right-Mouse Click on This PC Select Properties 3] Push the Change Settings Button


14 Windows-Database-Server-Installation-1.docx Dr. Tom Hicks 14 P a g e 4] Push the Change Button 5] Replace the auto generated Computer Name with the one I provide you (Cloud-0, Cloud-1, Cloud-2, etc.); note that we have network problems any time the Computer Names of two, or more computers, are the same within your local network.


15 Windows-Database-Server-Installation-1.docx Dr. Tom Hicks 15 P a g e 6] As part of the start up process, your computer exchanges your computer name, your network card/adapter MAC address, and IP address with your router. It is time to restart your computer to allow this to take place. Push the OK Button. 7] Push the Close Button. 8] Push the Restart Now Button.
![Windows-Database-Server-Installation-1.docx Dr. Tom Hicks 16 P a g e Examine Networking Use Command Prompt 1] Make sure you have Internet access. 2] Navigate your browser to google.](/docs-images/93/111684603/images/16-1.jpg "com 3] I have already configured the static IP on your computer, but I would like to illustrate the process of doing so below.")
16 Windows-Database-Server-Installation-1.docx Dr. Tom Hicks 16 P a g e Examine Networking Use Command Prompt 1] Make sure you have Internet access. 2] Navigate your browser to google.com 3] I have already configured the static IP on your computer, but I would like to illustrate the process of doing so below. If you are one of my students, I would like you to walk through this process step by step as if you were doing it for the first time. 4] Configuring the DNS entry is part of the process that will enable your computer to be accessed from anywhere on campus. 5] Start a command window. 6] Enter CMD in the search window on task bar. Click on the Command Prompt.

![our campus network. 8] This Computer Name is cloud-0 9] The subnet for Computer Science is cs.trinity.edu 10] Ping your computer DNS entry Use the Command window to Ping your computer.](/docs-images/93/111684603/images/17-1.jpg "It should be something like : ping cloud-0.cs.trinity.edu 11] The ping will turn out to be unreachable if the IP address is not yet configured to match the DNS entry.")
17 Windows-Database-Server-Installation-1.docx Dr. Tom Hicks 17 P a g e 7] I have had each one of the Computer Names, that I will provide for you, entered into our DNS Server so that you might be able to access any of these computers from anywhere on our campus network. 8] This Computer Name is cloud-0 9] The subnet for Computer Science is cs.trinity.edu 10] Ping your computer DNS entry Use the Command window to Ping your computer. It should be something like : ping cloud-0.cs.trinity.edu 11] The ping will turn out to be unreachable if the IP address is not yet configured to match the DNS entry. The ping above was unreachable, but it tells us something really important. It tells us how to set the static IP. 12] The static IP, for cloud-0, needs to be Write down your static IP. 13] Enter the command ipconfig /all in the command window. 14] The dynamic configuration automatically provided at installation will provide us some valuable information.
![Windows-Database-Server-Installation-1.docx Dr. Tom Hicks 18 P a g e 15] We know that the current IP address on this system is 131.194.34.](/docs-images/93/111684603/images/18-0.jpg "205 16] We know that the current subnet mask on this system is 255.255.255.0 Ours is going to be the same. Record this. 17] We know that the current gateway on this system is 131.194.34.")
18 Windows-Database-Server-Installation-1.docx Dr. Tom Hicks 18 P a g e 15] We know that the current IP address on this system is ] We know that the current subnet mask on this system is Ours is going to be the same. Record this. 17] We know that the current gateway on this system is Ours is going to be the same. Record this. 18] If we did not have DNS servers, we would have to type into the browser when we wanted to go to google.com. The DNS servers do a reverse lookup that allows us to enter google.com into our browser instead of the IP address. 19] There are thousands of DNS Servers on the Internet; any could work. The ones provided by the router during network installation are generally the closest DNS servers; we should generally use these because they will provide the fastest response. Our DNS Servers are & Record this. Configure A Static IP Address 1] It is now time to configure our static IP. Your Static IP addresses are going to be configured for Cloud-1.cs.trinity.edu, Cloud-2.cs.trinity.edu, Cloud-3.cs.trinity.edu, 2] Right-Mouse Click on Network Select Properties

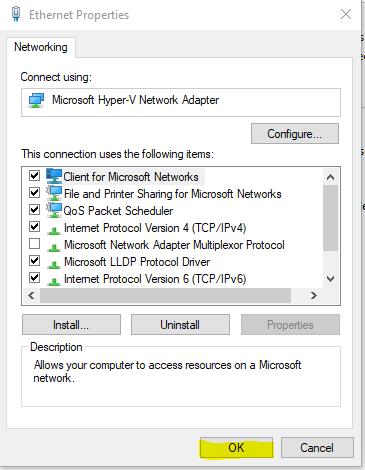
19 Windows-Database-Server-Installation-1.docx Dr. Tom Hicks 19 P a g e 3] Push the Ethernet Button 4] Push the Properties Button

![Tom Hicks 20 P a g e 5] Double Click](/docs-images/93/111684603/images/20-1.jpg "on the Internet Protocol Version 4 6]")

20 Windows-Database-Server-Installation-1.docx Dr. Tom Hicks 20 P a g e 5] Double Click on the Internet Protocol Version 4 6] Double Click on the Internet Protocol Version 4. Configure it using your IP address. Push the Advanced Button.


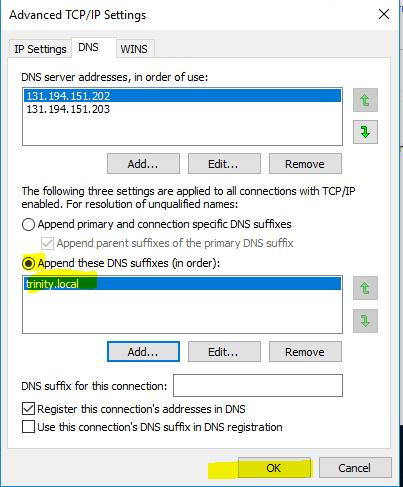
21 Windows-Database-Server-Installation-1.docx Dr. Tom Hicks 21 P a g e 7] Push the DNS Tab. 8] Push the radio button Append DNS suffixes; add trinity.local This DNS enable users to get to the trinity network drives.

22 Windows-Database-Server-Installation-1.docx Dr. Tom Hicks 22 P a g e 9] Push the OK button 10] Push the OK button
![Windows-Database-Server-Installation-1.docx Dr. Tom Hicks 23 P a g e 11] Push the OK button 12] Make sure you have Internet access.](/docs-images/93/111684603/images/23-2.jpg "13] Start the command prompt once more. Ping your computer.")
23 Windows-Database-Server-Installation-1.docx Dr. Tom Hicks 23 P a g e 11] Push the OK button 12] Make sure you have Internet access. 13] Start the command prompt once more. Ping your computer. If you have configured your IP address correctly, on doing ping on your computer should work.


24 Windows-Database-Server-Installation-1.docx Dr. Tom Hicks 24 P a g e 14] Start the command prompt on a different computer that is connected to your same network. Ping your computer. We are doing this to show that we have not yet opened the security to the point that your computer can be accessed from the outside world. Open The Networking Security 1] Right-Mouse click on the Network Select Properties 2] Select Change Advanced Sharing Settings


25 Windows-Database-Server-Installation-1.docx Dr. Tom Hicks 25 P a g e 3] Select All Networks Turn on All options as shown above. Users will still need a username and password to access things on this computer. 4] Start the command prompt on a different computer that is connected to your same network. Ping your computer. Note that we can now access your computer. Download & Install Chrome Browser
![Windows-Database-Server-Installation-1.docx Dr. Tom Hicks 26 P a g e 1] Install Chrome.](/docs-images/93/111684603/images/26-0.jpg "Add a short cut to the Task Bar.")
26 Windows-Database-Server-Installation-1.docx Dr. Tom Hicks 26 P a g e 1] Install Chrome. Add a short cut to the Task Bar. Configuring Remote Desktop 1] Right-Mouse Click on This PC Select Properties

![Tom Hicks 27 P a g e 2] Select Remote](/docs-images/93/111684603/images/27-2.jpg "Settings 3] Select Allow Remote")

27 Windows-Database-Server-Installation-1.docx Dr. Tom Hicks 27 P a g e 2] Select Remote Settings 3] Select Allow Remote Connections Radio Button; Push the Select Users Button. 4] Note that Administrator and thicks are Remote Desktop Users. Push the Add Button.

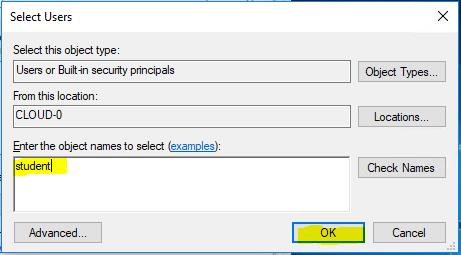

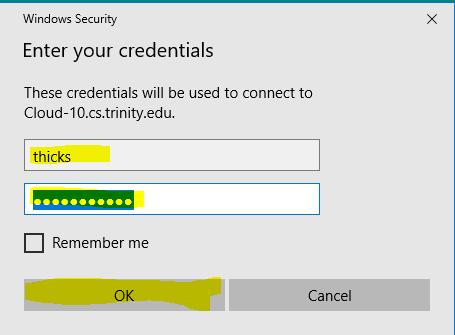
28 Windows-Database-Server-Installation-1.docx Dr. Tom Hicks 28 P a g e 5] Add both Admin and student to the Remote Desktop Users. Remote Desktop Into Your System 1] Start the Remote Desktop Client on a different computer. Enter your DNS computer name 2] Enter student and your Password.

![Tom Hicks 29 P a g e 3] Push the Yes](/docs-images/93/111684603/images/29-1.jpg "Button. 4] We have a connection.")
29 Windows-Database-Server-Installation-1.docx Dr. Tom Hicks 29 P a g e 3] Push the Yes Button. 4] We have a connection. You can do this from anywhere on our campus network.
30 Windows-Database-Server-Installation-1.docx Dr. Tom Hicks 30 P a g e Remote Desktop Into Your System 1] Double-Click on the Control Panel. 2] Hold Down the View By drop-drop down Select Large Icons 3] Double-Click on File Explorer Options


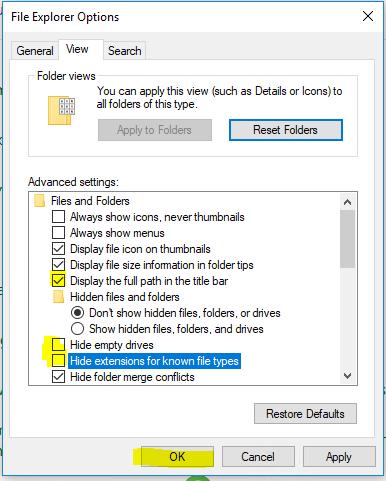
31 Windows-Database-Server-Installation-1.docx Dr. Tom Hicks 31 P a g e 4] Select the View tab. 5] The configuration changes shown above will enable users to see the file extensions.


32 Windows-Database-Server-Installation-1.docx Dr. Tom Hicks 32 P a g e 6] I did the screen capture above to demonstrate that we can see the file extensions. Download & Install The Visual Studio Installer 1] Navigate your browser to the download page above. 2] Select the Community Installer.


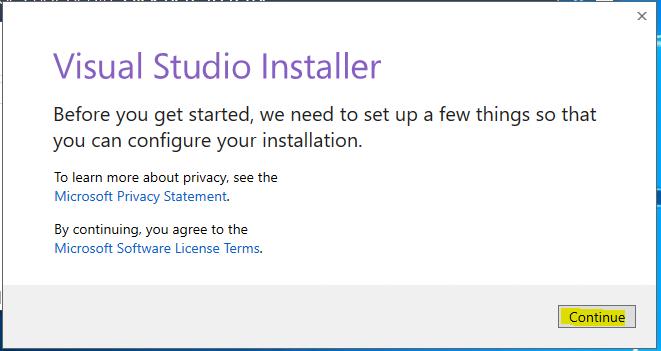
33 Windows-Database-Server-Installation-1.docx Dr. Tom Hicks 33 P a g e 3] Double-Click on the installer. 4] Push the Yes Button 5] Push the Continue Button


34 Windows-Database-Server-Installation-1.docx Dr. Tom Hicks 34 P a g e 6] Select the 9 Components above. Push the Install Button. The installation time will vary depending upon the Internet availability at the time. This install required 48 minutes. 7] You can see Visual Studio started above.

![org/download/releases/2.7/ 1] Navigate your browser to the link above.](/docs-images/93/111684603/images/35-2.jpg "2] Select the 64-bit Windows application.")
35 Windows-Database-Server-Installation-1.docx Dr. Tom Hicks 35 P a g e Download & Install Python 1] Navigate your browser to the link above. 2] Select the 64-bit Windows application. 3] Place the installer in folder C:\Software\Python 2.7 4] Double-Click on the Installer.


36 Windows-Database-Server-Installation-1.docx Dr. Tom Hicks 36 P a g e 5] Push the Next Button. 6] Push the Next Button.

![Push the Next Button. 8] Push the OK Button.](/docs-images/93/111684603/images/37-2.jpg "8] Push the Finish Button.")
37 Windows-Database-Server-Installation-1.docx Dr. Tom Hicks 37 P a g e 7] Select to download all on this system. Push the Next Button. 8] Push the OK Button. 8] Push the Finish Button. Download MySQL Installer

![2] Download the latest version of the Installer; it may differ from the](/docs-images/93/111684603/images/38-2.jpg "screen captures below. 3] You can log in if you like.")
38 Windows-Database-Server-Installation-1.docx Dr. Tom Hicks 38 P a g e 1] Navigate your browser to the link above. 2] Download the latest version of the Installer; it may differ from the screen captures below. 3] You can log in if you like. I will opt for No Thanks! 4] Create folder C:\Software
![Windows-Database-Server-Installation-1.docx Dr. Tom Hicks 39 P a g e 5] Create folder C:\Software\MySQL 6] Place the MySQL Installer, just downloaded, into your Software folder.](/docs-images/93/111684603/images/39-2.jpg "Install MySQL 1] Double-Click on the Installer. Depending upon which version you download, your installation may not be exactly like this, but it will be similar.")
39 Windows-Database-Server-Installation-1.docx Dr. Tom Hicks 39 P a g e 5] Create folder C:\Software\MySQL 6] Place the MySQL Installer, just downloaded, into your Software folder. Install MySQL 1] Double-Click on the Installer. Depending upon which version you download, your installation may not be exactly like this, but it will be similar. 2] Push the Yes Button

40 Windows-Database-Server-Installation-1.docx Dr. Tom Hicks 40 P a g e 3] Push the Yes Button 4] Push the Next Button


41 Windows-Database-Server-Installation-1.docx Dr. Tom Hicks 41 P a g e 5] I am not sure why the installer did not find the Python, but we will continue. Push the Next Button 1` 6] Select Full. Push the Next Button


42 Windows-Database-Server-Installation-1.docx Dr. Tom Hicks 42 P a g e 7] I am not sure why the installer did not find the Python, but we will continue. Push the Next Button 8] Ignore this. Push the Yes Button

43 Windows-Database-Server-Installation-1.docx Dr. Tom Hicks 43 P a g e 9] This installer will install the database, the workbench, and a bunch of connectors. Push the Execute Button 10] This installed everything, except the Python connector. Push the Next Button


44 Windows-Database-Server-Installation-1.docx Dr. Tom Hicks 44 P a g e 11] We want to configure the Database. We are not going to create a cluster; therefore, we are not going to configure the Router. Push the Next Button 12] Push the Next Button

![Tom Hicks 45 P a g e 13] Select TCP/IP,](/docs-images/93/111684603/images/45-1.jpg "Named Pipe, and Shared Memory.")
45 Windows-Database-Server-Installation-1.docx Dr. Tom Hicks 45 P a g e 13] Select TCP/IP, Named Pipe, and Shared Memory. Push the Next Button 14] Push the Next Button


46 Windows-Database-Server-Installation-1.docx Dr. Tom Hicks 46 P a g e 15] Enter the password that I gave you. Push the Add User Button 16] Enter thicks. Make the password trinity1. Push the Next Button

![Enter the password I gave you. 18] Enter Admin.](/docs-images/93/111684603/images/47-1.jpg "Enter the password I gave you.")
47 Windows-Database-Server-Installation-1.docx Dr. Tom Hicks 47 P a g e 17] Enter student. Enter the password I gave you. 18] Enter Admin. Enter the password I gave you. Push the Next Button 19] Push the Next Button

48 Windows-Database-Server-Installation-1.docx Dr. Tom Hicks 48 P a g e 20] Push the Next Button 21] Push the Execute Button
49 Windows-Database-Server-Installation-1.docx Dr. Tom Hicks 49 P a g e 22] Push the Finish Button 23] Push the Next Button


50 Windows-Database-Server-Installation-1.docx Dr. Tom Hicks 50 P a g e 24] Push the Cancel Button. You may choose to install the examples? Or Continue to Cancel until done. Run MySQL From The Command Line 1] Look in folder C:\Program Files\MySQL folder MySQL Server 8.x contains the Database. Check it out.
51 Windows-Database-Server-Installation-1.docx Dr. Tom Hicks 51 P a g e 2] Look in folder C:\Program Files\MySQL\MySQL Server 8.0 folder bin contains the executables for our Database. Check it out. 3] Look in folder C:\Program Files\MySQL\MySQL Server 8.0\bin you can see that there are a number of different executables that we shall use this semester. mysql.exe will start our database at the command line. Check it out. 4] You can try double-clicking on mysql.exe this will not start it; the executable is meant to run on the command line. 5] Bring up a command prompt. Enter mysql it does not run because the installer does not create a path to the database. Try it!
52 Windows-Database-Server-Installation-1.docx Dr. Tom Hicks 52 P a g e 6] Change your active directory to the path to your database server. For me, that is cd \Program Files\MySQL\MySQL Server 8.0\bin 7] Enter mysql -uroot p you will then have the opportunity to enter a password! 8] We now have a connection. SQL Server 8.x contains the Database. Check it out.
53 Windows-Database-Server-Installation-1.docx Dr. Tom Hicks 53 P a g e 2] Look in folder C:\Program Files\MySQL\MySQL Server 8.0 folder bin contains the executables for our Database. Check it out. 3] Look in folder C:\Program Files\MySQL\MySQL Server 8.0\bin you can see that there are a number of different executables that we shall use this semester. mysql.exe will start our database at the command line. Check it out. 4] You can try double-clicking on mysql.exe this will not start it; the executable is meant to run on the command line. 5] Bring up a command prompt. Enter mysql it does not run because the installer does not create a path to the database. Try it!
![Windows-Database-Server-Installation-1.docx Dr. Tom Hicks 54 P a g e 6] Change your active directory to the path to your database server. For me, that is cd \Program Files\MySQL\MySQL Server 8.](/docs-images/93/111684603/images/54-1.jpg "0\bin 7] Enter mysql -uroot p you will then have the opportunity to enter a password! 8] We now have a connection. Rapid Environment Editor https://www.rapidee.")
54 Windows-Database-Server-Installation-1.docx Dr. Tom Hicks 54 P a g e 6] Change your active directory to the path to your database server. For me, that is cd \Program Files\MySQL\MySQL Server 8.0\bin 7] Enter mysql -uroot p you will then have the opportunity to enter a password! 8] We now have a connection. Rapid Environment Editor 1] Navigate your browser to the link above.

![Tom Hicks 55 P a g e 2] Download the](/docs-images/93/111684603/images/55-1.jpg "Rapid Environment Editor.")
![3] Create folder Rapid Environment](/docs-images/93/111684603/images/55-2.jpg "Editor put the download installer in")
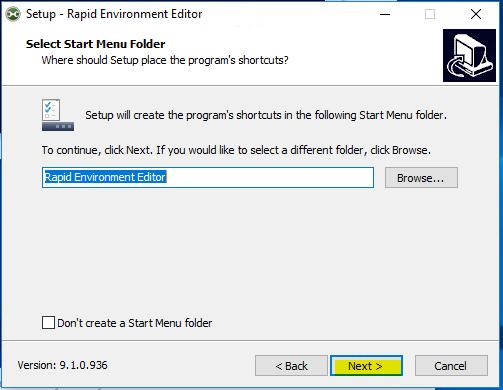
55 Windows-Database-Server-Installation-1.docx Dr. Tom Hicks 55 P a g e 2] Download the Rapid Environment Editor. 3] Create folder Rapid Environment Editor put the download installer in this folder. 4] Double-Click on the installer.


56 Windows-Database-Server-Installation-1.docx Dr. Tom Hicks 56 P a g e 5] Create folder Rapid Environment Editor put the download installer in this folder. 4] Push the OK Button 5] Push the Next Button

57 Windows-Database-Server-Installation-1.docx Dr. Tom Hicks 57 P a g e 6] Push the Next Button 7] Push the Next Button 8] Push the Next Button


58 Windows-Database-Server-Installation-1.docx Dr. Tom Hicks 58 P a g e 9] Push the Next Button 10] Push the Finish Button Place MySQL In The Path 1] Start the Rapid Environment Editor as Administrator


59 Windows-Database-Server-Installation-1.docx Dr. Tom Hicks 59 P a g e 2] Push the Yes Button 3] Select the Path in the System Variables (in the left); push the Add Value Button 4] Paste/type the path to MySQL. This entry, once saved, will include MySQL in the path next time the computer is started. It does not change the value stored in the current path.

; push the Add")
60 Windows-Database-Server-Installation-1.docx Dr. Tom Hicks 60 P a g e 5] Note that MySQL is currently added. It needs to be saved. 6] Select the Path in the User Variables (in the left); push the Add Value Button 7] Select the Path in the User Variables (in the left); push the Add Value Button

![It needs to be saved. Push the Save Button. 9] Launch your command window.](/docs-images/93/111684603/images/61-1.jpg "Enter Path note that MySQL is now there.")
61 Windows-Database-Server-Installation-1.docx Dr. Tom Hicks 61 P a g e 8] Note that MySQL is currently added. It needs to be saved. Push the Save Button. 9] Launch your command window. Enter Path note that MySQL is now there. 10] We can now start MySQL, without entering the path, from any command window.

62 Windows-Database-Server-Installation-1.docx Dr. Tom Hicks 62 P a g e 11] I just wanted you to see that we can get all the way into MySQL. Configure MySQL Workbench 1] Start MySQL Workbench. If there is are any connections, please delete them.


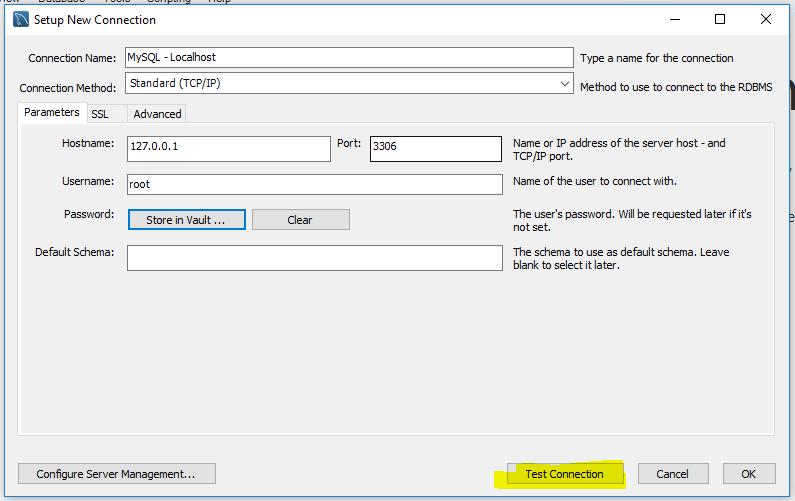
63 Windows-Database-Server-Installation-1.docx Dr. Tom Hicks 63 P a g e 2] Name your connection MySQL Localhost Push the Store In Vault Button. 3] Enter your password Push the OK Button 4] Push the Test Connection Button

![Push the OK Button 6] Push the OK Button 7]](/docs-images/93/111684603/images/64-2.jpg "Push the new Connection button.")
64 Windows-Database-Server-Installation-1.docx Dr. Tom Hicks 64 P a g e 5] Connection Successful! Push the OK Button 6] Push the OK Button 7] Push the new Connection button. 8] We are connected.


![2] Download the Installer.](/docs-images/93/111684603/images/65-2.jpg "3] Place the installer in directory")
65 Windows-Database-Server-Installation-1.docx Dr. Tom Hicks 65 P a g e Download & Install Notepad ] Navigate browser to the link above. 2] Download the Installer. 3] Place the installer in directory C:\Software\Notepad ++. 4] Double-Click on the Installer.


66 Windows-Database-Server-Installation-1.docx Dr. Tom Hicks 66 P a g e 5] Push the Yes Button. 6] Push the OK Button. 7] Push the Next Button.


67 Windows-Database-Server-Installation-1.docx Dr. Tom Hicks 67 P a g e 8] Push the I Agree Button. 9] Push the Next Button. 10] Push the Next Button.


68 Windows-Database-Server-Installation-1.docx Dr. Tom Hicks 68 P a g e 11] Push the Next Button. 12] Push the Finish Button.

![2] Pin the items shown above to your taskbar for easy/fast access.](/docs-images/93/111684603/images/69-1.jpg "Chrome, Command Prompt, MySQL Workbench, Visual Studio 2017, and Notepad ++")
69 Windows-Database-Server-Installation-1.docx Dr. Tom Hicks 69 P a g e Taskbar Configuration 1] Unpin Mail from your taskbar. 2] Pin the items shown above to your taskbar for easy/fast access. Chrome, Command Prompt, MySQL Workbench, Visual Studio 2017, and Notepad ++ Create A Share Folder 1] Create folder C:\Share


![3] Check Share This Folder Share Name = Share.](/docs-images/93/111684603/images/70-2.jpg "Push the Permissions Button 4] Add users Admin, student,")
70 Windows-Database-Server-Installation-1.docx Dr. Tom Hicks 70 P a g e 2] Right-Mouse Click on the Share Folder Select Properties. Select the Sharing Tab. Push the Advanced Sharing Button. 3] Check Share This Folder Share Name = Share. Push the Permissions Button 4] Add users Admin, student, and thicks. Be sure that all three of the users have Full Control.


![7] If you have completed the task correctly, you (and I)](/docs-images/93/111684603/images/71-2.jpg "should be able to copy and retrieve files from the Share")
71 Windows-Database-Server-Installation-1.docx Dr. Tom Hicks 71 P a g e 5] Go to another computer on the network. Enter \\ + your DNS Name. 6] Enter your UserName and Password. 7] If you have completed the task correctly, you (and I) should be able to copy and retrieve files from the Share folder from any other computer on the network. Try it!
MySQL SERVER INSTALLATION, CONFIGURATION, AND HOW TO USE WITH STARCODE NETWORK
 MySQL SERVER INSTALLATION, CONFIGURATION, AND HOW TO USE WITH STARCODE NETWORK This document describes how to install MySQL server (5.7.19) on Windows PC, and how to use StarCode Network with MySQL server
MySQL SERVER INSTALLATION, CONFIGURATION, AND HOW TO USE WITH STARCODE NETWORK
 MySQL SERVER INSTALLATION, CONFIGURATION, AND HOW TO USE WITH STARCODE NETWORK This document describes how to install MySQL server (version 5.7.19) on Windows PC, and how to use StarCode Network with MySQL
CS 356 Lab #1: Basic LAN Setup & Packet capture/analysis using Ethereal
 CS 356 Lab #1: Basic LAN Setup & Packet capture/analysis using Ethereal Tasks: Time: 2:00 hrs (Task 1-6 should take 45 min; the rest of the time is for Ethereal) 1 - Verify that TCP/IP is installed on
Windows 95/98 Infoway Connection Instructions 1/4/2002; rev. 1/9/2002
 Windows 95/98 Infoway Connection Instructions 1/4/2002; rev. 1/9/2002 The following are the basic steps for setting up your computer for a PPP connection to the library s Infoway Internet service. A PPP
8.9.2 Lab: Configure an Ethernet NIC to use DHCP in Windows Vista
 8.9.2 Lab: Configure an Ethernet NIC to use DHCP in Windows Vista Introduction If Vista is not available in your classroom, you may complete this lab by viewing the figures in this document. Print and
SETTING UP NETWORKING FOR LOOKOUT 4.0
 NOTE TO USER SETTING UP NETWORKING FOR LOOKOUT 4.0 Contents Testing TCP/IP Capability The purpose of this document is to help you with basic configuration of your computers in order to run Lookout 4. This
DSL-G624T. Wireless ADSL Router. If any of the above items is missing, please contact your reseller. This product can be set up using any
 This product can be set up using any current web browser, i.e., Internet Explorer 6x or Netscape Navigator 7x. DSL-G624T Wireless ADSL Router Before You Begin 1. If you purchased this Router to share your
Configuring Windows 10 for Sierra Wave
 PAGE: 1 of 23 Configuring Windows 10 for Sierra Wave This document will describe how to setup Windows 10 for optimal performance of the Sierra Wave program, please configure Window 10 as outlined in the
Lab - Connect to a Router for the First Time
 Introduction In this lab, you will configure basic settings on a wireless router. Recommended Equipment A computer with Windows installed An Ethernet NIC installed Wireless router Ethernet patch cable
Evolution 2.0 & Affiniti AOS 1.5 Network Share Direct Connect
 Evolution.0 & Affiniti AOS. Network Share Direct Connect QuickGuide Create a folder anywhere on the computer, including the desktop. Creating a Shared Folder on a PC Only the shared folder will be accessible
IT Essentials v6.0 Windows 10 Software Labs
 IT Essentials v6.0 Windows 10 Software Labs 5.2.1.7 Install Windows 10... 1 5.2.1.10 Check for Updates in Windows 10... 10 5.2.4.7 Create a Partition in Windows 10... 16 6.1.1.5 Task Manager in Windows
I m InTouch Installation Guide for the DSL/Cable environment with a Linksys router Models: BEFSRU31, BEFSR41 V.2, BEFSR11
 I m InTouch router configuration p. 1 I m InTouch Installation Guide for the DSL/Cable environment with a Linksys router Models: BEFSRU31, BEFSR41 V.2, BEFSR11 Note: Different models may vary slightly
CSE 101 Introduction to Computers Development / Tutorial / Lab Environment Setup
 CSE 101 Introduction to Computers Development / Tutorial / Lab Environment Setup Purpose: The purpose of this lab is to setup software that you will be using throughout the term for learning about Python
Touch Dynamic Quest II 7 - Tablet Staging Setup
 Touch Dynamic Quest II 7 - Tablet Staging Setup Overview This page was written to assist with setting up and staging of tablets. Touch Dynamic Quest II 7 - Initializing and Turning on the Tablet 1. When
POS. EPSON TM-U220 IP CONFIGURATION Windows Version (Firmware V. 4.00) a project guide to rezku POS
 a project guide to rezku POS") POS POS a project guide to rezku EPSON TM-U220 IP CONFIGURATION Windows Version (Firmware V. 4.00) Copyright 2017 Guest Innovations, Inc. All Rights Reserved. EPSON TM-U220 IP Configuration Windows Version
POS POS a project guide to rezku EPSON TM-U220 IP CONFIGURATION Windows Version (Firmware V. 4.00) Copyright 2017 Guest Innovations, Inc. All Rights Reserved. EPSON TM-U220 IP Configuration Windows Version
Thermal Printer Configuration (EPSON)
") Thermal Printer Configuration (EPSON) STEP A : IDENTIFY THE THERMAL PRINTER MODEL Check for your EPSON printer model by finding the label on the printer. Figure 1.1 For the example above (Figure 1.1),
Thermal Printer Configuration (EPSON) STEP A : IDENTIFY THE THERMAL PRINTER MODEL Check for your EPSON printer model by finding the label on the printer. Figure 1.1 For the example above (Figure 1.1),
Step-by-Step Guide to Ansur Executive 3.0 With or without Electronic Signatures
 Step-by-Step Guide to Ansur Executive 3.0 With or without Electronic Signatures Table of Contents Background...3 Set up Central PC:...4 Configuring SQL Server 2005:... 11 Ansur Executive Server Installation:...
Installation of Actiheart Data Analysis Suite:
 Installation of Actiheart Data Analysis Suite: Currently software is only compatible with XP platform and version 6 of Java. Installation requires: - Windows XP platform - MySQL installation - Folders:
Automation Anywhere Enterprise 10 LTS
 Automation Anywhere Enterprise 10 LTS Document Version: 1.3 Installation Guide Date of Publication: 15 th November, 2016 Update(s) to this document edition: Table of Contents 1. Client Prerequisites Processor
IIS & Web & PHP Configuration Dr. Tom Hicks Trinity University
 IIS & Web & PHP Configuration Dr. Tom Hicks Trinity University Install IIS (Internet Information Services) 1] Open the Control Panel. Push the Programs & Features Button. IIS-Web-PHP-Configuration-Key.docx
MAC Address Filtering Setup (3G18Wn)
") MAC Address Filtering Setup (3G18Wn) MAC Address Filtering MAC address filtering refers to the process of allowing (or denying) access to your wireless network based on the hardware address of the device
MAC Address Filtering Setup (3G18Wn) MAC Address Filtering MAC address filtering refers to the process of allowing (or denying) access to your wireless network based on the hardware address of the device
Microsoft OneDrive. How to login to OneDrive:
 Microsoft OneDrive The beauty of OneDrive is that is accessible from anywhere you have an Internet connection. You can access it from a Mac or Windows computer. You can even access it on your SmartPhone
Practice and Review Activities Software
 Practice and Review Activities Software Installation and Setup Procedure Reading Mastery Signature Edition Corrective Reading Installation Insert the Practice and Review Activities CD-ROM into the CD/DVD
Windows 2000/XP Network
 This section provides installation and troubleshooting steps for Windows 2000/XP: Preliminary steps see page 23. Quick CD-ROM install steps see page 23. Other methods of installation see page 24. Quick
Troubleshooting Can not access the router on
 Troubleshooting Can not access the router on 192.168.0.1 Please note that when accessing the router s Web interface via http://192.168.0.1 you are not accessing some web site on the Internet. The router
Simple Router Configuration Router Lab 10 Points Networking & Data Communications
 DCN-Router-Configuration-HW.doc 1 CSCI 3342 You must do at least 90% of this homework without the assistance of anyone else. Once you have 90% or more of the homework completed, you may double check your
CIS 231 Windows 7 Install Lab #2
 CIS 231 Windows 7 Install Lab #2 1) To avoid certain problems later in the lab, use Chrome as your browser: open this url: https://vweb.bristolcc.edu 2) Here again, to avoid certain problems later in the
Lab - Remote Desktop in Windows 8
 Lab - Remote Desktop in Windows 8 Introduction In this lab, you will remotely connect to another Windows 8 computer. Recommended Equipment The following equipment is required for this exercise: Two Windows
Installation Guide: VirtualBox, Windows 10, and Microsoft Visio (Mac OS)
") (434) 924-7988, RRH 219 helpdesk@comm.virginia.edu Installation Guide: VirtualBox, Windows 10, and Microsoft Visio (Mac OS) Prerequisites: Verify that your installation of OS X and Safari have the most
(434) 924-7988, RRH 219 helpdesk@comm.virginia.edu Installation Guide: VirtualBox, Windows 10, and Microsoft Visio (Mac OS) Prerequisites: Verify that your installation of OS X and Safari have the most
Lab - Configure Wireless Router in Windows
 Introduction In this lab, you will configure and test the wireless settings on a wireless router. Recommended Equipment A computer with Windows installed A Wireless NIC installed An Ethernet NIC installed
Network Setup 2.0
 Network Setup 2.0 4343-7709-01 Foreword Welcome Thank you for using Network Setup. Network Setup is utility software which allows simple network setup of devices such as printers. It allows setup of devices
Lab 11-1 Lab User Profiles and Tracking
 In the following lab instructions, you will be setting up groups, users, and passwords to require password-protected login to Kofax Capture modules. Rights will be assigned to the groups and users that
Troubleshooting AB Tutor Control Connection problems
 Troubleshooting AB Tutor Control Connection problems Contents Troubleshooting AB Tutor Control Connection problems... 1 Overview... 2 Common Problems... 2 Failed to find a computer during a Scan ( Find
FireFox. CIS 231 Windows 10 Install Lab # 3. 1) Use either Chrome of Firefox to access the VMware vsphere web Client.
 Use either Chrome of Firefox to access the VMware vsphere web Client.") CIS 231 Windows 10 Install Lab # 3 1) Use either Chrome of Firefox to access the VMware vsphere web Client. https://vweb.bristolcc.edu CHROME At the your connection is not private message, click Advanced
CIS 231 Windows 10 Install Lab # 3 1) Use either Chrome of Firefox to access the VMware vsphere web Client. https://vweb.bristolcc.edu CHROME At the your connection is not private message, click Advanced
WINDOWS 95 SETUP GUIDE
 WINDOWS 95 SETUP GUIDE This guide will assist you in connecting to Nauticom using your Windows 95 Operating System. Double-click My Computer. Look for a folder called Dial-Up Networking. If you do not
Configuring GNS3 for CCNA Security Exam (for Windows) Software Requirements to Run GNS3
 Software Requirements to Run GNS3") Configuring GNS3 for CCNA Security Exam (for Windows) Software Requirements to Run GNS3 From Cisco s website, here are the minimum requirements for CCP 2.7 and CCP 2.8: The following info comes from many
Configuring GNS3 for CCNA Security Exam (for Windows) Software Requirements to Run GNS3 From Cisco s website, here are the minimum requirements for CCP 2.7 and CCP 2.8: The following info comes from many
Print Audit 6. Print Audit 6 Documentation Apr :07. Version: Date:
 Print Audit 6 Version: Date: 37 21-Apr-2015 23:07 Table of Contents Browse Documents:..................................................... 3 Database Documentation.................................................
Windows XP ResNet Installation Guide
 Windows XP ResNet Installation Guide 1.) Connecting Your Computer to the Network: What you need: a) An Ethernet card - Also called a network interface card (NIC). This may be already installed, or built-in
Wireless Setup Instructions
 Wireless Setup Instructions THESE INSTRUCTIONS ARE VERY IMPORTANT TO SECURE YOUR WIRELESS NETWORK The purpose of this procedure is to "lock" your router so other users can not access your network without
Mega 100WR ADSL 2+ Router - Easy Start
 Mega 100WR ADSL 2+ Router - Easy Start Mega 100WR ADSL 2+ Router - Easy Start Chapter 1 Introduction Thank you for purchasing a Mega 100WR Router. This Easy start guide is a complete guide to configuring
Figure 1-1. When we finish Part 2, our server will be ready to have workstations join the domain and start sharing files. Now here we go!
 1 of 18 9/6/2008 4:05 AM Configuring Windows Server 2003 for a Small Business Network, Part 2 Written by Cortex Wednesday, 16 August 2006 Welcome to Part 2 of the "Configuring Windows Server 2003 for a
PostMaster Enterprise v8.xx Setup Guide Windows
 PostMaster Enterprise v8.xx Setup Guide Windows How Do I Carry Out A Fresh Setup Of PMEv8 The complete installation of PMEv8 covers the following steps Start PMEv8 How Do I Carry Out A Fresh Setup Of PMEv8
BASICS OF PORT FORWARDING ON A ROUTER
 BASICS OF PORT FORWARDING ON A ROUTER FOR SECURITY DVRS 192.168.1.100 Internet Public IP Address 72.248.26.116 Private IP Address 192.168.1.1 192.168.1.150 192.168.1.200 www.nightowlsp.com Basics of Port
Packet Tracer: Novice Session 2007 Cisco Systems, Inc. All rights reserved. Cisco Public. Packet Tracer: Novice Session
 Packet Tracer: Novice Session Packet Tracer: Novice Session 1 How Can I Use Packet Tracer? Problem Scenario: Your students need to learn how to configure a router Ethernet interface and to verify connectivity
C-MagSys and Q-MagSys Components Installation Guide (20 January 2010) C-MagSys and Q-MagSys Components Overview at Clinic
 C-MagSys and Q-MagSys Components Overview at Clinic") C-MagSys and Q-MagSys Components Installation Guide (20 January 2010) C-MagSys and Q-MagSys Components Overview at Clinic The following are files used for this installation: 1. CMagSysSetup.exe 2. QMagSysSetup.exe
C-MagSys and Q-MagSys Components Installation Guide (20 January 2010) C-MagSys and Q-MagSys Components Overview at Clinic The following are files used for this installation: 1. CMagSysSetup.exe 2. QMagSysSetup.exe
Valley Library Consortium
 On December 13, 2018 the Valley Library Consortium will be upgrading to Horizon 7.5.5. The system will be down from 6:00 AM until the upgrade process is finished. All Horizon staff clients will need to
29 March 2017 SECURITY SERVER INSTALLATION GUIDE
 29 March 2017 SECURITY SERVER INSTALLATION GUIDE Contents 1. Introduction... 2 1.1 Assumptions... 2 1.2 Prerequisites... 2 2. Required setups prior the Security Server Installation... 3 1.1 Create domain
Windows XP Remote Control Explained
 Windows XP Remote Control Explained last modified 11/30/2001 Jason Simotas www.rethinkit.com Windows XP offers two built-in options for remote control operations allowing you to view (and control) another
Two factor authentication for Microsoft Remote Desktop Web Access
 Two factor authentication for Microsoft Remote Desktop Web Access logintc.com/docs/connectors/rd-web-access.html Overview The LoginTC RD Web Access Connector protects access to your Microsoft Remote Desktop
Dr. Tom Hicks. Computer Science Department Trinity University
 Dr. Tom Hicks Computer Science Department Trinity University 1 1 Remote Desktop Into CS-X That Contains Your Switch? Open Putty To Your Switch 2 What is the Command To Go Into Privilege Mode DO IT! enable
CS356 Lab NIL (Lam) In this lab you will learn: Cisco 2600 Router Configuration Static Routing PartB 20 min Access Control Lists PartC 30 min Explore!
 In this lab you will learn: Cisco 2600 Router Configuration Static Routing PartB 20 min Access Control Lists PartC 30 min Explore!") CS356 Lab NIL (Lam) In this lab you will learn: PartA Time: 2 hrs 40 min Cisco 2600 Router Configuration Static Routing PartB 20 min Access Control Lists PartC 30 min Explore! Components used: 2 computers
CS356 Lab NIL (Lam) In this lab you will learn: PartA Time: 2 hrs 40 min Cisco 2600 Router Configuration Static Routing PartB 20 min Access Control Lists PartC 30 min Explore! Components used: 2 computers
WA2423 JavaScript for Web 2.0 Development. Classroom Setup Guide. Web Age Solutions Inc. Copyright Web Age Solutions Inc. 1
 WA2423 JavaScript for Web 2.0 Development Classroom Setup Guide Web Age Solutions Inc. Copyright Web Age Solutions Inc. 1 Table of Contents Part 1 - Minimum Hardware Requirements...3 Part 2 - Minimum Software
APPENDIX B: INSTALLATION AND SETUP
 APPENDIX B: INSTALLATION AND SETUP Page A. Overview... B:1 How do I install and setup ICMS?... B:1 Do I need special security rights to install ICMS?... B:1 Installation Basics... B:1 How do I get a quick
Adding a VPN connection in Windows XP
 Adding a VPN connection in Windows XP Open up the Control Panel by selecting Start, Settings, Control Panel (in Classic Menu view) or Start, Control Panel (in XP Menu view). Double click on Network Connections.
Software Installations for Components
 Install Microsoft Windows Server, page 1 Install VMware Tools, page 3 Configure Network Adapters for Unified CCE Call Server and Unified CCE Data Server, page 4 Set Persistent Static Routes, page 5 Run
SMC Barricade Routers
 SMC Barricade Routers User Guide SMC7004BR V1.0 Congratulations on your purchase of the SMC Barricade. The SMC Barricade is a Broadband Router designed to share Internet Access, provide security, and to
Wireless 300N 3G quick install
 Wireless 300N 3G Router quick install guide Model 524681 INT-524681-QIG-0809-01 introduction Thank you for purchasing the INTELLINET NETWORK SOLUTIONS Wireless 300N 3G Router, Model 524681. This quick
WA2592 Applied Data Science and Big Data Analytics. Classroom Setup Guide. Web Age Solutions Inc. Copyright Web Age Solutions Inc.
 WA2592 Applied Data Science and Big Data Analytics Classroom Setup Guide Web Age Solutions Inc. Copyright Web Age Solutions Inc. 1 Table of Contents Part 1 - Class Setup...3 Part 2 - Minimum Software Requirements
XenMobile 10 Cluster installation. Here is the task that would be completed in order to implement a XenMobile 10 Cluster.
 XenMobile 10 Cluster installation Here is the task that would be completed in order to implement a XenMobile 10 Cluster. For this example, running on my lab, I am using XenServer 6.5 SP1 as hypervisor
Data Privilege Adding or Removing Members
 Data Privilege allows you to add or remove Members, aka Users, (individuals permitted to access all or portions of a group s resources) from any security group for which you are an Owner or an Authorizer.
ManagerTM Mission Falls Court Fremont, CA an ISO 9001 certified company PHONE (510) FAX (510)
 FAX (510)") ManagerTM Integrating the NexSentry Manager 2.02 with DataCard QwikWorks 4.0 47102 Mission Falls Court Fremont, CA 94539-7818 an ISO 9001 certified company PHONE (510) 360-7800 FAX (510) 360-7820 Copyright
ManagerTM Integrating the NexSentry Manager 2.02 with DataCard QwikWorks 4.0 47102 Mission Falls Court Fremont, CA 94539-7818 an ISO 9001 certified company PHONE (510) 360-7800 FAX (510) 360-7820 Copyright
Application Note #5494 Upgrading Plus Ethernet Radio Firmware September 9, 2013
 Application Note #5494 Upgrading Plus Ethernet Radio Firmware September 9, 2013 The Plus Ethernet transceivers share a common firmware upgrade platform and process using the FreeWave TFTP Server and a
First: Obtain a Linksys "WUSB300N for V11A" adapter kit: it contains the USB wireless
 First: Obtain a Linksys "WUSB300N for V11A" adapter kit: it contains the USB wireless network adapter (with USB extension cable and Windows XP installation CD.) Before plugging in the adapter, verify that
Click on Close button to close Network Connection Details. You are back to the Local Area Connection Status window.
 How to configure EW-7228APn/EW-7416APn as a Repeater to extend wireless range This article can apply on EW-7228APn and EW-7416APn. We used screen shots of EW-7416APn in this instruction. We recommend you
Bridge Cable User s Guide
 Bridge Cable User s Guide Table of Contents Overview -------------------------------------------------------------------- 2 Driver Installation --------------------------------------------------------
Lab IP Addresses and Network Communication
 Lab 3.5.2 IP Addresses and Network Communication Objectives Build a simple peer-to-peer network and verify physical connectivity. Assign various IP addresses to hosts and observe the effects on network
Tutorial: Creating A FoxPro Application
 Tutorial: Creating A FoxPro Application Dr. Thomas E. Hicks Computer Science Department Trinity University Organize Files & Create Directories/Folders Download and decompress the following FoxPro Database
Libraries. Multi-Touch. Aero Peek. Sema Foundation 10 Classes 2 nd Exam Review ICT Department 5/22/ Lesson - 15
 10 Classes 2 nd Exam Review Lesson - 15 Introduction Windows 7, previous version of the latest version (Windows 8.1) of Microsoft Windows, was produced for use on personal computers, including home and
E7495A/B Remote Operation
 E7495A/B Remote Operation E7495A/B Firmware Version: A.03.00 and later Java J2SE or VM Version: 1.4.2 NOTE: You must have J2SE 1.4.2 or later installed on your PC for the Remote GUI program to function
PreLab for CS356 Lab NIL (Lam) (To be submitted when you come for the lab)
 (To be submitted when you come for the lab)") PreLab for CS356 Lab NIL (Lam) (To be submitted when you come for the lab) Name: UT EID: 1. Differentiate between Routers, Switches, and Hubs. 2. Explain subnet masks. 3. For this lab, where is subnet
PreLab for CS356 Lab NIL (Lam) (To be submitted when you come for the lab) Name: UT EID: 1. Differentiate between Routers, Switches, and Hubs. 2. Explain subnet masks. 3. For this lab, where is subnet
Centra Workbench (V3.12 onwards)
") Workbench Installation Guide Centra Workbench (V3.12 onwards) Create and Customize User Interfaces for Router Control snellgroup.com Introduction Description This guide describes the system requirements
Workbench Installation Guide Centra Workbench (V3.12 onwards) Create and Customize User Interfaces for Router Control snellgroup.com Introduction Description This guide describes the system requirements
VMware vsphere 5.5: Install, Configure, Manage Lab Addendum. Lab 3: Configuring VMware ESXi
 VMware vsphere 5.5: Install, Configure, Manage Lab Addendum Lab 3: Configuring VMware ESXi Document Version: 2014-07-08 Copyright Network Development Group, Inc. www.netdevgroup.com NETLAB Academy Edition,
3G Router 431R/421R/321R/311R/221R/211R. Quick Start Guide
 3G Router 431R/421R/321R/311R/221R/211R ---------------------------------------------------------- Version: 2.0----------------------------------------------------------- Check Package Contents: 3G Router
CIS 231 Windows 10 Install Lab # 3
 CIS 231 Windows 10 Install Lab # 3 1) To avoid certain problems later in the lab, use Chrome as your browser: open this url: https://vweb.bristolcc.edu 2) Here again, to avoid certain problems later in
Lab DHCP Client Setup
 Lab 9.3.5 DHCP Client Setup Objective The purpose of this lab is to introduce Dynamic Host Configuration Protocol (DHCP) and the process for setting up a network computer as a DHCP client to use DHCP services.
P964 APR 964 Cable Router with 11g AP Quick Installation Guide VER. 1.0
 P964 APR 964 Cable Router with 11g AP Quick Installation Guide VER. 1.0 CABLE POWER PORT LAN1~LAN4 Rear Panel Connections CONNECTION Connect the F-type connector to the CATV outlet using a coaxial cable.
Status Web Evaluator s Guide Software Pursuits, Inc.
 Status Web Evaluator s Guide 2018 Table of Contents Introduction... 2 System Requirements... 2 Contact Information... 2 Installing Microsoft IIS... 2 Verifying Microsoft IIS Features... 9 Installing the
Fiery Installation Instructions for the WorkCentre 7300 Series
 Fiery Installation Instructions for the WorkCentre 7300 Series This document describes how to install and set up the Fiery Network Controller for WorkCentre 7300 Series. IMPORTANT: The complete installation
Step-by-Step Guide to Installing Cluster Service
 Page 1 of 23 TechNet Home > Products & Technologies > Windows 2000 Server > Deploy > Configure Specific Features Step-by-Step Guide to Installing Cluster Service Topics on this Page Introduction Checklists
CS 326e Lab 2, Edmondson-Yurkanan, Spring 2004 Router Configuration, Routing and Access Lists
 CS 326e Lab 2, Edmondson-Yurkanan, Spring 2004 Router Configuration, Routing and Access Lists Name: In this lab you will learn: PartA Cisco 2600 Router Configuration Static Routing PartB 20 min Dynamic
Lab: Install a NIC in Windows XP
 11.4.1 Lab: Install a NIC in Windows XP Introduction Print and complete this lab. In this lab, you will install a NIC, verify NIC operation, and manually configure an IP address. Recommended Equipment
AT&T Digital Subscriber Line Service
 AT&T Digital Subscriber Line Service Windows 2000 Professional PC Configuration Guide Overview Welcome to AT&T DSL Internet Service! This guide is designed to help you configure your PC to access the Internet
MCS-TOUCHSCREEN Auto Disk Clean up
 APP093 - MCS-Touchscreen Error 16 Auto Diskcleanup Procedure Micro Control Systems APPLICATION NOTE APP-093 MCS-TOUCHSCREEN Auto Disk Clean up Revision History Date Author Revision Description 07/31/2014
MigmaIntersection TM for detecting pedestrians at intersection crossings
 Monitor Connection Connect the VGA and USB connectors of MigmaMonitor to the SBC. Close both programs (two screens with yellow prints) by clicking on the exit button (X) on top of each DOS window. Now
1) Use either Chrome of Firefox to access the VMware vsphere web Client. https://vweb.bristolcc.edu. FireFox
 Use either Chrome of Firefox to access the VMware vsphere web Client. https://vweb.bristolcc.edu. FireFox") CIS 231 Windows 7 Install Lab #2 1) Use either Chrome of Firefox to access the VMware vsphere web Client. https://vweb.bristolcc.edu CHROME At the your connection is not private message, click Advanced
CIS 231 Windows 7 Install Lab #2 1) Use either Chrome of Firefox to access the VMware vsphere web Client. https://vweb.bristolcc.edu CHROME At the your connection is not private message, click Advanced
Signing In to WebEx Assistant, page 1
 Use WebEx Assistant to quickly start or schedule meetings, and set up or change your WebEx account settings without going to your Cisco WebEx site., page 1 Switching Sites, page 2 Starting an Instant Meeting
Business Router II Lab
 Business-Router-1-Lab.doc 1 CSCI 3342 If this lab is an Individual assignment, you must do all coded programs on your own. You may ask others for help on the language syntax, but you must organize and
Appserv Internal Desktop Access Mac OS Device with Safari Browser. Enter your Appserv username and password to sign in to the Website
 Appserv Desktop Access Logging on from a Mac OS device Step 1. To sign in to the Appserv Desktop Access website, enter the following address into the Safari browser address bar. Please Note: This documentation
Abila MIP DrillPoint Reports. Installation Guide
 Abila MIP DrillPoint Reports This is a publication of Abila, Inc. Version 16.1 2015 Abila, Inc. and its affiliated entities. All rights reserved. Abila, the Abila logos, and the Abila product and service
FUJITSU Cloud Service S5
 FUJITSU Cloud Service S5 Basic System Setup Windows 2008 and 2012 VMs This guide documents the basic configuration that should be performed to a vsys and VM in order to configure the standard London East
Installation Procedure Windows 95/98/ME with Internet Explorer 5.x & 6.0
 Installation Procedure Windows 95/98/ME with Internet Explorer 5.x & 6.0 Printer Friendly Version [ PDF 240K ] Before You Begin Before proceeding with the installation of a SOHO 6 appliance, you must have
QUICK START GUIDE MODEL 195Ep
 QUICK START GUIDE MODEL 195Ep Before You Begin The ESTeem Model 195Ep wireless Ethernet radio modem is compatible with many different applications. The most common application is to bridge two or more
Lab - System Restore in Windows 8
 Lab - System Restore in Windows 8 Introduction In this lab, you will create a restore point and use it to restore your computer. Recommended Equipment A computer running Windows 8 Step 1: Create a restore
DIGIOP ELEMENTS V8.7 NVR Software-only Installation Guide
 DIGIOP ELEMENTS V8.7 NVR Software-only Installation Guide About this installation guide Use this document as a guide to install your DIGIOP ELEMENTS NVR software system. It includes procedures to install
TCP/IP CONFIGURATION 3-6
 TCP/IP CONFIGURATION 3. Type IPCONFIG /RENEW and press the Enter key. Verify that your IP Address is now 192.168.2.xxx, your Subnet Mask is 255.255.255.0 and your Default Gateway is 192.168.2.1. These
Lab - Remote Desktop in Windows 7 and Vista
 Lab - Remote Desktop in Windows 7 and Vista Introduction In this lab, you will remotely connect to another Windows 7 or Vista computer. Recommended Equipment The following equipment is required for this
Lab - Configure a NIC to Use DHCP in Windows
 Introduction In this lab, you will configure an Ethernet NIC to use DHCP to obtain an IP address and test connectivity between two computers. Recommended Equipment Wireless router Two computers running
edp 8.2 Info Sheet - Integrating the ediscovery Platform 8.2 & Enterprise Vault
 edp 8.2 Info Sheet - Integrating the ediscovery Platform 8.2 & Enterprise Vault 12.0.1 Date: December 2017 Author: Technical Field Enablement (II-TEC@veritas.com) Applies to: ediscovery Platform 8.x and
Networking for Wide Format Printers
 Networking for Wide Format Printers Table of Contents Configure PC before RIP Installa on... 1 Verifying Your Network Se ngs for Mac Communica on... 3 Changing Your Network Adapter for Mac Communica on...
Getting Started With Windows 10
 Getting Started With Windows 10 1 Table of Contents Navigating the Windows 10 Environment... 3 Logging In... 3 Navigating the Desktop... 4... 4... 4 Working With Applications... 5 Actions Center and Settings...