roller shutters ALUMINIUM ROLLER SHUTTERS FOR SPECIAL VEHICLES
|
|
|
- Solomon Shaw
- 5 years ago
- Views:
Transcription

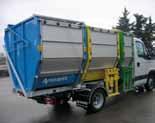
1 roller shutters ALUMINIUM ROLLER SHUTTERS FOR SPECIAL VEHICLES

2 ROLLER SHUTTERS INTRODUCTION The main target of company SRS is to offer competence and reliability to the customers in the production of aluminium roller shutters for special vehicles. Furthermore the Company has a wide sales net with many contact points all over Europe and assists the customer through all stages: offer, order, delivery and after sales service. SRS has more than 30 years experience in producing roller shutters and is specialized in the aluminium profile manufacturing, extrusion and assembling. The SRS products are manufactured in Italy and are therefore a synonym of reliability, functionality, technology and appealing design for the world wide market of special vehicles.


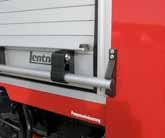
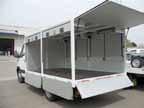
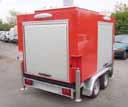
3 ROLLER SHUTTERS The SRS roller shutters are made in extruded aluminium profiles that are assembled in order to assure the maximum sealing against bad weather, easy mounting and noiseless functioning. The roller shutters can be mounted on many different types of commercial, industrial and special vehicles, replacing the cumbersome and troublesome leaf-doors. The profiles are of high quality, made in special shapes, are satin-finished silver anodized or RAL 7035 powder painted and can be 30mm, 35mm or 38mm high. On request the profiles can be painted in more than 150 RAL colours. The closing is automatic and is available with or without key. It is made of metallic and plastic mechanisms in order to assure an excellent and long lasting reliability. The winding rolls are available in Ø 45 or 60mm, in order to give a solution to room problems and are realized using steel springs, which grant the maximum toughness. The lateral guides, made in aluminium and in special shapes, and the lateral sealing gaskets make the roller shutter slide perfectly. Thanks to the upper, lower and internal sealing gaskets the metallic parts can t come in contact with each other. The roller shutters can be made in different dimensions, complying with the maximum recommended heights. HIGHLIGHTS Reliability and resistance against external events Perfect sliding Balanced movements Easy mounting and use Easy to handle Space-saving Safety for the operator Customer made solutions Different closing groups with different handles Winding rolls with two different diameters (depending on the shutters dimensions) for maximum toughness, reliability and space-saving Easy mounting on the vehicle body Centering of the lateral guide profiles on demand Different lateral guide profiles available for better fitting in different chassis Powder coated painting for the best external appearance Different available accessories: - Electromagnetic switches 12V 2c and 24V 2c - Magnet with plate - Door opening with standard, neon or led lights - Remote controls and electric shutters 12V, 24V or 220V Personalized customer s LOGO Quick delivery terms Spare parts always available Experience and assistance to the customer 3


4 ROLLER SHUTTERS FROM OFFER TO DELIVERY KNOW HOW CUSTOMERS RELATIONSHIP The company uses the last and state of the art solutions for the manufacturing, including the extrusion of the profiles, the moulding of the details, the packing and the delivery. QUALITY All the production phases are monitored by qualified personnel that constantly check the manufacturing and characteristics of the final products. Our staff is always at the customer disposal, for requests, technical advices and help, in order to find always new and better solutions for the mounting, by taking advantage of the customers suggestions and help. PERSONALIZATION On demand the roller shutters can be personalized with the customer s LOGO or with the name of the company. AVAILABILITY AND QUICK DELIVERY TERMS SRS offers to the customer availability and quickness in offer, order and delivery. All the spare parts are available. 4


5 ROLLER SHUTTERS ROLLER SHUTTERS 5
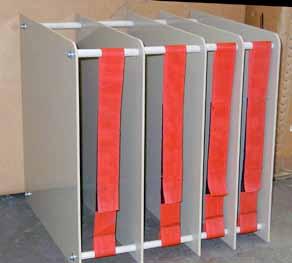
6 SRS ECO The aluminium roller shutter mod. ECO is assembled with profiles H30 or H38, is realized in the required heights in extruded shapes and special characteristics. The shutter can be used for little and medium compartments, in substitution to the troublesome leaf-doors. Usually the roller shutters are delivered silver anodized or RAL 7035 painted, or on demand painted in different RAL colours. The sliding system of these shutters permits to make good use of the available space inside the vehicle. When open the shutter will lay flat horizontally under the roof and the eventual surplus length will lay vertically in the rear part. This sliding system is recommended for areas of max. 1m2. It is a cheap and easy mounting solution, which anyway maintains the reliability and design standards of all SRS shutters. The roller shutter will be delivered divided into parts, which can be easily assembled: - 1 pre-assembled shutter complete with closing end with or without key - 1 pair of vertical guides - 2 pairs of curves (entire or separate) - 2 eventual sliding extensions, to be put between the curves, when the curves are separate - 1 box with accessories + required optionals USEFUL AREA Max. recommended area 1 m 2 EXPLODED VIEW 1 right guide left guide right upper guide left upper guide side rubber profile shutter profile middle profile lower shutter profile lower rubber profile right sliding block left sliding block profiles fixing screws front left upper internal profile front right upper internal profile back left upper internal profile back right upper internal profile handles handle fixing scews stop spring locking locking block with key locking block without key locking barlock with key grip profile locking block with key locking 6
7 AVAILABLE MOUNTING PROFILES 20,5 26,5 1, ,5 30 C H tot H int L R80 L=50 20,5 22,5 D WS WU D 25,5 1,5+25, ,5 MP1 MP2 MP3 MP4 MP MP6 1, Only for H30 - H 38 Only for H35 27,1 MP7 MEASUREMENTS H tot Total height H int Internal height L Sliding room C Light height WU Light width WS Total width D Guide and gasket edge 7
8 SRS ECO SIMPLY The aluminium roller shutter mod. ECO SIMPLY is assembled with profiles H30 or H38, is realized in the required heights in extruded shapes and special characteristics. The shutter can be used for USEFUL AREA Max. recommended area 1 m 2 little and medium compartments, in substitution to the troublesome leaf-doors. Usually the roller shutters are delivered silver anodized or RAL 7035 painted, or on demand painted in different RAL colours. The sliding system of these shutters permits to make good use of the available space inside the vehicle. When open the shutter will lay flat horizontally under the roof and the eventual surplus length will lay vertically in the rear part. This sliding system is recommended for areas of max. 1m2. It is a cheap and easy mounting solution, which anyway maintains the reliability and design standards of all SRS shutters. The roller shutter will be delivered divided into parts, which can be easily assembled: - 1 pre-assembled shutter complete with closing end with or without key - 1 pair of vertical guides - 2 pairs of plastic curves (entire or separate) - 2 eventual sliding extensions, to be put between the curves, when the curves are separate - 1 box with accessories + required optionals 21,5 mm 26,5 mm 25 mm ECO SIMPLY 1 EXPLODED VIEW 1 barlock with key aglas ( block ) shutter s grasp profile closing with key closing without key aglas ( block ) closing with handles little rubber leaf middle rubber right sliding block left sliding block left side guide right side guide rubber seal little shutter s profile upper guide fixing scews lateral plastic curve A lateral plastic curve B
9 ECO SIMPLY 2 EXPLODED VIEW 1 barlock with key aglas ( block ) shutter s grasp profile closing with key closing without key aglas ( block ) closing with handles little rubber leaf middle rubber right sliding block left sliding block left side guide right side guide rubber seal little shutter s profile upper guide fixing scews rear guide lateral plastic curve A lateral plastic curve B ECO SIMPLY 3 EXPLODED VIEW 1 barlock with key aglas ( block ) shutter s grasp profile closing with key closing without key aglas ( block ) closing with handles little rubber leaf middle rubber right sliding block left sliding block left side guide right side guide rubber seal little shutter s profile lateral double plastic curve fixing scews rear guide
10 SRS ECO PLUS The aluminium roller shutter mod. ECO PLUS is assembled with profiles H30 or H38, is realized with the required heights in extruded shapes and special characteristics and can be used for medium compartments, in substitution to troublesome leaf-doors. Usually the roller shutters are delivered silver anodized or RAL 7035 painted, or on demand painted in different RAL colours The ECO PLUS shutters have a special wrapping roll Ø45, pre-set in accordance to the shutters dimensions and have special guides, as the ECO model. When open the shutter will lay flat horizontally under the roof and the eventual surplus length will lay vertically in the rear part. This sliding system is recommended for areas of max. 1,5m2. Its characteristics are reliability, quality and design. The roller shutter will be delivered divided into parts, which can be easy assembled: - 1 pre-assembled shutter complete with closing end with or without key - 1 pair of vertical guides - 2 pairs of curves (entire or separate) - 2 eventual sliding extensions, to be put between the curves, when the curves are separate - 1 box with accessories + required optionals USEFUL AREA Max. recommended area 1,5 m 2 EXPLODED VIEW 1 right guide left guide right upper guide left upper guide side rubber profile shutter profile middle profile lower shutter profile lower rubber profile right sliding block left sliding block profiles fixing screws front left upper internal profile front right upper internal profile back left upper internal profile back right upper internal profile handles handle fixing screws stop spring locking closing group with key closing group without key barlock with key gripping profile roll group with supports locking

11 C H tot H int L R80 AVAILABLE MOUNTING PROFILES D WS WU L=50 D 20,5 20,5 22,5 26,5 1, , ,5 1,5+25, ,5 MP1 MP2 MP3 MP4 MP MP6 1, Only for H30 - H 38 Only for H35 27,1 MP7 MEASUREMENTS H tot Total height H int Internal height L Sliding room C Light height WU Light width WS Total width D Guide and gasket edge 11
12 SRS ECO PLUS SIMPLY The aluminium roller shutter mod. ECO PLUS SIMPLY is assembled with profiles H30 or H38, is realized with the required heights in extruded shapes and special characteristics and can be used for medium compartments, in substitution to troublesome leaf-doors. Usually the roller shutters are delivered silver anodized or RAL 7035 painted, or on demand painted in different RAL colours The ECO PLUS shutters have a special wrapping roll Ø45, pre-set in accordance to the shutters dimensions and have special guides, as the ECO model. When open the shutter will lay flat horizontally under the roof and the eventual surplus length will lay vertically in the rear part. This sliding system is recommended for areas of max. 1,5m2. Its characteristics are reliability, quality and design. The roller shutter will be delivered divided into parts, which can be easy assembled: - 1 pre-assembled shutter complete with closing end with or without key - 1 pair of vertical guides - 2 pairs of plastic curves (entire or separate) - 2 eventual sliding extensions, to be put between the curves, when the curves are separate - 1 box with accessories + required optionals USEFUL AREA Max. recommended area 1,5 m 2 ECO PLUS SIMPLY 1 ECO PLUS SIMPLY 2 AVAILABLE MOUNTING PROFILE 26,5 mm 21,5 mm 25 mm 12
13 ECO PLUS SIMPLY 1 EXPLODED VIEW 1 barlock with key aglas ( block ) shutter s grasp profile closing with key closing without key aglas ( block ) closing with handles little rubber leaf middle rubber right sliding block left sliding block left side guide right side guide rubber seal little shutter s profile group roll with the support upper guide fixing scews lateral plastic curve A lateral plastic curve B ECO PLUS SIMPLY 2 EXPLODED VIEW 1 barlock with key aglas ( block ) shutter s grasp profile closing with key closing without key aglas ( block ) closing with handles little rubber leaf middle rubber right sliding block left sliding block left side guide right side guide rubber seal little shutter s profile group roll with support fixing screws lateral plastic curve A lateral plastic curve B
14 SRS TOP The aluminium roller shutter mod. TOP is assembled with profiles H30 or H38, is realized with the required heights in extruded shapes and special characteristics and can be used for the main compartments, in substitution to troublesome leaf-doors. Usually the roller shutters are delivered silver anodized or RAL 7035 painted, or on demand painted in different RAL colours. USEFUL AREA Max. recommended area 5 m 2 Width max. 2,5 m Height max. 2,4 m Width min. 0,45 m The space-saving TOP shutters have a special wrapping roll Ø45 or Ø60, pre-set in accordance to the shutters dimensions. The roller shutter will be delivered divided into parts, which can be easy assembled: - 1 pre-assembled shutter complete with closing end with or without key - 1 pair of vertical guides - 1 pre-set wrapping roll - 1 box with accessories + required optionals EXPLODED VIEW 1 roll group with holders little leaf rubber middle rubber shutter profile right sliding plate left sliding plate lateral guide seal rubber little cover wheel group left fixing plate right fixing plate roll space pin with bearing barlock with key grip profile locking closing group with key closing group without key locking
15 C H tot H int L AVAILABLE MOUNTING PROFILES D WS WU L=50 D 20,5 20,5 22,5 26,5 1, , ,5 1,5+25, ,5 MP1 MP2 MP3 MP4 MP MP6 1, Only for H30 - H 38 Only for H35 27,1 MP7 MEASUREMENTS H tot Total height H int Internal height L Sliding room C Light height WU Light width WS Total width D Guide and gasket edge 15
16 MOUNTING INSTRUCTION VIDEO AVAILABLE ON SRS TOP READY MP4 Only for H30 - H 38 The aluminium roller shutter mod. TOP is assembled with profiles H30 or H38, is realized with the required heights in extruded shapes and special characteristics and can be used for the main compartments, in substitution to troublesome leaf-doors. Usually the roller shutters are delivered silver anodized or RAL 7035 painted, or on demand painted in different RAL colours. The roller shutter will be delivered in a single kit composed by: pre-assembled kit: 1 shutter, 1 roll, 2 plates, 2 groups of wheel - 1 pair of vertical guides - 1 box with accessories + required optionals MOUNTING PLATE ,00 3,00 8,00 A A 337,50 314,00 21,00 13,60 +0,00-0,10 8,12 10,00 15,00 5,50 12,00 10,00 14,03 31,74 29,39 B B 248,00 11,00 38,00 16,50 16,50 16,50 16,50 16,50 16,50 16,50 70,00 179,00 116,53 175,32 C 5,50 120,00 C 85,92 20,00 5,00 5,50 47,42 29,39 D D 40,00 115,00 135,00 25,00 2,50 11,00 20,00 il disegno rappresenta il particolare sx ( )-il particolare dx E E PROFILE F F 1 20, L EXPLODED VIEW 25,5 1 barlock with key aglas ( blocks ) shutter s grasp profile closing with key closing without key aglas ( block ) connection little rubber leaf middle rubber sliding block right sliding block left left side guide right side guide rubber seal little shutter s profile group wheel left fixing plate right fixing plate rolls group with support reinforcement left reinforcement right MP4 MEASUREMENTS H tot Total height H int Internal height L Sliding room C Light height WU Light width WS Total width D Guide and gasket edge H tot H int D C WS WU L=60 L=50 D 16
17 MOUNTING INSTRUCTION VIDEO AVAILABLE ON SRS TOP READY MP5 Only for H30 - H 38 The aluminium roller shutter mod. TOP is assembled with profiles H30 or H38, is realized with the required heights in extruded shapes and special characteristics and can be used for the main compartments, in substitution to troublesome leaf-doors. Usually the roller shutters are delivered silver anodized or RAL 7035 painted, or on demand painted in different RAL colours. The roller shutter will be delivered in a single kit composed by: pre-assembled kit: 1 shutter, 1 roll, 2 plates, 2 groups of wheel - 1 pair of vertical guides - 1 box with accessories + required optionals MOUNTING PLATE ,00 A 8,00 15,00 3,00 337,50 310,50 12,00 13,60 +0,00-0,10 2,50 A B B C 180,00 180,00 C 120,00 10,00 10,00 5,00 6,50 230,00 46,00 39,00 16,50 16,50 16,50 16,50 16,50 16,50 16,50 5,50 60,00 5,50 90,00 40,00 115,00 135,00 5,00 57,00 D 5,00 D 21,14 20,00 20,00 E il particolare rappresenta il particolare sx ( )-il particolare dx E PROFILE F F EXPLODED VIEW 1 barlock with key aglas ( blocks ) shutter s grasp profile closing with key closing without key aglas ( block ) connection little rubber leaf middle rubber sliding block right sliding block left left side guide right side guide rubber seal little shutter s profile group wheel left fixing plate right fixing plate rolls group with support reinforcement left reinforcement right spacer ,5+25,5 22, ,5 MP5 MEASUREMENTS H tot Total height H int Internal height L Sliding room C Light height WU Light width WS Total width D Guide and gasket edge L H tot H int D 4 C 5 WS WU 6 7 L=60 L=50 D 8 17
18 SRS TOP XL The TOP XL shutters are realized for big areas, but are also a good solution for areas until 7m2. They are very strong and have an increased closing part and wrapping roll and a special hooking system. They are mostly required for commercial and distribution vehicles. Width min. 1,0 m The aluminium roller shutter mod. TOP XL is assembled with profiles H30 or H38, is realized with the required heights in extruded shapes and special characteristics and can be used for the main compartments, in substitution to the troublesome leaf-doors. Usually the roller shutters are delivered silver anodized or RAL 7035 painted, or on demand painted in different RAL colours. The space-saving TOP shutters have a special wrapping roll Ø45 or Ø60, pre-set in accordance to the shutters dimensions. The roller shutter will be delivered divided into parts, which can be easy assembled: - 1 pre-assembled shutter complete with closing end with or without key - 1 pair of vertical guides - 1 pre-set wrapping roll - 1 box with accessories + required optionals USEFUL AREA Max. recommended area 7 m 2 Width max. 2,9 m Height max. 2,5 m EXPLODED VIEW 1 closing group stainless steel locking group with 2 lockings roll group with holders leaf rubber middle rubber shutter profile right sliding plate left sliding plate lateral guide seal rubber little cover wheel group left fixing plate right fixing plate roll seat pin with bearing handle

19 C H tot H int L AVAILABLE MOUNTING PROFILES D WS WU L=50 D 20,5 20,5 22,5 26,5 1, , ,5 1,5+25, ,5 MP1 MP2 MP3 MP4 MP5 Only for H30 - H 38 MEASUREMENTS H tot Total height H int Internal height L Sliding room C Light height WU Light width WS Total width D Guide and gasket edge 19
20 SRS TOP XL-E This roller shutter, with profile H30 or H38, is foreseen for large areas and special applications and can be integrated with a motor for the winding. The motor is available in its standard version or with radio frequencies, different capacities, great features, low consumptions, small dimensions, available or 230V, depending on the model and requested features. USEFUL AREA Max. recommended area 7 m 2 Width max. 3,0 m Height max. 2,8 m Width min. 1,0 m Similar to the rolling system of the TOP and TOP XL models, it has 2 different types of closing parts, without key lock. The closing ends can be loaded, in order to have an easier closing. It can be silver anodized or RAL 7035 painted, on demand a range of other RAL colours is available. This solution is an innovation in the commercial, industrial and special vehicles field. The roller shutter will be delivered divided into parts, which can be easy assembled: - 1 pre-assembled shutter complete with closing end without locks - 1 pair of vertical guides - 1 box with accessories - 1 winding roll - 1 box with one motor, all the necessary accessories and mounting instructions for the motor + required optionals NEW PATENTED* RELEASE SYSTEM ON VOLT EXPLODED VIEW 1 end side profile of leaf rolls group with supports little rubber of leaf middle rubber roller shutter profile right sliding block left sliding block side guide rubber of seal little cover wheel group left fixing plate right fixing plate motor roll support with bearing * Patented by serena
21 C H tot H int L L=50 D WS WU D AVAILABLE MOUNTING PROFILES 20,5 20,5 22,5 26,5 1, , ,5 1,5+25, ,5 30 MP1 MP2 MP3 MP4 MP MP6 1, Only for H30 - H 38 Only for H35 27,1 MP7 MEASUREMENTS H tot Total height H int Internal height L Sliding room C Light height WU Light width WS Total width D Guide and gasket edge 21

 only available with key T3 DESIGNED FOR: ECO - ECO PLUS - TOP mounting profile compatibility MP4 - MP5 (h30 - h38) MP6 - MP7 (h35) also available without key")
22 The SRS roller shutters can have different types of closing groups, according to the shutter model. They are available with or without key, made in extruded aluminium, with metallic and plastic mechanisms for the longest reliability; the shutters are automatically closed when pulled down. ROLLER SHUTTERS T1 DESIGNED FOR: ECO mounting profile compatibility MP1 - MP2 - MP3 (h30 - h38) MP6 - MP7 (h35) also available without key T2 DESIGNED FOR: ECO - ECO PLUS - TOP mounting profile compatibility MP1 - MP2 - MP3 (h30 - h38) only available with key T3 DESIGNED FOR: ECO - ECO PLUS - TOP mounting profile compatibility MP4 - MP5 (h30 - h38) MP6 - MP7 (h35) also available without key T4 DESIGNED FOR: TOP - TOP XL mounting profile compatibility MP1 - MP2 - MP3 (h30 - h38) also available without key 22
23 CLOSING GROUPS 1 barlock with key lower lock cap handle barlock block with spring right stick block dx 7 left stick block sx 8 lower rubber profile end profile back covering profile middle rubber closing sticks stick supports lock with key sliding plate h 38 left sx 16 sliding plate h 38 right dx 17 gripping profile lower rubber profile closing-end profile handle stainless steel lock knob washer screw screw dead bolts screw guiding block end-group block washer nut lock screw washer nut end profile cover profile handle lock with key button spring rolls holder rolls vtstc m6x10 comerc. 9 vtstc m6x10 comerc. 10 internal notched washer uni string locking seat vtstc m5x5 tc comerc. 13 string locking dowel m5x5 tc comer. 15 flexible string right closing dx 17 left closing sx 18 closing spring right closing dx 20 left closing sx 1 lower profile rubber lower profile right sliding plate left sliding plate handles handle fixing screws block with key bush bush fixing screw rivets
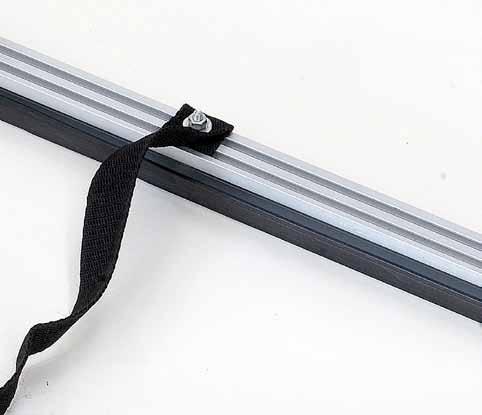
24 The aluminium extruded winding rolls are available in Ø45 or Ø60, in order to find a good solution for every room problem and are made with steel springs for the maximum toughness. ROLLER SHUTTERS ATTENTION: PRE-SET WRAPPING ROLL D45 In order to mount the roll, insert it into the proper supports, in the correct position, as indicated on the label on the roll itself. The black band pointed out on the paper (right headside of the roll) indicates the safety PIN position. Place the roll with the safety pin (covered with a protection paper) so that it is positioned under the roll. Remove the protection paper, so that the safety pin will stick out of the roll. Turn it manually in the loading direction and release it immediately. The loaded roll will wrap the straps and roll the shutter. DON T REMOVE THE SAFTEY PIN UNTIL THE COM- PLETE ROLLER SHUTTER HAS BEEN MOUNTED. In case the roll gets unloaded before the mounting of the roller shutter has been completed, load it again following the loading direction and number of turns indicated on the roll, block it and insert the safety pin. Repeat again all the previous points. D45 for ECO PLUS In order to mount the roll, insert it into the proper supports, in the correct position, as indicated on the label on the roll itself. Fix the straps on the internal part of the last profile (profile with the rubber profile). Place the roll with the safety pin (covered with a protection paper) so that it is positioned under the roll. Remove the protection paper, so that the safety pin will stick out of the roll. Turn it manually in the loading direction and release it immediately. The loaded roll will wrap the straps and roll the shutter. DON T REMOVE THE SAFTEY PIN UNTIL THE COM- PLETE ROLLER SHUTTER HAS BEEN MOUNTED. In case the roll gets unloaded before the mounting has been completed, load it again following the loading direction and number of turns indicated on the roll, block it and insert the safety pin. Repeat again all the previous points. Roller Shutter / Serranda Avvolgibile For Dim. / Per Vano W x H mm TO LOAD PER CARICARE Roll. / Rullo Pre loaded / Precaricato W N revs/giri SX HOLDER ROLL / RULLO DX HOLDER BOTTOM SIDE / PARTE INFERIORE 24
 indicates the safety PIN position. Place the roll with the safety pin (covered with a protection paper) so that it is positioned under the roll.")
25 ROLLS D60 In order to mount the wrapping roll, place it into the proper supports in the correct position, like indicated (right side, seen from outside the vehicle) The black band pointed out on the paper (right head-side of the roll) indicates the safety PIN position. Place the roll with the safety pin (covered with a protection paper) so that it is positioned under the roll. Remove the protection paper, the safety pin will stick out of the roll. DON T REMOVE THE SAFTEY PIN UNTIL THE COMPLETE ROLLER SHUTTER HAS BEEN MOUNTED. In case the roll gets unloaded before the mounting has been completed, load it again following the loading direction and number of turns indicated on the roll, block it and insert the safety pin. Repeat again all the previous points. Don t load the roll in the wrong direction, as it will cause the irreparably damage of the roll (that has to be replaced). Roller Shutter / Serranda Avvolgibile For Dim. / Per Vano W x H mm TO LOAD PER CARICARE Roll. / Rullo Pre loaded / Precaricato W N revs/giri SX HOLDER ROLL / RULLO DX HOLDER BOTTOM SIDE / PARTE INFERIORE 25


26 The high quality profiles, with special shape, can be standard silver satin-finished anodized or powder-painted in RAL 7035 and can have heights from 30mm to 38mm. On demand the painting can be made in more than 150 RAL colours. ROLLER SHUTTERS 26


27 FINISHING 27


28 There are many different available types of accessories. ROLLER SHUTTERS ELECTROMAGNETIC SWITCH 12v or 24v MAGNET MOUNTING PULLING BELT 28


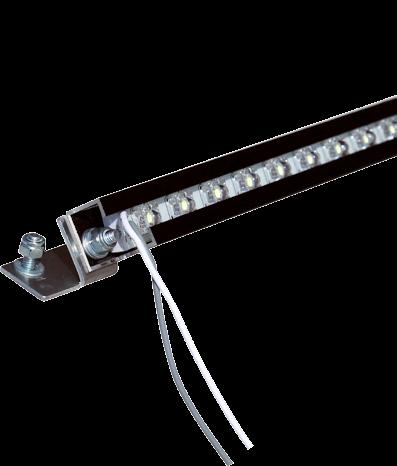
29 ACCESSORIES PRESSURE CLOSING GROUP WITH KEY FOR MODELL ECO LIGHTS NEON LED 29


30 ROLLER SHUTTERS OPENING/CLOSING GROUP FOR DRAWERS OPENING/CLOSING GROUP FOR SLIDES UNIVERSAL KEY LOCK FOR SHUTTERS AND TRUCK DOORS ALUMINIUM AND STAINLESS STEEL LADDERS LADDER HOLDERS ALUMINIUM DRAWER 30


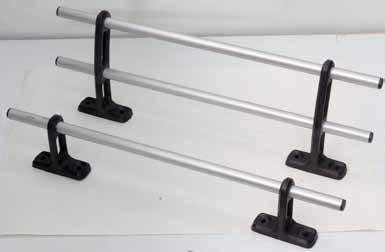
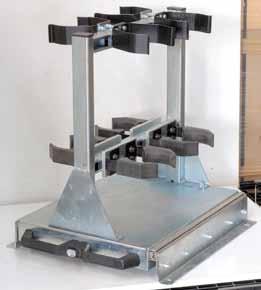
31 OTHER PRODUCTS HOLDER FOR SELF-BREATHING APPARATUS HANDRAILS ZINC-COATED SLIDES HOSE DEVIDERS ALUMINIUM SLIDES 31
32 MOUNTING INSTRUCTIONS SRS ECO In case of pressure closing group with key, place the fixing plate in order that the hole is in correspondence with the key lock pin. If necessary the plate has to be cut accordingly. 1 right guide left guide right upper guide left upper guide side rubber profile shutter profile middle profile lower shutter profile lower rubber profile right sliding block left sliding block profiles fixing screws front left upper profile front right upper profile back left upper profile back right upper profile handles handle fixing screws stop spring Place and block provisionally the vertical guides 2. Position the upper guides like shown in the sketch cut and pierce introduce the locking spring 3. Fix with screws tps 3,5x16 4. Remove the vertical guides 5. Lubricate the fixed upper guides 6. Insert the complete roller shutter into the upper guides 7. Insert the vertical guides into the lower part of the roller shutter, place again against the opening and the upper guides, pierce and fix with screws tps 3,5x16 8. Lubricate the vertical fixed guides 1. Place and block provisionally the vertical guides 2. Position the upper guides like shown in the sketch cut and pierce 3. Fix with screws tps 3,5x16 4. Remove the vertical guides 5. Lubricate the fixed upper guides 6. Insert the complete roller shutter into the upper guides 7. Insert the vertical guides into the lower part of the roller shutter, place again against the opening and the upper guides, pierce and fix with screws tps 3,5x16 8. Lubricate the vertical fixed guides 32
33 MOUNTING INSTRUCTIONS SRS ECO 1 right guide left guide right upper guide left upper guide side rubber profile shutter profile middle profile locking lower rubber profile right sliding block left sliding block profiles fixing screws front left upper internal profile front right upper internal profile back left upper internal profile back right upper internal profile barlock with key grip profile stop spring lower profile Place and block provisionally the vertical guides 2. Position the upper guides like shown in the sketch cut and pierce introduce the locking spring 3. Fix with screws tps 3,5x16 4. Remove the vertical guides 5. Lubricate the fixed upper guides 6. Insert the complete roller shutter into the upper guides 7. Insert the vertical guides into the lower part of the roller shutter, place again against the opening and the upper guides, pierce and fix with screws tps 3,5x16 8. Fix the lockings on the outer side of the guides at the bottom 9. Fix the lockings on the outer side of the guides at the top 10. Fix the guttering profile (if requested/supplied) 11. Lubricate the vertical fixed guides 1. Place and block provisionally the vertical guides 2. Position the upper guides like shown in the sketch cut and pierce 3. Fix with screws tps 3,5x16 4. Remove the vertical guides 5. Lubricate the fixed upper guides 6. Insert the complete roller shutter into the upper guides 7. Insert the vertical guides into the lower part of the roller shutter, place again against the opening and the upper guides, pierce and fix with screws tps 3,5x16 8. Fix the lockings on the outer side of the guides at the bottom 9. Fix the lockings on the outer side of the guides at the top 10. Fix the guttering profile (if requested/supplied) 11. Lubricate the vertical fixed guides 33
34 MOUNTING INSTRUCTIONS SRS ECO 1 right guide left guide right upper guide left upper guide side rubber profile shutter profile middle profile locking lower rubber profile right sliding block left sliding block profiles fixing screws front left upper profile front right upper profile back left upper profile back right upper profile locking block with key locking block without key stop spring Place and block provisionally the vertical guides 2. Position the upper guides like shown in the sketch cut and pierce - introduce the locking spring 3. Fix with screws tps 3,5x16 4. Remove the vertical guides 5. Lubricate the fixed upper guides 6. Insert the complete roller shutter into the upper guides 7. Insert the vertical guides into the lower part of the roller shutter, place again against the opening and the upper guides, pierce and fix with screws tps 3,5x16 8. Fix the lockings on the inner side of the guides at about 6cm from the lower profile (use the slots for the centering) 9. Fix the guttering profile (if requested/supplied) 10. Lubricate the vertical fixed guides 1. Place and block provisionally the vertical guides 2. Position the upper guides like shown in the sketch -cut and pierce 3. Fix with screws tps 3,5x16 4. Remove the vertical guides 5. Lubricate the fixed upper guides 6. Insert the complete roller shutter into the upper guides 7. Insert the vertical guides into the lower part of the roller shutter, place again against the opening and the upper guides, pierce and fix with screws tps 3,5x16 8. Fix the lockings on the inner side of the guides at about 6cm from the lower profile (use the slots for the centering) 9. Fix the guttering profile (if requested/supplied) 10. Lubricate the vertical fixed guides 34
35 MOUNTING INSTRUCTIONS SRS ECO 1 right guide left guide right upper guide left upper guide side rubber profile shutter profile middle profile locking lower rubber profile right sliding block left sliding block profiles fixing screws front left upper profile front right upper profile back left upper profile back right upper profile locking block door lock stop spring Place and block provisionally the vertical guides 2. Position the upper guides like shown in the sketch cut and pierce - introduce the locking spring 3. Fix with screws tps 3,5x16 4. Remove the vertical guides 5. Lubricate the fixed upper guides 6. Insert the complete roller shutter into the upper guides 7. Insert the vertical guides into the lower part of the roller shutter, place again against the opening and the upper guides, pierce and fix with screws tps 3,5x16 8. Regulate the height of the lockings along the guides for a correct closing of the lock (use bolts m4) 9. Fix the guttering profile (if requested/supplied) 10. Position the lockings in the upper part (use bolts m4) 11. Lubricate the vertical fixed guides 1. Place and block provisionally the vertical guides 2. Position the upper guides like shown in the sketch cut and pierce 3. Fix with screws tps 3,5x16 4. Remove the vertical guides 5. Lubricate the fixed upper guides 6. Insert the complete roller shutter into the upper guides 7. Insert the vertical guides into the lower part of the roller shutter, place again against the opening and the upper guides, pierce and fix with screws tps 3,5x16 8. Regulate the height of the lockings along the guides for a correct closing of the lock (use bolts m4) 9. Fix the guttering profile (if requested/supplied) 10. Position the lockings in the upper part (use bolts m4) 11. Lubricate the vertical fixed guides 35
36 MOUNTING INSTRUCTIONS SRS ECO SIMPLY 1 barlock with key aglas ( block ) shutter s grasp profile closing with key closing without key aglas ( block ) closing with handles little rubber leaf middle rubber right sliding block left sliding block left side guide right side guide rubber seal little shutter s profile upper guide fixing scews lateral plastic curve A lateral plastic curve B Place and fix the lateral plastic curves A and B with TC 4,8 x 16 screws 2. Place and block provisionally the vertical guides 3. Position the upper guides like shown in the sketch cut and pierce 4. Fix with screws tps 3,5x16 5. Remove the vertical guides 6. Lubricate the vertical fixed guides 7. Insert the complete roller shutter into the upper guides 8. Fix the guttering profile (if requested/supplied) 9. Insert the vertical guides into the lower part of the roller shutter, place again against the opening and the upper guides, pierce and fix with screws tps 3,5x Lubricate the vertical fixed guides 36
37 MOUNTING INSTRUCTIONS 1 barlock with key aglas ( block ) shutter s grasp profile closing with key closing without key aglas ( block ) closing with handles little rubber leaf middle rubber right sliding block left sliding block left side guide right side guide rubber seal little shutter s profile upper guide fixing scews rear guide lateral plastic curve A lateral plastic curve B SRS ECO SIMPLY 1. Place and fix the lateral plastic curves A and B with TC 4,8 x 16 screws 2. Place and block provisionally the vertical guides 3. Position the upper guides like shown in the sketch cut and pierce 4. Fix with screws tps 3,5x16 5. Remove the vertical guides 6. Lubricate the vertical fixed guides 7. Insert the complete roller shutter into the upper guides 8. Fix the guttering profile (if requested/supplied) 9. Insert the vertical guides into the lower part of the roller shutter, place again against the opening and the upper guides, pierce and fix with screws tps 3,5x Lubricate the vertical fixed guides 37
38 MOUNTING INSTRUCTIONS SRS ECO SIMPLY 1 barlock with key aglas ( block ) shutter s grasp profile closing with key closing without key aglas ( block ) closing with handles little rubber leaf middle rubber right sliding block left sliding block left side guide right side guide rubber seal little shutter s profile lateral double plastic curve fixing scews rear guide Place and fix the lateral plastic curves A and B with TC 4,8 x 16 screws 2. Place and block provisionally the vertical guides 3. Position the upper guides like shown in the sketch cut and pierce 4. Fix with screws tps 3,5x16 5. Remove the vertical guides 6. Lubricate the vertical fixed guides 7. Insert the complete roller shutter into the upper guides 8. Fix the guttering profile (if requested/supplied) 9. Insert the vertical guides into the lower part of the roller shutter, place again against the opening and the upper guides, pierce and fix with screws tps 3,5x Lubricate the vertical fixed guides 38
39 MOUNTING INSTRUCTIONS SRS ECO PLUS 1 right guide left guide right upper guide left upper guide side rubber profile shutter profile middle profile end profile lower rubber profile right sliding block left sliding block profiles fixing screws front left upper profile front right upper profile back left upper profile back right upper profile handles handle fixing screws roll group with supports Place and block provisionally the vertical guides 2. Position the upper guides like shown in the sketch cut and pierce introduce the locking spring 3. Fix with screws tps 3,5x16 4. Remove the vertical guides 5. Lubricate the fixed upper guides 6. Insert the complete roller shutter into the upper guides 7. Insert the vertical guides into the lower part of the roller shutter, place again against the opening and the upper guides, pierce and fix with screws tps 3,5x16 8. Lubricate the vertical fixed guides 1. Place and block provisionally the vertical guides 2. Position the upper guides like shown in the sketch cut and pierce 3. Fix with screws tps 3,5x16 4. Remove the vertical guides 5. Lubricate the fixed upper guides 6. Insert the complete roller shutter into the upper guides 7. Insert the vertical guides into the lower part of the roller shutter, place again against the opening and the upper guides, pierce and fix with screws tps 3,5x16 8. Lubricate the vertical fixed guides 39
40 MOUNTING INSTRUCTIONS SRS ECO PLUS 1 right guide left guide right upper guide left upper guide side rubber profile shutter profile middle profile lower shutter profile lower rubber profile right sliding block left sliding block profiles fixing screws front left upper internal profile front right upper internal profile back left upper internal profile back right upper internal profile locking block with key locking block without key roll group with supports locking Place and block provisionally the vertical guides 2. Position the upper guides like shown in the sketch cut and pierce - introduce the locking spring 3. Fix with screws tps 3,5x16 4. Remove the vertical guides 5. Lubricate the fixed upper guides 6. Insert the complete roller shutter into the upper guides 7. Insert the vertical guides into the lower part of the roller shutter, place again against the opening and the upper guides, pierce and fix with screws tps 3,5x16 8. Fix the lockings on the inner side of the guides at about 6cm from the lower profile (use the slots for the centering) 9. Fix the guttering profile (if requested/supplied) 10. Lubricate the vertical fixed guides 1. Place and block provisionally the vertical guides 2. Position the upper guides like shown in the sketch cut and pierce 3. Fix with screws tps 3,5x16 4. Remove the vertical guides 5. Lubricate the fixed upper guides 6. Insert the complete roller shutter into the upper guides 7. Insert the vertical guides into the lower part of the roller shutter, place again against the opening and the upper guides, pierce and fix with screws tps 3,5x16 8. Fix the lockings on the inner side of the guides at about 6cm from the lower profile (use the slots for the centering) 9. Fix the guttering profile (if requested/supplied) 10. Lubricate the vertical fixed guides 40
41 MOUNTING INSTRUCTIONS SRS ECO PLUS 1 right guide left guide right upper guide left upper guide side rubber profile shutter profile middle profile locking lower rubber profile right sliding block left sliding block profiles fixing screws front left upper profile front right upper profile back left upper profile back right upper profile barlock with key grip profile roll group with supports Place and block provisionally the vertical guides 2. Position the upper guides like shown in the sketch cut and pierce introduce the locking spring 3. Fix with screws tps 3,5x16 4. Remove the vertical guides 5. Lubricate the fixed upper guides 6. Insert the complete roller shutter into the upper guides 7. Insert the vertical guides into the lower part of the roller shutter, place again against the opening and the upper guides, pierce and fix with screws tps 3,5x16 8. Fix the lockings on the outer side of the guides at the bottom 9. Fix the lockings on the outer side of the guides at the top 10. Fix the guttering profile (if requested/supplied) 11. Lubricate the vertical fixed guides 1. Place and block provisionally the vertical guides 2. Position the upper guides like shown in the sketch cut and pierce 3. Fix with screws tps 3,5x16 4. Remove the vertical guides 5. Lubricate the fixed upper guides 6. Insert the complete roller shutter into the upper guides 7. Insert the vertical guides into the lower part of the roller shutter, place again against the opening and the upper guides, pierce and fix with screws tps 3,5x16 8. Fix the lockings on the outer side of the guides at the bottom 9. Fix the lockings on the outer side of the guides at the top 10. Fix the guttering profile (if requested/supplied) 11. Lubricate the vertical fixed guides 41
42 MOUNTING INSTRUCTIONS SRS ECO PLUS SIMPLY ECO SIMPLY 1 EXPLODED VIEW 1 barlock with key aglas ( block ) shutter s grasp profile closing with key closing without key aglas ( block ) closing with handles little rubber leaf middle rubber right sliding block left sliding block left side guide right side guide rubber seal little shutter s profile group roll with the support upper guide fixing scews lateral plastic curve A lateral plastic curve B Place and fix the lateral plastic curves A and B with TC 4,8 x 16 screws 2. Place and block provisionally the vertical guides 3. Fix with screws tps 3,5x16 4. Remove the vertical guides Lubricate the lateral plastic curves Insert the shutter 7. Insert the vertical guides into the lower part of the roller shutter, place again against the opening and the upper guides, pierce and fix with screws tps 3,5x16 8. Insert the complete roller shutter into the upper guides 9. Position and fix the roll with 4,8 x 16 screws 10. Fix the belts of the shutter to the roll with max. 4 x 10 rivets 11. Release the roll 12. Lubricate the vertical fixed guides 42
43 MOUNTING INSTRUCTIONS 18 ECO SIMPLY 2 EXPLODED VIEW 1 barlock with key aglas ( block ) shutter s grasp profile closing with key closing without key aglas ( block ) closing with handles little rubber leaf middle rubber right sliding block left sliding block left side guide right side guide rubber seal little shutter s profile group roll with support fixing screws lateral plastic curve A lateral plastic curve B SRS ECO PLUS SIMPLY 1. Place and fix the lateral plastic curves A and B with TC 4,8 x 16 screws 2. Place and block provisionally the vertical guides 3. Fix with screws tps 3,5x16 4. Remove the vertical guides Lubricate the lateral plastic curves Insert the shutter 7. Insert the vertical guides into the lower part of the roller shutter, place again against the opening and the upper guides, pierce and fix with screws tps 3,5x16 8. Insert the complete roller shutter into the upper guides 9. Position and fix the roll with 4,8 x 16 screws 10. Fix the belts of the shutter to the roll with max. 4 x 10 rivets 11. Release the roll 12. Lubricate the vertical fixed guides 43
44 MOUNTING INSTRUCTIONS SRS TOP 1 barlock with key grip profile leaf rubber lower profile middle rubber shutter profile roll group right sliding plate h dx 9 left sliding plate h sx 10 lower locking lateral guide seal rubber little cover wheel group right fixing plate left fixing plate roll space pin with bearing right sliding plate h dx 20 left sliding plate h sx 21 upper locking gutter profile pulling belt
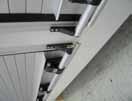
45 MOUNTING INSTRUCTIONS Vehicle roof Little cover SRS TOP Vehicle side Guide Roller Shutter Roll support plate VTSP 3,5x16 Pierce and flare Little cover 1. Mount the lower profile 2. Place the guides 3. Mount the upper cover 4. Position the plates with the wheels and the roll holders (already mounted) in reference to the guides (see plan) 5. Fit the plates 6. Insert the roll into the holders in the correct position, like shown in the plan and on the roll 7. Remove the guides 8. Insert the shutter into the opening from the front side (the shutter looks like shown in the spare parts plan) 9. Mount again the guides and fit them definitively 10. Fit the belts on the preset roll 11. Remove the roll security, turn it manually in the loading direction and release it. (Attention: now the shutter will wrap around the roll). In order to load it follow the load direction and number of turns indicated on the roll. 12. Fix the lockings on the outside of the guides, in the lower position 13. Fix the lockings on the outside of the guides, in the upper position 14. Fit the gutter profile (if requested/supplied) 15. Lubricate the sliding guides Please note: The supplied cover can be replaced by a built-in frame. 45
46 MOUNTING INSTRUCTIONS SRS TOP 1 closing group with key closing group without key lower rubber lower profile middle rubber shutter profile roll group right sliding plate h dx 9 left sliding plate h sx 10 lateral guide pulling belt seal rubber little cover wheel group right fixing plate left fixing plate roll space pin with bearing gutter profile locking upper block
47 MOUNTING INSTRUCTIONS Little cover Vehicle roof SRS TOP Vehicle side Guide Roller Shutter Roll support plate VTSP 3,5x16 Pierce and flare Little cover 1. Mount the lower profile 2. Place the guides 3. Mount the upper cover 4. Position the plates with the wheels and the roll holders (already mounted) in reference to the guides (see plan) 5. Fix the plates 6. Insert the roll into the holders in the correct position, like shown in the plan and on the roll 7. Remove the guides 8. Insert the shutter into the opening from the front side (the shutter looks like shown in the spare parts plan) 9. Mount again the guides and fit them definitively 10. Fit the belts on the preset roll 11. Remove the roll security, turn it manually in the loading direction and release it. (Attention: now the shutter will wrap around the roll). In order to load it follow the load direction and number of turns indicated on the roll. 12. Fix the lockings on the inner side of the guides at about 6 cm from the lower profile (use the slots for the centering) 13. Fit the gutter profile (if requested/supplied) 14. Lubricate the sliding guides Please note: The supplied cover can be replaced by a built-in frame. 47
48 MOUNTING INSTRUCTIONS SRS TOP XL 1 closing group stainless steel locking + 2 locks rolls group with supports lower rubber middle rubber shutter profile right sliding plate left sliding plate lateral guide sealing rubber cover wheel group left fixing plate right fixing plate roll seat pin with bearing handle
49 MOUNTING INSTRUCTIONS Little cover Vehicle roof SRS TOP XL Vehicle side Guide Roller Shutter Roll support plate VTSP 3,5x16 Pierce and flare Little cover 1. Mount the lower profile 2. Place the guides 3. Mount the upper cover 4. Position the plates with the wheels and the roll holders (already mounted) in reference to the guides (see plan) 5. Fit the plates 6. Insert the roll into the holders in the correct position, like shown in the plan 7. Remove the guides 8. Insert the shutter into the opening from the front side (the shutter looks like shown in the spare parts plan) 9. Mount again the guides and fit them definitively 10. Fit the belts on the preset roll 11. Adjust the height of the lockings along the guides for a correct closing (use bolts M4) 12. Fit the gutter profile (if requested/supplied) Please note: The supplied cover can be replaced by a built-in frame. 49
50 MOUNTING INSTRUCTIONS SRS TOP XL - E 1 closing end (that can be loaded) lower profile rolls group with supports lower rubber profile middle rubber shutter profile right sliding plate left sliding plate side guide sealing rubber cover wheel group left fixing plate right fixing plate motor roll support with bearing
51 MOUNTING INSTRUCTIONS 1. Place the guides 2. Fix the profile of the litttle cover 3. Position the plates with the wheels and the roll holders (already mounted) in reference to the guides (see plan) 4. Fix the plates 5. Cut the roll accordingly 6. Insert the roll into the holders in the correct position, like shown in the plan and on the roll 7. Remove the guides 8. Insert the shutter into the opening from the front side (the shutter looks like shown in the spare parts plan) 9. Mount again the guides and fit them definitively 10. Fit the belts on the preset roll 11. Regulate the opening end-switch 12. Regulate the closing end-switch 13. Lubricate the sliding guides SRS TOP XL - E Please note: The supplied cover can be replaced by a built-in frame. 1. Mount the lower profile (shorten or shape if necessary) 2. Mount the end-switches plates onto the upper and lower guide (right guide for the RH motors and left guide for the LH motors) 3. Locate the guides (shorten them if necessary) 4. Mount pin and wheel onto the roll holding plate /choose the more suitable position among the prearranged holes onto plate) 5. Mount the plate with pin and wheel, with reference to the guide (see plan) 6. Mount pin and wheel onto the motor plate (choose the more suitable position among the prearranged holes onto the plate) 7. Mount the emergency handle for motor release (complete with cable and sheath) in one of the 3 positions set on the motor after adapting the cable length, which depends on the position chosen for the emergency handle 8. Locate and fix the motor with pin and wheel mounted, taking the guides as a reference (see plan) 9. Shorten the roll and put the cap with hexagonal pin 10. Secure the support for the square pin of the roll to the plate in line with hexagonal axis on the motor 11. Locate the winding toll in the correct position 12. Remove the guides 13. Locate the shutter into the vehicle opening from the front (the shutter will look like in the spare parts table) 14. Fix the guides permanently 15. Fix the belts onto the pre-loaded winding roll 16. Perform the motor release operation by using the related emergency handle 17. See the instructions on the winding roll. PAY ATTENTION the winding roll comes pre-loaded. Remove the safety pin from the roll, rotate it manually towards the loading direction and release it. Now the shutter winds onto the roll 18. Mount the gutter profile 19. Duly lubricate the sliding guides 20. Locate the squashing end-switch plate onto the shutter closing profile LH or RH side (depending on the position of the motor) For the electrical connections please follow the electrical table supplied 51
52 MOUNTING INSTRUCTIONS SRS TOP XL - E -12/24 V WARNING: PRE-LOADED WRAPPED ROLL For mounting the roller correctly, connect it in the proper support, fitting on the opposite side the cap with hexagonal pin coupling to the engine and in the correct position as indicated on the label. THE BLACK STRIPE ON THE PAPER must be positioned on the wrapping roll: RH head side of roll in case of LEFT motorization LH head side of roll in case of RIGHT motorization POINT OUT THE POSITION OF SAFETY PLUG Set the roller with the safety pin (wrapped by protective paper) so it comes out under the roll, releasing the roll from the paper. The pin comes out from the roll itself. Loosen the engine with proper handle Manually rotate the roller in the charging direction and release it immediately. The roller loader will wrap the straps recalling the roller shutter DO NOT CLEAR THE ROLL FROM THE SAFETY PIN BEFORE HAVING FULLY FITTED THE ROLLER SHUTTER AND HAVING RELEASED THE ENGINE. In case of download of winding roll before have completed the mounting process, recharge following the direction of charging and the strokes number always indicated on the roller itself; lock reinserting the safety pin. Repeat again the previous operations. Roller Shutter / Serranda Avvolgibile For Dim. / Per Vano W x H mm TO LOAD PER CARICARE Roll. / Rullo Pre loaded / Precaricato W N revs/giri SX HOLDER ROLL / RULLO DX HOLDER BOTTOM SIDE / PARTE INFERIORE 52


 8.")
53 MOUNTING INSTRUCTION VIDEO AVAILABLE ON MOUNTING INSTRUCTIONS READY MP4 & READY MP5 MOUNTING INSTRUCTIONS SYSTEM READY (MP4 MP5) Refer to the video 1. Check that the measures inside the compartment are correct 2. Fix the lower profile (if supplied) with bi-adhesive already provided 3. Fox the upper cover profile (if supplied) with bi-adhesive already provided 4. Mount the reinforcing support brackets in the seats positioned on the rear guide 5. Join the guides on the plates in their seats inserting in the proper seats 6. Adjust and secure the reinforcing support brackets to the plates with the TPS screws 7. Slip on the whole kit with mounted guides holding it by the guides into the compartment of the roller shutter (operation to be done in 2 or more persons depending on the size of the roller shutter) 8. Position, drill and fasten the guides to the compartment 9. Check and adjust the exact height of the plate (front-rear) 10. Fix the plate and lock the reinforcing support brackets 11. If necessary, adjust the height of the wheels across the adjustable seat support 12. Drill and fix the locking 13. Grease the sliding lateral guides 53
54 SRS Roller Shutters s.r.l. Via Enrico Fermi, Gussago (BS) Tel Fax REQUEST FOR ROLLER SHUTTERS FOR SPECIAL VEHICLES Customer: Date: Delivery date: Note: Offer: Order: SLIDING SYSTEM P P =... N.B.: Please note: dimens max. dimensions max 1,5m2 mq SHUTTER DIMENSIONS Quantity H Tot. height H Internal height C Passing height WS Total Width PROFILE MODEL CLOSING FINISHING H30 WITH KEY STANDARD ANODIZED H38 WITHOUT KEY STANDARD RAL7035 PAINTED H35* PAINTED RAL N *only for Barlock CLOSING END MODEL SIDE PROFILE GUTTER PROFILE RAW QUANTITY ANODIZED LENGHT MP1 MP2 MP3 MP4 MP5 Only for H30 - H 38 PROFILE FOR BARLOCK Only for H35 STOP LOWER PROFILE MP6 MP7 GRIP LOWER PROFILE ANODIZED ANODIZED PAINTED PAINTED note: THIS ORDER FORM CAN BE DOWNLOADED IN PDF FILE FORMAT DIRECTLY FROM 54


55 MEASURING MEASUREMENTS H tot Total height H int Internal height L Sliding room C Light height WU Light width WS Total width D Guide and gasket edge L H tot H int C H int H tot C WS WS H int WU H tot L=50 D WS WU D 55
The space-saving TOP shutters have a special wrapping roll Ø45 or Ø60, pre-set in accordance to the shutters dimensions.
 The aluminium roller shutter mod. TOP is assembled with profiles H30 or H38, is realized with the required heights in extruded shapes and special characteristics and can be used for the main compartments,
roller shutters ALUMINIUM ROLLER SHUTTERS FOR SPECIAL VEHICLES
 roller shutters ALUMINIUM ROLLER SHUTTERS FOR SPECIAL VEHICLES ROLLER SHUTTERS HIGHLIGHTS ROLLER SHUTTERS The SRS roller shutters are made in extruded aluminium profiles that are assembled in order to
37 Polished Stainless Steel
 80 BAWER 81 82 1,5 mm SERIES BAWER 37 37 Polished Stainless Steel Example of fitting-out Stainless Steel AISI 304/X5CrNi18-10/1.4301-2R Thickness mm 1,5 Mechanical resistance; water resistance Laser and/or
MODULAR SYSTEM OF FITTINGS FOR SHUTTERS HARDWARE SYSTEMS FOR WINDOWS AND DOORS
 MODULAR SYSTEM OF FITTINGS FOR SHUTTERS HARDWARE SYSTEMS FOR WINDOWS AND DOORS Added strength to tradition The shutter is more than a mere screen that shuts out the light and protects from the weather.
Organisational Kitchen Fittings Drawer and Front Extensions
 GRASS NOVA PRO TOUCH LATCH SENSO Application: For drawer and front pull-out Material: Steel, plastic, aluminium Finish: Zinc plated, powder coated Opening version: Full extension with self opening mechanism
Single action door patch fittings
 Single action door patch fittings The flexible system for all installation situations. CONTENTS Technical details - 5 Materials and surface finishes Product information Patch fittings / none rebated frame
STORAGE. WORKTOP Worktop covered with a removable 2 mm ABS plate. HANDLES Metal handle.
 STORAGE Roller cabinets 04 Modules 06 Expandable magnetic trays 08 Trolley 09 HANDLES Metal handle. LOCKING Central locking. WORKTOP Worktop covered with a removable 2 mm ABS plate. Metal chests 09 Tool
GALVANIZED-COATED SHELFING SYSTEM SHELVING FOR FOOD
 ALVANIZED-COATED SHELFIN SYSTEM SHELVIN FOR FOOD ALVANIZED COATED SHELVIN ALVANIZEDRAL 7035 Entirely made of first grade steel and cold-profiled with galvanized steel according to the Sendzimir process
Parts Manual Kleen Sweep 28 - Model Battery
 Parts Manual Kleen Sweep 28 - Model Battery Parts Manual - Kleen Sweep 28 - Model Battery Page 2 Table of Contents Side broom cpl. part 1... Side broom cpl. part 2... Frame - Wheels... Covering MM KS 28B...
MK-101 TILE SAW OWNER S MANUAL & OPERATING INSTRUCTIONS SERIAL NUMBER:
 MK-0 TILE SAW OWNER S MANUAL & OPERATING INSTRUCTIONS CAUTION: Read all safety and operating instructions before using this equipment Enter the Serial Number of your new saw in the space below. The Serial
Roller Shutter Door Kits. Diversity in profiles
 Roller Shutter Door Kits - fast online configuration - certified according to DIN EN 13241-1 - high quality components - everything from one source Diversity in profiles Roller shutter door kits Configuration
Product catalogue. Aztec International S.A., ul. Bułgarska 63/65, Poznań, Poland, phone ,
 Product catalogue Delivery Programme 2014 Status 02/2014 - Subject to change - Index Rail system... 4 Accessories mounting rails... 11 Rail connectors... 11 Cross connectors... 12 Module clamps... 13 Module
Profile Handles +DQGHO %DWDQJ 6 6.1
 Profile Handles.1 Dim. A Dim. B 21 19.5 2,500 12.21.902 30 12.22.909 Dim. A Dim. B 11.5 19.5 2,500 12.20.905.2 Chrome plated Silver coloured anodized E/EV1 Stainless steel coloured Dim. A 300 295 12.2.201
Door stopper, wall mounting 4-7 Door stopper, floor mounting 8-9. Door stopper, wall mounting 10 Door stopper, floor mounting 11
 oor stopper : 8 Content oor stopper Seite Satin stainless steel oor stopper, wall mounting 4-7 oor stopper, floor mounting 8-9 Stainless Steel,black oor stopper, wall mounting 0 oor stopper, floor mounting
HARDWARE SYSTEM FOR WINDOWS AND DOORS. Modular system of fittings for shutters
 HARDWARE SYSTEM FOR WINDOWS AND DOORS Modular system of fittings for shutters Added strength to tradition The shutter is more than a mere screen that shuts out the light and protects from the weather.
* See following pages for Assembly Breakdowns HMD914 Magnet Base Drill (120v Standard Base) HMD914 Magnet Base Drill
 HMD914 Magnet Base Drill") 00 HMD Magnet Base Drill (0v Standard Base) 00 HMD Magnet Base Drill (0v Swivel Base) Item Qty Part No. 00 Description (0v standard base) a 0 (0v swivel base) 00 (0v standard base) a 0 0 Drill Housing
00 HMD Magnet Base Drill (0v Standard Base) 00 HMD Magnet Base Drill (0v Swivel Base) Item Qty Part No. 00 Description (0v standard base) a 0 (0v swivel base) 00 (0v standard base) a 0 0 Drill Housing
Required Tools. Ford Transit Connect J4075 with R16 Tracks TRANSIT CONNECT 69 RAIL IBI. Marker. 7/16 / 9/16 / 1/2 Wrench.
 IBI Required Tools INSTRUCTION MANUAL Marker 7/16 / 9/16 / 1/2 Wrench Drill with 3/8 Drill Bit Allen Key Ford Transit Connect J075 with R16 Tracks Part # J075 Rails 96 Bars 55 [ ] BLACK WHITE SILVER [
5. Office furniture. 5. Office furniture. Laboratory furniture. Flexible and customised
 5. Office Flexible and customised 5. Office Laboratory Your laboratory staff needs a thoughtfully planned office or work area and we have just the you have been looking for. Functional and customised to
Limanda. Technical data
 Polyamide hand held enclosures for data acquisition, MCR and automation engineering 2 sizes: 270 x 248 x 64 mm to 311 x 281 x 72 mm Large fitting area For installations and command devices mobile and stationary
Ideal protection for your electrics: häwa cable ducts
 Ideal protection for your electrics: häwa cable ducts Well Conceived The häwa group has established itself as an innovative and highly competent supplier to machinery and facility equipment companies in
Seceuro Range CD38 Built On
 Seceuro Range CD38 Built On Technical Specifications www.hag.co.uk Advice Line 0800 072 3444 Seceuro Range CD38 Built On What is it made from The Seceuro range offers an all Aluminium Construction Typical
US FUTABA. M 19 x 1.25 Ø 8. ESTABLISHED mm. Unlocked Locked LOCKS Door Thickness mm. 18.
 ked 38.5 mm 9 M 19 x 1.5 ESTABLISHED 1983 18 mm 3 mm Ø 3.5 4 mm 46 6.7 mm.5 mm 4. mm 6.5 1 Ø 8.65 mm 31 mm 6 mm mm 18.4 mm 17.6 mm Ø Diam Cylind Unlocked 6.7 mm 3 mm 31 5 9 86.8 17 8.5 Locked 4 4 19.5
XL 4000 metal free-standing enclosures and cable compartments
 87045 LIMOGES Cedex Telephone : 05 55 06 87 87 Fax : 05 55 06 88 88 XL metal free-standing enclosures and CONTENTS PAGE 1. General characteristics...1 2. Range...2 3. Overall dimensions...2 4. Equipment...3
Argenta W A L L M O U N T I N G M E T A L C A B I N E T S
 Argenta W A L L M O U N T I N G M E T A L C A B I N E T S The ARGENTA Series is a group of metal enclosures used to house on the inside electrical or electronic switchgear, controlgear and equipment necessary
Accessories for control enclosures. BERNSTEIN attachment solutions. Double coupling head (console version with suspension system attachment)
") 25 Accessories for control enclosures BERNSTEIN attachment Single coupling head (suspended console version) Double coupling head (console version with suspension system attachment) 322.5 231 232 140 The
25 Accessories for control enclosures BERNSTEIN attachment Single coupling head (suspended console version) Double coupling head (console version with suspension system attachment) 322.5 231 232 140 The
8mm 16mm F $ $ mm 19mm F $ $ mm 25mm F $ $ mm 32mm F $ $135.
 Sheet Metal Part No Galv Sheet 800 x 600 x 0.55mm F106765 $11.50 $9.20 10 Galv Sheet 800 x 600 x 0.75mm F106766 $14.70 $11.70 10 Galv Sheet 800 x 600 x 0.95mm F105143 $24.70 $19.80 10 Aluminium Sheet (H34)
1 AM-167/202/242/282/322 Parts Manual. Table Of Contents
 AM-167/202/242/282/322 Parts Manual Table Of Contents Mower Beam with Bearings...2 Mower Beam with Bearings...4 Cutting Discs...6 Main Gearbox...8 V-Belt Pulley...10 Headstock...12 Carrier Beam...14 V-Belt
Frontslide 60/A-Telescopic
 Frontslide 60/A-Telescopic Patents A lot of motion with a single slide. Hardware for simultaneously sliding up to 4 wood, metal or aluminium shutters of up to 60 kg (132 lbs.). Guides pages Seite 32 Locking
 OTHER FLAGPOLES 3 Other flagpoles FLAGMORE ACTION / Flagpole 6-2 meters Flagpole for temporary in ground installation. Delivered complete with cleat holes. Cleat holes on,5 m from the bottom or at any
OWNER & OPERATOR INSTRUCTION MANUAL
 For service contact: German Knife Inc. -00-00- www.turboairinc.com OWNER & OPERATOR INSTRUCTION MANUAL Model No. GBS-0S IMPORTANT SAFETY NOTICE To ensure safe and trouble free performance of you new German
Husqvarna X2000E. Illustrated Parts List ConstructionParts.com ConstructionParts.com. ConstructionParts.
 Husqvarna X000E Illustrated Parts List -0 0 Jun 00 MAINFRAME ASSEMBLY 0 X000E 000 MAINFRAME ASSEMBLY, X000 000 SHSB, / x / 00 SHAFT, ARBOR LOCK 00 FRAME, ROLL CAGE, X000 0 COVER, BELT GUARD 00 COVER, BELT
21C-64M1066 Bronco CRT Roto-Tiller (2008) Page 1 of 13 Drive System
 Page 1 of 13 Drive System") 21C-64M1066 Bronco CRT Roto-Tiller (2008) Page 1 of 13 Drive System 21C-64M1066 Bronco CRT Roto-Tiller (2008) Page 2 of 13 Drive System 1 656-04023A 1 Engine Pulley Bronco 1 656-04005A 1 /P Engine Pulley
21C-64M1066 Bronco CRT Roto-Tiller (2008) Page 1 of 13 Drive System 21C-64M1066 Bronco CRT Roto-Tiller (2008) Page 2 of 13 Drive System 1 656-04023A 1 Engine Pulley Bronco 1 656-04005A 1 /P Engine Pulley
Door Systems Ltd. Commercial shutters. r =-"""!"'.!;=::::;;::::::::;-- Types of doors
 I =:re 3 Door Systems Ltd BISDoor Systems Limited offers one of the widest ranges of high quality industrial and commercial security doors available in the U.K. Commitment to continual research and development
AIR CUSHION TECHNOLOGY
 AIR CUSHION TECHNOLOGY Air Speed 5000 V3 PX3 PARTS CATALOG VER. 20110822 P1001 A5000 V1/V2/V3 BELT (TEFLON) P1021 A5000 V1/V2/V3 SMART V1/V2 KNIFE (SLITTER BLADE) P1112 A5000 V1/V2/V3 RUBBER NIP ROLLER
Grommets & OFFICE Accessories
 Groets & OFFICE Accessories SISO A/S MILEPARKEN 11 DK - 2740 SKOVLUNDE (COPENHAGEN) DENMARK PHONE: (+45) 45 830 900 FAX: (+45) 45 830 444 DISTRIBUTOR Contents GROMMETS 4-13 WIRE MANAGERS 14-17 keyboard
PERFECT HANDLING. PCB Front Panels & Injector/Extractor Handles... Package Your Electronics With Ripac.
 Front Panels & Injector/Extractor Handles... PERFECT HANDLING. Package Your Electronics With Ripac. When it comes to electronics, no one handles today s demanding applications better than Rittal Ripac
ROLLING COUNTER SHUTTERS
 500 ROLLING COUNTER SHUTTERS EXCEPTIONAL SECURITY AND AESTHETICS WAYNE DALTON COMMERCIAL DOOR SYSTEMS The Wayne Dalton Rolling Counter Shutter system provides the perfect solution for smaller openings
Lift Up Floor Locks Multi-Directional Castor. W Series. M Series (full stainless steel) WHEELS & CASTORS
 WHEELS & CASTORS") Lift Up Floor s Multi-Directional Castor K Series M Series O Series M Series (full stainless steel) W Series WHEELS & CASTORS WWW.SITECRAFT.COM.AU WHEELS & CASTORS Lift Up Floor s Used on warehouse trolleys,
Lift Up Floor s Multi-Directional Castor K Series M Series O Series M Series (full stainless steel) W Series WHEELS & CASTORS WWW.SITECRAFT.COM.AU WHEELS & CASTORS Lift Up Floor s Used on warehouse trolleys,
Snap locks and door locks
 TopLine Cabinets - type A The modern design of the TopLine cabinets creates a visual calmness in the department. Behind the calm exterior you will find a highly functional diverse interior with endless
MIDSIZE VEHICLES OR PICKUP TOPPERS & CAPS M-1000, M-2000, M-3000 ALUMINUM
 IAB INSTRUCTION MANUAL MIDSIZE VEHICLES OR PICKUP TOPPERS & CAPS M-1000, M-2000, M-3000 ALUMINUM Required Tools Drill with 5/16 Drill Bit MIDSIZE VEHIGLES M1105 50 [ ] M1100 60 [ ] M1150 72 [ ] M2105 50
Limanda. Technical data
 Polyamide hand held enclosures for data acquisition, MCR and automation engineering 2 sizes - 270 x 248 x 64 mm to 311 x 281 x 72 mm Large fitting area For installations and command devices mobile and
G12/G12x USER S MANUAL
 G12/G12x USER S MANUAL TABLE OF CONTENTS SECTION 1 SLIDE CONFIGURATION SECTION 2 SLIDE CONFIGURATION ACCESSORIES SECTION 3 TABLETOP CONFIGURATION SECTION 4 TABLETOP CONFIGURATION ACCESSORIES SECTION 5
Free Advice Free Quote Nationwide. Security Direct property protection. Bar and Servery Buying Guide SECURITY DIRECT.
 Security Direct property protection Free Advice Free Quote Nationwide Bar and Servery Buying Guide SECURITY DIRECT www.securitydirect.uk.com Bar and Serveries Roller Shutter Buying Guide We have a very
Multitronic. Technical data
 Multitronic EMC Aluminium enclosure system for MCR technology Integrated guide grooves for PCB s External mounting slots with spring nuts Technical data Material: DIN EN 573 EN AW-AlMgSi Ingress protection:
SYSTEM WORLD PRODUCT INFO
 SYSTEM WORLD PRODUCT INFO August 208 System case.. System Case Configuration.. Width x depth x height (inches).56 x 0.62 x 3.3 inches Number of System Boxes Material Lid Type Art. No. Empty* ABS Black
Assembly Instructions for #5630 Medication PalWOW
 Assembly Instructions for #5630 Medication PalWOW Before assembling, please familiarize yourself with all the parts and check to make sure you have all the parts as listed below. A B A & B - The box in
Parts Manual Kleen Sweep 32R Rider Sweeper
 Parts Manual Kleen Sweep 32R Page 2 Table of Contents Side broom R.H., part 1... Side broom R.H., part 2... Front wheel drive... Accelerator... Steering... Seat group... Group of main sweeper roller, part
Operators Guide. Vision 3 Pan & Tilt Head. Vinten Camera Control Solutions
 Operators Guide Vision 3 Pan & Tilt Head Vinten Camera Control Solutions Vision 3 Pan and Tilt Head Publication Part No. 3543-8 Issue 4 Copyright Vinten Broadcast Limited 2004 All rights reserved throughout
Model 2704 Parts List * = Standard Equipment 〇 = Circuit Diagram
 2704 11-05 99 98 97 82 88 89 83 84 85 86 87 101 103 100 106 81 71 105 104 73 74 75 76 77 78 80 79 57 62 58 56 63 65 66 67 68 64 69 70 59 60 61 31 30 29 32 34 35 41 40 42 36 37 38 39 43 4445 46 21 22 20
LOSS PREVENTION CERTIFICATION BOARD (LPCB) APPROVED PRODUCTS
 APPROVED PRODUCTS") LOSS PREVENTION CERTIFICATION BOARD (LPCB) APPROVED PRODUCTS Technical Datasheets www.rocheystems.co.uk E37 ELITE SR1 Insurance-approved shutter suitable for high security domestic and commercial applications
LOSS PREVENTION CERTIFICATION BOARD (LPCB) APPROVED PRODUCTS Technical Datasheets www.rocheystems.co.uk E37 ELITE SR1 Insurance-approved shutter suitable for high security domestic and commercial applications
KM6-II Subracks. APW Electronic Solutions. 152 APW Electronic Solutions Toll Free (800) Fax: (858)
 Fax: (858)") KM6-II Subracks Fully compatible with DIN41494 part 5 and IEC60297-3. KM6-II Standard is available in kit form, offering quick and simple assembly. KM6-II Universal is a highly versatile subrack system,
KM6-II Subracks Fully compatible with DIN41494 part 5 and IEC60297-3. KM6-II Standard is available in kit form, offering quick and simple assembly. KM6-II Universal is a highly versatile subrack system,
Telescopic Masts STV Vehicle Adapters
 Upper console STV-U/01 EXAMPLE: Telescopic Mast type STV-10/105 attached to the vehicle shelter with the mounting adapters STV-U/01 and STV-L/01 Lower console STV- L/01 Adapter STV-L/01 Adapter STV-L/01
Frontslide 100/A. Description. Applications. Features of the HAWA-Frontslide 100/A. Patents
 Frontslide 100/A Patents Sliding shutters for a functional façade finish. Hardware system for wood, metal or aluminium sliding shutters with a panel weight up to 100 kg (220 lbs.) Guides page 112 Locking
CHAPTER 5 UNIT MAINTENANCE INSTRUCTIONS
 FPU SYSTEMS OPERATION MANUAL (INCLUDING REPAIR PARTS & SPECIAL TOOL LIST) STANDARD AND SPECIALIZED FPU MODULES BOH FPU Field Pack-up Units CHAPTER 5 UNIT MAINTENANCE INSTRUCTIONS BOH-PM-0-5 06 BOH Environmental
ROLLER SHUTTER LOUVER WINDOWS. Contact us now for more information on Thailand or visit us at
 The ONLY Roller Shutter With Adjustable Slats. More Than Just A Roller Shutter LLER SHUTTERS ROLLER SHUTTER LOUVER WINDOWS http://www.kssthailand.com 1 Roller Shutters With Adjustable Slats NEW to Thailand
Grommets & OFFICE Accessories
 Groets & OFFICE Accessories The technical descriptions and dimensions in this catalogue, also those with the photographs and drawings, are not binding. We reserve the right to make design improvements.
VEROTEC Electronics Packaging
 VEROTEC Electronics Packaging Enclosure Enclosure Value Added Services from Verotec CUSTOM ENCLOSURE ACCESSORIES TecServ is the vehicle by which Verotec delivers its value added services. These fall within
nandu Exploded views / Part lists
 nandu Exploded views / Part lists Rev. date (.2017) On the following pages you will find the parts used to assemble this product. Please note that some spare parts cannot be purchased individually but
Weatherproof enclosures for all corrosive environments
 IP 66 MRIN INETS N ENLOSURES >>> Marina cabinets polyester - IP 66 - IK 10 www.klinkmann.com Weatherproof enclosures for all corrosive environments 362 56 362 76 Technical characteristics (p. 289) IP 66
Grommets & OFFICE Accessories
 Groets & OFFICE Accessories The technical descriptions and dimensions in this catalogue, also those with the photographs and drawings, are not binding. We reserve the right to make design improvements.
INSTALLATION INSTRUCTIONS
 Design and Assembly Envisor components are designed to function as an Equipment Screening System. Modular by Design allows for a more user-friendly installation. This instruction packet is intended to
Operators Guide. Vision 8 Pan & Tilt Head. Vinten Camera Control Solutions
 Operators Guide Vision 8 Pan & Tilt Head Vinten Camera Control Solutions Vision 8 Pan and Tilt Head Publication Part No. 3441-8 Issue 4 Copyright Vinten Broadcast Limited 2004 All rights reserved throughout
Free Advice Free Quote Nationwide. Security Direct property protection. Shop Front Buying Guide SECURITY DIRECT.
 Security Direct property protection Free Advice Free Quote Nationwide Shop Front Buying Guide SECURITY DIRECT www.securitydirect.uk.com Shop Front Roller Shutter Buying Guide We have a very large range
herontm Exploded views / Part lists Rev. date ( )
") herontm Exploded views / Part lists Rev. date (12.201) On the following pages you will find the parts used to assemble this product. Please note that some spare parts cannot be purchased individually but
herontm Exploded views / Part lists Rev. date (12.201) On the following pages you will find the parts used to assemble this product. Please note that some spare parts cannot be purchased individually but
Product Overview. Features
 APCF1 Model Tripod Product Overview The Ravelli APCF1 is a Professional Quality Carbon Fiber Tripod providing a solid base for high-end photographic equipment. This model is a mix of carbon fiber and magnesium
High Security Roller Shutters. factories retail shops loading bays warehouses industrial units
 High Security Roller Shutters Where higher levels of security is a main concern, the LPS1175 approved Centurion Shutter resists attempts at forced entry from SR1 right up to SR4 to combat the most determined
OWNER & OPERATOR INSTRUCTION MANUAL
 For service contact: German Knife Inc. -00-00- www.turboairinc.com OWNER & OPERATOR INSTRUCTION MANUAL Model No. GBS-0S IMPORTANT SAFETY NOTICE To ensure safe and trouble free performance of you new German
Area of use The Provita wall rail system is suitable for use
 WALL RAILS GENERAL WALL RAILS Area of use The Provita wall rail system is suitable for use in normal wards in intensive care wards in pre-operation rooms in the recovery room in doctors surgeries. Due
ORLANDO BERLIN. High quality and elegance à from the doorplate to the outdoor stand the lightly
 34 BERLIN High quality and elegance à from the doorplate to the outdoor stand the lightly arched front characterizes all elements of the collection. Whether outdoor or indoor totem, floor directories,
CATALOG OF REPLACEMENT PARTS
 CATALOG OF REPLACEMENT PARTS HS600 MIXER HS600 HS600 HS600CE HS600CE ML-141022 ML-141023 ML-141024 ML-141025 A product of HOBART 701 S. RIDGE AVENUE TROY, OHIO 45374-0001 FORM 43232 (December 2010) TABLE
Knurr Miracel Server Rack
 Knurr Miracel Server Rack Knurr Server Racks are featured in these Scenarios: Scenario A 1-2 Rack page 8 Scenario C 3-6 Racks page 12 Scenario D 7-10 Racks page 14 Scenario E 10-30 Racks page 16 Scenario
SERVICE PARTS MANUAL
 SERVICE PARTS MANUAL DX SERIES SNOW PLOW FOR SERIES SNOW PLOWS SERIAL NUMBERS AFTER DX0000 00 Sno-Way International 0G TABLE OF CONTENTS Page HYDRAULIC SYSTEM (DX)... POWER PACK FRAME... 3 BLADES... LIFT
BLITZ 60L - BLITZ 55 - BLITZ 50. Double head sawing machine with motorized movement of the mobile head and electronic control of the head tilting
 BLITZ 60L - BLITZ 55 - BLITZ 50 Double head sawing machine with motorized movement of the mobile head and electronic control of the head tilting 12/08/2015 - Page 1 of 12 Technical specifications: First
RD 100. Spare parts list. RD 100 s/n BES Construction Tools PC AB No
 RD 100 Spare parts list RD 100 s/n BES100496 2018 Construction Tools PC AB No. 9800153901 2018-10 General information This spare parts list applies to the following: Part number 8311030410 RD 100 Description
Redexim-Charterhouse Verti-Core 1300/ 1700/ 2100 pag 01 code 0202
 Redexim-Charterhouse Verti-Core 1300/ 1700/ 2100 pag 01 code 0202 Part# 1300 Part# 1700 Part# 2100 DESCRIPTION REMARKS QUA 1 844.060.060 Same Same Winged nut - M6 10 2 830.060.060 Same Same Self lock nut
Page 3. Page Page 4. Page 5. Page 6. Page 2. Page 7
 Parts manual Verti-Drain 416 Page 01 Code 1640 TM Page 3 Page -10 Page 4 Page Page 6 Page 2 Page Page 8 Page : PTO Page : Tines, adapters and turf hold down kits Page 13: Optional core collector Page
Linear Luminaire with LED Series 6412/5
 > For use in Zones 2, 21 & 22 > Latest LED technology with a high luminous efficacy and a long service life > Extra flat version for low mounting depth > Powder-coated sheet-steel or brushed stainless
Bolt 1/4"x 2" Grade 2 Zinc , , , Nyloc Hex Nut 5/16" , , ,
 Color Logo use on white background only Parts Details LH00, LH000, LH00, LH000, Track Sections & Engines Updated: //0 TIE DOWN ENGINEERING Villanova Drive SW Atlanta, GA 0 www.tiedown.com (0) -0000 Fax
SPARE PARTS LIST. v.3
 SPARE PARTS LIST v. Parts list chassis Hose connection /8 0 2 Sliding valve Sliding valve Sliding valve 5 Quick coupling female 27 Quick coupling male 7 Barrel nipple /8 29 8 Handle complete see page 9
KWS Door Hardware. Building hardware
 KWS Door Hardware Building hardware Contents Informations General informations Page 3 Door Hardware Door Handles Page 4 Modular System Page 6 Door Holders and Gate Holders Page 8 Door Stops Page 10 Flush
LEE DAN COMMUNICATIONS, INC.
 THE NAME TO KNOW IN POSTAL SPECIALTIES LEE DAN COMMUNICATIONS, INC. 55 Adams Avenue, Hauppauge NY 788-3699 YEAR AFTER YEAR, S U G G E S T E D S P E C I F I C A T I O N S OUR REPUTATION IS BASED ON PERFORMANCE
LEE DAN COMMUNICATIONS, INC.
 THE NAME TO KNOW IN POSTAL SPECIALTIES LEE DAN COMMUNICATIONS, INC. 155 Adams Avenue, Hauppauge NY 11788-3699 YEAR AFTER YEAR, S U G G E S T E D S P E C I F I C A T I O N S OUR REPUTATION IS BASED ON PERFORMANCE
Combi range. Professional lighting equipment for general purpose stages. professional lighting for the performing arts
 Combi range Professional lighting equipment for general purpose stages professional lighting for the performing arts General features Combi range Ventilation slots on the rear housing for efficient cooling
AUREOL RECESSED BEAMSHAPER OPERATION MANUAL
 AUREOL RECESSED BEAMSHAPER OPERATION MANUAL Thank you for purchasing an Aureol Recessed BeamShaper. We have designed this luminaire to provide superior performance in design and engineering and we are
Medical Rail Systems 147
 Medical Rail Systems 147 Medical Rail Systems + unobtrusive + tidy + many variants 148 General Product Introduction Medical Rail Systems Different rooms, different walls - one solution: Medical rail systems
P5/20M - P13/9M R7/17M - L120/11M
 P5/20M - P13/9M R7/17M - L120/11M en Assembly and Operating Instructions Roller Shutter and Awning Drives with mechanic limit switching Important information for: Fitters Electricians Users Please forward
TABLE OF CONTENTS SECTION 1 TABLETOP CONFIGURATION SECTION 2 TABLETOP CONFIGURATION ACCESSORIES SECTION 3 SLIDE CONFIGURATION
 S6 USER S MANUAL TABLE OF CONTENTS SECTION 1 TABLETOP CONFIGURATION SECTION 2 TABLETOP CONFIGURATION ACCESSORIES SECTION 3 SLIDE CONFIGURATION SECTION 4 SLIDE CONFIGURATION ACCESSORIES SECTION 5 RACK MOUNT
Linear Luminaire with LED Series 6012/5
 > For use in Zones 1 & 2, 21 & 22 > Latest LED technology with a high luminous efficacy and a long service life > Extra flat version for low mounting depth > Powder-coated sheet-steel or brushed stainless
IDRO TEKNA HR 2015LP 400/50 TS (HYPER TR) C/ACCUM. TEST.NICHEL.
 C/ACCUM. TEST.NICHEL.") IDRO TEKNA HR 2015LP 400/50 TS (HYPER TR) C/ACCUM. TEST.NICHEL. Content filters: validity 8.623.0939 - IDRO TEKNA HR 2015LP 400/50 TS (HYPER TR) C/ACCUM. TEST.NICHEL... 3 R56010571-1 - MOTORPUMP... 4 R56090183-2
IDRO TEKNA HR 2015LP 400/50 TS (HYPER TR) C/ACCUM. TEST.NICHEL. Content filters: validity 8.623.0939 - IDRO TEKNA HR 2015LP 400/50 TS (HYPER TR) C/ACCUM. TEST.NICHEL... 3 R56010571-1 - MOTORPUMP... 4 R56090183-2
Pixus Technologies Catalog
 The Power of Embedded Ingenuity Pixus Technologies Catalog Kaparel, Ripac, & Vario Brand Products www.pixustechnologies.com sales@pixustechnologies.com S: 96.524.8242 CAN: 59.885.5775 Product Diversity
Guide to Screen and Kit sizes 612 Retractable Pleated Insect Screen
 Guide to Screen and Kit sizes Screen sizes: Width - screen reduces in width to the size of the next smallest screen, eg. a 3600mm wide screen can be installed in an opening that is between 2700mm-3600mm
EcoTec SP tables and base cabinets
 Shapes and colours Tabletops and furniture surfaces Table superstructures, base cabinets and handles 30 mm panel with replaceable edge, Antistatic, light grey 30 mm panel with impact-resistant edge band
LEE DAN COMMUNICATIONS, INC.
 THE NAME TO KNOW IN POSTAL SPECIALTIES LEE DAN COMMUNICATIONS, INC. 155 Adams Avenue, Hauppauge NY 11788-3699 YEAR AFTER YEAR, S U G G E S T E D S P E C I F I C A T I O N S OUR REPUTATION IS BASED ON PERFORMANCE
TopConsole system TP. Combination options 1-part 2-part 3-part. System accessories Page 537 Monitors, keyboards From page 796 Climate control Page 389
 opconsole system P System accessories Page 537 Monitors, keyboards From page 796 Climate control Page 389 Enclosure: Sheet steel 1.5 mm Door and console cover: Sheet steel, 2.0 mm, all-round foamed-in
INSTALLATION SUPPLY DOES NOT INCLUDE THE BRACKETS SUPPORTING THE WINDING TUBE AND ELECTRICAL COMPONENTS.
 INSTALLATION 2 3 4 5 6 7 9 8 10 LEGEND: 1. Movement chain 2. Electrical motor 3. Winding tube 4. Strap fastening 5. Central winding roller 6. Side winding roller 7. Terminal chain 8. Winding tube plug
Brighton 6' series Greenhouse
 Brighton ' series Greenhouse ssembly instructions Model HSP Model HSP Walk-in Greenhouse Statement ear Customer! May we congratulate you on your new Greenhouse. We feel sure that by following the detailed
Husqvarna X4000. Illustrated Parts List Jun 2009
 Husqvarna Illustrated Parts List -0 0 Jun 00 MAINFRAME 00 000 MAINFRAME ASSEMBLY, 000 COVER, BELT GUARD 00 WHEEL COVER 000 ROLLCAGE, RIGHT 000 ROLLCAGE, LEFT 00 BLOCK, SPRING 00 BRACKET, ACTUATOR MOUNT
W6884 US. Outer casing
 W6884 US Outer casing 101 107 108 105 106 138 111 136 113 131 137 114 127 129 117 115 139 112 122 140 123 119 ASKO, W6884 US - white (WM70.2) Pos Spare part No. Description Qty Comment 101 8061817-0 Top
July Manual 10-slide disk outdoor viewer
 Ing. J. de Wijs. Populierstraat 44, 4131 AR Vianen, the Netherlands Tel/Fax. +31 (0)347-372242 e-mail: info@dewijs-3d.com Website: www.dewijs-3d.com Design and production of stereoscopic instruments. July
Rolling Shutters - 3 Part Specs
 Rolling Shutters - 3 Part Specs ARCHITECTURAL SPECIFICATIONS: 107100 EXTERIOR PROTECTION PART 1 GENERAL 1.01 SUMMARY 1. Section includes exterior overhead Roll-Up hurricane/typhoon shutters 1.02 SUBMITTALS