CyberLink. PowerDirector. User's Guide
|
|
|
- Charles Matthews
- 6 years ago
- Views:
Transcription

1 CyberLink PowerDirector User's Guide
2 Copyright and Disclaimer All rights reserved. To the extent allowed by law, PowerDirector IS PROVIDED AS IS, WITHOUT WARRANTY OF ANY KIND, EITHER EXPRESS OR IMPLIED, INCLUDING WITHOUT LIMITATION ANY WARRANTY FOR INFORMATION, SERVICES, OR PRODUCTS PROVIDED THROUGH OR IN CONNECTION WITH PowerDirector AND ANY IMPLIED WARRANTIES OF MERCHANTABILITY, FITNESS FOR A PARTICULAR PURPOSE, EXPECTATION OF PRIVACY, OR NON-INFRINGEMENT. BY USING THIS SOFTWARE, YOU AGREE THAT CYBERLINK WILL NOT BE LIABLE FOR ANY DIRECT, INDIRECT, OR CONSEQUENTIAL LOSS ARISING FROM THE USE OF THIS SOFTWARE OR MATERIALS CONTAINED EITHER IN THIS PACKAGE. The terms and conditions here under shall be governed and construed in accordance with the laws of Taiwan. PowerDirector is a registered trademark along with other company and product names mentioned in this publication, used for identification purposes and remain the exclusive property of their respective owners. Manufactured under license from Dolby Laboratories. Dolby and the double-d symbol are registered trademarks of Dolby Laboratories. Confidential unpublished works. Copyright Dolby Laboratories. All rights reserved. For DTS patents, see Manufactured under license from DTS Licensing Limited. DTS, the Symbol, & DTS and the Symbol together are registered trademarks, and DTS 5.1 Producer is a trademark of DTS, Inc. DTS, Inc. All Rights Reserved. International Headquarters Mailing Address CyberLink Corporation 15F., No. 100, Minquan Rd., Xindian Dist. New Taipei City 231, Taiwan (R.O.C.) Web Site Telephone Fax Copyright 2017 CyberLink Corporation. All rights reserved.
3 Contents...1 Introduction Welcome...1 Latest...1 Features DirectorZone...2 and CyberLink Cloud PowerDirector...4 Versions Minimum...5 System Requirements...7 PowerDirector Editing Modes Auto Mode...8 Slideshow...10 Creator Setting...12 Music Preferences Customizing...13 Slideshows in the Slideshow Designer...18 PowerDirector Workspace PowerDirector...18 Modules Rooms...19 Media...19 Room Effect...21 Room PiP...21 Objects Room Particle...21 Room Title...22 Room Transition...22 Room Audio...22 Mixing Room Voice-Over...22 Recording Room Chapter...23 Room Subtitle...23 Room i
4 CyberLink PowerDirector Help Library...23 Window Explorer...25 View Searching...25 the PowerDirector Library Filtering...26 Media in the Library Library...28 Menu Expanding...28 the Workspace Preview...29 Window Preview...30 Player Controls Preview...31 Screen Snapshots Preview/Display...31 Options Zoom...34 In/Out Undocking...34 the Preview Window Playing Media Files Previewing...36 in 3D Mode Editing...37 Workspace Timeline...37 Mode Storyboard...49 Mode...50 PowerDirector Projects Setting...50 Project Aspect Ratio 360 Video...51 Projects Exporting...52 Projects Reusing...52 PowerDirector Projects CyberLink...55 Cloud Projects Importing Media into...57 PowerDirector Importing...57 Media Files Media Files 3D...59 Media Importing...62 PowerDirector Projects Capturing...62 Media ii
5 Capturing...63 from a DV Camcorder Capturing...64 from an HDV Camcorder Capturing...65 from a TV Signal Capturing...65 from a Digital TV Signal Capturing...65 from a Webcam Capturing...65 from a Microphone Capturing...65 from a CD Capturing...66 from an AVCHD Camcorder Capturing...66 from an Optical Device Capture...66 Desktop with Screen Recorder Captured...66 Content Quality...67 Profile Setup Capture...67 Settings Capture...67 Preferences Downloading...68 Media Downloading...69 Content from DirectorZone/CyberLink Cloud Downloading...70 Photos From Flickr Downloading...71 Royalty Free Music Detecting Scenes, Extracting Audio, and Capturing...72 Snapshots Detecting...72 Scenes in a Video Clip Extracting...73 Audio from a Video Clip Capturing...74 Screen Snapshots from a Video Clip...76 PowerDirector Plug-ins Using the...76 MultiCam Designer Importing...77 Media Synchronizing...79 Clips Creating...80 Recorded Content Changing...82 the Recorded Content Using the...84 Theme Designer Overview...85 Adding...85 Theme Templates/Sequences iii
6 CyberLink PowerDirector Help Adding...87 Media Clips Importing...90 More Media Files Editing...91 Media Clips Editing...92 Background Music Editing...93 Title Text Replacing...94 Background Images Adding...94 Transitions Between Sequences Previewing...95 and Saving Movies Editing...95 Created Movies Editing...96 Video in the Action Camera Center Fixing...98 Video Clips Creating Action Effects on Video Clips Action Camera Center Settings Changing the Action Camera Center Content Using an Express Project Recording Your Desktop with the Screen Recorder Setting Capture Area Configuring the Screen Recorder Settings Creating Overlays with the Blending Effect Blending Image Presets/Templates Creating Video Collages Creating a Video Collage Arranging Media in Your Production Adding Video Clips and Images to the Timeline Adding Video Clips and Images Adding Color Boards and Backgrounds Adding Audio Clips Syncing Audio Syncing Clips by Audio Using the Magic Movie Wizard iv
7 Using the Slideshow Creator Editing Your Media Editing Video Projects Content Aware Editing Using Content Aware Editing Splitting a Clip Unlinking Video/Audio Clips Trimming Video and Audio Clips Trimming a Video Clip Trimming an Audio Clip Setting a Media Clip's Duration Setting TV (Video Clip Interlacing) Format Adjusting Video Clip Aspect Ratio Stretching Images Cropping Images Changing the Shape of Media Fixing and Enhancing Images/Videos Advanced Fixes and Enhancements Utilizing Keyframes on Media Adding Keyframes Muting Audio Advanced Audio Editing Time Info Magic Fix Magic Cut Using the Tools Using the Power Tools Crop & Zoom Video v
8 CyberLink PowerDirector Help Adjusting Video Speed in the Video Speed Designer Audio Ducking Motion Tracker Tracking the Motion of Objects in Videos Adding and Editing Trackers Adding Motion Tracking Effects Action Camera Center Blending Effect View Designer Customizing Direction of View in 360º Video Clips Creating Little Planet Videos 360º Start View Setting Adding Effects Blending Clips on the Timeline Adding Video Effects Modifying a Video Effect Using Magic Motion Magic Motion Designer Using Magic Style Using the Freeze Frame Effect Creating PiP Effects Adding PiP Objects Types of PiP Objects Creating Custom PiP Objects Using the Paint Designer Creating a Paint Animation Modifying Media in the PiP Designer Mode Selection and Zoom Tools Modifying PiP Media Size and Position vi
9 Modifying PiP Media Properties Adding Motion to PiP Media Utilizing PiP Keyframes Saving and Sharing PiP Objects Adding Particle Effects Modifying Particle Effects in the Particle Designer Mode Selection and Zoom Tools Adding Objects, Images, and Backgrounds Modifying Particle Object Range and Position Modifying Particle Object Properties Adding Motion to Particle Objects Utilizing Particle Keyframes Saving and Sharing Particle Effect Templates Adding Title Effects Title Effect Categories Standard D Title Effects 3D Title Effects 360º Title Effects Modifying Titles in the Title Designer - Basic Zoom Tools Adding Additional Title Text Modifying Title Effect Position Modifying Title Text Properties Setting Title Text Length Saving and Sharing Title Templates Modifying Titles in the Title Designer - Advanced Mode Selection and Zoom Tools Adding Text, Particles, Images, and Backgrounds Modifying Title Effect Position Modifying Title Text and Image Properties Applying Animation Effects to Title Text vii
10 CyberLink PowerDirector Help Adding Motion to Title Text Utilizing Title Effect Keyframes Saving and Sharing Title Templates Creating Custom Masks in the Mask Designer Mode Selection and Zoom Tools Selecting Masks Creating Custom Masks Modifying Mask Size and Position Modifying Mask Object Settings Adding Motion to Masks Utilizing Mask Keyframes Saving and Sharing Masks Using Transitions Adding Transitions to a Single Clip Adding Transitions Between Two Clips Using Audio Transitions Setting Transition Behavior Modifying Transition Settings Modifying Alpha Transitions in the Transition Designer Creating New Alpha Transitions Modifying Alpha Transition Properties Saving Alpha Transitions Mixing Audio and Recording Voice-Overs Adjusting Audio Clip Volume Levels Mixing Audio In-Track Mixing Audio in the Audio Mixing Room Adding Fade Effects to Audio Clips viii
11 Restoring Audio Clip Volume Levels Recording Voice-Overs Adding Chapters Adding Chapter Markers Setting Chapter Thumbnails Adding Subtitles Adding Subtitle Markers Importing Subtitles from a File Extracting Subtitles from an MKV File Editing Subtitles Syncing Subtitles Producing Your Project Utilizing Intelligent SVRT Produce Window Outputting to a Standard 2D File Producing a 360 Video Outputting in a 3D Format Outputting to a Device Uploading Video to Online Media Sites Uploading a 360 Video Batch Produce Creating Discs Importing Additional Disc Content Selecting a Disc Menu Editing Disc Menu Properties Configuring Disc Menu Settings Editing Disc Menu Text Setting Disc Menu Music Adding a First Play Video ix
12 CyberLink PowerDirector Help Setting Disc Playback Mode Specifying Buttons Per Page Modifying Menu Object Properties Customizing Disc Menus in the Menu Designer Mode Selection, Zoom Tools, and Context Menu Setting Menu Opening and Background Adding Title Text and Images to Menus Modifying Text Object and Image Properties Adding and Editing Menu Buttons Enabling D Depth in Disc Menus Saving and Sharing Disc Menu Templates Burning Your Production to Disc Burning a Disc in 2D Burning a Disc in 3D Configuring Burn Settings Erasing Discs PowerDirector Preferences General Preferences Editing Preferences File Preferences Display Preferences Hardware Acceleration Preferences Project Preferences Produce Preferences Capture Preferences Confirmation Preferences DirectorZone Preferences CyberLink Cloud Preferences Improvement Program Preferences x
13 PowerDirector Hotkeys Default Keyboard Hotkeys Application Menu Bar Hotkeys System Hotkeys Capture Hotkeys Edit Hotkeys Designer Hotkeys Customizing Keyboard Hotkeys Hotkey Sets Appendix Intelligent SVRT: When Is Used? Licensing and Copyright Information Licenses and Copyrights Technical Support Before Contacting Technical Support Web Support Help Resources xi
14 CyberLink PowerDirector Help Chapter 1: Introduction This chapter introduces CyberLink PowerDirector and the digital video editing process. It also outlines all of the latest features, available versions, and reviews the minimum system requirements for CyberLink PowerDirector. Note: this document is for reference and informational use only. Its content and the corresponding program are subject to change without notice. For more helpful tips on using the program, please visit our members forum or see the video tutorials at Welcome Welcome to the CyberLink family of digital media tools. CyberLink PowerDirector is a digital video editing program that lets you create professional-looking videos and photo slideshows, complete with music, voice-overs, special effects, transitions, and much more. You can then output your project to a file, camcorder, portable device, upload it directly to various online video sharing web sites, or burn it to a disc, complete with stylish menus. Latest Features Below is a list of some of the latest features within the CyberLink PowerDirector program. More True360* Video Editing Options Use 360º Start View Setting to change the starting view in your 360º video clips. Apply more fixes to 360º video, including stabilization, brightness, and denoise. Convert titles and non-360º media clips in 360º video projects for better looking results. Track moving objects in 360º videos in the Motion Tracker to apply motion tracking effects. 1
15 Introduction More Editing Tools for Enhanced Creativity Create professional looking edits of your video quickly in the Video Collage Designer*. Utilize Audio Ducking to auto lower background music during dialogue or voice overs. Use 360º video clips to create unique little planet* videos. Auto create conventional videos in the View Designer* by tracking moving objects in 360º video. Adds support for Academy Award winning Boris FX* plugin effects. More Video Enhancement Options for Better Looking Videos Set a matching color tone in your videos with Color Match. Transform the colors in a video using color look-up tables (CLUT). Produce creative color effects on your videos with Split Toning. Apply the HDR effect on video clips and images. More Usability Improvements Choose the new Basic mode in the Title Designer for a simpler editing experience. Set the resolution of created shadow files. Choose how to apply shadow effects in Title and PiP Designers. Adds support for.mov video (alpha PNG) and 10-bit video (H.265 decode only) import. Note: * optional feature in CyberLink PowerDirector. Check the version table on our web site for detailed versioning information. DirectorZone and CyberLink Cloud You can upload/download effects and templates, and back up media, preferences, projects, and more with the DirectorZone and CyberLink Cloud* features. 2
16 CyberLink PowerDirector Help Note: * optional feature in CyberLink PowerDirector. Check the version table on our web site for detailed versioning information. DirectorZone DirectorZone is a free web service that lets you search for and download theme templates, PiP objects, paint animations, title templates, particle objects, sound clips, and disc menus created by other users of CyberLink PowerDirector. To access the benefits of DirectorZone, you can sign in by: clicking the Sign in to DirectorZone link in the top right corner of the CyberLink PowerDirector window. clicking the button at the top of the window to open the PowerDirector preferences, and then on the DirectorZone tab. See DirectorZone Preferences for more information. Also, be sure to periodically click the button to check out the latest DirectorZone Bulletin and view the Popular templates on DirectorZone. Just click in either of these sections in the Notifications window to view the bulletin or download these templates. Or go to to find out more information on the features and benefits of the DirectorZone web service. CyberLink Cloud CyberLink Cloud is a cloud storage service from CyberLink where users can upload and download their effects and templates, PowerDirector projects, produced video clips, and more. CyberLink Cloud allows users to back up media, preferences, projects, etc., and ensure their working environment is the same on multiple computers. Note: CyberLink Cloud is a subscription cloud storage service that is included with some CyberLink products, and is available for purchase through our web site. For more detailed information, see 3
17 Introduction PowerDirector Versions The features that are available to you within CyberLink PowerDirector are completely dependent on the version you have installed on your computer. Supported file formats, editing features, disc-making functions, and other features vary depending on the version that you have. To view the PowerDirector version table, please go to our web site: To determine your version of CyberLink PowerDirector, click on the CyberLink PowerDirector logo in the top right corner or select? > About CyberLink PowerDirector. PowerDirector Live PowerDirector Live is a subscription based version of CyberLink PowerDirector that provides all the editing features you expect, and adds the CyberLink Cloud storage service and more. With a PowerDirector Live subscription, you get: All the award-winning features of the Ultimate version of CyberLink PowerDirector, including the production of 4K ultra HD video and stunning 3D movies. The ability to back up program preferences, projects, project media, and (PiP object, paint animation, title effect, particle effect, disc menu) templates on the cloud storage space CyberLink Cloud. Guaranteed updates to the latest versions of CyberLink PowerDirector Ultimate. PowerDirector Live is the must-have solution for on-the-go video editors who want easy access to their media and the latest up-to-date editing technologies. Updating PowerDirector Software upgrades and updates (patches) are periodically available from CyberLink. CyberLink PowerDirector automatically prompts you when either is available. 4
18 CyberLink PowerDirector Help Note: you can prevent CyberLink PowerDirector from auto checking for updates/upgrades in General Preferences. To update your software, do this: 1. Click the button to open the Notifications window. 2. Check the New Updates and Upgrade Info sections. 3. Select an item in these sections to open your web browser, where you can purchase product upgrades or download the latest patch update. Note: you must connect to the Internet to use this feature. Minimum System Requirements The system requirements listed below are recommended as minimums for general digital video production work. System Requirements Operating System Microsoft Windows 10, 8/8.1, 7 (64 bit OS recommended) Processor (CPU) Intel Core i-series or AMD Phenom II Graphics Processor (VGA) NVIDIA GTX220/470 (2010 Fermi) AMD 5450 (2010 Evergreen) Intel Ivy Bridge (2012) Memory 2 GB required (6 GB or above recommended) Screen Resolution 1024 x 768, 16-bit color Hard Disk Space 7 GB required Burning Drive Burning drive is required for disc burning purpose Sound Card Windows compatible sound card is required Internet Connection Internet connection required for initial software & file formats activation 5
19 Introduction Note: please consult the CyberLink web site ( for the most recent system requirements information. * optional feature in CyberLink PowerDirector. Check the version table on our web site for detailed versioning information. 6
20 CyberLink PowerDirector Help Chapter 2: PowerDirector Editing Modes When you launch the program from the start menu, or the CyberLink PowerDirector shortcut on the desktop, you are prompted to choose one of the following editing modes: Note: before selecting your preferred editing mode, be sure to set the video aspect ratio for your project (16:9, 4:3, or 9:16). Timeline Mode: select this option to enter timeline mode, a multi video track editing mode, where all of the program's features are available to you. For more details about this mode and the available tracks, see Timeline Mode. Storyboard Mode: select this option if you want to view a large graphical display of all your video clips and images on the first track in the timeline. See Storyboard Mode for more information about what's available in this mode. Slideshow Creator: with the Slideshow Creator you can instantly turn your photos into a dynamic slideshow. Follow the steps in the Slideshow Creator to import your photos, add background music, and stylish slideshow templates. Once done, you can preview the slideshow, before outputting it as a video file or burning it to disc. Auto Mode: if you are new to the editing process and not sure how or where to get started, then auto mode's Magic Movie Wizard can help. The Magic Movie Wizard takes you through a step-by-step process to import, style, adjust, and preview your finished movie, in just a few steps. You can then edit the created production, output it to a video file, or burn it to a disc. 360 Editor*: select this option to create a 360 virtual reality video. See 360 Media Files for information on importing these types of media files, or Editing 360 Video Projects for information on how to edit them. Note: select the Always enter timeline mode option at the bottom of this dialog to skip this window at startup. You can always reset this selection at any time in Confirmation Preferences. 7
21 PowerDirector Editing Modes Auto Mode If you are new to the editing process and not sure how or where to get started, then auto mode's Magic Movie Wizard can help. The Magic Movie Wizard takes all of your media and creates a completed video production in just a few steps. To create your video production using the Magic Movie Wizard in auto mode, do this: Note: if you want more creative control than the Magic Movie Wizard provides, you can also use the Theme Designer to create your video production. The Theme Designer allows you to customize the theme templates used and choose the exact images, video clips, and background music you want in your production. See Using the Theme Designer for more information. 1. Select Auto Mode when prompted which mode you prefer at startup. The Magic Movie Wizard displays. Note: if you are in the timeline mode, you can quickly launch the Magic Movie Wizard by clicking on the selecting M agic M ovie Wizard. 2. In the Source window, click to import all of the media you want to use in your video production. Select Import Media Files to import a number of individual video or image files, or select Import a Media Folder if all of your media is in a specific folder on your computer's hard drive. CyberLink PowerDirector will import all of the supported media file formats in the selected folder. Note: click 3. button above the timeline and to remove any unwanted media files from your production. Before proceeding to the next window, you can perform simple trims on video clips and crop any imported images as follows: hover your mouse over a video clip you want to trim, and then click on its thumbnail to open the Trim window. See Performing a Single Trim for information on how to trim video clips. hover your mouse over an image you want to crop, and then click on its thumbnail to open the Crop window. See Cropping Images for information on how to crop images. 8
22 CyberLink PowerDirector Help 4. Once you are done importing, trimming and cropping, click Next to continue. Note: once you proceed, you can always click the Previous button to return to the Source window to import more media or trim/crop the imported video clips/images. 5. In the Style window, select from the available movie styles. Each style you select will result in a different outputted video. Select Free Download* to get more style templates. See DirectorZone for more information. Note: the style templates with the 3D icon produce a 3D effect in 3D mode and when outputted in 3D video productions. * optional feature in CyberLink PowerDirector. Check the version table on our web site for detailed versioning information. 6. Click Next to continue. 7. In the Adjustment window, click to add music to your production. Then use the available controls to do the following: use the button to add more music files to the background music playlist. Use the and buttons to set the order of the music in the playlist. The total duration of all the music added is noted above the playlist. Mix audio level between music and the video's audio: use the slider to mix the audio level, by deciding whether to have more background music or the original video's audio in the production. Specify the movie duration: here you can specify how long your movie will be. Select Original duration if you don't want the Magic Movie Wizard to make any edits to your imported media; Select Set output duration to manually specify how long you want the movie to be in the field provided; Select Fit duration to background music if you want your video production to match the duration of the music you imported into the playlist. 8. Click the Settings* button to use the sliders to customize the criteria the Magic Movie Wizard uses to cut your movie. Click OK to save the settings. Note: * optional feature in CyberLink PowerDirector. Check the version table on our web site for detailed versioning information. 9. Click Next to continue. 10. In the Preview window the Magic Movie Wizard generates a version of your production. If available, enter a Starting title and Ending title for your 9
23 PowerDirector Editing Modes production in the fields provided, and then use the available player controls to preview it. Note: if you are not satisfied with the current video production you can click the Previous button to return to previous windows to add/remove music, select a different style, change the criteria settings, duration, or import more media. You can also click the Reorder M edia button (if available) to shuffle the media files in the created production for a different look, or the Edit in the Theme Designer button if you want to customize the style template used. See Using the Theme Designer for more information. 11. Click Next to continue. 12. You are done. To finish and close the Easy Editor, choose one of the following: Produce Video: click to enter the Produce module where you can output your production to a video file, device, or upload it to a video sharing web site. See Producing Your Project. Create Disc: click to burn your production to a disc, complete with a professional looking disc menu, in the Create Disc module. See Creating Discs. Advanced Editing: click this option if you'd like to perform some more advanced editing on your production in the Edit module. Slideshow Creator The Slideshow Creator is the easiest way to create a dynamic slideshow with your photos. To create a slideshow in the Slideshow Creator, do this: 1. Select Slideshow Creator when prompted which mode you prefer at startup. The first Slideshow Creator window displays. Note: if you are in the timeline mode, you can launch the Slideshow Creator by adding photos to the timeline, selecting them, and then clicking on the Slideshow button above the timeline. See Using the Slideshow Creator for more information. 2. In the Source window, click to import all of the photos you want to use in your slideshow. Select Import Image Files to import a number of individual photos, or select Import an Image Folder if all of your photos are in a specific folder on your computer's hard drive. CyberLink PowerDirector will import all of the supported image formats in the selected folder. 10
24 CyberLink PowerDirector Help Note: you can right-click on a photo and select Set 3D Source Format if required. For more information, please refer to Setting 3D Source Format. You can also click slideshow. to remove any unwanted photos from your 3. Click Next to continue. 4. In the Style & Music window, select a slideshow style. Each style you select will result in a different slideshow. 5. In the Style & Music window, click the button to add background music to your slideshow. After adding music, click the Music Preferences button to customize the music duration and add fades. See Setting Music Preferences for a detail description of the available preferences. 6. In the Style & Music window, click the Slideshow Preferences button to set your slideshow preferences as follows: Duration: use this option to set the length of your slideshow. Select Fit photos to music to have the length of the slideshow match the duration of the added background music. Select Fit music to photos (if launched in Full Feature Mode) for the length of the music to match the duration of the slideshow, i.e. its specified length on the timeline. Sequence: use this option to set the order of the photos in the slideshow. Select Timeline order (if launched in Full Feature Mode) to have the sequence match the order the photos are currently displayed in the timeline. Select Date/time taken for the photos to display in chronological order based on the date and time they were taken. Detect faces: some slideshow templates include this option. When selected, the Slideshow Creator will scan and detect the faces in the photos included in the slideshow. The faces in the photos will then become the area of focus in the created photo slideshows. Click OK to save your changes. 7. Click Next to continue. 8. In the Preview window, the Slideshow Creator generates a version of your slideshow. Use the available player controls to preview it. 11
25 PowerDirector Editing Modes Note: if you are not satisfied with the current slideshow, you can click the Previous button to return to previous windows to select a different style, or import more photos. Also, if available, click the Replace Background button in the Preview window to replace the background image used in the slideshow, or Customize to fully customize your slideshow in the Slideshow Designer. See Customizing Slideshows in the Slideshow Designer for a detailed description of all the available options for your selected slideshow style. 9. Click Next to continue. 10. You are done. To finish and close the Easy Editor, choose one of the following: Produce Video: click to enter the Produce window where you can output your slideshow to a video file, device, or upload it to a video sharing web site. See Producing Your Project. Create Disc: click to burn your slideshow to a disc, complete with a professional looking disc menu, in the Create Disc window. See Creating Disc. Advanced Editing: click this option if you'd like to perform some more advanced editing on your slideshow in the Edit window. Note: if you select the Advanced Editing option, the Slideshow Creator adds your created slideshow to the timeline in the Edit window as a combined video file. If you'd like to do further editing on this slideshow (combined video file), just select it and click the Customize button above the timeline to edit in the Slideshow Designer. If you would like to remove the slideshow effects added by the template and display each individual photo in the slideshow on the timeline, just right-click on the file and then select Remove Slideshow Effects. Setting Music Preferences If you are using background music in your slideshow, click on the Music Preferences button in the Style & Music window of the Slideshow Creator to configure the preferences as follows: 1. In the Trim audio section you can trim the length of the music file you added as background music as follows: use the player controls to find the desired start point for the music, and then click. 12
26 CyberLink PowerDirector Help use the player controls to find the desired end point for the music, and then click. drag the markers on the music timeline to set the desired start and end times manually. 2. Select the Fade-in option to have the background music gradually fade-in at the beginning of the slideshow. 3. Select the Fade out option to have the background music gradually fade-out at the end of the slideshow. 4. Click OK to save your changes. Customizing Slideshows in the Slideshow Designer In the Preview window of the Slideshow Creator, click on the Customize button to open the Slideshow Designer to modify the selected slideshow style. Note: if the Customize button is not available in the Preview window, the slideshow style template you selected cannot be customized in the Slideshow Designer. 13

27 PowerDirector Editing Modes A - Preview Area, B - Editing Area, C - Slide Area, D - Extra Tools Area, E - Selected Slide The editing options and tools that are available in the Slideshow Designer, depend on the slideshow style template you selected. The following outlines the editing options available for the style templates that utilize the Slideshow Designer. Camera/Cell Slideshow When customizing a Camera or Cell slideshow in the Slideshow Designer, you can perform the following functions: 14
28 CyberLink PowerDirector Help in the slide area, click on a specific slideshow slide to view and edit it. in the preview area, click and drag a photo to an alternative cell. in the editing area (Unused photos), click the Add Photos button to import additional photos for use in the slideshow. in the editing area (Unused photos), indicate the maximum number of photos that are displayed on a slide. in the editing area, drag and drop the photos from Unused photos to the cell in the preview area where you want it on the slide. You can also highlight a cell by clicking it and use the photos. buttons to add or remove selected in the preview area, select a cell with a photo and then click on the button to set the focus of that cell on a specific portion of the photo. Manually resize and drag the box to set the desired focus area. in the extra tools area, click the Remix button to generate a new version of the slideshow. in the preview area, use the player controls to preview the slideshow. Motion Slideshow When customizing a Motion slideshow in the Slideshow Designer, you can perform the following functions: in the slide area, click on a specific slideshow slide to view and edit it. in the editing area (Cropping area), use the Magic Motion Designer to customize the motion on the slide. See Magic Motion Designer for detailed instructions on using all its features. in the preview area, use the player controls to preview the slideshow. Highlight Slideshow When customizing a Highlight slideshow in the Slideshow Designer, you can perform the following functions: in the slide area, click on a specific slideshow slide to view and edit it. 15
29 PowerDirector Editing Modes in the extra tools area, select whether you want to edit the foreground or background photo. in the editing area (Cropping area), resize and drag the box to the area of the photo you want highlighted on the slide. in the preview area, use the player controls to preview the slideshow. 3D/Balloon/Frozen Space/Outer Space Slideshow When customizing a 3D, Frozen Space, or Future slideshow in the Slideshow Designer, you can perform the following functions: in the slide area, click on a specific slideshow slide to view and edit it. in the editing area (Cropping area), resize and drag the box to the area of the photo you want highlighted in the photo on the slide. click the Replace Background button if you want to import a custom image to use as the slideshow's background. Note: the slideshow background cannot be replaced for slideshows using the Balloon template. in the preview area, use the player controls to preview the slideshow. Time-Lapse Slideshow When customizing a time-lapse slideshow in the Slideshow Designer, you can specify the following settings: Note: to create a time-lapse slideshow, you need to prepare the photos for it ahead of time. This feature works best with a series of photos taken with a camera that supports time-lapse photography. Duration of each image: in the field provided, specify how long you want each of the imported images to display. Each image can display for as long as 99 frames, or as short as for 1 single video frame. For each displayed image, skip: when importing a large number of images that were taken over a period of time, you may find the need to remove some 16
30 CyberLink PowerDirector Help of the images to reduce the slideshow's duration. In the field provided, enter the number of images you want to remove for each displayed image in your slideshow. 17

31 PowerDirector Workspace Chapter 3: PowerDirector Workspace This chapter outlines the CyberLink PowerDirector workspace, and all of its features. The workspace in the Edit module is where you will spend most of your time when using CyberLink PowerDirector, so getting familiar with everything it has to offer is recommended. A - Rooms, B - Import Media, C - PowerDirector Plug-ins, D - Library Window, E - Expandable Workspace, F - Preview Window, G - Zoom In/Out, H - Undock Preview Window, I - 3D Display Configuration, J - Enable/Disable 3D Mode, K - Preview Quality/Display Options, L - Take Snapshot, M - Preview Player Controls, N - Editing Workspace, O - Range Selection, P - Function Buttons, Q Timeline Ruler, R - View Entire Movie, S - Track Manager PowerDirector Modules When you are within the main program window of CyberLink PowerDirector, there are four main modules available to you. Module Description 18
32 CyberLink PowerDirector Help Capture Capture media in a number of formats, from a variety of different sources. See Capturing Media. Edit In the Edit module you can edit and trim your imported media, arrange it in your video production, add effects, titles, PiP objects, transitions, music, chapters, subtitles, and much more. See the relevant section of this help file that corresponds with the editing feature you'd like to use. Produce In the Produce module you can output your created production to a video file in a variety of formats (including 3D formats), a device (camcorder, mobile phone, or other portable device), or upload it to YouTube, Facebook, DailyMotion, Vimeo, and more. See Producing Your Project. Create Disc Use the features in the Create Disc module to design discs with menus, and then burn your video production in a variety of different formats in 2D or 3D. See Creating Discs. When CyberLink PowerDirector launches in timeline or storyboard mode, it automatically opens in the Edit module. Just click on the module button at the top of the window to quickly switch to the available modules to perform your required task. Rooms The various rooms in the Edit module of CyberLink PowerDirector are where you can access all of your media, effects, titles, and transitions when editing your video production. You can also gain access to controls for recording and mixing audio, adding chapters or subtitles. By default, the library window displays the Media Room. Media Room The Media Room provides access to your media library and the PowerDirector plugins. The media library contains your video, audio, and image files. You can also access a number of useful color boards and backgrounds for use in your video productions, or view your library of saved and express projects. 19
33 PowerDirector Workspace Click to access the PowerDirector plug-ins. See PowerDirector Plug-ins for a detailed description of the plug-ins and their available features. Managing the Media Library Use the button to manage the media in your media library. You can sort the media, change the media thumbnail icon size, or select Details to view file information instead of a thumbnail. Note: if you cannot find this button when in the media library, you may need to resize the preview window to reveal it. See Expanding the Workspace for more information. Other media library management options include: Note: see Library Window for more information about the library menu options available in all rooms. Export Library: select to export your entire media library as a file for backup, in the PDL (PowerDirector Library) format. Import Library: select to import a media library PDL file, exported from another project or version of CyberLink PowerDirector. Empty the Library: select to empty the entire contents of the media library. Remove All Unused Content from Library: select if you just want to remove the media that is not being used in the current project. Content Aware Details When in the Media Room, you can select the Content Aware Details* option from the library menu to view the analysis results for all the video clips analyzed and edited in Content Aware Editing. Clips that were previously analyzed are indicated by the green (good parts) and light brown (bad parts) dots in the specific columns. Note: * optional feature in CyberLink PowerDirector. Check the version table on our web site for detailed versioning information. To analyze video clips in this view, select them in the Analyze column and then click the Analyze button. 20
34 CyberLink PowerDirector Help To edit a video clip using Content Aware Editing, click. If the video clip has not yet been analyzed, CyberLink PowerDirector will do this first before opening the Content Aware Editing window. See Content Aware Editing for more detailed information on this feature. Effect Room The Effect Room contains a library of special effects that are used on the video files and images in your project. For more information, see Adding Effects. Note: the video effects with the 3D icon produce a 3D effect in 3D mode and when outputted in 3D video productions. PiP Objects Room The PiP Objects Room contains a library of PiP objects, or graphics, that you can add on top of the video or images on a video track. You can place PiP objects onto any track in the timeline. The PiP Objects Room also includes paint animation objects and access to the Paint Designer. Note: the PiP objects with the 3D icon produce a 3D effect in 3D mode and when outputted in 3D video productions. For information on adding PiP objects, see Adding PiP Objects. For information on the hand drawn paint animation objects you can create in the Paint Designer, see Using the Paint Designer. Particle Room The Particle Room contains a library of effects you can place on a video track to add a particle object (snow, clouds, smoke, etc.) on top of a video or image on a video track. Note: the particle effects with the 3D icon produce a 3D effect in 3D mode and when outputted in 3D video productions. You can modify particles in the Particle Designer. For more information, see Adding Particle Effects. 21
35 PowerDirector Workspace Title Room The Title Room contains a library of title effects that allow you to add movie titles, screen captions, credits, etc. on your videos. Note: the title effects with the 3D icon produce a 3D effect in 3D mode and when outputted in 3D video productions. For more information, see Adding Title Effects. Note: if you want to add subtitles to your video, see the Subtitle Room. Transition Room The Transition Room contains transitions that you can use on or between clips in your project. Transitions let you control how media appears and disappears in your project, and changes from one clip to the next. For more information, see Using Transitions. Note: you can create your own custom transitions, or edit existing alpha transitions, using the Transition Designer. See Modifying Alpha Transitions in the Transition Designer for more information. The transitions with the 3D icon produce a 3D effect in 3D mode and when outputted in 3D video productions. See The Difference Between 3D and 3D-Like Effects to learn more about both types of effects. Audio Mixing Room In the Audio Mixing Room you can use controls to mix all of the audio tracks in your project. For more information, see Mixing Audio and Recording Voice-Overs. Voice-Over Recording Room In the Voice-Over Recording Room you can record a voice over for your video production, while you are watching it play back. For more information, see Recording Voice-Overs. 22
36 CyberLink PowerDirector Help Chapter Room In the Chapter Room* you can automatically or manually set chapter markers for your project. Setting chapters on your final disc allows viewers to jump from the menu page to the chapter markers you have set in order to navigate through your disc. For more information, see Adding Chapters. Note: * optional feature in CyberLink PowerDirector. Check the version table on our web site for detailed versioning information. Subtitle Room In the Subtitle Room you can add subtitles to your video production manually or through the import of a TXT, SRT, or MKV file. For more information, see Adding Subtitles. Library Window The library window contains all of the media in CyberLink PowerDirector, including your video, images, and audio files. When you are in other rooms (Effect Room, PiP Objects Room, etc.), it contains the effects, titles, and transitions you apply to your media. The media content and available buttons that display in the library window depend on the room you are currently in. Click the button above the library window and then use the slider to adjust the size of the media thumbnails in the library. 23


37 PowerDirector Workspace You can also resize the media thumbnails by selecting a default size from the library menu. 24

38 CyberLink PowerDirector Help Explorer View Select the button to display the explorer view within the library windows. In the explorer view you can use tags to categorize the media, templates, and effects in your library. This lets you quickly browse through and filter what is in each room. Note: you can also use tags to filter the express projects in your library. See Using an Express Project for more information on express projects. In the explorer view you can: click on to add a new tag in a library window. select an existing tag and then click to delete a previously created tag. filter the media in the library window by selecting an existing tag. Searching the PowerDirector Library If you are looking for specific media, effects, or templates in a library window, use the search function to find it. To search in the library, do this: 1. Enter in a keyword in the search field located on top of the library window. 2. CyberLink PowerDirector filters the content in the library window based on the keywords entered. 25

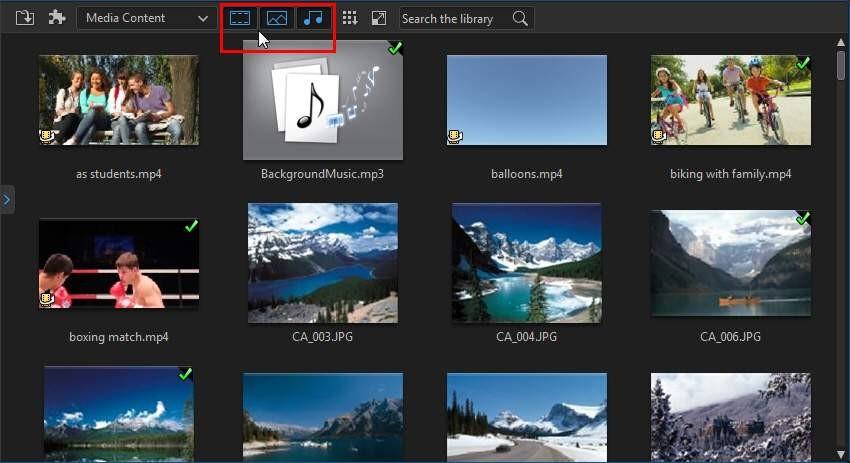
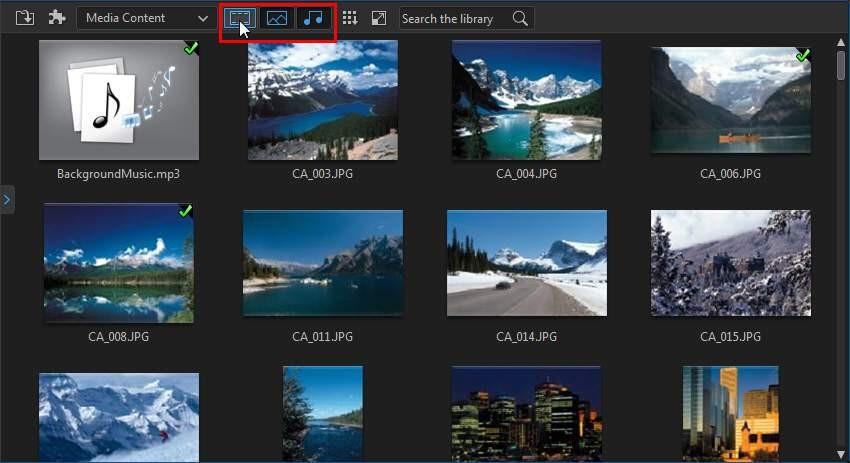
39 PowerDirector Workspace Note: click on to clear the search results. Filtering Media in the Library Use the available drop-down menus at the top of the library window to filter the media that is displayed. For example, when viewing the media in the Media Room, use the Media Content drop-down to display just your media content, the available color boards, backgrounds, your saved projects, or to select a tag. Select Express Projects to view a library of project templates you can use. See Using an Express Project for more information. If you'd like to filter the media files that are in the library by file type, use the three buttons above the library window. Click these buttons to hide media so you can more easily find what you are looking for. 26
40 CyberLink PowerDirector Help 27
41 PowerDirector Workspace Library Menu Click on to access the library menu. In the library menu you can sort the content in a room by name, date created, file size, and more. You can also select all the content in the room or change the media/effect thumbnail display size. Other options that are available in the library menu, but are dependent on the specific room you are in. Note: if you cannot find this button when in the media library, you may need to resize the preview window to reveal it. See Expanding the Workspace for more information. Expanding the Workspace The look and layout of the CyberLink PowerDirector workspace is fully expandable and customizable based on your personal preference. 28

42 CyberLink PowerDirector Help Simply drag the borders of the preview window and timeline to resize them to your liking. This allows you to get the most out of your display device space and customize the size of the preview window and timeline as you work. Note: you can also undock the preview window for a much larger timeline and library view. See Undocking the Preview Window for more information. Preview Window While creating your video production, you can preview it in the preview window using the available player controls. 29

43 PowerDirector Workspace Preview Player Controls With the player controls you can preview your production as you edit, including playing your project from the current timeline position, or pausing and stopping playback. Click the Clip button to play back only the clip that is selected in the timeline, or Movie to play the entire video production. When viewing media in Clip mode, the cross hairs and grid lines/tv safe zone (if enabled) are visible to help with the placement of the selected clip in the video display area. When in Movie mode, these items are hidden. Note: you can set PowerDirector to auto switch the playback mode to M ovie mode in Editing Preferences. Use the button to select a seek by method (frame, second, minute, scene, subtitle, chapter, segment) and then use the buttons on either side of it for a more precise step through of your current production. 30
44 CyberLink PowerDirector Help You can also click and drag the playback slider, or enter in a specific timecode in the time field, and then press the enter key on your keyboard to quickly find a specific scene. Click the button to undock the preview window for a larger view of your production. See Undocking the Preview Window for more information. Preview Screen Snapshots While previewing your video project, click to take a screen snapshot and save it as an image file that's added to your media library. The resolution of preview screen snapshots is 1920x1080, no matter the project preview resolution or the resolution of the original clip. Note: if you want the screen snapshot to be the same resolution as the original video clip, take it while the clip is in the media library. See Capturing Screen Snapshot from a Video Clip for more details. You can also take a 3D* screen snapshot (just enable 3D mode) and then save it as an MPO or JPS image file. Note: * Optional feature in CyberLink PowerDirector. Check the version table on our web site for detailed versioning information. Before taking the snapshot, you can set its file format (and default file name) on the File Preferences tab. Preview/Display Options CyberLink PowerDirector includes some preview and display options that help make your editing experience easier. Click on to set the preview quality, show the TV safe zone, display grid lines, or enable dual preview. Note: you can also set these options in Display Preferences. 31
45 PowerDirector Workspace Preview Quality Click, select Preview Quality, and then a preview quality from the list (Full HD*, HD*, high, normal, low) to set the resolution/quality of the video used when previewing your movie in the preview window. The higher the quality you select, the more resources that are required to preview your video project. Note: Full HD and HD preview resolution are only available when the Ultra or Ultimate version of CyberLink PowerDirector is installed on a 64-bit operating system. Preview Mode CyberLink PowerDirector provides two modes you can use to preview your video production: Real-time Preview: synchronizes and renders clips and effects in real-time, displaying a preview of your video at the specified frames per second. See the timeline frame rate option in General Preferences for information on setting the correct frame rate for your production. Non Real-time Preview: mutes the audio and displays a preview at a reduced speed to help make editing go more smoothly. Useful when editing highdefinition video, using multiple PiP tracks on a less powerful computer, or when you receive dropped frames when previewing. By muting the audio and slowing down the video, CyberLink PowerDirector lets you view more frames per second when your computer has trouble providing a smooth preview during editing. Note: you can also preview a portion of your video using the Render Preview and Produce Range options. See Range Selection for more information on these functions. TV Safe Zone/Grid Lines When you place media on the timeline, use the TV safe zone and grid lines to help with the precise placement on your video project's image. These display options are only available when in the Clip preview mode. 32
46 CyberLink PowerDirector Help Click the button and then select TV Safe Zone > On to enable a box that indicates the on-screen area of most TV displays. Click the button, select Grid Lines, and then select the number of lines you want to display in a grid over the video image. Use this grid to more precisely place the PiP media and title text on the video image. Once enabled, select Snap to Reference Lines* to have the selected objects snap to the grid lines, TV safe zone, and the boundary of the preview window. Dual Preview If you have a secondary display device, such as a monitor, TV, or DV camcorder connected to your computer, click the button and then select Dual Preview* to extend your workspace and preview your project on a secondary display. Note: to use a connected monitor or TV as a secondary preview window, you must first enable extend desktop to a secondary display in the Windows Display Properties Settings. * optional feature in CyberLink PowerDirector. Check the version table on our web site for detailed versioning information. Once enabled, when you click play in the preview window, you can preview your production on both your primary and secondary display when Primary 2D and Secondary 2D Display is selected. Select DV Camcorder to extend your production preview to a connected DV camcorder device. 3D Dual Preview When your desktop is extended to a secondary display, you can enable 3D on one of the two devices. If you want one of your previews to be in 3D, select either Primary 2D and Secondary 3D Display or Primary 3D and Secondary 2D Display to enable it. Your selection depends on which device you want to enable, and which one supports 3D. Note: if both of your displays are 3D devices, you can only enable 3D on one of the two devices in dual preview mode. 33
47 PowerDirector Workspace Zoom In/Out When you place media on the timeline, use the Fit* drop-down underneath the preview window to zoom in or out on the video. Zooming in is useful for precise placement of media, while zooming out lets you add media that begins off screen. Note: * optional feature in CyberLink PowerDirector. Check the version table on our web site for detailed versioning information. Undocking the Preview Window Click the button to undock the preview window. Once undocked, you can preview your production at full screen or move it to an extended desktop. You can also resize the timeline and library window to your liking. Once undocked, you can: click to view your production at full screen, or preview window. click to maximize the to minimize the preview window, and hide it so you can edit more freely. Click on window. click on next to the APP button to show the minimized preview to re-dock the preview window. Playing 360 Media Files After 360 * video and image files are imported into the media library, they can be played back in 360 viewer mode. To play back a 360 media file in 360 viewer mode, do this: Note: see 360 Media Files for more information about imported 360 videos and images. * optional feature in CyberLink PowerDirector. Check the version table on our web site for detailed versioning information. 1. First, ensure your project's aspect ratio is set to 360. See Setting Project Aspect Ratio for more information. 2. Select the 360 media file in the media library or on the project timeline. 3. Click to enable the 360 viewer mode. 34

48 CyberLink PowerDirector Help 4. If it is a video file, click the play button to start playing it back. 5. Use the 360 controls to view and explore the 360 environment. Note: you can also click and drag your mouse in the preview window to explore the 360 environment. 360 Controls When you select or play 360 media files, there are extra 360 controls available in the preview window. When viewing or playing a 360 media file, you can click and drag on the preview window to pan around the 360 environment or use the 35 controls to pan left,
49 PowerDirector Workspace right, up, or down. Note that you can click the in the middle of the controls at any time to reset to the default viewing position. Note: you can also use your mouse's scroll wheel to zoom in and out within the 360 view. Previewing in 3D Mode In the preview window you can enable 3D* mode to view the media in your production in 3D, while you work. Note: for detailed information on adding and setting the source format of 3D media, see 3D Media. * Optional feature in CyberLink PowerDirector. Check the version table on our web site for detailed versioning information. 3D Configuration Before you can enable 3D mode, you must first set your 3D display device. To set your 3D display device, do this: 1. Select the 3D configuration menu underneath the preview window 2. Select one of the following options:. select your 3D display type from the list, i.e. 3D-Ready HDTV (Checkerboard), Micro-polarizer LCD 3D (Row-Interleaved), 120Hz Time-sequential 3D LCD, HDMI 1.4 Enabled 3D TV, etc. if you are not sure which type of 3D display you have, select the Auto Detect 3D Mode option to have CyberLink PowerDirector detect it for you. if you do not have a 3D display, select Anaglyph Red/Cyan mode and then use anaglyphic (red/cyan) 3D glasses to view 3D content. Enabling 3D Mode Once you have set your 3D display device, you can enable 3D mode at any time to preview your video production in 3D. To enable, just click the button. 36
50 CyberLink PowerDirector Help Note: any 2D media in your production will not display in 3D. However, you can convert all of the 2D media to 3D using TrueTheater 3D in Power Tools. See Power Tools: 2D to 3D for more information. To disable 3D mode, just click the button. Editing Workspace The editing workspace is where you create your project by adding your media, various effects, transitions, title effects, etc. The editing workspace has two different modes, the timeline and storyboard modes. They are accessed at first launch in the PowerDirector launcher window. Note: once you have entered one of the editing workspace modes, if you'd like to switch to the other mode, you can do so by pressing the Tab key on your keyboard. Timeline Mode In timeline mode you can view your entire project based on running time. This view is useful if you want to insert media, effects, subtitles, etc. at a specific moment in production. The timeline also provides a view of all the tracks, media, and other content (chapter markers, subtitle markers) that are displayed in the timeline. Timeline Tracks The timeline contains the following tracks: Track Description Video tracks contain your project's media clips (video clips and images) and effects (PiP objects, particle effects, title effects, etc.) on the timeline. By default, there are two video tracks in the timeline, but you can have up to 100 video tracks by adding more in the Track Manager. Each video track in the timeline may have an associated audio track for the video clip's audio. Audio tracks contain the audio in your project. The audio may be the audio portion of a video clip on the video track, or a separate audio track for music clips or other audio. By default there are two audio tracks linked with a video track, and a separate audio 37
51 PowerDirector Workspace track for music, which is always the bottom track in the timeline. You can have up to 100 audio tracks by adding more in the Track Manager. The effect track contains any special effects that you want to apply to your final video. Video effects in the effect track are applied to all the video tracks that are positioned above it in the timeline. The title track contains the text title effects that appear in your project. The titles you add to this track display over all the content in every video track that display during their duration. The voice track contains a narrative voice-over or other audio clips. The music track contains your video's soundtrack. The chapter track contains all of the chapter markers in your current video production. This track displays when you are in the Chapter Room. Right-click on the timeline and then select Show Chapter Track if you always want this track to display in the timeline. The subtitle track contains all of the subtitle markers in your current video production. This track displays when you are in the Subtitle Room. Right-click on the timeline and then select Show Subtitle Track if you always want this track to display in the timeline. The SVRT track displays the Intelligent SVRT information for your current project. See Utilizing Intelligent SVRT for more information. Right-click on the timeline and then select Show SVRT Track if you always want this track to display in the timeline. The clip marker track displays all of the clip markers on your media clips. Clip markers are automatically added when using Music Beat Detection or the Screen Recorder. Or they can be added manually on each individual media clip on the timeline. Right-click on the timeline and then select Show Clip Marker Track if you always want this track to display in the timeline. 38
52 CyberLink PowerDirector Help Timeline Behavior The CyberLink PowerDirector timeline has several behavior features that make it easy to manage media on the timeline. On the timeline you can: place media clips at any position on a video track. If no media is placed before a media clip on the timeline, your video production displays a black screen until the timeline position of your media clip is reached. media clips will snap to other clips on the timeline for easy placement in your production. If want to move the clips more freely on the timeline, you can disable snap to clips in Editing Preferences. hold down the Ctrl key on the keyboard and select multiple media clips on the timeline. click and drag the mouse to select multiple media clips on the timeline. right-click on select media in the timeline and select Group Objects. Doing this allows you to move all the selected media clips as a group. Select Ungroup Objects to once again allow for individual media clip movement. Note: you cannot include transitions in grouped objects. Timeline Ruler You can resize the timeline ruler for a more expanded or condensed view of your production. To resize the ruler, click on the ruler and drag it left or right. Expanding the ruler is especially handy when aligning clips and effects, while condensing it gives you a global overview of your entire production. Click to auto fit your current project in the timeline area if you want to view the entire movie in the editing workspace. You can also right-click on the timeline ruler 39
53 PowerDirector Workspace and select View Entire Movie to do this. Or select Zoom In or Zoom Out to change the view to your required size. Use the timeline ruler slider corner to manually resize the timeline. located in the bottom left Timeline Markers You can add timeline markers* to the timeline ruler for more precise media placement on the timeline. Once added, media clips snap to the timeline markers, allowing your media to appear in your video production at the exact moment you want it. Note: * optional feature in CyberLink PowerDirector. Check the version table on our web site for detailed versioning information. Adding Timeline Markers To add a timeline marker, do this: 1. Hover your mouse over the timeline ruler. The green timeline marker indicator displays with the displayed time. Note: use the timeline ruler to expand the timeline for a more precise placement of timeline markers. 2. Once you have found the time where you want to place the timeline, rightclick on the ruler and then select Add Timeline Marker. 3. Input a Note for the new timeline marker, if required. 4. Click on OK to add the new timeline marker. 40

54 CyberLink PowerDirector Help Once a timeline marker is added, media will snap to it when added to a track in the timeline. Note: you can manually drag a timeline marker to different position if the original is not in the exact location you wanted it. Expand the timeline ruler for a more precise placement, if necessary. Right-click on the timeline ruler and then select Edit Timeline Markers to view a list of all the timeline markers you have added. In this list you can remove any of the existing markers, or double-click in the Note column to edit the associated text. Clip Markers You can manually add markers to a selected clip in the timeline. Once added, media clips and effects snap to the clip markers, allowing for more precise editing. Adding Clip Markers To add a clip marker, do this: 1. First, ensure that the clip marker track is displayed. To display it, right click on the timeline and then select Show Clip Marker Track. 2. Select the clip on the timeline. 41


55 PowerDirector Workspace 3. Drag the timeline slider to the moment/time position in the clip where you want to add the marker. 4. Right-click at the timeline slider position on the clip marker track, and then select Add Clip Marker. 5. Input a Note for the new clip marker, if required. 6. Click on OK to add the new timeline marker. 42

56 CyberLink PowerDirector Help Once a clip marker is added, media and effects will snap to it when added to a track in the timeline. Note: you can manually drag a clip marker to different position if the original is not in the exact location you wanted it. Also, if you move the media clip to another position on the timeline, its clip markers move with it. Function Buttons When you select media that is on the timeline, whether it's a video clip, image, audio clip, effect, title effect, etc., several function buttons display above the timeline. These buttons let you perform a variety of tasks or gain access to some important features of CyberLink PowerDirector. The function buttons that are available depend on the type of media content you select. However, whenever you select media, the always displayed. Click and buttons are to remove the selected media content from the timeline, or to gain access to more timeline functions, which vary depending on the selected media. 43
57 PowerDirector Workspace Magic Tools When editing your video project in the timeline, you can click the button to use the magic tools to edit and touch up your audio, video, and image clips. Magic tools can also help you add a creative style to your video production or add the right background music. CyberLink PowerDirector offers the following magic tools: Magic Movie Wizard: automatically creates an edited video blended with stylish effects and transitions. Magic Fix: fixes and enhances your photos and videos, including fixing shaky video, enhancing video quality, removing red-eye, and enhancing the focus on photos. Magic Motion: applies zooms and pans to your images. You can also use the Magic Motion Designer to manually customize motion on an image. Magic Cut: condenses long video segments into shorter clips that contain only the best moments. Magic Style: creates professional videos with pre-designed style templates automatically. Click on the using them. button within these tools to consult the ihelp for assistance on Range Selection Click and drag one of the arrows on either side of the timeline slider to select a range* of media on the timeline. Note: * optional feature in CyberLink PowerDirector. Check the version table on our web site for detailed versioning information. 44

58 CyberLink PowerDirector Help Once selected, right click on the selection, select Loop Playback, and then click the play button if you want to continuously play back of the selected range. You can also cut or copy the range, and then paste it to another position on the timeline. You can also use this feature to manually highlight a portion of a clip that you want to then remove or trim out. Click Render Preview to have CyberLink PowerDirector render a video preview of only the highlighted range for playback in the preview window. Click Produce Range to produce just the selected range in the Produce window, outputting it as a video file that will be added to the media library. Click Lock Range if you want to lock the selected range. Once locked, you can more easily preview and even add additional media into the range for previewing, rendering, or producing. Click Lock Range again to unlock the selected range. Track Manager In the Track Manager* you can add additional video and audio tracks to the timeline. You can have up to 100 video tracks (with or without an audio track) in the timeline, or add up to 98 additional audio tracks. Note: * optional feature in CyberLink PowerDirector. Check the version table on our web site for detailed versioning information. Adding Tracks to Timeline Each video track you add, adds another layer of PiP video on the tracks above it in the timeline. To add tracks to the timeline, do this: Note: CyberLink PowerDirector auto adds a video and audio track for you when all the current video/audio tracks in the timeline have media on them. 45
59 PowerDirector Workspace 1. In the timeline mode, click on to open the Track Manager. 2. In the Video section, enter in the number of video tracks you want to add to the timeline. By default, one track is added, but you can add up to 98 video tracks (100 in total) to the timeline, as required. Note: if you don't want your additional video tracks to have a track for its audio, enter in 0 tracks in the Audio section. 3. In the Video section, select the Position in the timeline where you want to add the tracks. 4. In the Audio section, enter in the number of audio tracks you want to add to the timeline. By default, one track is added, but you can add up to 98 audio tracks (100 in total) to the timeline, as required. Note: if you only want to add an audio track (i.e. without a linked video track), enter in 0 tracks in the Video section. 5. In the Audio section, select the Position in the timeline where you want to add the tracks. 6. Click on OK to add the tracks to the timeline. To quickly remove any unwanted tracks from the timeline, just right-click on the timeline and then select Remove Empty Tracks. Customizing Timeline Tracks In CyberLink PowerDirector you can customize the layout of the workspace timeline and its tracks to fit your preference. Customizing Track Names To make it easy to identify all of your tracks if you have lots of media on multiple tracks, drag the left sidebar to reveal the track names. 46


60 CyberLink PowerDirector Help You can give all the tracks in the timeline a custom name as required. Reordering Tracks You can reorder the video tracks in the timeline if required. To reorder, click on the left sidebar and drag the track to the new position in the timeline. You can also drag the effect track to a new position in the timeline. Effects on the effect track are applied to all video tracks that are positioned above it in the timeline. 47

61 PowerDirector Workspace Adjusting Track Height Click and drag the bottom of a track on the left sidebar to resize it to your preference. You can also right-click on the timeline and select Adjust Video Track Height to adjust the height of all the video tracks in the timeline to one of the default sizes. Select Adjust Audio Track Height to resize all of the audio tracks, including the music track, voice track, and each video track's corresponding audio track. Locking/Unlocking Tracks To lock a track in the timeline, click at the left of the track. When a track is locked, you cannot add new clips to the track, or move or edit the clips it contains. To unlock a track in the timeline, click to the left of the track. Enable/Disable Tracks To disable a track in the timeline*, deselect to the left of the track. When a track is disabled, the media it contains is not displayed in the Preview window. This allows you to preview your project by tracks so you can concentrate on the track you are working on. Note: * optional feature in CyberLink PowerDirector. Check the version table on our web site for detailed versioning information. To enable a track in the timeline, select to the left of the track. 48

62 CyberLink PowerDirector Help Storyboard Mode Storyboard mode is a large graphical display, or storyboard, of all your video clips and images on the first track in the timeline. You can use it to visualize the main scenes and overall production more clearly. Note: some features are unavailable in the storyboard mode. If you try to perform a function that is unavailable, the program switches to the timeline mode automatically. You can switch back to storyboard mode after using the function by pressing the Tab key on your keyboard. Added transitions and effects are viewable and editable in storyboard mode. Just select the "i" icon and then the Effect function button to edit added effects, or select the transition icon and then Modify to customize the transition settings. To add background music in storyboard mode, just click the do this in the Add Background Music dialog: button and then 1. Click the 2. Select the audio file you want to use as the background music. 3. Use the slider to mix the audio level, by deciding whether to have more background music (More music) or the original video's audio (More video) in the production. 4. Click the OK button. 49 button.
63 PowerDirector Projects Chapter 4: PowerDirector Projects When working on a new video production, click the button to save it as a.pds file, a project file format that is used exclusively by CyberLink PowerDirector. These project files can be imported directly into the timeline, if required. See Importing PowerDirector Projects for more information. Note: a CyberLink PowerDirector project (.pds) file essentially contains a list of the media clips and effects used in your project, and a log of all the edits you want to make to your media. Project files do not include the media clips in them. If you want to save all your video production files in one place, use the Pack Project Materials function. To do this select, File > Pack Project M aterials from the menu. Use the options in the File menu to save, create new, or open existing projects in CyberLink PowerDirector. When you create a new project, CyberLink PowerDirector resets your media library. If you want to create a new video production using the same media that's currently in your library, select File > New Workspace. Note: saved PowerDirector projects are now easily accessible in the media library, and they are also reusable. See Reusing PowerDirector Projects for more information. If you have a CyberLink Cloud subscription you can upload saved projects and more to CyberLink Cloud*. See CyberLink Cloud Projects for more information. Note: * optional feature in CyberLink PowerDirector. Check the version table on our web site for detailed versioning information. The changes you make to your media in CyberLink PowerDirector do not affect the original media you imported into the program. Since your edits are all saved in the project file, you can trim, edit, or remove clips, but still keep your original files on your hard drive, untouched. So let yourself get creative. If you end up changing things too drastically, you can always start over. Setting Project Aspect Ratio To set the aspect ratio for your project, and your outputted video, select 4:3, 16:9, 9:16*, or 360* from the aspect ratio drop-down at the top of the window. 50

64 CyberLink PowerDirector Help When you select 360, your project will actually have an aspect ratio of 2:1 and is for users wanting to create and produce 360 virtual reality videos. See 360 Video Projects for more detail about these types of projects, and Playing 360 Media Files for more information on the extra preview window controls available in these types of projects. If you want to create/output a vertical video or video for playback on a portrait monitor, you should select the 9:16 aspect ratio. If some of the video clips you want to use in video production have a different aspect, you can adjust their aspect ratio once in the timeline. See Adjusting Video Clip Aspect Ratio for more information. Note: * optional feature in CyberLink PowerDirector. Check the version table on our web site for detailed versioning information. 360 Video Projects 360 * video projects let you create virtual reality videos you can output as a video file, or upload to YouTube, Vimeo, or Facebook. Note: if an imported 360 media file is not displaying correctly (no 360 logo), it usually means the file is in the RAW format and was not converted (stitched) for playback. The 360 media file must be stitched before it can be used in a 360 video project in CyberLink PowerDirector. See the documentation for your 360 camera manufacturer for information on stitching the files for viewing and editing. * this feature is not available in some versions of CyberLink PowerDirector. To play a 360 media file, just select it in the media library and then use the playback and 360 controls. See Playing 360 Media Files for more information. For information about editing these types of projects, see Editing 360 Video Projects. 51

65 PowerDirector Projects Exporting Projects You can export your CyberLink PowerDirector projects by writing them to a DV tape, or by packing all the materials in a folder on your computer's hard drive or CyberLink Cloud*. Exported projects can then be imported into another computer running CyberLink PowerDirector. Note: * optional feature in CyberLink PowerDirector. Check the version table on our web site for detailed versioning information. To export your project to a DV tape select File > Export > Write to DV Tape. To export it to a folder select File > Pack Project Materials. If you have a CyberLink Cloud subscription you can select File > Pack Project Materials and Upload to CyberLink Cloud to back up all the media files, and the project file, in a folder on CyberLink Cloud. Reusing PowerDirector Projects All projects created in CyberLink PowerDirector are now reusable, allowing you to use them as templates for your future productions. To access all your saved projects, make sure you are in the Media Room, and then do either of the following: Note: reusing your projects is similar to express projects, except you replace your media instead of the media placeholders. See Using an Express Project for more information. click to open the explorer view and then click My Projects. select My Projects from the Media Content drop-down. 52
66 CyberLink PowerDirector Help Note: to play back a saved project, just double-click on it in the media library. To reuse a saved project, just select it in the media library and then drag and drop it to a desired position on the timeline. You can also insert the saved project anywhere within a current project by dragging and dropping it to the desired position on the timeline. Saved projects can be added to the timeline in the exact same way as media clips. See Adding Media to the Workspace for detailed information on adding content to the timeline. Note: when you add a saved project to the timeline, all of its media is automatically added back into the media library. Once the saved project is in the timeline, you can simply replace all of the existing media clips, templates, and effects with the content you want to use in your new production. To do this, just drag the media clips/effects/templates to the desired positions on the timeline, hovering over the clip/effect/template you want to replace, drop it, and then select Replace. This replaces the current content with the new content you want to add, without changing the structure of the project. 53

67 PowerDirector Projects 54

68 CyberLink PowerDirector Help Note: if a media clip you are replacing is shorter than a newly added video/audio clip, CyberLink PowerDirector automatically trims the video/audio clip to fit the space. For all other media clips, CyberLink PowerDirector automatically resizes them to fit the original clip's duration. CyberLink Cloud Projects If you have a CyberLink Cloud subscription you can select File > Upload Project to CyberLink Cloud to store project files on the CyberLink Cloud* service from CyberLink. Note: * optional feature in CyberLink PowerDirector. Check the version table on our web site for detailed versioning information. To download a project that was saved on CyberLink Cloud, including projects that were packed in a folder with their media (materials), select Download Project from 55
69 PowerDirector Projects CyberLink Cloud from the File menu. In the window that displays, select a project and then click Download. Note: when you open a packed project stored on CyberLink Cloud, the project file and all the project media is downloaded to your local computer and stored in the download folder specified in CyberLink Cloud Preferences. 56
70 CyberLink PowerDirector Help Chapter 5: Importing Media into PowerDirector You can import media in a wide variety of formats into CyberLink PowerDirector, in many different ways. Whether you need to capture media from external sources, import media that is already on your computer's hard drive, or download it from the Internet. CyberLink PowerDirector makes it easy to get all your media into the program quickly, so you can start working on your video production. Note: media you import is saved in the current CyberLink PowerDirector project you are working on. If you create a new project, you will be asked if you want to merge the media in your library into the new project. You can also select File > New Workspace to create a new project, while maintaining the current media in the library. Importing Media Files If you already have video, audio, and image files that you want to use in your production on your computer's hard drive, in the Edit module you can import the files directly into CyberLink PowerDirector's media library in the Media Room. You can also import media files that are on a removable device. Note: if you import media files that are on a removable device into the media library, they will be removed if the removable device is disconnected. For best results, it is recommended that you copy the media to your computer's hard drive before importing. CyberLink PowerDirector supports the following file formats: Note: for a more complete and up-to-date list of the supported file formats, and supported devices, please visit out web site: Image: Animated-GIF, BMP, GIF, JPEG, PNG, TIFF 3D Image Format: JPS*, MPO* CyberLink PowerDirector also supports the import of the following camera RAW image formats, which are then converted to JPEG once imported: ARW (SONY), CR2 57
71 Importing Media into PowerDirector (Canon), DNG (Ricoh), ERF (Epson), KDC (Kodak), MRW (Konica Minolta), NEF (Nikon), NRW (Nikon), ORF (OLYMPUS), PEF (Pentax), RAF (Fujifilm), RW2 (Panasonic), SR2 (SONY), SRF (SONY) Video: 3GPP2, AVI, DAT, DivX**, DV-AVI, DVR-MS*, FLV (H.264), HD MPEG-2, M2T*, MKV (H.264, H.265), MOD*, MOV, MOV (H.264), MP4, MPEG-1*, MPEG-2*, MPEG-4 AVC (H.264)*, MPEG-4 HEVC (H.265)*, MTS*, TOD*, VOB*, VRO*, WMV, WMV-HD, WTV*, XAVC S* Note: ** to enable, you must download the DivX codec online. Available on Windows 32-bit only. 3D Video Format: Dual-stream AVI, MVC*, Side-by-Side Video*, Over/Under Video Audio: AAC, ALAC, M4A, MP3, OGG, WAV, WMA Note: * optional feature in CyberLink PowerDirector. Check the version table on our web site for detailed versioning information. To import media into CyberLink PowerDirector, in the Edit module, click then select one of the following options: and Import Media Files: import media files individually. Import a Media Folder: import the entire contents of a folder that contains the media files you want to use in your current project. Note: you can also drag and drop media onto the CyberLink PowerDirector window to import it into the program. 360 Media Files You can import and edit video and image files that were recorded with a 360* camera. Once imported, the 360 video files are automatically detected and indicated by a 360 logo in the top right of the thumbnail. Note: if an imported 360 video file is not displaying correctly (no 360 logo), it usually means the file is not using the 360 equirectangular projection video format required for editing. See the documentation for your 360 camera manufacturer for information on producing the video file in this format. * this feature is not available in some versions of CyberLink PowerDirector. 58
72 CyberLink PowerDirector Help See Playing 360 Media Files for information on the additional preview controls available in the preview window for these types of videos. See 360 Video Projects for more information on the what type of editing you can perform with these types of media files, and what features are not available. Setting 360 Projection Format If CyberLink PowerDirector did not detect your 360 video file and you are sure it has been produced for playback and editing, you can manually set the 360 projection format. You can also disable 360 mode for a file that was mistakenly detected as a 360 video file. Note: if you want to use 360 video clips and images in a 2D video production, you still need to set the correct 360 projection format to ensure the media displays properly in 2D. To set the 360 projection format, do this: 1. Right-click on a 360 media file in the media library and then select Set 360 Projection Format. 2. Select the 360 projection format by selecting one of the following: Equirectangular (360 ): equirectangular video is the standard projection used in 360 video. Equirectangular projection displays the 360 video environment, which is a sphere, onto a rectangular video screen. 2D Format (Not 360 ): select this option if the selected media file is actually 2D content. Note: if you want to use 360 video clips in a conventional video production, setting the projection format as 2D is not going to help. You will need to create the conventional video using the 360 footage in the View Designer. 3D Media CyberLink PowerDirector supports various 3D* video and image formats. You can use 3D media to create both 3D videos, and standard 2D video productions. All 3D media in the library is indicated by a 3D icon in the top left of its thumbnail. 59
73 Importing Media into PowerDirector Note: click the button to enable 3D mode to view the 3D content during the editing process. For more information on enabling 3D mode and configuring your 3D display settings, see Previewing in 3D Mode. * Optional feature in CyberLink PowerDirector. Check the version table on our web site for detailed versioning information. You can use and arrange 3D video clips and images in your video productions the same way you use 2D media. However, note that if you want to create a 3D video production, any 2D media in your project must be converted to 3D before production. See PowerTools: 2D to 3D for more information. Setting 3D Source Format When 3D media is imported into the media library, you may need to set the format of the 3D source video. This is because 3D media comes in a variety of different video source formats. CyberLink PowerDirector needs to know the source format of each 3D media file so that it can display it properly in 3D. Note: if you want to use 3D video clips and images in a 2D video production, you still need to set the correct 3D source format to ensure the media displays properly in 2D. CyberLink PowerDirector will incorporate the specified eye frames into your 2D video. To set the 3D source format of your 3D media, do this: 1. Right-click on a 3D media file in the media library and then select Set 3D Source Format. If the media file is on the timeline, right-click on it, select Set Clip Attributes, and then Set 3D Source Format. The Set 3D Source Format window displays. 2. Select the 3D source format by selecting one of the following: Auto Detect 3D Source Format: if you are not sure what the source format is of your 3D video, click this button to have CyberLink PowerDirector automatically detect and set it for you. 2D: select this option if the selected media file is actually 2D content. Side by side format: select this option if the 3D content has two different images side by side. CyberLink PowerDirector merges the two images to produce the 3D effect. Over/Under format: select this option if the 3D content has two different video images, one on top of the other. CyberLink PowerDirector merges the two images to produce the 3D effect. 60
74 CyberLink PowerDirector Help Multiview video coding: select this option if the 3D content is in the MVC video format (.mts or.m2ts file format). Dual view format: select this option if the 3D content is in the dual view source format (.avi file format). 3. From the drop-down available, Specify whether to display the left or right eye frame first. Use this feature if while editing or playing back 3D content you begin to feel uncomfortable or uneasy. This may be because the layout of the 3D image is displayed differently than most standard content. If this occurs, try selecting the opposite eye view. This switches the way the 3D content is displayed on your display device, and may reduce the discomfort. 4. Click OK to set your changes to the selected media file. The Difference Between 3D and 3D-Like Effects In supported versions of CyberLink PowerDirector, there are both 3D effects* and effects that have "3D-Like" properties. Like 3D media that can be imported into the library, 3D effects* are composed of two images from slightly different perspectives. 3D effects have one image for the left eye, and one image for the right eye. When these images are viewed together with compatible 3D hardware and software, they produce an effect that gives the perception of depth. In supported versions of CyberLink PowerDirector, you can enable this type of 3D effect for PiP media, particle effects, title effects, and on disc menus. The video effects and transitions indicated with the 3D icon on their thumbnail, also have these 3D effect properties when viewed and included in 3D video productions. Some title effects, transitions, and other features in CyberLink PowerDirector have 3D-Like properties. Available in all versions of the program, these effects are simply 3D animations that only consist of one image. 3D-Like effects do not produce a 3D depth effect when viewed in 3D mode. Note: * optional feature in CyberLink PowerDirector. Check the version table on our web site for detailed versioning information. 61
 you worked on and saved previously can be imported and then directly inserted into your video production's timeline. To do this, select File > Insert Project from the menu.")
75 Importing Media into PowerDirector Importing PowerDirector Projects CyberLink PowerDirector projects (.pds files) you worked on and saved previously can be imported and then directly inserted into your video production's timeline. To do this, select File > Insert Project from the menu. All of the media in the original project will be imported into the current project's media library, and also inserted at the current position of the timeline slider. Capturing Media CyberLink PowerDirector lets you capture media from a variety of sources directly into the media library. Click the Capture button to enter the Capture module. In the Capture module, the program appears as follows: A - Capture from a DV Camcorder, B - Capture from an HDV Camcorder, C - Capture from a TV Signal, D - Capture from a Digital TV Signal, E - Capture from a Webcam, F - Capture from a Microphone, G Capture from a CD, H - Capture from an External or Optical Device, I - Capture Desktop with Screen Recorder, J - Capture Preview Window, K - Captured Content, L - Quality Profile Setup, M - Capture Settings (Drive), N - Capture Player Controls, O - Capture Preferences 62
76 CyberLink PowerDirector Help Capturing from a DV Camcorder You can capture video content that you recorded with a DV camcorder. Use the capture from a DV camcorder option only if your camcorder connects to your computer using an IEEE 1394 (FireWire) cable. You can capture a single scene or a number of scenes in a batch from your camcorder. Note: to add a text remark, date, or timecode to the video you are capturing, click on the button in capture preferences area to enable it. See Capture Preferences for more information. If your DV camcorder connects to your computer via a USB connection, just import the video files directly from your camcorder, as if it was another hard drive on your computer. See Importing Media for information on importing video files onto your computer. Capturing a Single Scene You can capture a single segment of video from your camcorder using the capture player controls (record, stop, fast forward, rewind, etc.) underneath the capture preview window. This function is particularly useful, for example, if you want to acquire a long video segment in its entirety without skipping over sections. DV Backup The DV Backup* feature lets you back up the digital video from your DV camcorder directly to DVD using CyberLink PowerDirector. Insert a blank DVD disc into your disc drive and then click the backing up your video. button to begin Note: this feature requires a DVD burner. * Optional feature in CyberLink PowerDirector. Check the version table on our web site for detailed versioning information. Batch Capture from a DV Camcorder With Batch Capture, CyberLink PowerDirector scans your DV camcorder for intervals or scenes (or allows you to set them manually) on the tape, and then captures these scenes as separate video files and imports each of them into the program. 63
77 Importing Media into PowerDirector Automatic Batch Capture If you want CyberLink PowerDirector to auto capture and import each of the intervals/scenes on your DV camcorder, click the Camcorder tab. button on the DV An interval/scene is the content you recorded each time you pressed record and then stop during the video shooting process. For help on using this function, use the tips on the user interface. Manual Batch Capture Using manual batch capture* gives you more control over the capturing process and ensures that the scenes you want to include are captured. Manual batch capture is recommended when you know which scenes you want to capture and have a good idea where they are located on the tape. Click the button to access the manual batch capture feature. For help on using this function, use the helpful tips on the user interface. Note: * optional feature in CyberLink PowerDirector. Check the version table on our web site for detailed versioning information. Capturing from an HDV Camcorder You can capture video footage you shot with an HDV* camcorder. Use the capture from an HDV camcorder option only if your camcorder connects to your computer using an IEEE 1394 (FireWire) cable. To a capture scene from your HDV camcorder, use the capture player controls (record, stop, fast forward, rewind, etc.) underneath the capture preview window. If your HDV camcorder connects to your computer via a USB connection, just import the video files directly from your camcorder, as if it was another hard drive on your computer. See Importing Media for information on importing video files onto your computer. Note: * optional feature in CyberLink PowerDirector. Check the version table on our web site for detailed versioning information. 64
78 CyberLink PowerDirector Help Capturing from a TV Signal If your computer has a TV* tuner card installed and you want to capture segments from your favorite programs, select this option. To capture, use the capture player controls (record, stop, change channel, etc.) underneath the capture preview window. Note: * optional feature in CyberLink PowerDirector. Check the version table on our web site for detailed versioning information. Capturing from a Digital TV Signal If your computer has a TV tuner card installed that receives a digital* TV signal and you want to capture segments from your favorite programs, select this option. To capture, use the capture player controls (record, stop, change channel, etc.) underneath the capture preview window. Note: this feature is not available in all regions. * Optional feature in CyberLink PowerDirector. Check the version table on our web site for detailed versioning information. Capturing from a Webcam You can record live content with a webcam that is attached to your computer and then import it directly into your CyberLink PowerDirector media library. To capture, use the capture player controls (record, stop, etc.) underneath the capture preview window. Capturing from a Microphone Select this option to record audio with a microphone that is attached to your computer. To capture, use the capture player controls (record, stop, etc.) underneath the capture preview window. Capturing from a CD Use this option to rip your favorite music, or other audio, from an audio CD. To capture, use the capture player controls (record, play, stop, next/previous track, etc.) underneath the capture preview window. 65
79 Importing Media into PowerDirector Capturing from an AVCHD Camcorder You can capture video content that is on an external device, such as an AVCHD camcorder. Use the capture from an AVCHD camcorder option only if your camcorder connects to your computer using an IEEE 1394 (FireWire) cable. To a capture scene from your AVCHD camcorder, use the capture player controls (record, stop, etc.) underneath the capture preview window. If your AVCHD camcorder connects to your computer via a USB connection, just import the video files directly from your camcorder, as if it was another hard drive on your computer. See Importing Media for information on importing video files onto your computer. Note: * optional feature in CyberLink PowerDirector. Check the version table on our web site for detailed versioning information. Capturing from an Optical Device You can capture content from an optical device, such as video scenes from a DVD. To capture, use the capture player controls (record, play, stop, next/previous frame, etc.) underneath the capture preview window. You can also use the DVD disc structure tree to quickly select the titles and chapters you want to capture. Note: some DVDs are protected by technology that does not allow you to capture the content they contain. * Optional feature in CyberLink PowerDirector. Check the version table on our web site for detailed versioning information. Capture Desktop with Screen Recorder CyberLink PowerDirector's Screen Recorder lets you capture a video of your mouse movements on your computer's desktop. See Recording Your Desktop with the Screen Recorder for a detailed description of this feature. Captured Content All of the media you capture in the capture window is displayed in the Captured Content area. When you return to the Edit module, all of the media is automatically imported into your media library. 66
80 CyberLink PowerDirector Help In the Captured Content area you can right-click on media to perform a number of options, including detecting scenes in video clips and deleting unwanted content so that it won't import into the Edit module. The content captured in CyberLink PowerDirector is stored in the folder noted underneath the Captured Content area. If you want to store it in a different location, click the Change Folder button and select a different folder. Quality Profile Setup To set the file format and quality of the media you capture, click the Profile button. If this button is grayed out, that means that the original format and quality of the media is maintained, as set on the original media device (camcorder, etc.). The profile settings that are available depend on the capture device connected and the capture mode you have selected. Capture Settings Use the Settings button to configure the set up of your selected capture device. The capture settings that are available depend on the capture device connected and the capture mode you have selected. Note: when capturing from a DVD, this button reads Drive, allowing you to select the specific disc drive you want to capture from. Capture Preferences Before capturing media, you can set the preferences for your captured content. The capture preferences that are available, depend on the content you are capturing. Set the capture preferences as follows: to set a maximum capture length, select Time limit and then enter a time in the timecode box. to set a maximum captured file size, select Size limit and then enter a size limit (in MB). to add a text remark, date stamp, or time stamp to the video being captured, click on the button. In the Add Text Overlay window, select which type and display format of text overlay you want to include on your recorded video 67

81 Importing Media into PowerDirector on the Text tab. Select the Format tab to set the font and text position for the text. to take a still photo of a frame of video for use in your project, just click on at the point where you want to take the snapshot. The image is saved to the Captured content area. You can specify your preferred snapshot image file format in preferences. See File Preferences for detailed information. select Non real-time when capturing from a camcorder to continue processing captured video after the original video stops playing in order to ensure that no frames are dropped. select Begin with fade-in to add fade-in to audio captured with a microphone. select End with fade-out to add fade-out to audio captured with a microphone. select Record at maximum speed to record CD audio at a higher speed. Capturing at a higher speed reduces processing time, but yields audio of a lower quality. Downloading Media If you feel that you do not have enough media for your project, or you are looking for specific media to make your creation just perfect, in the Edit module you can download media from Flickr, DirectorZone, and CyberLink Cloud* into the media room library. Note: * optional feature in CyberLink PowerDirector. Check the version table on our web site for detailed versioning information. To display all the current downloaded media in the media library, select Downloaded from the Media Content drop-down. 68
82 CyberLink PowerDirector Help Downloading Content from DirectorZone/CyberLink Cloud You can download templates and effects created by CyberLink and other PowerDirector users from DirectorZone. Users that have a CyberLink Cloud subscription can also download any effects and templates you backed up on CyberLink Cloud*. Note: * optional feature in CyberLink PowerDirector. Check the version table on our web site for detailed versioning information. Downloading Effects and Templates from DirectorZone If you are looking for additional PiP objects, paint animation objects, title effects, particle effects, or disc menu templates for your library, you can click Download Templates to download them directly from the DirectorZone web site in to the PiP Objects Room, Particle Room, Title Room, or Create Disc module. When in the Edit module's Media Room, you can download sound clips into the media library. To do this, click on DirectorZone. and then select Download Sound Clips from Visit the DirectorZone web site for more information: My DirectorZone Templates In the My DirectorZone window you can conveniently download your custom PiP object, paint animation object, title effect, particle effect, and disc menu templates that you previously uploaded to DirectorZone. You can also access and download templates from your DirectorZone download history and also your favorite templates. To download My DirectorZone templates, do this: 1. In the Edit module, click in the PiP Objects Room, Particle Room, Title Room, or Create Disc module. 2. Click the My DirectorZone tab. 69
83 Importing Media into PowerDirector 3. Filter the templates by My Uploads, Download History, or My Favorites, or enter a search keyword in the field provided. 4. Select all of the templates you want to download. 5. Click Download to download them to your computer and import them into the library. Downloading Effects and Templates from CyberLink Cloud If you have a CyberLink Cloud subscription you can download the PiP object, paint animation, title effect, particle effect, and disc menu templates you previously backed up to CyberLink Cloud. Once downloaded, these templates are stored in the download folder specified in CyberLink Cloud Preferences, and imported into your media library. To download template from CyberLink Cloud, do this: 1. In the Edit module, click in the PiP Objects Room, Particle Room, Title Room, or Create Disc module. 2. Click the My CyberLink Cloud tab. 3. Filter the templates by selecting a collection from the drop-down, or enter a search keyword in the field provided. 4. Select all of the templates you want to download. 5. Click Download to download them to your computer and import them into the library. Downloading Photos From Flickr You can download your own photos directly from your account on Flickr into CyberLink PowerDirector. You can also search for and browse other user s photos from within CyberLink PowerDirector, and then import them into your media library for use in a project. To download photos from Flickr, do this: 1. In the Edit module, click on Flickr. and then select Download Photos from 70
84 CyberLink PowerDirector Help 2. Follow the steps in the wizard window to authorize CyberLink PowerDirector to use your Flickr account and accept the Terms of Use from Flickr. Note: having a Flickr account is not required to search for, browse, and download photos from Flickr. 3. Select from the drop-down whether to search for photos from: My Photos on Flickr: this option displays thumbnails of all the photos you have uploaded to your Flickr account. My Contacts' Photos: this option displays thumbnails of all the photos your Flickr contacts have uploaded to Flickr. Search for Photos on Flickr: select this option to perform a search for photos on Flickr. Note: use the drop-down filter menu at the top of the search window to sort the photos. 4. Select all of the photos that you want to import into your media library and then click on the Download button. Note: you cannot use the photos downloaded into your media library for commercial use. Click on the view its copyright information. button underneath a photo thumbnail to Downloading Royalty Free Music You can download royalty free music from Muserk and Audio Network, and use it in your video productions. Note: please consult the terms of use sections for both of these music services before purchasing, downloading, and including the music in your video project. To download royalty free music, in the Edit module click on and then select Download Royal Free Music from Muserk/Audio Network to go to the web site. Consult the help/faq on these web sites for detailed information about how to get music for your video productions. 71
85 Importing Media into PowerDirector Detecting Scenes, Extracting Audio, and Capturing Snapshots CyberLink PowerDirector can detect scenes in your video clips or extract the audio from them. You can also capture screen snapshots from video clips for use in your video projects. These new clips are displayed, separately from the original clips, in the media library. Detecting Scenes in a Video Clip The scene detection function automatically creates individual clips based on the individual scenes (or pre-edited shots) contained within a video clip. Detected scenes are not split from the original clip, but can be added to the workspace like any other media clip. Note: depending on the file format, scene detection on certain clips may not work as precisely as it does for others. You may need to split the scenes manually in the Scene Detection window. To detect the scenes in a video clip, do this: 1. Right-click on it in either the Captured Content area (Capture module), or in the media library (Edit module), and then select Detect Scenes. 2. The scenes in the video clip are automatically detected and then displayed in the Scenes panel. 3. Once you are done detecting the scenes in the video clip, click OK. The detected clips are displayed in a sub folder under the original video clip. When using scene detection, please note: if required, use the Sensitivity slider to increase or decrease scene detection sensitivity. Doing this may yield an increased or decreased number of scenes that are detected. Click Detect to redetect the scenes in the video clip. You are asked to confirm the clearing of the previously detected clips and then the updated scenes are detected and displayed in the Scenes panel. click on the button to configure the Advanced Scene Detection Settings. If the selected video clip is a DV-AVI file, you have the option to Detect by 72

86 CyberLink PowerDirector Help change of video frame (used on all other file formats) or Detect by change of timecodes (i.e.: timecodes are automatically set when you start and stop recording). Select the Disable preview during detection option to speed up the detection process if you find your computer runs slow during the process. to stop the scene detection process before completion, click the stop button on the playback controls. to detect scenes manually, drag the slider (in Clip mode) to the beginning of each new scene and then click. to preview a detected scene, just select it in the Scenes panel (ensure Segment is selected) and then click the play button. to view all the detected scene markers on the clip timeline, ensure that Clip is selected. to merge two or more detected scenes into one longer scene, select them in the Scenes panel and then click Merge. Click Remove All if you want to restore the clip to the original. You can add the individual scenes to the timeline or manage them in the media library like any other video clip. Video clips that contain detected scenes show a small folder icon in the lower right corner of the clip when displayed in the media library. To display a clip s scenes, click the folder icon. Extracting Audio from a Video Clip If you just want to use the audio from a video clip in your production, you can extract it in the media library by right-clicking on it and selecting Extract Audio. The audio is separated from the video and saved in the media library. You can use it in your project like any other audio file. 73
87 Importing Media into PowerDirector Note: when a video clip is already on the timeline, you can separate the audio from the video file by right-clicking on it and selecting Unlink Video and Audio. Capturing Screen Snapshots from a Video Clip You can capture screen snapshots while playing a video clip in the media library, or when previewing your video project on the timeline. The screen snapshots are added to the media library, and can be used in your video projects. Screen Snapshot Formats You can set the screen snapshot image file format in the Snapshot file name section of File Preferences. The following file formats are available: 2D screen snapshots: BMP, JPG, GIF, or PNG 3D* screen snapshots: MPO or JPS Screen Snapshot Resolution The resolution of a captured screen snapshot is 1920x1080, when previewing your video project on the timeline. If you want a screen snapshot to be the same resolution as the original video clip, you can capture it while the clip is in the media library. Capturing Screen Snapshots To capture a screen snapshot, do this: 1. While previewing your video project in the timeline, or a video clip in media library, click the button on the preview controls to pause playback. You can also drag the timeline slider, or use the other preview controls, to find the exact moment in the video where you want to capture the snapshot. 2. Click to take the screen snapshot. 74
88 CyberLink PowerDirector Help Note: if you want a 3D* screen snapshot, click first. to enable 3D mode 3. If required, browse to and then select the location where you want to save the new image file. 4. If required, enter a filename for the snapshot file. 5. Click Save to add it to your media library. Note: * Optional feature in CyberLink PowerDirector. Check the version table on our web site for detailed versioning information. 75
89 PowerDirector Plug-ins Chapter 6: PowerDirector Plug-ins CyberLink PowerDirector includes a number of plug-ins that can help you create video content for your production. In the Edit module, click the button above the Media Room library in the Edit module to view the available PowerDirector plug-ins. See the following sections for detailed information: Using the MultiCam Designer* Using the Theme Designer* Editing Video in the Action Camera Center Using an Express Project Recording Your Desktop with the Screen Recorder Creating Blends in the Blending Effect Designer Creating Video Collages Note: * optional feature in CyberLink PowerDirector. Check the version table on our web site for detailed versioning information. Using the MultiCam Designer The MultiCam Designer lets you seamlessly edit footage from multiple cameras, simulating the use of a live camera switcher. The MultiCam Designer* creates professional-looking edited content for use in your CyberLink PowerDirector projects. Note: * optional feature in CyberLink PowerDirector. Check the version table on our web site for detailed versioning information. To open the MultiCam Designer, in the Edit module, click the then select MultiCam Designer. button and Note: when entering the MultiCam Designer, any selected video files are automatically imported into the available camera (video source) areas. 76

90 CyberLink PowerDirector Help A - Import Video, B - Available Cameras (Video Sources), C - Import Audio, D - Synchronization Type, E - Selected Camera (Video Source), F - Recording Track, G - Recording/Playback Controls, H - Audio Source, I - Recorded Content, J - Available Audio Source, K - Source Tracks Importing Media In the MultiCam Designer you can have up to four different video sources from four different cameras. Each available camera (video source) can have more than one imported video clip on its source video track. Note: if you require more than four video sources for your production, you can use Sync by Audio to align them on the timeline and then edit the footage manually. See Syncing Clips by Audio for more information. You can also import one or more audio files to use as the source audio in the clip you are recording. 77
91 PowerDirector Plug-ins Importing Video Clips When you enter the MultiCam Designer, any video clips that were selected in the media library are automatically imported into the empty camera (video source) areas and the corresponding source video tracks. If no clips were selected, you are prompted to select clips from your hard drive for import. You can select multiple video clips for import. Each selected clip is placed in the next available camera area. Once all the camera areas are full, the next clip is imported into the first camera area, after (on the corresponding source video track) the previously imported clip. To import additional video clips, do either of the following: click the Import Video button and then Import From Hard Drive to import video clips from your computer's hard drive, or Import From Media Room to import clips from the existing media in the Media Room library. Select one or more clips and then click Open. The clips are placed in the next available camera areas and the corresponding source video tracks. Note: once all the available camera areas are full, the next clip is imported into the first camera area, after (on the corresponding source video track) the previously imported clip. to import video clips into a specific camera (video source) area, click the corresponding button. Next, select Import From Hard Drive to import video clips from your computer's hard drive, or Import From Media Room to import clips from the existing media in the Media Room library. Select one or more clips and then click Open. The clips are placed in the camera area and the corresponding source video tracks. Source Video Tracks All of the imported video clips are imported into the corresponding source video tracks. You can move the video clips to different locations on the video tracks, or even drag them to different tracks. You can also reorder the video clips on a source track by clicking the button next to the track and then using the and buttons to reorder them as required. 78
92 CyberLink PowerDirector Help To remove a video clip from a source video track, click next to the track, select the check box next to the clip you want to remove, and then click additional video clips to the source track, click the. To add button. Importing Audio Clips If you want to use an audio clip as the audio source in your recording instead of the audio of the imported video clips, you can import it separately into the MultiCam Designer. To import audio clips, click the Import Audio button and then Import From Hard Drive to import audio clips from your computer's hard drive, or Import From Media Room to import clips from the existing media in the Media Room library. Select one or more clips and then click Open. The clips are placed on the source audio track in the timeline. Source Audio Track All of the imported audio clips are imported into the source audio track. You can move the audio clips to different locations on the audio track. You can also reorder the audio clips on the source track by clicking the button next to the track and then using the and buttons to reorder them as required. To remove an audio clip from the source track, click next to the track, select the check box next to the clip you want to remove, and then click additional audio clips to the source track, click the. To add button. Synchronizing Clips Once you have imported all of the media clips into the MultiCam Designer that you want to use in your recording, the next step is to synchronize them. To synchronize the clips in the MultiCam Designer, do this: 1. Select the Audio source for your recording from the drop-down. You can use the audio of any of the imported video clips or select Imported Audio to use the audio that was imported on to the source audio track. 2. In the Synchronization drop-down, select one of the following: 79
93 PowerDirector Plug-ins Manual: select this option if you want to manually adjust the starting position of each clip on the source tracks. You can do this by clicking and dragging the clips on the source track to a new position. Note: you can also click the button in the camera area to manually move the clip on the source track back one frame. Click forward one frame. to move it Timecodes: select this option and then click Apply if you want the MultiCam Designer to synchronize using the video clip's timecodes. The MultiCam Designer will auto adjust the clips on the source tracks. Note: this option can only be used if the video clips were recorded with a DV or HDV camera that imprinted the timecode information in the clips and were captured by CyberLink PowerDirector. File Created Time: select this option and then click Apply to use the date and time the file was created as the synchronization points. The MultiCam Designer will auto adjust the clips on the source tracks. Audio Analysis: select this option and then click Apply if you want the MultiCam Designer to analyze the audio and then sync the files based on the audio in them. The MultiCam Designer will auto adjust the clips on the source tracks. Markers on Clips: select this option and then use the playback controls to find the synchronization points in each clip. Once you find a point, right click on the source track and then select Set Marker. Once you have manually added all the markers, click the Apply button. The MultiCam Designer will adjust the clips on the source tracks. Creating Recorded Content Once you have imported and then synchronized all the media clips in the MultiCam Designer, you are ready to record your video. The recorded video is placed on the recording track and then is imported into the Edit module's timeline once you click OK. To record your content, do this: 1. Select the camera (video source) you want to start off the recording with. You can do this by simply clicking on the camera preview area. 80

 or use keyboard hotkeys 1-4 to switch the recording to that source's content. 5.")
94 CyberLink PowerDirector Help 2. If required, click on in the recording controls to set the preview window resolution. Select the Create Shadow File for HD Video option to also create a shadow file for the recorded file. This can help speed up editing when using high definition files in your production. 3. When you are ready, click to begin recording. The MultiCam Designer will start recording, adding the current selected camera footage as recorded content on the recording track. 4. As required during the recording process, click another camera (video source) or use keyboard hotkeys 1-4 to switch the recording to that source's content. 5. Continue switching the camera (video source) as required, creating your recorded content on the recording track. 81
95 PowerDirector Plug-ins 6. When you are done click the or button to stop the recording process. 7. Click on OK to close the MultiCam Designer, and import the recorded content into the timeline. Note: if you'd like to modify the MultiCam Designer recorded content once it is in the timeline, just select it and then click the M ulticam Designer button. See Changing the Recorded Content for more information. Changing the Recorded Content Once you have recorded your content in the MultiCam Designer and imported it into the timeline, you can edit it like any other video clip on the timeline. However, if you find that you want to replace some of the footage, or add more footage to the recorded content, you can do this by re-entering the MultiCam Designer. To change recorded content in the MultiCam Designer, click on it in the timeline and then click on the MultiCam Designer function button above the timeline. Adding More Content If required, you can record more content. You can record from the beginning over the existing content, or continue from where you left off by using the playback controls to find a specific starting point to record from. See Creating Recorded Content for information on recording new content. When you are done, click OK to save your changes and import the updated recorded content into the timeline. Replacing Existing Content If you want to replace an existing segment on the recording track, do this: 1. Use the playback controls to find the segment you want to replace. 2. If you only want to replace part of a segment, you can split it into two separate segments. To do this, ensure the timeline slider is at the starting position of the part you want to replace, and then click Split. 82


96 CyberLink PowerDirector Help 3. Right-click on the camera segment you want to replace, and then select another camera (video source). 4. Repeat the above steps as required to edit and replace the segments. 5. When you are done, click OK to save your changes and import the updated recorded content into the timeline. 83

97 PowerDirector Plug-ins Using the Theme Designer If you enjoy using the Magic Movie Wizard to create your video productions, you can now fully customize the theme templates used to create these dynamic looking videos in the Theme Designer*. A theme may consist of one or more theme templates, or individual sequences from different theme templates. Note: * optional feature in CyberLink PowerDirector. Check the version table on our web site for detailed versioning information. As you customize the theme template, you can also fully customize how your media is displayed, giving you more creative control over your outputted movie. To open the Theme Designer, in the Edit module, click the then select Theme Designer. button and 84
98 CyberLink PowerDirector Help A - Media Tab, B - Effects Tab, C - Sequence Content Area, D - Added Sequences Area, E - Selected Sequence, F - Title Settings, G - Theme Background Music, H - Sequence Background Image, I Transition Settings, J - Preview Window, K - Preview Controls, L - Take a Snapshot, M - Auto Fill Media Slots Overview Themes that you edit in the Theme Designer consist of theme templates and your media (images and video clips). The resulting video is similar to the movie content created by the Magic Movie Wizard and Magic Style, but the Theme Designer provides much more creative control over the outputted movie. Theme Templates Theme templates are used to create a video production, with a specific type of theme or style, and can be downloaded from DirectorZone. Theme templates consist of a number of sequences. Each of these sequences contain elements, some of which are customizable and some of which are not. The customizable elements include the text and media (images, videos, and background music) you add to each sequence. You can add effects on this media and set how and when it is displayed. You can also set the background image on some sequences, and select the transition between each sequence in templates named "with transitions". Non-customizable elements include any animation included in the sequences. When selecting a theme template to use in the Theme Designer, you can choose to add one or more theme templates, creating a more original production. You can even just select some of the sequences in a theme template, or mix and match the sequences used. There are three types of sequences: opening, middle, and closing sequences. Opening and closing sequences usually contain text, while the elements in middle sequences are much more random. Adding Theme Templates/Sequences In the Theme Designer you can use one or more theme templates, or just certain selected sequences, to create your video. When you first enter the Theme Designer, you are prompted to select a theme template. 85

99 PowerDirector Plug-ins To add a theme template, just select it in the window and all of its sequences will be added. Note: you can preview a theme template in the preview window by selecting it and then using the available playback controls. 86
100 CyberLink PowerDirector Help If you don't want to use all the theme template's sequences, just deselect the ones you don't want to use. You can also select sequences from other theme templates and include them in your video. The Theme Designer will remember the order of your selections. Click OK once you have selected all the sequences. They will be loaded into the added sequences area of the Theme Designer. If you'd like to add more sequences, just click the button. You can drag and drop the sequences to reorder them, or right click to remove the selected one. Adding Media Clips Once you have selected the theme templates (and their sequences) that you want to use, you can start adding your images and video files to them. Note: the number of media files you can add to a sequence is dependent on its design. 87

101 PowerDirector Plug-ins To add media into the selected sequences, do this: 1. In the added sequences area, select the individual sequence you want to add media to. Note the number of media slots that are available in the sequence content area. The number of available slots varies from sequence to sequence. Note: some of the media slots in sequences allow you to add both images and videos into them, while others only allow one type of media. 2. Click on the Media tab and then drag and drop the media that you want in the sequence to the desired slot. Note: the media that is available on the Media tab are the videos and images you imported into the Media Room library. See Importing More Media Files if you want to import more media. 3. Continue this process until all the media slots have been used. 88
102 CyberLink PowerDirector Help 4. Select the next sequence, and then repeat steps 2 and 3 until all the media slots have been filled. Note: if you want a media file to continue playing from one sequence to the next, ensure the Continue from last clip in the previous sequence is selected. The first media slot will be auto populated with the content from the last media slot on the previous sequence. Deselect this option if you want new media displayed in the next sequence. 89
103 PowerDirector Plug-ins 5. Continue selecting all the sequences in your video until all of the media slots and sequences contain media. Note: when adding media you can also click the button to auto fill all the empty media slots in the sequences. Select Auto Fill by Library Order to fill by the created date, as displayed in the Media Room library. Select Auto Fill Using Videos First if you want to add the video clips first. Importing More Media Files Once you are in the Theme Designer, there are two ways you can import more media files into the window. To import more video files and images located on your hard drive, click the Import Media button. To take still snapshots from videos in the Theme Designer, click the Snapshot button. See Taking Snapshots from Videos for more information. Taking Snapshots from Videos You can take a snapshot from a paused video and then import the image into the Theme Designer to use in your video production. To take a snapshot, do this: 1. In the main Theme Designer window, select the video file you want to use and then click the Snapshot button. 2. In the Snapshot window, use the playback controls to find the video frame you want to take a snapshot of. Pause the video and use the buttons to find the precise frame you want to capture. and 3. Click the. The snapshot image is captured. 4. Repeat the steps to take as many snapshots from the video as you wish. 5. Click OK to close the Snapshot window and import the captured images into the Theme Designer. 90
104 CyberLink PowerDirector Help Editing Media Clips There are several editing options available for the media clips you want to use in the Theme Designer. Note: the editing options in the Theme Designer are limited to video trimming, image duration, and adding effects. If you need to perform more complex editing on your media clips, it is recommended that you do this before importing the clips into the Theme Designer. See for Editing Your Media for more advanced editing options. Trimming Video Clips You can perform trims on the video clips used in the Theme Designer. To trim a video clip, right-click on it in the Theme Designer and then select Trim. Or hover your mouse over the video clip and click on in its thumbnail. See Performing a Single Trim for detailed information on trimming video clips. Muting Video Clips Some theme templates and sequences contain background music that will be used in your video. Because of this, you may want to mute the audio in the imported video clips, so that it doesn't conflict with the background music. To mute the audio in a video clip, hover your mouse over the video clip and then click on in its thumbnail. Modifying Image Duration To modify the duration that an image clip is displayed in your outputted video, do this: 1. Right-click on it in the Theme Designer and then select Set Duration. Or hover your mouse over the image clip and then click on in its thumbnail. In the Duration Settings window, enter in the how long you want it to display in your video production. You can set the duration down to the number of frames.
105 PowerDirector Plug-ins 3. Click on OK. Applying Zoom In on Media Clips Some media slots in sequences allow you to zoom in on the media clip that was added to it. If a zoom is available, then the corner. icon is displayed in the top right To apply a zoom in on the media clip, click on the if required. icon. Click to remove it Adding Video Effects to Clips In the Theme Designer you can add special effects to your images and video clips. Each special effect has unique attributes that you can customize to help achieve the impression you want in your video production. To add a video effect to a clip, do this: 1. Click on the Effects tab. 2. Select an effect and then drag and drop it on the clip. 3. If required, right-click on the clip and then select Modify Effect Settings. Use the available sliders and options to customize the video effect to your preference. Click on OK to save your changes. See Adding Video Effects for more information on video effects. Editing Background Music You can customize the music that is used in your video. To edit the background music, select one of the following options in the Background music drop-down: Default (First Page): select this option to use the background music that is included by default in theme templates. Note: if you select sequences from more than one theme template, the Theme Designer uses the background music that is applied to the first sequence in the video. 92

106 CyberLink PowerDirector Help Imported: select this option if you want to import your own custom background music from your computer's hard drive. Select the music you want to use and then click OK to set it as the music used. No Music: select this option if you don't want to have any background music in your video. Background Music Preferences You can trim the music used in your video or add fades. To do this, select Preferences in the Background music drop-down. Modify the music preferences as follows: if required, trim the background music using the player controls and the mark-in/mark-out indicators. if required, adjust the volume of the music using the available volume control. if required, use the slider to mix the audio level, by deciding whether to have more background music or the original video's audio in the production. Click OK to save your changes. Editing Title Text Some sequences contain title text that you can edit. If a sequence allows you to edit title text, the text fields in Title settings will become active when the sequence is selected. 93

107 PowerDirector Plug-ins To edit the title text, just enter the text you want to use in the fields provided. If you don't want any text displayed in the selected sequences, just make sure the text field blank. Replacing Background Images Some sequences let you replace their background image. A thumbnail of the background image is displayed in the Background area if the sequence has a replaceable background image. Click Click to replace the background with an image from your computer's hard drive. if you want to remove the background image from the sequence. Adding Transitions Between Sequences When viewing a video created with the Theme Designer, you will notice that there are transitions between the sequences in a theme template. These transitions are editable in theme templates named "with transitions". Transitions can also be added between sequences if you are using sequences from different theme templates. Note: in theme templates not named "with transitions", the transitions between sequences are not editable. These theme templates use your media to make the transitions between the sequences. If adding a transition is available for a sequence, the Transition settings area displays when the sequence is selected. 94


108 CyberLink PowerDirector Help Click to add a transition before the selected sequence. Click if you want to remove a selected transition from the sequence. See Using Transitions for more information on transitions. Previewing and Saving Movies As you are creating your video in the Theme Designer, you can preview your creation using the available preview controls. Click to preview the entire movie, or to preview just the selected sequence. Click movie. to change the preview resolution, or to take a photo snapshot of your The keyframe indicators on the preview timeline indicate where the media files in the sequence are in the movie. Hover your mouse over a keyframe to view the clip information. Once you are done previewing your movie and you are satisfied with the results, click on OK to close the Theme Designer, and import the created movie into the timeline. Editing Created Movies Once you have created your content in the Theme Designer and imported it into the timeline, you can edit it like any other video clip on the timeline. If you want to 95
109 PowerDirector Plug-ins edit or replace the media used in the created movie you can do this in the Theme Designer. To edit created content in the Theme Designer, do this: 1. Click on the created content in the timeline and then the Theme Designer function button. 2. As required, edit the video in the Theme Designer. 3. When you are satisfied, click OK to save your changes and import the updated created content into the timeline. Editing Video in the Action Camera Center In the Action Camera Center* you can fix video clips or add effects that highlight the action sequences in the video. Note: * optional feature in CyberLink PowerDirector. Check the version table on our web site for detailed versioning information. To open the Action Camera Center, in the Edit module, select a video clip in the media library, click the button, and then select Action Camera Center. Note: if your video clip is already on the timeline, you must select it and then click Tools > Action Camera Center to open it in the Action Camera Center. 96
110 CyberLink PowerDirector Help A - Fix Video Clips, B - Add Action Effects, C - Preview Window, D - Action Camera Center Settings, E Zoom on Timeline, F - Action Camera Center Timeline Once in the Action Camera Center, you can: Fix Video Clips Create Action Effects When you are done editing the video clip, click the OK button to save your changes. Your changes are applied to the video clip and updated on the video timeline. Note: to edit content created with the Action Camera Center, click on it in the timeline and then click on the Action Camera Center function button above the timeline. If you would like to view the individual clips created by the Action Camera Center for editing directly in the timeline, just right-click on the file and then select Show Individual Clips. 97
111 PowerDirector Plug-ins Fixing Video Clips When in the Action Camera Center, click on the Fix tab to stabilize shaky video, adjust video white balance, or add color presets. You can also use lens correction to remove fisheye distortions and vignettes. Lens Correction Select the Lens Correction option to import lens profiles to auto correct distorted videos, or use the controls to manually correct them if they have a fisheye distortion or vignette effect. Note: lens correction is not available in 360º video projects. When you enter the Action Camera Center, manually select the lens profile, using the Maker and Model drop-downs, that matches the camera your video was shot with. Once selected, CyberLink PowerDirector will auto correct the video. Note: if none of the lens profiles match your camera, you can download more from DirectorZone or manually fix the distorted video using the controls in this window. See more details below. Downloading Lens Profiles from DirectorZone If your video camera's lens and profile are not available in CyberLink PowerDirector you can click the button to download more lens profiles from DirectorZone. Once downloaded, click the button to import it. CyberLink PowerDirector should auto detect the imported profile and then correct the selected video. Fisheye Distortion The fisheye distortion section helps correct videos that appear distorted. Dragging the slider to the right straightens lines that bend away from the center, correcting barrel distortions. Dragging it to the left straightens lines that bend towards the center, fixing pincushion distortions in videos. 98
112 CyberLink PowerDirector Help Vignette Removal Use the following sliders to remove an unwanted vignette effect on videos that was caused by a camera lens or the lighting environment: Vignette amount: use this slider to adjust the level of vignette removal on the video. Vignette midpoint: drag the midpoint slider to the left to increase the size of the area (towards the center of the video) where the vignette removal is applied. Drag it right to decrease the size, towards the corners. Video Stabilizer Select the Video Stabilizer option to employ motion compensation technology to correct shaky videos. This tool is ideal for use with videos taken without a tripod or recorded while moving. Once enabled, drag the Strength slider to increase or decrease the level of correction. Note: when using the video stabilizer in 360º video projects, you can select the Compare in split preview option to compare the fixed video to the original source video in the preview window. Please note that all other fixes and effects are temporarily disabled when in split preview. Select the Fix rotational camera shake option if the clip has segments where the camera rotates from side to side. Select the Enhanced stabilizer option to improve the output quality of some video clips. Using this feature requires more computing power, so it is recommended that you switch to non-real time preview or render a preview for the applied range. Note: the rotational camera shake and enhanced stabilizer options are not available in 360º video projects. White Balance Select the White Balance option and then Color temperature to adjust the video's color temperature or create a specific atmosphere. Once enabled, use the slider to adjust the color of the video image. A lower value applies a colder temperature, 99
113 PowerDirector Plug-ins while a higher value creates an atmosphere that is warmer. Use the Tint slider to adjust the color level of the clip. Select the White calibration option and then click to color correct the video image. By indicating which portion of the video image should be white, CyberLink PowerDirector automatically adjusts the other colors accordingly to be more vivid and true. Color Presets Select the Color Presets option to apply CyberLink ColorDirector presets on your video clips, instantly transforming the color and look of the clips. To apply a ColorDirector color preset, do this: 1. Select the Color Presets check box. 2. Select one of the available color presets to apply it. If you have CyberLink ColorDirector installed, click the Edit in ColorDirector* button to access the advanced color enhancements available in this program. See Advanced Fixes and Enhancements for more information. Creating Action Effects on Video Clips Click on the Effect tab in the Action Camera Center to highlight action sequences in your videos clips with time shifts and freeze frames. Time shifts let you replay, reverse, or alter the speed of key moments in your videos, while freeze frames pause and zoom in on the action. Note: before you finish creating your action effects, configure the Action Camera Center Settings to ensure the best output results. Creating Time Shifts Time shifts let you highlight action in video clips by adding slow motion or replays on key moments. To create a time shift, do this: 1. On the Effect tab, use the player controls or drag the Action Camera Center timeline slider to the position in your video clip where you want the time shift to start. 100
114 CyberLink PowerDirector Help Note: use the zoom controls above the Action Camera Center timeline to zoom in on the video clip's timeline to more precisely add the time shift. 2. Click on the Create time shift button. CyberLink PowerDirector will create the time shift, which is indicated in orange on the timeline. 3. If required, drag each end of the time shift so that it covers the segment of the video you want to add the effect to. Note: the length of the original time shift is dependent on how much you have zoomed in on the Action Camera Center timeline. 4. Apply the effect as required (see below) to the time shift segment. Note: you can create more than one time shift on a video clip. Just repeat the above steps to add another. Replay In the Replay section, select the Apply replay and reverse option if you want to loop the selected segment of video in the time shift. Once selected, indicate how many times you want the segment to play by setting it in the Play times field. Select the Add reverse effect option if you want the video to reverse forward and backward as it loops playback. 101
115 PowerDirector Plug-ins Speed In the Speed section, select the Apply speed effect option to speed up or slow down just the selected segment of video in the time shift. Once selected, you can enter a new Duration for the segment in the field provided, or use the Speed multiplier slider. Drag it left to slow down the segment, or right to speed it up. When you apply a speed effect to a segment of video, by default the change in the speed in the video is instantaneous once the timeline slider enters the time shift. If you want it to be more gradual and look smoother, you can use the Ease in/out options. Select Ease in if you want the change of speed at the beginning of the time shift to gradually speed up/slow down to the specified speed. Select Ease out if you want the video to gradually return to the original video speed at the end of the time shift. Note: if you also selected the Apply replay and reverse option, in the Apply effect to drop down select whether to apply the speed effect to the first or last play of the time shift segment. Stop Motion Select the Stop Motion tab and then the Apply stop motion option to add a stop motion effect on the selected segment of video in the time shift. This effect pauses on a frame of video for a specified number of frames, before jumping to the current frame of video. Drag the slider right to increase the number of frames the video will pause for, or drag it left to reduce the number of frames. Zoom and Pan In the Zoom and Pan section you can add zooms and pans on the selected segment of video in the time shift. To add a zoom and pan in a time shift segment: 1. Drag the timeline slider to the moment in the segment where you want to be zoomed in/out on a portion of the video frame, and then click keyframe marker. to add a 102
116 CyberLink PowerDirector Help Resize and move the focus area box as required. Make it smaller to zoom in on a portion of the video, or make it larger to zoom out. Moving the focus area box will add a pan as the camera moves to the location of the box by the time the timeline slider reaches the keyframe.

117 PowerDirector Plug-ins Note: in the above example, the zoom in will begin at the beginning of the time shift. Once the keyframe is reached, the camera will start zooming back out. 3. If required, you can add more keyframes to customize the effect. For example, you can add another keyframe to hold the zoom, which is done by keeping the focus area box the same size and following the subject (moving the focus area box). 104
118 CyberLink PowerDirector Help Adding Freeze Frames Add a freeze frame to pause a frame of video for a specified duration. To add a freeze frame, do this: 1. On the Effect tab, use the player controls or drag the Action Camera Center timeline slider to the position in your video clip where you want the freeze frame. Note: use the zoom controls above the Action Camera Center timeline to zoom in on the video clip's timeline to more precisely find the frame Click on the Add freeze frame button. CyberLink PowerDirector will add a freeze frame, which is indicated by the blue indicator.
119 PowerDirector Plug-ins 3. In the Duration field, enter how long you want the video to pause on this frame of video. Note: you can add more than one freeze frame to a video clip. Just repeat the above steps to add another. Applying Zoom Effect Select the Apply zoom effect option if you want to zoom in and out on the paused frame of video. Once selected, resize and align the focus box to the part of the video frame where you want the zoom to occur. Note: if you also selected the Apply replay and reverse option, in the Apply effect to drop down select whether to apply the freeze frame to the first or last play of the time shift segment. Action Camera Center Settings Click the button in the Action Camera Center window to open the settings window. The available options are as follows: Audio setting: Remove audio: select this option if you want to mute the audio in the entire video clip. Keep audio: select this option if you want to keep the audio in the edited video clip. Select the Keep audio pitch (0.5X to 2X only) if you are changing the speed of the video. Selecting this will stretch the audio to match the new video's length, minimizing the warping of the sound as the video speed changes. Interpolation setting: Apply interpolated technology when available: select this option when reducing the speed of the video. CyberLink PowerDirector uses frame interpolated technology* to create a more advanced and smooth slow motion effect. Note: * optional feature in CyberLink PowerDirector. Check the version table on our web site for detailed versioning information. 106

120 CyberLink PowerDirector Help Changing the Action Camera Center Content Once you have created your action effects in the Action Camera Center and imported the resulting video clip into the timeline, you can edit it like any other video clip on the timeline. However, if you find that you want to edit or refine the effects more, you can do this by re-entering the Action Camera Center. Note: if you would like to view the individual clips created by the Action Camera Center so you can edit them directly in the timeline, just right-click on the file and then select Show Individual Clips. To edit content created with the Action Camera Center, click on it in the timeline and then click on the Action Camera Center function button above the timeline. Editing Content When you re-enter in the Action Camera Center, you can refine any of the fixes you made on the Fix tab. Click on the Effect tab to edit any action effects you created, or add new ones. To edit a created time shift, just select it on the video timeline, and then adjust its parameters as required. For freeze frames, select the freeze frame indicator, 107
121 PowerDirector Plug-ins and then adjust the freeze frame settings as required. Note: if you want to remove a time shift or freeze frame from a video clip, just select it on the Action Camera Center timeline and then click the button. When you are done, click OK to save your changes and import the updated content into the timeline. Using an Express Project Express projects are pre-designed project templates that will help you speed up the editing process. Note the names of the express project templates, as some are designed with a specific theme in mind (sports, wedding, travel, etc.) and to be at the opening, middle, or end of projects. To access the express projects, click the Projects. button and then select Express Note: you can also access the library of express projects at any time when you are in the Media Room by selecting Express Projects from the M edia Content drop-down. To use an express project, just select it in the media library and then drag and drop it on the timeline. You can also insert the express project anywhere within a current project, by dragging and dropping it to the desired position on the timeline. Express projects can be added to the timeline in the exact same way as media clips. See Adding Media to the Workspace for detailed information on adding content to the timeline. Note: you can also reuse old PowerDirector projects you created. See Reusing PowerDirector Projects for more information. Once the express project is in the timeline, simply replace the media placeholders in the template with the media content you want to use in your new production. To do this, just drag the media clips to the desired media placeholders on the timeline (which are indicated by the numbers on their thumbnails). Hover over the media 108

122 CyberLink PowerDirector Help placeholder until the clip fits within the placeholder length as shown below. This is done by hovering the hand icon over the media placeholder where you want the clip to be. Doing this replaces the media placeholders with the content you want to add, without changing the structure of the express project. Continue this process until all the media placeholders have been filled. Once you are done, you can continue to edit the project like any other project, including the effects and transitions that have been included in the express project. Recording Your Desktop with the Screen Recorder The Screen Recorder lets you record a video of your mouse movements and computer usage, allowing you to create instruction videos, record webcasts, and 109

123 PowerDirector Plug-ins more. To access the Screen Recorder dialog, click the select Screen Recorder. button and then Note: you can also access the screen recorder from the Capture module, by double-clicking on the desktop shortcut that was created during installation, or from the Windows start menu by selecting All Programs > CyberLink Screen Recorder. To capture with the screen recorder, do this: 1. In the Edit module, click the button and then select Screen Recorder. The Screen Recorder dialog displays. 2. Before capturing, set the recording preferences as follows: Aspect ratio: select whether you want the recorded video to have a 16:9 or 4:3 aspect ratio. Note: if you choose an aspect ratio that does not match the capture area selected, the resulting recorded video file will have black areas within the frame to fill the gaps on the video image. Mouse clicks: click the colored dot to set the color of animation used to illustrate that a mouse click was performed during the recording of the video. Select the option if you don't want the animation to appear in your video. Capture area: select whether you want the Screen Recorder to capture at Full Screen, using Lock to App, or just a Custom portion of the screen. See Setting Capture Area for detailed information on the available capture areas. Settings: before recording, click the Settings button to configure the Screen Recorder settings, including the recording file format, frame rate, and video resolution. See Configuring the Screen Recorder Settings for detailed information. 110
124 CyberLink PowerDirector Help 3. When you are ready, click the REC button to start the capture. The Screen Recorder displays a countdown screen, and then starts recording. 4. Once you are finished recording your video, press the hotkey (F10 is the default) you specified to stop the desktop capture (if enabled). If hotkeys are not enabled, click on the minimized Screen Recorder dialog and then click the button. 5. Once the recording has stopped, the video file is saved in the folder specified in Screen Recording Settings. If Import into PowerDirector is enabled in settings, you are returned directly to CyberLink PowerDirector window and the video file is also imported directly into the media library. Note: if the Import into PowerDirector option is not enabled, the Screen Recorder dialog is displayed after capture. Click the Edit button to launch PowerDirector and edit the video, or click on the REC button to record another video. Setting Capture Area Before you use the Screen Recorder to record a video, be sure to set the area of your computer's screen you want to capture. The following are the three options that are available: Full Screen Lock to App Custom Note: if you set a capture area that does not match the specified aspect ratio, the resulting recorded video file will have black areas within the frame to fill the gaps on the video image. Full Screen Click the 111 button if you want to record your entire computer screen.

125 PowerDirector Plug-ins Lock to App Click the button if you want to record within a running program window. Once selected, hover your mouse over the program you want to record within and then click in the program window to set the capture area. Note that a yellow dotted line is drawn around the program. This area represents the screen area that will be captured during the recording. If you move the program before recording starts, the Screen Recorder will follow the program. 112


126 CyberLink PowerDirector Help However, once you start recording, the Screen Recorder will only record the current capture area. If you move the program you originally focused on outside the dotted capture area, the Screen Recorder does not follow the program window once recording has started. 113

127 PowerDirector Plug-ins Custom Click the button and then use your mouse to manually set the size of the capture area by clicking and dragging your mouse. You can resize the selected capture area at any time before you start recording. 114
128 CyberLink PowerDirector Help You also have the option of selecting one of the fixed dimensions to use as your custom capture area by clicking the down arrow on the custom area button. You can even manually enter a dimension in pixels in the fields provided within the Screen Recorder dialog to set your custom capture area. 115


129 PowerDirector Plug-ins Please note that before you start recording, you can move the your custom capture area by clicking and dragging the crosshairs to a new location. 116
130 CyberLink PowerDirector Help Configuring the Screen Recorder Settings In the Screen Recorder Settings window, the available options are as follows: File settings: File name: enter a default name for recorded video files. Format: select the file format for the recorded video files. You can choose from MP4 and WMV file formats. Resolution: set the video resolution of the recorded video files. The larger the resolution, the larger the resulting recorded file will be. Frame rate: set the frame rate (in frames per second) of the recorded video file. The higher the frame rate, the larger the resulting recorded file will be. Save to: indicates the folder where the recorded video will be saved on your computer. To change this folder, click the new folder. button and then select a Import into PowerDirector: select this option to import captured files into the media library directly after capture. Audio settings: Voice over: select the On option if you have a microphone connected to your computer and you want to record a voice over while recording your video. Click the Setup button to set up your microphone as follows: select your connected microphone or other input device from the Input Device dropdown. Speak into the microphone, and then use the Input volume slider to set the recording level. Click OK to save the changes. System audio: select the On option if you want to loop back record the audio from your computer's sound card as you record. Any system sounds and audio being played by your computer will be included in your video. Mix: use the slider to mix the audio levels, by deciding whether to have more from the microphone or from your computer's sound card (loop back record). Control settings: Pause/Resume: set the hotkey for pausing the recording during capture. This hotkey is also used to resume the recording once paused. Stop: set the hotkey for stopping the recording. 117
131 PowerDirector Plug-ins Enable hotkeys: select this option to enable the above hotkeys during recording. If this option is not selected, you must pause or stop the recording by clicking on the minimized Screen Recorder dialog and then clicking the available buttons. Advanced Screen Recorder Settings Click the Advanced button to access the Advanced Screen Recorder Settings window to configure the following options: Monitor settings: if you have two monitors connected to your computer and you have extended your desktop, select whether you want to capture on the Primary or Secondary monitor. Performance settings: Hardware video encoding: if your computer supports it, select this option to improve recording performance using hardware encoding. Enable high performance mode: select this option to disable Windows Aero for improved recording performance (Windows 7/Vista only). Editing settings: Create.mrk file when recording: select this option if you want CyberLink PowerDirector to create a log file that tracks the mouse clicks when you capture with the Screen Recorder. These mouse clicks will be indicated on the clip marker track when the captured file is added to the timeline. Other media clips added to the timeline will snap to these clip markers to help you sync voice overs, music, etc. in your video production. Creating Overlays with the Blending Effect In the Blending Effect window you can blend a selected clip with an image preset or template to create a unique looking overlay effect in your video. To access the Blending Effect window, in Edit module, select a media clip in the media library, click the button, and then select Blending Effect. 118

132 CyberLink PowerDirector Help Note: you can also use the Blending Effect on clips already on the timeline. To do this, select a clip and then Tools > Blending Effect. A - Blending Presets and Templates, B - Preview Window, C - Blend Properties When you are done creating the blend effect, click the OK button to save your changes. CyberLink PowerDirector will add the selected media file to the timeline at the current timeline slider position. It will also add the blending image preset/template to the track below it in the timeline. Blending Image Presets/Templates The Blending Effect helps you to create a blending effect on a selected clip, by blending it with an image preset or template you downloaded from DirectorZone. Note: you can also blend two clips that are already on different tracks in the timeline. See Blending Clips on the Timeline for more information. 119
133 PowerDirector Plug-ins To blend image presets/templates with the Blending Effect, do this: 1. In the Edit module, select a media clip in the media library, click the button, and then select Blending Effect. 2. In the Blending Effect window, select one of the available presets or downloaded templates. Note: you can click Free Templates to download more image preset templates from DirectorZone. 3. Select a Blending Mode to specify how the selected image preset is blended with the clip below it in the video (the selected media clip). There are 8 blending modes to choose from, with each having a different effect. Below is a general description of each blending mode, but it is recommended that you select each to experiment which best fits the needs of your video: Normal: Normal is the default blending mode and does not mix the pixel colors in the selected image preset with the pixels in the selected media clip. The pixels in the selected image preset are placed over the pixels in the media clips, and are not blended. 120

134 CyberLink PowerDirector Help Darken: the Darken blending mode retains the darkest pixels of all the media clips being blended. Multiply: Multiply blending mode retains the darkest pixel colors of the selected image preset, and removes the lightest pixels by making them transparent. Lighten: the Lighten blending mode retains the lightest pixel colors of all the media clips being blended. Screen: Screen blending mode is the opposite of Multiply, as the brightest pixels are retained, with the darkest pixels effectively becoming transparent. Overlay: Overlay combines the effects of the Multiply and Screen blending modes. When blending the media clips, for darker pixels it blends like Multiply. For lighter pixels, it blends like Screen. Difference: Difference subtracts the brightest pixel color value from the pixel colors in the selected media clips. The resulting effect is similar to the look of a film negative, but is more colorful. Hue: use the Hue blending mode to blend just the hue from the selected image preset's pixels with the lightness and saturation of the below media clip's pixels. 121


135 PowerDirector Plug-ins 4. If required, use the Opacity slider to set the transparency of the effect. 5. Click OK to close the Blending Effect window, and add the two clips to the timeline. Once you close the Blending Effect window, you cannot reopen it to select another blending mode or to adjust the opacity of the blending effect. To edit the blending effect once added to the timeline: 122

136 CyberLink PowerDirector Help right click on the image preset, and then select Set Clip Attributes > Set Blending Mode to select a different blending mode. See Blending Clips on the Timeline for more detailed information. select the image preset in the timeline and then click the Designer button above the timeline to open the PiP Designer. See Changing Object Settings for information on adjusting the opacity of the selected clip. Creating Video Collages In the Video Collage Designer* you can create professional looking edits of your video. To open the Video Collage Designer, in Edit module, click the button and then select Video Collage Designer. Note: * optional feature in CyberLink PowerDirector. Check the version table on our web site for detailed versioning information. 123
137 PowerDirector Plug-ins A - Media Tab, B - Import Media, C - Filter Media, D - Video Collage Preview, E - Collage Templates, F Playback Settings, G - Collage Preferences, H - Preview Controls, I - Auto Fill Media Slots When you are done creating the video collage, click the OK button to save your changes. CyberLink PowerDirector will add the created video to the timeline at the current timeline slider position. Creating a Video Collage To create a video collage do this: 1. In the Edit module, click the and then select Video Collage. 2. All the videos and images that are in the media library are loaded into the Video Collage Designer. If required, click Import Media to import more. Note: select the All M edia drop-down to filter the available media. You can also choose to use a color board in your video collage by selecting it in this drop-down. 3. Choose one of the layouts of the available collage templates. Note: use the and arrows to scroll through all the available collage templates. Select a template and then click the play button to preview its frame animation. 4. Drag the video clips you want to use into the available frames as required. 124

138 CyberLink PowerDirector Help Note: the playback order of the clips is indicated by the ordinal numbers in the template After a video clip is added to a collage template's frame, you can reposition it by clicking and dragging it within the frame.


139 PowerDirector Plug-ins 6. Click the clip. if you want to perform a single trim on a clip, or click to mute 7. Click the Settings button to configure the playback settings for the video collage. 8. Set the collage template preferences as follows: Border: select this option if you want there to be a visual border between the frames in your video collage. Once selected, set the Size and Color of the border. Frame animation: select whether you want the frame animation to start at the beginning (From Beginning), or during the closing (During Closing) of the video. Select Off to disable frame animation. Match collage duration to: from this drop-down, set the duration of your video collage by selecting one of the available options. 126
140 CyberLink PowerDirector Help 9. Use the player controls to preview your video collage. Once you are satisfied, click OK to close the Video Collage Designer and add the created video onto the first track in the timeline. Note: you can edit the saved video collage further by clicking on it in the timeline and then clicking on the Video Collage function button above the timeline. Configuring Video Collage Playback Settings When in the Video Collage Designer, click the Settings button to configure the playback settings as follows: Playback timing: you can choose to have the imported clips play all at once, or one after the other. You can also delay the playback of the secondary clips by the inputted time. Start clip playback: if your collage includes frame animation, indicate whether the clips start playing back with the frame animation, or once the animation is complete. Before/after clip playback: if the video clips in your video collage don't all start at the same time, or end before the collage does, use this option to select what will display in the frame before playback starts or after it ends. 127
141 Arranging Media in Your Production Chapter 7: Arranging Media in Your Production Once you have your media in the media library, you can begin putting your video production together by adding media clips to the editing workspace in the Edit module. You add the media clips in the order that tells the story you want to tell. Note: the timeline mode of the CyberLink PowerDirector workspace offers more editing freedom and ease of movement in your production. Be sure to consult the Timeline Mode and Timeline Behavior sections to get the most out of this mode. See Storyboard Mode for information on the features that are available in that editing mode. There are several program features you can utilize to assist with the arrangement of media in your video production, including: Magic Movie Wizard: auto creates a movie for you, using the media clips and effects in your library. See Using the Magic Movie Wizard for more information. Slideshow Creator: auto creates a slideshow with your photos, in a few simple steps. See Using the Slideshow Creator for more information. Express Projects: choose from a number of project templates that will help you speed up the editing process. See Using an Express Project for more detailed information. Timeline markers*: add to the timeline ruler for more precise media clip placement on the timeline. See Timeline Markers for more information. Music Beat Detection*: use this feature to add music beat clip markers on the clip marker track, which you can use to arrange media clips to music. See Music Beat Detection for more information. Sync by Audio: you can sync two or more clips that are on different timeline tracks using the Sync by Audio feature. See Syncing Clips by Audio for more information. Note: * optional feature in CyberLink PowerDirector. Check the version table on our web site for detailed versioning information. 128
142 CyberLink PowerDirector Help Adding Video Clips and Images to the Timeline To start creating your video production, in the Edit module, begin adding video clips and images to the video tracks in the timeline. If you are not sure which tracks you can add your media to, just select a clip in the media library. The tracks in the timeline you can add the media to will "light up". For more information on what media you can add to which track, see Timeline Tracks. Note: you may prefer to add video clips and images using the storyboard mode, since this view is simpler than the timeline mode. However, you can only add clips to the first track in this mode. Therefore, this section uses the timeline mode in all of the procedures. You can add video clips and images at any position on any video track in the timeline. You no longer need to place your media on the top track or at the beginning of the timeline. You now have total freedom to add the media exactly where you want, and in the order you want it. Just start placing the media on a timeline track, in a sequence that tells your story. Note: if you want to add media to a precise position on the timeline, consider using timeline markers. See Adding Timeline Markers for more information. If you insert or drop media onto other existing media clips that are on the timeline, don't worry. CyberLink PowerDirector will prompt you to use its ripple editing feature to overwrite, insert, replace, split, trim, transition, or speed up media to help you easily place the media where you want it. Once you add a video clip or image to any timeline track, click the Designer button above the timeline to edit its properties in the PiP Designer. See Modifying Media in the PiP Designer for more information. Note: you can add additional tracks to your project's timeline in the Track Manager, allowing you to have up to 99 PiP objects displayed on a video at the same time. See Track Manager for more information. Adding Video Clips and Images You can add video clips and images onto any video track in the timeline, and at any position. 129
143 Arranging Media in Your Production Note: when you add video clips to the timeline, CyberLink PowerDirector automatically adds its audio track (if available) to the linked audio track. To insert video clips or images into the workspace, do one of the following: use the timeline slider to set the position where you want the media, select the media in the library, and then click selected video track. to add it to the use the timeline slider to set the position where you want the media, right- click on the media in the library, and then select Insert on Selected Track to add it to the selected video track. You can also manually drag and drop a media clip to a desired position on a video track to add it to the timeline. When adding a clip to the timeline (inserting or dragging and dropping), if the timeline slider is over an existing clip, or you drop it on an existing clip, you are prompted to use one of the ripple editing options to insert the clip: Overwrite: select to overwrite the existing clip with the newly added clip. Insert: select to split the clip and insert the new clip between the two portions. CyberLink PowerDirector also only moves the clips on the same track to the right. Insert and Move All Clips: select to split the clip and insert the new clip between the two portions. CyberLink PowerDirector also moves all of the media clips on the timeline that lie to the right of the inserted clip, right. Crossfade: select to lay the clip over a portion of the existing clip and auto add a transition between the two clips. CyberLink PowerDirector uses the fade transition on the video track, and the constant gain audio transition if both clips have audio on the corresponding audio track. Note: the Crossfade option does not overwrite the content on the track, instead adding an overlap transition between the two clips. See Setting Transition Behavior for more information. The Crossfade option is only available if the end of the new clip is not over any existing content on the track. Replace: select to replace the current clip on the timeline with the new clip. Use this option if you don't want to change the structure of the current content on the timeline. 130

144 CyberLink PowerDirector Help Note: if the duration of the clip you are replacing is shorter than the newly added video clip, CyberLink PowerDirector automatically trims the video clip to fit the original clip's duration. For images, CyberLink PowerDirector automatically resizes them to fit the original clip's duration. When inserting a video file, if the timeline slider is in a gap between two clips on a timeline track, you are prompted to use one of these ripple editing options to insert the clip: Trim to Fit: select to have CyberLink PowerDirector auto trim off the end of the video clip to fit the gap to the right of the timeline slider. Note: this feature is also available when inserting image clips into a timeline gap that have durations longer than the gap. Speed up to Fit: select to have CyberLink PowerDirector auto speed up the video clip so that it fits the gap to the right of the timeline slider. Adding Color Boards and Backgrounds The use of color boards allows you to insert solid frames of color into your video. Color boards are really useful as quick transitions between video clips or as a background for titles and ending credits. Backgrounds provide interesting and creative environments for PiP objects, titles, and more. Note: you can create your own custom color boards in the Media Room. See Creating New Color Boards for more information. You can find color boards and backgrounds in your media library, by clicking to open the explorer view, or selecting Color Boards or Backgrounds from the Media Content drop-down. To insert color boards or backgrounds into the workspace, do one of the following: 131
145 Arranging Media in Your Production use the timeline slider to set the position where you want the color boards or backgrounds, select it in the library, and then click to the selected video track. to add it use the timeline slider to set the position where you want the color boards or backgrounds, right-click on it in the library, and then select Insert on Selected Track to add it to the selected video track. You can also manually drag and drop a color board or background to a desired position on a video track to add it to the timeline. When adding a color board or background to the timeline (inserting or dragging and dropping), if the timeline slider is over an existing clip, or you drop it on an existing clip, you are prompted to use one of the ripple editing options to insert the clip: Overwrite: select to overwrite the existing clip with the color board/background. Insert: select to split the clip and insert the color board/background between the two portions. CyberLink PowerDirector also only moves the clips on the same track to the right. Insert and Move All Clips: select to split the clip and insert the color board/background between the two portions. CyberLink PowerDirector also moves all of the media clips on the timeline that lie to the right of the inserted clip, right. Crossfade: select to lay the color board/background over a portion of the existing clip and auto add a fade transition between the two clips. Note: the Crossfade option does not overwrite the content on the track, instead adding an overlap transition between the two clips. See Setting Transition Behavior for more information. The Crossfade option is only available if the end of the new clip is not over any existing content on the track. Replace: select to replace the current clip on the timeline with the color board/background. Use this option if you don't want to change the structure of the current content on the timeline. Note: if the duration of the clip you are replacing is longer or shorter than the newly added clip, CyberLink PowerDirector automatically resizes it to fit the original clip's duration. 132
146 CyberLink PowerDirector Help If the timeline slider is in a gap between two clips on a timeline track when inserting a color board or background, you are prompted to use this ripple editing option to insert the clip: Trim to Fit: select to have CyberLink PowerDirector auto set the duration of the color board/background to fit the gap to the right of the timeline slider. Changing Color Board Color After adding a color board to the timeline, you can select it and then click the Change Color button if you want to change its color. Changing Color Board Color Using the Color Selector To change a color board's color using the color selector, do this: 1. Select the color board on the timeline and then click the Change Color button. 2. Select From Color Selector. 3. In the color palette, do any of the following: Select one of the basic colors. Use the color picker to choose a color, and the leveler on the right to adjust the shade. Type in the desired HSL or RGB values. 4. Click OK to close the color palette and change the color of the color board on the timeline. Changing Color Board Color from a Media File To change a color board's color by selecting a pixel in the preview window, do this: 1. Add the media clip to the timeline that you want to use to change the color board's color. 2. Select the color board on the timeline and then click the Change Color button. 3. Select From Preview. 133
147 Arranging Media in Your Production 4. If required, use the playback controls to find the frame of video that contains the color you want to use to create the color board. 5. In the Select Color from Preview window, use the eye dropper to select the pixel in the video preview image that you want to use to create a color board. 6. Click OK to close the window and change the color of the color board on the timeline. Creating New Color Boards CyberLink PowerDirector lets you create custom color boards using the color selector, or by selecting an area in the media file preview window. Creating a Color Board Using the Color Selector To create a color board using the color selector, do this: 1. Click on the button. 2. Select From Color Selector. 3. In the color palette, do any of the following: Select one of the basic colors. Use the color picker to choose a color, and the leveler on the right to adjust the shade. Type in the desired HSL or RGB values. 4. Click OK to close the color palette and add the new color board to the media library. Creating a Color Board from a Media File To create a color board by selecting a pixel in the preview window, do this: 1. Add the media clip to the timeline that you want to use to create the color board. 2. If required, use the playback controls to find the frame of video that contains the color you want to use to create the color board. 134
148 CyberLink PowerDirector Help 3. Make sure the media file is selected in the timeline, i.e. that a preview of the media file is displayed in the preview window. 4. Click on the 5. Select From Preview. 6. In the Select Color from Preview window, use the eye dropper to select the pixel in the video preview image that you want to use to create a color board. 7. Click OK to close the window and add the new color board to the media library. button. Adding Audio Clips Audio clips allow you to add background music or a narrative voice-over to your video production. In the Edit module, you can add audio clips to the audio portion of a video track, to the voice track, or to the music track. Note: you can add transitions between two audio clips on any of the available audio tracks. To do this, go to the Transitions Room and then select Audio from the transition library filter drop-down. See Using Transitions for more information on adding transitions between two clips. If you are not sure which tracks you can add audio to, just select a clip in the media library. The tracks in the timeline you can add the audio to will "light up". For more information on what media you can add to which track, see Timeline Tracks. Note: you can add additional audio tracks to your project's timeline in the Track Manager. See Track Manager for more information. To insert audio into the workspace, do one of the following: Note: if you want to add audio to a precise position on the timeline, consider using timeline markers. See Adding Timeline Markers for more information. use the timeline slider to set the position where you want the audio, select the audio file in the library, and then click: 135 to add it to the audio portion of the selected video track. to add it to the voice track.
149 Arranging Media in Your Production to add it to the music track. The music track is always the bottom track in the timeline. use the timeline slider to set the position where you want the audio, right- click on the audio file in the library, and then select: Add to Voice Track to add it to the voice track. Add to Music Track to add it to the music track. The music track is always the bottom track in the timeline. You can also manually drag and drop an audio clip to a desired position on any of the audio tracks available it the timeline. When adding audio to the timeline (inserting or dragging and dropping), if the timeline slider is over an existing clip, or you drop it on an existing clip, you are prompted to use one of the ripple editing options to insert the clip: Overwrite: select to overwrite the existing clip with the newly added audio clip. Insert: select to split the clip and insert the new audio clip between the two portions. CyberLink PowerDirector also only moves the clips on the same track to the right. Insert and Move All Clips: select to split the clip and insert the new audio clip between the two portions. CyberLink PowerDirector also moves all of the media clips on the timeline that lie to the right of the inserted clip, right. Crossfade: select to lay the audio over a portion of the existing clip and auto add a constant gain transition between the two clips. Note: the Crossfade option does not overwrite the content on the track, instead adding a transition between the two clips. The Crossfade option is only available if the end of the new clip is not over any existing content on the track. Replace: select to replace the current audio clip on the timeline with the new audio clip. Use this option if you don't want to change the structure of the current content on the timeline. Note: if the duration of the audio clip you are replacing is shorter than the newly added audio clip, CyberLink PowerDirector automatically trims it to fit the original clip's duration. 136
150 CyberLink PowerDirector Help If the timeline slider is in a gap between two clips on an audio timeline track when inserting audio, you are prompted to use one of these ripple editing options to insert the clip: Trim to Fit: select to have CyberLink PowerDirector auto trim off the end of the audio clip to fit the gap to the right of the timeline slider. Speed up to Fit: select to have CyberLink PowerDirector auto speed up the audio clip so that it fits the gap to the right of the timeline slider. Syncing Audio When you add independent audio to any of the audio tracks on the timeline, it is important to ensure that it syncs with the video in your production. CyberLink PowerDirector displays the audio waveform on each clip that is added to the timeline. The waveform is useful when trimming or splitting the audio clip, and also when trying to sync audio to the video in your production. Note: if you are trying to sync audio in an audio clip with the audio is a video clip (because they have the same source audio), you can use Sync by Audio to sync the clips. You can even zoom in on the timeline for more precise syncing, as the waveform is viewable down to the 1/10 frame level. Note: if an audio clip's waveform is not displayed, it may be because this option was disable in preferences. You can enable it again by selecting Show sound waveform in timeline in General Preferences. 137

151 Arranging Media in Your Production Once zoomed in, you can use the waveform in conjunction with Timeline Markers to sync media more precisely in your video production. Music Beat Detection Use the Music Beat Detection* feature in CyberLink PowerDirector to analyze audio clips or video clip's with music in your video production. Once analyzed, music beat clip markers are added to the clip marker track to help you sync the audio to the video in your production. You can also manually add music beat clip markers. Note: * optional feature in CyberLink PowerDirector. Check the version table on our web site for detailed versioning information. You can then use these music beat clip markers for more precise arrangement and syncing of media with the added music. To add music beat clip markers, do this: 1. Add an audio clip or video clip with music to the timeline. 2. Right-click on the clip and then select Use Automatic Music Beat Detection. The Automatic Music Beat Detection window opens. 3. Use the slider to set the Minimum time between beat markers. For example, if you know the beats in the music are once a second, you can set the slider to apply markers ever 2.0 seconds if you want to place media on every other beat. 4. Click Detect. CyberLink PowerDirector will analyze the clip, and then detect and apply the music beat clip markers to the clip marker track. 5. Click on Apply to close the Music Beat Detection window. Once the music beat clip markers are added, media will snap to them when added to a track on the timeline. 138


152 CyberLink PowerDirector Help Also note that the music beat clip markers are connected to the clip. So if you move the clip on the timeline, its music beat clip markers will move with in on the track. To remove the music beat clip markers, do one of the following: remove the music clip from the timeline. right-click on a music beat marker on the clip marker track, and then select Remove Selected Clip Marker. right-click on the clip marker track, and then select Remove All Music Clip Markers. Manually Adding Music Beat Clip Markers To manually add music beat clip markers to the clip marker track, do this: 1. Add an audio clip or video clip with music to the timeline. 2. Right-click on the clip and then select Use Automatic Music Beat Detection. The Use Automatic Music Beat Detection window opens. 3. If required, use the magnification tools to zoom in on the audio waveform for the selected clip. 4. Manually drag the timeline slider to the position on the audio waveform where you want to add the music beat clip marker. 5. Click Add (or the press the A key on your keyboard) to add a music beat clip marker at the current position. 6. Repeat the above steps to add as many music beat clip markers as you want. 7. Click on Apply to close the Music Beat Detection window. 139
153 Arranging Media in Your Production Note: you can also use the player controls to play the clip, and then continually click the Add button (or press the A key on your keyboard) to add the music beat clip markers when you hear a beat. Syncing Clips by Audio If you have two or more clips that have the same source audio, you can use Sync by Audio to align the starting positions of the clips on the timeline so that they are all in sync. Note: you can sync both video and audio clips using this feature. To sync two or more clips by audio*, do this: Note: * optional feature in CyberLink PowerDirector. Check the version table on our web site for detailed versioning information. 1. Select all of the clips on the timeline that you want to sync. 2. Click the Sync by Audio function button that displays after selecting the clips. 3. CyberLink PowerDirector analyzes all the selected clips and then realigns them so that their audio is in sync. Using the Magic Movie Wizard If you are new to the editing process and not sure how or where to get started, then the Magic Movie Wizard can help. The Magic Movie Wizard takes all of your media and creates a completed video production in just a few steps. You can then edit the created production, output it to a file, or burn it to a disc. Note: if you want more creative control than the Magic Movie Wizard provides, you can also use the Theme Designer to create your video production. The Theme Designer allows you to customize the theme templates used and choose the exact images, video clips, and background music you want in your production. See Using the Theme Designer for more information. To use the Magic Movie Wizard, do this: 1. Click the Wizard. button above the timeline and then select Magic Movie 140
154 CyberLink PowerDirector Help 2. Select which media you want to use in your movie, as follows: Media Library: the Magic Movie Wizard uses all of the media in the library to create your movie. Timeline: the Magic Movie Wizard only uses the media that is currently on the timeline. Note: any edits you previously made in your project to the clips in the timeline are ignored. The Magic Movie Wizard uses the source clips to create you final movie. Select items: the Magic Movie Wizard only uses the media that is currently selected in the library. 3. Click Next to continue. 4. See the step by step description in Easy Editor for more information on the remaining steps in the Magic Movie Wizard. Using the Slideshow Creator The Slideshow Creator is the easiest way to instantly turn your photos into a dynamic slideshow. To create a slideshow using the Slideshow Creator, do this: 1. Drag all the photos that you want in the slideshow into the timeline. 2. Make sure the photos are selected, and then click on the Slideshow button to launch the Slideshow Creator. 3. See the step by step description in Slideshow Creator for more information on the remaining steps required to create your slideshow. Note: after the Slideshow Creator has created your slideshow and inserted it into the timeline, if you would like to view each individual slide/photo in the slideshow for advanced editing, just right-click on the file in the timeline and then select Show Individual Photos. 141
155 Editing Your Media Chapter 8: Editing Your Media Once you have your video clips, audio files, and images in the editing workspace/timeline you can start editing them. Editing is a broad term that encompasses a number of different functions, including splitting, trimming, applying fixes, and much more. Note: this section outlines the procedures for editing media in timeline mode, as all the program's features are available in this mode. If you prefer to use the storyboard mode, and you find one of the outlined features is not available, you can press the Tab key on your keyboard to switch to timeline mode during the editing process. This section describes all of the editing processes you can perform on your media clips in the Edit module. Editing 360 Video Projects Once 360 * media files are added to the timeline you can produce them right away, or make some edits to the media files. Note: * this feature is not available in some versions of CyberLink PowerDirector. When editing 360 video projects, please note the following: you can add more than one 360 media file on the timeline. In the produced 360 video, the media files will play in the order they are arranged on the timeline. You can use transitions between the media files if required. if you want to change the direction of view at the start of a 360 video clip, you can do this in 360º Start View Setting. your 360 videos can include 360 compatible title text by adding 360 title effects. when adding non-360 media files, PiP objects, and title effects to 360 videos, be sure to convert them to 360 for the best results. see the Editing Your Media section for information on some of the editing you can perform on your 360 media files. You can split, trim, or apply some fixes 142
156 CyberLink PowerDirector Help and enhancements (including fixing shaky video or making color corrections) on 360 video clips that are on the timeline, and more. in the Action Camera Center you can speed up portions of the 360 video and more. When you are done editing your 360 video, click the Produce button to produce it, which renders it as a 360 video file. See Producing a 360 Video for more information. You can also upload it directly to YouTube or Facebook. See Uploading a 360 Video for more information. Converting Title Effects and Media Clips to 360 When adding non-360 title effects, videos, images, and PiP objects to your 360 video projects, for the best results you can convert them to 360 clips. Note: 3D title effects cannot be converted to 360. To convert a non-360 title effect for use in a 360 video project, right-click on it in the timeline and then select Convert to 360 Title. To convert a non-360 media clip, right-click on it in the timeline and then select Convert to 360 Object. Note: to convert a clip back to the original format, just right-click on it and then select Convert to 2D Title/Object. Once converted to 360, you can customize the 360 position of the title effect or PiP media clip in the 360 environment in the Title Designer and PiP Designer respectively. Features Not Available in 360 Video Projects The follow is a list of PowerDirector features that are not available when editing a 360 video project: Magic Movie Magic Style Theme Designer 143
157 Editing Your Media Video Crop 2D to 3D in PowerTools Lens Correction 3D Orientation Express Projects Content Aware Editing MultiCam Designer Create Disc Chapter Room Content Aware Editing Use Content Aware Editing* on your video clips to automatically generate the best outputted video content for your production. Note: * optional feature in CyberLink PowerDirector. Content Aware Editing analyzes your video clips to find the portions that it believes are the best and most interesting moments, and also the portions that need fixing. You can then simply click on the "good parts" to include them in the video production, and choose to fix or trim away the "bad parts". Note: during the analysis process, CyberLink PowerDirector also detects all the scenes in the video clips and marks them on the Content Aware Editing window timeline with. To analyze the video clips and then open the Content Aware Editing window, rightclick on a video clip in the media library or the timeline, and then select Content Aware Editing. If you would like to perform a batch analysis on multiple video clips at once, do this: 1. In the Media Room, click on Content Aware Details. to access the library menu and then select 144

158 CyberLink PowerDirector Help 2. Select all the video clips in the Analyze column and then click the Analyze button. 3. Once the analysis is complete, click the button next to the video clip that you want to edit in the Content Aware Editing window. Note: the Content Aware Details view displays the analysis results for all the video clips analyzed and edited in Content Aware Editing. See Content Aware Details for more information. Using Content Aware Editing When editing video clips in Content Aware Editing, its window displays as follows: A - Player Controls, B - Segment Selection Tools, C - Selected Segments, D - Deselected Segments, E Detected Scene Markers, F - Recommended Segments, G - Segments Need Fixing, H - Fix All Segments, I - Content Selection Categories 145
159 Editing Your Media Note: the preview quality of the video in the Content Aware Editing window is dependent on preview quality setting specified in preview/display options. See Preview Quality for more information on selecting a preview quality. In the Content Aware Editing window, the segments indicated in green are the recommended portions of the clip that CyberLink PowerDirector believes are the most interesting, or are the "good parts". They may include camera zooms or pans, and segments that contain a lot of motion or people talking (speech). CyberLink PowerDirector also performs face detection on the video clip to highlight sections that include people's faces. The light brown segments are parts that need fixing, because either the video is shaky or poorly lit. You can choose to fix or remove these "bad parts". Check the content selection categories for details of what each highlighted segment consists of. Note: hover your mouse over the highlighted segments for more detailed information about what they include. The segments that are not highlighted are parts of your video that CyberLink PowerDirector believes are not necessary to include. You can however include these segments by selecting them with the mark in and out buttons. Previewing the Video Content Use the player controls to preview the entire video clip. To preview a specific highlighted segment, right-click on it and then select Preview this Segment. Playback stops once the selected segment playback is complete. Fixing Content If the segments that CyberLink PowerDirector has highlighted for removal contain parts of your video that you don't want to exclude, you can instantly fix them in the Content Aware Editing window. To fix segments, do either of the following: right-click on the highlighted segment and then select Apply Fix to Entire Scene. Select this option to apply the required fix to the entire scene in the video clip, which is indicated by the detected scene markers. This ensures there are no sudden changes in lighting or other video properties in the scene. 146
160 CyberLink PowerDirector Help In the Auto Fixer window use the player controls to preview how the fixed content will look. If satisfied with the results, ensure that Apply auto fix is selected and then click on OK to apply the fix to the scene. Note: if no scenes were detected in your video clip, the fix is applied to the entire clip when Apply Fix to Entire Scene is selected. right-click on the highlighted segment and then select Apply Fix to this Segment. Select this option to apply the required fix to just the selected segment of video. In the Auto Fixer window use the player controls to preview how the fixed content will look. If satisfied with the results, ensure that Apply auto fix is selected and then click on OK to apply the fix to the selected segment of the video clip only. click the button to have CyberLink PowerDirector auto fix each of the highlighted segments in the same content selection category. CyberLink PowerDirector will fix the segments, which are then indicated with a wrench icon. Note: if you'd like to undo any of the fixes you made in the Content Aware Editing window, just right-click on a fixed segment and then select Remove Applied Fix. Content Selection Use the segment selection tools to begin selecting the video content you want to include in the trimmed clip. Any content segments you add to the deselected list, or do not select, will be trimmed out of the video clip. Note: you must add at least one segment to the Selected list to enable the OK button and trim the video clip. Selecting Content To select video content, do any of the following: click on a highlighted segment and then click the Selected button. 147
161 Editing Your Media right-click on a segment and then select Add to Selected List. click on to add all of the video content, except the content in the Deselected list, to the Selected list. CyberLink PowerDirector will remove any content you previously added to the Selected list. use the player controls to find and then click on to mark the beginning of a segment of video you want to include. Use the player controls or drag the timeline slider and then click to mark the end. Once selected, click on Selected to add to the Selected list. Once you are done selecting all the content, click the button in the Selected list to preview what the trimmed video clip will look like. Select a segment and then click if you want to remove it from the list. Click on OK to trim the video clip as specified. The trimmed video is automatically inserted into the timeline at the current timeline slider position. Deselecting Content To deselect video content, do any of the following: click on a highlighted segment and then click the Deselected button. right-click on a segment and then select Add to Deselected List. use the player controls to find and then click on to mark the beginning of a segment of video you do not want to include. Use the player controls or 148

162 CyberLink PowerDirector Help drag the timeline slider and then click to mark the end. Once selected, click on Deselected to add to the Deselected list. Once you are done deselecting all the content, click the button in the Deselected list to preview the content that will be trimmed out. Select a segment and then click if you want to remove it from the list. Click on OK to trim the video clip as specified. The trimmed video is placed in the timeline for you automatically. Splitting a Clip You can quickly split a media clip that is on any track in the timeline into two separate clips. To do this, move the timeline slider (or use the player controls) to the position in the clip where you want to split it. Next, click the button above the timeline to separate it into two clips that you can then move around separately from one another. 149


163 Editing Your Media You can also use it to quickly remove unwanted portions of a media clip, or if you want to insert other media between the two portions. Unlinking Video/Audio Clips When you add a video clip with audio to the timeline, its audio portion is visible on its corresponding audio track. You can unlink the two portions of the clip, allowing you to modify them separately, remove one completely from the timeline, or use it elsewhere in your project. To unlink the audio from a video clip, right-click on it in the timeline and then select Unlink Video and Audio. To link the two files back together, select them both, right-click on them, and then select Link Video and Audio. 150
164 CyberLink PowerDirector Help Trimming Video and Audio Clips Use the trim functions to remove unwanted portions from your video and audio clips. You can use the Single Trim function to trim off the beginning and/or ends of a video clip, or the Multi Trim function to remove multiple portions at once. The Trim Audio function lets you trim audio visually, using its waveform. Note: when you trim media clips, the program does not delete any of the original source media's content. It just marks the requested edits on the clips and then applies the edits when it renders the final video during production. Trimming a Video Clip To trim a video clip, select it in the timeline and then click the the timeline. button above Performing a Single Trim Use the video trim function to quickly trim off unwanted portions at the beginning and end of a video clip on the timeline. 151

165 Editing Your Media A - Preview Area, B - Marked Positions in Clip, C - Mark Out Position Slider, D - Lock Duration, E Selected Content, F - Mark In Position Slider, G - Player Controls To trim a video clip, do this. 1. Select the video clip on the timeline you want to trim, and then click on the Trim button above the timeline. 2. If required, click on the Single Trim tab. 3. Use the player controls to find where you want the trimmed clip to begin, and then click to set the mark in position or drag the mark in position slider to this position. 152
166 CyberLink PowerDirector Help 4. Use the player controls to find where you want the trimmed clip to end, and then click to set the mark out position or drag the mark out position slider to this position. Note: you can click to lock the duration of the video you want trimmed. Once locked, click and drag the selected content to the exact position you want trimmed. 5. If required, you can preview what the trimmed clip will look like by clicking Output and then clicking the play button on the player controls. Click Original if you want to play the original video. 6. Click OK to set your changes and trim the clip. Note: you can reenter the trim window to refine the trimmed clip at any time. You can also drag the trimmed edges of a video clip on the timeline as well. Performing a Multi Trim The multi trim function lets you trim out one or more segments of a video clip at once, resulting in a series of clips that are independent from the original video. 153

167 Editing Your Media A - Preview Area, B - Timeline, C - Timeline Magnifier*, D - Magnified Timeline, E - Selected Segments, F - Magnifier Controls*, G - Trimming Tools, H -Player Controls, I - Frame Display Note: * optional feature in CyberLink PowerDirector. Check the version table on our web site for detailed versioning information. To perform a multi trim on a video clip, do this. 1. Select the video clip on the timeline you want to trim, and then click on the Trim button above the timeline. 2. Click on the Multi Trim tab. 3. If required, use and to change the magnification level on the video clip. You can magnify the timeline down to each individual frame for a more precise edit. The size of the timeline magnifier changes based on the magnification level set. 154
168 CyberLink PowerDirector Help 4. Use the player controls to find the beginning of the first trimmed segments, or the mark in position. 5. Click 6. Use the player controls or drag the timeline slider to position where you want the first segment to end, and then click to set the mark out position. The trimmed segment is added to Selected Segments section. 7. Repeat the above steps to trim out all the required segments. 8. If required, you can preview what the trimmed clip will look like by clicking Output and then clicking the play button on the player controls. Click Original if you want to play the original video. 9. Click OK to set your changes and trim the clip. to set the mark in position. Note: the segments of video that CyberLink PowerDirector inserts into the timeline are indicated in blue. If you want to remove these segments from the trimmed video clip, click the button to invert the trimming results. Extra Trimming Tools On the Multi Trim tab, you can also use the following extra trimming tools to: you can manually drag the mark in and out sliders on the timeline or magnified timeline to edit the current positions if required. detect all the scenes in the selected video clip by clicking on. Once selected, choose whether you want the program to add all the scenes to the trimmed segments area, or just mark the scene breaks for you on the timeline. Trimming an Audio Clip Use the audio trim function to quickly trim off unwanted portions at the beginning and end of an audio clip on the timeline. 155

169 Editing Your Media A - Audio Waveform, B - Timeline Slider, C - Marked Positions in Clip, D - Zoom Controls, E - Mark In/Out Buttons, F - Player Controls To trim an audio clip, do this. 1. Select the audio clip on the timeline you want to trim, and then click on the button above the timeline If required, use and to zoom in and out on the audio waveform for a more precise edit. Use the player controls to find where you want the trimmed clip to begin, or the mark in position. 156
170 CyberLink PowerDirector Help 4. Click to set the mark in position. 5. Use the player controls or drag the timeline slider to position where you want to audio clip to end, and then click 6. to set the mark out position. Click OK to set your changes and trim the clip. Note: you can reenter the trim window to refine the trimmed clip at any time. You can also drag the trimmed edges of the audio clip on the timeline as well. Setting a Media Clip's Duration When you add images, color boards, and backgrounds to a timeline track, you set how long they are displayed in your video production. Unlike video and audio clips which have a maximum length, these media clips can have any duration you want. Note: to set the duration of a video or audio clip, see Trimming Video and Audio Clips. To set a media clip's duration, do this: Note: you can also set the duration of effects, such as PiP objects, particle effects, and title effects, using this same method. 1. Select the clip in the timeline. 2. Click the Duration button (or right-click on the clip, select Set Clip Attributes, and then select Set Duration). 3. In the Duration Settings window, enter in the how long you want it to display in your video production. You can set the duration down to the number of frames. 4. Click on OK. You can also change the duration of a media clip (including video and audio clips) by selecting it and then dragging the end of the clip to the desired length. Note: you can only lengthen a video or audio clip back to its original duration. 157
171 Editing Your Media Setting TV (Video Clip Interlacing) Format All video clips have an interlacing (TV) format, which specifies how frames are displayed. Using video clips with conflicting (or incorrect) TV formats can result in degraded video quality in your final production. Before you produce your video, it is recommended that you set all of the video clips to the same format. While CyberLink PowerDirector can normally detect and suggest the correct format, some interlaced video (such as a video with very little motion) may be misjudged as a progressive video. CyberLink PowerDirector automatically produces interlaced video for DVD and DVAVI. Only change this setting if you are sure that CyberLink PowerDirector has wrongly set the format. Note: this is an extremely important step to take before production, as it can drastically affect final video quality. It is recommended that you check the user guide for your video camcorder to determine what format your video should be. To set a video clip's TV format, do this: 1. Right-click on a video clip in the timeline, select Set Clip Attributes, and then Set TV format. 2. In the Interlace/Progressive Settings window, do one of the following: click the Scan and Suggest Format button to have CyberLink PowerDirector auto detect and set the format for you. manually select one of the three available formats. See the description on the right of the window for a detailed description of each format. 3. Click OK to set your changes. Adjusting Video Clip Aspect Ratio Some of the video clips in the timeline may not have the same aspect ratio as your project/video production. You can adjust the aspect ratio for these clips, so that all the media in your video production has the same aspect ratio. 158
172 CyberLink PowerDirector Help To adjust a video clip's aspect ratio, do this: 1. Right-click on a video clip in the timeline, select Set Clip Attributes, and then Set Aspect Ratio. 2. In the Clip Aspect Ratio Settings window, do one of the following: if you want your project to use the original aspect ratio of the selected video clip, select Detect aspect ratio automatically. If the clip's aspect ratio is different from the project's, then CyberLink PowerDirector will letterbox the video clip to fill in the rest of the frame. if the aspect ratio of the selected clip is 4:3, then select The aspect ratio of the video is 4:3 option. If the project aspect ratio is not 4:3, select the stretch method to convert the 4:3 clip to the project's aspect ratio. if the aspect ratio of the selected clip is 16:9, then select The aspect ratio of the video is 16:9 option. If the project aspect ratio is not 16:9, select the stretch method to convert the 16:9 clip to the project's aspect ratio. if the aspect ratio of the selected clip is 9:16, then select The aspect ratio of the video is 9:16 option. If the project aspect ratio is not 9:16, select the stretch method to convert the 9:16 clip to the project's aspect ratio. if the selected clip has an aspect ratio other than 4:3, 16:9 or 9:16, then select the Not 4:3, 16:9 or 9:16 option. Next, select the stretch method to convert the video clip's aspect ratio to the project's aspect ratio. if you are not sure what the aspect ratio of the original video clip is, click the Detect and Suggest button. CyberLink PowerDirector will select one of the above options for you. Note: for best results when changing a clip's aspect ratio, select the CLPV option. CLPV (CyberLink Pano Vision) is video stretching technology from CyberLink that produces minimal distortion in the center of the picture. 3. Select the Apply to all video clips option if you want to apply the current setting to all the video clips on the same track. 4. Click OK to set your changes. 159
173 Editing Your Media Stretching Images Some of the images/photos in the timeline may not have the same aspect ratio as your video production. You can stretch these images, so that all the media in your video production has the same aspect ratio. To stretch an image, do this: 1. Right-click on an image in the timeline, select Set Clip Attributes, and then select Set Image Stretch Mode. 2. In the drop-down in the Image Stretch Mode Settings window, select one of the following: Stretch clip to 4:3/16:9 aspect ratio: select this option if you want CyberLink PowerDirector to stretch the sides of the select image to fit your project's aspect ratio. Use CLPV to stretch clip to 4:3/16:9 aspect ratio: select this option to use CLPV to stretch the image. CLPV (CyberLink Pano Vision) is an image stretching technology from CyberLink that produces minimal distortion in the center of the image. 3. Select the Apply to all image clips option if you want to apply the current setting to all the image clips on the same track. 4. Click OK to set your changes. Cropping Images You can completely customize the aspect ratio of the images in your video production or crop out unwanted portions of a photo, using the crop image function. To crop an image, do this: 1. Select the image in the timeline and then click the button above the timeline. You can also right-click on the image and then select Crop Image. 2. Set the size of the crop area by selecting one of the following: 4:3: gives the crop area, and the resulting cropped image, a 4:3 aspect ratio. 16:9: gives the crop area, and the resulting cropped image, a 16:9 aspect ratio. 160

174 CyberLink PowerDirector Help Freeform: select if you want to manually resize the crop area on the image and give the resulting cropped image a custom aspect ratio. Custom: select if you want to set a custom aspect ratio for the cropped image using the Width and Height fields. 3. Use the Crop size controls to set the size of the crop area, and the resulting cropped image. You can also manually drag the edges of the crop area on the image to resize it as required. 4. C lick OK to set your changes and crop the image. Changing the Shape of Media CyberLink PowerDirector lets you change the shape of the media in your video production. Videos, images, and PiP objects added to the timeline have freeform properties, so you can easily change their shape to create media that is different from the usual rectangle or square shape. CyberLink PowerDirector lets you change the X and Y positions for the four corners and the center of a media clip, giving it a custom freeform shape. Note: the top-left corner of the video frame is the 0 axis, with the bottomright corner having a value of 1.0, 1.0. The center position in the video frame is 0.500, To change the shape of a media clip, do this: 1. Select a media clip on the timeline, and then ensure that you are in the Clip preview mode so that the media crosshairs are displayed. 2. Use your mouse to click and drag the blue nodes in the corners of the media clip, changing it to the desired freeform shape. 161

175 Editing Your Media Note: you can also change the shape of media clips by altering their freeform positions using keyframes. See Utilizing Keyframes on Media for more information. Fixing and Enhancing Images/Videos Select an image, video, or audio clip in the timeline and then click the Fix/Enhance button to apply fixes and make enhancements to these clips. Note: you can also apply advanced fixes and enhancements on images and videos in CyberLink PhotoDirector and ColorDirector. See Advanced Fixes and Enhancements for more information. You can apply fixes and enhancements to the entire duration of a media clip, or click the Keyframe button to customize how they are displayed using keyframes. See Utilizing Keyframes on Media for more information on customizing the way the fixes and enhancements are displayed in your video production. Applying Fixes Select a media file on the timeline and then click the Fix/Enhance button to apply instant fixes, such as lighting adjustments, lens correction, video/audio denoise, video stabilization, and more. In the Fix section, the following options are available: 162
176 CyberLink PowerDirector Help Note: the options that are available is dependent on the type of media file you have selected. Lighting Adjustment Adjusts the brightness/contrast/saturation ratios. Best used to change the color settings if the video clip or photo contains portions that are overly dark or bright. Use the slider to adjust the intensity of the lighting adjustment. Enable the Extreme Backlight option to adjust the back lighting in a clip. Best used to provide separation between a subject and the background, or reduce the silhouette effect caused by too much backlight, for example from the sun. Once enabled, use the slider to adjust the intensity of the backlight. White Balance The Color temperature option adjusts the clip's color temperature or creates a specific atmosphere, such as winter or summer. Once enabled, use the slider to adjust the Color temperature in the media clip. A lower value applies a colder temperature, while a higher value applies an atmosphere that is warmer. Use the Tint slider to adjust the color level of the clip. Select the White calibration option, and then click the button to use the eye dropper to select an area in the video or image that should be white. By indicating which portion of an image should be white, CyberLink PowerDirector automatically adjusts the other colors accordingly to be more vivid and true. If you use white calibration, you cannot use other fixes or enhancements. Video Stabilizer Employs motion compensation technology to correct shaking videos. This tool is ideal for use with videos taken without a tripod or recorded while moving. Once enabled, drag the slider to increase or decrease the level of correction. Select the Fix rotational camera shake* option if the clip has segments where the camera rotates from side to side. The Use enhanced stabilizer option improves the output quality of video clips that have video stabilizer applied. Note: * optional feature in CyberLink PowerDirector. 163
177 Editing Your Media Lens Correction Select the Lens Correction option to use lens profiles to auto correct distorted images/videos. Select the lens profile, using the Maker and Model drop-downs, that matches the camera your image/video was shot with. Once selected, CyberLink PowerDirector will auto correct the image/video. Note: if you can't find your camera's lens profile, click the button to download more from DirectorZone. Once downloaded, click the button to import it into CyberLink PowerDirector. You can also use the Fisheye distortion control to manually correct clips that have fisheye distortion. Use the Vignette Removal sliders to manually remove an unwanted vignette effect on photos that was caused by a camera lens or the lighting environment: Vignette amount: use this slider to adjust the level of vignette removal on the photo. Vignette midpoint: drag the slider to the left to increase the size of the area (towards the center of the photo) where the vignette removal is applied. Drag it right to decrease the size, towards the corners. Video Denoise This tool removes video noise from a video clip, including High-ISO and TV signal noise. Once enabled, drag the slider to increase or decrease the level of denoise on the video. Audio Denoise Use audio denoise on video clips that were recorded outdoors, in a room with poor acoustics, in a car, or other noisy locations. The audio denoise tool uses CLNR (CyberLink Noise Reduction) technology to improve your video's audio quality and reduce background noise. Select the Noise type from the drop-down menu and then use the Degree slider to adjust the amount of denoise applied. 164
178 CyberLink PowerDirector Help Remove Red-eye When enabled, CyberLink PowerDirector will detect the faces in the selected image and remove red-eye automatically. Apply Re-focus Enhances images that are out of focus. Drag the slider to increase or decrease the degree of enhancement. 3D Orientation If your 3D media was shot with a camera that uses a plug in lens to create the 3D effect, the resulting media may not display correctly if the lens angles are slightly off. Use the sliders to adjust the horizontal and vertical orientation of the two images to fix the 3D effect on the media. Enhancing Media Clips Select a media file on the timeline and then click the Fix/Enhance button to enhance the media by adjusting its color, applying edge enhancement or the HDR effect, and much more. In the Enhance section, the following options are available: Note: the options that are available is dependent on the type of media file you have selected. Edge Enhancement Gives standard definition videos the look and feel of true high definition, through the use of CyberLink's TrueTheater HD intelligent resolution up scaling. Once enabled, drag the slider to increase or decrease the degree of enhancement on the video. 165
179 Editing Your Media Color Adjustment Lets you manually adjust the color attributes (exposure, brightness, contrast, hue, etc.) of the video image or a photo. Once enabled, you cannot use other fixes or enhancements. Use the sliders to adjust the attributes as follows: Exposure: use on media clips that are over or underexposed. A lower value darkens all the colors in the clip, while a higher value lightens them. Brightness: use to increase or decrease the brightness of the media clip's image. Contrast: use to adjust contrast, or the difference between light and dark areas of the media clip. Hue: use to fine tune the shade or purity of the colors in the media clip. Saturation: use to adjust the saturation of the colors in a media clip. A smaller value moves the colors towards black and white, while a higher value increases the overall intensity of color in the clip. Vibrancy: use to make the colors in a media clip brighter and more vivid, by enhancing the duller colors. Highlight healing: is applied to areas of media clips that are overexposed to recover detail in the highlights and brighter areas. Shadow: use to enhance detail in dark sections of the media clip by lightening shadows and underexposed areas. Sharpness: use the slider to adjust the amount of sharpness applied to the media clip. Color Enhancement Color Enhancement dynamically adjusts the color saturation ratio in video. Use the available slider to make the colors in the video more vivid, without affecting skin tones. 166
180 CyberLink PowerDirector Help Color Match The Color Match feature lets you change the color in a selected video or image, by matching it to another clip in your project. To use Color Match, do this: Note: you can only match the color in one clip at a time. 1. Select two clips on the timeline and then click the Color Match button. Or select one clip, click Fix/Enhance, and then the Color Match option and button to enter the Color Match panel. 2. If you haven't yet done so, select the reference media clip on the timeline. The reference clip contains the colors you want matched in the target clip. Note: if the Reference and Target clips are reversed/not correct, click the button to switch them. If you selected the wrong clip, you must exit the Color Match panel and then reselect the clips to reenter. 3. In the Reference frame, use the playback controls to find the frame of video that has the exact color you want to match. 4. Click the Color Match button to match the colors. 5. Use the Level slider to adjust the strength of the matched colors. 6. When you are satisfied with the results, click OK to exit and apply the changes. Color Presets In the Fix/Enhance panel you can apply CyberLink ColorDirector presets on your video clips, instantly transforming the color and look of the clips. Note: ColorDirector presets can be downloaded from DirectorZone and imported into the Fix/Enhance panel by clicking downloaded preset file on your hard drive. and then selecting the To apply a ColorDirector color preset, do this: 1. Select the video clip in the timeline and then click the Fix/Enhance button. 2. Select the Color Presets check box. 3. Select one of the available color presets to apply it to the selected clip. 167
181 Editing Your Media Split Toning The Split Toning option lets you produce creative color effects on your videos, such as the Lomo effect. Select a video on the timeline, click Fix/Enhance and then Split Toning in the Enhance section to use the following controls: Highlights Click the colored box to choose the exact color you want used in the highlights, by selecting it or entering the color's HSL/RGB color code in the fields provided. Use the sliders to adjust the hue and saturation of the highlights, or the brightest areas of a selected video. Hue: use this slider to set the hue or color of the highlights in the video image. Saturation: use this slider to set the saturation of the color used, or its amount/strength. Dragging the slider right makes the color more saturated, while dragging it left makes it less saturated. Balance use the Balance slider to set the balance between the split toning effect applied on the highlights and shadows in the video image. Drag the slider left to increase the influence of the Shadows sliders on the video image, drag it right to increase the influence of the Highlights sliders. Set the Balance slider's value to 0 if you want both the effects on the highlights and shadows equally applied. Shadows Click the colored box to choose the exact color you want used in the shadows, by selecting it or entering the color's HSL/RGB color code in the fields provided. Use the sliders to adjust the hue and saturation of the shadows, or the darkest areas of a selected video. Hue: use this slider to set the hue or color of the shadows in the video image. Saturation: use this slider to set the saturation of the color used, or its amount/strength. Dragging the slider right makes the color more saturated, while dragging it left makes it less saturated. 168
182 CyberLink PowerDirector Help HDR Effect Select a video on the timeline, click Fix/Enhance and then HDR Effect in the Enhance section to apply an HDR effect on your videos. The HDR (high dynamic range) effect adjusts the lighting range on the edges in the video image, allowing you to recover any loss of detail caused by contrasting brightness during video exposure. Users can also use this effect to give videos a more dramatic tone. Glow Use the Glow sliders as follows to apply an HDR glow effect, or a "halo" edge, on contrast edges in the video image: Strength: use this slider to adjust the amount of the HDR glow effect applied to the video image. Radius: use the slider to adjust the radius of the HDR glow effect, or the amount of contrast applied to the edges in the video image. Balance: use the slider to adjust the balance (where it is applied) of the HDR glow effect. Moving the slider right applies it on the brighter parts (highlights) of edges. Moving it left applies it to the darker parts (shadows) of edges. Edge Use the Edge sliders as follows to apply the HDR effect on contrast edges in the video image: Strength: use this slider to adjust the amount of the HDR edge effect applied to the video image. Dragging it right will reveal more detail on the contrast edges. Dragging it left will blur them. Radius: use the slider to adjust the radius of the HDR edge effect, or the amount of contrast applied to the edges in the video image. Balance: use the slider to adjust the balance (where it is applied) of the HDR edge effect. Moving the slider right applies it on the brighter parts (highlights) of edges. Moving it left applies it to the darker parts (shadows) of edges. Look-up Table Use color look-up tables (CLUT) to transform the range of colors in a video clip to another range. Doing this can completely change the color scheme of the video, 169
183 Editing Your Media and ensure all your video clips have the same look. You can search for and download color look-up tables in a variety of formats (3DL, CSP, CUBE, M3D, MGA, RV3DLUT, VF), and then import and then use them in your CyberLink PowerDirector projects. To apply a color look-up table to a video clip, do this: 1. Select the video clip on the timeline you want to apply the color look-up table to. 2. Click on in the Fix/Enhance button. 3. In the Enhance section, select the Look-up table check box. 4. Click on the Browse button and then select the color look-up table you want to use. Click on Open to finish the selection. Advanced Fixes and Enhancements If you have CyberLink PhotoDirector* and/or ColorDirector* installed on your computer, you can access the advanced fixes and enhancements available in these programs from within CyberLink PowerDirector. The adjustments you make to your media clips are then imported back into your current video production. Note: * optional feature in CyberLink PowerDirector. CyberLink PhotoDirector is a photography program that lets you manage and adjust your digital photos. CyberLink ColorDirector is a video editing program that turns your video footage into eye-catching movies through the use of video color creating and correcting. To adjust an image in CyberLink PhotoDirector, do this: 1. Select the image clip on the timeline, click the Fix/Enhance button above the timeline, and then the PhotoDirector button. The CyberLink PhotoDirector program opens. 2. Perform the adjustments on the image as necessary. Please consult the help file in CyberLink PhotoDirector for detailed information on adjusting and editing images in that program. 3. Once you finish adjusting the image file in CyberLink PhotoDirector, click the Back button within the program. Your changes are saved and the adjusted image is imported back into the timeline. 170
184 CyberLink PowerDirector Help To adjust a video clip in CyberLink ColorDirector, do this: 1. Select the video clip on the timeline, click the Fix/Enhance button above the timeline, and then the ColorDirector button. The CyberLink ColorDirector program opens. 2. Perform the adjustments on the video clip as necessary. Please consult the help file in CyberLink ColorDirector for detailed information on adjusting video clips in that program. 3. Once you finish editing the video clip in CyberLink ColorDirector, click the Back button within the program. Your changes are saved and the adjusted video clip is imported back into the timeline. Utilizing Keyframes on Media Use keyframes in your video production to define the start and end points of an applied fix, enhancement, or effect on images, videos, and audio. You can also use keyframes to change the volume level of your video and audio clips at specific moments. To use keyframes on your media, select the clip on the timeline and then click the Keyframe* button to open the Keyframe Settings panel. See the available Keyframe Settings below, and Adding Keyframes for information on applying these settings at different moments in your video production. Note: * optional feature in CyberLink PowerDirector. Check the version table on our web site for detailed versioning information. In the Keyframe Settings panel, the following options are available, depending on the type of media selected: Note: once you have customized the fixes, enhancements, and effects on a clip using keyframes, you can right click on the clip and select Copy Keyframe Attributes. This allows you to paste all of its keyframe attributes onto another clip in the timeline, applying the same changes to the clip. To apply just some of the keyframe attributes modified in this panel, just right click on Fix/Enhance, Effect, Clip Attributes, or Volume to copy and paste the changes to another clip. 171
185 Editing Your Media Fix/Enhance Use the available sliders to fix and enhance images, videos, and audio clips at the current keyframe in your video production. See Fixing and Enhancing Photos/Videos for a detailed explanation of the available fixes and enhancements. Effect When you apply video effects to media clips on the timeline, you can use keyframes to adjust the intensity of the effect at different moments of the clip. See Adding Video Effects for information on adding effects to your media. Note: the settings and sliders that are available in the Keyframe Settings panel are completely dependent on the type of effect you are editing. Clip Attributes In the Clip Attributes section you can adjust the position, size, opacity, freeform shape, and more for media clips in your video production. Position: set the position of media clips at different moments (keyframes) in your video production. Adjusting the X and Y values between keyframes lets you manually create motion in your video. When you create motion for PiP media, you indicate where on the video image you want the PiP media to appear by adding keyframes. To create the motion, CyberLink PowerDirector will ensure it is in the desired location at the specified time. This can cause the PiP media to appear jerky, as it speeds up and slows down as it moves through the frame. To make the movement look smoother, you can use the Ease in/out options. Select Ease in to slow down the PiP media as it enters a keyframe. Select Ease out if you want it to gradually accelerate out of the keyframe. Note: CyberLink PowerDirector sets the value of the top-left corner of the media as the 0 axis, with the bottom-right corner having a value of 1.0, 1.0. The center position in the video frame is 0.500, You can more easily adjust clip position and motion in the PiP Designer. See Adding Motion to PiP Media for more details. Height: set the height of media clips at different moments (keyframes) in your video production. Width: set the width of media clips at different moments (keyframes) in your video production. 172
186 CyberLink PowerDirector Help Note: by default, when you adjust the height or width of a clip, the other value is also changed. Deselect the M aintain Aspect Ratio checkbox if you just want to change a clip's height or width. Opacity: use the slider to adjust the opacity of images and video clips at different moments (keyframes) in your video production. Rotation: enter in the preferred orientation in degrees for media clips at different moments (keyframes) in your video production. Freeform position: in the eight freeform position fields provided, define the shape of the selected media clip by setting the X and Y positions for its four corners in the video frame. By entering different values at different moments (keyframes) in your video production, the clip's freeform shape can change over time in your video production. See Changing the Shape of Media for more information on freeform media clips. Enable 3D depth on the PiP media: if you are creating a 3D video production, select this option to give the PiP media a 3D* effect. Once enabled, use the slider to set the amount of depth you want the PiP media to have in 3D. Dragging the slider left will make the 3D PiP object seem nearer to the audience (in the foreground), while dragging it right will make it appear farther away (in the background). Note: when using this feature, select the button to enable 3D mode for best editing results. See Previewing in 3D Mode for more information on using this mode. * Optional feature in CyberLink PowerDirector. Check the version table on our web site for detailed versioning information. Volume For video and audio clips in your video production, use the available slider to adjust the level of the selected clip's volume at different moments in your production. Adding Keyframes In the Keyframe Settings window, there is a mini timeline for the selected media clip. The timeline matches the duration of the selected media clip. 173

187 Editing Your Media You can resize the timeline ruler and move the timeline slider, just like on the main timeline. To add a keyframe to the keyframe timeline, do this: Note: once you have customized the fixes, enhancements, and effects on a clip using keyframes, you can right click on the clip and select Copy Keyframe Attributes. This allows you to paste these keyframe attributes on another clip in the timeline, applying the same changes to the clip. 1. Use the player controls to find the moment in your media clip where you want its properties to change. 2. In the panel on the left, use the slider or other options to change the clips properties as required. Note that a keyframe marker is added at that moment in timeline. 174

188 CyberLink PowerDirector Help 3. Use the player controls to find the next moment you want to add the next keyframe, and then modify the clip properties as required again. 4. Repeat these steps to create the kind of effect you want in your video production using keyframes. In the above example, the brightness of the media clip will slowly dim between the two keyframe moments. 175
189 Editing Your Media Modifying and Removing Keyframes At any time you can modify the keyframes added, by selecting it and changing the clip's properties, or dragging it to another position on the timeline. To remove a keyframe, select it on the timeline and then click. Note: if you want to reset the changes made at a keyframe, just ensure the keyframe is selected and then click next to the option/parameter you want to reset back to the original. Muting Audio You can mute the audio in a video clip (or in any audio clip on the timeline) simply by right-clicking on it in the timeline and then selecting Mute Clip. If you added any audio volume keys previously, they are hidden. To restore sound to the clip, right-click on the clip and then deselect Mute Clip. Note: if you would like to mute the audio of an entire track, right-click on the track and then select M ute Track. This is useful if you have video on a PiP track and you don't want any of its audio in your final production. Advanced Audio Editing You can edit the audio in your video production in CyberLink AudioDirector* and/or WaveEditor*, depending on your preference and which one is installed on your computer. CyberLink AudioDirector and WaveEditor are companion programs that let you perform more advanced editing on your audio clips. To edit an audio clip in CyberLink AudioDirector or WaveEditor, do this: 1. Select an audio or a video clip (with audio) on the timeline, click the Edit Audio* button above the timeline, and then select AudioDirector or WaveEditor. The CyberLink AudioDirector/WaveEditor program opens. 2. Perform the edits on the audio clip as necessary. Please consult the help file within the program directly for detailed information on editing audio. 3. Once you finish editing the audio file in CyberLink AudioDirector/WaveEditor, exit the program, and then click Yes to save your changes and import your edited audio clip back into the timeline. 176
190 CyberLink PowerDirector Help Note: * optional feature in CyberLink PowerDirector. Check the version table on our web site for detailed versioning information. Time Info When a DV-AVI video clip captured from a DV tape camcorder or an EXIF image is added to the timeline, the Time Info button is enabled. Click the Time Info button to enable the date or time stamp (displayed as an image) that was captured from the original camcorder or digital camera. You may also add a text remark to your video or image if required. Note: CyberLink PowerDirector does not support the enabling of running time codes on video files. Magic Fix With Magic Fix CyberLink PowerDirector can auto stabilize videos taken with shaky hands, enhance a video's audio, or the quality of a video's image. Magic Fix can also auto remove red-eye from photos, or improve the clarity on photos that are out of focus. To use Magic Fix to fix and edit a media clip, select it on the timeline, click on the button above the timeline, and then select Magic Fix. Click on the these features. button to consult the ihelp for more information on using Magic Cut You can use Magic Cut* to have CyberLink PowerDirector auto-edit your video clips using video technology that locates and keeps the most interesting moments, while discarding sections of lesser importance. The Magic Cut tool is ideal for condensing long video segments into shorter clips. For example Magic Cut can edit a one hour video down to ten minutes. Note: * optional feature in CyberLink PowerDirector. Check the version table on our web site for detailed versioning information. 177
191 Editing Your Media To use Magic Cut on a video clip, select it on the timeline, click on the button above the timeline, and then select Magic Cut. Click on the feature. button to consult the ihelp for more information on using this 178
192 CyberLink PowerDirector Help Chapter 9: Using the Tools CyberLink PowerDirector includes a number of tools you can use to edit your media and add cool and creative effects. In the Edit module, select a media clip on the timeline, and then click the Tools button to use one of the following tools: Note: this section outlines the procedures for using the tools in timeline mode, as all the program's features are available in this mode. If you prefer to use the storyboard mode, and you find one of the outlined tools is not available, you can press the Tab key on your keyboard to switch to timeline mode. Power Tools Audio Ducking Motion Tracker Action Camera Center Blending Effect View Designer 360º Start View Setting Note: * optional feature in CyberLink PowerDirector. Check the version table on our web site for detailed versioning information. Using the Power Tools In the Edit module, select a media clip on the timeline, then the Tools button, and then Power Tools to perform a range of powerful functions, including: 2D to 3D*: select this option to convert any 2D images or videos into 3D, using TrueTheater 3D. Use the Scene Depth slider to adjust the amount of depth in the resulting 3D image. Video/Audio in Reverse*: when enabled on a selected video or audio clip, it plays backwards. Crop & Zoom: select this option to crop out the edges of the video frame or zoom in on a specific portion of the video. Select the Crop/Zoom button to 179
193 Using the Tools define the area you want to crop out/zoom in on. See Crop & Zoom Video for detailed information on customizing the zoom by adjusting the cropped area (focus area) of the video. Video/Audio Speed: select this option to change the speed of a video or audio clip. For audio clips, just enter the desired audio length in the Modified audio length field to change the clip's speed. You can also use the Speed multiplier slider to speed audio up by 2X, or slow it down by 0.5X. Drag it left to slow down the clip, or right to speed it up. For video clips, click the Speed Adjustment button to adjust the video speed in the Video Speed Designer. See Adjusting Video Speed in the Video Speed Designer for more details on adjusting the speed. Note: you can also hold down the Ctrl key on your keyboard and then click and drag the edge of a video or audio clip on the timeline to manually change its speed to fit your required duration. Video/Photo Rotation: select this option and then use the buttons to rotate a video or image up to 360 degrees in either direction. You can also enter in a custom rotation amount in the field provided, and press the Enter key on your keyboard to apply it. Blending Mode: select this option to blend the selected video or image clip with a clip above it in the timeline. Once selected, choose from the available blending modes. See Blending Clips on the Timeline for more detailed information about this feature and a description of the blending modes. Note: * optional feature in CyberLink PowerDirector. Check the version table on our web site for detailed versioning information. Crop & Zoom Video After you select Crop/Zoom button in Power Tools, the Crop/Zoom window displays. 180

194 CyberLink PowerDirector Help A - Focus Area, B - Rotation Amount, C - Focus Area Preview, D - Focus Area Aspect Ratio, E - Zoom In/Out, F - TV Safe Zone/Grid Lines, G - Keyframe Buttons, H - Keyframe Timeline To crop the video, you just need to resize the focus area. Here are some tips when cropping videos: set the focus area aspect ratio by selecting one of the available options on the right. Choose Freeform to manually resize the focus area shape to create a custom aspect ratio for your cropped video. crop the video by resizing the focus area box the desired amount. The cropping results are displayed in the focus area preview. To add a zoom on the video, you need to use keyframes to customize the zoom. Keyframes are frames of your video that define the start and end points of an effect, 181
195 Using the Tools which in this example is the zoom in or out. Here are some tips when adding zooms on videos: click on to add keyframes to the keyframe timeline. By adding keyframes you can alter the zoom by adjusting the size of the focus area between two points on the keyframe timeline. click on to duplicate the previous or next keyframe on the keyframe timeline. Doing this copies the properties of the specified keyframe to the new position. set the focus area aspect ratio by selecting one of the available options on the right. Choose Freeform to manually resize the focus area shape to create a custom aspect ratio for your zoom. add a rotation to the zoom by adding a keyframe to the keyframe timeline and then entering the rotation amount in the field provided. You can also click and drag on top of the focus area to rotate it manually. When working in the Crop/Zoom window, you can also: click on to to zoom in or out on the preview window. click on to use the TV safe zone and grid lines to help with the precise placement of the focus area on the video. Select Snap to Reference Lines to have the focus area snap to the grid lines, TV safe zone, and boundary of the video area. When you are done cropping or zooming on a video, click the OK button to save your changes. Your changes are applied to the video clip and updated on the video timeline. If you want to edit the crop/zoom results, just reselect the clip on the timeline and then reenter the Crop/Zoom window by selecting Tools > Power Tools. Adjusting Video Speed in the Video Speed Designer The Video Speed Designer* let's you change the speed of an entire video clip, or just a selected range using time shifts. Note: * optional feature in CyberLink PowerDirector. Check the version table on our web site for detailed versioning information. 182

196 CyberLink PowerDirector Help A - Change Speed for Entire Clip, B - Change Speed for Selected Range, C - Preview Window, D - Video Speed Designer Settings, E - Zoom on Timeline, F - Video Speed Designer Timeline When you are done changing the video clip's speed, click the OK button to save your changes. Your changes are applied to the video clip and updated on the video timeline. Changing the Speed for an Entire Clip Click on the Entire Clip tab if you want to change the speed of the entire video clip. To change the clip's speed, enter the desired video length in the New video duration field. You can also use the Speed multiplier slider to manually speed up or slow down the video clip. Drag it left to slow down the clip, or right to speed it up. Use the player controls to preview the results of adjusting the clip's speed. Configure the Video Speed Designer Settings to ensure you get your desired results. You can click the Reset button at any time to undo your changes. 183
197 Using the Tools Changing the Speed for a Selected Range Click on the Selected Range tab in the Video Speed Designer to change the speed of the clip for just a selected range of the video using a time shift. Note: before you finish changing the speed for a selected range, configure the Video Speed Designer Settings to ensure the best output results. To change the video speed using a time shift, do this: 1. On the Selected Range tab, use the player controls or drag the Video Speed Designer timeline slider to the position in your video clip where you want the time shift to start. Note: use the zoom controls above the Video Speed Designer timeline to zoom in on the video clip's timeline to more precisely add the time shift. 2. Click on the Create time shift button. CyberLink PowerDirector will create the time shift, which is indicated in orange on the timeline. 3. If required, drag each end of the time shift so that it covers the segment of the video you want to add the effect to. Note: the length of the original time shift is dependent on how much you have zoomed in on the Video Speed Designer timeline. 4. Change the video speed as required (see below) for the time shift segment (selected range). 184
198 CyberLink PowerDirector Help Note: you can create more than one time shift on a video clip. Just repeat the above steps to add another. Speed Effect Make sure the created time shift is selected on the Video Speed Designer timeline and enter a new Duration for the selected range in the field provided, or use the Speed multiplier slider. Drag it left to slow down the segment, or right to speed it up. When you apply a speed effect to a selected range, by default the change in the speed in the video is instantaneous once the timeline slider enters the time shift. If you want it to be more gradual and look smoother, you can use the Ease in/out options. Select Ease in if you want the change of speed at the beginning of the time shift to gradually speed up/slow down to the specified speed. Select Ease out if you want the video to gradually return to the original video speed at the end of the time shift. Video Speed Designer Settings Click the button in the Video Speed Designer window to open the settings window. The available options are as follows: Audio setting: Remove audio: select this option if you want to mute the audio in the entire video clip. Keep audio: select this option if you want to keep the audio in the edited video clip. Select the Keep audio pitch (05X to 2X only) if you are changing the speed of the video. Selecting this will stretch the audio to match the new video's length, minimizing the warping of the sound as the video speed changes. Interpolation setting: Apply interpolated technology when available: select this option when reducing the speed of the video. CyberLink PowerDirector uses frame interpolated technology* to create a more advanced and smooth slow motion effect. 185
199 Using the Tools Note: * optional feature in CyberLink PowerDirector. Check the version table on our web site for detailed versioning information. Audio Ducking Use audio ducking to automatically optimize the audio mix in videos that contain dialogue or narration. By selecting a clip in your video production that you want to be quieter, audio ducking will help ensure the voices in concurrent clips are heard by lowering the volume in the selected clip. To use audio ducking, do this: 1. In the Edit module, select a video or audio clip on the timeline that you want to have a lower volume. 2. Click Tools above the timeline and then select Audio Ducking. 3. In the Audio Ducking window, you can customize the controls as follows: Sensitivity: sets the level of detection of dialogue/narration in other clips. Ducking level: set how much you want to reduce the volume in the selected clip. Fade-out duration: set the duration for lowering the volume in the selected clip. Fade-in duration: set the duration for fading the audio back in once the dialogue/narration in the other clip ends. Note: select the Apply to all clips on the same track option if you want to sync the audio ducking applied to all the clips in your video project. 4. Click OK to apply. CyberLink PowerDirector will lower the audio in the selected clip using the audio level keyframe nodes. 186
200 CyberLink PowerDirector Help Motion Tracker The Motion Tracker* tool lets you track the motion of one or more objects in a video clip. You can then add title text, effects, or PiP images/videos that move with the tracked object in the video. To open the Motion Tracker, in the Edit module, select a video clip on the timeline and then select Tools > Motion Tracker. Note: * optional feature in CyberLink PowerDirector. Check the version table on our web site for detailed versioning information. A - Tracker Steps and Properties, B - Tracker Selection Box, C - Preview Window, D - Tracker Timeline, E - Track Object 187
201 Using the Tools When you are done using the Motion Tracker, click the OK button to save your changes. Your changes are applied to the video clip and updated on the video timeline. Tracking the Motion of Objects in Videos To track the motion of a specific object in a video clip, do this: 1. In the Edit module, select a video clip on the timeline and then select Tools > Motion Tracker. 2. In the Motion Tracker window, if required, use the player controls or drag the Motion Tracker timeline slider to the position in your video clip where you want to begin tracking the object and then click. Note: if you want to track the object for the entire duration of the clip, you do not have to use the mark in and out buttons. 3. Ensure the video is paused and then place the tracker selection box over the object you want to track by dragging and resizing it. 188

202 CyberLink PowerDirector Help 189
203 Using the Tools 4. If required, find the position in the video where you want the tracking to stop and then click. 190
204 CyberLink PowerDirector Help Add some title text, a media clip, or effect that will move with the tracked object. See Adding Motion Tracking Effects for more information.

205 Using the Tools 6. Click the Track button to track the object and apply the effect. See Adding and Editing Trackers for more detailed information on this and how to edit them once added. Note: you can track more than one object, or add multiple effects to one object by adding multiple trackers. Adding and Editing Trackers When you track an object in the Motion Tracker, a tracker is added to the Motion Tracker timeline. 192
206 CyberLink PowerDirector Help The timeline indicates the duration of the video clip, and green area is the amount of time the object is tracked during the playback of the clip. If required, you can adjust how long the object is tracked by clicking and dragging either end of the tracker. If you want to track another object in the same video clip, just click the Add a tracker button. A new tracker is added to the Motion Tracker timeline. Follow the same steps as when you added the first tracker. See Tracking the Motion of Objects in Videos for more information. To edit the properties of a tracker when there are more than one in the timeline, just select it. 193
207 Using the Tools You can also click from your project. to hide a tracker during the editing process, or to delete it Adding Motion Tracking Effects There are three types of motion tracking effects that can be added to objects in the Motion Tracker: title text, media clip, and a mosaic, spotlight, or blur effect. Note: you can only add one of these tracking effects to a single tracker. If you want to add more than one, just track the same object multiple times, i.e. more than one tracker. The motion tracking effects can be added before or after the object is tracked. You can also edit the tracking effect properties at any time by selecting the tracker in the Motion Tracker timeline. Note: if you are adding a motion tracking effect to an object that is only tracked for a portion of the clip, the timeline slider must be over the tracker (green area) in the timeline before you can edit the motion tracking properties. 194

208 CyberLink PowerDirector Help Adding Title Text Click the button to add title text that will move and dynamically change size (if enabled) as it follows the tracked object. Once clicked, update the title text properties as follows: 1. Enter the required text in the text box provided. 2. Be sure to set the font face style, size, color, and layout using the available font options. 3. Set the title text options as follows: Border: select this option if you want to include a border on the text. Click to set the border color. 195
209 Using the Tools Maintain aspect ratio: select this option to have the title text's aspect ratio remain constant as it is resized as it moves with the object. Smooth: select this option if there is a lot of movement by the object. This will minimize the amount of shake on the text as it follows the object. Adjust effect size with tracked object: select this option if you want the title text to dynamically resize as the tracked object's size changes. Note: once you exit the Motion Tracker and your changes are applied to the video clip, a title text template is added to the video timeline independently. If required, you can perform advanced editing on the title text's font, motion, size, etc. in the Title Designer. See Modifying Titles in the Title Designer for more information. Adding Media Clips (Images, PiP Objects, and Videos) Click the button to add an image, PiP object, or video clip that will move and dynamically change size (if enabled) as it follows the tracked object. Once clicked, add the media clip as follows: 1. Click the Import Media Clip button, and then: Import From Hard Drive: to import a file that is on your computer's hard drive. Import From Media Room: to import a file you previously imported into the current PowerDirector project. Import From PiP Object Room: to import a PiP object that is currently in your PiP Object Room. 2. If required, resize the media clip in the preview window to your liking. 3. Set the media clip options as follows: Border: select this option if you want to include a border around the media clip. Click to set the border color. Smooth: select this option if there is a lot of movement by the object. This will minimize the amount of shake on the media clip as it follows the object. 196
210 CyberLink PowerDirector Help Adjust effect size with tracked object: select this option if you want the media clip to dynamically resize as the tracked object's size changes. Note: once you exit the Motion Tracker and your changes are applied to the video clip, the added media clip is added to the video timeline independently. If required, you can perform advanced editing on the clip's motion, size, etc. in the PiP Designer. See Modifying Media in the PiP Designer for more information. Adding Mosaic, Spotlight, or Blur Effects Click the button to add a mosaic, spotlight, or blur effect that will move and dynamically change size (if enabled) as it follows the tracked object. Once clicked, add the effects as follows: Note: motion tracking mosaic, spotlight, and blur effects are not available in 360º video projects. 1. From the available drop-down, select the effect you want to apply: Mosaic: this effects adds a pixelated blur on portions of the tracked object, for example a person's face. Spotlight: this effect highlights the tracked object in the video. Blur: this effect blurs out portions the tracked object in the video. Gaussian Blur: this effect applies a softer blur on the tracked object in the video. 2. If required, resize the effect in the preview window to your liking. 3. Depending on the effect you selected, modify the effect properties as follows: Grid scale: for the mosaic effect, drag this slider to adjust the size of the squares in the pixelated blur. Light color: for the spotlight effect, click the colored box to set the color of the spotlight. Brightness: for the spotlight effect, drag this slider to adjust the brightness of the spotlight. Gradient: for the spotlight effect, drag this slider to adjust gradient and size of the spotlight. 197
211 Using the Tools Mask Type: for blur/gaussian blur, select the shape of the blur applied. Degree: for blur/gaussian blur, use this slider to set the strength of the blur. Gradient Depth: for blur/gaussian blur, use the slider to soften the blur's gradient edge. Invert effect area: for blur/gaussian blur, select this option to invert the blurred area. When selected, the area outside the mask is blurred out. Smooth: for all the effects, select this option if there is a lot of movement by the object. This will minimize the amount of shake on the effect as it follows the object. Adjust effect size with tracked object: for all the effects, select this option if you want the effect to dynamically resize as the tracked object's size changes. Note: once you exit the Motion Tracker and your changes are applied to the video clip, you can perform advanced editing on the effect in the Effect Settings panel. See Modifying a Video Effect for more information. Action Camera Center In the Action Camera Center you can fix video clips or add effects that highlight the action sequences in the video. To open the Action Camera Center, in the Edit module, select a video clip on the timeline and then select Tools > Action Camera Center. Note: you can also use the Action Camera Center on clips that are still in the media library. To do this, select a clip in the media library, click the button, and then select Action Camera Center. See Editing Video in the Action Camera Center for a detailed description of this feature. Blending Effect In the Blending Effect Designer you can blend a selected clip with an image preset or template to create a unique looking effect in your video. To access the Blending Effect Designer, in the Edit module, select a media clip on the timeline and then select Tools > Blending Effect. 198
212 CyberLink PowerDirector Help Note: you can also use the Blending Effect Designer on clips that are still in the media library. To do this, select a clip in the media library, click the button, and then select Blending Effect. See Creating Blends in the Blending Effect Designer for a detailed description of this feature. View Designer In non 360º video projects, the View Designer* lets you customize the direction of view in 360º video clips for use in conventional/standard 2D video productions. You can also use it to create new unique videos with your 360º video clips that look like little planets. Note: if you want to set/change the starting view of 360 video clips, see 360º Start View Setting. To do this, in the Edit module, select a 360 video clip on the timeline and then select Designer > View Designer or Tools > View Designer. Note: * optional feature in CyberLink PowerDirector. Check the version table on our web site for detailed versioning information. 199

213 Using the Tools A - Direction of View/Little Planet Properties, B - Object Tracking, C - Select Projection Mode, D Preview Window, E - Display/Hide Keyframe Timeline, F - Keyframe Timeline See Customizing Direction of View in 360º Video Clips and Creating Little Planet Videos for more information about these View Designer features. When you are done customizing the video, click the OK button to save your changes and create the conventional video. Your changes are applied to the video clip and updated on the video timeline. Customizing Direction of View in 360º Video Clips 360 videos allow the viewer to choose where they look during playback. When creating a standard 2D/conventional video (non 360 project) using 360 footage, 200
214 CyberLink PowerDirector Help you can customize this direction of view in 360 video clips using keyframes. You can customize the direction of view using object tracking or by doing it manually. Using Object Tracking to Customize Direction of View With object tracking enabled, CyberLink PowerDirector can track a selected object in a 360 video clip as it moves within the 360 environment. This will auto customize the direction of view in your video. To use object tracking, do this: 1. In the Edit module, select a 360 video clip on the timeline and then select Designer > View Designer or Tools > View Designer. 2. In the Projection mode drop-down, ensure that Standard 2D is selected. 3. If required, use the player controls or drag the timeline slider to the position in your video clip where you want to begin tracking the object. 4. Use the navigation controls, or click and drag your mouse in the preview window, to find the object you want to track in the 360 environment. 201

215 Using the Tools 5. Select the Object tracking option and then place and resize the tracker selection box on the object you want to track. 202
216 CyberLink PowerDirector Help Note: if the point in your video where you want to track the object is not at the beginning of the clip, click tracking. 6. If required, find the position in the video where you want the tracking to stop and then click 203 to set the start point of the object.

217 Using the Tools Note: if you want to track an object for the entire duration of the clip, you do not have to use the mark in and out buttons. 7. Click the Track button. CyberLink PowerDirector will track the selected object as it moves in the 360 environment, customizing the direction of view. 204

218 CyberLink PowerDirector Help 8. When the tracking is complete, use the player controls to view the results. Note: if you did not track an object for the entire duration of a video clip, you can use the available controls to manually customize the direction of view in the rest of the clip. Manually Customizing Direction of View To manually customize the direction of view in a 360 video clip, do this: 1. Select a 360 video clip on the timeline and then select Designer > View Designer or Tools > View Designer. 2. In the Projection mode drop-down, ensure that Standard 2D is selected. 3. In the View Designer, click 205 to add a keyframe at the beginning of the video.

219 Using the Tools 4. If required, set the direction you want the camera (audience's view) to be pointing at the beginning of the video. You can do this by clicking and dragging your mouse in the preview window, or using the navigation controls in the top left corner of the preview window. 206

220 CyberLink PowerDirector Help 5. Use the playback controls, or drag the timeline slider to a point in the video where you want the camera to have a different direction of view, and then pause the video. 6. Once again, set the direction of view by clicking and dragging on the preview window, using the navigation controls, and/or the Zoom in/out slider. This will add another keyframe to the Direction of view keyframe timeline, and the audience will have this view at this point in the video's playback. 207
 where you want the camera to be facing at specific times in the video")
221 Using the Tools Note: if required, you can also use the X, Y, Z rotation and Zoom (or use your mouse's scroll wheel) sliders to customize the view at the first or any keyframe. 7. Repeat steps 5 and 6, changing the direction of view as many times as required (or setting all the points (keyframes) where you want the camera to be facing at specific times in the video clip). 208
222 CyberLink PowerDirector Help 8. When you are done, use the playback controls to preview the video. Click OK to save your changes and add the updated video to the timeline. Note: if you want to edit the video after closing the View Designer, just select it again on the timeline and then Tools > View Designer to reenter the window. Ease In/Out Adjusting the direction of view and X, Y, and Z rotation sliders lets you manually create camera movements in your video. To change the direction of view/camera movement, you indicate when in the video you want the camera to be facing a specific direction by adding keyframes. To create the camera movement, CyberLink PowerDirector will ensure the camera is facing in the selected direction at the specified time in the video. However, this may cause the camera movements to appear jerky. To make the sudden camera movements look smoother, be sure to enable the Ease in/out option. 209
223 Using the Tools Modifying Direction of View Keyframes At any time you can modify the keyframes added, by selecting them and changing the direction of view/zoom, or by dragging the keyframe to another position on the keyframe timeline. Note: if you cannot find the keyframe timeline in the View Designer, just click the button under the preview window to display it. To remove a keyframe, select it on the keyframe timeline and then click. Creating Little Planet Videos In the View Designer you can use 360º video clips to create little planet videos. To create a little planet video, do this: 1. In the Edit module, select a 360 video clip on the timeline and then select Designer > View Designer or Tools > View Designer.. 2. In the Projection mode drop-down, select the Little Planet option to transform the video. 210
224 CyberLink PowerDirector Help Customizing the Look of Your Little Planet Video When creating a little planet video, use the direction of view sliders, fly in/out, and keyframes to customize the look of your final video. Direction of View Use the X, Y, Z rotation sliders and keyframes to customize the look of your little planet video. See Customizing Direction of View in 360º Video Clips for more details on how to use these to customize the direction of view to your liking. Fly Out Select the Fly out option if you want the video to begin as a regular video, and then fly out to reveal the little planet. 211

225 Using the Tools 212
226 CyberLink PowerDirector Help You can modify the look and timing of the fly out by adjusting the added keyframes. 213
227 Using the Tools Fly In Select the Fly in option if you want the video to end as a regular video, by flying in on the little planet. 214

228 CyberLink PowerDirector Help 215
229 Using the Tools You can modify the look and timing of the fly out by adjusting the added keyframes. 216
230 CyberLink PowerDirector Help Ease In/Out Adjusting the direction of view, and adding a fly out and in, may cause movements in your video to appear jerky. To make them look smoother, be sure to enable the Ease in/out option. 360º Start View Setting In 360 video projects, if you find that the starting view in a 360 video clip is not facing the direction that you want, you can use the 360 Start View Setting* feature to change it. To do this, in the Edit module, select a 360 video clip on the timeline and then select Tools > 360º Start View Setting. Note: * optional feature in CyberLink PowerDirector. Check the version table on our web site for detailed versioning information. 217

231 Using the Tools A - Direction of View Properties, B - Preview Window To change the starting view in a 360 video clip, do this: 1. In the Edit module, select a 360 video clip on the timeline and then select Tools > 360º Start View Setting. 2. Set the direction you want the camera to be pointing at the beginning of the video. You can do this by clicking and dragging your mouse in the preview window, using the navigation controls in the top left corner of the preview window, or by using the available X, Y, Z rotation controls. 218

232 CyberLink PowerDirector Help Click OK to save your changes and update the starting view in the 360 video. Your changes are applied to the video clip and updated on the video timeline.

233 Adding Effects Chapter 10: Adding Effects You can add many different kinds of effects to your video production, including blending media and video effects that you apply to a portion or the entire media clip. Use Magic Motion to apply a motion effect to images in your video production, or the Magic Style and Freeze Frame features to auto create some effects for you. Note: this section outlines the procedures for adding effects in timeline mode, as all the program's features are available in this mode. If you prefer to use the storyboard mode, and you find one of the outlined features is not available, you can press the Tab key on your keyboard to switch to timeline mode. Blending Clips on the Timeline You can blend any video or image clip on a timeline track, with the media that displays above it in the timeline. Doing this blends the pixels in the media clips together, creating a unique overlay effect in your video production. To blend clips on the timeline, do this: 1. Select a clip on a lower track in the timeline. 2. Right click on the clip on the lower track, and then select Set Clip Attributes > Set Blending Mode. 220
234 CyberLink PowerDirector Help Note: you can also blend clips together using the Power Tools. 3. Select one of the available blending modes to specify how the selected media clip is blended with the clip above it in the timeline (below it in the video production). There are 8 blending modes to choose from, with each having a different effect. Below is a general description of each blending mode, but it is recommended that you select each to experiment which best fits the needs of your video: Normal: Normal is the default blending mode and does not mix the pixel colors in the selected image preset with the pixels in the selected media clip. The pixels in the selected image preset are placed over the pixels in the media clips, and are not blended. Darken: the Darken blending mode retains the darkest pixels of all the media clips being blended. Multiply: Multiply blending mode retains the darkest pixel colors of the selected image preset, and removes the lightest pixels by making them transparent. Lighten: the Lighten blending mode retains the lightest pixel colors of all the media clips being blended. Screen: Screen blending mode is the opposite of Multiply, as the brightest pixels are retained, with the darkest pixels effectively becoming transparent. Overlay: Overlay combines the effects of the Multiply and Screen blending modes. When blending the media clips, for darker pixels it blends like Multiply. For lighter pixels, it blends like Screen. Difference: Difference subtracts the brightest pixel color value from the pixel colors in the selected media clips. The resulting effect is similar to the look of a film negative, but is more colorful. Hue: use the Hue blending mode to blend just the hue from the selected image preset's pixels with the lightness and saturation of the below media clip's pixels. 221


235 Adding Effects 4. Once selected, the two clips are blended together to create the effect. Adding Video Effects In the Edit module, click the button to open the Effect Room and access over 100 effects you can add to your images and video clips. Each effect has unique 222
236 CyberLink PowerDirector Help attributes that you can customize to help achieve the impression you want in your video production. Note: CyberLink PowerDirector includes the video effects lens flare, tilt shift, water reflection, and magnifier. You can find these effects by clicking on the Special tag in the explorer view. CyberLink PowerDirector includes many video effects from NewBlue*. To view these effects, select the NewBlue Art Effects filter from the drop-down in the effects library. To view extra help and information about these effects, add them to your production, select them, and then click the Modify button. In the Effect Settings panel, select the Help and Information buttons for more detailed information. Note: * optional feature in CyberLink PowerDirector. Check the version table on our web site for detailed versioning information. To insert a video effect to a portion of a clip in the timeline, do one of the following: select an effect in the Effect Room and then click to add it to the effect track at the current position of the timeline slider. Note: videos effects in the effect track are applied to all the video tracks that are positioned above it in the timeline. drag an effect from the Effect Room into the effect track directly beneath the clips on the tracks that you want to apply it to. right-click on an effect and select Add to Timeline to add it to the current position of the timeline slider. click and then select Apply Random Video Effect to add a random video effect at the current position of the timeline slider. When adding an effect to the timeline (inserting or dragging and dropping), if the timeline slider is over an existing effect, or you drop it on an existing effect, you are prompted to do one of the following: Overwrite: select to overwrite the existing effect with the newly added effect. Insert: select to split the effect and insert the new effect between the two portions. CyberLink PowerDirector also only moves the effects on the same track to the right. 223
237 Adding Effects Insert and Move All Clips: select to split the effect and insert the new effect between the two portions. CyberLink PowerDirector also moves all of the media clips on the timeline that lie to the right of the inserted effect, right. Note: once an effect is added to the effect track, select it and then click the M odify button to edit the effect's settings. See Modifying a Video Effect for more information. To add a video effect to an entire media, PiP object, or title template clip in the timeline, do this: Note: video effects cannot be added to an entire paint animation or particle effect clip. select an effect in the Effect Room, drag it to a video track, and then drop it on top of the media, PiP object, or title effect clip you want to apply it to. The video effect is applied to the entire duration of the clip. Note: to modify the settings of a video effect applied to the entire clip, select the clip on the timeline and then click the Effect button. See Modifying a Video Effect for more information. Modifying a Video Effect Many video effects let you customize their properties, such as the intensity, position, and much more. You can customize a video effect for the entire duration (clip mode) or customize it using keyframes (keyframe mode). To modify a video effect, double click on it in the timeline or select it and then click Modify. To modify a video effect that is applied to an entire clip, select the clip and then click the Effect button above the timeline. You can modify video effects in one of two modes: Note: the type of modifications that are available in the Effect Settings panel are completely dependent on the effect you selected. Clip Mode: when the Effect Settings panel first opens, it displays in clip mode. Any changes you make to the effect's settings are applied for the entire duration of the effect. Use the available sliders and options to customize the video effect to your preference. Keyframe Mode*: some effects utilize keyframes to customize an effect's settings. Keyframes are frames of your video that define the start and end 224
238 CyberLink PowerDirector Help points of an effect, for example the intensity of an effect between two keyframes. To customize an effect in keyframe mode, click the Keyframe button in the Effect Settings panel. See Utilizing Keyframes on Media for detailed information on using keyframes to customize effects in your production. Note: to remove an effect applied to an entire clip, deselect the effect name in the Effect Settings panel when in Clip Mode. * optional feature in CyberLink PowerDirector. Check the version table on our web site for detailed versioning information. Using Magic Motion CyberLink PowerDirector's Magic Motion tool adds zooms or pans to images, creating a motion effect in your final video. You can select from a number of motion templates for each photo in your project, or use the Magic Motion Designer to customize the motion to your liking. To use Magic Motion, do this: 1. Select an image on the timeline, click the button above the timeline, and then select Magic Motion. The Magic Motion panel opens. 2. Select one of the available Magic Motion templates. 3. Use the preview player controls to preview the applied motion template. 4. If required, click on the Motion Designer button to customize the motion in the Magic Motion Designer. 225

239 Adding Effects Magic Motion Designer After you select a motion template to apply to the selected image, select the Motion Designer* button to customize the motion in the Magic Motion Designer. A - Focus Area, B - Timeline Indicator, C - Motion Path, D - Rotation Amount, E - Focus Area Preview, F - Focus Area Aspect Ratio, G - Zoom In/Out, H - TV Safe Zone/Grid Lines, I - Keyframe Buttons, J Keyframe Timeline Note: * optional feature in CyberLink PowerDirector. Check the version table on our web site for detailed versioning information. The Magic Motion Designer uses keyframes to customize the motion on an image. Keyframes are frames of your video that define the start and end points of an effect, which in this example is motion, rotation, or size of the focus area. 226
240 CyberLink PowerDirector Help In the Magic Motion Designer you can: use the player controls or drag the slider to preview the current motion in the preview window. click on to add keyframes to the keyframe timeline. By adding keyframes you can alter the motion, rotation, or size of the focus area between two points on the keyframe timeline. click on to duplicate the previous or next keyframe on the keyframe timeline. Doing this copies the properties of the specified keyframe to the new position. set the focus area aspect ratio by selecting one of the available options on the right. Choose Freeform to manually resize the focus area shape to create a custom aspect ratio. resize the focus area at keyframe positions on the keyframe timeline to define the areas on the image you want to highlight or focus on. click and drag the motion path to alter the movement of the focus area. add a rotation effect at keyframe positions on the keyframe timeline by entering the rotation amount in the field provided and then pressing the Enter key on your keyboard. You can also click and drag on top of the focus area to rotate the focus area manually. click on to to zoom in or out on the preview window. Zooming in is useful for precise movement of motion, while you can zoom out if you want to start the motion off screen. click on to use the TV safe zone and grid lines to help with the precise placement of the focus area on the image. Select Snap to Reference Lines to have the focus area snap to the grid lines, TV safe zone, and boundary of the video area. Using Magic Style With Magic Style you can auto create professional looking videos using predesigned style templates. Magic Style includes pre-designed opening sequences, transitions, and effects to automatically generate professional-looking videos on your timeline. 227
241 Adding Effects Note: the Magic Style templates with the 3D icon produce a 3D effect in 3D mode and when outputted in 3D video productions. To use Magic Style to add effects and some style to media clips in your video production, select them on the timeline, click the timeline, and then select Magic Style. Click on the feature. button above the button to consult the ihelp for more information on using this Note: if you want more creative control than the Magic Style provides, you can also use the Theme Designer to create your video production. The Theme Designer allows you to customize the theme templates used and choose the exact photos, video clips, and background music you want in your production. See Using the Theme Designer for more information. Using the Freeze Frame Effect Right-click on a video clip on the timeline, select Edit Video/Photo and then Freeze Frame to instantly create a freeze frame effect. CyberLink PowerDirector takes a snapshot of the current frame of video and then inserts it into the timeline, along with a video and title effect, creating a freeze frame effect. Edit the inserted image and effects to your specification to ensure the freeze frame effect fits your requirements. You can choose to not have CyberLink PowerDirector insert the effects by deselecting the option in preferences. See Editing Preferences for more information. 228
242 CyberLink PowerDirector Help Chapter 11: Creating PiP Effects In CyberLink PowerDirector there are many PiP (picture in picture) effects you can create and use in your video production. PiP effects not only include the use of PiP objects, but also adding motion or modifying the properties of media clips on any track in timeline, creating custom hand drawn paint animation objects in the Paint Designer, using the chroma key effect, and much more. Note: this section outlines the procedures for creating PiP effects in timeline mode, as all the program's features are available in this mode. If you prefer to use the storyboard mode, and you find one of the outlined features is not available, you can press the Tab key on your keyboard to switch to timeline mode. Adding PiP Objects In the Edit module, click the button to open the PiP Objects Room to access a library of PiP objects, or graphics, that you can add on top of the video or images on a video track. Note: the PiP Objects Room also includes paint animation objects. See Using the Paint Designer for more information. To insert a PiP object, or paint animation object, to the timeline, do one of the following: Note: you can download additional PiP and paint animation objects from the DirectorZone web site. See Downloading from DirectorZone for more information. use the timeline slider to set the position where you want the PiP or paint animation object, select it in the library, and then click add it to the selected video track. to use the timeline slider to set the position where you want the PiP or paint animation object, right-click on it in the library, and then select Add to Timeline to add it to the selected video track. You can also manually drag and drop a PiP or paint animation object to a desired position on a video track to add it to the timeline. 229
243 Creating PiP Effects When adding a PiP or paint animation object to the timeline (inserting or dragging and dropping), if the timeline slider is over an existing clip, or you drop it on an existing clip, you are prompted to use one of these ripple editing options to insert the clip: Overwrite: select to overwrite the existing clip with the PiP/paint animation object. Insert: select to split the clip and insert the PiP object/paint animation object between the two portions. CyberLink PowerDirector also only moves the clips on the same track to the right. Insert and Move All Clips: select to split the clip and insert the PiP/paint animation object between the two portions. CyberLink PowerDirector also moves all of the media clips on the timeline that lie to the right of the inserted clip, right. Crossfade: select to lay the PiP/paint animation object over a portion of the existing clip and auto add a fade transition between the two clips. Note: the Crossfade option does not overwrite the content on the track, instead adding an overlap transition between the two clips. See Setting Transition Behavior for more information. The Crossfade option is only available if the end of the new clip is not over any existing content on the track. Replace: select to replace a current clip on the timeline with the PiP or paint animation object. Use this option if you don't want to change the structure of the current content on the timeline. Note: if the duration of the clip you are replacing is longer or shorter than the PiP or paint animation object, CyberLink PowerDirector automatically resizes it to fit the original clip's duration. If the timeline slider is in a gap between two clips on a timeline track when inserting a PiP or paint animation object, you are prompted to use this ripple editing option to insert the clip: Trim to Fit: select to have CyberLink PowerDirector auto set the duration of the PiP/paint animation object to fit the gap to the right of the timeline slider. Once added to the timeline, select the PiP object and then click the Designer button to edit its placement, motion, and more in the PiP Designer. See Modifying Media in the PiP Designer for more information. For information on setting the amount of time the PiP effect appears in your video production, see Setting a Media Clip's Duration. 230
244 CyberLink PowerDirector Help Types of PiP Objects There are five main types of objects in the PiP Objects Room: static graphics. motion graphics that move through clips. decorative borders that are added to frame your video. tripod covers for 360º videos. hand drawn paint animation objects you create in the Paint Designer. Note: the PiP objects with the 3D icon produce a 3D effect in 3D mode and when outputted in 3D video productions. When editing 360º video projects, you can convert PiP objects and media to 360º for you use in your project. Tripod Cover PiP Objects Click on the Tripod Cover tag in the PiP objects room to view the PiP objects effects in your media library that can be used to cover up the tripod in your 360º videos. You can customize the tripod cover PiP object in the PiP Designer, if required. Creating Custom PiP Objects You can create a custom PiP object using your own graphics and images. To create a custom PiP object, do this: 1. Click on 2. In the PiP Objects room, click on 3. Select the image file on your computer you want to use. 4. Click Open to import it and open the PiP Designer. See Modifying Media in the PiP Designer for details on editing the object's properties in the PiP Designer. 231 to open the PiP Objects room..

245 Creating PiP Effects Using the Paint Designer The Paint Designer* lets you create hand drawn paint animation objects (such as your written signature) on top of a color board, image, or video clip in your video production. In the Edit module, click on and then to open the Paint Designer. A - Paint Settings, B - Paint Canvas, C - Freeze Time, D - Upload to DirectorZone, D - Capture Controls, E - Tools, F - Set Brush Width, G - Set Brush Color Note: * optional feature in CyberLink PowerDirector. Check the version table on our web site for detailed versioning information. 232
246 CyberLink PowerDirector Help Creating a Paint Animation To create a new hand drawn paint animation template, do this: 1. Click on and then to open the Paint Designer. 2. Select the type of brush in the Tools area that you want to use. Each tool creates a different looking line. 3. Use the slider to set the width of the drawn line. 4. In the Color area, hover your mouse over the color band and then use the eye dropper to set the color of the drawn line. Or click the colored box beside the color band to select it from the color palette. 5. Before you start drawing, be sure to set the Paint Settings as follows: Brush mode: select to draw on the paint canvas with the selected tool. Inverse mode: select to switch the paint canvas background to a solid color, which you erase as you draw. Show current timeline image as background: insert a media clip on the timeline, use the timeline slider to find a frame you want to use as a background, and then select this option to use it as a guideline when drawing. The background image is not included in the paint animation object. 6. If required, input a Freeze time in the field provided. This time should equal the duration you want the finished drawing to be displayed at the very end of the resulting paint animation object. 7. Click the button and then start drawing on the paint canvas. CyberLink PowerDirector captures your mouse strokes to create a paint animation object. 233
247 Creating PiP Effects 8. When you are done, click on again. Use the player controls to preview your paint animation object if required. 9. Select the Insert at current timeline position option if you want to insert the saved paint animation object at the current position on the timeline when you are done. 10. Once you are satisfied, click on the Save button to save it to the PiP Objects library. When prompted to save, enter a custom name for the new paint animation, use the slider to select the frame in the paint animation you want to use as its thumbnail in the library, and then click OK. Editing Paint Animation Templates At anytime you can edit the paint animation templates that are in the PiP objects library. Just select the paint animation and then click on. When editing a paint animation template, you can: use the player controls to preview the paint animation. click the button to add more content to the end of the drawing. click the button to take a snapshot of a frame in the paint animation, and save it as a new image in the media library. Saving and Sharing Paint Animation Templates Once you are finished modifying/customizing a paint animation template you can save it in your PiP objects library for future use, upload it to DirectorZone to share it with others, or back it up on CyberLink Cloud*. Note: * optional feature in CyberLink PowerDirector. Check the version table on our web site for detailed versioning information. click on Share to upload your custom template to DirectorZone or back it up on CyberLink Cloud. See Sharing and Backing Up Paint Animation Templates for more information. 234
248 CyberLink PowerDirector Help click on Save As to save a modified template as a new template to the disc menu library. click on OK to save a new template to the disc menu library. Sharing and Backing Up Paint Animation Templates You can share your customized paint animation templates with other CyberLink PowerDirector users by uploading them to DirectorZone. If you have a CyberLink Cloud subscription you can back up all your customized templates by storing them on CyberLink Cloud. To share and back up your paint animation templates, do this: 1. Do either of the following: in the Paint Designer, click on Share, enter a name for the custom template, and then click OK. select the paint animation template in the library, and then click 2.. In the upload window, enter the information as follows: Upload to: select where you want to upload the template. Title: name of the template as it will display once uploaded. Style: select a style or category for the template. Type: if required, select the type of template you are uploading. Tags: enter some keyword search tags that will help users find the template when searching. Note: separate each tag you enter with a space. If you want to use two words as the tag, just put quotes around them, e.g. "dollar bill". Collection: enter the name of the collection you want the template added to. Description: enter a short description of your template. 3. Click Next to proceed. 4. Confirm the copyright disclaimer, and then click Next to proceed with the upload. 235

249 Creating PiP Effects 5. Click on Finish to close the upload window. Modifying Media in the PiP Designer When you add a video clip, image, or PiP object to a video track you can apply PiP effects to it in the PiP Designer*. PiP (picture-in-picture) effects include making your media transparent, applying borders, shadows, chroma key (green screen), motion, motion blur, and more. To open the PiP Designer, in the Edit module, select a video clip, image, or PiP object on the timeline, click the Designer button and then select PiP Designer. 236
250 CyberLink PowerDirector Help A - PiP Effect Properties Tab, B - PiP Effect Properties, C - Motion Tab, D - PiP Object, E - Background Video, F - Mode Selection, G - Zoom Tools, H - Display/Hide Keyframe Timeline, I - TV Safe Zone/Grid Lines, J - Upload to Internet, K - PiP Media Keyframe Timeline Note: if you have trouble clearly seeing some elements of the media you are modifying in the PiP Designer because they blend into the background, try selecting the Only show the selected track option to change the preview background. You can also open the PiP Designer by: clicking on in the PiP Objects room and then selecting: 2D PiP to create a new PiP object template from scratch by importing a custom image. 360º PiP in a 360º video project to create a PiP object that supports 360º. See Modifying 360º Position for more information. selecting an existing PiP object in the PiP Objects room, clicking on, and then selecting Modify PiP Attributes to edit the template. Mode Selection and Zoom Tools When modifying PiP media in the PiP Designer use the mode selection and zoom tools for assistance. Note: when modifying PiP media in the PiP Designer, use the player controls to preview, and click can also click preview window. to preview the effect at full screen. You to hide the keyframe timeline for a larger view of the Mode Selection In the PiP Designer there are two selection modes. Click the button to enable the PiP media selection. When selected, you can freely click and move the PiP media to different areas of the video frame. Click the button to enable a mode that lets you drag the view in the PiP Designer. This mode is especially helpful when applying PiP motion effects to media that start off screen. 237
251 Creating PiP Effects Zoom Tools Use the zoom tools and to zoom out and in on the preview window when modifying PiP media. You can also select the viewer zoom amount from the drop-down to set the size of the PiP media preview. Select Fit to resize the PiP media so that is fits in the PiP Designer's viewer window. Note: you can also hold down the Ctrl key on your keyboard and then use the mouse scroll wheel to zoom in or out on the PiP media. Modifying PiP Media Size and Position You can change the size, position, and orientation of the media clip or object in a PiP effect. The resizing options are unrestricted. You can reduce the clip to miniature size or enlarge it to completely obscure any underlying media content on the timeline. Note: click on to use the TV safe zone and grid lines to help with the precise placement of the PiP effect on the video. Select Snap to Reference Lines to have the PiP effect snap to the grid lines, TV safe zone, and boundary of the video area. To modify PiP media size, position, or orientation: click and drag a corner or side to resize the PiP media. Note: click the Aspect Ratio item on the Properties tab, and then deselect M aintain aspect ratio to resize the media clip or PiP object more freely. click on the PiP media and drag it to a new position. Use the X and Y position fields in object settings for more precise positioning. Note: if you are editing a 360º video project, be sure to first convert the PiP media to 360º so that you can use the Longitude and Latitude sliders to adjust its 360º position. click on above the PiP media and drag it left or right to change its orientation. click and drag the blue nodes in corners to change its shape. See Changing the Shape of Media for more information. 238
252 CyberLink PowerDirector Help Note: you can use keyframes to customize the size and shape of PiP media. See Utilizing PiP Keyframes for more information. Modifying PiP Media Properties Click on the PiP effect Properties tab to change the properties of the PiP media. See the following sections for detailed information on the properties you can modify on this tab. Changing Object Settings Using Chroma Key Applying a Shadow Adding a Reflection Applying a Border Flipping PiP Media Enabling 3D Depth Applying Fades Note: while modifying the PiP effect properties, you can select the Only show the selected track option to hide any other media that is displayed in the preview window while modifying. Changing Object Settings Use the Object Settings option to change some of the basic properties of the PiP media. Use the X and Y position fields to set the precise location of the top left corner of the PiP media on the video image. When used with keyframes, you can manually create motion of the PiP media. Note: CyberLink PowerDirector sets the value of the top-left corner of the media as the 0 axis, with the bottom-right corner having a value of 1.0, 1.0. The center position in the video frame is 0.500, You can more easily adjust clip position and motion on the M otion tab. See Adding Motion to PiP Media for motion information. When you create motion for PiP media, you indicate where (Position) on the video image you want the PiP media to appear by adding keyframes. To create the 239
253 Creating PiP Effects motion, CyberLink PowerDirector will ensure the PiP media is in the desired position at the specified time (keyframe). Use the Scale sliders to change PiP media size, or Opacity to make it more transparent. Note: select the M aintain aspect ratio option if you want to ensure the PiP media's aspect ratio does not change while you are moving or resizing it. Deselect this option if you want to change the PiP media's shape or alter its aspect ratio. To rotate the PiP media, use the Rotation slider to set the angle. Note: you can use keyframes to customize each of these object settings. See Utilizing PiP Keyframes for more information. Ease In/Ease Out Creating motion for PiP media, by changing the Position, Scale, or Rotation object settings at different keyframes, can cause the PiP media to appear jerky, as it speeds up and slows down when it moves through the frame, changes its size, or rotates in the video frame. To make the movement look smoother, use the Ease in/out options. Select Ease in to slow down the PiP media as it enters a keyframe. Select Ease out if you want it to gradually accelerate out of the keyframe. Modifying 360º Position When editing 360º video projects, the Longitude and Latitude position sliders are available for 360º PiP media so you can customize the 360º position of in the 360º environment. Use these sliders to move the PiP media clip to the desired position, or just click and drag it around the 360º environment. When used with keyframes, you can manually create motion of the PiP media clip in the 360º environment. Note: if you are using non-360º PiP media in your 360º video project, you must first convert it to 360º if you want to customize its 360º position. Using Chroma Key Select the Chroma Key option to add a chroma key (green screen) effect to your PiP media. Once enable, do this: 240
254 CyberLink PowerDirector Help 1. Click on and then select the color in the image or video clip that you want to replace/make transparent. 2. Adjust the Tolerance of hue, Tolerance of saturation, and Tolerance of luminance sliders to remove the selected color/background (green screen). Adjust until the image or video behind your PiP media is completely revealed, without any loss of quality on the PiP media. 3. Use the Edge sharpness slider to fine tune the edges of the PiP media on the revealed background. Using this slider can make the PiP effect look more authentic by sharpening the edges. Applying a Shadow Select the Shadow* option to add a shadow on the PiP media. Once selected, choose whether to apply the shadow on the Object Only, or the Object and Border, if you applied a border. Select Border Only to just display the shadow of the applied border. Use the other available options to change the shadow's color, direction, and distance from the PiP effect. You can also set the opacity and blur levels of the shadow using the available sliders. Note: * optional feature in CyberLink PowerDirector. Check the version table on our web site for detailed versioning information. Adding a Reflection Select the Reflection option to reflect the PiP media onto the background media. Use the Distance slider to set space between the reflection and the PiP media. Use the Opacity slider to set the opacity of the reflection. Applying a Border Select the Border option to add a border around the PiP media. Use the Size slider to set the width of the border, and the Blur and Opacity sliders to customize its appearance. 241
255 Creating PiP Effects Selecting Border Color When selecting the color of the border, you have the following options in the Fill type drop-down: Uniform color: select this option if you want the border to be one solid color. Click the colored square to open the color palette and select the desired border color. 2 color gradient: select this option if you want the border color to change from one color to another using a gradient. Click the colored squares to set the beginning and ending colors, and then drag the Gradient direction control to set which way the color flows. 4 color gradient*: select this option if you want the border to consist of four colors. Click the colored squares to set the colors in each of the four corners of the border. Note: * optional feature in CyberLink PowerDirector. Check the version table on our web site for detailed versioning information. Flipping PiP Media Select the Flip option to flip the PiP media upside down or from left to right, depending on your requirement. Enabling 3D Depth If you are creating a 3D video production, select the 3D Settings* option to give the PiP media a 3D effect. Note: when using this feature, select the button to enable 3D mode for best editing results. See Previewing in 3D Mode for more information on using this mode. * Optional feature in CyberLink PowerDirector. Check the version table on our web site for detailed versioning information. Once enabled, use the slider to set the amount of depth you want the PiP media to have in 3D. Dragging the slider left will make the 3D PiP object seem nearer to the audience (in the foreground), while dragging it right will make it appear farther away (in the background). 242
256 CyberLink PowerDirector Help Note: you can use keyframes to customize when the 3D depth is applied. See Utilizing PiP Keyframes for more information. Applying Fades Select the Fades option to apply a fade effect on the PiP media. Select whether to enable a fade-in and/or fade-out on the PiP media. Note: when a fade is applied, note that keyframes are added to the Opacity keyframe timeline so you can customize the length of the fade, if required. See Utilizing PiP Keyframes for more information. Adding Motion to PiP Media Click on the Motion tab to add motion* to PiP media, allowing it to move across the screen. You can choose from a number of predefined motion paths or create your own custom PiP motion. You can also add a rotation effect to the PiP media. Note: * optional feature in CyberLink PowerDirector. Check the version table on our web site for detailed versioning information. Using a Motion Path Template To add motion to PiP media you can select a motion path template on the Motion tab that fits your requirements. Note that keyframes are added to the Position track of the PiP Designer keyframe timeline. These motion path templates have predefined motion in them, but you can customize the motion. See Customizing PiP Motion and Utilizing PiP Keyframes for detailed information on using keyframes to customize PiP motion. Customizing PiP Motion The PiP Designer uses keyframes to customize the motion of PiP media. Keyframes are frames of your video that define the start and end points of an effect, which in this example is motion. Note: some PiP objects have predefined motion already applied. 243
257 Creating PiP Effects To customize the motion of PiP media: Note: once you are done customizing the PiP media motion you can use the motion blur effect to make it look smother and more natural. See Applying Motion Blur for more information. drag an existing keyframe to a new location in the preview window. The PiP media will follow the modified path to get to the changed keyframe position. drag the path line to alter the path the PiP media takes to get to the next keyframe. use the player controls to find a position on the motion path, and then click on the Position track of the keyframe timeline to add a new keyframe at a new position, if required. Customizing the Speed of PiP Effect Motion You have full control over the speed to the PiP media's motion. The following three factors determine the speed of the PiP media's motion. Note: on the Properties tab in Object Settings you can manually adjust the PiP media position at keyframes and use ease in/out to make the movement look smoother. See Changing Object Settings for more information. 244
258 CyberLink PowerDirector Help Duration of the PiP Clip in the Timeline The longer the duration of PiP media clip, the slower the PiP object's motion is. For example, if the PiP media clip is 10 seconds, it takes the PiP media 10 seconds to travel from the first Position keyframe to the last Position keyframe. Distance Between Keyframes The distance between each keyframe also contributes to the speed of the PiP media motion. The further the distance between each keyframe, the quicker the PiP media needs to move to get to the next keyframe. Keyframe Timeline The keyframe timeline is located below the preview window. Each keyframe in the motion path has a corresponding marker on the keyframe timeline. Note: if you cannot find the keyframe timeline in the PiP Designer, just click the button under the preview window to display it. If the PiP media clip on the timeline has a duration of 10 seconds, the keyframe timeline is 10 seconds long. To increase the speed of a PiP media's motion, drag a keyframe marker closer to previous keyframe marker. 245
259 Creating PiP Effects Saving a Custom PiP Motion Path Once you finish modifying your PiP motion path you can save it for future use. To save a motion path, click on to save it as a custom path. It is then available in motion path list the next time you want to use it. Customizing PiP Effect Rotation Select the Rotation Settings option to customize the rotation of moving PiP media. Use the slider to set the amount the PiP media will rotate as it moves across the screen. Select whether PiP media rotates counter clockwise, or clockwise. Note: click the button to reset the rotation amount to 0. Any added rotation is removed. Applying Motion Blur Select the Motion blur* option to make PiP media movement appear smoother, giving it a more natural and authentic look. Note: * optional feature in CyberLink PowerDirector. Check the version table on our web site for detailed versioning information. Once selected, use the available sliders as follows: Blur length: drag this slider to set the duration (number of frames) you want blended into a single frame (the blur). Dragging the slider right will apply more of a blur to the moving PiP media. 246
260 CyberLink PowerDirector Help Blur density: drag this slider to set the number of samples (of PiP media) used per frame. Dragging the slider right will make the PiP media less blurry as it adds samples to fill the missing content caused by the movement. Utilizing PiP Keyframes Use keyframes when modifying your PiP media to define the start and end points of the customized effects. In the PiP Designer you can use keyframes to change the PiP media clip's opacity, size (scale), rotation, motion, shape (freeform), and 3D depth. Note: once you have customized the effects on PiP media using keyframes, you can right click on the clip in the timeline and select Copy Keyframe Attributes. This allows you to paste all of its keyframe attributes (including motion) onto another clip in the timeline, applying the same effects to the clip. Keyframe Timeline A custom keyframe timeline is generated for each PiP media clip when you open it in the PiP Designer. In the below example, because the media clip is 10 seconds long on the project timeline, the keyframe timeline is also 10 seconds. Note: if you cannot find the keyframe timeline in the PiP Designer, just click the button under the preview window to display it. If you'd like to view the movie timeline, click the 247 button.

261 Creating PiP Effects The keyframe timeline lets you precisely place each keyframe, so you can time the applied effect in your movie production. Adding Keyframes To add a keyframe to the keyframe timeline, do this: Note: if you cannot find the keyframe timeline in the PiP Designer, just click the button under the preview window to display it. 1. Use the player controls to find the moment in your PiP media clip where you want its properties to change. 2. Click next to the property you want to change to add a keyframe to the corresponding keyframe track. 3. Use the features in the PiP Designer to modify the properties of the effect as required for this keyframe. In this example we are modifying the opacity of the PiP media clip at the beginning of the clip. 248

262 CyberLink PowerDirector Help Note: notice above that when opacity is changed, a keyframe is automatically added at the current timeline slider position. 249
263 Creating PiP Effects When previewed, at the first keyframe the PiP media is the completely transparent, and then slowly gets more opaque until it reaches the specified opacity level by the time the playback slider reaches the second keyframe. 250
264 CyberLink PowerDirector Help It will maintain this opacity until the playback slider reaches the last keyframe, unless you add more keyframes or change the properties of the last keyframe. Note: you can also modify the properties of a keyframe by right clicking on it and selecting Duplicate Previous Keyframe or Duplicate Next Keyframe. Doing this copies the properties of the specified keyframe to the keyframe you right clicked on. 4. Repeat these steps to create the kind of effect you want in your video production using keyframes to modify the PiP media clip's properties and motion. Modifying and Removing Keyframes At any time you can modify the keyframes added, by selecting it and changing the PiP media clip's properties, or by dragging the keyframe to another position on the keyframe timeline. To remove a keyframe, select it on the keyframe timeline and then click. Saving and Sharing PiP Objects Once you are finished modifying/customizing a PiP object you can save it to your PiP objects library for future use, upload it to DirectorZone to share it with others, or back it up on CyberLink Cloud*. Note: * optional feature in CyberLink PowerDirector. Check the version table on our web site for detailed versioning information. click on Share to upload your custom template to DirectorZone or back it up on CyberLink Cloud. See Sharing and Backing Up PiP Objects for more information. click on Save As to save a modified template as a new template to the PiP Objects Room. click on OK to save a new template to the PiP Objects Room. Sharing and Backing Up PiP Objects You can share your customized PiP objects with other CyberLink PowerDirector users by uploading them to DirectorZone. If you have a CyberLink Cloud 251
265 Creating PiP Effects subscription you can back up all your customized templates by storing them on CyberLink Cloud. To share and back up your PiP objects, do this: 1. Do either of the following: in the PiP Designer, click on Share, enter a name for the custom template, and then click OK. select the PiP object in the library, and then click 2.. In the upload window, enter the information as follows: Upload to: select where you want to upload the template. Title: name of the template as it will display once uploaded. Style: select a style or category for the template. Type: if required, select the type of template you are uploading. Tags: enter some keyword search tags that will help users find the template when searching. Note: separate each tag you enter with a space. If you want to use two words as the tag, just put quotes around them, e.g. "dollar bill". Collection: enter the name of the collection you want the template added to. Description: enter a short description of your template. 3. Click Next to proceed. 4. Confirm the copyright disclaimer, and then click Next to proceed with the upload. 5. Click on Finish to close the upload window. 252
266 CyberLink PowerDirector Help Chapter 12: Adding Particle Effects In the Edit module, click the button to open the Particle Effects Room to access a library of effects you can place on a video track to add a particle effect (snow, cloud cover, fire effects, and more) on top of a video or image. Note: this section outlines the procedures for adding particle effects in timeline mode, as all the program's features are available in this mode. If you prefer to use the storyboard mode, and you find one of the outlined features is not available, you can press the Tab key on your keyboard to switch to timeline mode. To insert a particle effect to the timeline, do one of the following: Note: you can download additional particle effects from the DirectorZone web site. See Downloading from DirectorZone for more information. use the timeline slider to set the position where you want the particle effect, select it in the library, and then click selected video track. to add it to the use the timeline slider to set the position where you want the particle effect, right-click on it in the library, and then select Add to Timeline to add it to the selected video track. You can also manually drag and drop a particle effect to a desired position on a video track to add it to the timeline. When adding a particle effect to the timeline (inserting or dragging and dropping), if the timeline slider is over an existing clip, or you drop it on an existing clip, you are prompted to use one of the ripple editing options to insert the clip: Overwrite: select to overwrite the existing clip with the particle effect. Insert: select to split the clip and insert the particle effect between the two portions. CyberLink PowerDirector also only moves the clips on the same track to the right. Insert and Move All Clips: select to split the clip and insert the particle effect between the two portions. CyberLink PowerDirector also moves all of the media clips on the timeline that lie to the right of the inserted clip, right. 253
267 Adding Particle Effects Crossfade: select to lay the particle effect over a portion of the existing clip and auto add a fade transition between the two clips. Note: the Crossfade option does not overwrite the content on the track, instead adding an overlap transition between the two clips. See Setting Transition Behavior for more information. The Crossfade option is only available if the end of the new clip is not over any existing content on the track. Replace: select to replace a current clip on the timeline with the particle effect. Use this option if you don't want to change the structure of the current content on the timeline. Note: if the duration of the clip you are replacing is longer or shorter than the particle effect, CyberLink PowerDirector automatically resizes it to fit the original clip's duration. If the timeline slider is in a gap between two clips on a timeline track when inserting a particle effect, you are prompted to use this ripple editing option to insert the clip: Trim to Fit: select to have CyberLink PowerDirector auto set the duration of the particle effect to fit the gap to the right of the timeline slider. Once added to the timeline, select the particle effect and then click the Designer button to edit its properties in the Particle Designer. See Modifying Particle Effects in the Particle Designer for more information. For information on setting the amount of time the particle effect appears in your video production, see Setting a Media Clip's Duration. 254

268 CyberLink PowerDirector Help Modifying Particle Effects in the Particle Designer You can completely customize particle effects, and all of its particle object properties, in the Particle Designer*. To open the Particle Designer, in the Edit module, select a particle effect on the timeline and then click the Designer button. A - Particle Object Properties Tab, B - Particle Object Properties, C - Particle Object Motion Tab, D - Add Objects, Images, Backgrounds, E - Particle Object, F - Background Video, G - Mode Selection, H Zoom Tools, I - Display/Hide Keyframe Timeline, J - TV Safe Zone/Grid Lines, K - Upload to Internet, L - Particle Effect Keyframe Timeline Note: * optional feature in CyberLink PowerDirector. Check the version table on our web site for detailed versioning information. 255
269 Adding Particle Effects You can also open the Particle Designer by: clicking on in the Particle Room to create a new particle effect template from scratch by importing a custom image. selecting a particle effect in the Particle Room and then clicking on the button to edit it. Mode Selection and Zoom Tools When modifying particle effects in the Particle Designer use the mode selection and zoom tools for assistance. Note: when modifying particle effects in the Particle Designer, use the player controls to preview, and click You can also click the preview window. to preview the effect at full screen. to hide the keyframe timeline for a larger view of Mode Selection In the Particle Designer there are two selection modes. Click the button to enable the object selection. When selected, you can freely click and move the particle objects, images, etc. to different areas of the video frame. Click the button to enable a mode that lets you drag the view in the Particle Designer. This mode is especially helpful when applying particle motion effects if the object starts off screen. Zoom Tools Use the zoom tools and to zoom out and in on the preview window when modifying the particle effect. You can also select the viewer zoom amount from the drop-down to set the size of the particle effect preview. Select Fit to resize the particle effect so that is fits in the Particle Designer's viewer window. Note: you can also hold down the Ctrl key on your keyboard and then use the mouse scroll wheel to zoom in or out on the particle effect. 256
270 CyberLink PowerDirector Help Adding Objects, Images, and Backgrounds Each particle effect template can contain one or more particle objects, or attributes that create the desired effect. It may also include a background and other images. Note: you can give all the added objects, images, and backgrounds custom names in the Particle Designer to make them easily identifiable in the keyframe timeline. Just enter the desired name in the Selected object field. Adding New Particle Objects You can add additional particle objects to a particle effect template. To add a new particle object to a particle effect, click on the button. CyberLink PowerDirector adds a default particle object to the particle effect template. See Modifying Particle Object Properties for more information on customizing the default particle object to fit the particle effect you are trying to create. Adding Images You can insert your own images into your particle effect template. To add a image, do this: 1. Click on the button. 2. Browse to and then select the image on your computer you want to add, and then click Open. 3. Once added, resize and reposition the image in the Particle Designer as required. Setting Backgrounds Your particle effect can consist of a background that the particle objects emit over. You can choose from the default backgrounds, or import your own custom background. 257
271 Adding Particle Effects To set a background, do this: 1. Click on the 2. Select: button. Add Default Background Image: if you want to select one of the backgrounds provided with your copy of CyberLink PowerDirector. Select the background, and then click Open. Add Custom Background Image: if you want to import your own custom background. Select the background, and then click Open. 3. When prompted, set the adjustment settings for the background, as required. Note: to remove the imported background image, just click the button. Modifying Particle Object Range and Position You can increase the range of the particle object so that it covers more of the background, or modify the position or direction particles fall/emit from their source point. You can also change the position and size of images and backgrounds used in the effect. Note: click on to use the TV safe zone and grid lines to help with the precise placement of the particle object on the video. Select Snap to Reference Lines to have the particle effect snap to the grid lines, TV safe zone, and boundary of the video area. To modify range and position of objects, image, and backgrounds in a particle effect, do this: to change the position and source (emit) point of a particle object, select the particle object in the keyframe timeline, and then click and drag position. to a new if the particle effect has an image, select the Image track in the keyframe timeline. Next click and drag a corner or side to resize the image. Click on to drag the image to a new position, if required. 258
272 CyberLink PowerDirector Help to rotate a particle object, select it in the keyframe timeline, and then click and drag to the desired orientation. to change the range and direction an effect emits from the particle object's source point, select the particle object in the keyframe timeline, and then click and drag to a new position. Modifying Particle Object Properties Click on the particle object Properties tab to change the properties of the selected particle object. See the following sections for detailed information on the properties you can modify on this tab. Selecting Emit Method Selecting Particle Style Adding/Deleting Particles Modifying Parameters Enabling 3D Depth Adding Color Applying Fades Selecting Emit Method Select a particle object in the keyframe timeline and then the Emit Method option to select how the particles emit from the source point. You can have them emit from a single point, from a line, or spray out in a circle. Select the Mask option, and then select a mask from the list (or click to import a custom mask image) to create a masked area where particles emit from. Depending on the mask you select/import and how you resize it, the particles will emit differently. Selecting Particle Style Select a particle object in the keyframe timeline and then the Particle Style option to select the style of the emitting particle object. Depending on the property you 259
273 Adding Particle Effects select, the particle shape and behavior changes. Select the style that best suits the effect you are trying to accomplish. Adding/Deleting Particles Particle objects can consist of one or more particles, or small customizable images. Select a particle object in the keyframe timeline and then the Add/Delete Particles option to add or remove individual particles from a particle object. Click on and then select Insert a Default Image if you want to select one of the particle images provided with your copy of CyberLink PowerDirector. Select Insert a Custom Image if you want to import your own custom particle image. You can add as many custom particles as you like to a particle object. Select an existing particle and then click to delete it from the particle object. Modifying Parameters Select a particle object in the keyframe timeline and then the Modify Parameters option to completely customize the properties of the particle object as follows: Note: you can use keyframes to customize the parameters of particle objects. See Utilizing Particle Keyframes for more information. Emit rate: use the slider or enter in a value in the box provided to set the rate or speed particles emit from the source point. Max count: use the slider or enter in a value in the box provided to set the number of particles that emit from the source point. Life: use the slider or enter in a value in the box provided to set the life, or how long the particle displays in the effect. The lower the number, the shorter amount of time each particle displays before fading out. For example, if you enter 100, the life will equal the entire length of the clip. Life variation: use the slider or enter in a value in the box provided to set the amount of variation there is in particle life. For example, if you enter 50, then half of the particles will die out before they meet the specified life amount. Size: use the slider or enter in a value in the box provided to set the size of the particle. 260
274 CyberLink PowerDirector Help Size variation: use the slider or enter in a value in the box provided to set the amount of variation there is in particle size. For example, if you enter 50, then half of the particles will equal the defined size. Speed: use the slider or enter in a value in the box provided to set the speed of the particle. Speed variation: use the slider or enter in a value in the box provided to set the amount of variation there is in particle speed. For example, if you enter 50, then half of the particles will have the defined speed. Wave (amplitude): use the slider or enter in a value in the box provided if you want your particle to travel in a wave pattern. The higher the number, the bigger the amplitude of the wave. If the value is 0, then the particle travels in a straight line. Wave (amplitude) variation: use the slider or enter in a value in the box provided to set the amount of variation there is in wave's amplitude. For example, if you enter 50, then half of the particles will have the same amplitude. Wave (frequency): use the slider or enter in a value in the box provided if you want your particle to travel in a wave pattern. The higher the number, the larger the frequency of the wave. If the value is 0, then the particle travels in a straight line. Wave (frequency) variation: use the slider or enter in a value in the box provided to set the amount of variation there is in wave's frequency. For example, if you enter 50, then half of the particles will have the same frequency. Symmetry: use the slider or enter in a value to set the symmetry of the wave. The higher the value, the more asymmetrical the wave will be. Rotation speed: use the slider or enter in a value in the box provided to set the rotation speed of the particle. The higher the value, the faster it rotates. Depending on whether the parameter has a positive or negative value determines the direction of the rotation. Rotation speed variation: use the slider or enter in a value in the box provided to set the amount of variation there is in the particle's rotation speed. For example, if you enter 50, then half of the particles will have the same rotation speed. 261
275 Adding Particle Effects Gravity: use the slider or enter in a value in the box provided to set the amount of gravity applied to the particle. Depending on whether the parameter has a positive or negative value determines the direction of the gravitational pull. Enabling 3D Depth Select a particle object in the keyframe timeline and then the 3D Settings* option if you are creating a 3D video production and want the particle object to have a 3D effect. Select Enable 3D depth to enable, and then use the slider to set the amount of depth you want the particle object to have in 3D. Dragging the slider left will make the 3D particle object seem nearer to the audience (in the foreground), while dragging it right will make it appear farther away (in the background). Note: when using this feature, select the button to enable 3D mode for best editing results. See Previewing in 3D Mode for more information on using this mode. * Optional feature in CyberLink PowerDirector. Check the version table on our web site for detailed versioning information. Adding Color Select a particle object in the keyframe timeline and then the Color option if you want to add or change the color of the particles. To do this, select Enable color and then set the following options: Select color: click the colored box to select the color of the selected particle object. Opacity: use this slider to set the opacity or transparency level of the particle object. Enable particle overlay: select this option to enable an overlay on colored particles to change their appearance, if required. 262

276 CyberLink PowerDirector Help Applying Fades Select a particle object in the keyframe timeline and then the Fades option to apply a fade effect to it. Select whether to enable a fade-in and/or fade-out on the particle object. Note: if you cannot find the keyframe timeline in the Particle Designer, just click the button under the preview window to display it. When a fade is applied, note that a keyframe indicator is added to the particle object's track on the keyframe timeline, indicating the duration of the fade. You can click and drag the keyframe indicator to customize the duration of the fade, if required. 263
277 Adding Particle Effects Adding Motion to Particle Objects Click on the Motion tab to add motion to particle objects, by enabling the particle's source to move across the screen. You can choose from a number of predefined motion path templates or create your own custom motion path. The path properties of a particle object are similar to a PiP object. See Adding Motion to PiP Effects for detailed information on customizing a particle object's motion. Utilizing Particle Keyframes Use keyframes when modifying particle object parameters to define the start and end points of the customized effects. Keyframe Timeline A custom keyframe timeline is generated for each particle effect clip when you open it in the Particle Designer. In the below example, because the particle effect clip is 10 seconds long on the project timeline, the keyframe timeline is also 10 seconds. Note: if you cannot find the keyframe timeline in the Particle Designer, just click the button under the preview window to display it. 264
278 CyberLink PowerDirector Help If you'd like to view the movie timeline, click the button. The keyframe timeline lets you precisely place each keyframe, so you can time the applied effect in your movie production. You can also click and drag the beginning of a particle object or image track in the keyframe timeline, to set precisely when the effect first appears in the particle effect. Click and drag the end of the track to set when you want the effect to end. 265
279 Adding Particle Effects Adding Keyframes To add a keyframe to the keyframe timeline, do this: 1. Use the player controls to find the moment in your particle object where you want its parameters to change. 2. In the Modify Parameters section on the Properties tab, click the next to the parameter you want to change. 3. If required, click the arrow next to the corresponding particle track to display the parameter keyframe track. 4. Click next to the parameter you want to change to add a keyframe to the parameter keyframe track. 5. Use the sliders in the Modify Parameters section to modify the parameters of the object as required for this keyframe. In this example we are modifying the emit rate of the particles from the source point at the second keyframe. 6. Repeat these steps to create the kind of effect you want in your video production using keyframes to modify the particle object parameters. button 266
280 CyberLink PowerDirector Help Modifying and Removing Keyframes At any time you can modify the keyframes added, by selecting it and changing the particle object's parameters, or by dragging the keyframe to another position on the keyframe timeline. To remove a keyframe, select it on the keyframe timeline and then click. Saving and Sharing Particle Effect Templates Once you are finished modifying your particle effect template you can save it to your particle effects library for future use, upload it to DirectorZone to share it with others, or back it up on CyberLink Cloud*. Note: * optional feature in CyberLink PowerDirector. Check the version table on our web site for detailed versioning information. click on Share to upload your custom template to DirectorZone or back it up on CyberLink Cloud. See Sharing and Backing Up Particle Effect Templates for more information. click on Save As to save a modified template as a new template to the Particle Room. click on OK to save a new template to the Particle Room. Sharing and Backing Up Particle Effect Templates You can share your customized particle effect templates with other CyberLink PowerDirector users by uploading them to DirectorZone. If you have a CyberLink Cloud subscription you can back up all your customized templates by storing them on CyberLink Cloud. To share and back up your particle effect templates, do this: Do either of the following:
281 Adding Particle Effects in the Particle Designer, click on Share, enter a name for the custom template, and then click OK. select the particle effect template in the library, and then click 2.. In the upload window, enter the information as follows: Upload to: select where you want to upload the template. Title: name of the template as it will display once uploaded. Style: select a style or category for the template. Type: if required, select the type of template you are uploading. Tags: enter some keyword search tags that will help users find the template when searching. Note: separate each tag you enter with a space. If you want to use two words as the tag, just put quotes around them, e.g. "dollar bill". Collection: enter the name of the collection you want the template added to. Description: enter a short description of your template. 3. Click Next to proceed. 4. Confirm the copyright disclaimer, and then click Next to proceed with the upload. 5. Click on Finish to close the upload window. 268
282 CyberLink PowerDirector Help Chapter 13: Adding Title Effects In the Edit module, click the button to open the Title Room to access a library of title effect templates that allow you to add movie titles, screen captions, credits, etc. to your videos. You can add title effects to a video track or to the title track. Note: this section outlines the procedures for adding title effects in timeline mode, as all the program's features are available in this mode. If you prefer to use the storyboard mode, and you find one of the outlined features is not available, you can press the Tab key on your keyboard to switch to timeline mode. To insert a title effect to the timeline, do one of the following: Note: once the latest content pack is installed, the Title Room includes title sets, or groups of four themed title templates. These title sets are useful if you want to add titles with themed animations that include video opening and closing credits. use the timeline slider to set the position where you want the title, select the title effect template in the library, and then click to the selected video track. to add it use the timeline slider to set the position where you want the title, select the title effect template in the library, and then click to the title track. to add it use the timeline slider to set the position where you want the title, right-click on the title effect template in the library, and then select Add to Timeline to add it to the title track. Note: 360º title effects can be added to the timeline in the same way as non-360º (2D or 3D) title effects. If you want to use a non-360º title effect in your 360º video project, you should first convert it to 360º. Note that some features are not available for 360º title effects. You can also manually drag and drop a title effect template to a desired position on the title track (or any video track) to add it to the timeline. Note: you can now add video effects onto entire title effect clips in the timeline, like any other media clip. See Adding Video Effects for more information. 269
283 Adding Title Effects When adding a title effect to the timeline (inserting or dragging and dropping), if the timeline slider is over an existing clip, or you drop it on an existing clip, you are prompted to use one of the ripple editing options to insert the clip: Overwrite: select to overwrite the existing clip with the title effect. Insert: select to split the clip and insert the title effect between the two portions. CyberLink PowerDirector also only moves the clips on the same track to the right. Insert and Move All Clips: select to split the clip and insert the title effect between the two portions. CyberLink PowerDirector also moves all of the media clips on the timeline that lie to the right of the inserted clip, right. Crossfade: select to lay the title effect over a portion of the existing clip and auto add a fade transition between the two clips. Note: the Crossfade option does not overwrite the content on the track, instead adding an overlap transition between the two clips. See Setting Transition Behavior for more information. The Crossfade option is only available if the end of the new clip is not over any existing content on the track. Replace: select to replace a current clip on the timeline with the title effect. Use this option if you don't want to change the structure of the current content on the timeline. Note: if the duration of the clip you are replacing is longer or shorter than the title effect, CyberLink PowerDirector automatically resizes it to fit the original clip's duration. If the timeline slider is in a gap between two clips on a timeline track when inserting a title effect, you are prompted to use this ripple editing option to insert the clip: Trim to Fit: select to have CyberLink PowerDirector auto set the duration of the title effect to fit the gap to the right of the timeline slider. Once added to the timeline, select the title effect template and then click the Designer button to edit it in the Title Designer. See Modifying Titles in the Title Designer for more information. For information on setting the amount of time the title effect appears in your video production, see Setting a Media Clip's Duration. 270

284 CyberLink PowerDirector Help Title Effect Categories Title effects allow you to add movie titles, screen captions, credits, and more to your videos, and then come in three main title effect categories: Standard 2D title effects 3D title effects 360º title effects Standard 2D Title Effects Standard 2D title effects are the title text used in most standard, non-3d video projects, which have a 4:3, 16:9, or 9:16 aspect ratio. Click in title room and then select 2D Title to create a new 2D title effect in the Title Designer. Standard 2D title effects may consist of title text, particle effects, images, and inserted backgrounds. See Modifying Titles in the Title Designer - Advanced for a complete list and description of all the features available for these types of title effects. 271

285 Adding Title Effects 3D Title Effects 3D title effects are available for 3D video projects and provide title text with a depth of field, when viewed with a 3D display device. 3D title effects are indicated on the timeline by the 3D logo in the top left corner of the title effect thumbnail. Select the 3D/3D-Like tag in the media room, or click on in title room and then select 3DLike Title, to use a 3D title effect in your video project. Title text, particle effects, images, and inserted backgrounds are supported in 3D title effects, but their motion properties cannot by modified. 3D title effects are added and edited the same way as standard 2D title effects, with a few extra controls to customize the 3D properties. See Modifying 3D-Like Title Effect Properties for a description of these extra controls. 360º Title Effects 360º title effects are title text that is for use in 360º video projects. Click the 360 tag in the title room to view the available 360º title effects in your media library. Click in title room and then select 360 Title to create a new 360º title effect in the Title Designer. 272

286 CyberLink PowerDirector Help Note: all standard 2D title effects can be converted to 360º for use in your 360º video projects. See Converting Title Effects and Media Clips to 360 for more information. Additional title text objects, particle effects, images, and inserted backgrounds are not supported in 360º title effects, and their motion properties cannot by modified. 360º title effects are added and edited the same way as standard 2D title effects, with two extra controls to customize the text's 360º position. See Modifying 360º Position for a description of these extra controls. Tripod Cover Title Effects Click on the Tripod Cover tag in the title room to view the title effects in your media library that can be used to cover up the tripod in your 360º videos. You can edit and customize the title text on the tripod cover in the Title Designer. 273

287 Adding Title Effects Modifying Titles in the Title Designer - Basic To open the Title Designer, in the Edit module, select a title effect on the timeline and then click the Designer button. Click on the Basic button to use a more simplified version of the Title Designer, which allows you to just apply some text on your video. A - Text Properties Tab, B - Title Text Properties, C - Insert Text, D - Background Video, E - Enter Basic Editing, F - Title Text, G - Zoom Tools, H - Upload to Internet, I - Title Keyframe Timeline You can also open the Title Designer by: clicking on in the Title Room and then select: 2D Title to create a new 2D title template from scratch. See Modifying 2D Text Properties for information on editing its title text properties. 274
288 CyberLink PowerDirector Help 3D-Like Title to create a new title template with 3D-Like effect properties. See Modifying 3D-Like Text Properties for information on editing its title text properties. selecting an existing title effect in the Title Room and then clicking on to edit the existing template. Zoom Tools Use the zoom tools and to zoom out and in on the preview window when modifying the title effect. You can also select the viewer zoom amount from the drop-down to set the size of the title effect preview. Select Fit to resize the title effect so that is fits in the Title Designer's viewer window. Note: you can also hold down the Ctrl key on your keyboard and then use the mouse scroll wheel to zoom in or out on the title effect. Adding Additional Title Text You can add additional title text boxes that contain the text you want to display in your video production. To add new title text, click on the button and then click in the preview window to add the title text box to the desired position. Type in the required text in the new title text box. See Modifying Title Text Properties for more information on customizing the added title text's properties. Modifying Title Effect Position You can change the position and orientation of the title text and images in a title effect, quickly and easily. To modify title text and image position or orientation: click on the title text or an image, and then drag it to a new position. if editing a 2D title, click on above the title text or image, and drag it right or left to change its orientation. 275
289 Adding Title Effects if the title effect contains an image, select it and then click and drag a corner or side to resize the image. Modifying Title Text Properties On the Object tab you can change the properties of selected title text you inserted into the title effect. The properties that are available on the tab depend on the type of title effect (2D or 3D-like title) you are editing. See Modifying 2D Title Effect Properties if you are editing a 2D title effect template, or Modifying 3D-Like Title Effect Properties if editing 3D-Like title effect template. Modifying 2D Title Effect Properties If you are creating or editing a 2D title effect template, on the object properties tab you can modify everything from the text size, style, color, as well as add shadows, borders, reflections, and more to both title text and inserted images. Applying Character Presets to Title Text Select the Character Presets option to apply a defined character preset to title text. After you have applied a defined character preset you can refine it using the other properties on the tab, if required. To apply a character preset to title text, ensure the text box is selected in the preview window and then click on a character preset in the list. Note: once you are done customizing all of the text properties on the tab, click on to save the character preset to your favorites. To find and use saved character presets, select M y Favorites in the Character types drop-down. Customizing Font/Paragraph Select the Font/Paragraph option to set the font type, size, and spacing of the selected title text. You can also select the font face color, bold or italicize text, change the line and text spacing, and set the text alignment in the text box. If the font type you are using supports it, you can select the Kerning check box to reduce the space between the letters in the title text. 276
290 CyberLink PowerDirector Help Customizing Font Face Select the Font Face option to customize the font color, blur, and opacity. Once selected, use the Blur and Opacity sliders to customize its appearance. When customizing the font face color, you have the following options in the Fill type drop-down: Uniform color: select this option if you want the font to be one solid color. Click the colored square to open the color palette and select the desired font color. 2 color gradient: select this option if you want the font color to change from one color to another using a gradient. Click the colored squares to set the beginning and ending colors, and then drag the Gradient direction control to set which way the color flows. 4 color gradient*: select this option if you want the font to consist of four colors. Click the colored squares to set the colors in each of the four corners of the text. Note: * optional feature in CyberLink PowerDirector. Check the version table on our web site for detailed versioning information. Adding a Reflection Select the Reflection option to add a reflection of title text or an inserted image onto the background media. Use the Distance slider to set space between the reflection and the object. Use the Opacity slider to set the opacity of the reflection. Applying Shadow Select the Shadow option to add a shadow to selected title text or an inserted image. Once selected, choose whether to apply the shadow on the Text/Object Only, or the Text/Object and Border, if you applied a border. Select Border Only to just display the shadow of the applied border. Use the other available options to change the shadow's color, direction, distance from the object, and add an opacity or blur effect. 277
291 Adding Title Effects Applying Border Select the Border option to add a border around selected title text or an inserted image. Available options allow you to change the border's size, and add a opacity or blur effect. You can customize the border color using the following options in the Fill type drop-down: Uniform color: select this option if you want the border to be one solid color. Click the colored square to open the color palette and select the desired border color. 2 color gradient: select this option if you want the border color to change from one color to another using a gradient. Click the colored squares to set the beginning and ending colors, and then drag the Gradient direction control to set which way the color flows. 4 color gradient*: select this option if you want the border to consist of four colors. Click the colored squares to set the colors in each of the four corners of the border. Note: * optional feature in CyberLink PowerDirector. Check the version table on our web site for detailed versioning information. Modifying 3D-Like Title Effect Properties If you are creating or editing a 3D-Like title effect template, on the object properties tab you can modify the text size, style, color, as well as its extrusion, opacity, texture, and rotation settings. Note: see The Difference Between 3D and 3D-Like Effects to learn more about both types of effects. Applying Character Presets to 3D-Like Title Text Select the Character Presets option to apply a defined character preset to 3D-Like title text. After you have applied a defined character preset you can refine it using the other properties on the tab, if required. 278
292 CyberLink PowerDirector Help To apply a character preset to 3D-Like title text, ensure the text box is selected in the preview window and then click on a character preset in the list. Note: once you are done customizing all of the 3D-Like text properties, click on to save the character preset to your favorites. To find and use saved character presets, select M y Favorites in the Character types drop-down. Customizing Font/Paragraph Settings Select the Font/Paragraph option to set the font type, size, and spacing of the selected 3D-Like title text. You can also select the font face color, bold or italicize the text, and set the text spacing in the text box. If the font type you are using supports it, you can select the Kerning check box to reduce the space between the letters in the title text. Customizing Font Face Settings In Font Face Settings you can customize the font extrusion and opacity amount. To set the font color, click the colored square to open the color palette and select the desired color of the 3D-Like title text. Note: when applying an extrusion to the 3D-Like title text, the angle of the extruded text changes as you move the text to different areas of the video frame. Adding a Reflection Select the Reflection option to add a reflection of the 3D-Like title text or inserted image onto the background media. Use the Distance slider to set space between the reflection and the 3D-Like object. Customizing 3D Rotation Settings Select the 3D Rotation Settings option to customize the rotation of your 3D-Like title text. If you applied extrusion in the font face settings, use the available sliders to rotate the 3D text to generate your preferred 3D-Like effect and orientation. 279

293 Adding Title Effects Applying 3D Texture Settings Select the 3D Texture Settings option to apply texture to the 3D-Like text by selecting a text skin from the list. Click the Add Texture button to import your own image. Based on the color properties of the imported image, CyberLink PowerDirector applies a custom texture to the title text. Setting Title Text Length You can set the length of all the title text individually in your title effect. To do this: 1. Select a title text object in the Title Designer. 2. As required, drag the mark in/out sliders to set the title text length. 280
294 CyberLink PowerDirector Help This allows you to set when the title text appears and disappears as the title effect plays on the timeline. Saving and Sharing Title Templates Once you finish modifying your title template you can save it to your title effects library for future use, upload it to DirectorZone to share it with others, or back it up on CyberLink Cloud*. Note: * optional feature in CyberLink PowerDirector. Check the version table on our web site for detailed versioning information. click on Share to upload your custom template to DirectorZone or back it up on CyberLink Cloud. See Sharing and Backing Up Title Templates for more information. click on Save As to save a modified template as a new template to the Title Room. click on OK to save a new template to the Title Room. 281
295 Adding Title Effects Sharing and Backing Up Title Templates You can share your customized title templates with other CyberLink PowerDirector users by uploading them to DirectorZone. If you have a CyberLink Cloud subscription you can back up all your customized templates by storing them on CyberLink Cloud. To share and back up your title templates, do this: 1. Do either of the following: in the Title Designer, click on Share, enter a name for the custom template, and then click OK. select the title template in the library, and then click 2.. In the upload window, enter the information as follows: Upload to: select where you want to upload the template. Title: name of the template as it will display once uploaded. Style: select a style or category for the template. Type: if required, select the type of template you are uploading. Tags: enter some keyword search tags that will help users find the template when searching. Note: separate each tag you enter with a space. If you want to use two words as the tag, just put quotes around them, e.g. "dollar bill". Collection: enter the name of the collection you want the template added to. Description: enter a short description of your template. 3. Click Next to proceed. 4. Confirm the copyright disclaimer, and then click Next to proceed with the upload. 5. Click on Finish to close the upload window. 282

296 CyberLink PowerDirector Help Modifying Titles in the Title Designer - Advanced To open the Title Designer, in the Edit module, select a title effect on the timeline and then click the Designer button. Click on the Advanced button at the top of the Title Designer to use all of the available features to completely customize the title effects in your project. Title effects contain character presets, animation, and background options that you can modify to fit your video project. A - Text Properties Tab, B - Title Text Properties, C - Title Animation Effect Tab, D - Title Motion Tab, E Insert Text/Images/Particles/Backgrounds, F - Background Video, G - Title Text, H - Enter Advanced Editing, I - Mode Selection, J - Zoom Tools, K - Display/Hide Keyframe Timeline, L - TV Safe Zone/Grid Lines, M - Align Objects, N - Upload to Internet, O - Title Keyframe Timeline You can also open the Title Designer by: 283
297 Adding Title Effects clicking on in the Title Room and then selecting: 2D Title to create a new 2D title template from scratch. See Modifying 2D Text Properties for information on editing its title text properties. 3D-Like Title to create a new title template with 3D-Like effect properties. See Modifying 3D-Like Text Properties for information on editing its title text properties. 360 Title in a 360º video project to create a title that supports 360º title text. See Modifying 360º Position for more information. selecting an existing title effect in the Title Room and then clicking on to edit the existing template. Mode Selection and Zoom Tools When modifying title effects in the Title Designer use the mode selection and zoom tools for assistance. Note: when modifying title effects in the Title Designer, use the player controls to preview, and click can also click preview window. to preview the effect at full screen. You to hide the keyframe timeline for a larger view of the Mode Selection In the Title Designer there are two selection modes. Click the button to enable the object selection. When selected, you can freely click and move the title text, particles, images, etc. to different areas of the video frame. 284

298 CyberLink PowerDirector Help 285

299 Adding Title Effects Click the button to enable a mode that lets you drag the view in the Title Designer. This mode is especially helpful if zoomed in on the title effect. 286

300 CyberLink PowerDirector Help Zoom Tools Use the zoom tools and to zoom out and in on the preview window when modifying the title effect. You can also select the viewer zoom amount from the drop-down to set the size of the title effect preview. Select Fit to resize the title effect so that is fits in the Title Designer's viewer window. Note: you can also hold down the Ctrl key on your keyboard and then use the mouse scroll wheel to zoom in or out on the title effect. Adding Text, Particles, Images, and Backgrounds Each title effect template can contain one or more title text boxes. It can also contain particle effects, images, and backgrounds that the text displays over. 287

301 Adding Title Effects Adding Title Text You can add additional title text boxes that contain the text you want to display in your video production. To add new title text, click on the button and then click in the preview window to add the title text box to the desired position. Type in the required text in the new title text box. See Modifying Title Text and Image Properties for more information on customizing the added title text's properties. Adding Particle Effects You can add particle effects to a title effect template. See Adding Particle Effects for more detailed information on particle effects. To add a particle effect to a title effect, click on the particle effect you want to add to the template. button and then select the Note: the properties of particle effects cannot be modified once added to a title template. However, you can adjust the effects start and end time in the title effect's keyframe timeline. Adding Images You can insert your own images into your title effect template. To add a image, do this: 288
302 CyberLink PowerDirector Help 1. Click on the button. 2. Browse to and then select the image on your computer you want to add, and then click Open. 3. Once added, resize and reposition the image in the Title Designer as required. See Modifying Title Text and Image Properties if you would like to use chroma key to make the image in the title effect transparent. You can also add shadows, reflections and more on the inserted image. Inserting Backgrounds Your title effect can consist of a background that the title text displays over. To set a background, do this: 1. Click on the button. 2. Browse to and then select the image on your computer you want to use as the background, and then click Open. 3. When prompted, set the adjustment settings for the background, as required. Note: to remove the imported background image, just click the button. Modifying Title Effect Position You can change the position and orientation of the title text and images in a title effect, quickly and easily. Note: click on to use the TV safe zone and grid lines to help with the precise placement of the title effect on the master video. Select Snap to Reference Lines to have the title effect snap to the grid lines, TV safe zone, and boundary of the video area. To modify title text and image position or orientation: click on the title text or an image, and then drag it to a new position. Use the X and Y position fields in object settings for more precise positioning. 289
303 Adding Title Effects Note: if you are editing a 360º video project, be sure to first convert the title effect to 360º so that you can use the Longitude and Latitude sliders to adjust its 360º position. if editing a 2D title, click on above the title text or image, and drag it right or left to change its orientation. if the title effect contains an image, select it and then click and drag a corner or side to resize the image. Modifying Title Text and Image Properties Click on the Object tab to change the properties of selected title text or images you inserted into the title effect. The properties that are available on the tab depend on the type of title effect (2D or 3D-like title) you are editing. See Modifying 2D Title Effect Properties if you are editing a standard 2D title effect template, or Modifying 3D-Like Title Effect Properties if editing 3D title effect template. Modifying 2D Title Effect Properties If you are creating or editing a 2D title effect template, on the object properties tab you can modify everything from the text size, style, color, as well as add shadows, borders, reflections, and more to both title text and inserted images. Applying Character Presets to Title Text Select the Character Presets option to apply a defined character preset to title text. After you have applied a defined character preset you can refine it using the other properties on the tab, if required. To apply a character preset to title text, ensure the text box is selected in the preview window and then click on a character preset in the list. Note: once you are done customizing all of the text properties on the tab, click on to save the character preset to your favorites. To find and use saved character presets, select M y Favorites in the Character types drop-down. 290
304 CyberLink PowerDirector Help Customizing Font/Paragraph Select the Font/Paragraph option to set the font type, size, and spacing of the selected title text. You can also select the font face color, bold or italicize text, change the line and text spacing, and set the text alignment in the text box. If the font type you are using supports it, you can select the Kerning check box to reduce the space between the letters in the title text. Customizing Font Face Select the Font Face option to customize the font color, blur, and opacity. Once selected, use the Blur and Opacity sliders to customize its appearance. When customizing the font face color, you have the following options in the Fill type drop-down: Uniform color: select this option if you want the font to be one solid color. Click the colored square to open the color palette and select the desired font color. 2 color gradient: select this option if you want the font color to change from one color to another using a gradient. Click the colored squares to set the beginning and ending colors, and then drag the Gradient direction control to set which way the color flows. 4 color gradient*: select this option if you want the font to consist of four colors. Click the colored squares to set the colors in each of the four corners of the text. Note: * optional feature in CyberLink PowerDirector. Check the version table on our web site for detailed versioning information. Using Chroma Key Select the Chroma Key option and then Apply chroma key to add a green screen effect to an image you inserted into the title effect. Select Once enabled, do this: Click on and then select the color in the image that you want to replace/make transparent.
305 Adding Title Effects 2. Adjust the Tolerance of hue, Tolerance of saturation, and Tolerance of luminance sliders to remove the selected color. Adjust until the image or video behind your inserted image is completely revealed, without any loss of quality on the image. 3. Use the Edge sharpness slider to fine tune and sharpen the edges of the inserted image on the revealed background. Adding a Reflection Select the Reflection option to add a reflection of title text or an inserted image onto the background media. Use the Distance slider to set space between the reflection and the object. Use the Opacity slider to set the opacity of the reflection. Applying Shadow Select the Shadow option to add a shadow to selected title text or an inserted image. Once selected, choose whether to apply the shadow on the Text/Object Only, or the Text/Object and Border, if you applied a border. Select Border Only to just display the shadow of the applied border. Use the other available options to change the shadow's color, direction, distance from the object, and add an opacity or blur effect. Applying Border Select the Border option to add a border around selected title text or an inserted image. Available options allow you to change the border's size, and add a opacity or blur effect. You can customize the border color using the following options in the Fill type drop-down: Uniform color: select this option if you want the border to be one solid color. Click the colored square to open the color palette and select the desired border color. 2 color gradient: select this option if you want the border color to change from one color to another using a gradient. Click the colored squares to set the beginning and ending colors, and then drag the Gradient direction control to set which way the color flows. 292
306 CyberLink PowerDirector Help 4 color gradient*: select this option if you want the border to consist of four colors. Click the colored squares to set the colors in each of the four corners of the border. Note: * optional feature in CyberLink PowerDirector. Check the version table on our web site for detailed versioning information. Enabling 3D Depth If you are creating a 3D video production, select the 3D Settings* to give selected title text or an inserted image a 3D effect. Note: when using this feature, select the button to enable 3D mode for best editing results. See Previewing in 3D Mode for more information on using this mode. * Optional feature in CyberLink PowerDirector. Check the version table on our web site for detailed versioning information. Once enabled, use the slider to set the amount of depth you want the object to have in 3D. Dragging the slider left will make the 3D object seem nearer to the audience (in the foreground), while dragging it right will make it appear farther away (in the background). Flipping Images Select Flip if you want to to flip an inserted image upside down or from left to right, depending on your requirement. Apply Fades to Images You can select Fade to enable a fade effect on an inserted image. Select whether to enable a fade-in and/or fade-out on the image. Note: when a fade is applied, note that keyframes are added to the Opacity keyframe timeline so you can customize the length of the fade, if required. See Utilizing PiP Keyframes for more information. Changing Object Settings Use the Object Settings option to change some of the basic properties of selected title text or an inserted image. Use the X and Y position fields to set the precise 293
307 Adding Title Effects location of the top left corner of the object on the video image. When used with keyframes, you can manually create motion for the title object. Note: CyberLink PowerDirector sets the value of the top-left corner of the object as the 0 axis, with the bottom-right corner having a value of 1.0, 1.0. The center position in the video frame is 0.500, You can more easily adjust title text position and motion on the M otion tab. See Applying Motion to Title Text for motion information. When you create motion for an object, you indicate where (Position) on the video image you want the object to appear by adding keyframes. To create the motion, CyberLink PowerDirector will ensure the object is in the desired position at the specified time (keyframe). Use the Scale sliders to change an object's size, or Opacity to make it more transparent. Note: select the M aintain aspect ratio option if you want to ensure the object's aspect ratio does not change while you are moving or resizing it. Deselect this option if you want to change the object's shape or alter its aspect ratio. To rotate an object, hover your mouse over, click and then drag your mouse left or right as required. You can also manually enter a rotation amount in the Rotation filed and then press the enter key to rotate it. Note: you can use keyframes to customize all of these object settings when editing title text. See Utilizing Title Effect Keyframes for more information. Ease In/Ease Out Creating motion for title text, by changing the Position, Scale, or Rotation object settings at different keyframes, can cause the title text to appear jerky, as it speeds up and slows down when it moves through the frame, changes its size, or rotates in the video frame. To make the movement look smoother, use the Ease in/out options. Select Ease in to slow down the title text as it enters a keyframe. Select Ease out if you want it to gradually accelerate out of the keyframe. Modifying 360º Position When editing 360º video projects, the Longitude and Latitude position sliders are available for 360º title effects, so you can customize the 360º position of title text in the 360º environment. Use these sliders to move the title text to the desired position, or just click and drag it around the 360º environment. When used with 294
308 CyberLink PowerDirector Help keyframes, you can manually create motion of the title text in the 360º environment. Note: if you are using a non-360º title effect in your 360º video project, you must first convert it to 360º if you want to customize its 360º position. Modifying 3D-Like Title Effect Properties If you are creating or editing a 3D-Like title effect template, on the object properties tab you can modify the text size, style, color, as well as its extrusion, opacity, texture, and rotation settings. Note: see The Difference Between 3D and 3D-Like Effects to learn more about both types of effects. Applying Character Presets to 3D-Like Title Text Select the Character Presets option to apply a defined character preset to 3D-Like title text. After you have applied a defined character preset you can refine it using the other properties on the tab, if required. To apply a character preset to 3D-Like title text, ensure the text box is selected in the preview window and then click on a character preset in the list. Note: once you are done customizing all of the 3D-Like text properties, click on to save the character preset to your favorites. To find and use saved character presets, select M y Favorites in the Character types drop-down. Customizing Font/Paragraph Settings Select the Font/Paragraph option to set the font type, size, and spacing of the selected 3D-Like title text. You can also select the font face color, bold or italicize the text, and set the text spacing in the text box. If the font type you are using supports it, you can select the Kerning check box to reduce the space between the letters in the title text. 295
309 Adding Title Effects Customizing Font Face Settings In Font Face Settings you can customize the font extrusion and opacity amount. To set the font color, click the colored square to open the color palette and select the desired color of the 3D-Like title text. Note: when applying an extrusion to the 3D-Like title text, the angle of the extruded text changes as you move the text to different areas of the video frame. Using Chroma Key Select the Chroma Key option to add a chroma key (green screen) effect to an inserted image. Once enable, do this: 1. Click on and then select the color in the image that you want to replace/make transparent. 2. Adjust the Tolerance of hue, Tolerance of saturation, and Tolerance of luminance sliders to remove the selected color. Adjust until the image or video behind your inserted image is completely revealed, without any loss of quality on the image. 3. Use the Edge sharpness slider to fine tune and sharpen the edges of the inserted image on the revealed background. Adding a Reflection Select the Reflection option to add a reflection of the 3D-Like title text or inserted image onto the background media. Use the Distance slider to set space between the reflection and the 3D-Like object. Applying Shadow Select the Shadow option to add a shadow to an inserted image. Available options allow you to change the shadow's color, direction, distance from the object, and add an opacity or blur effect. 296
310 CyberLink PowerDirector Help Applying Border Select the Border option to add a border around an inserted image. Available options allow you to change the border's size, and add a opacity or blur effect. You can customize the border color using the following options in the Fill type drop-down: Uniform color: select this option if you want the border to be one solid color. Click the colored square to open the color palette and select the desired border color. 2 color gradient: select this option if you want the border color to change from one color to another using a gradient. Click the colored squares to set the beginning and ending colors, and then drag the Gradient direction control to set which way the color flows. 4 color gradient*: select this option if you want the border to consist of four colors. Click the colored squares to set the colors in each of the four corners of the border. Note: * optional feature in CyberLink PowerDirector. Check the version table on our web site for detailed versioning information. Customizing 3D Rotation Settings Select the 3D Rotation Settings option to customize the rotation of your 3D-Like title text. If you applied extrusion in the font face settings, use the available sliders to rotate the 3D text to generate your preferred 3D-Like effect and orientation. Applying 3D Texture Settings Select the 3D Texture Settings option to apply texture to the 3D-Like text by selecting a text skin from the list. Click the Add Texture button to import your own image. Based on the color properties of the imported image, CyberLink PowerDirector applies a custom texture to the title text. 297
311 Adding Title Effects Enabling 3D Depth If you are creating a 3D video production, select the 3D Settings*option to give 3DLike title text or an inserted image a 3D effect. Note: when using this feature, select the button to enable 3D mode for best editing results. See Previewing in 3D Mode for more information on using this mode. * Optional feature in CyberLink PowerDirector. Check the version table on our web site for detailed versioning information. Once enabled, use the slider to set the amount of depth you want the 3D-Like object to have in 3D. Dragging the slider left will make the 3D object seem nearer to the audience (in the foreground), while dragging it right will make it appear farther away (in the background). Flipping Images Select Flip if you want to to flip an inserted image upside down or from left to right, depending on your requirement. Apply Fades to Images You can select Fade to enable a fade effect on an inserted image. Select whether to enable a fade-in and/or fade-out on the image. Note: when a fade is applied, note that keyframes are added to the Opacity keyframe timeline so you can customize the length of the fade, if required. See Utilizing PiP Keyframes for more information. Changing Object Settings Use the Object Settings option to change some of the basic properties of an inserted image. Use the X and Y position fields to set the precise location of the top left corner of the object on the video image. Note: CyberLink PowerDirector sets the value of the top-left corner of the object as the 0 axis, with the bottom-right corner having a value of 1.0, 1.0. The center position in the video frame is 0.500, Use the Scale sliders to change an object's size, or Opacity to make it more transparent. 298
312 CyberLink PowerDirector Help Note: select the M aintain aspect ratio option if you want to ensure the object's aspect ratio does not change while you are moving or resizing it. Deselect this option if you want to change the object's shape or alter its aspect ratio. To rotate an object, hover your mouse over, click and then drag your mouse left or right as required. You can also manually enter a rotation amount in the Rotation filed and then press the enter key to rotate it. Applying Animation Effects to Title Text Click on the Effects tab to apply animations to title text, such as text fades, text motion, or wipes. Note: once you are done customizing the title text animation you can use the motion blur effect to make it look smother. See Applying Motion Blur for more information. To apply animation to text, do this: 1. Select the title text you wish to animate in the preview window. 2. Select the Starting Effect option and then select an animation from the available list. 3. Select the Ending Effect option and then select an animation from the available list. Customizing the Speed of Title Text Effect You can modify the speed of a title text's animation. The following two factors determine the speed for the animation to complete. Note: on the Text tab you can manually adjust the title text position at keyframes and use ease in/out to make the movement look smoother. See Changing Object Settings for more information. Duration of the Title Effect Clip in the Timeline The longer the duration of the title effect clip in your project's timeline, the longer it takes for the title effect animation to complete. For example, if the title effect clip is 20 seconds, it takes the title effect 20 seconds to complete the starting and ending animation. 299
313 Adding Title Effects Note: if you cannot find the keyframe timeline in the Title Designer, just click the button under the preview window to display it. Keyframe Timeline A custom keyframe timeline is generated for each title effect when you open it in the Title Designer. In the above example, because the title effect clip is 20 seconds long on the project timeline, the keyframe timeline is also 20 seconds. Note: if you cannot find the keyframe timeline in the Title Designer, just click the button under the preview window to display it. If you'd like to view the movie timeline, click the button. The keyframe timeline lets you precisely place each keyframe, so you can time the applied effect in your movie production. The title effect animation has four keyframes. 300
314 CyberLink PowerDirector Help The first two keyframes indicate the start and end points for the starting effect, while the last two indicate the start and end points for the ending effect. The darker green section indicates the time it takes for the starting/ending effect to complete. If you would like to change the start or end time of the effect or how long it takes for the starting or ending effect to complete, just drag a keyframe to the desired position in the timeline. Note: the lighter green section indicates how long the title effect displays on screen once the starting effect animation is complete. Applying Motion Blur Select the Enable motion blur option if your title text has an animation effect applied. Motion blur makes the animation appear smoother. Once selected, use the available sliders as follows: Blur length: drag this slider to set the duration (number of frames) you want blended into a single frame (the blur). Dragging the slider right will apply more of a blur to the title text. Blur density: drag this slider to set the number of samples (of title effect) used per frame. Dragging the slider right will make the title text less blurry as it adds samples to fill the missing content caused by the movement. 301
315 Adding Title Effects Adding Motion to Title Text Click on the Motion tab to add motion* to title text, allowing it to move across the screen. You can choose from a number of predefined motion paths or create your own custom title text motion. Note: * optional feature in CyberLink PowerDirector. Check the version table on our web site for detailed versioning information. Using a Motion Path Template To add motion to title text you can select a motion path template on the Motion tab that fits your requirements. Note that keyframes are added to the Position track of the Title Designer keyframe timeline. These motion path templates have predefined motion in them, but you can customize the motion. See Customizing Title Text Motion and Utilizing Title Effect Keyframes for detailed information on using keyframes to customize title text motion. Customizing Title Text Motion The Title Designer uses keyframes to customize the motion of title text. Keyframes are frames of your video that define the start and end points of an effect, which in this example is motion. Note: if you added an animation effect to your title text, it may already have motion. However, you can combine these two types of effects to create impressive titles in your production. To customize the motion of title text: drag an existing keyframe to a new location in the preview window. The title text will follow the modified path to get to the changed keyframe position. 302
316 CyberLink PowerDirector Help drag the path line to alter the path the title text takes to get to the next keyframe. use the player controls to find a position on the motion path, and then click on the Position track of the keyframe timeline to add a new keyframe at a new position, if required. Customizing the Speed of Title Text Motion You have full control over the speed to the title text's motion. The following three factors determine the speed of the title text's motion. Note: on the Properties tab in Object Settings you can manually adjust the title text position at keyframes and use ease in/out to make the movement look smoother. See Changing Object Settings for more information. Duration of the Title Effect in the Timeline The longer the duration of title effect clip, the slower the title text's motion is. For example, if the title effect clip is 10 seconds, it takes the title text 10 seconds to travel from the first Position keyframe to the last Position keyframe. Distance Between Keyframes The distance between each keyframe also contributes to the speed of the title text motion. The further the distance between each keyframe, the quicker the title text needs to move to get to the next keyframe. 303
317 Adding Title Effects Keyframe Timeline The keyframe timeline is located below the preview window. Each keyframe in the motion path has a corresponding marker on the keyframe timeline. Note: if you cannot find the keyframe timeline in the Title Designer, just click the button under the preview window to display it. If the title effect clip on the timeline has a duration of 10 seconds, the keyframe timeline is 10 seconds long. To increase the speed of title text motion, drag a keyframe marker closer to previous keyframe marker. Saving a Custom Title Text Motion Path Once you finish modifying your title text path you can save it for future use. To save a motion path, click on to save it as a custom path. It is then available in motion path list the next time you want to use it. 304
318 CyberLink PowerDirector Help Utilizing Title Effect Keyframes Use keyframes when modifying your title effects to define the start and end points of text effects. In the Title Designer you can use keyframes to change the title effect's opacity, size (scale), rotation, motion, and position. Note: if you cannot find the keyframe timeline in the Title Designer, just click the button under the preview window to display it. Adding Keyframes To add a keyframe to the keyframe timeline, do this: 1. Use the player controls to find the moment in your title effect where you want its properties to change. 2. Click next to the text property you want to change to add a keyframe to the corresponding keyframe track. 3. Use the features in the Title Designer to modify the properties of the title effect as required for this keyframe. In this example we are modifying the opacity of the title effect at the beginning of the clip. 305
319 Adding Title Effects Note: notice above that when opacity is changed, a keyframe is automatically added at the current timeline slider position. 306

320 CyberLink PowerDirector Help When previewed, at the first keyframe the title effect is the completely transparent, and then slowly gets more opaque until it reaches the specified opacity level by the time the playback slider reaches the second keyframe. 307
321 Adding Title Effects It will maintain this opacity until the playback slider reaches the last keyframe, unless you add more keyframes or change the properties of the last keyframe. Note: you can also modify the properties of a keyframe by right clicking on it and selecting Duplicate Previous Keyframe or Duplicate Next Keyframe. Doing this copies the properties of the specified keyframe to the keyframe you right clicked on. 4. Repeat these steps to create the kind of effect you want in your video production using keyframes to modify the title effect's properties. Modifying and Removing Keyframes At any time you can modify the keyframes added, by selecting it and changing the title effect's object properties, or by dragging the keyframe to another position on the keyframe timeline. To remove a keyframe, select it on the keyframe timeline and then click. Saving and Sharing Title Templates Once you finish modifying your title template you can save it to your title effects library for future use, upload it to DirectorZone to share it with others, or back it up on CyberLink Cloud*. Note: * optional feature in CyberLink PowerDirector. Check the version table on our web site for detailed versioning information. click on Share to upload your custom template to DirectorZone or back it up on CyberLink Cloud. See Sharing and Backing Up Title Templates for more information. click on Save As to save a modified template as a new template to the Title Room. click on OK to save a new template to the Title Room. Sharing and Backing Up Title Templates You can share your customized title templates with other CyberLink PowerDirector users by uploading them to DirectorZone. If you have a CyberLink Cloud 308
322 CyberLink PowerDirector Help subscription you can back up all your customized templates by storing them on CyberLink Cloud. To share and back up your title templates, do this: 1. Do either of the following: in the Title Designer, click on Share, enter a name for the custom template, and then click OK. select the title template in the library, and then click 2.. In the upload window, enter the information as follows: Upload to: select where you want to upload the template. Title: name of the template as it will display once uploaded. Style: select a style or category for the template. Type: if required, select the type of template you are uploading. Tags: enter some keyword search tags that will help users find the template when searching. Note: separate each tag you enter with a space. If you want to use two words as the tag, just put quotes around them, e.g. "dollar bill". Collection: enter the name of the collection you want the template added to. Description: enter a short description of your template. 3. Click Next to proceed. 4. Confirm the copyright disclaimer, and then click Next to proceed with the upload. 5. Click on Finish to close the upload window. 309
323 Creating Custom Masks in the Mask Designer Chapter 14: Creating Custom Masks in the Mask Designer In the Mask Designer you can create custom masks that are added directly to media clips on the timeline. Masks let you hide portions of the video image, only displaying the portions of the media clip that you want. Note: this section outlines the procedures for creating custom masks in timeline mode, as all the program's features are available in this mode. If you prefer to use the storyboard mode, and you find one of the outlined features is not available, you can press the Tab key on your keyboard to switch to timeline mode. To open the Mask Designer, in the Edit module, select a media clip on the timeline and then select Designer > Mask Designer. Note: * optional feature in CyberLink PowerDirector. Check the version table on our web site for detailed versioning information. 310

324 CyberLink PowerDirector Help A - Mask Properties Tab, B - Mask Properties, C - Motion Tab, D - Media Clip/Video Being Masked, E Mask, F - Mode Selection, G - Zoom Tools, H - Display/Hide Keyframe Timeline, I - TV Safe Zone/Grid Lines, J - Upload to Internet, K - Mask Keyframe Timeline When you are done customizing your mask in the Mask Designer, click the OK button to save your changes. Your changes are applied to the selected media clip and updated on the video timeline. If you want to edit the mask further, just reselect the media clip on the timeline and then reenter the Mask Designer by selecting Designer > Mask Designer. Mode Selection and Zoom Tools When modifying masks in the Masks Designer use the mode selection and zoom tools for assistance. 311
325 Creating Custom Masks in the Mask Designer Note: when modifying masks in the Mask Designer, use the player controls to preview, and click click window. to preview the video at full screen. You can also to hide the keyframe timeline for a larger view of the preview Mode Selection In the Mask Designer there are two selection modes. Click the button to enable the mask selection. When selected, you can freely click and move the mask to different areas of the video frame. Click the button to enable a mode that lets you drag the view in the Mask Designer. This mode is especially helpful when applying masks with motion that start off screen. Zoom Tools Use the zoom tools and to zoom out and in on the preview window when modifying masks. You can also select the viewer zoom amount from the drop-down to set the size of the mask preview. Select Fit to resize the mask so that is fits in the Mask Designer's viewer window. Note: you can also hold down the Ctrl key on your keyboard and then use the mouse scroll wheel to zoom in or out on the mask. Selecting Masks Click on the Mask tab and then select a mask in Mask Properties to overlay portions of the media clip you selected on the timeline. 312
326 CyberLink PowerDirector Help Click and drag the edges of the mask to move and resize it as required. See Modifying Mask Size and Position for more information. The area that is white in the mask thumbnail, is the part of the mask that is transparent. However, you can select the Invert mask option to invert the portion of the media that is being masked. 313
327 Creating Custom Masks in the Mask Designer Use the Feather radius slider if you want to adjust the softness on the mask's edges. 314

328 CyberLink PowerDirector Help Creating Custom Masks In the Mask Designer you can import your own images to create custom masks. You can also create masks in the Mask Composer using title text and images. Importing Images To create a mask using an imported image, click on the Load Image button in the Mask Properties section of the Mask tab, and then import an image from your computer's hard drive. 315

329 Creating Custom Masks in the Mask Designer 316

330 CyberLink PowerDirector Help 317

331 Creating Custom Masks in the Mask Designer As with the mask templates, by default, the lighter areas of the imported image become transparent. Once imported, change the properties and mask objects settings to customize to your requirements. 318
332 CyberLink PowerDirector Help Mask Composer Clicking on the Create Mask button in the Mask Properties section of the Mask tab, 319
333 Creating Custom Masks in the Mask Designer will open the Mask Composer, where you can create a custom mask using title text and images. 320
334 CyberLink PowerDirector Help Editing Title Text Click on the title text object and then enter the text you want to use in your custom mask. Note: if required you can add more than one title text object in the mask by clicking on the button and then clicking in the preview window to adding the title text box to the desired position. 321
335 Creating Custom Masks in the Mask Designer Use the Font Type options to set the font type and size of the selected title text. You can also bold or italicize text, change the line and text spacing, and set the text alignment in the text box. If the font type you are using supports it, you can select the Kerning check box to reduce the space between the letters in the title text. 322
336 CyberLink PowerDirector Help Mask Object Properties In the Object Settings section you can change some of the basic properties of the mask. In the Position section, you can manually position the mask on the video frame, using the X and Y position fields to set the precise location of the top left corner of the mask. Note: CyberLink PowerDirector sets the value of the top-left corner of the mask as the 0 axis, with the bottom-right corner having a value of 1.0, 1.0. The center position in the video frame is 0.500, Use the Scale sliders to change the mask's size, or Opacity to make it less transparent. Note: select the M aintain aspect ratio option if you want to ensure the mask's aspect ratio does not change while you are moving or resizing it. Deselect this option if you want to change the mask's shape or alter its aspect ratio. To rotate the mask, enter the Rotation amount in the field provided. 323

337 Creating Custom Masks in the Mask Designer Importing Images In the Mask Composer you can also click on the button to import images for use in your custom mask. The lighter areas of the imported image become transparent once imported. When you are done creating your mask, click OK to close the Mask Composer. Your changes will be saved and the new mask will be available in Mask Properties of the Mask Designer. 324

338 CyberLink PowerDirector Help If you want to make further edits to your custom mask, just right click on its thumbnail and then select Modify to reenter the Mask Composer. Modifying Mask Size and Position You can change the size, position, and orientation of the mask. The resizing options are unrestricted. You can reduce the mask to miniature size or enlarge as much as you want. Note: click on to use the TV safe zone and grid lines to help with the precise placement of the masks on the video image. Select Snap to Reference Lines to have the mask snap to the grid lines, TV safe zone, and boundary of the video area. To modify mask size, position, or orientation: click and drag a corner or side to resize the mask. 325
339 Creating Custom Masks in the Mask Designer Note: in the M ask Scale section on the Mask Object Settings, you can deselect the M aintain aspect ratio option to resize the mask more freely. click on the mask and drag it to a new position. click on above the mask and drag it left or right to change its orientation. click and drag the blue nodes in corners to change its shape. See Changing the Shape of Media for more information. Note: you can use keyframes to customize the size and shape of masks. See Utilizing Mask Keyframes for more information. Modifying Mask Object Settings On the Mask tab, click on the Object Settings section to change some of the basic properties of the mask. Note: while modifying the mask's object settings, you can select the Only show the selected track option to hide any other media that is displayed in the preview window while modifying. In the Mask Position section, you can manually position the mask on the video frame, using the X and Y position fields to set the precise location of the top left corner of the mask. When used with keyframes, you can manually create motion of the mask. Note: CyberLink PowerDirector sets the value of the top-left corner of the mask as the 0 axis, with the bottom-right corner having a value of 1.0, 1.0. The center position in the video frame is 0.500, You can more easily adjust mask position and motion on the M otion tab. See Adding Motion to Masks for motion information. When you create motion for masks, you indicate where (Mask Position) on the video image you want the mask to appear by adding keyframes. To create the motion, CyberLink PowerDirector will ensure the mask is in the desired position at the specified time (keyframe). Use the Mask Scale sliders to change the mask's size, or Mask Opacity to make it more transparent. 326
340 CyberLink PowerDirector Help Note: select the M aintain aspect ratio option if you want to ensure the mask's aspect ratio does not change while you are moving or resizing it. Deselect this option if you want to change the mask's shape or alter its aspect ratio. To rotate the mask, enter the Rotation amount in the field provided. Note: you can use keyframes to customize each of these object settings. See Utilizing PiP Keyframes for more information. Ease In/Ease Out Creating motion for masks, by changing the Mask Position, Mask Scale, or Rotation object settings at different keyframes, can cause the mask to appear jerky, as it speeds up and slows down when it moves through the frame, changes its size, or rotates in the video frame. To make the movement look smoother, use the Ease in/out options. Select Ease in to slow down the mask as it enters a keyframe. Select Ease out if you want it to gradually accelerate out of the keyframe. Adding Motion to Masks Click on the Motion tab to add motion* to masks, allowing them to move across the screen. You can choose from a number of predefined motion paths or create your own custom motion. You can also add a rotation effect to the mask. Note: * optional feature in CyberLink PowerDirector. Check the version table on our web site for detailed versioning information. Using a Motion Path Template To add motion to mask you can select a motion path template on the Motion tab that fits your requirements. Note that keyframes are added to the Position track of the Mask Designer keyframe timeline. These motion path templates have predefined motion in them, but you can customize the motion. See Adding Motion to Masks and Utilizing Mask Keyframes for detailed information on using keyframes to customize mask motion. 327


341 Creating Custom Masks in the Mask Designer Customizing Mask Motion The Mask Designer uses keyframes to customize the motion of masks. Keyframes are frames of your video that define the start and end points of an effect, which in this example is motion. Note: some masks have predefined motion already applied. To customize the motion of masks: drag an existing keyframe to a new location in the preview window. The mask will follow the modified path to get to the changed keyframe position. drag the path line to alter the path the mask takes to get to the next keyframe. use the player controls to find a position on the motion path, and then click on the Position track of the keyframe timeline to add a new keyframe at a new position, if required. Customizing the Speed of Mask Motion You have full control over the speed to the mask's motion. The following three factors determine the speed of the mask's motion. 328
342 CyberLink PowerDirector Help Note: on the Properties tab in Object Settings you can manually adjust the mask position at keyframes and use ease in/out to make the movement look smoother. See Changing Object Settings for more information. Distance Between Keyframes The distance between each keyframe contributes to the speed of the mask motion. The further the distance between each keyframe, the quicker the mask needs to move to get to the next keyframe. Keyframe Timeline The keyframe timeline is located below the preview window. Each keyframe in the motion path has a corresponding marker on the keyframe timeline. Note: if you cannot find the keyframe timeline in the Mask Designer, just click the button under the preview window to display it. If the selected media clip on the timeline has a duration of 10 seconds, the keyframe timeline is 10 seconds long. To increase the speed of a mask's motion, drag a keyframe marker closer to the previous keyframe marker. 329
343 Creating Custom Masks in the Mask Designer Saving a Custom Mask Motion Path Once you finish modifying your mask's motion path you can save it for future use. To save a motion path, click on to save it as a custom path. It is then available in motion path list the next time you want to use it. Utilizing Mask Keyframes Use keyframes when modifying your masks to define the start and end points of the customized effects. In the Mask Designer you can use keyframes to change the mask's position, size (mask scale), opacity, rotation, and motion. Keyframe Timeline A custom keyframe timeline is generated for each mask when you open it in the Mask Designer. In the below example, because the selected media clip is 10 seconds long on the project timeline, the keyframe timeline is also 10 seconds. Note: if you cannot find the keyframe timeline in the Mask Designer, just click the button under the preview window to display it. If you'd like to view the movie timeline, click the button. 330
344 CyberLink PowerDirector Help The keyframe timeline lets you precisely place each keyframe, so you can time the applied effect in your movie production. Adding Keyframes To add a keyframe to the keyframe timeline, do this: Note: if you cannot find the keyframe timeline in the Mask Designer, just click the button under the preview window to display it. 1. Use the player controls to find the moment in your media clip where you want the mask's properties to change. 2. Click next to the property you want to change to add a keyframe to the corresponding keyframe track. 3. Use the features in the Mask Designer to modify the properties of the effect as required for this keyframe. In this example we are modifying the opacity of the mask at the beginning of the media clip. 331
345 Creating Custom Masks in the Mask Designer Note: notice above that when opacity is changed, a keyframe is automatically added at the current timeline slider position. 332


346 CyberLink PowerDirector Help When previewed, at the first keyframe the mask is the completely transparent, and then slowly gets more opaque until it reaches the specified opacity level by the time the playback slider reaches the second keyframe. 333
347 Creating Custom Masks in the Mask Designer It will maintain this opacity until the playback slider reaches the last keyframe, unless you add more keyframes or change the properties of the last keyframe. Note: you can also modify the properties of a keyframe by right clicking on it and selecting Duplicate Previous Keyframe or Duplicate Next Keyframe. Doing this copies the properties of the specified keyframe to the keyframe you right clicked on. 4. Repeat these steps to create the kind of effect you want in your video production using keyframes to modify the mask's properties and motion. Modifying and Removing Keyframes At any time you can modify the keyframes added, by selecting it and changing the mask's properties, or by dragging the keyframe to another position on the keyframe timeline. To remove a keyframe, select it on the keyframe timeline and then click. Saving and Sharing Masks Once you are finished modifying/customizing a mask you can save it to your mask library for future use. You can also share the PiP part of the mask on DirectorZone, or back it up on CyberLink Cloud*. Note: * optional feature in CyberLink PowerDirector. Check the version table on our web site for detailed versioning information. click on Share to upload the PiP part of the custom mask to DirectorZone or back it up on CyberLink Cloud. See Saving and Sharing PiP Objects for more information. click on Save As to save a modified mask as a new mask in the Mask Designer mask library. Note: masks created after selecting a video clip on the timeline cannot be saved or shared. You can only save and share masks created with image backgrounds. 334
348 CyberLink PowerDirector Help Chapter 15: Using Transitions In the Edit module, click the button to open the Transition Room to access a library of transitions that you can use on or between image and video clips in your video production. You can also use the available audio transitions between two audio clips on the voice or music tracks, or on an audio track. Note: this section outlines the procedures for using transitions in timeline mode, as all the program's features are available in this mode. If you prefer to use the storyboard mode, and you find one of the outlined features is not available, you can press the Tab key on your keyboard to switch to timeline mode. Transitions let you control how media appears and disappears in your project, and changes, or transitions, from one clip to the next. You can add a transition to a single clip, or between two clips on a track. Adding Transitions to a Single Clip By adding a transition to a single clip, you can control how the clip appears and/or disappears in your production. For example, you can add transitions to PiP video (including images, video clips, color boards, PiP objects, paint animation objects, title effects, and particle effects) and fully control its appearance in your final video. Note: you can set the default behavior and duration of transitions added to the timeline on the Editing preferences tab. See Editing Preferences for more information. To add a transition to a single clip, do this: 1. In the Edit module, click on 2. Select a transition effect and then drag it to the beginning (prefix transition) or ending (postfix transition) of a clip on a video track. 3. To change the duration of the transition, click on the Duration button or click and drag its start/end points within the clip. 335 to open the Transition Room.

349 Using Transitions Prefix Transition 336
350 CyberLink PowerDirector Help Postfix Transition Note: you can add transitions to all the video, image, and effect clips on the timeline at once by clicking, choosing Apply Random Transition to All Videos or Apply Fading Transition to All Videos, and then the desired transition behavior. You can also do this for all the audio clips by selecting Apply Random Audio Transition to All Audio. Adding Transitions Between Two Clips You can also add a transition between two image and video clips on a video track or between two audio clips on any of the audio related (audio, voice or music) tracks. To add a transition between two clips, do this: 337
351 Using Transitions 1. In the Edit module, click on to open the Transition Room. 2. Select a transition effect and then drag it between the two clips on a track. 3. To change the duration of the transition, click on the Duration button or click and drag its start/end points within the clips. Note: you can add transitions to all the video, image, and effect clips on the timeline at once by clicking, choosing Apply Random Transition to All Videos or Apply Fading Transition to All Videos, and then the desired transition behavior. You can also do this for all the audio clips by selecting Apply Random Audio Transition to All Audio. Using Audio Transitions You can use audio transitions to transition between two audio files on an audio track, or between two video clips that contain audio. Audio transitions can also be added at the beginning or end of a single audio or video clip. Note: when you add an audio transition between two video clips, the fade transition is automatically added on the corresponding video track. The video transition cannot be removed, but it can be replaced with another video transition in the transition library. To add an audio transition to a clip, do this: 1. In the Edit module, click on to open the Transition Room. 2. Select the Audio tag on the left to display the available audio transitions. 3. Select one of the transitions and then drag it to the desired position (beginning (prefix transition), ending (postfix transition), or between two clips). 338
352 CyberLink PowerDirector Help To change the duration of the transition, click on the Duration button or click and drag its start/end points within the clips.
353 Using Transitions Setting Transition Behavior Once you have added a transition between two clips, you can set its behavior. Transitions between two clips in CyberLink PowerDirector have one of the following behaviors: Note: you can set the default behavior of transitions added to the timeline on the Editing preferences tab. See Editing Preferences for more information. Cross Transition: when using a cross transition, the two clips are side by side on the timeline and the transition acts like a bridge between them. For example, if you add a two second transition between two five second clips, the total duration is 10 seconds. The transition begins at the four second mark of the first clip, and ends at the one second mark of the second clip. Overlap Transition: when using an overlap transition, the two clips overlap while the transition is taking place. This allows for parts of the two clips to play over each other during the transition. Using the same example as above, the total duration is eight seconds, with the transition playing for two seconds over both clips. To set a transition's behavior, do this: 1. Click on the transition between two clips. 2. Click the Modify button to change to the other transition type, or right-click on the transition and then select Modify Transition. 3. In the Transition Settings panel, set the behavior of the transition. 340
354 CyberLink PowerDirector Help Modifying Transition Settings Some transitions have settings you can modify in the Transition Settings panel. These settings may include the ability to modify the background color used in the transition, the direction of the transition effect, the type of effect used, and more. Note: if you are modifying the settings of an alpha transition, the Transition Designer button is available in the Transition Settings panel. Click it to perform more advanced modifications on the alpha transition. See Modifying Alpha Transitions in the Transition Designer for more information. To check if a transition you are using has adjustable settings, select it on the timeline and then click the Modify button to open the Transition Settings panel. If there is a setting available, adjust as required to achieve your desired results. Note: you can also set the transition behavior in the Transition Settings panel. See Setting Transition Behavior for more information. 341
355 Using Transitions Modifying Alpha Transitions in the Transition Designer In the Transition Designer* you can modify the existing alpha transitions in the transition library, or create new ones from scratch. Alpha transitions are wipes that use custom images or masks to create the transition effect. Note: * optional feature in CyberLink PowerDirector. Check the version table on our web site for detailed versioning information. To open the Transition Designer, in the Edit module, click on to enter the Transition Room, and then select the Alpha transition tag on the left. Next, select an alpha transition in the library and then click the button. 342

356 CyberLink PowerDirector Help A - Alpha Transition Properties, B - Transition Effect Preview, C - Transition Effect Keyframe Timeline To create a new alpha transition, enter the Transition Room and then click the button to open the Transition Designer. See Creating New Alpha Transitions for more detailed information. Note: you can also open the Transition Designer when editing an alpha transition's settings by clicking the Transition Designer button in the Transition Settings panel. Creating New Alpha Transitions You can create new custom alpha transitions using your own imported images. 343
357 Using Transitions Note: when you create a new alpha transition, it is saved under the Custom tag in the transition library, not under the Alpha tag. To create a new alpha transition, do this: 1. Click to enter the Transition Room and then the transition library. button above the 2. Browse to and then select the image you want to use in the alpha transition. Once selected, click the Open button to import it into the Transition Designer. Note: for the best results, it is recommended that you use images that contain gradients. 3. Proceed to modify the properties of the alpha transition as required. See Modifying Alpha Transition Properties for more detailed information. Note: once the image is imported, it is converted to gray scale for use in the Transition Designer. Modifying Alpha Transition Properties In the Properties tab of the Transition Designer you can customize the alpha transition's properties. See the following sections for detailed information on the properties you can modify on this tab. Alpha Transition Overview Changing Image Properties Applying a Border Customizing the Shift Progression Setting Edge Sharpness 344

358 CyberLink PowerDirector Help Alpha Transition Overview Alpha transitions use an image's properties to perform the transition, i.e. shift from one clip to another when used in your video production. The image in the Transition Designer is converted to gray scale for use in the alpha transition. By default, the areas that are blackest are the areas that are revealed (transitioned) first, followed by the grays, and then the whitest areas. In the example below, the center of the heart is black, so the B is revealed in that area first. Note: you can invert the transition area so that the whitest areas are revealed first. See Inverting Transition Area for more information. While the whitest outside areas are the last parts to be revealed. 345

359 Using Transitions Note: you can fully customize the progression of the shift (from A to B) in the alpha transition. See Customizing the Shift Progression for more information. Changing Image Properties In the Image section of the Transition Designer you can change some of the properties for the image used in the alpha transition. If required, change the position of the focus area in the Image preview, or the area of the image that will be used in the alpha transition. 346

360 CyberLink PowerDirector Help Deselect the Keep aspect ratio option if you want more control on the shape of the focus area. Note that the aspect ratio of the focus area matches your current project's aspect ratio. 347

361 Using Transitions Select the Flip upside down option if you want to flip the image vertically, or Flip left to right if you want to flip it horizontally. Applying a Border You can apply a color border on the edge of the transition line. To do this, select the Border option and then set the level of Opacity on the border to adjust its appearance. 348
362 CyberLink PowerDirector Help Selecting Border Color When selecting the color of the border, you have the following options in the Fill type drop-down: Uniform color: select this option if you want the border to be one solid color. Click the colored square to open the color palette and select the desired border color. 2 color gradient: select this option if you want the border color to change from one color to another using a gradient. Click the colored squares to set the beginning and ending colors. Customizing the Shift Progression In this section you can customize the shift progression of the alpha transition, or how it transitions from one clip to another when used in your video production. Shift Progression Timeline The shift progression timeline is a graphical representation of how the transition progresses, i.e. how the alpha transition shifts from the A to the B as shown in the below example. 349
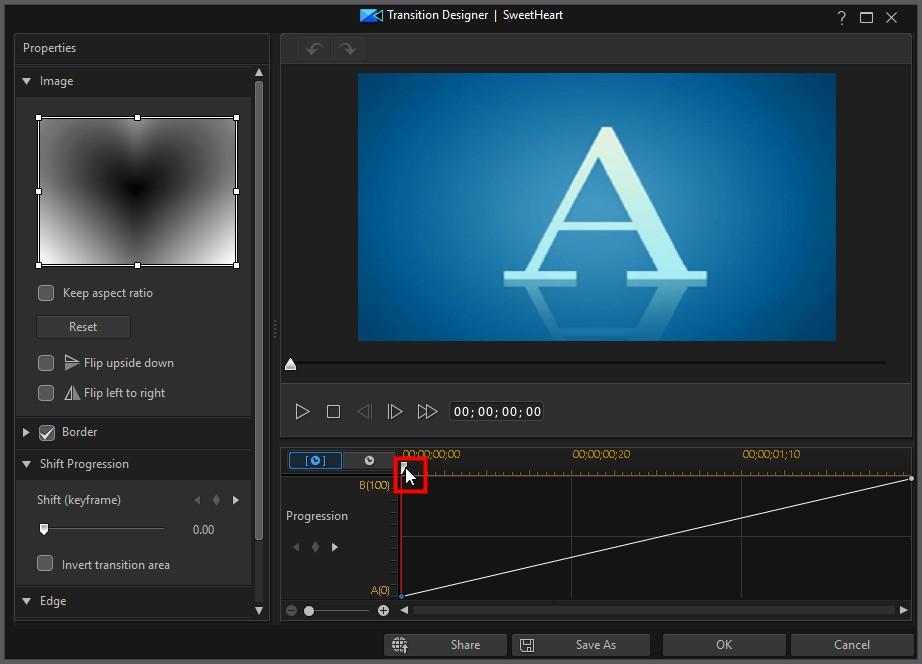
363 Using Transitions 350
364 CyberLink PowerDirector Help 351
, the keyframe timeline is also two seconds.")
365 Using Transitions The timeline along the top is the keyframe timeline and is generated for the alpha transition when you open it in the Transition Designer. In the below example, because the transition duration is two seconds long (by default in the transition library), the keyframe timeline is also two seconds. If you increased the duration of the transition in the timeline to five seconds, the keyframe timeline would then be five seconds long. 352
366 CyberLink PowerDirector Help If alpha transition you are editing is on the timeline, click the to view the movie timeline. button The scale to the left represents the progression from the A to the B, and the line shows the progress. You can modify the shift progression as required, by changing the beginning and ending points, or adding keyframes to precisely customize the shift progression, or transition from one clip to another when used in your production. Adding Keyframes To add a keyframe to the keyframe timeline, do this: 353

367 Using Transitions 1. Use the player controls to find the moment in the transition where you want the progression to shift. 2. Click line. 3. If required, use the Shift slider to change the progression position of the line. in the Shift Progression section to add a keyframe to the progression In this above example, the transition will now shift 75% from A to B in the first second of the transition, and then progress the final 25% in the last second. 4. Repeat these steps to customize the shift progression as required using keyframes. Removing Keyframes To remove a keyframe, drag the timeline slider over it so that it is highlighted and then click. Inverting Transition Area Select the Invert transition area option if you want the whitest areas of the alpha transition image to transition first, followed by the grays, and then the blackest areas. 354
368 CyberLink PowerDirector Help 355
369 Using Transitions Setting Edge Sharpness In the Edge section, use the slider to set the sharpness of the transition line by adjusting its gradient level. Dragging it left will make it sharper, 356

370 CyberLink PowerDirector Help while dragging it right will make it softer or more blurry. Saving Alpha Transitions Once you are finished modifying/customizing an alpha transition you can save it to your transition library for future use, upload it to DirectorZone to share it with others, or back it up on CyberLink Cloud*. Note: * optional feature in CyberLink PowerDirector. Check the version table on our web site for detailed versioning information. click on Share to upload your custom template to DirectorZone or back it up on CyberLink Cloud. See Sharing and Backing Up PiP Objects for more information. 357
371 Using Transitions click on Save As to save a modified template as a new template to the Transition Room. click on OK to save a new template to the Transition Room. Note: when you create a new alpha transition, or edit an existing one, it is saved under the Custom tag in the transition library, not under the Alpha tag. Sharing and Backing Up Alpha Transitions You can share your customized alpha transitions with other CyberLink PowerDirector users by uploading them to DirectorZone. If you have a CyberLink Cloud subscription you can back up all your customized alpha transitions by storing them on CyberLink Cloud. To share and back up your alpha transitions, do this: 1. Do either of the following: in the Transitions Designer, click on Share, enter a name for the custom template, and then click OK. select the alpha transitions in the library, and then click 2.. In the upload window, enter the information as follows: Upload to: select where you want to upload the template. Title: name of the template as it will display once uploaded. Style: select a style or category for the template. Type: if required, select the type of template you are uploading. Tags: enter some keyword search tags that will help users find the template when searching. Note: separate each tag you enter with a space. If you want to use two words as the tag, just put quotes around them, e.g. "dollar bill". Collection: enter the name of the collection you want the template added to. Description: enter a short description of your template. 3. Click Next to proceed. 358
372 CyberLink PowerDirector Help 4. Confirm the copyright disclaimer, and then click Next to proceed with the upload. 5. Click on Finish to close the upload window. 359
373 Mixing Audio and Recording Voice-Overs Chapter 16: Mixing Audio and Recording Voice-Overs Your production's audio can make or break your video production. In the Edit module, click to open the Audio Mixing Room to mix the audio levels of your production, or to your video. to record a voice-over in the Voice-Over Room to add narration You can also mix the audio right in the timeline using keyframe nodes. Adjusting Audio Clip Volume Levels Your video production may contain audio in one of the audio tracks, the music track, or the voice track. Since the audio may have been recorded at different levels, the result could produce an overwhelming and confusing soundtrack. In the Edit module, click to open the Audio Mixing Room to mix all of the audio levels into a more harmonious soundtrack for your video, or mix the levels in track on each individual clip using volume keys. Mixing Audio In-Track In the Edit window, you can manually adjust the volume level of individual audio and video clips in the timeline. Note: for easier audio syncing, you can increase the timeline scale by selecting the Enlarge timeline scale for audio track in Editing Preferences. Adjusting Volume for Entire Clip Duration To adjust the volume level for the entire duration of a clip in the timeline, just click and drag the audio level line up or down as required. 360


374 CyberLink PowerDirector Help Note: if you want to adjust the volume of all the clips on a specific track at the same time, use the master gain control in the Audio Mixing Room. Using Volume Keyframes to Mix Audio Level If you want to use volume keyframes to mix an individual clip's audio in the timeline, hold down the Ctrl key on your keyboard and then click on the audio level line at the point where you want to change the audio level. Drag the volume keyframe up to increase the volume, or down to decrease the volume. Note: to remove a volume keyframe, drag it outside the clip's borders. 361

375 Mixing Audio and Recording Voice-Overs Mixing Audio in the Audio Mixing Room Click the Edit button, and then to gain access to the audio mixer in the Audio Mixing Room, to set the audio level for each track using the available controls. A - Audio Tracks in Timeline, B - Master Volume Controls, C - Fade In/Out Controls, D - Normalize Volume, E - Audio Level Meter, F - Master Gain Control When you enter the Audio Mixing Room, the audio at the current position of the timeline slider is available for mixing. Use the player controls to locate the position in your video where you want to mix the audio. To mix the audio in the timeline, do this: 362
376 CyberLink PowerDirector Help select a clip in the timeline, and then use the master volume controls to increase or decrease the volume at the timeline slider's current position. Note: adjusting the master volume control adds a volume keyframe at the timeline slider's current position. If you want to adjust the volume for the entire duration of a clip, you can do that in-track. Use the master gain control to adjust the volume of an entire track. if there is more than one audio clip on the voice or music track, or on any of the audio tracks, click the Normalize* button to have CyberLink PowerDirector set the volume for all the clips to the same level. Note: * optional feature in CyberLink PowerDirector. Check the version table on our web site for detailed versioning information. use the master gain control sliders to increase or decrease the volume of all the media on a track. use the audio level meter to view the audio level, or loudness in decibels, during playback. If the audio levels rise to the red levels, you can adjust the master volume to lower the audio level. Note: if audio in a clip enters the red level of the audio level meter, CyberLink PowerDirector marks the area on the timeline in red. Use the master volume controls and audio level meter to fix the problem area as required. Adding Fade Effects to Audio Clips To add a fade-in/fade-out effect to an audio clip, do this: 1. Click the Edit button, and then open the Audio Mixing Room 2. Select the audio clip in the timeline. 3. Ensure the timeline slider is at the beginning of the audio clip, and then click to add a fade-in effect. 4. Drag the timeline slider to the position in your audio clip where you want the audio to start fading out, and then click effect. Note: when you add fade effects, volume keys are added to the audio clip in the timeline. You can adjust these volume keys to customize the fade effect. See Mixing Audio In-Track for more information on adjust volume keys. 363

377 Mixing Audio and Recording Voice-Overs Restoring Audio Clip Volume Levels If you are dissatisfied with the volume level of any audio clip, you can easily restore the clip's original volume level. To do this, right-click on the audio clip and then select Restore to Original Volume Level. Recording Voice-Overs In the Edit module, click to open the Voice-Over Recording Room and record a narration with a microphone while watching a preview of your video production. Note: access to the Voice-Over Recording Room is only available if CyberLink PowerDirector detects there is a microphone or other audio input device available. A - Recording Volume Level, B - Recording Preferences, C- Record/Stop Button, D- Fade-In/Out 364
378 CyberLink PowerDirector Help When you capture your voice-over, the audio is placed on the voice track and is automatically synchronized with the video. Set your recording preferences as follows: click Device to select your audio device and input. click Profile to set the quality of the recorded audio. click Preferences to set a recording time limit or three second delay before recording begins to ensure you are ready to record. You can also set auto fades. select Mute all tracks when recording if you want CyberLink PowerDirector to mute all the other audio while you are recording the voice over. select fade-in the voice over, or to add a fade-out effect. To record a voice over, do this: 1. Set the recording volume level using the available slider. 2. Click to begin recording. Record your voice over as you watch the video in the preview window. 3. Click the voice track. 365 to stop recording. The captured voice clip is placed on
379 Adding Chapters Chapter 17: Adding Chapters In the Edit module, click the button to open the Chapter Room*. Chapters are used to ease navigation of your finalized production if you decide to burn it to a disc. Chapters allow viewers to watch only the content they want or easily find their place if the disc was stopped before completion. Note: for best results, adding chapters should be the last editing step before burning your video production to disc. * Optional feature in CyberLink PowerDirector. Check the version table on our web site for detailed versioning information. Adding Chapter Markers To auto add chapter markers in the Chapter Room do one of the following: select Insert chapter at the start of each clip on the first video track to add a chapter marker before each clip on the top track in the timeline. select Insert chapters at fixed intervals, and then enter the interval (in minutes) in the field provided. select Insert chapters evenly and then enter the number of chapters in the field provided, to set a specified number of chapters evenly in your project. Click the Start button to auto add the chapter markers as specified. To set chapter markers manually, navigate to a point in your video production and then click. To remove a chapter marker, select it and then click. Click to remove all of the chapter markers in your production. Setting Chapter Thumbnails You can set the thumbnail image for each of your chapters, which display in the disc menu on a finalized disc. Just drag the timeline slider to the frame in your video production you want to use as the chapter thumbnail, and then click the button. 366
380 CyberLink PowerDirector Help Chapter 18: Adding Subtitles CyberLink PowerDirector lets you add subtitles to your video production, either for a disc or imprinted on a video file. You can also import subtitles from a file, extract them from an MKV file, or add them manually in the Subtitle Room. To add subtitles to your video production, in the Edit module, click on the Subtitle Room and then to open to select one of the following types of subtitles: Create subtitles for discs/files*: select this option to create subtitles that are compatible with most DVD/BDMV/AVCHD/MKV playback software and can be switched on/off like those found on commercial discs. Note: when you select Create subtitles for discs/files, there is a Subtitles option by default in your created disc menu in the Create Disc window. Text formatting for disc subtitles is more limited. * Optional feature in CyberLink PowerDirector. Check the version table on our web site for detailed versioning information. Create subtitles imprinted on a video file: select this option to blend subtitles into the video. Note: if you are creating subtitles for an MKV file, make sure you select the Create subtitles for disc/files option, not the option where the subtitles are imprinted on the video file. Adding Subtitle Markers Subtitle markers are the placeholders for the subtitle text added to your production. They are added to display at the exact time the dialogue is spoken in the video production, and display until it has completed. Unless you are importing subtitles from an SRT file or extracting them from an MKV file, you must add all the subtitle markers manually to your video production. To manually add subtitle markers to your video production, you can: click the play button on the player controls and then click the button at the beginning of every piece of dialogue spoken to create all the subtitle markers required for your production. Continue this process until the video is 367
381 Adding Subtitles complete, and then click the stop button to load the subtitle markers into the Subtitle Room. use the player controls to find the position in the video where you want to add the subtitle, and then click the marker. button to add a single subtitle Once you have added the subtitle markers, the next step is to edit the subtitle text and duration. See Editing Subtitles for more information. Importing Subtitles from a File Click the button in the Subtitle Room to import subtitles from a file* in the SRT or TXT formats. This allows you to compose subtitles outside the program or retrieve them from another source, and then import them into CyberLink PowerDirector. Note: when an SRT file is imported, the subtitle markers are created automatically in the Subtitle Room. However for TXT files you must first add all of the subtitle markers before you can import the file. See Adding Subtitle Markers fore more information. If importing from a TXT file, you should ensure the subtitle markers in the Subtitle Room match the number of lines of subtitle text in the file. When composing the subtitles in a TXT file, each subtitle should be placed on a new line in the file. CyberLink PowerDirector detects each line, and then imports the corresponding text into the subtitles markers in the Subtitle Room. Note: * optional feature in CyberLink PowerDirector. Check the version table on our web site for detailed versioning information. Extracting Subtitles from an MKV File CyberLink PowerDirector lets you extract the subtitles from an MKV file, importing them directly into the Subtitles Room. This allows you to manually edit the subtitles, and then re-produce the file with the updated subtitle text. To extract subtitles from an MKV file, do this: 368
382 CyberLink PowerDirector Help 1. Import the MKV file into the media library, and then place the video file on the timeline. 2. Right-click on the file, select Extract Subtitles, and then the language of the subtitles you want to extract. 3. CyberLink PowerDirector will extract the subtitles into the Subtitle Room. Once you have extracted the subtitles from the file, you can then edit the subtitle text. See Editing Subtitles for more information. Editing Subtitles Once the subtitle markers are added in the Subtitle Room, you can perform a variety of edits on them, including editing subtitle text, changing the subtitle text font, positioning them on the screen, and more. To edit the subtitles in your video production, do this: double-click on each subtitle marker in the timeline (or in the Subtitle Text column), and then enter the text as required. click the button to set the position of the subtitles on the screen. Use the X position slider to set its position on the horizontal, use the Y position slider to set its vertical position. click the button to format the subtitle text as required. If you are creating a 3D video production, use the 3D Depth* slider to set the amount of depth you want the subtitles to have in 3D. Dragging the slider left will make the 3D subtitles seem nearer to the audience (in the foreground), while dragging it right will make them appear farther away (in the background). Note: when using this feature, select the button to enable 3D mode for best editing results. See Previewing in 3D Mode for more information on using this mode. * Optional feature in CyberLink PowerDirector. Check the version table on our web site for detailed versioning information. to remove a subtitle marker, select it and then click the button. Note: once you are done editing the subtitles, you can click the button to export and save them as an SRT file. 369
383 Adding Subtitles Syncing Subtitles To ensure the subtitles in your video production sync with the video dialogue, you can manually adjust the start and end time for each subtitle marker, or the duration they display on screen. To set a start time for a subtitle marker, do either of the following: double click on the Start Time column for the subtitle marker, and then enter a time code. position your cursor at the beginning of the subtitle marker on the subtitle track, and then drag it to the new position. To set an end time for a subtitle, do either of the following: double click on the End Time column for the subtitle marker, and then enter a time code. position your cursor at the end of the subtitle marker on the subtitle track, and then drag it to the new position. You can also easily set the duration of each subtitle marker by selecting it on the subtitle track and then clicking the Duration button above the timeline. In the Duration Settings window, enter in the how long you want it to display, and then click on OK. 370
384 CyberLink PowerDirector Help Chapter 19: Producing Your Project When you are done editing your project, it's time to produce it. Producing simply means compiling (or rendering) the separate elements your project contains into a playable file. As your production may be destined for many different uses, CyberLink PowerDirector has several options suited for all your requirements. You can even produce just your project's audio into a music file, creating your own production soundtrack in one easy step. Utilizing Intelligent SVRT Intelligent SVRT* (Smart Video Rendering Technology) is a proprietary rendering technology from CyberLink that assists in the output of your video productions by suggesting which video profile you should use. Note: * optional feature in CyberLink PowerDirector. Check the version table on our web site for detailed versioning information. Based on the format of original video clips in your project, what portions of the clips were modified (and therefore require rendering during production), and which portions of them were not changed (and thus can be skipped over during the rendering process), Intelligent SVRT suggests the video profile that will result in the best output quality possible, and save you the most time during production. Note: see SVRT: When Is It Used? for more information about the SVRT feature. To utilize Intelligent SVRT, do one of the following: when editing your video production in the Edit window, right-click on the timeline and select Show SVRT Track. in the Produce window, click the Intelligent SVRT button on the Standard 2D or 3D tab. In the Intelligent SVRT dialog that displays, CyberLink PowerDirector auto selects the video profile it suggests you use to output your video production, and some other video profiles you can utilize. 371
 button to quickly switch to the Edit window.")
385 Producing Your Project Note: view the SVRT information in the Edit window for more detailed information, including which video clips need rendering. If you viewing the SVRT information in the Produce window, click the Details (Edit) button to quickly switch to the Edit window. To select a video profile, just select it in the Intelligent SVRT dialog and then click Apply when you are in the Produce window. The selected video profile is auto highlighted and selected as you proceed to produce. The video profile you used is also saved in the dialog, and will always be available when utilizing Intelligent SVRT. Produce Window Click the Produce button to compile your video production into a file that is ready for a variety of uses, including sharing with others, uploading to the Internet, or for burning to disc at a later date. A - Output in a Standard 2D Format, B - Output in a 3D Format, C - Output to a Device, D - Production Profiles (Video/Audio File Formats), E - Upload to Online Web Site, F - Production Preview, G Production Details, H - Profile Settings, I - Production Preferences 372
386 CyberLink PowerDirector Help Note: before producing a movie production, make sure that all of your video clips have the same interlacing format. This is an extremely important step to take before production, as it can drastically affect final video quality. If you produce your movie and find the video quality unsatisfactory, verify if the interlacing format of all of your video clips is the same. If your clips have different interlacing formats, set them all to the same format, then produce your movie again. For more information, see Setting TV (Video Clip Interlacing) Format. In the produce window, select the production option that matches the task you want to perform. You can select one of the following production options: Tab Description Standard 2D Click on the Standard 2D tab if you want to output your production to a 2D video file that you can watch on a computer or burn to a disc at a later date. You can also output just the audio into a audio file for playback on a variety of devices. See Outputting to a Standard 2D File for more information. 360 Video When editing a 360 video project, select this tab to output it as a 360 virtual reality video file. See Producing a 360 Video for more information. 3D Click on the 3D tab if you want to output your production in a 3D video file format. See Outputting in a 3D Format for more information. Device Click on the Device tab if you want to produce your video and then output it to a camcorder or portable device. See Outputting to a Device for more information. Online Click on the Online tab if you want to upload your video to YouTube, Facebook, Dailymotion, or Vimeo. See Uploading Video to Social Web Sites for more information. Note: you can also produce multiple created video production projects at one time in the Edit window using the Batch Produce feature. See Batch Produce for more information. 373
387 Producing Your Project Outputting to a Standard 2D File You can output your video production as a standard 2D video file, which you can watch on a computer, burn to disc, or output to a portable device. You can also output just the audio into a audio file format for playback. Note: if you're not sure which video file format you should output your production in, click the Intelligent SVRT button for assistance. See Utilizing Intelligent SVRT for more information on using this feature. You can output your project to one of the following formats: Note: if you're editing a vertical video 9:16* project, only the H.264 AVC* and audio output options are available. AVI MPEG-2* Windows Media H.264 AVC* H.265 HEVC* XAVC S * Audio file To output your video production in standard 2D, do this: Note: if there is any 3D media in your video production, you must ensure the file's 3D source format is set prior to production to ensure the media displays properly in 2D. CyberLink PowerDirector will incorporate the specified eye frames into your 2D video. See Setting 3D Source Format for more information. 1. Click on the Produce button, and then the Standard 2D tab. 2. Select a video file format by clicking it (or the audio file option if you just want to output your production's audio). Note: if you select the H.265 HEVC or H.264 AVC output format, you must also select the container from the drop-down. You can choose from the.m2ts,.mkv, or.mp4 container file format. If you want to output to an audio file, select the audio file format in the drop-down that displays. You can output in the WMA, WAV, or M4A file format. 374
388 CyberLink PowerDirector Help 3. Select the Profile name/quality you want to use to create the file. This selection determines the video resolution, file size, and overall quality of the outputted file. See Customizing Profiles for more information. Note: in some versions of CyberLink PowerDirector, the H.265 HEVC, H.264 AVC, and WMV video file formats support up to 4K* resolution (Ultra HD). Before production, be sure to select the desired video resolution in the Profile name/quality drop-down. * optional feature in CyberLink PowerDirector. Check the version table on our web site for detailed versioning information. 4. Configure the production options as required. See Configuring Production Options for more information. 5. Check the production details and that the file will be exported to the folder on your computer where you want it. Click if you want to select another export folder or change the name of the produced file. 6. Click the Start button to begin producing your file. Customizing Profiles After you select a file format for your outputted file, depending on the format you selected, there may be quality settings you can customize in the profiles section. These quality settings are called profiles, and can consist of a video file's resolution, bitrate compression, audio compression type, and more. Before you output your production, you may want to create a new quality profile, edit an existing one, or select a different profile and other options from one of the available drop-downs in the production options section. Configuring Production Options Before you begin producing your file, you can select from the following production options: Note: the options that are available depend on the file format you selected and the version of CyberLink PowerDirector that is installed on your computer. Fast video rendering technology: SVRT and Hardware video encoder are options that can reduce production time. The Hardware video encoder 375
389 Producing Your Project option is only enabled if your computer supports hardware acceleration (NVIDIA graphics card that supports CUDA, an AMD graphics card that supports AMD Accelerated Parallel Processing, or a computer with Intel Core Processor Family technology), and you are outputting in a file format that supports it (H.264 and MPEG-4). Dolby Digital 5.1: select this preference if you want to include Dolby Digital 5.1 audio in your produced video file. x.v.color: x.v.color is a color system that can display a wider color range than usual. CyberLink PowerDirector can generate an x.v.color-compliant stream, which is backward compatible with RGB displays, while offering the opportunity to achieve better visual quality if your playback environment is x.v.color ready. Upload a copy to CyberLink Cloud*: if you have a CyberLink Cloud subscription, select this option if you also want the program to upload the produced file to your CyberLink Cloud storage space after production. Note: if you selected to upload a copy of the produced file to CyberLink Cloud, PowerDirector will ask you if you want to convert it before uploading. Click Yes to convert it to an.mp4 file that is playable on a portable device, or No if you want to upload the original produced file. Enable preview during production: select this option to preview your movie during production. Selecting this option will increase the time required to produce your file. Note: * optional feature in CyberLink PowerDirector. Check the version table on our web site for detailed versioning information. Producing a 360 Video You can output your 360 * video file in the H.264 AVC (.MP4) format. Note: * optional feature in CyberLink PowerDirector. Check the version table on our web site for detailed versioning information. To output your video production, do this: Note: for your file to be produced as a 360 video file, your project aspect ratio must be set to 360º. See Setting Project Aspect Ratio for more information. 1. Click on the Produce button, and then the 360 Video tab. 376
390 CyberLink PowerDirector Help 2. Select a video file format by clicking it H.264 AVC (.MP4). 3. Select the Profile name/quality you want to use to create the file. This selection determines the video resolution, file size, and overall quality of the outputted file. Note: H.264 AVC video file format supports up to 4K resolution (Ultra HD). Before production, be sure to select the desired video resolution in the Profile name/quality drop-down. 4. Configure the production options as required. See Configuring Production Options for more information. 5. Check the production details and that the file will be exported to the folder on your computer where you want it. Click if you want to select another export folder or change the name of the produced file. 6. Click the Start button to begin producing your file. Configuring Production Options Before you begin producing, you can select the following production options: Hardware video encoder: this option is only enabled if your computer supports hardware acceleration (NVIDIA graphics card that supports CUDA, an AMD graphics card that supports AMD Accelerated Parallel Processing, or a computer with Intel Core Processor Family technology), and you are outputting in a file format that supports it. Enable preview during production: select this option to preview your movie during production. Selecting this option will increase the time required to produce your file. Note: a 360 video preview is not available during production. Playing Your 360 Video Once the production is complete, the 360 video file is automatically imported into your media library. To play it back, just select it in the media library and then use the playback and 360 controls. See Playing 360 Media Files for more information. 377
391 Producing Your Project 360 video files can also be played on compatible VR (virtual reality) devices, or you can upload and then play it on YouTube and Facebook. See Uploading a 360 Video for more information. Outputting in a 3D Format You can output your production in a 3D* video file format. To output your project to a file, select the 3D tab and then select the desired file format. Note: if you're not sure which video file format you should output your production in, click the Intelligent SVRT button for assistance. See Utilizing Intelligent SVRT for more information on using this feature. * Optional feature in CyberLink PowerDirector. Check the version table on our web site for detailed versioning information. You can output your production to one of the following file formats: Windows Media MPEG-2* H.264 AVC* To output your video production in 3D, do this: Note: if there is any 2D media in your video production, you must convert it to 3D before production. See Power Tools: 2D to 3D for more information. 1. Click on the Produce button, and then the 3D tab. 2. Select a 3D video file format by clicking it. Note: if you select the H.264 AVC output format, you must also select the container from the drop-down. You can choose from the.m2ts,.mkv, or.mp4 container file format. 3. Select the 3D output format from the drop-down. See 3D Output Formats for more information. 4. Select the Profile name/quality you want to use to create the file. This selection determines the video resolution, file size, and overall quality of the outputted file. See Customizing Profiles for more information. 378
392 CyberLink PowerDirector Help Note: in some versions of CyberLink PowerDirector, the H.264 AVC/WMV video file formats support up to 4K* resolution (Ultra HD). Before production, be sure to select the desired video resolution in the Profile name/quality drop-down. * optional feature in CyberLink PowerDirector. Check the version table on our web site for detailed versioning information. 5. Configure the production options as required. See Configuring Production Options for more information. 6. Check the production details and that the file will be exported to the folder on your computer where you want it. Click if you want to select another export folder or change the name of the produced file. 7. Click the Start button to begin producing your file. 3D Output Formats Once you select a video file format (or container), you need to select the 3D output source format. This selection specifies how the 3D content is displayed. You can select one of the following 3D output source formats: Side-by-Side Half Width (L/R): a side-by-side 3D source format optimized for 4:3 or non-hd video productions. Side-by-Side Full Width (L/R): a side-by-side 3D source format optimized for HD video productions.* Note: * 3D MPEG-2 videos cannot be outputted with this source format. The side-by-side full width format is only available when the Ultra version of CyberLink PowerDirector is installed on a 64-bit operating system. H.264 Multi-View Coding: a Multi-View Coding (MVC) source format. Anaglyph: a red/cyan source format. Select this format if you do not have a 3D display device, to watch a 3D video production with anaglyphic 3D glasses. 379
393 Producing Your Project Customizing Profiles After you select a file format for your outputted file, depending on the format you selected, there may be quality settings you can customize in the profiles section. These quality settings are called profiles, and can consist of a video file's resolution, bitrate compression, audio compression type, and more. Before you output your production, you may want to create a new quality profile, edit an existing one, or select a different profile and other options from one of the available drop-downs in the production options section. Configuring Production Options Before you begin producing your file, you can select from the following production options: Note: the options that are available depend on the file format you selected and the version of CyberLink PowerDirector that is installed on your computer. Fast video rendering technology: SVRT and Hardware video encoder are options that can reduce production time. The Hardware video encoder option is only enabled if your computer supports hardware acceleration (NVIDIA graphics card that supports CUDA, an AMD graphics card that supports AMD Accelerated Parallel Processing, or a computer with Intel Core Processor Family technology), and you are outputting in a file format that supports it (H.264 and MPEG-4). Dolby Digital 5.1: select this preference if you want to include Dolby Digital 5.1 audio in your produced video file. x.v.color: x.v.color is a color system that can display a wider color range than usual. CyberLink PowerDirector can generate an x.v.color-compliant stream, which is backward compatible with RGB displays, while offering the opportunity to achieve better visual quality if your playback environment is x.v.color ready. Upload a copy to CyberLink Cloud*: if you have a CyberLink Cloud subscription, select this option if you also want the program to upload the produced file to your CyberLink Cloud* storage space after production. 380
394 CyberLink PowerDirector Help Note: if you selected to upload a copy of the produced file to CyberLink Cloud, PowerDirector will ask you if you want to convert it before uploading. Click Yes to convert it to an.mp4 file that is playable on a portable device, or No if you want to upload the original produced file. Enable preview during production: select this option to preview your movie during production. Selecting this option will increase the time required to produce your file. Note: * optional feature in CyberLink PowerDirector. Check the version table on our web site for detailed versioning information. Outputting to a Device Select the Device tab if you want to output your video production back to a DV or an HDV* tape. Note: you must manually locate the position on your HDV camcorder tape where you want to write back your content to before proceeding. You can also output your production to a file that you can then copy back to an HDD (hard disk drive) camcorder*. Or output it in a file format that is compatible with a number of portable devices, including for an ipod/iphone/ipad, PS3*/PSP/Walkman, Xbox/Zune, and a wide variety of mobile phones*. To output your video production to a device, do this: Note: if there is any 2D media in your video production, you must convert it to 3D before production. See PowerTools: 2D to 3D for more information. 1. Click on the Produce button, and then the Device tab. 2. Select a device type by clicking it. If you are writing back to a DV or HDV camcorder, ensure it is connected and turned on. 3. Select the Profile Type or Profile name/quality you want to use to create the file. This selection determines the video resolution, file size, and overall quality of the outputted file. See Customizing Profiles for more information. 4. Configure the production options as required. See Configuring Production Options for more information. 381
395 Producing Your Project 5. Check the production details and that the file will be exported to the folder on your computer where you want it. Click if you want to select another export folder or change the name of the produced file. 6. Click the Start button to begin producing your file. Customizing Profiles After you select the format of your produced project file, depending on your selection, there may be video quality settings you can customize in the video profiles section. These video quality settings are called profiles, and can consist of your video's resolution, bitrate compression, audio compression type, and more. Before you output your production, you may want to create a new quality profile, edit an existing one, or select a different profile and other options from one of the available drop-downs in the production options section. Configuring Production Options Before you begin producing, you can select from the following production options: Note: the preferences that are available depend on the file format you selected and the version of CyberLink PowerDirector that is installed on your computer. Fast video rendering technology: SVRT and Hardware video encoder are options that can reduce production time (available for creating an HDD camcorder file only). The Hardware video encoder option is only enabled if your computer supports hardware acceleration (NVIDIA graphics card that supports CUDA technology, an AMD graphics card that supports AMD Accelerated Parallel Processing, or a computer with Intel Core Processor Family technology), and you are outputting in a file format that supports it (H.264 and MPEG-4). Dolby Digital 5.1: select this preference if you want to include Dolby Digital 5.1 audio in your produced video file (available for creating an HDD camcorder file only). x.v.color: x.v.color is a new color system that can display a wider color range than usual (available for creating an HDD camcorder file only). CyberLink 382
396 CyberLink PowerDirector Help PowerDirector can generate an x.v.color-compliant stream, which is backward compatible with RGB displays, while offering the opportunity to achieve better visual quality if your playback environment is x.v.color ready. Upload a copy to CyberLink Cloud*: if you have a CyberLink Cloud subscription, select this option if you also want the program to upload the produced file to your CyberLink Cloud* storage space after production. Note: if you selected to upload a copy of the produced file to CyberLink Cloud, PowerDirector will ask you if you want to convert it before uploading. Click Yes to convert it to an.mp4 file that is playable on a portable device, or No if you want to upload the original produced file. Delete the file after the write back is complete: select this option to have CyberLink PowerDirector delete the produced video file after it has written it back to your DV or HDV camcorder. Enable preview during production: select this option to preview your movie during production. Selecting this option will increase the time required to produce your file. Note: * optional feature in CyberLink PowerDirector. Check the version table on our web site for detailed versioning information. Uploading Video to Online Media Sites Click on the Online tab to upload your video production to one of the following online media web sites: Facebook YouTube Dailymotion Vimeo Niconico Douga Youku Note: in some versions of CyberLink PowerDirector, you can produce and upload up to 4K* resolution (Ultra HD) video to social web sites. Before production, be sure to select the desired video resolution in the Profile name/quality drop-down. 383
397 Producing Your Project Uploading Video to Facebook To upload your video to Facebook, do this: 1. Click on the Produce button, and then the Online tab. 2. Click the Facebook button. 3. Select the desired quality of your video from the Profile type drop-down list. 4. Enter a Title and Description for your video in the fields provided. The text you enter is included on Facebook once uploaded. 5. Configure the production options as required. See Configuring Production Options for more information. 6. Specify the Export folder, or the location where the produced video file that will be uploaded is saved. Click if you want to select another export folder or change the name of the produced file. 7. Click Start to begin. 8. Click Authorize and then grant CyberLink PowerDirector permission to upload videos to your Facebook account by following the steps in the Facebook Authorization windows. 9. CyberLink PowerDirector proceeds to produce and upload the video file. Click Close when done to return to the program. Configuring Production Options Before you begin producing, you can select from the following production options: Hardware video encoder: this option is only enabled if your computer supports hardware acceleration (NVIDIA graphics card that supports CUDA, an AMD graphics card that supports AMD Accelerated Parallel Processing, or a computer with Intel Core Processor Family technology), and you are outputting in a file format that supports it. Enable preview during production: select this option to preview your movie during production. Selecting this option will increase the time required to produce your file. 384
398 CyberLink PowerDirector Help Uploading Video to YouTube To upload your video to YouTube, do this: Note: if the size/length of the your video exceeds the maximum allowed, CyberLink PowerDirector will separate the video into smaller/shorter videos, upload these videos, and then create a playlist for you on YouTube. 1. Click on the Produce button, and then the Online tab. 2. Click the YouTube Videos button. 3. Select the desired quality of your video from the Profile type drop-down. The quality you select will result in the corresponding quality option being available after the video is fully processed on YouTube. Note: the quality option available on YouTube is also dependent on the original captured video quality and the bandwidth of the user who is watching the video. 4. Enter a Title and Description for your video in the fields provided. The text you enter is included on YouTube once uploaded. Also select one of the Video categories and enter in some keyword Tags that users can search for to find your video. 5. Set whether you want the video to be Public or Private once it is uploaded to YouTube. Note: sign in to DirectorZone and then select Share in CyberLink DirectorZone Video Gallery if you want to show others how you adjusted the clips in your video production. When selected, an animated version of your project's storyboard displays, along with your uploaded video, on DirectorZone. 6. Configure the production options as required. See Configuring Production Options for more information. 7. Specify the Export folder, or the location where the produced video file that will be uploaded is saved. Click if you want to select another export folder or change the name of the produced file. 8. Click Start to begin. 9. Click Authorize and then grant CyberLink PowerDirector permission to upload videos to your YouTube account by following the steps in the YouTube Authorization windows. 385
399 Producing Your Project 10. CyberLink PowerDirector proceeds to produce and upload the video file. Click Close when done to return to the program. Uploading to YouTube 3D If the video production you are uploading is a 3D production, select the Share as a 3D video* option to upload it to YouTube in a 3D video source format. Once uploaded, you will be able to watch it on YouTube in 3D. Note: * optional feature in CyberLink PowerDirector. Check the version table on our web site for detailed versioning information. Configuring Production Options Before you begin producing, you can select the following production preference: Hardware video encoding: this option is only enabled if your computer supports hardware acceleration (NVIDIA graphics card that supports CUDA, an AMD graphics card that supports AMD Accelerated Parallel Processing, or a computer with Intel Core Processor Family technology), and you are outputting in a file format that supports it. Enable preview during production: select this option to preview your movie during production. Selecting this option will increase the time required to produce your file. Uploading Video to Dailymotion To upload your video to Dailymotion, do this: Note: if the size/length of the your video exceeds the maximum allowed, CyberLink PowerDirector will separate the video into smaller/shorter videos, upload these videos, and then create a playlist for you on Dailymotion. 1. Click on the Produce button, and then the Online tab. 2. Click the Dailymotion button. 3. Select the desired quality of your video from the Profile type drop-down. The quality you select will result in the corresponding quality option being available after the video is fully processed on Dailymotion. 386
400 CyberLink PowerDirector Help Note: the quality option available on Dailymotion is also dependent on the original captured video quality and the bandwidth of the user who is watching the video. 3. Enter a Title and Description for your video in the fields provided. The text you enter is included on Dailymotion once uploaded. Also select one of the Video categories and enter in some keyword Tags that users can search for to find your video. 4. Set whether you want the video to be Public or Private once it is uploaded to Dailymotion. Note: sign in to DirectorZone and then select Share in CyberLink DirectorZone Video Gallery if you want to show others how you adjusted the clips in your video production. When selected, an animated version of your project's storyboard displays, along with your uploaded video, on DirectorZone. 5. Configure the production options as required. See Configuring Production Options for more information. 6. Specify the Export folder, or the location where the produced video file that will be uploaded is saved. Click if you want to select another export folder or change the name of the produced file. 7. Click Start to begin. 8. Click Authorize and then grant CyberLink PowerDirector permission to upload videos to your Dailymotion account by following the steps in the Dailymotion Authorization windows. 9. CyberLink PowerDirector proceeds to produce and upload the video file. Click Close when done to return to the program. Configuring Production Options Before you begin producing, you can select the following production options: Hardware video encoder: this option is only enabled if your computer supports hardware acceleration (NVIDIA graphics card that supports CUDA, an AMD graphics card that supports AMD Accelerated Parallel Processing, or a computer with Intel Core Processor Family technology), and you are outputting in a file format that supports it. 387
401 Producing Your Project Enable preview during production: select this option to preview your movie during production. Selecting this option will increase the time required to produce your file. Uploading Video to Vimeo To upload your video to Vimeo, do this: Note: if the size/length of the your video exceeds the maximum allowed, CyberLink PowerDirector will separate the video into smaller/shorter videos, upload these videos, and then create a playlist for you on Vimeo. 1. Click on the Produce button, and then the Online tab. 2. Click the Vimeo button. 3. Select the desired quality of your video from the Profile type drop-down. The quality you select will result in the corresponding quality option being available after the video is fully processed on Vimeo. Note: the quality option available on Vimeo is also dependent on the original captured video quality and the bandwidth of the user who is watching the video. 4. Enter a Title and Description for your video in the fields provided. The text you enter is included on Vimeo once uploaded. Also enter in some keyword Tags that users can search for to find your video. 5. Set whether you want the video to be Public or Private once it is uploaded to Vimeo. Note: sign in to DirectorZone and then select Share in CyberLink DirectorZone Video Gallery if you want to show others how you adjusted the clips in your video production. When selected, an animated version of your project's storyboard displays, along with your uploaded video, on DirectorZone. 6. Configure the production options as required. See Configuring Production Options for more information. 7. Specify the Export folder, or the location where the produced video file that will be uploaded is saved. Click if you want to select another export folder or change the name of the produced file. 8. Click Start to begin. 388
402 CyberLink PowerDirector Help 9. Click Authorize and then grant CyberLink PowerDirector permission to upload videos to your Vimeo account by following the steps in the Vimeo Authorization windows. 10. CyberLink PowerDirector proceeds to produce and upload the video file. Click Close when done to return to the program. Configuring Production Options Before you begin producing, you can select the following production options: Hardware video encoder: this option is only enabled if your computer supports hardware acceleration (NVIDIA graphics card that supports CUDA, an AMD graphics card that supports AMD Accelerated Parallel Processing, or a computer with Intel Core Processor Family technology), and you are outputting in a file format that supports it. Enable preview during production: select this option to preview your movie during production. Selecting this option will increase the time required to produce your file. Uploading Video to Niconico Douga To upload your video to Niconico Douga, do this: Note: if the size/length of the your video exceeds the maximum allowed, CyberLink PowerDirector will separate the video into smaller/shorter videos, upload these videos, and then create a playlist for you on Niconico Douga. 1. Click on the Produce button, and then the Online tab. 2. Click the Niconico Douga button. 3. Enter your Niconico Douga Username and Password. If you don't have an account, click the Sign Up to Niconico link to get one. 4. Select the desired quality of your video from the Profile type drop-down. The quality you select will result in the corresponding quality option being available after the video is fully processed on Niconico Douga. Note: the quality option available on Niconico Douga is also dependent on the original captured video quality and the bandwidth of the user who is watching the video. 389
403 Producing Your Project 5. Enter a Title and Description for your video in the fields provided. The text you enter is included on Niconico Douga once uploaded. Also enter in some keyword Tags that users can search for to find your video. 6. Set whether you want the video to be Public or Private once it is uploaded to Niconico Douga. Note: sign in to DirectorZone and then select Share in CyberLink DirectorZone Video Gallery if you want to show others how you adjusted the clips in your video production. When selected, an animated version of your project's storyboard displays, along with your uploaded video, on DirectorZone. 7. Configure the production options as required. See Configuring Production Options for more information. 8. Use the player controls in the preview window to find the frame of video in your production you want to use as the video's thumbnail on the Niconico Douga web site, and then click the Set Thumbnail button. 9. Specify the Export folder, or the location where the produced video file that will be uploaded is saved. Click if you want to select another export folder or change the name of the produced file. 10. Click Start to begin. 11. Click Authorize and then grant CyberLink PowerDirector permission to upload videos to your Niconico Douga account by following the steps in the Niconico Douga Authorization windows. 12. CyberLink PowerDirector proceeds to produce and upload the video file. Click Close when done to return to the program. Configuring Production Options Before you begin producing, you can select the following production options: Hardware video encoder: this option is only enabled if your computer supports hardware acceleration (NVIDIA graphics card that supports CUDA, an AMD graphics card that supports AMD Accelerated Parallel Processing, or a computer with Intel Core Processor Family technology), and you are outputting in a file format that supports it. 390
404 CyberLink PowerDirector Help Enable preview during production: select this option to preview your movie during production. Selecting this option will increase the time required to produce your file. Uploading Video to Youku To upload your video to Youku, do this: Note: if the size/length of the your video exceeds the maximum allowed, CyberLink PowerDirector will separate the video into smaller/shorter videos, upload these videos, and then create a playlist for you on Youku. 1. Click the Youku button. 2. Select the desired quality of your video from the Profile type drop-down. The quality you select will result in the corresponding quality option being available after the video is fully processed on Youku. Note: the quality option available on Youku is also dependent on the original captured video quality and the bandwidth of the user who is watching the video. 3. Enter a Title and Description for your video in the fields provided. The text you enter is included on Youku once uploaded. Also select one of the Video categories and enter in some keyword Tags that users can search for to find your video. 4. Set whether you want the video to be Public or Private once it is uploaded to Dailymotion. Note: sign in to DirectorZone and then select Share in CyberLink DirectorZone Video Gallery if you want to show others how you adjusted the clips in your video production. When selected, an animated version of your project's storyboard displays, along with your uploaded video, on DirectorZone. 5. Configure the production options as required. See Configuring Production Options for more information. 6. Specify the Export folder, or the location where the produced video file that will be uploaded is saved. Click if you want to select another export folder or change the name of the produced file Click Start to begin.
405 Producing Your Project 8. Click Authorize and then grant CyberLink PowerDirector permission to upload videos to your Youku account by following the steps in the Youku Authorization windows. 9. CyberLink PowerDirector proceeds to produce and upload the video file. Click Close when done to return to the program. Configuring Production Options Before you begin producing, you can select the following production options: Hardware video encoder: this option is only enabled if your computer supports hardware acceleration (NVIDIA graphics card that supports CUDA, an AMD graphics card that supports AMD Accelerated Parallel Processing, or a computer with Intel Core Processor Family technology), and you are outputting in a file format that supports it. Enable preview during production: select this option to preview your movie during production. Selecting this option will increase the time required to produce your file. Uploading a 360 Video On the Online tab you can upload your 360 * video to either Facebook, YouTube, or Vimeo. Once uploaded, you can click and drag on video player window, or use any available 360 controls, to rotate and view the entire 360 video. Note: in some versions of PowerDirector, you can produce and upload up to 4K resolution (Ultra HD) video to social web sites. Before production, be sure to select the desired video resolution in the Profile name/quality drop-down. * optional feature in CyberLink PowerDirector. Check the version table on our web site for detailed versioning information. Uploading 360 Video to Facebook To upload your 360 video to Facebook, do this: 1. Click on the Produce button, and then the Online tab. 2. Click the Facebook button. 3. Select the desired quality of your video from the Profile type drop-down list. 392
406 CyberLink PowerDirector Help 4. Enter a Title and Description for your video in the fields provided. The text you enter is included on Facebook once uploaded. 5. Configure the production options as required. See Configuring Production Options for more information. 6. Check the production details and that the file will be exported to the folder on your computer where you want it. Click if you want to select another export folder or change the name of the produced file. 7. Click Start to begin. 8. Click Authorize and then grant PowerDirector permission to upload videos to your Facebook account by following the steps in the Facebook Authorization windows. 9. PowerDirector proceeds to produce and upload the video file. Click Close when done to return to the program. Configuring Production Options Before you begin producing, you can select the following production options: Hardware video encoder: this option is only enabled if your computer supports hardware acceleration (NVIDIA graphics card that supports CUDA, an AMD graphics card that supports AMD Accelerated Parallel Processing, or a computer with Intel Core Processor Family technology), and you are outputting in a file format that supports it. Enable preview during production: select this option to preview your movie during production. Selecting this option will increase the time required to produce your file. Note: a 360 video preview is not available during production. Uploading 360 Video to YouTube To upload your 360 video to YouTube, do this: Note: if the size/length of the your video exceeds the maximum allowed, PowerDirector will separate the video into smaller/shorter videos, upload these videos, and then create a playlist for you on YouTube. 393
407 Producing Your Project 1. Click on the Produce button, and then the Online tab. 2. Click the YouTube Videos button. 3. Select the desired quality of your video from the Profile type drop-down. The quality you select will result in the corresponding quality option being available after the video is fully processed on YouTube. Note: the quality option available on YouTube is also dependent on the original captured video quality and the bandwidth of the user who is watching the video. 4. Enter a Title and Description for your video in the fields provided. The text you enter is included on YouTube once uploaded. Also select one of the Video categories and enter in some keyword Tags that users can search for to find your video. 5. Set whether you want the video to be Public or Private once it is uploaded to YouTube. Note: sign in to DirectorZone and then select Share video on DirectorZone if you want to show others how you adjusted the clips in your video production. When selected, your uploaded video also displays on DirectorZone. 6. Configure the production options as required. See Configuring Production Options for more information. 7. Check the production details and that the file will be exported to the folder on your computer where you want it. Click if you want to select another export folder or change the name of the produced file. 8. Click Start to begin. 9. Click Authorize and then grant PowerDirector permission to upload videos to your YouTube account by following the steps in the YouTube Authorization windows. 10. PowerDirector proceeds to produce and upload the video file. Click Close when done to return to the program. Configuring Production Options Before you begin producing, you can select the following production options: 394
408 CyberLink PowerDirector Help Hardware video encoder: this option is only enabled if your computer supports hardware acceleration (NVIDIA graphics card that supports CUDA, an AMD graphics card that supports AMD Accelerated Parallel Processing, or a computer with Intel Core Processor Family technology), and you are outputting in a file format that supports it. Enable preview during production: select this option to preview your movie during production. Selecting this option will increase the time required to produce your file. Note: a 360 video preview is not available during production. Uploading 360 Video to Vimeo To upload your 360 video to Vimeo, do this: Note: if the size/length of the your video exceeds the maximum allowed, CyberLink PowerDirector will separate the video into smaller/shorter videos, upload these videos, and then create a playlist for you on Vimeo. 1. Click on the Produce button, and then the Online tab. 2. Click the Vimeo button. 3. Select the desired quality of your video from the Profile type drop-down. The quality you select will result in the corresponding quality option being available after the video is fully processed on Vimeo. Note: the quality option available on Vimeo is also dependent on the original captured video quality and the bandwidth of the user who is watching the video. 4. Enter a Title and Description for your video in the fields provided. The text you enter is included on Vimeo once uploaded. Also enter in some keyword Tags that users can search for to find your video. 5. Set whether you want the video to be Public or Private once it is uploaded to Vimeo. Note: sign in to DirectorZone and then select Share in CyberLink DirectorZone Video Gallery if you want to show others how you adjusted the clips in your video production. When selected, an animated version of your project's storyboard displays, along with your uploaded video, on DirectorZone. 395
409 Producing Your Project 6. Configure the production options as required. See Configuring Production Options for more information. 7. Check the production details and that the file will be exported to the folder on your computer where you want it. Click if you want to select another export folder or change the name of the produced file. 8. Click Start to begin. 9. Click Authorize and then grant CyberLink PowerDirector permission to upload videos to your Vimeo account by following the steps in the Vimeo Authorization windows. 10. CyberLink PowerDirector proceeds to produce and upload the video file. Click Close when done to return to the program. Configuring Production Options Before you begin producing, you can select the following production options: Hardware video encoder: this option is only enabled if your computer supports hardware acceleration (NVIDIA graphics card that supports CUDA, an AMD graphics card that supports AMD Accelerated Parallel Processing, or a computer with Intel Core Processor Family technology), and you are outputting in a file format that supports it. Enable preview during production: select this option to preview your movie during production. Selecting this option will increase the time required to produce your file. Note: a 360 video preview is not available during production. Batch Produce CyberLink PowerDirector lets you produce multiple projects an once using the Batch Produce feature. In the Batch Produce window, you can import multiple CyberLink PowerDirector projects in the.pds format and output them as video files in a variety of formats all in one sitting. To perform a batch production, do this: 396
410 CyberLink PowerDirector Help Note: if you are currently working on a video production, you must save and close it before you can perform a batch production. 1. Select File > Batch Produce from the menu. 2. Click, and then browse to and select the CyberLink PowerDirector project you want to add to the production queue. 3. If required, click on the file name in the Outputted File Name column to change the name of the outputted video file. 4. If required, click on follows: to edit the task's production profile settings as Note: if required, click on the Intelligent SVRT button for assistance on selecting an output profile. See Utilizing Intelligent SVRT for more information. Export folder: if required, select another location on your computer where the file will be exported to by clicking to set another export folder. Production type: select whether you want to output the selected task as a video file, video file for a device, or a 3D* video file. Media file format: select the format of the outputted video file from this drop- down. Note: based on your first two selections, the available drop-downs that follow will differ. Use them to select 3D* output format, profile, etc. Click OK to close the Profile Settings window and set your changes. 5. If your computer supports hardware acceleration (NVIDIA graphics card that supports CUDA, an AMD graphics card that supports AMD Accelerated Parallel Processing, or a computer with Intel Core Processor Family technology) and you are outputting in a file format that supports it (H.264 and MPEG-4), select the Enable GPU hardware video encoder automatically option if you want C yberlink PowerDirector to use it, when available, during the batch production. 6. Click Start to begin the production of all the tasks in the list. Note: select the Shut down computer after production option to have CyberLink PowerDirector shut down the program and your computer once all the tasks are produced. 397

411 Creating Discs Chapter 20: Creating Discs After you finish creating your video production, click on Create Disc to burn your movie onto a disc, complete with a disc menu. You can also import additional videos and CyberLink PowerDirector projects, creating multi-layered professional looking disc in just a few simple steps. A - Disc Content Tab, B - Menu Preferences Tab, C - 2D Disc Preferences Tab, D - 3D Disc Preferences Tab, E - Disc Menu Font Properties, F - Disc Menu Preview Window, G - Set Buttons Per Page, H - Burn to Disc, I - Preview Disc Menu, J - Disc Menu Properties, K - Menu Navigation Controls, L - Disc Content Discs created in CyberLink PowerDirector can have one or more titles (video files or CyberLink PowerDirector projects), which are called Scenes on the final disc. Each title (or Scene) can have multiple chapters and include subtitles. To create a disc menu and then burn your video production to disc, do this: 1. Click on the Create Disc button to open the Create Disc window. The video production you were working on is automatically imported into the window. 398
412 CyberLink PowerDirector Help 2. On the Content tab, click the and buttons to import additional titles (video files and/or PowerDirector projects) onto your disc. See Importing Additional Disc Content for more detailed information. 3. Click on the Menu Preferences tab and then select the menu in the library that you want to use on your disc. See Selecting a Disc Menu for more detailed information on selecting disc menus, or for information on customizing your own. 4. Edit the selected disc menu's properties, including customizing menu text, the number of buttons, background music, and more. See Editing Disc Menu Properties for more information. 5. If required, right-click on your selected disc menu's thumbnail in the library and select Modify to perform advanced editing on it in the Menu Designer. You can also create new disc menus and 3D* menus in the Menu Designer. See Customizing Disc Menus in the Menu Designer for more detailed information. 6. The last step is to burn your production to disc. Do one of the following: if your project is a standard 2D video production, click the 2D Disc tab. See Burning a Disc in 2D for more information. if your project is a 3D* video production, click the 3D Disc tab. See Burning a Disc in 3D for more information. Note: * optional feature in CyberLink PowerDirector. Check the version table on our web site for detailed versioning information. Importing Additional Disc Content The Content tab contains your current video production that will be burned to disc. On this tab you can import additional titles (video files and CyberLink PowerDirector projects), which, with your current video production, are called Scenes on the disc menu. On the Content tab you can add additional titles to your disc by doing the following: 399

413 Creating Discs click on to import additional video files that you want on your created disc. click on to import any saved CyberLink PowerDirector projects that you want on your created disc. Note: as you add content, click on the M enu Structure button to view the structure of your disc menu. In the structure tree you can see all the titles/scenes (videos and projects) on your disc and any chapters within each title. While importing videos and CyberLink PowerDirector projects on to the Content tab, use the following buttons to: hover your mouse over the title and then click on on its thumbnail to play back the title. - edit the selected title in the Edit window of CyberLink PowerDirector. - remove the selected title from the disc menu. Click on Show Chapters to view the chapters in the selected title (video or project). You can click the button to set/edit the selected title's chapters in the Chapters Room. For more information on editing chapters see Adding Chapters. Note: as you add content to your disc, note the capacity information at the bottom of the window. Click to toggle the disc capacity display or to view the Disc Production Summary at any time. When you are done adding all the content you want on your disc, you can reorder all the titles simply by dragging them to the position you want. 400


414 CyberLink PowerDirector Help The order of the titles on the Content tab is the order they are burned to disc. Selecting a Disc Menu Click on the Menu Preferences tab to select the disc menu template in your menu library that you want to include on your disc. To preview the pages in a disc menu, just click on its thumbnail in the library. Note: if you want to create a new disc menu from scratch, click the Create M enu button at the top of the Menu Preferences tab. See Customizing Disc Menus in the Menu Designer for more information on customizing it. Most of the disc menu templates in CyberLink PowerDirector are multi-layered, and can consist of the following pages: Note: if you do not want to include a menu on your burned disc, select the No M enu template in the menu library. When you play the burned disc, it will automatically start playing the first title/scene. a main menu home (Root menu) page. This is the first menu page that displays when you play the disc. It can contain a menu opening, motion thumbnails, and more. 401
415 Creating Discs Note: you can choose not to include a root menu on your disc. See Configuring Disc Menu Settings for more information. if you have more than one title (video or project), your disc will have a Scenes page in the Disc Preview Window. Note that when in the Menu Designer, it is called the Titles page. If you choose to not include a root menu, the scenes page becomes the page displayed when you play the disc. a Chapters page where you can navigate through your titles. This page is available if you added chapters in the Chapter Room. a Subtitles page that lets you enable/disable the subtitles on your disc. Note: the Subtitles page in a disc menu is only available if you selected Create subtitles for disc when creating subtitles in the Subtitle Room. See Adding Subtitles for more information. To select the disc menu template for your disc, do either of the following: Note: after you select your menu template be sure to edit its properties. You can edit the text, menu music, and more right in the disc menu preview window on the right. See Editing Disc Menu Properties for more information. You can also customize a disc menu's buttons, background, individual pages, and much more in the Menu Designer. See Customizing Disc Menus in the Menu Designer for more information. Right-click on the menu template's thumbnail in the menu library that you want to use and then select: Apply to set the menu page to the current menu page you are viewing in the disc menu preview window. For example, if you navigate to the scenes page in the disc menu preview window and you select Apply, that menu template is only used on the scenes page of the menu. Apply to All Pages to apply the menu template to all the pages in your menu, i.e. home/root, titles/scenes, chapters. Click on a menu template thumbnail in the menu library that you want to use and then select: Apply to set the menu page to the current menu page you are viewing in the disc menu preview window. For example, if you navigate to a chapters page in the disc menu preview window and you select Apply, that menu template is only used on the chapters page of the menu. 402
416 CyberLink PowerDirector Help Apply to All Pages to apply the menu template to all the pages in your menu, i.e. home/root, titles/scenes, chapters. Note: if required, you can download and import additional disc menu templates from DirectorZone. See Downloading from DirectorZone for more information. Editing Disc Menu Properties CyberLink PowerDirector gives you full creative control over the look of your disc menu. Use the menu navigation controls in the disc menu preview window to preview the design and behavior of the selected disc menu. If you want to view the titles/scenes, chapters, or subtitles page, click in the disc menu preview window on the right, and then use the button and the other menu navigation controls to navigate through the disc menu. Or click the Preview button at the bottom of the window to view what your burned disc will look like when played on a disc player. Note: to perform more advanced editing on a selected disc menu template using the Menu Designer, right-click on the menu template in the menu library and then select M odify. See Customizing Disc Menus in the Menu Designer for more information. Configuring Disc Menu Settings At the bottom of the Menu Preferences tab you can configure the disc menu settings as follows: Include root menu: select this option if you want a root menu or home page on your disc. If you deselect this option, the scenes page is displayed by default when you play the burned disc. Include menu opening video: deselect this option if you don't want the disc menu to include the menu opening video that is available in some disc menus. This option is different than the first play video, which you can include whether this item is selected or not. Show thumbnail index: select to add numbering to each scene and chapter thumbnail on your menu pages. Enable motion thumbnail: deselect this option if you want to disable the motion preview in the video title thumbnails in your disc menu. 403
417 Creating Discs Editing Disc Menu Text To edit the menu text that appears on the menu page, including clickable menu button text, double-click on it in the disc menu preview window, and then enter the new text. You can modify menu text style, size, and alignment using the disc menu font properties options located at the top of the disc menu window. To change the position of any menu text on your menu, just click and drag it to the new position. Note: when changing disc menu text position in the preview window, click to enable the TV safe zone to help with the placement of the selected clip in the video display area. Setting Disc Menu Music Some of the pre-designed disc menu templates contain menu music. In the disc menu properties area, you can: click on to edit or replace the menu's background music. See Setting Background Music for more information. click to remove the current background music from the disc menu. Setting Background Music If you are using background music in your disc menu, click the perform the following functions: button to Note: the final duration of your disc menu's background music is dependent on the time entered in the Duration field in the Playback Mode Settings window, not the length of the music file used. See Setting Disc Playback Mode for more information on setting your menu's duration. click the button to add or replace the current disc menu background music. if required, trim the background music using the player controls and the mark-in/mark-out indicators. 404

418 CyberLink PowerDirector Help if required, set the menu music to gradually Fade-in or Fade-out. if the length of your menu music file is not as long as the specified duration, select the Auto repeat option to loop it. When you are done setting the background music options, click Apply to All Pages to set the music for all the pages in the disc menu, or Apply to set it just for the current menu page you are viewing in the disc menu preview window. Adding a First Play Video Use this option to add a video (or an existing CyberLink PowerDirector project) as a first play video to your created disc. The first play video plays automatically when the disc is inserted into a disc player, before the disc menu loads. No navigation buttons are available during the first play, and viewers cannot fast forward past this segment. In a professional production, this is usually a copyright notice or warning. However, you may prefer to use a personal introduction or other video clip instead. To set a video clip as the first play video, do this: click click click and select the video that you want. to remove the video set as the first play video. to preview the first play video. Note: if you are creating a 3D video production and burning it to disc in 3D, you can use a 3D video clip as the first play video. Once added, click to set the 3D source format of the clip. See Setting 3D Source Format for more detailed information. 405
419 Creating Discs Setting Disc Playback Mode Click the button open the Playback Mode Settings window and set how the disc plays back any scenes/titles that are on your disc. Note: disc playback mode determines how the titles/scenes (videos and projects added on the Content tab) play back on your disc, not the chapters contained within each title/scenes. If your disc only has one title on it, the settings for disc playback mode have no affect on the burned disc. In the Playback Mode Settings window you can set the following: choose from one of the three available playback modes based on the available descriptions. Your disc will follow the selected behavior when inserted or play is pressed on your disc player. Auto menu time out: select this option if you want the disc content to play automatically when you insert the disc into a disc player. When selected, your content plays automatically after displaying the disc menu for the specified duration. If you do not select this option, your menu loops endlessly until you press the play button on your disc player. Duration: enter in the duration the content (background video, background music, etc.) in your disc menu is displayed. The minimum duration allowed is 10 seconds, while your disc can be up to 99 seconds long before it loops back to the beginning. Note: the duration you enter is also the length of your menu's background music, even if the selected music file's length is longer than the duration specified. Specifying Buttons Per Page When creating a disc with multiple titles or chapters, you can select the number of buttons that display on each of the Titles (Scenes) and Chapters menu pages. To change the number of buttons that display on a title or chapter page, you must first navigate to the page via the disc menu preview window. Next select the number of Buttons per page you want on each title and chapter page from the drop-down above the disc menu preview window. Each individual title and chapter page can have a different number of buttons, allowing you to make each page unique. 406
420 CyberLink PowerDirector Help Note: the maximum number of buttons that can display on each menu page is dependent on the design of the menu template. If you want more buttons on a page, see Adding Menu Buttons for more information. Modifying Menu Object Properties You can modify the properties of a disc menu's objects directly in the preview window, in both the Create Disc module and the Menu Designer. Menu objects include text, added images, video thumbnails, menu buttons, navigation buttons, etc. To modify the properties of a menu object, just select it and then perform any of the following options: Modify Menu Object Position Align Menu Objects Modifying Menu Object Position You can change the position and orientation of the title text, images, thumbnails, buttons, etc. in the disc menu. Note: click on to use the TV safe zone and grid lines to help with the precise placement of the precise placement of buttons, images, text, etc. on your menu pages. Select Snap to Reference Lines to have the objects snap to the grid lines, TV safe zone, and boundary of the menu area. To modify menu object position or orientation: click on a menu object, and then drag it to a new position. when in the Menu Designer, click on above the selected object and then drag it right or left to change its orientation. when in the Menu Designer, select images and buttons, and then click and drag a corner or side to resize them. Aligning Menu Objects To align menu objects in the disc menu, select the object and then the desired alignment from the drop-down. If you just want to align the buttons, click the button at the top of the Menu Designer window. 407

421 Creating Discs Customizing Disc Menus in the Menu Designer You can perform more advanced editing on your disc menu in the Menu Designer*. You can also create a brand new disc menu template from scratch. To edit an existing disc menu, right-click on the disc menu template in the library on the Menu Preferences tab and then select on Modify. To create a new disc menu template, click on the Create Menu button. A - Change Object Properties Tab, B - Menu Properties, C - Set Button Properties Tab, D - Menu Page View (Edit page), E - Add Media/Image/Text/Button, F - Set Title/Scene Button Type, G - Mode Selection, H - Zoom Tools, I - TV Safe Zone/Grid Lines, J - Align Objects, K - Select Video Effect, L - Set Menu Motion, M - Navigation Buttons, N - Upload to Internet, O - Enable 3D Depth, P - Thumbnail Button, Q - Text Menu Button 408
422 CyberLink PowerDirector Help Note: * optional feature in CyberLink PowerDirector. Check the version table on our web site for detailed versioning information. In the Menu Designer you can edit all three possible disc menu pages. Note that the titles/scenes (videos and projects on your disc) and chapters pages always have the same layout. To modify a specific page, select Root Menu, Titles/Chapters Menu, or Subtitles Menu from the Edit page drop-down menu. Note: the subtitles menu page is only available if you selected Create subtitles for disc when you added subtitles in the Subtitle Room. See Adding Subtitles for more information. Mode Selection, Zoom Tools, and Context Menu When customizing menus in the Menu Designer use the mode selection, zoom tools, and context menu for assistance. Note: when modifying menus in the Menu Designer, use the player controls to preview, and click to preview the menu at full screen. Mode Selection In the Menu Designer there are two selection modes. Click the button to enable object selection. When selected, you can freely click and move the menu text, buttons, images, etc. to different areas of the menu. Click the button to enable a mode that lets you drag the view in the Menu Designer. This mode is especially helpful if zoomed in on the disc menu. Zoom Tools Use the zoom tools and to zoom out and in on the preview window when modifying the disc menu. You can also select the viewer zoom amount from 409
423 Creating Discs the drop-down to set the size of the disc menu preview. Select Fit to resize the disc menu so that is fits in the Menu Designer's viewer window. Note: you can also hold down the Ctrl key on your keyboard and then use the mouse scroll wheel to zoom in or out on the disc menu. Context Menu When in the Menu Designer, you can right-click on an item in the preview window to gain access to some functionality you may find useful. In the context menu you can: insert images, title text, and buttons onto the menu page. cut, copy, paste, or delete items on the menu page. bring the selected item forward, or send it backward. quickly align selected items in the menu page how you want them. select Align All Menu Buttons to uniformly align all of the menu buttons on the current menu page. go to Full Screen View for a larger view of the current menu page. Setting Menu Opening and Background You can import a video that plays in the background while the menu is loading. Usually called a menu opening, it is seen on most commercial discs before the menu options display. You can also add or replace the background of your disc menu with an image or a video file, or set a video effect that is applied to the background of your disc menu. Including a Menu Opening To include a video as the menu opening, click the button, select the Import User Video For Menu Opening option, and then the video you want to use. 410
424 CyberLink PowerDirector Help Note: the Include menu opening video option on the Menu Preferences tab must be selected for this feature to work when burned to disc. Setting Menu Background To set or replace the background image of your menu, with either an image or a video file. To do this, click the button and then select the Set Background Image or Video option. Once selected, set how the background media is displayed in the Background Media Adjustment Settings window. Note: to remove the imported background image or video, just click the button. Adjusting Menu Background's Media Settings When you import video clips and images to use as a background for your disc menu, the Background Media Adjustment Settings window displays. In the window you can set the following: Stretch Setting: on this tab, select what you want CyberLink PowerDirector to do if the video clip or image you selected as the background has a different aspect ratio than your disc menu template. Select Apply to all menu pages to use this setting on all menu pages. Set Source Format: if you are outputting a 3D video production as a 3D-BD* disc, click on this tab to set the 3D source format of the background video you imported. See Setting 3D Source Format for more detailed information. Note: * optional feature in CyberLink PowerDirector. Check the version table on our web site for detailed versioning information. Adding Motion to Background Images If you imported an image to use as the menu's background, you can select a motion effect to make your menu more engaging. To do this, select from the available motion options in the drop-down below the preview window. 411

425 Creating Discs Selecting a Video Effect Background To apply a video effect to your disc menu's background, click on the button at the bottom of the designer window, and then select the video effect from the list. Use any available settings to customize the effect to your liking. Adding Title Text and Images to Menus You can add additional title text or import images into the disc menus. Adding Title Text to Disc Menus To add additional title text to your disc menu, do this: Note: if you want to add more text menu buttons, see Adding Menu Buttons. 1. Click the button. 2. Type in the text you want to use. See Modifying Text Object and Image Properties for information on customizing the added title text's properties. Adding Images in Disc Menus Click the button to add an image to your disc menu. If you want to add an image as the menu's background, see Setting Menu Background. 412
426 CyberLink PowerDirector Help See Modifying Text Object and Image Properties if you would like to use chroma key to make the image in the disc menu transparent. You can also add shadows, reflections and more on the inserted image. Modifying Text Object and Image Properties Click on the tab to change the properties of text objects (disc menu text, text menu buttons, or inserted title text). You can also change the properties of images you added into the disc menu. Note: you cannot edit the disc menu text or text menu button content in Menu Designer window. You must edit this text in the disc menu preview window. See Editing Disc Menu Text for more information. Applying Preset Character Types to Text Objects Select the Character Presets option to apply a defined character preset to a text object. After you have applied a defined character preset you can refine it using the other properties on the tab, if required. To apply a character preset to a text object, ensure the text box is selected in the preview window and then click on a character preset in the list. Note: once you are done customizing all of the text properties on the tab, click on to save the character preset to your favorites. To find and use saved character presets, select M y Favorites in the Character types drop-down. Customizing Font Type Select the Font Type option to set the font type and size of the selected text object. You can also select the font face color, bold or italicize text, change the line and text spacing, and set the text alignment in the text box. If the font type you are using supports it, you can select the Kerning check box to reduce the space between the letters in the text. 413
427 Creating Discs Customizing Font Face In Font Face you can customize the font color, blur, and opacity. Select to enable the font face properties on the selected text object, and then use the Blur and Opacity sliders to customize its appearance. When customizing the font face color, you have the following options in the Fill type drop-down: Uniform color: select this option if you want the font to be one solid color. Click the colored square to open the color palette and select the desired font color. 2 color gradient: select this option if you want the font color to change from one color to another using a gradient. Click the colored squares to set the beginning and ending colors, and then drag the Gradient direction control to set which way the color flows. 4 color gradient*: select this option if you want the font to consist of four colors. Click the colored squares to set the colors in each of the four corners of the text. Note: * optional feature in CyberLink PowerDirector. Check the version table on our web site for detailed versioning information. Using Chroma Key Select the Chroma Key option and then Apply chroma key to add a green screen effect to an image you added to the disc menu. Once enable, do this: 1. Click on and then select the color in the image that you want to replace/make transparent. 2. Adjust the Tolerance of hue, Tolerance of saturation, and Tolerance of luminance sliders to remove the selected color. Adjust until the background behind your inserted image is completely revealed, without any loss of quality on the image. 3. Use the Edge sharpness slider to fine tune and sharpen the edges of the inserted image on the revealed background. 414
428 CyberLink PowerDirector Help Adding a Reflection Select the Reflection option to add a reflection of a selected text object or added image onto the background media. Use the Distance slider to set space between the reflection and the object. Use the Opacity slider to set the opacity of the reflection. Applying Shadow Select the Shadow option to add a shadow to selected text object or an added image. Once selected, choose whether to apply the shadow on the Text/Object Only, or the Text/Object and Border, if you applied a border. Select Border Only to just display the shadow of the applied border. Use the other available options to change the shadow's color, direction, distance from the object, and add an opacity or blur effect. Applying Border Select the Border option to add a border around a selected text object or an added image. Available options allow you to change the border's size, and add a opacity or blur effect. You can customize the border color using the following options in the Fill type drop-down: Uniform color: select this option if you want the border to be one solid color. Click the colored square to open the color palette and select the desired border color. 2 color gradient: select this option if you want the border color to change from one color to another using a gradient. Click the colored squares to set the beginning and ending colors, and then drag the Gradient direction control to set which way the color flows. 4 color gradient*: select this option if you want the border to consist of four colors. Click the colored squares to set the colors in each of the four corners of the border. 415
429 Creating Discs Note: * optional feature in CyberLink PowerDirector. Check the version table on our web site for detailed versioning information. Enabling 3D Depth If you are creating a 3D video production, select the 3D Settings* option to give a selected text object or an imported image a 3D effect. Note: when using this feature, select the button to enable 3D mode for best editing results. See Previewing in 3D Mode for more information on using this mode. * Optional feature in CyberLink PowerDirector. Check the version table on our web site for detailed versioning information. Once enabled, use the slider to set the amount of depth you want the object to have in 3D. Dragging the slider left will make the 3D object seem nearer to the audience (in the foreground), while dragging it right will make it appear farther away (in the background). Applying Fades to Images If your disc menu contains an added image, select it and then the Fade option to apply a fade effect on it. Select whether to enable a fade-in and/or fade-out on the image. You can adjust the fades by clicking and dragging the keyframes below the preview window. 416

430 CyberLink PowerDirector Help The section in blue is how long the image displays, while the orange parts are the fade in and out. Shortening the orange parts will make the fade in or out happen more quickly, so you can customize the fade as required. 417
431 Creating Discs Changing Object Settings Use the Object Settings option to change some of the basic properties of text objects and inserted images. Use the X and Y position fields to set the precise location of the top left corner of the object on the disc menu. Note: CyberLink PowerDirector sets the value of the top-left corner of the object as the 0 axis, with the bottom-right corner having a value of 1.0, 1.0. The center position in the disc menu is 0.500, Use the Scale sliders to change an object's size, or Opacity to make it more transparent. Note: select the M aintain aspect ratio option if you want to ensure the object's aspect ratio does not change while you are moving or resizing it. Deselect this option if you want to change the object's shape or alter its aspect ratio. 418
432 CyberLink PowerDirector Help To rotate an object, hover your mouse over, click and then drag your mouse left or right as required. You can also manually enter a rotation amount in the Rotation filed and then press the enter key to rotate it. Adding and Editing Menu Buttons You can add additional menu text buttons to your disc menu. You can also set the properties for all of the menu and navigation buttons used in the menu. Setting the Title/Scene Menu Button Type You can set which type of title/scene menu buttons are used in the disc menu. From the menu button type drop-down, select one of the following types: Text Only: select this type if you only want clickable menu button text displayed in your disc menu. Thumbnails & Text: select this type if you want each title/scene to display both a clickable video thumbnail and text. Single Thumbnail: select this type to only display a video thumbnail for the first title/scene on the page, which is not clickable. All the titles/scenes will have clickable menu button text on the menu page. Adding Menu Buttons Menu buttons are the buttons that provide access to your disc's content, chapters, and subtitles. They may consist of just text or text and an accompanying thumbnail, depending on the menu button type set above and the design of the disc menu template. Note: you can add up to 14 menu buttons on each menu page. To add a menu button, click the button. Depending on the page in your disc menu you add the button to, the new button might just be text or button text and a scene/chapter thumbnail. 419
433 Creating Discs Note: click the button at the top of the Menu Designer to align all of the current menu buttons in the disc menu window. If you want all newly added menu button to auto align, click select Auto Align Buttons > On. next to this button and then Setting Button Properties Click on the menu. tab and to set the properties of all the buttons in your disc Note: the menu button properties that are available depend on which menu page you are currently editing. Changing Navigation Buttons To change the menu navigation buttons that are used in your disc menu, select the Navigation Buttons option. Select a set of navigation button (each set contains four navigation buttons) from the list, or click on Import Custom if you want to use your own buttons you custom created. If you imported custom buttons, or modified an existing set, click the Save as button to save the current buttons as a new set of navigation buttons. Setting Button Highlight Style Select the Button Highlight Style option to set the highlight icon used on a menu button thumbnail for scenes and chapter buttons. Click on Import Custom if you want to use your own custom highlight icon. If your disc menu is using text buttons, select the Enable text highlight option if you want it to be highlighted on the menu when it is active on the screen. Select Highlight color and then click the colored square to open the color palette to select the desired highlight color used. 420
434 CyberLink PowerDirector Help Setting Button Frame and Mask If using Thumbnails & Text menu button type, select the Button Frame and Mask option to set the frame or mask used on a menu button thumbnail. Click on Import Custom if you want to use your own custom button frame or mask. Setting Button Layout Select the Button Layout to select the desired layout of the thumbnail buttons on the selected page. The number of layouts available is dependent on the template you are editing. Enabling 3D Depth in Disc Menus If you are creating a 3D video production and want your disc menu to be in 3D, click the button and then select the desired 3D format from the drop-down. Note: when using this feature, select the button to enable 3D mode for best editing results. See Previewing in 3D Mode for more information on using this mode. * Optional feature in CyberLink PowerDirector. Check the version table on our web site for detailed versioning information. Saving and Sharing Disc Menu Templates Once you are finished modifying/customizing a disc menu template you can save it in your disc menu library for future use, upload it to DirectorZone to share it with others, or back it up on CyberLink Cloud*. Note: * optional feature in CyberLink PowerDirector. Check the version table on our web site for detailed versioning information. click on Share to upload your custom template to DirectorZone or back it up on CyberLink Cloud. See Sharing and Backing Up Disc Menu Templates for more information. click on Save As to save a modified template as a new template to the disc menu library. click on Save to save a new template to the disc menu library. 421
435 Creating Discs Sharing and Backing Up Disc Menu Templates You can share your customized disc menu templates with other CyberLink PowerDirector users by uploading them to DirectorZone. If you have a CyberLink Cloud subscription you can back up all your customized templates by storing them on CyberLink Cloud. To share and back up your disc menu templates, do this: 1. Do either of the following: in the Menu Designer, click on Share, enter a name for the custom template, and then click OK. select the disc menu template in the library, and then click 2.. In the upload window, enter the information as follows: Upload to: select where you want to upload the template. Title: name of the template as it will display once uploaded. Style: select a style or category for the template. Type: if required, select the type of template you are uploading. Tags: enter some keyword search tags that will help users find the template when searching. Note: separate each tag you enter with a space. If you want to use two words as the tag, just put quotes around them, e.g. "dollar bill". Collection: enter the name of the collection you want the template added to. Description: enter a short description of your template. 3. Click Next to proceed. 4. Confirm the copyright disclaimer, and then click Next to proceed with the upload. 5. Click on Finish to close the upload window. 422
436 CyberLink PowerDirector Help Burning Your Production to Disc Burning your video production to disc is the final stage of the create disc process. Once your disc is burned, you are able to play it on a disc player. You can also create a disc folder to organize your media files on your hard drive. When finalizing your disc, you have the choice of: Burning a Disc in 2D Burning a Disc in 3D In CyberLink PowerDirector you can burn your video production to one of the following optical disc formats: DVD: DVD-R, DVD-RW, DVD+R, DVD+RW Blu-ray Disc(TM)*: BDXL, BD-RE, BD-R Note: * optional feature in CyberLink PowerDirector. Check the version table on our web site for detailed versioning information. Burning a Disc in 2D If you created a standard 2D video production, click on the 2D Disc tab to configure your disc's preferences and burn it to disc. Configuring Disc Preferences The following preferences are available on the 2D Disc tab: Disc Format select the disc format type you want to use to burn your video to a disc. Depending on the disc format type that you select, there may be a drop-down option to select the capacity of the disc. Video and Audio Settings Select the video recording format: if available for your selected disc format, select the recording format of the video on your disc and its aspect ratio. Select the video encoding format and quality: if available for your selected disc format, select a video encoding format and video quality for your disc from 423
437 Creating Discs the drop-downs. For quality, select the Smart Fit option if you want CyberLink PowerDirector to automatically adjust the bitrate to create the best quality video file possible, which will fit the capacity of the disc you are using. Select the audio encoding format and channels: select an audio format for your disc, and the number of channels it is capable of outputting to. If burning a DVD, Blu-ray Disc, or AVCHD disc, you can select Dolby Digital to create a disc with Dolby Digital 2 or 5.1 surround sound. If burning a DVD or Blu-ray Disc, you can also select DTS to have CyberLink PowerDirector use the DTS 5.1 Producer to create a disc with DTS 5.1 surround sound. Note: the video quality and audio type options that are available depend on the disc format that you have selected. Enable CyberLink TrueTheater Surround: if available, select this option to enable CyberLink TrueTheater Surround to enhance the menu background music. Choose from Living Room, Theater, or Stadium. Burning the Disc To burn your video production and created menu to a disc in 2D, do this: Note: before you burn the disc, you should ensure there is enough disc space available (on the export folder drive/partition) for the temp file that is created and then burned to the disc. For DVD production, 10 GB is required (20 GB recommended). For Blu-ray Disc/AVCHD production, 60 GB required (100 GB recommended). You can change the export folder to a different drive/partition in File Preferences. 1. Click on the 2D Disc tab. 2. Click the Burn in 2D button. The Final Output window displays. 3. Configure the production preferences as follows: Current drive: the burning drive (or removable disc for the AVCHD format) CyberLink PowerDirector will use to burn the production to disc. If necessary, click the button to select another drive and configure the burn settings. See Configuring Burn Settings for more information. If you are burning your production to a rewritable disc, you can click See Erasing Discs for more information. to erase it. 424
438 CyberLink PowerDirector Help Disc volume label: in the field provided, enter a label for your disc. The disc label can be up to 16 characters long. Burn to disc: ensure this option is selected if you want your production burned to a disc. Number of copies: in the field provided, enter the number of discs you want CyberLink PowerDirector to burn for you in succession. Save as disc image: select this option if you want to create a disc image file on your computer's hard drive. Disc images can be burned to disc at a later time if required. Click on to specify the folder where it is created. Create a folder: select this option to create a disc folder on your computer that contains all the files necessary for burning. Click on to specify the folder where it is created. Creating a folder overwrites all of the existing data in a directory. Enable x.v.color: x.v.color is a color system that can display a wider color range than usual. CyberLink PowerDirector can generate an x.v.colorcompliant stream, which is backward compatible with RGB displays, while offering the opportunity to achieve better visual quality if your playback environment is x.v.color ready. Enable hardware video encoder: enable this option to speed up rendering and burning time. This option is only enabled if your computer supports hardware acceleration (NVIDIA graphics card that supports CUDA, an AMD graphics card that supports AMD Accelerated Parallel Processing, or a computer with Intel Core Processor Family technology). 4. When ready, click the Start Burning button to burn your production to disc. Note: the burning process may take a few minutes, depending on the length and quality of your video, and your computer's processing power. Be prepared for a short wait while CyberLink PowerDirector renders your movie and burns it to the disc. Time remaining does not include the time it takes to finalize/close discs. Burning a Disc in 3D If you created a 3D* video production, click on the 3D Disc tab to configure your disc's preferences and burn it to disc. 425
439 Creating Discs Note: * optional feature in CyberLink PowerDirector. Check the version table on our web site for detailed versioning information. Configuring Disc Preferences The following preferences are available on the 3D Disc tab: Disc Format select the disc format type you want to use to burn your video to a disc. Depending on the disc format type that you select, there may be a drop-down option to select the capacity of the disc. Video and Audio Settings Select the video recording format: if available for your selected disc format, select the recording format of the video on your disc and its aspect ratio. Select the video encoding format and quality: if available for your selected disc format, select a video encoding format and video quality for your disc from the drop-downs. For quality, select the Smart Fit option if you want CyberLink PowerDirector to automatically adjust the bitrate to create the best quality video file possible, which will fit the capacity of the disc you are using. Select the audio encoding format and channels: select an audio format for your disc, and the number of channels it is capable of outputting to. If burning a DVD, Blu-ray Disc, or AVCHD disc, you can select Dolby Digital to create a disc with Dolby Digital 2 or 5.1 surround sound. If burning a DVD or Blu-ray Disc, you can also select DTS to have CyberLink PowerDirector use the DTS 5.1 Producer to create a disc with DTS 5.1 surround sound. Note: the video quality and audio type options that are available depend on the disc format that you have selected. 3D output format: select the 3D output source format of the video that is rendered and then burned to the disc. Note: subtitles and disc menus are not supported on 3D discs using the side-by-side 3D source format. 426
440 CyberLink PowerDirector Help Enable CyberLink TrueTheater Surround: if available, select this option to enable CyberLink TrueTheater Surround to enhance the menu background music. Choose from Living Room, Theater, or Stadium. Burning the Disc To burn your video production and created menu to a disc in 3D, do this: Note: before you burn the disc, you should ensure there is enough disc space available (on the export folder drive/partition) for the temp file that is created and then burned to the disc. For DVD production, 10 GB is required (20 GB recommended). For Blu-ray Disc/AVCHD production, 60 GB required (100 GB recommended). You can change the export folder to a different drive/partition in File Preferences. 1. Click on the 3D Disc tab. 2. Click the Burn in 3D button. The Final Output window displays. 3. Configure the production preferences as follows: Current drive: the burning drive (or removable disc for the AVCHD format) CyberLink PowerDirector will use to burn the production to disc. If necessary, click the button to select another drive and configure the burn settings. See Configuring Burn Settings for more information. If you are burning your production to a rewritable disc, you can click See Erasing Discs for more information. to erase it. Disc volume label: in the field provided, enter a label for your disc. The disc label can be up to 16 characters long. Burn to disc: ensure this option is selected if you want your production burned to a disc. Number of copies: in the field provided, enter the number of discs you want CyberLink PowerDirector to burn for you in succession. Save as disc image: select this option if you want to create a disc image file on your computer's hard drive. Disc images can be burned to disc at a later time if required. Click on to specify the folder where it is created. Create a folder: select this option to create a disc folder on your computer that contains all the files necessary for burning. Click on 427 to specify the folder
441 Creating Discs where it is created. Creating a folder overwrites all of the existing data in a directory. Enable x.v.color: x.v.color is a color system that can display a wider color range than usual. CyberLink PowerDirector can generate an x.v.colorcompliant stream, which is backward compatible with RGB displays, while offering the opportunity to achieve better visual quality if your playback environment is x.v.color ready. Enable hardware video encoder: enable this option to speed up rendering and burning time. This option is only enabled if your computer supports hardware acceleration (NVIDIA graphics card that supports CUDA, an AMD graphics card that supports AMD Accelerated Parallel Processing, or a computer with Intel Core Processor Family technology). 4. When ready, click the Start Burning button to burn your production to disc. Note: the burning process may take a few minutes, depending on the length and quality of your video and your computer's processing power. Be prepared for a short wait while CyberLink PowerDirector renders your movie and burns it to the disc. Time remaining does not include the time it takes to finalize/close discs. Configuring Burn Settings Before you burn to a disc for the first time, it is advised that you click on set your burning configuration as follows: to Recording drive: select the burning drive CyberLink PowerDirector will use to burn the production to disc. Recording speed: set the recording speed used when burning the disc. If you encounter errors during the burning process, try lowering the burning speed. Include buffer under-run protection: select this option to ensure that video is written to disc without interruption. An interruption in video burning can result in an unusable disc. After you set this configuration, CyberLink PowerDirector uses the same configuration each time you burn until you change the settings. 428
442 CyberLink PowerDirector Help Erasing Discs If you are using a rewritable disc, you can erase content that has data previously recorded on it. This allows you to reuse the same discs over and over without the need to continually buy new discs. Click on the disc. button to begin erasing a To erase a disc, select: the Quick option to erase the disc index contained on the disc. the Full option to erase all of the content the disc contains. Click OK to erase the disc. 429
443 PowerDirector Preferences Chapter 21: PowerDirector Preferences To set your preferences in CyberLink PowerDirector, just click the button. General Preferences Click the button to open the Preferences window, and then select the General tab. The available options are as follows: Application: Maximum undo levels: enter the number (between 0 and 100) of undos (Ctrl+Z) you would like to make available while you work on your video production. Setting a higher number consumes more CPU resources. Audio channels: select the default number of channels for the audio in your video production when editing and previewing it. If Stereo is selected, CyberLink PowerDirector will downmix any 5.1 channel audio to two channels during preview. Note: when editing and previewing video or audio with 7.1 channels, it is downmixed to the number of audio channels selected in this preference option. Timeline frame rate: select the TV format (NTSC or PAL) and frame rate for your video production. The format should correspond to the region in which you plan to play your video (if you burn it to disc). The frame rate should correspond to the source video footage being used in your production. Use drop frame timecode: if your selected TV format is NTSC, select "Yes" to synchronize the timecode of your video to its video length in the timeline. Show sound waveform in timeline: select to display the sound waveform in the timeline that represents the sound levels in audio clips. Enable continuous thumbnails on video clips for easy scene recognition: select this option to enable frame thumbnails throughout the video clips inserted on the timeline. Enabling this option makes it easier to find the different scenes in your clips. 430
444 CyberLink PowerDirector Help Enable shadow files (proxy files) on high res videos: select this option to speed up the editing of high definition and 4K video by allowing CyberLink PowerDirector to create smaller and lower resolution proxy files that will be used during the editing process. Once enabled, select the resolution of the shadow file from the Shadow file resolution drop-down. Note: enabling shadow files is recommended when editing large, high resolution videos on some computers. Please note that enabling shadow files won't affect the resolution of your final produced video, but will consume some computer resources while the file is being created. Auto delete temporary files every: select to have CyberLink PowerDirector automatically delete temporary files created while editing, every specified number of days. Click on the Manually Delete button if you want to select and delete specific temporary files to free up disc space. Internet: Automatically check for software updates: select to periodically check for updates or new versions of PowerDirector automatically. Language: Use system default language (if supported): select this option for the language display to be the same as the language of your operating system. This feature is only available if your operating system's language is one of the supported user defined languages. User defined: select this option and then select the language from the drop- down list that you want to use. 431
445 PowerDirector Preferences Editing Preferences Click the button to open the Preferences window, and then select the Editing tab. The available options are as follows: Timeline: Set default transition behavior: select the default behavior of transitions added between two clips on a timeline track. See Setting Transition Behavior for more information on the differences between the overlap and cross transition. Add transition between photos when applying Magic Motion: select this option to add the transition selected in Transition type between photos when using the Magic Motion tool and apply to all photos. Add an effect and a title when using Freeze Frame: select this option to automatically add an effect and title effect to the timeline when you click the Freeze Frame button. Return to clip/movie beginning after preview: select this option if you want the playback slider to return to beginning of the selected clip or movie at the end of playback, depending on which is selected. If deselected, the playback slider stays at the end of the clip when the playback ends. Switch to movie mode automatically during playback: select this option if you want PowerDirector to auto switch to movie mode when previewing your video production. Doing this allows you to preview all the content in your production, instead of just the selected clip. Enable snap to clips in timeline: deselect this option if you don't want clips to snap to other clips when moving them around on the timeline tracks. Enlarge timeline scale for audio track: select this option to increase the timeline scale for more precise audio syncing. Doing this allows for easier mixing of audio in-track by allowing syncing down to 1/10 of a frame. 432

446 CyberLink PowerDirector Help Durations: set the default durations (in seconds) for image files and the different effects, transitions, titles, subtitles, etc. when placed in the timeline. Keyboard hotkeys: click the Customize button to fully customize PowerDirector's keyboard shortcut hotkeys to fit your requirements. See Customizing Keyboard Hotkeys for detailed information. click the Import button to import a custom hotkey set. See Hotkey Sets for more information. 433
447 PowerDirector Preferences File Preferences Click the button to open the Preferences window, and then select the File tab. The available options are as follows: Default locations: Import folder: indicates the last folder that media was imported from. To change this folder, click Browse and then select a new folder. Export folder: set the folder where captured media is saved. To change this folder, click Browse and then select a new folder. Note: the export folder is where produced projects are outputted to by default. Also, when you burn a file to disc, this folder is where the temp file is created before burning it to disc. File name: Captured video prefix: enter a default name for captured video files. When capturing from a DV/HDV tape, select the Append time information after the file prefix option to add the date captured information to the file name. Production file prefix: enter a default name for your produced files. Snapshot file name: enter a default name for captured snapshots in both 2D and 3D. Select a file format from the drop-down list for your snapshots. You have the choice of BMP, JPG, GIF and PNG 2D formats, or MPO and JPS when taking snapshots of 3D content. The captured 3D snapshots are also in 3D. Snapshot destination: select the location where PowerDirector saves captured snapshots from the drop-down. You can save them as a file, copy them to your clipboard, or set them as your wallpaper background on your computer's desktop. Display Preferences Click the button to open the Preferences window, and then select the Display tab. The available options are as follows: Preview quality: select the default preview quality from the list (Full HD*, HD*, high, normal, low) to set the resolution/quality of the video used when 434
448 CyberLink PowerDirector Help previewing your movie in the preview window. The higher the quality you select, the more resources that are required to preview your video project. Note: Full HD and HD preview resolution are only available when the Ultra version of CyberLink PowerDirector is installed on a 64-bit operating system. Preview mode: select the default preview mode used when previewing video production: Real-time Preview: synchronizes and renders clips and effects in real-time, displaying a preview of your video at the specified frames per second. Non Real-time Preview: mutes the audio and displays a preview at a reduced speed to help make editing much more fluid. Useful when editing high-definition video, using multiple PiP tracks on a less powerful computer, or when you receive dropped frames when previewing. By muting the audio and slowing down the video, CyberLink PowerDirector lets you view more frames per second when your computer has trouble providing a smooth preview during editing. Snap to reference lines*: select to have the selected objects in the preview window snap to the grid lines, TV safe zone, and the boundary of the window. TV safe zone: select to enable a box on the preview window that indicates the on-screen area of most TV displays. Grid lines: select the number of lines you want to display in a grid over the video image in the preview window. Use this grid to more precisely place the PiP media and title text where you want on the video image. Dual preview*: if you have a secondary display device, such as a monitor, TV, or DV camcorder connected to your computer, you can select it from this drop-down to extend your workspace and preview your project on a secondary display. See Dual Preview for more detailed information. 3D* display configuration: from the drop-down select your default 3D display device. See 3D Configuration for more detailed information. Note: * optional feature in CyberLink PowerDirector. Check the version table on our web site for detailed versioning information. 435
449 PowerDirector Preferences Hardware Acceleration Preferences Click the button to open the Preferences window, and then select the Hardware Acceleration tab. The available options are as follows: Hardware acceleration: Note: ensure you download and install the latest drivers, and any related hardware acceleration software, for your computer's graphics card to enable this feature in CyberLink PowerDirector. Enable OpenCL technology to speed up video effect preview/render: if your computer supports GPU hardware acceleration, select this option to speed up the rendering of some video effects by tapping into the multi-core parallel processing power of your computer. Note: to activate hardware acceleration technology during production, select Hardware video encoder in the production preferences section of the produce window before production. If your computer does not support Open CL, the wording on the UI will be replaced with the supported hardware acceleration technology (Intel Effect Acceleration, NVIDIA CUDA, or AMD Accelerated Parallel Processing). Enable hardware decoding: if your computer supports NVIDIA CUDA/AMD Accelerated Parallel Processing/Intel Core Processor Family technology, select this option to use hardware acceleration to decode the video during the editing process and when producing video. Project Preferences Click the button to open the Preferences window, and then select the Project tab. The available options are as follows: Project: Number of recently used projects: enter the number (between 0 and 20) of recently used projects that you would like to make available in the File menu when you open CyberLink PowerDirector. Automatically load the last project when PowerDirector opens: select this option to automatically load the last project you were working on. 436
450 CyberLink PowerDirector Help Automatically load sample clips when PowerDirector opens: select this option to automatically load the sample image and video clips into your media library when the program opens. Auto save project every: select this to automatically save your project every specified number of minutes, so you don't lose your changes by accident. If you want to set a specific location for the auto save files, click the Browse button and select a folder location on your computer. Produce Preferences Click the button to open the Preferences window, and then select the Produce tab. The available options are as follows: Produce: Reduce video blocky artifacts (Intel SSE4 optimized): select this option to improve the production overall quality of produced video, if your computer supports Intel SSE4 optimization. Reduce video noise when using MPEG-1, MPEG-2, and H.264 software encoders: select this option if you want CyberLink PowerDirector to auto apply video denoise when encoding MPEG-1, MPEG-2, and H.264 video during production. H.264 AVC: Allow SVRT on single IDR H.264 video: select this option if you want CyberLink PowerDirector to use SVRT to render a movie project when you only have one H.264 AVC clip on the timeline. See Utilizing Intelligent SVRT for more information on SVRT. WMV: Produce WMV video with Speed Mode: select this option if you want CyberLink PowerDirector to use Speed Mode to render WMV videos more quickly. Capture Preferences Click the button to open the Preferences window, and then select the Capture tab. The available options are as follows: 437
451 PowerDirector Preferences Capture: Add captured files to media library: select this option to import captured files into the media library directly after capture. Add captured files to empty workspace: select this option to automatically import captured files into an empty area in the workspace (timeline). Enable automatic file replacement when recording voice-over: select this option to overwrite existing audio if the voice-over overlaps during recording. Auto scene detection: Do not detect scenes after capture: select this option if you do not want to activate the auto scene detection function after video is captured. After capture, detect scenes by change of video frames: select this option to perform scene detection after video capture. Once capture is complete, the Detect Scenes window is opened, displaying the captured video. See Detecting Scenes in a Video Clip for more information. During capture, detect scenes by timecode, and then save each scene as a separate file (DV-VCR mode only): select this option to detect scene break signals and to save each scene as a separate file. (DV camcorders generate a scene break signal on the tape whenever users release the REC button.) This feature is only available in DV camcorder capture. DV parameters setup: click the DV Parameters button to set the buffer time (in the Batch capture/ Writing to tape sections) for your DV camcorder. Setting a buffer time ensures that your DV camcorder and the batch capture/ writing to tape function begin at the same time. Without a buffer, batch capturing or writing to tape may begin before the camcorder is engaged. In the DV auto stop section of the DV Parameters Setup window, select whether you want CyberLink PowerDirector to automatically stop scanning/capturing after a specified interval of blank tape. You can specific the interval, in seconds, in the field provided. Confirmation Preferences Click the button to open the Preferences window, and then select the Confirmation tab. The available options are as follows: 438
452 CyberLink PowerDirector Help Confirmation Always prompt me when aspect ratios conflict: select this option to enable a warning message when you add a video clip to the workspace whose aspect conflicts with that of the project. Enable file deletion from hard drive: select this option if you would like to enable the deletion of files from your hard drive when in the media library. Enable warning when chapters are removed during editing: select this option to enable a warning message if chapter points are deleted during video editing. Always prompt me when widescreen is not supported: select this option if you want PowerDirector to notify you when a widescreen format is not supported. Always prompt me when I import high definition video into the library: select this option if you want PowerDirector to notify you when you are importing high definition video into the media library. Always prompt me to confirm captured video prefix name: select this option if you want PowerDirector to ask you for a file name when capturing videos in the capture window. If you deselect this option, PowerDirector will auto name the files for you. Always prompt me to confirm captured snapshot file name: select this option if you want PowerDirector to ask you for a file name when capturing screen snapshots of video. If you deselect this option, PowerDirector will auto name the files for you. Always enter timeline mode at startup: select this option if you don't want PowerDirector to ask you which editing mode it should open every time you launch the program. Once selected, you will enter the timeline mode every time you open the program. Always prompt me when entering 3D full screen mode: select this option if you want PowerDirector to prompt you when it enters 3D full screen mode on some computers that can only view 3D content at full screen. Always prompt me when there is a poor quality segment in Content Aware Editing: select this option if you want PowerDirector to ask if you want to auto fix segments of video that are shaky or have poor lighting when encountered during the analysis process of Content Aware Editing. 439
453 PowerDirector Preferences Always prompt me when entering non real-time preview mode: select this option if you want to be prompted every time you click the play button when non real-time preview mode is enabled. Always prompt me before pasting keyframes attributes: select this option if you want to be prompted every time you try and paste a clip's keyframe attributes onto another clip. Always show tips dialog when entering express projects library: select this option if you want to see the helpful tips on how to use express projects every time you enter the express projects library. Always show tips when entering 360º editor: select this option to show some tips when entering the 360º video editor from the launcher. Always prompt me about merging media files when opening an existing project: select this option if you want PowerDirector to prompt you about merging existing media in the library with the media in the saved project you are opening. DirectorZone Preferences Click the button to open the Preferences window, and then select the DirectorZone tab. The available options are as follows: Sign in: enter in your address and Password, and then click the Sign in button to sign in to DirectorZone. If you do not have a DirectorZone account, click on the Get an Account link. Auto sign in to DirectorZone: select this option to automatically sign in to DirectorZone when the program is opened. Note: you can sign out from DirectorZone at any time by returning to this tab, and then clicking the Sign out button. Retrieve templates from DirectorZone: Templates Uploaded to DirectorZone: click this button when you have signed in to your DirectorZone account if you want to download and import all of the templates you previously uploaded to DirectorZone. 440
454 CyberLink PowerDirector Help Templates Downloaded from DirectorZone: click this button when you have signed in to your DirectorZone account if you want to download and import all of the templates you previously downloaded from DirectorZone. Privacy rules: Allow DirectorZone to gather editing information: select this option to allow DirectorZone to collect all of the names of the templates used in a finished project you upload to YouTube. CyberLink Cloud Preferences Click the button to open the Preferences window, and then select the CyberLink Cloud* tab. The available options are as follows: Note: * optional feature in CyberLink PowerDirector. Check the version table on our web site for detailed versioning information. Back up and restore your program settings: If you have a CyberLink Cloud subscription you can click Back up to CyberLink Cloud to back up program preferences, keyboard hotkeys, and custom output profiles to CyberLink Cloud. Click Restore from CyberLink Cloud to replace your current program settings with the ones you previously backed up on CyberLink Cloud. Download folder: click the Browse button to change the folder where CyberLink Cloud effects, projects, and media are stored when downloaded. Clear CyberLink Cloud cache: click the Clear Offline Cache button to free up some disk space by emptying the temp files stored when downloading content from CyberLink Cloud. Sign out from CyberLink Cloud service: if you are currently signed in to CyberLink Cloud, click the button to sign yourself out. Note: click the Account Information link in the bottom right corner of the preferences windows if you want to know your CyberLink Cloud subscription expiry date, how much storage space you have, and more. 441
455 PowerDirector Preferences Improvement Program Preferences Click the button to open the Preferences window, and then select the Improvement Program tab. The available options are as follows: CyberLink Product Improvement Program I want to participate: select this item if you would like to participate in the CyberLink Product Improvement Program for PowerDirector. Once enabled, CyberLink PowerDirector will collect information about the hardware and software configuration of your computer system, as well as your usage behavior and statistics related to the software. Click the Read more information about the improvement program online link to view more detailed information about the content collected. Note: the CyberLink Product Improvement Program for PowerDirector will not collect any personal information for purposes of identifying you. 442
456 CyberLink PowerDirector Help Chapter 22: PowerDirector Hotkeys CyberLink PowerDirector includes a number of keyboard hotkeys that can make the whole video editing process go more quickly and smoothly. CyberLink PowerDirector has many Default Keyboard Hotkeys, but you can also fully customize the hotkeys to fit your requirements. See Customizing Keyboard Hotkeys for detailed information. Default Keyboard Hotkeys The following is a list of the default keyboard hotkeys in CyberLink PowerDirector when the program is first installed. Note: if the hotkeys were modified in the Customize Keyboard Hotkeys window, this list will no longer be accurate. Select PowerDirector Default from the Hotkey set drop-down in the Customize Keyboard Hotkeys window to reset them back to these default values. Application Menu Bar Hotkeys System Hotkeys Capture Hotkeys Edit Hotkeys Designer Hotkeys 443
457 PowerDirector Hotkeys Application Menu Bar Hotkeys Hotkeys Command File Ctrl + N Create new project Ctrl + Shift + W New workspace Ctrl + O Open existing project Ctrl + S Save project Ctrl + Shift + S Save project as Ctrl + Q Import media files Ctrl + W Import a media folder Alt + F9 Switch to Capture module Alt + F10 Switch to Edit module Alt + F11 Switch to Produce module Alt + F12 Switch to Burn (EZProducer/Create Disc) module Alt + P Display project properties Alt + F4 Exit CyberLink PowerDirector Edit Ctrl + Z Undo Ctrl + Y Redo Ctrl + X Cut Shift + X Cut and leave gap Ctrl + Alt + X Cut and move clips on the same track Alt + X Cut and move all timeline clips after removed clip Ctrl + C Copy Ctrl + V Paste Alt + left arrow key Move timeline selected object one frame left 444
458 CyberLink PowerDirector Help Hotkeys Command Alt + right arrow key Move timeline selected object one frame right Shift + left arrow key Go to previous marker Shift + right arrow key Go to next marker Shift + M Add marker at current timeline position Alt + 1 Opens Magic Mix function Alt + 2 Opens Magic Motion function Alt + 3 Opens Magic Cut function Alt + 4 Opens Magic Style function Alt + 6 Opens Magic Movie Wizard F2 Modify (selected clip in PiP/Particle/Title Designer) Ctrl + Alt + T Open Trim window Delete Delete/Remove selected item(s) Shift + Delete Remove and leave gap Ctrl + Delete Remove and move clips on the same track Alt + Delete Remove and move all timeline clips after removed clip Ctrl + A Select all Ctrl + T Split clip at current timeline slider position Ctrl + P Take a snapshot of content in the preview window Ctrl + D Detect scenes Alt + H Customize keyboard hotkeys Alt + C Open user preferences window View Tab Switch between timeline/storyboard mode F3 Switch to Media Room 445
459 PowerDirector Hotkeys Hotkeys Command F4 Switch to Effect Room F5 Switch to PiP Room F6 Switch to Particle Room F7 Switch to Title Room F8 Switch to Transition Room F9 Switch to Audio Mixing Room F10 Switch to Voice Over Room F11 Switch to Chapter Room F12 Switch to Subtitle Room + Zoom in on timeline ruler - Zoom out on timeline ruler Alt + S View SVRT information Playback Page Up Switch to Clip mode Page Down Switch to Movie mode Space Play/Pause Ctrl + / Stop, Previous unit (seek by frame, second, etc.). Next unit (seek by frame, second, etc.) Home Go to the beginning of clip/project End Go to the end of clip/project Ctrl + left arrow key Go to previous clip in track (Clip mode) Ctrl + right arrow Go to next clip in track (Clip mode) key Alt + up arrow key Next second 446
460 CyberLink PowerDirector Help Hotkeys Command Alt + down arrow Previous second key Ctrl + G Go to timecode Ctrl + F Fast forward Ctrl + U Adjust system volume Ctrl + Backspace Mute/Mute off F Full screen System Hotkeys Hotkeys Command F1 Open help file Delete Delete/Remove selected item(s) Shift + F12 View hotkey list Alt + F4 Exit CyberLink PowerDirector Capture Hotkeys Hotkeys Command Alt + R Start/Pause recording Space DV play/pause preview Ctrl + / DV stop preview Ctrl +, DV rewind Ctrl +. DV fast forward Alt + Y Add text captions on captured video 447
461 PowerDirector Hotkeys Edit Hotkeys Hotkeys Command Library Ctrl + A Select all Ctrl + Tab Filter media type in media library Ctrl + D Detect scenes Ctrl + Q Import media files Ctrl + W Import a media folder Workspace Ctrl + Drop Overwrite content on track when a clip is dropped on another clip Shift + Drop Move all clips on the timeline to the right when a clip is dropped on another clip Alt + Drop Lay the clip over the existing clip and add a transition between the two clips when a clip is dropped on another clip [ Mark in ] Mark out 1 Select camera 1 in MultiCam Designer 2 Select camera 2 in MultiCam Designer 3 Select camera 3 in MultiCam Designer 4 Select camera 4 in MultiCam Designer Designer Hotkeys Hotkeys Command Ctrl + B Make text bold Ctrl + I Make text italic Ctrl + L Left-align text 448
462 CyberLink PowerDirector Help Hotkeys Command Ctrl + R Right-align text Ctrl + E Center-align text Up arrow key Move object up Down arrow key Move object down Left arrow key Move object left Right arrow key Move object right Alt + D Share template on DirectorZone Customizing Keyboard Hotkeys CyberLink PowerDirector lets you fully customize its keyboard shortcut hotkeys to fit your requirements. You can even add hotkeys for commands that are not available in the default keyboard hotkeys. To customize the keyboard hotkeys, do this: Note: click the Restore button if you need to reset a selected hotkey that you customized, to the default value. 1. Select Edit > Keyboard Hotkeys > Customize from the menu. Or just press the Alt+H keys on your keyboard to open the Customize Keyboard Hotkeys window. 2. Browse to and find the hotkey command that you want to customize. Note: if required, enter in a search keyword in the field provided for the hotkey command you want to customize and then click. Click it repeatedly to locate multiple instances of the inputted search keyword, if required. 3. Click in the Hotkeys column next to the command you want to customize. 4. Press the hotkey combination on your computer's keyboard that you want to use/replace the existing hotkey with. Note: if the keyboard hotkey you specify is already in use in the program, you will be asked if you want to remove it from the existing command to use in the new specified command. The replaced command will no longer have a keyboard hotkey associated to it. 449
463 PowerDirector Hotkeys 5. Repeat the above steps to customize all the keyboard hotkeys to your preference. 6. Once you are done, click the Apply button, enter a name for the new set of customized keyboard hotkeys, and then click OK to apply and save the changes. Hotkey Sets When you customize keyboard hotkeys in CyberLink PowerDirector, they are saved as hotkey sets in the Customize Keyboard Hotkeys window. If required you can create multiple sets of hotkeys, which are quickly accessible in the window. In the Customize Keyboard Hotkeys window, you can: quickly switch among the saved hotkey sets by selecting the one you want to use from the Hotkey sets drop-down and then clicking the Apply button. Select the PowerDirector Default hotkey set to use the original hotkey settings. edit an existing hotkey set by further customizing the keyboard hotkeys, and then clicking the Apply button. Click the Save as button to save it as a brand new hotkey set. delete a custom hotkey set by selecting it in the Hotkey sets drop-down and then clicking the Delete button. Importing and Exporting Hotkey Sets In the Customize Keyboard Hotkeys window you can export all of the hotkey sets you created. This saves the custom to a file that can then be imported into another version of CyberLink PowerDirector that supports the importing of hotkey sets. To export a hotkey set, do this: 1. Select Edit > Keyboard Hotkeys > Export from the CyberLink PowerDirector menu. 2. Specify a file name and save location on your computer. 3. Click the Save button to complete export process. To import a hotkey set, do this: 450
464 CyberLink PowerDirector Help 1. Select Edit > Keyboard Hotkeys > Import from the CyberLink PowerDirector menu. 2. Browse to the location of the exported file in the.pdh file format. 3. Click the Open button to complete the import process. 451
465 Appendix Chapter 23: Appendix This chapter contains reference information to help answer questions you may have about the digital movie production process or about using CyberLink PowerDirector. Intelligent SVRT: When Is Used? Intelligent SVRT can be applied to video clips in the MPEG-2 and H.264 formats. In the following conditions, clips (or portions of clips) do not require rendering during production, and SVRT can therefore be applied: The frame rate, frame size, and file format are the same as those of the destination production profile. The bitrate is similar to that of the destination production profile. The TV format is the same as that of the destination production profile. For more information, see Setting TV (Video Clip Interlacing) Format. If all of the above conditions are met, SVRT can be used. Any clips that do not meet the above criteria are fully rendered without SVRT. In the following conditions, clips (or portions of clips) must be rendered during production, and SVRT can therefore not be applied: Adding a title or transition effect. Modifying the color of a video clip. Merging two video clips (clips within 2 seconds before or after the merged clips will be rendered). Splitting a video clip (clips within 2 seconds before or after the split will be rendered). Trimming a video clip (clips within 2 seconds before or after the trimmed clip will be rendered). If the total duration of the production is less than one minute and any portion of the video requires rendering, the entire production will be rendered for efficiency reasons. 452
466 CyberLink PowerDirector Help Licensing and Copyright Information This section contains the PowerDirector licensing and copyright information, including a copy of the Intel License Agreement for Open Source Computer Library and the GNU Lesser General Public License. There is also a list of the third-party components used in PowerDirector. License Disclaimer This product includes certain copyrighted third-party software components license under the terms of the GNU Lesser General Public License and other similar license agreements offering free distribution of these software components offered by other organizations, if applicable. Copies of these agreements can be found by clicking the link associated with each of the component provided in the table below. You may also visit for a copy of GNU Lesser General Public License Agreement. LGPL components and other components listed below are licensed without warranties of any kind, either express or implied warranties, including without limitation the implied warranties of merchantability and fitness for a particular purpose. The entire risk as the quality and performance of these components is with you. Please check the respective license agreement for more details. Copyright Holders under LGPL and/or other license agreements mentioned herein shall not be responsible for any damages, general, special, incidental or consequential, arising out of the use or inability to use these components/software. Please check the respective license agreement for more details. For a list of components of such nature, and to acquire the full source code of these licensed components, including any scripts to control compilation and installation of the object code, please see "List of Components" below. Downloading Source Code You can download the machine-readable source code of the corresponding licensed component from Please read the copyright notice, the warranty disclaimer, and the license agreement accompanying these source codes. 453
467 Appendix List of Components Component License Information cv.dll Intel License Agreement for Open Source Computer Library cvaux.dll Intel License Agreement for Open Source Computer Library highgui.dll Intel License Agreement for Open Source Computer Library OptCVa6.dll Intel License Agreement for Open Source Computer Library OptCVm6.dll Intel License Agreement for Open Source Computer Library OptCVw7.dll Intel License Agreement for Open Source Computer Library PThreadVC2.dll GNU Lesser General Public License 454


468 CyberLink PowerDirector Help Licenses and Copyrights Below are the applicable licenses and copyright information that pertain to the components listed in the List of Components. Dolby Laboratories Manufactured under license from Dolby Laboratories. Dolby and the double-d symbol are registered trademarks of Dolby Laboratories. Confidential unpublished works. Copyright Dolby Laboratories. All rights reserved. DTS For DTS patents, see Manufactured under license from DTS Licensing Limited. DTS, the Symbol, & DTS and the Symbol together are registered trademarks, and DTS 5.1 Producer is a trademark of DTS, Inc. DTS, Inc. All Rights Reserved. 455
CyberLink. Screen Recorder 4. User's Guide
 CyberLink Screen Recorder 4 User's Guide Copyright and Disclaimer All rights reserved. To the extent allowed by law, Screen Recorder IS PROVIDED AS IS, WITHOUT WARRANTY OF ANY KIND, EITHER EXPRESS OR IMPLIED,
The Muvipix.com Guide to CyberLink PowerDirector 15 Ultimate
 The Muvipix.com Guide to CyberLink PowerDirector 15 Ultimate The Muvipix.com Guide to CyberLink PowerDirector 15 Ultimate Section 1: PowerDirector Basics Chapter 1 Get to Know PowerDirector 15... 3 What
PowerDirector Basics. Section 1. The Muvipix.com Guide to CyberLink PowerDirector 12 Ultimate. Chapter 1 Get to Know PowerDirector 12...
 The Muvipix.com Guide to CyberLink PowerDirector 12 Ultimate Section 1 PowerDirector Basics Chapter 1 Get to Know PowerDirector 12... 3 What s what and what it does Welcome to easy yet powerful moviemaking!
CyberLink. U Webinar. User's Guide
 CyberLink U Webinar User's Guide Copyright and Disclaimer All rights reserved. To the extent allowed by law, U Webinar IS PROVIDED AS IS, WITHOUT WARRANTY OF ANY KIND, EITHER EXPRESS OR IMPLIED, INCLUDING
CyberLink. ColorDirector. User's Guide
 CyberLink ColorDirector User's Guide Copyright and Disclaimer All rights reserved. To the extent allowed by law, ColorDirector IS PROVIDED AS IS, WITHOUT WARRANTY OF ANY KIND, EITHER EXPRESS OR IMPLIED,
 Hardware Acceleration Support Multi-Core CPU optimization Native 64bit Editing Engine Video effect acceleration by using GPGPU NVIDIA CUDA technology AMD Parallel Processing Accelerator Hardware decode
The Muvipix.com Guide to Vegas Movie Studio Platinum 14
 The Muvipix.com Guide to Vegas Movie Studio Platinum 14 What have I gotten myself into?... 1 Some basic questions and simple answers about Vegas Movie Studio 14 and how it works Chapter 1 Get to know Vegas
The Muvipix.com Guide to Sony Movie Studio Platinum 13
 The Muvipix.com Guide to Sony Movie Studio Platinum 13 Chapter 1 Get to know Sony Movie Studio Platinum 13... 5 What s what and what it does The Sony Movie Studio 13 interface 6 The Project Media window
CyberLink. YouCam 8 User's Guide
 CyberLink YouCam 8 User's Guide Copyright and Disclaimer All rights reserved. To the extent allowed by law, YouCam IS PROVIDED AS IS, WITHOUT WARRANTY OF ANY KIND, EITHER EXPRESS OR IMPLIED, INCLUDING
CyberLink. MagicSports 3.0. (Baseball Edition) User s Guide
 User s Guide") CyberLink MagicSports 3.0 (Baseball Edition) User s Guide Copyright and Disclaimer All rights reserved. No part of this publication may be reproduced, stored in a retrieval system, or transmitted in any
CyberLink MagicSports 3.0 (Baseball Edition) User s Guide Copyright and Disclaimer All rights reserved. No part of this publication may be reproduced, stored in a retrieval system, or transmitted in any
Working with Windows Movie Maker
 518 442-3608 Working with Windows Movie Maker Windows Movie Maker allows you to make movies and slide shows that can be saved to your computer, put on a CD, uploaded to a Web service (such as YouTube)
Get to Know the VideoStudio Workspace
 Get to Know the VideoStudio Workspace This written tutorial is a handy guide to understanding the various components of the VideoStudio interface. We will review the Capture, Edit and Share workspaces
Windows Movie Maker / Microsoft Photo Story Digital Video
 Windows Movie Maker / Microsoft Photo Story Digital Video http://intranet/technology/index.html TRC HELP DESK X5092 April 2006 Photo Story and Movie Maker Microsoft Photo Story 3 allows you to create fantastic
Movavi Video Editor 15 Business
 Movavi Video Editor 15 Business Don't know where to start? Read these tutorials: How to remove trial restrictions Save your video without a watermark and use the program after 14 days. Make a video in
Adobe Premiere Elements Workspace overview. Creating a new project. About projects. Start a new project
 Adobe Premiere Elements Workspace overview The Adobe Premiere Elements workspace is optimized for the four major phases of a project: organizing footage (video, stills, and audio), editing a movie, creating
The Muvipix.com Guide to CyberLink PowerDirector 13 Ultimate. Section 1. PowerDirector Basics
 The Muvipix.com Guide to CyberLink PowerDirector 13 Ultimate Section 1 PowerDirector Basics 1 The Muvipix.com Guide to CyberLink PowerDirector 13 Ultimate Get to Know the PowerDirector Workspaces Basic
PHOTO DVD MAKER USER MANUAL
 Photo DVD Maker User Manual 1 PHOTO DVD MAKER USER MANUAL Version 7.04 http://www.photo-dvd-maker.com Photo DVD Maker User Manual 2 0.1 WELCOME TO PHOTO DVD MAKER...4 0.2 GETTING HELP...5 1. GETTING STARTED...6
Editing in Premiere Pro CC 2015
 Editing in Premiere Pro CC 2015 Lesson 1: Exploring the Interface Exploring the Interface The Source Window The Program Window The Settings Menu Revealing the Video Scopes The Workspace Bar The Project
Windows Movie Maker. Panes (Movie and. Menu Bar. Tool Bar. Monitor. Rewind. Play. Storyboard/Timeline. Playhead. Audio. Microphone Playback
 Menu Bar Panes (Movie and Tool Bar Monitor Rewind Play Storyboard/Timeline Playhead Audio Microphone Playback Zoom In/Out 2004 Teaching Matters, Inc.-Page 1 Importing Video (Transfer the footage from the
CyberLink. StreamAuthor 3. User s Guide
 CyberLink StreamAuthor 3 User s Guide Copyright and Disclaimer All rights reserved. No part of this publication may be reproduced, stored in a retrieval system, or transmitted in any form or by any means
2018 imovie High Sierra
 2018 imovie High Sierra 1 Create a Movie Open imovie. Select the Projects button from the top menu. Click Create New. Next, Click Movie. You will see a sidebar of libraries and events, browser window with
Adobe Premiere Elements Tutorial
 Adobe Premiere Elements Tutorial Starting a New Project To import movie clips from a digital video camera, click on the Capture Video button. You will be prompted to name your project and choose a location
GETTING STARTED TABLE OF CONTENTS
 imovie 11 Tutorial GETTING STARTED imovie 11 is consumer-level digital video editing software for Macintosh. You can use imovie 11 to edit the footage you film with digital video cameras and HD video cameras.
Windows Movie Maker. The Toolbar. The Toolbar
 Windows Movie Maker The Menu Bar The Menu Bar gives access to all parts of the program. On the Menu Bar, click on File. Notice the choices of Save Project As and Save Movie File o Choose Save Project As
11 EDITING VIDEO. Lesson overview
 11 EDITING VIDEO Lesson overview In this lesson, you ll learn how to do the following: Create a video timeline in Photoshop. Add media to a video group in the Timeline panel. Add motion to still images.
Opening the Program. Adding Images and Videos. Movie Maker II 1
 1 Opening the Program To open the Movie Maker II application, use the Start All Programs Windows Live Movie Maker combination from the desktop. Alternatively, you can create a shortcut on the desktop.
Avigilon Control Center Player User Guide. Version 5.10
 Avigilon Control Center Player User Guide Version 5.10 2006-2016, Avigilon Corporation. All rights reserved. AVIGILON, the AVIGILON logo, AVIGILON CONTROL CENTER, ACC and HDSM, are trademarks of Avigilon
Get to Know the PowerDirector Workspaces Basic Video Editing Moves What s New in Version 15?
 The Muvipix.com Guide to CyberLink PowerDirector 15 Ultimate Get to Know the PowerDirector Workspaces Basic Video Editing Moves What s New in Version 15? Chapter 1 What s what and what it does There s
Intermediate Training
 Intermediate Training The material in this handout is taken directly from the Picasa Website. It was decided to add all the information in one place so it could be viewed at one time. However, what is
CyberLink. Power2Go. User s Guide
 CyberLink Power2Go User s Guide Copyright and Disclaimer All rights reserved. No part of this publication may be reproduced, stored in a retrieval system, or transmitted in any form or by any means electronic,
Get to Know the PowerDirector Workspaces Basic Video Editing Moves What s New in Version 14?
 The Muvipix.com Guide to CyberLink PowerDirector 14 Ultimate Get to Know the PowerDirector Workspaces Basic Video Editing Moves What s New in Version 14? Chapter 1 What s what and what it does There s
Editing and Finishing in DaVinci Resolve 12
 Editing and Finishing in DaVinci Resolve 12 1. Introduction Resolve vs. Resolve Studio Working in the Project Manager Setting up a Multi User Login Accessing the Database Manager Understanding Database
Camtasia Studio 5.0 PART I. The Basics
 Camtasia Studio 5.0 Techsmith s Camtasia Studio software is a video screenshot creation utility that makes it easy to create video tutorials of an on screen action. This handout is designed to get you
Adobe Premiere Pro CC 2018
 Course Outline Adobe Premiere Pro CC 2018 1 TOURING ADOBE PREMIERE PRO CC Performing nonlinear editing in Premiere Pro Expanding the workflow Touring the Premiere Pro interface Keyboard shortcuts 2 SETTING
CyberLink. StreamAuthor 4. User's Guide
 CyberLink StreamAuthor 4 User's Guide Copyright and Disclaimer CyberLink reserves all rights to this publication. No part of this publication may be reproduced, duplicated, saved or transmitted without
GOM Cam User Guide. Please visit our website (cam.gomlab.com) regularly to check out our. latest update.
 regularly to check out our. latest update.") GOM Cam User Guide Please visit our website (cam.gomlab.com) regularly to check out our latest update. From screen recording to webcam video and gameplay recording GOM Cam allows you to record anything
GOM Cam User Guide Please visit our website (cam.gomlab.com) regularly to check out our latest update. From screen recording to webcam video and gameplay recording GOM Cam allows you to record anything
Effortlessly create incredible movies
 Worldwide ADOBE PREMIERE ELEMENTS 8 Effortlessly create incredible movies The complete solution for your videos Automated moviemaking options Professional-quality effects and sound Sharing on disc, the
User Guide for Leawo Prof. Media - How to Use Leawo Prof. Media
 User Guide for Leawo Prof. Media - How to Use Leawo Prof. Media Leawo Prof. Media is an all-in-one total video converter solution. This total media converter suite could do various things for you: convert
Viewer for Luma Fisheye IP Surveillance Camera. Software Manual
 Viewer for Luma Fisheye IP Surveillance Camera Software Manual Important Notes This software is a third-party program that allows you to view, in a normal view, surveillance recordings that were made in
Digital Documentaries. Students as directors of their own learning
 Digital Documentaries Students as directors of their own learning Basic Vocabulary Collection Project Movie Collection A collection contains audio clips, video clips, or pictures that you have imported
Apple idvd 11 Tutorial
 Apple idvd 11 Tutorial GETTING STARTED idvd is a program that allows you to create a DVD with menus and graphics of a professionally made commercial disc to play on your home DVD player. To Begin your
GV-VMS. New Feature Guide V VMSV FG-B
 GV-VMS New Feature Guide V15.10.1.0 VMSV151010-FG-B 2016 GeoVision, Inc. All rights reserved. Under the copyright laws, this manual may not be copied, in whole or in part, without the written consent of
Adobe Premiere Elements 12
 Adobe Premiere Elements 12 Marketing Copy for Channel Partners: North America Adobe Premiere Elements 12 The following copy blocks can be used in web pages, catalogs, print ads, or other promotional materials
imovie 08 Basics USF College of Education Laptop Initiative EDU 252, Website:
 imovie 08 Basics USF College of Education Laptop Initiative EDU 252, Email: laptoplounge@coedu.usf.edu Website: http://fcit.usf.edu/laptop/ imovie 08 is a completely redesigned version of the video editing
Premiere Pro CC 2018 Essential Skills
 Premiere Pro CC 2018 Essential Skills Adobe Premiere Pro Creative Cloud 2018 University Information Technology Services Learning Technologies, Training, Audiovisual, and Outreach Copyright 2018 KSU Division
How to Make a Movie in imovie How to Make a Movie Trailer in imovie How to Color Correct a Movie in imovie
 How to Make a Movie in imovie How to Make a Movie Trailer in imovie How to Color Correct a Movie in imovie 1. Make sure you are using the Mac. Make a Movie in imovie 2. If your files are on an external
Editing & Color Grading 101 in DaVinci Resolve 15
 Editing & Color Grading 101 in DaVinci Resolve 15 1. Exploring Resolve Exploring Resolve The Media Page The Edit Page The Fusion Page The Color Page The Fairlight Page The Deliver Page The Processing Pipeline
Review PowerDirector 13 Deluxe computer softwares free download ]
![Review PowerDirector 13 Deluxe computer softwares free download ]](/thumbs/96/129005077.jpg "Review PowerDirector 13 Deluxe computer softwares free download ]") Review PowerDirector 13 Deluxe computer softwares free download ] Description: PowerDirector 13 Deluxe provides the easiest and fastest way to create and share your home videos. No time to create videos?
Review PowerDirector 13 Deluxe computer softwares free download ] Description: PowerDirector 13 Deluxe provides the easiest and fastest way to create and share your home videos. No time to create videos?
Creating a Recording in Canvas Embedding a Recording in Canvas To embed a recording into a discussion
 Table of Contents What is Kaltura... 3 Things to Remember... 3 My Media... 3 To access My Media... 3 Upload Media... 4 To perform a media upload... 4 Viewing Videos... 6 Add New List Options... 6 Media
User Manual of VSPlayer Software. VSPlayer Software. User Manual UD06784B
 VSPlayer Software User Manual UD06784B i User Manual COPYRIGHT 2017 Hangzhou Hikvision Digital Technology Co., Ltd. ALL RIGHTS RESERVED. Any and all information, including, among others, wordings, pictures,
Opening the Program. Movie Maker II 1
 1 Opening the Program To open the Movie Maker II application, use the Start Programs Movie Maker combination from the desktop. Alternatively, you can create a shortcut on the desktop. After executing this
COMMAND STATION PC SOFTWARE
 COMMAND STATION PC SOFTWARE MULTI-SITE MANAGEMENT SOFTWARE USER MANUAL Version 1.6 OpenEye Command Station Software Manual V 1.6 Manual Edition 34863AI - June 2018 2018, OPENEYE All Rights Reserved No
imovie Quick Guide Learning Technologies Center Gaskill Hall
 imovie Quick Guide Learning Technologies Center Gaskill Hall Introduction Welcome to the Miami University LTC This quick guide is designed to help acquaint you with some capabilities of imovie HD and idvd
idvd Authoring Program
 idvd Authoring Program idvd 7.0 is the standard DVD authoring program on all PSU Macs as of Fall 2008. The interface has changed slightly from previous versions and the media browser is better integrated
Photo to Movie Help. LQ Graphics, Inc.
 Photo to Movie Help LQ Graphics, Inc. Table of Contents Photo to Movie... 1 Introduction... 1 Installation... 3 Purchasing... 4 Organizing Your Movie... 5 Planning Your Movie... 5 Adding photos to your
DVD Production I: Introduction to idvd
 DVD Production I: Introduction to idvd Assemble your movies and still images Before you create your DVD, assemble your materials and check that your movies are in the correct format for idvd. All movies
Camtasia... 3 What is Camtasia and how do I download it?... 4 How do I record a video in Camtasia?... 6 How do I edit video and audio in
 CAMTASIA Table of Contents... 3 What is and how do I download it?... 4 How do I record a video in?... 6 How do I edit video and audio in?...14 How do I apply effects in?...19 How do I use a Green Screen
Editing and Effects in DaVinci Resolve 12.5
 Editing and Effects in DaVinci Resolve 12.5 1. Working with the Project Media Working with the Project Media Importing the Project Selecting a Capture Drive Relinking Media 2. Exploring the Edit Page The
imovie 10 Workshop #1 from basics to badass
 imovie 10 Workshop #1 from basics to badass interface importing open / save previewing selecting 1) The Project Area shows how your clips are arranged in your project 2) The Viewer allows you to preview
Creative Web Designer Course
 Creative Web Designer Course Photoshop 1. Getting to Know the Work Area Starting to work in Adobe Photoshop Using the tools Setting tool properties Undoing actions in Photoshop More about panels and panel
HP WEBCAM HD USER GUIDE
 HP WEBCAM HD USER GUIDE Copyright 2012 Hewlett-Packard Development Company, L.P. Microsoft, Windows, and Windows Vista are U.S. registered trademarks of Microsoft Corporation. AMD and Athlon are trademarks
Movavi Video Editor 15
 Movavi Video Editor 15 Don't know where to start? Read these tutorials: How to remove trial restrictions Save your video without a watermark and use the program after 7 days. Make a Quick Video Have your
Nero MediaHome Manual
 Table of Content 1. Start Successfully... 5 1.1. About the Application... 5 1.2. Versions and System Requirements... 5 2. Working With the Program... 7 2.1. Header... 7 2.2. Library Management and Options...
 S4B Split Movie Soft4Boost Help S4B Split Movie www.sorentioapps.com Sorentio Systems, Ltd. All rights reserved Contact Us If you have any comments, suggestions or questions regarding S4B Split Movie or
[Not for Circulation] This document provides a variety of shortcuts for working in PowerPoint 2007.
![[Not for Circulation] This document provides a variety of shortcuts for working in PowerPoint 2007.](/thumbs/72/67772637.jpg "[Not for Circulation] This document provides a variety of shortcuts for working in PowerPoint 2007.") PowerPoint Shortcuts This document provides a variety of shortcuts for working in PowerPoint 2007. Using Slides from Other Presentations To add a slide from an existing presentation to the current presentation,
PowerPoint Shortcuts This document provides a variety of shortcuts for working in PowerPoint 2007. Using Slides from Other Presentations To add a slide from an existing presentation to the current presentation,
Table of Content. Nero Recode Manual
 Table of Content 1. Start Successfully... 4 1.1. About Nero Recode... 4 1.2. Versions of Nero Recode... 4 1.3. Working with Nero Recode... 5 1.4. Starting Nero Recode... 6 2. Main Screen... 8 3. Recode
Keynote 08 Basics Website:
 Website: http://etc.usf.edu/te/ Keynote is Apple's presentation application. Keynote is installed as part of the iwork suite, which also includes the word processing program Pages and the spreadsheet program
MyDVD User Guide. MyDVD workspace
 MyDVD User Guide Welcome to MyDVD, an easy disc-creation program that lets you turn your videos into professional-looking multimedia disc projects, complete with image-rich menus and music. MyDVD offers
Section 2 - Part A - Setup Start Time End Time Duration Recording Section Overview 0:00 0:33 0:33 Recording Setup Overview 0:33 0:54 0:21 Recording Au
 Section 1 - Part A - Course Introduction Start Time End Time Duration Preparation Overview 0:00 0:49 0:49 Welcome and Congratulations! 0:49 1:26 0:37 Course Overview 1:26 2:52 1:26 Course Resources 2:52
North & South America Ulead Systems Inc. Support:
 User Guide Ulead Systems, Inc. May 2005 English edition for Ulead CD & DVD PictureShow 4, May 2005. 1992-2005 Ulead Systems, Inc. All rights reserved. No part of this publication may be reproduced or transmitted
Start Project and create Sequence. Creating a New Project - Open program with the Desktop Shortcut - Select New Project
 Start Project and create Sequence Creating a New Project - Open program with the Desktop Shortcut - Select New Project General project settings - Select Browse to specify saving location - Give name to
Product Highlights Introduction... 3 Key Features Key Features & Benefits... 4
 Content Product Highlights... 3 Introduction... 3 Key Features... 3 Key Features & Benefits... 4 Complete Burning Tool... 4 Burn All Media to Any Disc... 4 Desktop Burning Gadget... 4 Virtual Drives...
POWERPOINT BASICS: MICROSOFT OFFICE 2010
 POWERPOINT BASICS: MICROSOFT OFFICE 2010 GETTING STARTED PAGE 02 Prerequisites What You Will Learn USING MICROSOFT POWERPOINT PAGE 03 Microsoft PowerPoint Components SIMPLE TASKS IN MICROSOFT POWERPOINT
KODAK Software User s Guide. Software Version 9.0
 KODAK Create@Home Software User s Guide Software Version 9.0 Table of Contents 1 Welcome to KODAK Create@Home Software Features... 1-1 Supported File Formats... 1-1 System Requirements... 1-1 Software
For today, choose Format: NTSC Rate: Use: DV-NTSC Anamorphic (North American, widescreen)
") Final Cut Pro Final Cut Pro is a sophisticated video-editing program made by Apple. It is the editing software of choice for multimedia journalists using Apple computers, and is comparable to Adobe's Premiere
Final Cut Pro Final Cut Pro is a sophisticated video-editing program made by Apple. It is the editing software of choice for multimedia journalists using Apple computers, and is comparable to Adobe's Premiere
CyberLink. Media Deluxe. User s Guide
 CyberLink Media Deluxe User s Guide Copyright and Disclaimer All rights reserved. No part of this publication may be reproduced, stored in a retrieval system, or transmitted in any form or by any means
Picasa Basics Website:
 Website: http://etc.usf.edu/te/ Picasa is a free photo management program from Google that can be used to organize and manage all of the images you have stored on your computer. Picasa also allows you
MagicInfo VideoWall Author
 MagicInfo VideoWall Author MagicInfo VideoWall Author User Guide MagicInfo VideoWall Author is a program designed to construct a VideoWall layout and create VideoWall content by adding various elements
VSPlayer Software User Manual
 VSPlayer Software User Manual UD03888B User Manual COPYRIGHT 2016 Hangzhou Hikvision Digital Technology Co., Ltd. ALL RIGHTS RESERVED. Any and all information, including, among others, wordings, pictures,
How You Use the Timeline
 How You Use the Timeline The Timeline and the Canvas display two different views of the same sequence. The Timeline shows the chronological arrangement of clips and layered video and audio clip items,
VEGAS. Movie Studio 15. English language manual
 VEGAS Movie Studio 15 PLATINUM English language manual Last changes: Tuesday, February 06, 2018 This documentation is protected by copyright law. All rights, especially the right of duplication, circulation,
KODAK Software User s Guide
 KODAK Create@Home Software User s Guide Table of Contents 1 Welcome to KODAK Create@Home Software Features... 1-1 Supported File Formats... 1-1 System Requirements... 1-1 Software Updates...1-2 Automatic
Creating an im ovie project Adjust Project Settings
 Creating an imovie project Launch the app, choose projects at the top and tap on the + icon at the top right of the screen to begin a new project. You can choose either to make a movie or a trailer. First
APPLE IMOVIE HD TUTORIAL
 APPLE IMOVIE HD TUTORIAL O V E R V I E W Movie HD is consumer-level digital video editing software for Mac OS. You can use imovie to edit the footage you film with digital video cameras and HD video cameras.
GOM Mix Pro User Guide
 GOM Mix Pro User Guide Please visit our website (mix.gomlab.com) regularly to check out our latest update. `Powerful & Easy to Use Video Editor - GOM Mix Pro! GOM Mix Pro is a powerful, easy video editor
5. ADOBE AFTER EFFECTS MANUAL
 5. Introduction to Adobe After Effects Version 1.0-0913 2013 by VirTra Inc. All Rights Reserved. VirTra, the VirTra logo are either registered trademarks or trademarks of VirTra in the United States and/or
Movavi Screen Recorder 5 for Mac
 Movavi Screen Recorder 5 for Mac Don't know where to start? Read these tutorials: Recording screen Recording online video Recording video from players Capture any fragment of your screen or the full desktop.
Ecamm Live for Facebook User Guide
 Ecamm Live for Facebook User Guide Ecamm Live is a Facebook Live streaming app for Mac. Use the app to broadcast camera video, pre-recorded video, Skype video calls, or your Mac s screen, along with an
Create a Photo Slideshow
 Create a Photo Slideshow The Roxio Slideshow Assistant, part of the Roxio Creator suite, makes it easy to put together professional-looking slideshows with transitions and background audio. When you re
EDITING GUIDE (EDIT SUITES)
") PREMIERE PRO CC (VERSION 2015.2) EDITING GUIDE (EDIT SUITES) Version 3.3 (FEB 2016) PREMIERE PRO CC EDIT GUIDE - La Trobe University 2015 latrobe.edu.au 2 What do you want to do? 3 1. Back up SD card footage
PREMIERE PRO CC (VERSION 2015.2) EDITING GUIDE (EDIT SUITES) Version 3.3 (FEB 2016) PREMIERE PRO CC EDIT GUIDE - La Trobe University 2015 latrobe.edu.au 2 What do you want to do? 3 1. Back up SD card footage
Digital Video. Part II: Introduction to Editing and Distribution
 Digital Video Part II: Introduction to Editing and Distribution Contact Information The University of Utah Student Computing Labs Macintosh Support mac@scl.utah.edu We Will Cover History of video editing
TECHSMITH RELAY Santa Ana College Distance Education, Cesar Chavez Building Room A-101, (714) ,
 ,") TECHSMITH RELAY Santa Ana College Distance Education, Cesar Chavez Building Room A-101, (714) 564-6725, DistEd@sac.edu Techsmith Relay is a simple video creation program that allows users to record video
TECHSMITH RELAY Santa Ana College Distance Education, Cesar Chavez Building Room A-101, (714) 564-6725, DistEd@sac.edu Techsmith Relay is a simple video creation program that allows users to record video
Adobe Premiere Pro CC 2015 Certification Review
 Adobe Premiere Pro CC 2015 Certification Review 40 questions; 50 Minutes Need to know for matching and/or multiple choice: Razor tool Slide tool Rate Stretch tool Ripple Edit tool Mark In Mark Out Insert
Movie Maker Tutorial created by Cheryl McKnight
 Movie Maker Tutorial created by Cheryl McKnight The Movie Task Pane list the steps necessary in completing an editing project. If the Task Pane is turned off, go to View, and select Task Pane to toggle
Digital Display Wall Application Management Software
 VWAS6.0 日常使用手册 Digital Display Wall Application Management Software VWAS6.0/VCMS/VEMS User Manual Copyright Statement This manual is the copyright property of VTRON. Without prior written approval from
COPYRIGHTED MATERIAL. Using Adobe Bridge. Lesson 1
 Lesson Using Adobe Bridge What you ll learn in this lesson: Navigating Adobe Bridge Using folders in Bridge Making a Favorite Creating metadata Using automated tools Adobe Bridge is the command center
Premiere Pro Desktop Layout (NeaseTV 2015 Layout)
") Premiere Pro 2015 1. Contextually Sensitive Windows - Must be on the correct window in order to do some tasks 2. Contextually Sensitive Menus 3. 1 zillion ways to do something. No 2 people will do everything
Premiere Pro 2015 1. Contextually Sensitive Windows - Must be on the correct window in order to do some tasks 2. Contextually Sensitive Menus 3. 1 zillion ways to do something. No 2 people will do everything
Movavi Video Editor 14 Plus
 Movavi Video Editor 14 Plus Don't know where to start? Read these tutorials: How to remove trial restrictions Make a video in easy mode Make a video in full-feature mode Save your video without a watermark
Garageband Basics. What is GarageBand?
 Garageband Basics What is GarageBand? GarageBand puts a complete music studio on your computer, so you can make your own music to share with the world. You can create songs, ringtones, podcasts, and other
Media Commons Workshop: Final Cut Pro X
 Media Commons Workshop: Final Cut Pro X mediacommons@psu.edu mediacommons.psu.edu/instruction/workshops Description This is the Final Cut Pro Video Basics workshop. In this workshop we will cover how to