User s Guide to Breeze Web Application. Page 1
|
|
|
- Gyles Wells
- 6 years ago
- Views:
Transcription

1 User s Guide to Breeze Web Application Page 1
2 Contents Breeze Web Site Navigation Tips... 5 The Save Button... 5 The Cancel Button... 6 The New Button... 6 The Users, Databases and Users Tabs... 6 Images... 6 Drop Boxes... 7 Hyperlinks... 7 User Types and Roles... 8 Client Administrator: This is a function performed by the Client Data Administrator... 8 Function:... 8 Apparatus Needed:... 8 Roles Needed:... 8 Client User Full Access (has all Roles): All Functions except User/Data Setup... 8 Function:... 8 Apparatus Needed:... 8 Roles Needed:... 9 Mobile Inspector: Inspections only... 9 Function:... 9 Apparatus Needed:... 9 Page 2
3 Roles Needed:... 9 Inspection Report Manager: Views Reports Only... 9 Function:... 9 Apparatus Needed:... 9 Roles Needed:... 9 Work Order Manager: Creates/Views/Prints Work Orders Only Function: Apparatus Needed: Roles Needed: Username and Password Restrictions Usernames Passwords Sign In and Out of the Breeze Web Application Sign In to the Desktop Breeze Application with a Browser Login to the Breeze Mobile Inspection Application on an iphone, ipod Touch, or ipad Client Administrator: Users, Roles, Databases, Time Zone, Users Administration >> My Account >> Users >> Edit >> Edit Roles Administration >> My Account >> Databases >> Add/Edit Database Administration >> My Account >> Edit Database >> Edit Roles Administration >> My Account >> Users Database Sync Web Inspections with a Mobile Phone or Tablet Page 3
4 Sign In: Create an Inspection: Do the Inspection: View Inspection Reports: Web Inspections with a Desktop Browser Create Inspection Add Areas to Inspection Do an Inspection Inspect Areas / Items Select Corrective Actions Answer Yes or No to the Area Web Inspection Reports Web-Based Work Orders Create a Work Order Add Work Order Types, Action, Receivers and Requesters Assign Areas Assign Employees Additional Fields Change Field Labels Work Order Report Page 4

5 Breeze Web Site Navigation Tips 1. Tabs and hyperlinks enable you to navigate around the web site. The Save Button 2. The Save button creates the record or saves changes to the record. 3. YOU MUST SAVE EVERY RECORD ON EVERY FORM BEFORE CLOSING THE FORM. Page 5
6 The Cancel Button 4. The Cancel button does two things: a. Cancel prevents any changes to the record from being saved b. Cancel closes the form and returns back to the previous form The New Button 5. To add records, click the button that begins with New. The Users, Databases and Users Tabs 6. Click the tab that will take you to lists of Users or Databases. Images 7. The Pencil = edit 8. The Magnifying glass = view 9. Reports buttons: Page 6
7 10. Move between reports or records: 11. Work Order buttons Drop Boxes 12. Drop Boxes on the header bar. for selecting records. Hyperlinks 13. Hyperlinks on the header bar. for moving backwards Page 7
8 User Types and Roles Client Administrator: This is a function performed by the Client Data Administrator Function: 1. To Enter/View/Change Client Users, Roles, Databases, Users and Time Zone: 2. To create Inspections 3. To View and Print Inspection Reports 4. To Enter/ View/Print Work Orders and Work Order Reports Apparatus Needed: 5. iphone 6. ipod Touch 7. Web browser Roles Needed: 8. Client Administrator - inherits all other roles by default a. Mobile Inspector b. Work Order Manager c. Inspection Reporter Manager (required) Client User Full Access (has all Roles): All Functions except User/Data Setup Function: 1. To create Inspections 2. To View and Print Inspection Reports 3. To Enter/ View/Print Work Orders and Work Order Reports Apparatus Needed: 4. iphone 5. ipod Touch 6. Web browser Page 8
9 Roles Needed: 7. Mobile Inspector 8. Work Order Manager 9. Inspection Reporter Manager (required) Mobile Inspector: Inspections only Function: 1. To create Inspections 2. No permission to View and Print Inspection Reports Apparatus Needed: 3. iphone 4. ipod Touch Roles Needed: 5. Mobile Inspector Unless you also give this User the Role of Inspection Report Manager, he/she will have no access to reports! Inspection Report Manager: Views Reports Only Function: 10. To View and Print Inspection Reports Apparatus Needed: 11. web browser Roles Needed: 12. Inspection Reporter Manager (required) Page 9
10 Work Order Manager: Creates/Views/Prints Work Orders Only Function: 1. To Enter/ View/Print Work Orders and Work Order Reports Apparatus Needed: 2. web browser Roles Needed: 3. Work Order Manager 4. Inspection Reporter Manager (required) Page 10
11 Username and Password Restrictions 14. Username and Password will usually be remembered on the device or computer you use. 15. Username must be a minimum of 6 digits long (no capital letters or number restrictions) 16. Password must be a minimum of 6 digits long (no capital letters or number restrictions) Usernames 17. Username recommendation #1 a. All small letters with an underscore between first and last name b. Example: linda_bier 18. Username recommendation #2 a. Identical to your address b. Example: Linda@breezesoftware.com 19. Username recommendation #3 - Something short a. linda123 b. linda123 Passwords 20. Password recommendation #1 a. Same as Username 21. Password recommendation #2 a. Something short Page 11

12 Sign In and Out of the Breeze Web Application Sign In to the Desktop Breeze Application with a Browser 22. Recommended Procedures a. Enter Username and Password b. Click the Remember me box. c. Click the Sign in button d. Use the application e. Sign Out before closing your browser f. To Sign out a User or change the Sign in User name, click the Sign Out link in the upper right corner Page 12

13 Login to the Breeze Mobile Inspection Application on an iphone, ipod Touch, or ipad 23. Recommended Procedures a. Enter Username and Password b. Click the Remember me box. c. Click the Sign in button d. Use the application e. Sign Out before closing your browser f. To Log Out a User or change the Login User name, click the Sign Out link at the bottom Page 13
14 24. It is best to Sign Out every time the web browser is closed. This will allow the same User to Sign In to multiple places without having to wait. 25. If a User does not Sign Out, the User must wait 10 minutes before signing in on another device. Page 14

15 Client Administrator: Users, Roles, Databases, Time Zone, Users Although Breeze personnel may enter Users, Roles and Databases for a Client, so may the Client Administrator Client Administrator Adding Users, Roles, Databases and Users 26. When editing a Client, the Users and Databases tabs do two things: a. Each tab displays the current information about the Clients Users and Databases b. Each tab has a button to add New Client Users or New Client Databases. 27. Add a User a. Users have unique Usernames and Passwords Page 15
16 b. No User can have the same Username and Password as any other User c. Any Username or Password that needs to be changed must be changed by a Site or Client Administrator. d. Each User has an Address e. Each User has a unique Time Zone which appears on inspection reports f. To make this user a Client Administrator, check the Client Administrator box. Breeze does not recommend there be more than One Client Administrator Page 16

17 Client Administrator: Add Users and Roles You must Save every record on every form before closing the form Each User has a unique Time Zone which appears on inspection reports. Page 17
18 Administration >> My Account >> Users >> Edit >> Edit Roles 28. You may continue setting up the Users: a. Users may perform any or all of these things: i. Do Inspections ii. Enter Work Orders iii. View Reports b. Users must have a Role set up for each of the things above that they have permission to do 29. When editing a User, you do two things: a. Add User Roles for Specific Databases i. Select the Database from the Drop Down Box ii. Select the Role for the User from the Drop Down Box iii. Click the Add Role button b. Delete User Roles for Specific Databases i. Click the X next to the Database and Role in the List 30. The Roles created here will also appear in the Edit Databases area. 31. Any Role changed here will also change in the Edit Databases area. Page 18

19 Administration >> My Account >> Databases >> Add/Edit Database 32. Databases: a. A client may have one or more databases b. Each database needs to be synced individually c. Data viewed on the local workstation and on the web will be identical after synchronization for each database synced. Client Administrator Adding Database Administration >> My Account >> Edit Database >> Edit Roles 33. When adding or editing a Database, you can do two things: a. Add User Roles for the Selected Database i. Select the User from the Drop Down Box ii. Select the Role for the User from the Drop Down Box iii. Click the Add Role button b. Delete User Roles for the Selected Database: Click the X next to the User and Role in the List c. The Roles created here will also appear in the Edit Users area. d. Any Role changed here will also change in the Edit Users area. Page 19

20 Client Administrator: Adding Users and Roles for a Database Page 20

21 Administration >> My Account >> Users 34. The Client Administrator may add as many Users as needed for ing reports from Breeze-Online. These Users will appear in the drop down box on every report. Add as many s as you may need. They will all appear in the drop box on reports Page 21

22 Database Sync 35. The Client Administrator may sync one or more databases to the web application 36. Each database that will be used for Work Orders or Inspections must be synched initially for the Client Users to Inspect, Enter Work Orders and view reports. 37. Each synchronization will update the inspection and work order data on both the workstation and the web 38. Open the Breeze Sync Application on your desktop 39. Enter your Username and Password in the login box. 40. If you have more than one database, click the drop down box for the Remote Database and find the correct database to sync 41. Browse to select your local database (the database that syncs with the web database. 42. If you have synced before and have only one database, the Sync Application will remember the locations of these two files. 43. If you have more than one Client Account and the Sync Application will not allow you to sync the databases, you may click the Change Accounts button and enter the Administration Account that has permission to sync. Page 22

23 44. Click the Synchronize button Page 23

24 45. The Green Check icons indicate that the data has been synchronized. The Blue Exclamation icons have not yet synced. Page 24

25 46. When the sync is complete, Done will appear on the bottom of the window 47. Close the sync application and continue using the local desktop application and the web application. 48. The next time you run the sync application, the data will identify new and changed records and sync the most recent changed. 49. In this manner you may see and work with identical data on the web and your local desktop. Be aware that the Inspections synched from your desktop and showing in the web application include only inspections 365 days old or less. Web Inspections with a Mobile Phone or Tablet 50. From your Apple or Android Mobile device, you may do inspections using the Breeze-Online Inspection interface. 51. Client Users do not need to have the Custodial Solutions application on their workstation to use the web application 52. Go to: Page 25
26 Login: 1. Login with your User Name and Password. 2. Click the Remember me checkbox and the device will Log you in automatically from now on. 3. Tap the Login button. Page 26

27 Create an Inspection: 4. If there is no database showing on the black bar under the Select a Database button, tap the button to choose the database that holds the Facilities you want to inspect. Tap the Select a Database button and choose a database. 5. Tap the Make this my default bar. 6. Tap the Home button 7. If the database is correct, continue to the next step. 8. The Inspector chooses to create a new inspection or open an existing inspection 9. To create a new inspection, tap on the Create Inspection button Page 27
 15. Tap button: Save Process: 16. Enter items 2, 3, maybe 4 and 5, then 17. Tap the Create Save button 18.")
28 Data Entry Items: 10. Date created (auto-fill) 11. Date Inspected (auto-fill) Change if you choose. 12. Inspector's Name (drop down box) 13. Select a Template for this inspection (if desired) 14. Report Name (inspector enters this using the ABCs) 15. Tap button: Save Process: 16. Enter items 2, 3, maybe 4 and 5, then 17. Tap the Create Save button 18. At any time, a user may tap the Home button to begin again. Page 28

29 Process to Begin the Inspection: 19. Tap the Inspection just created by its name and date. 20. The Inspection Details page will appear. 21. At any time, a user may tap the Home button to begin again. Process to Change the Date Created or Date Inspected: 22. Tap Change Dates Page 29
30 23. Change either date as needed. 24. Tap the Inspections button to return to the current inspection. 25. Tap the Home button to start over. Process to add more Areas: 26. Under the Actions heading, tap the Add Areas button. 27. At any time, a user may tap the Home button to begin again. 28. The user may also tap the Inspections button to return to the list of Inspections. Page 30


31 Process to Add Areas: 29. Tap to select the Customer for this inspection 30. At any time, a user may tap the Back button to return to the previous page. 31. Tap to select the Facility for this inspection 32. To go back to Customers, tap the Customers button 33. At any time, a user may tap the Exit button to return to the Inspections Page. 34. Tap to select the Section for this inspection 35. To go back to Facilities, tap the Facilities button 36. At any time, a user may tap the Exit button to return to the Inspections Page. Page 31

32 Process to Add Areas: 37. Tap to select each Area to add to this inspection. Areas Selected will be checked and turn green. 38. To select Areas from a difference Section, tap the Section button 39. When done adding all the Areas for this inspection, tap the Exit button. Page 32

33 Do the Inspection: 40. After an Inspection has been created, the Inspector taps the Do Inspection button to open an existing inspection 41. From here, a user may also return to Home by tapping the Home button. 42. Or the user may return to the list of inspection already created by tapping the Inspections button Process to drill down to Areas: 43. Tap a Facility for this inspection or the Back button to return to the previous form. This will take user to the Sections form. 44. Tap a Section for this inspection or the Facilities button to return to the Facilities form. This will take user to the Areas form. 45. Tapping the Exit button will return user to the Inspections form. Page 33
34 Process to Select an Area to Inspect: 46. Uninspected Areas display by default (blue tab) 47. Uninspected Areas display N/A for Not Inspected. 48. When Inspected, an Area will only appear when All Areas is tapped. 49. Tap one Area to inspect it. 50. Tapping the Sections button will return user to the Sections form. 51. Tapping the Exit button will return user to the Inspections form. 52. After inspecting Areas, a user may tap the All Areas tab to display Area results. Page 34

35 Process of Inspecting One Area: 53. The Area Name is displayed on the black header. 54. Tap Items to begin the inspection. Page 35
 for Not Inspected 58. If you do not want to inspect an item, do not tap it. The N/A box will remain checked.")
36 Process of Inspecting Items: 55. Tap an Item the first time and it will turn green for Acceptable 56. Tap a second time to turn the Item pink for Not Acceptable 57. Tap a third time to turn the Item white (N/A) for Not Inspected 58. If you do not want to inspect an item, do not tap it. The N/A box will remain checked. All N/A Items will not be included in the reports. 59. The Uninspected Items and All Items tabs toggle between showing Uninspected Items (the default) and all the Items. 60. Tap these tabs to limit your Items list. 61. When done with Items, tap the Actions button to go to Corrective Actions. 62. If you do not want to select Corrective Actions, tap the Area button to select another Area to inspect. Page 36


37 Process of Selecting Corrective Actions: 63. The Area Name is displayed on the black bar. 64. Tap each Corrective Action for this Area. They will turn green and display a checkmark when selected. 65. Scroll down to find the Corrective Actions you need. 66. Tap the Selected Actions tab to display only the Corrective Actions you selected for this Area. 67. Tap the All Actions to display the whole list. 68. Should user need to see the Items list again, tap the Items button top right. 69. If not, tap the Area button top left. Page 37


38 Process of Completing the Inspection for this Area: 70. If the Employee showing is not the person who cleaned the Area, tap the Employee name and select the correct employee. 71. Click the Comment button to enter notes about the Area 72. Here is where you decide if the Area is Acceptable Yes or NO. 73. This decision will not affect the score for the Area. It is a decision based upon the inspector's view of the Area. 74. After checking "Yes" or "No", click the Areas button to select the next Area for Inspecting. 75. If user fails to select Yes or No for this Area, a reminder will display. 76. Tap Now to return the form for selecting Yes or No. This is most common because a User fails to check Yes or No. 77. Tap Later if selecting Yes or No is not appropriate at this time. 78. Tap X to return to the Areas to be inspected screen. Page 38

39 Process of Inspecting Additional Areas: 79. Uninspected Areas display by default (blue tab) 80. Uninspected Areas display N/A for Not Inspected. 81. When Inspected, an Area will only appear when All Areas is tapped. 82. After inspecting Areas, a user may tap the All Areas tab to display Area results. 83. When All Areas for this Section have been inspected, the user may tap the Sections button to select another Section with Areas not inspected. 84. If you do not want to inspect an Area, do nothing. The N/A box will remain checked and all N/A Areas and Items with not be included in the reports 85. When all Areas for all Facilities and Sections have been inspected, tap the Exit button to return to the Inspection form. Page 39
40 Process of Completing the Inspection: 86. When all Areas for all Facilities and Sections have been inspected, tap the Exit button to return to the Inspection form. 87. If user wants to perform another inspection, tap the Inspections button. 88. If user has completed all Inspections, tap the Home button. Page 40
41 View Inspection Reports: 89. If user would like to view the results of this inspection or any other inspection on the web, you may do so by tapping the View Inspection Reports button. 90. If you want this inspection to be synced back to the database on your local computer or server, you must have the Database Administrator do a Breeze Database Synchronization. 91. After the synchronization is complete, all inspections will be identical in the Web database and the Local Database. 92. When user is finished with the breeze-online.com application, user must Sign Out by tapping the Sign Out button. By doing this you may sign in on the web to view reports or inspections. If User does not Sign out, User will have to wait for 10 minutes before signing in again on the web. This prevents duplicate Sign Ins by a single User. Page 41

42 Web Inspections with a Desktop Browser 53. Go to: Enter your Username and Password: 55. The following Start Page will appear: 56. To start inspecting, click the Do Inspection tab 57. Select the database from the drop down box if you have more than one database. 58. Click the Create Inspection button. Page 42
 63.")
43 Create Inspection 59. Change your dates if necessary 60. Enter the name of the Inspector 61. If you will use an Inspection Template, select it from the drop box 62. Enter a Report Name (required) 63. Click the Create Inspection button Page 43

44 93. The following form will open 94. If you are ready to begin Inspecting, click the Do Inspection magnifying glass. 95. Click the Assign Areas pencil if you want to add more Areas to your inspection (in addition to those automatically entered from your template. Page 44
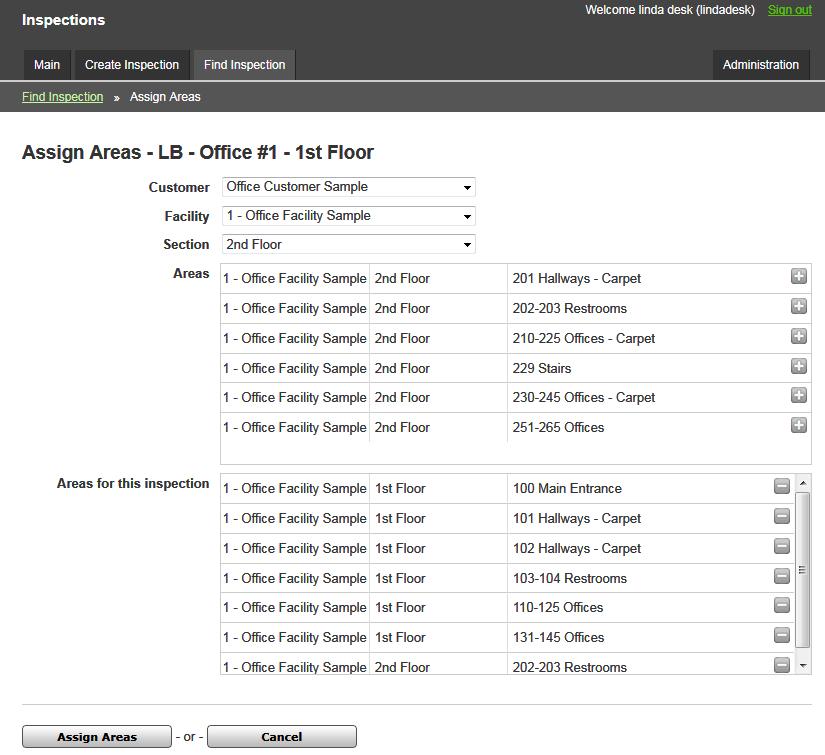
45 Add Areas to Inspection 64. The Assign Areas form will open 65. Select the Customer, Facility and Section for your New Areas 66. Click the Plus sign button on the right next to each Area to add. 67. The Areas added will appear in the bottom list. 68. If you make a mistake and do not want an Area selected, click the Minus button next the Area in the bottom box. The Area will be removed. 69. Make sure to click the Assign Areas button to add the Areas to your Inspection. 70. If you click Cancel, no Areas will be added. 71. ipad specific instructions for scrolling: a. the scroll bar will not appear on an ipad b. to scroll either the upper box (Area) or lower box (Areas for this inspection), two fingers, touching together, placed inside the Areas or Areas for this inspection boxes, when moved either up or down, will scroll the list box. Page 45
46 Page 46

47 Do an Inspection 72. To begin inspecting, click the Do Inspection Magnifying Glass. 73. If you have more than one Facility or Section, select the appropriate one from the drop down boxes. Page 47

48 74. The first Area will be ready to inspect. 75. If the Employee showing is incorrect, select a new Employee from the drop down box. 76. Notice that the Uninspected Areas radial button is selected. This means that only the Areas you have not inspected will appear in the lists. If you want all Areas to appear whether or not you have already inspected them, click the All Areas radial button. 77. Notice that the Uninspected Items radial button is selected. This means that only the Items you have not inspected will appear in the lists. If you want all Items to appear whether or not you have already inspected them, click the All Items radial button. Inspect Areas / Items 78. As you answer Yes or No to each Item in the list, it will disappear. 79. If you want to see all the Items as you answer Yes or No, you may click the All Items radial button at any time to see them. Page 48

49 Make sure to enter Comments before clicking the Done Area button Page 49
50 Example: Items already inspected have been hidden. Example: Items already inspected are showing Page 50
51 80. Before clicking the Done Area button, make sure to enter your Comments in the Comments box. 81. Then click Done Area 82. Corrective Actions will display. 83. To select a Corrective Action, click on the words, not the checkbox. 84. The Corrective Action will be highlighted and the checkbox will display a check mark. Page 51

52 Select Corrective Actions Page 52

53 Answer Yes or No to the Area 85. After entering corrective actions, make sure to check the Area as Acceptable Yes or No. 86. Then Click the Done button 87. The next Area in your inspection is automatically selected and ready to inspect. 88. If you have the Uninspected Radial button selected, those Areas already inspected will not appear in the list box. 89. If you click the All Areas radial button, they will all appear whether inspected or not. 90. Continue through all the areas until you are finished inspecting. 91. Any Area or Item that has not been answered Yes or No (left at N/A) will not appear in your reports. Page 53

54 Web Inspection Reports 92. Go to: Client Users do not need to have the Custodial Solutions application on their workstation to use the web application 94. Make sure you are looking at the correct database by checking the bar at the top. 95. Click on the magnifying glass next to the report you want to view or print. 96. This form will appear. 97. Select any of the buttons to view a report. Page 54

55 98. Click the Next button to move to the next inspection report in sequence 99. Click the Previous button to move to the previous inspection report in sequence 100. Two sample reports follow Page 55
56 Page 56
57 Page 57


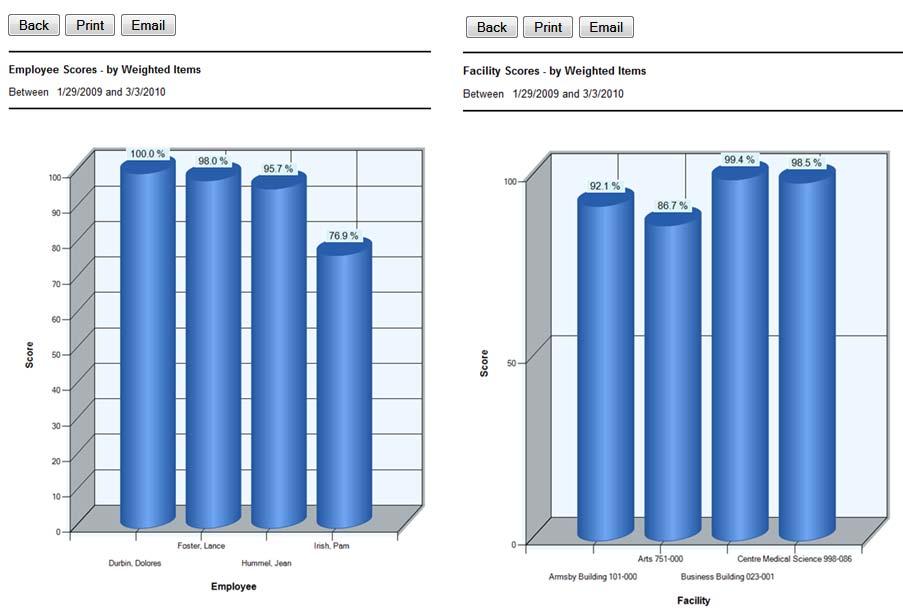
58 101. To any report to a User in your User List, Click the Button and select the recipient from the list. \ 102. Then click the Send Button 103. On the Main page, there are buttons for graph reports for selected Employees, Facilities and Supervisors by Date Range 104. Select the Employees or Facilities to include in the report by holding the CTRL key and clicking on the Facilities you want or holding the Shift key to select a range. Page 58

59 105. The Start and End Dates reflect those dates between the first and last inspection for this Database. You may select any date range you choose within those dates. Page 59
60 Page 60

61 H2 Page 61

62 Web-Based Work Orders 106. Work Orders may be entered either on the desktop or on the web On the desktop, Work Orders will sync with the web Work Orders when the sync application is run 108. Client Users do not need to have the Custodial Solutions application on their workstation to use the web application 109. Click the New Work Order button to start a new Work Order 110. Every Work Order has a unique sequential number and date, sorted in descending order. Create a Work Order All New or Changed Work Orders must be Saved upon completion, or Save and Start New Work Order Page 62
63 Page 63
64 111. There are many fields for data in a Work Order. Next to the Drop Down Boxes Received by, Requested By, Work Order Type and Work Order Action are small buttons with Plus signs. Click the Plus sign button next to a drop down box if you do not find the drop down item needed in the list All the forms for entering new data into a Drop Down Box function the same way For Example: To Add a Work Order Type, click the Plus sign button, then click the Add Row button at the bottom Enter a new item into the new space provided. (Details are not required) 115. Click the Save Changes Button this will Save and Exit this form 116. To Delete a Work Order Type, click the button with the Minus sign. A Work Order Type that is being used may not be deleted Click the Save Changes Button this will Save and Exit this form 118. When you click the Cancel button, all additions, deletions or changes made to the Work Order Types will be cancelled, even though they may appear to have been changed on the form Cancel will prevent any additions, deletions and changes and Exit this form Add Work Order Types, Action, Receivers and Requesters Page 64
65 120. To Assign Areas and Employees to this Work Order, Click the Assign Areas or Assign Employees buttons. Page 65
66 Assign Areas 121. Select the Customer, Facility and Section from the Drop Boxes to display the list of Areas from which to choose. Page 66
67 122. Click the Plus sign next to each Area you want on the Work Order, they will appear in the lower box Click the Assign Areas Button to Save the form will close and the Areas will appear on your Work order 124. When you click the Assign Employees button, this form will open Assign Employees 125. Click the Plus sign next to each Employee you want on the Work Order and they will appear in the lower box Click the Assign Employees Button to Save the form will close and the Employees will appear on your Work order Page 67
68 Additional Fields 127. There are optional additional fields on your Work Order. Click this button to show them. Page 68
69 128. This optional additional data will appear on your reports if you choose to use it Some of the Label Names for the additional fields are changeable by you. Click the Change Fields button to change the names. Change Field Labels Enter the changes in the My Label Name column and click the Save Changes Button Page 69
70 Work Order Report 130. The Work Order Details button previews a report for this work order 131. Click Back or Print to continue Page 70
SAS Mobile BI 8.14 for ipad and iphone: Help
 SAS Mobile BI 8.14 for ipad and iphone: Help 2 Welcome Getting Started How Do I Use the App? Check out the new features. View the videos: SAS Mobile BI for ipad and iphone playlist on YouTube Use VoiceOver?
Learn more about Pages, Keynote & Numbers
 Learn more about Pages, Keynote & Numbers HCPS Instructional Technology May 2012 Adapted from Apple Help Guides CHAPTER ONE: PAGES Part 1: Get to Know Pages Opening and Creating Documents Opening a Pages
For information on troubleshooting common issues, see the Technical Support section in the online help.
 GIFTS Online Mobile GIFTS Online Mobile gives users a mobile version of their GIFTS Online system in order to easily access grant related information when it is not convenient to log into their main version
SAS Mobile BI 8.1 for Windows 10: Help
 SAS Mobile BI 8.1 for Windows 10: Help Welcome Getting Started How Do I Use the App? Check out the new features. View the videos: SAS Mobile BI for Windows playlist on YouTube Use JAWS software? See the
CONTENTS. Using the Emperia Scan app 3. Using the Web Portal to access leads 6 FAQ 9
 CONTENTS Using the Emperia Scan app 3 Using the Web Portal to access leads 6 FAQ 9 Using the Emperia Scan app when there is no network connectivity 9 How to stop auto sync of scans 10 Changing assigned
Working with PDF s. To open a recent file on the Start screen, double click on the file name.
 Working with PDF s Acrobat DC Start Screen (Home Tab) When Acrobat opens, the Acrobat Start screen (Home Tab) populates displaying a list of recently opened files. The search feature on the top of the
Intuitive Mobile Quick Reference Guide
 Intuitive Mobile Quick Reference Guide Contents: Heading Page Intuitive Mobile and Login Screen 2 Site Selection and Main Menu 3 Job List and Job Detail Screen 4 Job Detail Red Flag, Warranty Dates and
Use Office 365 on your iphone or ipad
 Use Office 365 on your iphone or ipad Quick Start Guide Note: Please be aware that the Office Mobile app, the OneNote Mobile app, and Microsoft accounts such as Outlook.com and Hotmail.com, are provided
Wireless Setup Guide (for Windows XP, Windows Vista, Windows 7, Windows 8 and Mac OSx)
") Wireless Setup Guide (for Windows XP, Windows Vista, Windows 7, Windows 8 and Mac OSx) Wireless Setup Guide The following steps will take you through the process of setting up and connecting to your wireless
Wireless Setup Guide (for Windows XP, Windows Vista, Windows 7, Windows 8 and Mac OSx) Wireless Setup Guide The following steps will take you through the process of setting up and connecting to your wireless
Edmodo for Teachers Guide (Taken directly from Edmodo s site.)
") Edmodo for Teachers Guide (Taken directly from Edmodo s site.) Table of Contents: 1. Teacher Sign Up 2. Create a Group 3. Manage Your Groups 4. Small Group 5. Co-Teaching 6. Student Sign up 7. Post a Message
Edmodo for Teachers Guide (Taken directly from Edmodo s site.) Table of Contents: 1. Teacher Sign Up 2. Create a Group 3. Manage Your Groups 4. Small Group 5. Co-Teaching 6. Student Sign up 7. Post a Message
Mobile 3.1 ios & Android v2
 Mobile 3.1 ios & Android v2 Bookshelf Mobile 3.1 ios and Android v2 1 Introduction VitalSource Bookshelf lets you download and access books on any of the following devices: Android smartphone or tablet
Outlook Web App User s Guide
 Outlook Web App User s Guide The new Outlook Web App will be replacing your old Outlook Web Access. This upgrade includes many new features that were only previously available through Microsoft Outlook.
Quick Reference Guide to the IBS 2018 App
 Quick Reference Guide to the IBS 2018 App The IBS 2018 app is your guide to everything happening at the Builders Show as well as the NAHB Board Meeting. You can search education, events, meetings, speakers
YOUR Guide on using the Online Retailer EMPERIA. Scan app and web portal
 YOUR Guide on using the Online Retailer EMPERIA Scan app and web portal CONTENTS Using the Emperia Scan app 3 Using the Web Portal to access leads 6 FAQ 9 Using the Emperia Scan app when there is no network
Delaware Comprehensive Assessment System
 Delaware Comprehensive Assessment System About the Mobile Secure Browsers for ipad and Android Tablets 2013 2014 Delaware Department of Education, 2013 Descriptions of the operation of the Test Delivery
PISD WalkThroughs. Table of Contents
 PISD WalkThroughs Table of Contents Table of Contents... 1 PISD WalkThrough Web App... 2 Current Users... 2 Beginning of the School Year Updates... 2 Troubleshooting Wifi Connections... 2 New Users / New
YOUR Guide on using the Online Retailer EMPERIA. Scan app and web portal
 YOUR Guide on using the Online Retailer EMPERIA Scan app and web portal CONTENTS Using the Emperia Scan app 3 Using the Web Portal to access leads 6 FAQ 9 Using the Emperia Scan app when there is no network
Puma Energy elearning Hub. How To Guide for Staff Includes FAQs and Troubleshooting Guide
 Puma Energy elearning Hub How To Guide for Staff Includes FAQs and Troubleshooting Guide How To Guide for Staff Welcome to the elearning Hub. This How To Guide will highlight the steps you need to take
How to Transfer Your Contact Information Into Microsoft Outlook 2010
 How to Transfer Your Contact Information Into Microsoft Outlook 2010 Your Contacts Exported To an Excel Spreadsheet (CSV Format ) Now Located on a Device or Computer Then To Outlook 2010 on an L&F Computer
PBS Current vs New User Interface Side by Side
 This bulletin reviews the Current User Interface () compared to the New User Interface () and is meant as an introduction to the as well as some of its functionality. Although the processes bids the same
CME E-quotes Wireless Application for Android Welcome
 CME E-quotes Wireless Application for Android Welcome This guide will familiarize you with the application, a powerful trading tool developed for your Android. Table of Contents What is this application?
Table of Contents. How to Set up Kappa . How to Set up Outlook 2016 on PC How to Set up Outlook 2016 on a Mac 5-6
 Table of Contents How to Set up Outlook 2016 on PC. 2-4 How to Set up Outlook 2016 on a Mac 5-6 How to set up Email on Your Apple Mac 7-9 Setting up/troubleshooting Kappa Email for an iphone/ipad. 10-17
GETTING STARTED. Client Axcess Guide. Logging In to Client Axcess the First Time. 4. Enter your verification code on the Identity Verification screen.
 GETTING STARTED Logging In to Client Axcess the First Time When you log into Client Axcess for the first time, you will receive a one-time verification code to enter when setting up your password and establishing
Entering Grades in Evolve Faculty Centre
 Entering Grades in Evolve Faculty Centre General Support contacts for Evolve Grades Processing: Name Email Phone Extension Shelley Rowan Records Manager Shelley.Rowan@flemingcollege.ca 1512 Marg McGee
Nasuni Mobile Access User Guide
 Using Nasuni Mobile Access, you can access data stored in the Nasuni Filer using mobile devices, including ios-based devices (such as iphone and ipad) and Android phones. You can perform tasks such as
Allen University Microsoft Office 365
 Allen University Microsoft Office 365 Here's what you need to know to complete the transition On December 18 at 5:00pm, the University will complete the migration to Office 365, a new version of the hosted
Content Author's Reference and Cookbook
 Sitecore CMS 7.0 Content Author's Reference and Cookbook Rev. 130425 Sitecore CMS 7.0 Content Author's Reference and Cookbook A Conceptual Overview and Practical Guide to Using Sitecore Table of Contents
Save and Restore Backups using itunes File Sharing
 Save and Restore Backups using itunes File Sharing Pictello (ipad, iphone and ipod touch). In this tutorial you will learn how to create, save and restore Pictello library backups with itunes File Sharing
Telemet Mobile Application
 Telemet Mobile Application Access stock market and portfolio data outside Telemet Orion on all mobile devices with access to the internet Executive Summary Telemet America, Inc. is proud to introduce a
Before You Begin: Removing your GOS Account from the mail application installed on your ios device.
 Information Technology Division This overview document below is for installing the Outlook app on your ios phone. Email Online Migration - Outlook for ios Last revised: May 2018 Last reviewed: May 2018
PREA Online Audit System
 PREA Coordinator User Manual PREA Online Audit System PREA Coordinator User Manual MAY 2016 Table of Contents Introduction... 1 The PREA Coordinator s Role in the OAS... 1 This Manual... 1 Additional Help...
WellEz Information Management, LLC. Administrator User s Guide
 WellEz Information Management, LLC Administrator User s Guide Table of Contents Introduction to WellEz... 3 A Brief Overview... 4 Creating an Asset... 8 Creating a Location... 10 Creating a Location Work
Welcome to Selector2GO Help
 Welcome to Selector2GO Help World Headquarters 445 Hamilton Avenue, 7th floor, White Plains, New York 10601 United States of America Support: +1 914 259 4900 support@rcsworks.com 2004-2018. All Rights
Banner 9 Transition - Quick Reference
 Banner 9 is a major upgrade to the Banner Student System, providing a completely new look and feel. It is easily compatible with all mobile devices. It introduces the Application Navigator, a single web
iphone sync option in UVC Vers. 8
 iphone sync option in UVC UVC has the ability to sync your contacts and calendar appointments to your mobile iphone or ipad device. This allows users to add and edit contacts and appointments items in
Secure Transfer Site (STS) User Manual
 User Manual") Secure Transfer Site (STS) User Manual (Revised 3/1/12) Table of Contents Basic System Display Information... 3 Command Buttons with Text... 3 Data Entry Boxes Required / Enabled... 3 Connecting to the
Secure Transfer Site (STS) User Manual (Revised 3/1/12) Table of Contents Basic System Display Information... 3 Command Buttons with Text... 3 Data Entry Boxes Required / Enabled... 3 Connecting to the
Community Mobile Patrol Officer User Guide v13.4
 Community Mobile Patrol Officer User Guide v13.4 To download the PatrolLIVE App for the iphone: 1. On the iphone, go to the App Store and search for Guard Tour (Please note: The App is not supported on
TRAINING GUIDE. Tablet Cradle to Mobile GIS
 TRAINING GUIDE Tablet Cradle to Mobile GIS Tablet Cradle to Mobile One of the critical components of mobile is the GIS piece, and also can be the most complex. The mobile GIS maps are designed to consume
Remote Access Resources
 Remote Access Resources Windows 7 Windows 10 Firm Laptop Windows Windows Mac Computer Apple ipad Mac Computer Android Devices Apple ipad Remote Access Remote Access for Personal Computer (Windows) Quick
MyRED - Fundamentals. August 5, 2010 Page 1
 Table of Contents Signing into MyRED... 2 Navigation Overview... 2 Page Search... 3 Using Search Pages... 4 Searching for Students... 6 Advanced Search... 6 Viewing Information... 7 New Window... 8 Effective
WEB CREATOR FILE MANAGER
 WEB CREATOR FILE MANAGER TABLE OF CONTENTS TABLE OF CONTENTS... 2 ADMINISTRATIVE PERMISSIONS... 3 ACCESSING WEBSITE SETTINGS... 3 FILE MANAGER... 3 Accessing File Manager... 3 Views... 4 Actions... 4 FOLDER
Maximo Self Service Center
 Maximo Self Service Center Once you have received an email regarding your registration approval, go to the following web address: https://maximo.mysodexo.com Log in to the Self Service Center: Your User
Web Access User Guide for Employees
 Web Access User Guide for Employees 11/1/12 TABLE OF CONTENTS FUNCTIONS PAGE # Logging In 1 Forgot Username/Password 1 Changing Your Password 1 Logging Out 1 What is Available To You? 1 My Pay Statements
TRAINING GUIDE. Mobile for Administrators Part 3 - GIS
 TRAINING GUIDE Mobile for Administrators Part 3 - GIS Mobile for Administrators - GIS One of the critical components of mobile is GIS, and it can also be the most complex. The mobile GIS maps are designed
Workspace ios Content Locker. UBC Workspace 2.0: VMware Content Locker v4.12 for ios. User Guide
 UBC Workspace 2.0: VMware Content Locker v4.12 for ios User Guide Navigating Content Locker Content Locker centralizes all your enterprise data in a single container and integrates existing content repositories
Office 365. Contents. Features, screen shots, and instructions are subject to change at any time Page 1
 Office 365 Contents Office 365..1 Accessing Your Email...3 First Time Set-Up...4 Changing Your Password. 6 The Email Environment...8 Reading Pane View...9 Reading Your Emails.10 Reading Attachments...11
SAS Mobile BI 8.15 for Android: Help
 SAS Mobile BI 8.15 for Android: Help Welcome Getting Started How Do I Use the App? Check out the new features. View the videos: SAS Mobile BI for Android playlist on YouTube Use TalkBack? Learn the specialized
TRAINING GUIDE. Tablet: Cradle to Mobile GIS
 TRAINING GUIDE Tablet: Cradle to Mobile GIS Tablet Cradle to Mobile One of the critical components of mobile is the GIS piece, and also can be the most complex. The mobile GIS maps are designed to consume
XE Faculty Grade Entry AN ENHANCEMENT REVISED NOVEMBER 10, 2015
 XE Faculty Grade Entry AN ENHANCEMENT REVISED NOVEMBER 10, 2015 Objective of this training Go over the new steps to access and enter grades Show how to export the grade template using the wizard Show how
Drupal 7 guide CONTENTS. p. 2 Logging In
 Drupal 7 guide Drupal is a widely used, open-source, free platform that has an easy-to-use content management system for updating websites. This guide was created by the Health Communication Core (www.healthcommcore.org)
USER GUIDE Time and Attendance User Administration Human Capital Management Suite
 USER GUIDE Time and Attendance User Administration Human Capital Management Suite Ormed Information Systems Ltd. Version 1.2 (January 2015) What s Inside What s Inside...1 Introduction...2 Procedures...3
Ablyss CMS Tablet. Works on Android OS Lightweight and portable hardware Can work offline & allows you to synchronise when back in network range
 Ablyss CMS Tablet Works on Android OS Lightweight and portable hardware Can work offline & allows you to synchronise when back in network range Logging In Once the app has started the security settings
PrinterOn Mobile Printing Instructions for Current Students
 PrinterOn Mobile Printing Instructions for Current Students PrinterOn mobile printing allows Saint Paul College students to print from their personal mobile devices to the GoPrint Stations on campus. Students
Please keep this document for your records. 3. Tap the FREE button. Once tapped, it will turn into the INSTALL button.
 Accessing CopWare s iphone Version of the California Peace Officers Legal Sourcebook Installation Instructions: Please keep this document for your records. 1. After purchasing our software for the iphone,
Outlook: Web Access. Outlook: Web Access AIS Vienna
 Outlook: Web Access AIS Vienna Table of Contents Introduction to OWA...1 Log On... 1 OWA Workspace... 2 Hiding/Displaying the Reading Pane... 3 Collapsing/Expanding the Outlook Bar... 4 Log Off... 5 Sending
bla bla Groupware Compact Guide
 bla bla Groupware Compact Guide Groupware Groupware: Compact Guide Publication date Friday, 01. June 2018 Version 7.10.0 Copyright 2016-2018 This document is the intellectual property of OX Software GmbH
Office 365 Mobile Instructions. Setup on Apple (iphone, ipad) devices
 devices") Office 365 Mobile Instructions Setup email on Apple (iphone, ipad) devices 1. Open Settings 2. Select Mail, Contacts, Calendars. 3. Select Add Account 4. Select Microsoft Exchange 5. Enter your email address
Office 365 Mobile Instructions Setup email on Apple (iphone, ipad) devices 1. Open Settings 2. Select Mail, Contacts, Calendars. 3. Select Add Account 4. Select Microsoft Exchange 5. Enter your email address
What is a PDF? A PDF is the actual pattern you download and bring into knitcompanion.
 PDFs Contents PDFs Overview... 1 PDF List... 2 Using Open In... 4 PDF Viewer... 8 Swipe to Edit... 11 Creating a New Project... 12 Renaming the PDF... 14 Transferring the PDF to another app using Apple's
Salesforce Classic Guide for iphone
 Salesforce Classic Guide for iphone Version 35.0, Winter 16 @salesforcedocs Last updated: October 27, 2015 Copyright 2000 2015 salesforce.com, inc. All rights reserved. Salesforce is a registered trademark
CHI Easy Access: Register From on the CHI Network
 CHI Easy Access: Register From on the CHI Network Go to chieasyaccess.org and click "Register Now." You'll see the screen below. Your CHI Easy Access account is configured to use the same password you
Nextiva Drive The Setup Process Mobility & Storage Option
 Nextiva Drive The Setup Process The Setup Process Adding Users 1. Login to your account and click on the Account icon at the top of the page (this is only visible to the administrator). 2. Click Create
Learning Management System (LMS) Student Instructions
 Student Instructions") Learning Management System (LMS) Student Instructions CLUB LEARNING INSTITUTE Page 1 of 16 Table of Contents How do I login to the learning management system (LMS)?... 3 Navigation Panel... 4 How do I
Learning Management System (LMS) Student Instructions CLUB LEARNING INSTITUTE Page 1 of 16 Table of Contents How do I login to the learning management system (LMS)?... 3 Navigation Panel... 4 How do I
How to set up staff on your ios device (iphone, ipod or ipad)
") How to set up staff email on your ios device (iphone, ipod or ipad) This document shows you how to set up a connection between your Apple mobile device and your university staff Exchange mail account,
How to set up staff email on your ios device (iphone, ipod or ipad) This document shows you how to set up a connection between your Apple mobile device and your university staff Exchange mail account,
Microsoft Outlook Basics
 Microsoft Outlook 2010 Basics 2 Microsoft Outlook 2010 Microsoft Outlook 2010 3 Table of Contents Getting Started with Microsoft Outlook 2010... 7 Starting Microsoft Outlook... 7 Outlook 2010 Interface...
Barracuda Message Archiver Mobile App Instructions
 Barracuda Message Archiver Mobile App Instructions Android Instructions 1. Download and install the app for your mobile device. Here is the link to the app for Android devices: Android - https://play.google.com/store/apps/details?id=barracuda.bma&hl=en
MyGuest Training Guide
 MyGuest Training Guide Launching MyGuest... 2 Check Settings... 3 Requests Screen... 5 Handling Requests... 8 Complete Requests... 12 SEARCH for a Request... 13 Add A Request As Staff Member... 14 Support...
Save and Restore Backups using itunes File Sharing
 Save and Restore Backups using itunes File Sharing Proloquo2Go (ipad, iphone and ipod touch). In this tutorial you will learn how to create, export and import backups with itunes File Sharing using the
User Guide. Last Updated June 201 6
 User Guide Last Updated June 201 6 1 TABLE OF CONTENTS 1 Basics 4 1.1Logging In 4 1.2Dashboard 5 1.2.1 Tabs 5 1.2.2 Action Items 6 1.2.3 Coordinator s Dashboard 6 2 Forms 6 2.1Common Form Operations 6
Google Docs: ipad Technology Training and Development 6632 Bandera Rd, Building D San Antonio, Texas (210)
") Technology Training and Development 6632 Bandera Rd, Building D San Antonio, Texas 78238 (210)397-8126 Table of Contents Getting Started...3 G Suite...3 Sign in Glossary...3 ipad Passcode...3 Apple ID...3
Technology Training and Development 6632 Bandera Rd, Building D San Antonio, Texas 78238 (210)397-8126 Table of Contents Getting Started...3 G Suite...3 Sign in Glossary...3 ipad Passcode...3 Apple ID...3
Salesforce Classic Mobile Guide for iphone
 Salesforce Classic Mobile Guide for iphone Version 41.0, Winter 18 @salesforcedocs Last updated: November 30, 2017 Copyright 2000 2017 salesforce.com, inc. All rights reserved. Salesforce is a registered
User Guide. Web Intelligence Rich Client. Business Objects 4.1
 User Guide Web Intelligence Rich Client Business Objects 4.1 2 P a g e Web Intelligence 4.1 User Guide Web Intelligence 4.1 User Guide Contents Getting Started in Web Intelligence 4.1... 5 Log into EDDIE...
Safe Exam Browser - Secure Web Exam Delivery
 Safe Exam Browser - Secure Web Exam Delivery Preamble The Speedwell Safe Exam Browser prevents students from interacting with their computer s operating system or other applications during an online exam.
TALHI Mobile App Guide
 TALHI Mobile App Guide GETTING STARTED DOWNLOAD THE FREE TALHI APP TO YOUR SMART PHONE OR TABLET: iphone and ipad users search TALHI on the Apple App Store. Android users search TALHI on the Google Play
Welcome to the Opus Bank Mobile Banking App User Guide
 Welcome to the Opus Bank Mobile Banking App User Guide 1.855.678.7226 servicecenter@opusbank.com www.opusbank.com Table of Contents Enroll in Mobile Banking & Install App... 3 Login to Personal Online
Electronic Receipts. Printing, Saving and Retrieving Electronic Receipts INTRODUCTION CONTENTS
 Electronic Receipts Printing, Saving and Retrieving Electronic Receipts INTRODUCTION CU*Answers is pleased to introduce its first-ever integrated electronic receipt system. This booklet describes the CU*BASE
Texas Division How to Login and Register for My IT Support and ServiceNow
 Texas Division How to Login and Register for My IT Support and ServiceNow Go to texas.mychiitsuppport.org. You'll see the screen below. My IT Support/ServiceNow is a national system and utilizes national
Uncorkd User Manual v6.0 Contents
 Uncorkd User Manual v6.0 Contents Getting Started... 2 Restaurant Control Panel... 2 Logging In... 2 Preferences... 2 Categories... 5 Beverages... 7 Cocktails... 9 Food... 9 Assigning Devices to the Menu...
Table of Contents... ii. GO AHEAD BRING YOUR OWN DEVICE TO WORK... 1 Requirements... 1
 Table of Contents... ii GO AHEAD BRING YOUR OWN DEVICE TO WORK... 1 Requirements... 1 1: Use AT&T Toggle Applications on an iphone or ipad... 1 AT&T Toggle... 2 Set up Work Email within AT&T Toggle...
Plain Dealer e-edition Troubleshooting
 Plain Dealer e-edition Troubleshooting Plain Dealer subscribers are eligible for both the print and e-edition products, depending on the service purchased. Email Reminder Subscribers must have a valid
Introduction to iauditor +
 Introduction to iauditor + Login & Setup Login Page When you first launch the iauditor app you will be asked for a username and Password. Tap in the first cell to enter your username. Your username will
FatStax LLC ext 105
 Overview of FatStax Web FatStax Web provides FatStax users access to the same content that is available on their ipad from any device that has internet access: Desktop, tablet or Smart Phone. With much
U001: Navigating in COMPASS
 U001: Navigating in COMPASS Page 1 of 32 U001 NAVIGATING IN COMPASS SUBJECTS COVERED IN THIS UNIT Introduction... 3 Logging In... 7 Changing your Password... 9 COMPASS Navigator Screen... 10 Tool Bar Functions...
Rooms Management Manual
 Fidelio Suite 7 Rooms Management Manual Front Office Version 7.13 Creation Date: March 2002 Delphi is a trademark of Borland. MSDOS, Windows 95, Windows-NT and Microsoft Word are trademarks of Microsoft
WEBUS Web Updating System Client User s Guide
 WEBUS Web Updating System Version 2.3 TelVue Virtual Television Networks 16000 Horizon Way, Suite 500 Mt. Laurel, NJ 08054 Phone (800) 885-8886 (TVTN) Fax (856) 886-7411 www.tvtn.tv Table of Contents WEBUS...
Training Manual for Researchers. How to Create an Online Human Ethics Application
 Training Manual for Researchers How to Create an Online Human Ethics Application What is in this document This manual is intended to provide general tips on using functionality specific to QUEST online
Export / Import using itunes File Sharing
 Export to itunes File Sharing Access Edit Mode Tap the pencil button on the bottom toolbar to access Edit Mode. Select a Button or a Folder Select to the button(s) you want to export/ import. A checkmark
Page Topic 02 Log In to KidKare 02 Using the Navigation Menu 02 Change the Language
 Page Topic 02 Log In to KidKare 02 Using the Navigation Menu 02 Change the Language help.kidkare.com 03 Enroll a Child 03 Withdraw a Child 03 View Pending and Withdrawn Children 04 View Kids by Enrollment
Learn Center LMS Student Instructions
 VERTICLIMB Learn Center LMS Student Instructions 1 Table of Contents How do I login to the Learn Center LMS (learning management system)?... 3 Navigation Panel... 4 How do I take a course?... 5 Course
QST Mobile Application for Android
 QST Mobile Application for Android Welcome This guide will familiarize you with the application, a powerful trading tool developed for your Android. Table of Contents What is this application? Logging
Merlin Project Go Guide ProjectWizards
 Merlin Project Go Guide 2018 ProjectWizards Contents - as of April 2018 Create documents 1 New Document 3 Load Document 5 Document from Server / Dropbox 6 icloud Drive 9 Locations 10 Opening documents
WEB TIME SUPERVISOR GUIDE
 Revised 02/23/2018 WEB TIME SUPERVISOR GUIDE CLIENT RESOURCE PAYLOCITY.COM TABLE OF CONTENTS Web Time... 3 Home... 15 Employees... 28 Reports... 130 Web Kiosk Setup... 132 Glossary... 156 Index... 158
Using Online Activity Center
 Using Online Activity Center Creating custom views in the Activity Center You can select up to six fields to control which data appears in the Activity Center for each transaction type. For example, a
The Kindred Directory allows you to search for employees and locations across all of our lines of business.
 Release 2.0 July 2017 1 GETTING STARTED The Kindred Directory allows you to search for employees and locations across all of our lines of business. The Kindred Directory can be accessed in a variety of
Tutorial. Administrative Version with Reporting
 Tutorial Administrative Version with Reporting Welcome to the PoliceOne Academy, your online solution for must-have training from some of the most renowned experts in law enforcement! This tutorial will
Atriuum Mobile Interface
 Introduction Book Systems, Inc. provides the Atriuum Mobile Interface (AMI) application for Apple iphone, ipod touch, ipad, and ipad mini devices and Android devices so that librarians can continue to
Basic ipad Use. Your ipad:
 Basic ipad Use Your ipad: Taking a screen shot: Hold down the home key and then press and release the sleep/wake switch. The screen will white out for a moment and you have just taken a screen shot! The
Expedient User Manual Getting Started
 Volume 1 Expedient User Manual Getting Started Gavin Millman & Associates Pty Ltd 281 Buckley Street Essendon VIC 3040 Phone 03 9331 3944 Web www.expedientsoftware.com.au Table of Contents Logging In...
New User Orientation PARTICIPANT WORKBOOK
 New User Orientation PARTICIPANT WORKBOOK INTEGRATED SOFTWARE SERIES New User Orientation PARTICIPANT WORKBOOK Version 2.0 Copyright 2005 2009. Interactive Financial Solutions, Inc. All Rights Reserved.
BM Solutions Mortgage Portal. Document upload - Case tracking - Secure messaging Mobile technology. User Guide 15 January 2018 V3.
 BM Solutions Mortgage Portal Document upload - Case tracking - Secure messaging Mobile technology User Guide 15 January 2018 V3.0 KEY BENEFITS Moving forward together with secure online document upload
Using the Microsoft Remote Desktop on non-windows devices
 Using the Microsoft Remote Desktop on non-windows devices You can use the free Microsoft Remote Desktop Client to connect to the DGLPM Server from virtually any Apple Mac, iphone, ipad, or Android device