Boundless Desktop Documentation
|
|
|
- Winfred Jacobs
- 5 years ago
- Views:
Transcription
1 Boundless Desktop Documentation Release Boundless Sep 20, 2017
2
3 Contents 1 What is Boundless Desktop? 1 2 System requirements Windows system requirements Mac system requirements Installing Boundless Desktop Installing Boundless Desktop on Windows Installing Boundless Desktop on Mac OS X Uninstalling Boundless Desktop Quick start guide Windows Mac OS X Boundless Desktop components QGIS pgadmin Qt Designer GDAL/OGR Python interpreter Plugins Boundless plugins for QGIS Boundless QGIS Plugin Repository i
4 ii
5 CHAPTER 1 What is Boundless Desktop? Boundless Desktop is a fully supported software package prepared by Boundless and available for Windows and Mac OS X platforms. It s composed of open source geospatial client-side tools and is capable of addressing the most demanding desktop GIS users needs, including spatial analysis, data management, cartography and web publishing. Boundless Desktop 1.0 is composed of the following set of open source tools: QGIS 2.14 by Connect plugin for QGIS by Boundless PgAdmin 1.22 by Qt Designer 4.8 for QGIS by GDAL/OGR 2.1 by (See Boundless Desktop components section for more details on each component) Boundless Desktop is also enhanced by a set of Boundless-supported plugins for QGIS, those are aimed at improving QGIS functionality, but also a better integration with the other two Boundless Products: Boundless Suite and Boundless Exchange. (See more in Boundless plugins for QGIS) The central element of our QGIS installation is the Boundless connect plugin, which acts as a single entry point to Boundless technology and content for QGIS. This provides access to Boundless Connect content, which currently includes Boundless-supported plugins. Boundless Desktop is not composed solely of zeros and ones! It also comes with the deep technical knowledge and immediate readiness of Boundless experts. From product maintenance and day-to-day online support, whatever are your needs, there is a Boundless support plan suited for you (see more about it in following Boundless Connect page). 1

6 Fig. 1.1: Boundless Desktop ecosystem 2 Chapter 1. What is Boundless Desktop?
7 CHAPTER 2 System requirements Boundless Desktop should run well on most recent hardware systems. Nevertheless, the performance may vary depending on the data type, data size, and the type of operation/analysis performed. The following system requirements are the minimum and recommended settings for reliable average use. Note: Currently, Boundless does not provide Boundless Desktop installers for Linux. Read more about it in the Installing Boundless Desktop section. Windows system requirements Minimum: OS: 64-bit Windows 7 (SP1) or Server 2008 R2 CPU: Hyperthreaded dual core RAM for Desktop: 1 GB Screen resolution: 1280x800 at standard dpi Screen color depth: 32-bit Video RAM for Desktop: 256 MB or higher Graphics card: DirectX 9 (OpenGL 2.0) Disk space for Desktop (and data): 3 (10) GB Recommended: OS: 64-bit Windows 10 or higher CPU: Quad core or better RAM for Desktop: 2 GB or higher 3
8 Screen resolution: 1440x900 or higher at standard dpi Screen color depth: 32-bit Video RAM for Desktop: 512 MB or higher Graphics card: DirectX 11 (OpenGL 3.2) or better Disk space for Desktop (and data): 3 (40) GB or higher Mac system requirements Minimum: Hardware: Apple OS: OS X 10.9 Mavericks CPU: Intel Core 2 Duo RAM for Desktop: 1 GB Screen resolution: 1280x800 at standard dpi Screen color depth: 32-bit Video RAM for Desktop: 256 MB or higher Disk space for Desktop (and data): 3 (10) GB Recommended: OS: OS X El Capitan CPU: Intel Core 2 Quad, i5 or better RAM for Desktop: 2 GB or higher Screen resolution: 1440x900 or higher at standard dpi Screen color depth: 32-bit Video RAM for Desktop: 512 MB or higher Disk space for Desktop (and data): 3 (40) GB or higher 4 Chapter 2. System requirements
9 CHAPTER 3 Installing Boundless Desktop Boundless provides packages for Boundless Desktop on both Windows and OS X. Installing Boundless Desktop on Windows This section will describe how to install Boundless Desktop on Windows. Prerequisites Boundless Desktop can run on any recent hardware/software combination. See Windows system requirements for more details. Install To install Boundless Desktop on windows: 1. Double-click the downloaded installer file (Administrator permissions needed). If Windows User Account Control asks you permission to allow the app to make changes, click YES. 2. In the Welcome screen, click Next. 3. Read the License Agreement. Then, click I Agree. 4. Read the Read Me. Then, click Next. 5. Select the Destination folder where you would like to install Boundless Desktop, and click Next. 6. Select the name and location of the Start Menu folder to be created, and click Next. 7. Check the components you would like to install. You can hover the mouse over a component s name to see a full description of it. Click Next. 8. You are ready to install the software. Click Install to start the installation. 5
.")
10 9. Please wait while the installation proceeds. 10. After installation, click Finish. After a successful install, Boundless Desktop components, such as QGIS, can be run from shortcuts in the Start Menu (see Quick start guide for more information). Installing Boundless Desktop on Mac OS X This section will describe how to install Boundless Desktop on Mac OS X. Prerequisites Boundless Desktop can run on any recent hardware/software combination. See Mac system requirements for more details. Install To install Boundless Desktop: 1. Open the provided DMG archive. There will be a single BoundlessDesktop pkg 2. Double-click the installer package to launch the installer. 3. At the Welcome screen, click Continue. 4. Read the Read Me and then click Continue. 5. Read the License Agreement and click Continue. 6. When prompted about the license agreement, click Agree to continue the installation. 6 Chapter 3. Installing Boundless Desktop

11 Fig. 3.1: Welcome screen 3.2. Installing Boundless Desktop on Mac OS X 7

12 Fig. 3.2: License agreement 8 Chapter 3. Installing Boundless Desktop

13 Fig. 3.3: Read me file 3.2. Installing Boundless Desktop on Mac OS X 9

14 Fig. 3.4: Destination folder for the installation 10 Chapter 3. Installing Boundless Desktop

15 Fig. 3.5: Start Menu folder to be created 3.2. Installing Boundless Desktop on Mac OS X 11

16 12 Chapter 3. Installing Boundless Desktop

17 Fig. 3.6: Ready to install 3.2. Installing Boundless Desktop on Mac OS X 13

18 Fig. 3.7: Installation 14 Chapter 3. Installing Boundless Desktop
19 Fig. 3.8: Boundless Desktop successfully installed 3.2. Installing Boundless Desktop on Mac OS X 15

20 Fig. 3.9: Boundless Desktop package 16 Chapter 3. Installing Boundless Desktop
21 Fig. 3.10: Welcome screen 3.2. Installing Boundless Desktop on Mac OS X 17

22 Fig. 3.11: Read me file 18 Chapter 3. Installing Boundless Desktop

23 Fig. 3.12: License agreement screen 3.2. Installing Boundless Desktop on Mac OS X 19

24 Fig. 3.13: License agreement confirmation 20 Chapter 3. Installing Boundless Desktop

25 7. In the Installation type dialog check the components you would like to install and click Continue. Fig. 3.14: Installation Type screen 8. You are ready to install the software. Click Install to start the installation. 9. When prompted, enter your username and password. Click Install Software to continue. 10. Please wait while the installation proceeds. 11. After installation, click Close. After a successful install, Boundless Desktop components, such as QGIS, can be run from shortcuts in the Applications Folder (see Quick start guide for more information). Uninstalling Boundless Desktop Windows In windows, to uninstall Boundless Desktop 1.0 core apps, libs and utilities and the symbolically linked applications and documentation, use the Uninstall Desktop shortcut available in the Boundless Desktop shortcut folder or from the start menu. 1. Double-click the shortcut to run the uninstaller (administrator permissions are required). 2. In the User Account Control dialog, click YES Uninstalling Boundless Desktop 21


26 Fig. 3.15: Installation Type screen Fig. 3.16: Insert your administrator username and password 22 Chapter 3. Installing Boundless Desktop

27 Fig. 3.17: Installation 3.3. Uninstalling Boundless Desktop 23

28 Fig. 3.18: Boundless Desktop successfully installed 24 Chapter 3. Installing Boundless Desktop

29 Fig. 3.19: Uninstall Desktop shortcut location 3.3. Uninstalling Boundless Desktop 25
30 3. In the next dialog, press Uninstall to proceed with the uninstallation of Boundless Desktop from your computer. 4. Once the process is finished, click Close to close the uninstaller window. OS X In Mac OS X, to uninstall the Boundless Desktop core apps, libs and utilities, and the symbolically linked applications and documentation, use the Uninstall Desktop shortcut available in the Boundless Desktop s shortcuts folder (:menuselection: Applications > Boundless > Desktop 1.0). 1. Double-click the shortcut to run the uninstaller. Click Uninstall to start the uninstall procedure. 2. Administrator permissions are required. Enter your administrator credentials to proceed with the uninstall. 3. Once the uninstall is finished, a dialog will inform the user about what was removed. Click Quit to close it. Note: Both in Windows and Mac OS X, all user s configuration and settings (for example, QGIS settings and plugins) will be preserved for future installations of Boundless Desktop. Note: Although Boundless does not provides installers for Linux, all open source tools that ship with Boundless Desktop are also available for Linux. Please look for instructions in their communities official documentation. The Boundless Desktop components section in this documentation provide a list of links to online resources for each tool, which includes installation instructions. In that case, for installing Boundless Connect plugin or any other Boundless plugin for QGIS, please consult the Boundless plugins for QGIS section. 26 Chapter 3. Installing Boundless Desktop

31 Fig. 3.20: Boundless Desktop Uninstaller dialog 3.3. Uninstalling Boundless Desktop 27

32 Fig. 3.21: Uninstall Desktop shortcut location 28 Chapter 3. Installing Boundless Desktop

33 Fig. 3.22: Uninstall Desktop shortcut location 3.3. Uninstalling Boundless Desktop 29

34 Fig. 3.23: Entering administrator s credentials 30 Chapter 3. Installing Boundless Desktop

35 Fig. 3.24: Uninstallation complete 3.3. Uninstalling Boundless Desktop 31
36 32 Chapter 3. Installing Boundless Desktop

37 CHAPTER 4 Quick start guide Windows After installation, a Boundless Desktop shortcut is added for easy access to all the installed tools. Double-click the icon to open the shortcuts folder. Then, double-click any of the icons to launch the respective tools. Fig. 4.1: Boundless desktop shortcut and folder in windows 33

38 The same shortcuts are also added to the start menu in a group called Boundless Desktop 1.0. Click on any of the tools icons or names to launch it. Fig. 4.2: Boundless Desktop shortcuts group in the windows start menu There is also an Uninstall shortcut to easily remove Boundless Desktop from your computer. Please see Uninstalling Boundless Desktop for more information about uninstalling procedures. Note: Users should not pin the launched apps to the Windows taskbar because the pinned icons will not launch the apps correctly next time. 34 Chapter 4. Quick start guide

39 Mac OS X After installation, you will find a Boundless icon in the Applications folder. Fig. 4.3: Boundless icon in Mac OS X Applications folder Double-clicking the Boundless icon will lead you to a folder with a Desktop 1.0 icon. Double-clicking it will open the Boundless Desktop s shortcuts folder. In it, double-click any of the icons to launch the respective tool. In both Windows and Mac, there s a handy Licenses shortcut to access the licenses for each individual tool. Please make sure to consult those licenses, including Boundless EULA for Boundless desktop. There is also a link to Boundless Desktop s README file, that provide valuable information about it. For more information on how to use each tool, please see the Boundless Desktop components section Mac OS X 35

40 Fig. 4.4: Boundless desktop shortcuts folder in Mac OS X 36 Chapter 4. Quick start guide
41 CHAPTER 5 Boundless Desktop components Boundless Desktop is composed of several open source geospatial client-side tools. Each tool have it s own usefulness and facets. In the following section you will find more about each one of them, some quickstarts, and relevant links to their online resources. QGIS About QGIS is the central piece of the Boundless Desktop package installation. The well known leading Open Source GIS for desktop, QGIS, is a cross-platform desktop application for viewing, editing, and analysing geospatial data from a variety of (proprietary and open) vector, raster, and database formats. QGIS s development is steered by the QGIS Project, which works with hundreds of volunteers and companies (including Boundless) from all over the world, that helps enhance and maintain QGIS. For convenience, outside the supported scope of Boundless Desktop, the following processing providers are available for QGIS s Processing framework: SAGA 2.1 by GRASS 7.0 by Orfeo Toolbox 5.0 by Quick start guide This section aims to give you a brief overview about QGIS. We will mainly focus on QGIS s graphical user interface (GUI) and some of the most common operations like loading data, managing layers and printing a map. For more detailed information on QGIS usage see the tutorials on our learning centre and/or consult QGIS s official documentation. 37

42 For this Quick start, we will be using the Natural Earth data. Please, download Natural Earth Quickstart Kit and unzip it to any folder that you find convenient to access. QGIS user interface 1. Use any of the available QGIS s shortcuts on your computer to open QGIS. Note: When running QGIS for the first time after Boundless Desktop installation, the Boundless Connect plugin s First Run Wizard will be triggered. We will not cover that process in this page, so please see the Connect plugin s documentation for instructions on how to proceed or you can just cancel it (you can resume it later). By default, the QGIS GUI should resemble the one presented in the next figure. Fig. 5.1: QGIS Graphical User Interface (GUI) As a very basic overview of the default GUI we have: On the top of the screen you will find the menu bar (1). The menu bar provides access to various QGIS features using a standard hierarchical menu. Below it, you will find the main toolbar area (2). Toolbars allow access to most of the same functions as the menus, plus additional tools for interacting with the map. Hold your mouse over the item for a short 38 Chapter 5. Boundless Desktop components

43 description of the tool s purpose. Toolbars can be moved by dragging and dropping them elsewhere and even hidden using View Toolbars. Another toolbar can be found at the left side of the screen (3). By default, the Manage Layers Toolbar is placed there. This toolbar can be used to load and create data, as we will see later. Next to it, there are two Panels by default: The Browser Panel (4), which is used to browse and load data, and the Layers Panel (5) which is used to toggle layers visibility, setting their relative order, accessing the layer s properties and much more. Panels can also be moved by drag and drop, or even hidden using View > Panels. To the right and middle of the screen, you find the map canvas (6) where all visible layers geometries will be displayed. At the bottom of the screen you will find the status bar (7) with several useful information and controls for the current map scale, the mouse pointer coordinates, the current Coordinate Reference System s EPSG code in use, and more. Loading data In QGIS, to load data, you can either use the Browser Panel, the Manage Layers Panel or even use your operating system file explorer. 1. Using the Browser Panel, browse to the sample data location, more precisely into the Natural_Earth_quick_start\10m_physical folder. Double-click the folder s names or click the plus signs next to it to view its contents. Find the ne_10m_coastline.shp shapefile and drag and drop it from the browser to the map canvas. It will load the vector layer. Fig. 5.2: Loading a layer using the Browser Panel The layer should now be visible on the map canvas, using a random style. It should also be visible in the Layers Panel list QGIS 39

44 Fig. 5.3: Successfully loaded layer 40 Chapter 5. Boundless Desktop components

45 2. Let s open another file, this time using the Manage Layers toolbar buttons. Notice that there is one button for each type of dataset, so we should select the most suitable one. Click on the Add Raster Layer. Then, navigate ito the forlder Natural_Earth_quick_start\50m_raster\NE1_50M_SR_W, select the NE1_50M_SR_W.tif file and click Open. Fig. 5.4: Loading a layer using Add Raster Layer 3. Finally, let s open an ESRI filegeodatabase, just because it has a small catch. In the guilabel:manage Layers toolbar click the Add Vector Layer. In the next dialog, under Source type check the Directory option. Then, making sure that Type is set to ESRI FileGDB, use the Browse button to navigate and select the Natural_Earth_quick_start\10m_cultural\ne_10m_admin_1_states_provinces_geodb. gdb folder. Click choose. Finally, back in the dialog window, click Open to load the layer. 4. Feel free to add any other data, but bare in mind that you can load several files at once by holding the Ctrl key during file selection in any of the two described methods. Also, you can drag and drop files from your operating system s file manager (Windows Explorer in Windows or Finder in Mac OS X) into QGIS Map canvas to load them. Navigating in the map canvas To navigate the map canvas you can primarily use your mouse wheel. For more precise control over the map canvas, you can also use the Map Navigation Toolbar tools. 1. Position your mouse pointer in an area you that you want to have a closer look, and spin your mouse wheel up to Zoom In. Spin the mouse wheel in the opposite direction to Zoom Out QGIS 41

46 Fig. 5.5: Loading an ESRI FileGeodataBase layer using Add Vector Layer 2. To pan, just press the mouse wheel down and hold it, move the pointer around and release the wheel once satisfied. 3. As stated above, the Map Navigation Toolbar provides more precise ways to navigate the map. Press the Zoom Full button to show the full extent of your data. Now select the Zoom In tool and draw a rectangle around an area of interest using by clicking and dragging the left-mouse-button on the map canvas. 4. Notice you can use the Zoom last and Zoom last to undo and redo changes to the map canvas extent Managing Layers We have been using the Layers Panel already, but let s have a deeper look into it s potential. 1. Select a layer by clicking on its name on the layers list/legend. The layer will become the active layer, meaning that many layer specific tools and actions will apply to that layer in particular. For example, select the ne_10_coastline layer and, in the Map Navigation Toolbar, click the Zoom to Layer button. This will zoom the map canvas to the full extent of a particular layer. 2. You can change the order of the layers (and consequently their rendering order) by dragging them up and down in the Layers. Do this making sure to put the raster layer at the bottom, the polygons layer above it, and the line layer at the top. 3. You can change the visibility status of the layers by (un)checking the small checkbox next to its name. Give it a try and see the result in the map canvas. (Make sure to keep all layers visible in the end) 4. By double-clicking the layer name in the Layers Panel, or right-clicking and selecting properties, you will open the layer s properties. Double-click the ne_10m_admin_1_states_provinces layer, navigate to the Style tab. There you can change how the layer will be displayed in the map. Click the Simple fill in the symbols 42 Chapter 5. Boundless Desktop components


47 Fig. 5.6: Loading an ESRI FileGeodataBase layer using Add Vector Layer Fig. 5.7: Layer active in the Layers Panel 5.1. QGIS 43


48 Fig. 5.8: Changing the order of the layers Fig. 5.9: Changing the layers visibility 44 Chapter 5. Boundless Desktop components

49 layers list, and in the Fill Fill type select No brush. Press Ok to apply the changes and close the properties dialog. Fig. 5.10: Changing the layers style in the properties dialog At this time you might want to save your project. 5. Go to Project Save or hit Ctrl+S. Choose the destination folder where your project will be saved, type in a sugestive name and click Save. Exploring data s attributes To make proper use of the dataset, one should know its attributes. Let s see how to retrieve the attributes of our layers. 1. Make sure the ne_10m_admin_1_states_provinces layer is still active and in the Attributes toolbar (if not visible, go to View Toolbars), select the Identify tool. Then, click the map over one of the geometries of the layer. The Identify Results Panel will show up, where you can see the feature s fields and respective values. (You may need to expand the panel a bit to see it all). Seeing layer s attributes using the identify tool in a feature 2. You can also see all attributes of your layer in its attributes table. Having the ne_10m_admin_1_states_provinces layer selected, click the Open Attributes table in the Attributes toolbar (or right-click the layer s name in the Layers Panel and choose Open Attribute Table ). The layer s attribute table will show up. 3. In the attribute table, use the mouse wheel to quickly scroll up and down the attributes, or the scroll bar to move horizontally. 4. Select one feature by clicking its id number at the left side of the feature s row of attributes. Then, use the Zoom to Selected Rows tool at the top of the attribute table to zoom the map to that particular layer QGIS 45

50 46 Chapter 5. Boundless Desktop components

51 Fig. 5.11: Seeing layer s full attributes using the attribute table 5.1. QGIS 47

52 Fig. 5.12: Selecting a row in the attribute table and zooming to it s feature 5. Repeat step 4 selecting several rows by holding the Ctrl key while clicking the id numbers. In the end, make sure to deselect all features using the Deselect All button in the attribute table. Add simple labels Now that we already know our data attributes, let s use one as a label for our geometries. 1. Go back to the ne_10m_admin_1_states_provinces properties menu by double-clicking its name in the Layers panel. Go to the Labels tab, and select Show labels for this layer. Then, in the Label with combobox select the abbrev field. Press Ok to apply the changes, close the properties dialog and see how it looks. Print a simple map Now let s see how to print a very simple map with the layers that we have loaded. In QGIS, you can have as many map layouts (a.k.a. print compositions) as you like, and you can manage them in the Print Composer Manager. 1. Once you are satisfied with the map s looks, click the New Print Composer button in the File toolbar, type a representative name for the composer and click Ok. 2. The print composer will open with an empty page. To add a map item, click the Add Map in the Toolbox toolbar and draw a rectangle covering most of the page by clicking and dragging over it. The map content should appear. 3. You can adjust the map item position and size by clicking and dragging the corner and side handles. 48 Chapter 5. Boundless Desktop components


53 Fig. 5.13: Layer s properties Label tab Fig. 5.14: Creating a new composer and choosing a name 5.1. QGIS 49

54 Fig. 5.15: Adding a map item to the print composer page 50 Chapter 5. Boundless Desktop components

55 4. You can also adjust the map extent using the Move item content tool. While this tool is selected, you can pan the map content clicking and dragging inside of it, and change its scale using the mouse wheel. More precise controls to set the map item position, size, scale and extent can be found in the Item properties tab/panel. Fig. 5.16: Adjusting map item s scale and extent 5. Now that we are satisfied with our very minimalist map, let s export it. In the Composer toolbar, click Export to PDF. Choose a location and name for your PDF file and click Ok. Obviously, we could do more complex maps by adding other items like legends, labels and images. Please see our learning centre to learn how to work with them. Also, if you have interessed, have a look into this QGIS Map Gallery. QGIS Browser Alongside with QGIS you will find QGIS Browser, another QGIS standalone application in the Boundless Desktop folder. QGIS Browser can be used to browse the datasets quickly on your local computer, network or remote services. You can see its metadata, preview its geometries and see the attribute table. Online resources Official Site: Documentation: Official Plugins Repository: QGIS 51

56 Fig. 5.17: Standalone QGIS browser GUI 52 Chapter 5. Boundless Desktop components

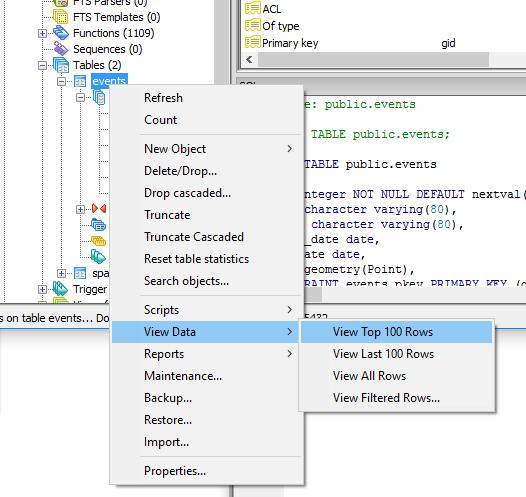
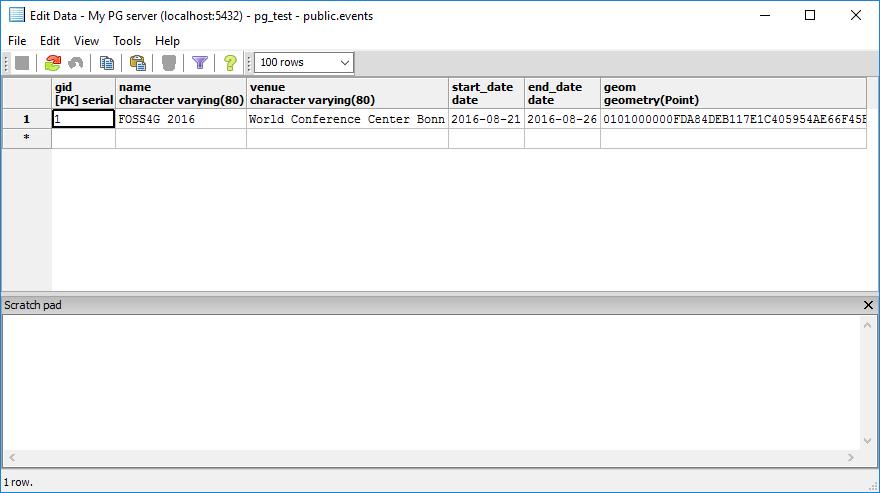
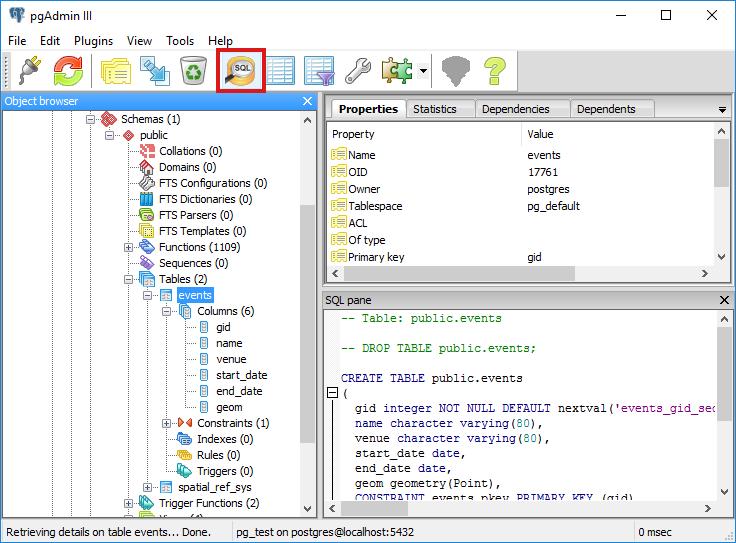
57 pgadmin About pgadmin is a feature rich Open Source administration and development platform for PostgreSQL, the most advanced Open Source database in the world, which includes, among others, the Postgis spatial extention. pgadmin is developed by a community of PostgreSQL experts around the world and is available in more than a dozen languages. It is Free Software released under the PostgreSQL License. pgadmin is aimed to answer the needs of all users, from writing simple SQL queries to developing complex databases. The graphical interface supports all PostgreSQL features and makes its administration easy. The application includes, among other things: syntax highlighting SQL editor, a server-side code editor, an SQL/batch/shell job scheduling agent, and much more. See more about it in the official website. Quick start guide Note: To execute this Quick Start Guide you will need a running instance of PostgreSQL database with the spatial extension PostGIS installed, please ask your system administrator for the connection parameters. For further information about PostgreSQL or PostGIS see Online resources. The following quick start guide will introduce you to pgadmin basics. It will show how to access to a spatially enabled database and run some simple queries on its tables. 1. Download the data for this tutorial here and unzip it anywhere you think it s convenient. 2. Import the geodata from the shapefile into the database, if you have shp2pgsql command line utility at hand you can import the data with: shp2pgsql events.shp psql -U postgres pg_test If you don t have this command available you can still use QGIS db manager to import you data into the database. 3. Open pgadmin using any of the available shortcuts in your computer. By default, pgadmin will show the following window on opening: 4. Click on the Add a connection to a server (the plug icon) to create a new database connection. 5. Enter the connection parameters in the dialog, a database connection is usually identified by: 5.2. pgadmin 53

58 host port username password 6. Click on the newly added server to open its features tree and select the events table or any other table you want to query 7. Perform operations on selected tables with Right-Click 8. Preview data with View Data View Top 100 Rows 9. Click on the SQL icon 10. Execute a spatial query: SELECT name, St_AsText( geom ) FROM events; Online resources Official Site: Documentation: PostgreSQL PostGIS 54 Chapter 5. Boundless Desktop components

59 5.2. pgadmin 55
 manner, and also test them using different styles and resolutions.")
60 Qt Designer About Qt Designer is a Qt s Framework tool for designing and building graphical user interfaces (GUIs) from Qt components. With it, you can compose and customise widgets or dialogs in a what-you-see-is-what-you-get (WYSIWYG) manner, and also test them using different styles and resolutions. The reason why Boundless Desktop includes Qt Designer is because it s extremely useful to create QGIS plugins interface dialogs, but also to create highly customised feature forms for editing vector layers attributes in QGIS projects. With that in mind, the shipped version brings a set of very convenient special widgets for QGIS (as an example, a combobox with all project s loaded layers). Qt Designer is created by the same team that delivers the Qt Framework. See more information about it in Qt official website Quick start guide The following quick start guide will introduce you to Qt Designer basics. It will show how to create a simple custom feature form for a vector layer in QGIS. 1. Download the data for this tutorial here. Unzip it to whatever folder you think is most convenient. 2. Open Qt Designer using any of the available shortcuts in your computer. By default, Qt Designer will show the New Form dialog on opening. 3. Choose Dialog with Buttons Bottom from the template\forms list and press Create. 4. Have a quick look into the Qt Designer s graphical user interface (GUI): In the middle of the screen, you will find the recently created new dialog, a blank form with only a pair of ok-cancel buttons (1). On the right-hand side of the screen you will find the Widget box which lists all available widgets (2). This list can be used to insert widgets by simply dragging and dropping them on top of the dialog. In the left-hand side (among others) there s the Property Editor (3), that can be used to edit the properties of the dialog itself or of each inserted widgets. Finally, in the top, near the menus, you will find the Forms toolbar(4), which we will use to impose some alignment layout for consistency purposes. 56 Chapter 5. Boundless Desktop components

61 Fig. 5.18: New form dialog window 5.3. Qt Designer 57

62 58 Chapter 5. Boundless Desktop components

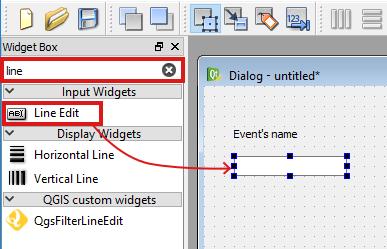
63 Note: In Mac OS X, Qt Designer starts up in Multiple Top-Level Windows mode by default, looking very different from what is presented above. To change it, you should go to Designer Preferences... and choose Docked Window in the User Interface Mode. To see what widgets we want to use on the new form, we will need to inspect the data s attributes and the layer s current feature form. 5. Open QGIS by using any of the available shortcuts in your computer. 6. Click the Add Vector layers button in the Manage layers Toolbar (or use the Layer Add Layer Add Vector Layer...) to browse to the events.shp shapefile location. (see QGIS Quick start guide if you need help with this task) 7. Right-click the recently loaded layer s name in the Layers panel and choose the option Open attribute table. Then, take some time noticing the layer s field names and types. 8. Let s now have a look at the layer s current feature form. Go back to QGIS main window, select the events layer and click Toggle editing in the digitising toolbar (if not visible check View Toolbars Digitizing toolbar). In the same toolbar, select the Add Feature tool and click anywhere in the map canvas to add a new point to your layer. This step should insert a point in the map canvas and show the default layer s feature form. Take some time analysing the feature form and then press Cancel to discard any changes. Let s go back to Qt Designer and add the necessary widgets for the first field: name. 9. We will start by adding a text label to our form. Scroll down the Widget box to locate the Label widget in the Display widgets group. Now, drag and drop it on the form. You can change the label s text either by doubleclicking label itself and typing or using the Property Editor, more precisely at the Text property. Set the value to Event's name. If necessary, expand the label box using the small squares in its border. 10. Now let s add an input widget for the name field. This time, instead of scrolling down the Widget box to locate the widget, try typing line edit on the filter bar at the top of it. Drag and drop a Line edit widget to be right below of the label. 11. Repeat steps 7 and 8, for the venue field (or just select both existing widgets pressing the Ctrl key, and copy 5.3. Qt Designer 59


64 60 Chapter 5. Boundless Desktop components

65 5.3. Qt Designer 61

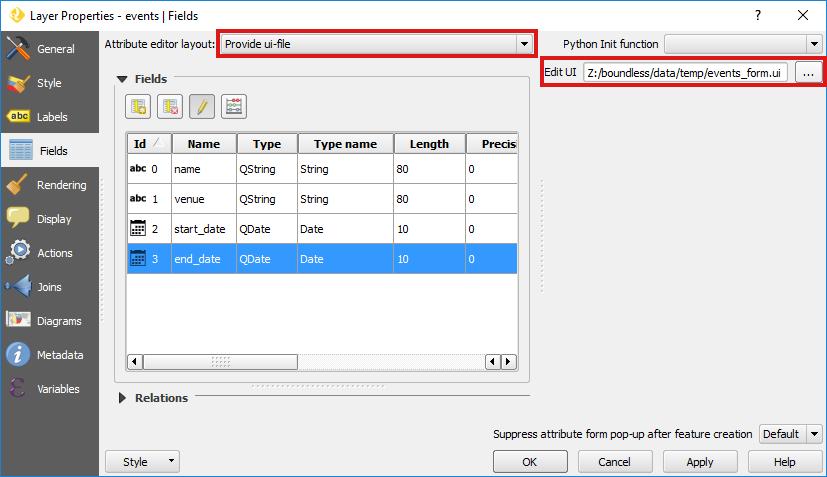
66 (Ctrl+c) and paste (Ctrl+v). Use Event's venue for the label, and put both Label and Line edit widgets below the other two. 12. Finally, let s add some special QGIS input widgets and respective labels to control the date fields. Using any of the two options described in steps 7 and 8, find and insert two QgsDateTimeEdit widgets. Put them side by side, and above them add the labels Start date and End date. Your form should look similar to the one in the following figure: To connect this dialog s input widgets to the QGIS layer s fields, we need to set their objectname property s value with the same name as the target field. As you will see, this can be done in several different ways. 1. Select the Name of event Line edit and in the Property Editor set the value of the objectname property to name. 2. Right-click the Venue of the event Line edit, and choose Change objectname. Set the value to have the name of the second field: venue. 3. For QgsDateTimeEdit widgets simply use the Object Inspector located above the Property Editor. Double-click on their current names and change them to start_date and end_date By now, all your input widgets should have the name of the corresponding fields, and in the Object Inspector you should have something similar to the next figure. We are almost finished. All we need to do now is align all widgets so that they look good together. For that, we will use a grid layout. 4. Right-click anywhere on the dialog s empty space (this will switch any focus over the widgets to the dialog instead) and choose layout Layout in a grid (or use the toolbar). After that, all widgets should be aligned according to their relative place to each others. 62 Chapter 5. Boundless Desktop components

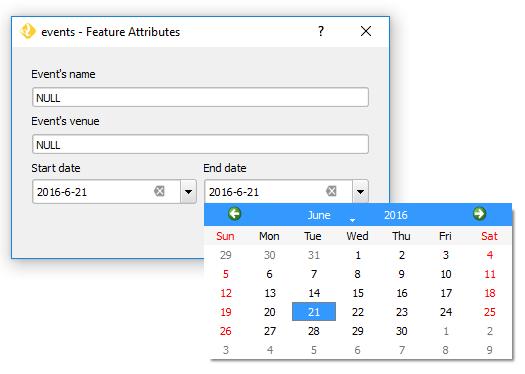
67 After you have applied the grid layout, you can now resize the form to make it more compact, by click and move the bottom-left-corner of the form. 5. Finally, using File Save as.. let s save the form using a suggestive name, for instance events_form.ui. For easy discovery, save it in the same folder that the data is located. Now, let s go back to QGIS and test the feature form in action. 6. In QGIS, right-click the layer s name in the Layers panel and choose Properties. Go to the Fields tab and in the Attribute editor layout select the Provide ui-file option. Then, in the Edit UI browse to the events_form.ui location. Finally, press Ok to apply the changes and close the layer s properties dialog. 7. Assuming that the events layer is still in editing mode, let s use the Add feature again to create a new point in the map canvas. This time, it should open the customised feature form created in Qt designer with all its widgets. To finish our feature form, let s make a small fix in the date fields otherwise the values won t be saved in the table because of the use of different date formats in Qt form and QGIS. 8. Back in Qt Designer, select the two QgsDateTimeEdit widgets (Hold the Ctrl key while clicking) and, in the Properties Editor set the Display format value to yyyy-m-dd and check the calendarpopup property. The changes will be applied on both widgets. Save the form again. 9. Back in QGIS, go to the fields tab in the Properties menu and for each date field change the widget to date/time. Make sure to use the same date format value in the Widget display as the one used in the form (yyyy-mm-dd). Also select the calendar popup and allow NULL options. Press Ok when you have finished. 10. Now, repeat step #17 to see the feature form changes take effect. The date values should be represented differently and a new icon will alow to choose the date from a popup calendar. Besides, saving the input to the table will now work fine. A lot more form customizations can be done using Qt Designer. You can use many different widgets, organise the widgets in groups or tabs, and you can even add some Python logic to make your forms responsive Qt Designer 63

68 64 Chapter 5. Boundless Desktop components

69 5.3. Qt Designer 65


70 66 Chapter 5. Boundless Desktop components

71 5.3. Qt Designer 67
72 Online resources Official Site: Documentation: GDAL/OGR About Geospatial Data Abstraction Library (GDAL/OGR) is a cross-platform C++ translator library for raster and vector geospatial data formats that is released under an X/MIT style Open Source license by the Open Source Geospatial Foundation. As a library, it presents a single abstract data model to the calling application for all supported formats. It also comes with a variety of useful command line utilities for data translation and processing. GDAL supports over 50 raster formats, and OGR over 20 vector formats. In Boundless Desktop installation, GDAL/OGR utilities are available through QGIS or the installed Command Shell. The shipped version of GDAL/OGR includes two extra libraries, LibKML and OpenJPEG2, for.kmz and JPEG2000 support, respectively. Quick start guide GDAL/OGR is a suite of command line programs that can be launched through the Command Shell. Command Shell can be found in the Boundless Desktop folder. 1. Download the data for this quick start here and unzip it anywhere you think it s convenient. 2. Open Command Shell using any of the available shortcuts in your computer. 68 Chapter 5. Boundless Desktop components

73 3. If you are on Windows, you will immediately see the list of available commands. To list them again, type o-help and press Enter. To print the list of available commands on Mac, type list-cmds and press Enter. 4. To execute a GDAL/OGR command, type its name an press enter. If executed without arguments GDAL/OGR commands normally print a short help text that can also be accessed with help option, for example: gdalinfo --help 5. To print all information on the shapefile events.shp contained in the sample data, navigate to the location of the unzipped quick start data and run the following: ogrinfo -al events.shp The output of the command is: INFO: Open of `events.shp' using driver `ESRI Shapefile' successful. Layer name: events Geometry: Point Feature Count: 1 Extent: ( , ) - ( , ) Layer SRS WKT: GEOGCS["GCS_WGS_1984", DATUM["WGS_1984", SPHEROID["WGS_84", , ]], PRIMEM["Greenwich",0], UNIT["Degree", ]] name: String (80.0) venue: String (80.0) start_date: Date (10.0) end_date: Date (10.0) OGRFeature(events):0 name (String) = FOSS4G 2016 venue (String) = World Conference Center Bonn start_date (Date) = 2016/08/21 end_date (Date) = 2016/08/26 POINT ( ) 6. To convert the shapefile events.shp to a different coordinate reference system (UTM 33N) and save it to a different format (MapInfo) you can use ogr2ogr: ogr2ogr -t_srs EPSG: f "MapInfo File" events_32633.tab events.shp 7. To check the transformed data you can use ogrinfo: 5.4. GDAL/OGR 69
74 ogrinfo -al events_32633.tab The output of the command is: Had to open data source read-only. INFO: Open of `events_32633.tab' using driver `MapInfo File' successful. Layer name: events_32633 Geometry: Point Feature Count: 1 Extent: ( , ) - ( , ) Layer SRS WKT: PROJCS["unnamed", GEOGCS["unnamed", DATUM["WGS_1984", SPHEROID["WGS 84", , ], TOWGS84[0,0,0,0,0,0,0]], PRIMEM["Greenwich",0], UNIT["degree", ]], PROJECTION["Transverse_Mercator"], PARAMETER["latitude_of_origin",0], PARAMETER["central_meridian",15], PARAMETER["scale_factor",0.9996], PARAMETER["false_easting",500000], PARAMETER["false_northing",0], UNIT["Meter",1.0]] name: String (80.0) venue: String (80.0) start_date: Date (10.0) end_date: Date (10.0) OGRFeature(events_32633):1 name (String) = FOSS4G 2016 venue (String) = World Conference Center Bonn start_date (Date) = 2016/08/21 end_date (Date) = 2016/08/26 Style = SYMBOL(a:0,c:#000000,s:12pt,id:"mapinfo-sym-35,ogr-sym-10") POINT ( ) Online resources Official Site: GDAL Raster Utilities: OGR Vector Utilities: Python interpreter A full Python interpreter install is embedded within Boundless Desktop. Desktop does not use any Python interpreter or modules that you have installed on your system. To manage packages available to the embedded Python install, open the included Command Shell application (as an administrator) and use pip: 70 Chapter 5. Boundless Desktop components
75 pip --help Please see pip documentation for more details. Pre-installed Packages The IPython and Jupyter packages are installed with Desktop. This allows for easy installation of the IPyConsole plugin for QGIS, an excellent additional console to QGIS s embedded Python console. Know issues IPython and Jupyter consoles on Windows When using the Command Shell application, the following commands will produce errors: ipython jupyter-console Alternatively, until a fix is provided, you can run these commands: ipython --simple-prompt jupyter-qtconsole (when run from a graphical user interface login) 5.5. Python interpreter 71
76 72 Chapter 5. Boundless Desktop components
77 CHAPTER 6 Plugins Boundless Desktop s functionality can be remarkably extended by the use of plugins for QGIS. Boundless plugins for QGIS QGIS for Boundless Desktop includes all the core plugins of a standard QGIS installation, plus the Boundless Connect plugin. Boundless Connect plugin, among other things, is responsible for setting up Boundless QGIS Plugin Repository, allowing user login, and can be used to find and install Boundless plugins (see more about it in Boundless Connect plugin documentation). The following list comprises the currently available Boundless plugins for QGIS with links to their official documentation. Boundless Connect Geoserver Explorer Lessons MGRS tools MIL-STD2525 Web App Builder What3words Boundless QGIS Plugin Repository QGIS s functionality can be remarkably extended by the use of plugins. This is the QGIS plugin repository for Boundless plugins that are not in the official QGIS repository. 73

78 Using the repository in QGIS If you are using Boundless Desktop, this repository should be already available in its QGIS along with the Boundless Connect plugin. Otherwise, if you are using QGIS from one of the community s installers, you can setup this repository in the Plugin manager by going to Plugins Manage and install plugins and, in the Settings tab, add a new repository with the following URL: Fig. 6.1: Adding Boundless QGIS plugin repository Note: You may wish to check Show also experimental plugins as well as Show also deprecated plugins options. The latter is required to install the updated, though deprecated, version of the OpenGeo Explorer plugin. Warning: On Windows operating systems, while trying to connect to the repository, it s possible that you get a Unable To Get Local Issuer Certificate error message, and you won t be able to access the repository. To solve the issue, try using your browser (Chrome, Edge or Internet Explorer) to open the repository s URL. This operation should add the needed certificate to your Windows system. Browsing the repository Available plugins 74 Chapter 6. Plugins
79 Archives of released versions Beta Repository If you have signed up for access to the Beta Plugin Repository, you must set it up to be able to download and install the latest beta versions of our plugins. To set the BETA repository, follow the instructions above giving the repository another name (e.g. Boundless Plugin Beta Repository) and using the following URL: Looking for something else? Boundless plugins in the official QGIS plugin repository Boundless Plugins documentation Older OpenGeo Explorer documentation Warning: OpenGeo Explorer is deprecated and users are recommended to migrate to the new GeoServer Explorer plugin Boundless QGIS Plugin Repository 75
Boundless Desktop Documentation
 Boundless Desktop Documentation Release 1.1.0 Boundless Sep 20, 2017 Contents 1 What is Boundless Desktop? 1 2 What s new in 1.1.0 3 3 System requirements 5 3.1 Windows system requirements......................................
GGR 375 QGIS Tutorial
 GGR 375 QGIS Tutorial With text taken from: Sherman, Gary E. Shuffling Quantum GIS into the Open Source GIS Stack. Free and Open Source Software for Geospatial (FOSS4G) Conference. 2007. Available online
Low Cost and Free Public Health Mapping Tools
 Low Cost and Free Public Health Mapping Tools Quantum GIS - QGIS 1) Download and Install a) QGIS can be quickly and easily installed on Windows, Macs and Linux from installers found here: http://hub.qgis.org/projects/quantum-gis/wiki/download
Introduction to QGIS: Student Workbook
 2016 Introduction to QGIS: Student Workbook Created by: MARK DE BLOIS, CEO / FOUNDER, UPANDE LIMITED WITH SUPPORT FROM THE WORLD BANK AND THE UK DEPARTMENT FOR INTERNATIONAL DEVELOPMENT (DFID) Module 3:
ADOBE DREAMWEAVER CS4 BASICS
 ADOBE DREAMWEAVER CS4 BASICS Dreamweaver CS4 2 This tutorial focuses on the basic steps involved in creating an attractive, functional website. In using this tutorial you will learn to design a site layout,
CSE 101 Introduction to Computers Development / Tutorial / Lab Environment Setup
 CSE 101 Introduction to Computers Development / Tutorial / Lab Environment Setup Purpose: The purpose of this lab is to setup software that you will be using throughout the term for learning about Python
Installation and Configuration Manual
 Installation and Configuration Manual IMPORTANT YOU MUST READ AND AGREE TO THE TERMS AND CONDITIONS OF THE LICENSE BEFORE CONTINUING WITH THIS PROGRAM INSTALL. CIRRUS SOFT LTD End-User License Agreement
NovaBACKUP CMon v19.0
 June 2017 NovaBACKUP CMon v19.0 User Manual Features and specifications are subject to change without notice. The information provided herein is provided for informational and planning purposes only. 2017
Virtual Workplace Personal Device Client Installation Instructions
 Virtual Workplace Personal Device Client Installation Instructions 1 Table of Contents About this Installation Guide... 3 Client Overview... 3 VMware Horizon View Clients... 3 UniPrint Clients... 3 Client
Introduction to QGIS: Instructor s Notes
 2016 Introduction to QGIS: Instructor s Notes Created by: MARK DE BLOIS, CEO / FOUNDER, UPANDE LIMITED WITH SUPPORT FROM THE WORLD BANK AND THE UK DEPARTMENT FOR INTERNATIONAL DEVELOPMENT (DFID) Module
Ion Client User Manual
 Ion Client User Manual Table of Contents About Ion Protocol...3 System Requirements... 4 Hardware (Client)... 4 Hardware (Server Connecting to)... 4 Software (Ion Client)... 4 Software (Server Connecting
Introduction to using QGIS for Archaeology and History Workshop by the Empirical Reasoning Center
 Introduction to using QGIS for Archaeology and History Workshop by the Empirical Reasoning Center In this workshop, we will cover the basics of working with spatial data, as well as its main uses for archaeology.
User Guide. Web Intelligence Rich Client. Business Objects 4.1
 User Guide Web Intelligence Rich Client Business Objects 4.1 2 P a g e Web Intelligence 4.1 User Guide Web Intelligence 4.1 User Guide Contents Getting Started in Web Intelligence 4.1... 5 Log into EDDIE...
Ektron Advanced. Learning Objectives. Getting Started
 Ektron Advanced 1 Learning Objectives This workshop introduces you beyond the basics of Ektron, the USF web content management system that is being used to modify department web pages. This workshop focuses
Introduction to GIS & Mapping: ArcGIS Desktop
 Introduction to GIS & Mapping: ArcGIS Desktop Your task in this exercise is to determine the best place to build a mixed use facility in Hudson County, NJ. In order to revitalize the community and take
Web Viewer Guide. HiPER LOOK Version Copyright 2016 PIXIA Corp. All Rights Reserved.
 Web Viewer Guide 2016 HiPER LOOK Version 1.4.16.0 Copyright 2016 PIXIA Corp. All Rights Reserved. Table of Contents 1 System Requirements... 5 1.1 Prerequisites... 5 1.2 Web Browser... 5 2 HiPER LOOK Web
MagicInfo VideoWall Author
 MagicInfo VideoWall Author MagicInfo VideoWall Author User Guide MagicInfo VideoWall Author is a program designed to construct a VideoWall layout and create VideoWall content by adding various elements
ECDL Module 6 REFERENCE MANUAL
 ECDL Module 6 REFERENCE MANUAL Presentation Microsoft PowerPoint XP Edition for ECDL Syllabus Four PAGE 2 - ECDL MODULE 6 (USING POWERPOINT XP) - MANUAL 6.1 GETTING STARTED... 4 6.1.1 FIRST STEPS WITH
EDINA Workshop: Creating a Campus Map and Displaying it in OpenLayers
 Contents Introduction... 2 What steps are involved?... 3 Before you start... 4 Create your campus map... 5 1. Load the basemap data into ArcMap... 5 2. Set up Symbology and Labels of Layers... 6 Improve
Microsoft Windows 10. Quick Reference. Watsonia Publishing 47 Greenaway Street Bulleen VIC 3105 Australia
 Watsonia Publishing 47 Greenaway Street Bulleen VIC 3105 Australia www.watsoniapublishing.com info@watsoniapublishing.com Quick Reference Course Code: INF1440 Table of Contents Chapter 1: Starting With
Secure Guard Central Management System
 Speco Technologies, Inc. Secure Guard Central Management System Usage Information Contents 1 Overview... 7 2 Installation... 7 2.1 System Requirements... 7 2.2 System Installation... 7 2.3 Command Line
Citrix Desktop for Home Computers Mac OS Instructions
 Citrix Desktop for Home Computers Mac OS Instructions You can use Citrix to create and access a virtual work desktop from your home computer. Step 1 Uninstall: To install the newest version of Citrix on
Cartoview Documentation
 Cartoview Documentation Release 0.8.4 Cartologic February 08, 2017 Contents 1 About Cartoview 3 1.1 GeoNode and Cartoview......................................... 3 2 Installation Guide 5 2.1 Recommended
WA L KT H R O U G H 1
 WA L KT H R O U G H 1 udig Install and Introduction 08 June 2008 TABLE OF CONTENTS 1Goals...3 2Installing and Running The udig Application...4 3Online Documentation and Tutorials...8 3.1Help Categories...9
Using Adobe Photoshop
 Using Adobe Photoshop 2 In this section we ll look at some essential things you need to know in order to use Photoshop effectively. First of all, we ll take a look at customising Photoshop s settings and
Press the Plus + key to zoom in. Press the Minus - key to zoom out. Scroll the mouse wheel away from you to zoom in; towards you to zoom out.
 Navigate Around the Map Interactive maps provide many choices for displaying information, searching for more details, and moving around the map. Most navigation uses the mouse, but at times you may also
Community Health Maps Lab Series
 Community Health Maps Lab Series Lab 6 Data Visualization with Carto Objective Understand how to upload and style data with Carto to create an online visualization of your data Document Version: 2017-08-28(Final)
OpenGeo Suite for Windows Release 3.0.1
 OpenGeo Suite for Windows Release 3.0.1 OpenGeo February 04, 2013 Contents 1 Prerequisites i 2 New Installation i 3 Upgrading vi 3.1 Upgrading from version 2.x to 3.x....................................
Introduction to QGIS
 Introduction to QGIS David Kramar, Ph.D. Minnesota State University Moorhead Department of Anthropology and Earth Science http://www.qgis.org/en/site/ Overview of Workshop What is QGIS? How do I get QGIS
IT Essentials v6.0 Windows 10 Software Labs
 IT Essentials v6.0 Windows 10 Software Labs 5.2.1.7 Install Windows 10... 1 5.2.1.10 Check for Updates in Windows 10... 10 5.2.4.7 Create a Partition in Windows 10... 16 6.1.1.5 Task Manager in Windows
GoLive will first ask you if your new site will be for one individual or a work group; select for a Single User, and click Next.
 Getting Started From the Start menu, located the Adobe folder which should contain the Adobe GoLive 6.0 folder. Inside this folder, click Adobe GoLive 6.0. GoLive will open to its initial project selection
D2M2 - GIS USER'S MANUAL
 D2M2 - GIS USER'S MANUAL USACE ERDC, July 2012 1 Content Overview of D2M2... 3 User Interface... 4 Menus... 4 File Menu... 4 Edit Menu... 5 View Menu... 5 Layer Menu... 6 Analysis Menu... 6 Tools Menu...
DOCUMENTUM D2. User Guide
 DOCUMENTUM D2 User Guide Contents 1. Groups... 6 2. Introduction to D2... 7 Access D2... 7 Recommended browsers... 7 Login... 7 First-time login... 7 Installing the Content Transfer Extension... 8 Logout...
KODAK Software User s Guide. Software Version 9.0
 KODAK Create@Home Software User s Guide Software Version 9.0 Table of Contents 1 Welcome to KODAK Create@Home Software Features... 1-1 Supported File Formats... 1-1 System Requirements... 1-1 Software
Parish . User Manual
 Parish Email User Manual Table of Contents LOGGING IN TO PARISH EMAIL... 3 GETTING STARTED... 3 GENERAL OVERVIEW OF THE USER INTERFACE... 3 TERMINATE THE SESSION... 4 EMAIL... 4 MESSAGES LIST... 4 Open
Introduction to SAGA GIS
 GIS Tutorial ID: IGET_RS_001 This tutorial has been developed by BVIEER as part of the IGET web portal intended to provide easy access to geospatial education. This tutorial is released under the Creative
Desktop & Laptop Edition
 Desktop & Laptop Edition USER MANUAL For Mac OS X Copyright Notice & Proprietary Information Redstor Limited, 2016. All rights reserved. Trademarks - Mac, Leopard, Snow Leopard, Lion and Mountain Lion
Geographical Information Systems Institute. Center for Geographic Analysis, Harvard University. LAB EXERCISE 1: Basic Mapping in ArcMap
 Harvard University Introduction to ArcMap Geographical Information Systems Institute Center for Geographic Analysis, Harvard University LAB EXERCISE 1: Basic Mapping in ArcMap Individual files (lab instructions,
KODAK Software User s Guide
 KODAK Create@Home Software User s Guide Table of Contents 1 Welcome to KODAK Create@Home Software Features... 1-1 Supported File Formats... 1-1 System Requirements... 1-1 Software Updates...1-2 Automatic
No Programming Required Create web apps rapidly with Web AppBuilder for ArcGIS
 No Programming Required Create web apps rapidly with Web AppBuilder for ArcGIS By Derek Law, Esri Product Manager, ArcGIS for Server Do you want to build web mapping applications you can run on desktop,
The Digital City: Warmoesstraat in 16 th Century
 The Digital City: Warmoesstraat in 16 th Century Manual: Weixuan Li, summer 2017 PART I: A data view of Warmoesstraat and its surroundings You probably have wandered in the restaurant/shop-packed Warmoesstraat
Mn/DOT MnCMAT Crash Analysis Application Help
 Mn/DOT MnCMAT Crash Analysis Application Contents Login... 5 User Login Dialog... 5 Login... 5 Request Access Dialog... 5 Forgotten Password Dialog... 6 Create/Open Project... 7 Create/Open Project Dialog...
Adobe Dreamweaver CS5 Tutorial
 Adobe Dreamweaver CS5 Tutorial GETTING STARTED This tutorial focuses on the basic steps involved in creating an attractive, functional website. In using this tutorial you will learn to design a site layout,
SAP GUI 7.30 for Windows Computer
 SAP GUI 7.30 for Windows Computer Student and Faculty Installation Instructions Table of Contents Caution:... 2 System Requirements:... 2 System Memory (RAM) requirements:... 2 Disk Space requirements:...
LearnOSM. PostgreSQL & PostGIS. Installing PostgreSQL and PostGIS. Reviewed
 PostgreSQL & PostGIS Reviewed 2016-09-10 LearnOSM In this chapter we will see how to set up PostgreSQL on Windows and how to create a database in which you can store geographic data. We ll be using the
End User Guide. 2.1 Getting Started Toolbar Right-click Contextual Menu Navigation Panels... 2
 TABLE OF CONTENTS 1 OVERVIEW...1 2 WEB VIEWER DEMO ON DESKTOP...1 2.1 Getting Started... 1 2.1.1 Toolbar... 1 2.1.2 Right-click Contextual Menu... 2 2.1.3 Navigation Panels... 2 2.1.4 Floating Toolbar...
CUMULUS WEB CLIENT USER ASSISTANCE 2017, CANTO GMBH. ALL RIGHTS RESERVED. Welcome!
 Cumulus is Canto s state-of-the-art Digital Asset Management solution. Cumulus makes it easy to quickly organize, find, share, and track all of your digital files: photos, logos, presentations, videos,
WinView. Getting Started Guide
 WinView Getting Started Guide Version 4.3.12 June 2006 Copyright 2006 Mincom Limited All rights reserved. No part of this document may be reproduced, transferred, sold or otherwise disposed of without
Discovering Computers & Microsoft Office Office 2010 and Windows 7: Essential Concepts and Skills
 Discovering Computers & Microsoft Office 2010 Office 2010 and Windows 7: Essential Concepts and Skills Objectives Perform basic mouse operations Start Windows and log on to the computer Identify the objects
Quick Start Guide - Contents. Opening Word Locating Big Lottery Fund Templates The Word 2013 Screen... 3
 Quick Start Guide - Contents Opening Word... 1 Locating Big Lottery Fund Templates... 2 The Word 2013 Screen... 3 Things You Might Be Looking For... 4 What s New On The Ribbon... 5 The Quick Access Toolbar...
SharePoint General Instructions
 SharePoint General Instructions Table of Content What is GC Drive?... 2 Access GC Drive... 2 Navigate GC Drive... 2 View and Edit My Profile... 3 OneDrive for Business... 3 What is OneDrive for Business...
Open. Select the database and click. Print. Set printing options using the dropdown menus, then click the
 The Original Quick Reference Guides Microsoft Access 2010 Access is a tool for creating and managing databases collections of related records structured in an easily accessible format such as a table,
Installation Guide. Research Computing Team V2.0 RESTRICTED
 Installation Guide Research Computing Team V2.0 RESTRICTED Document History This document relates to the BEAR DataShare service which is based on the product Power Folder, version 10.3.232 ( some screenshots
Software Introduction
 Software Introduction B Software Introduction Design Era Universal V11.21 November 2011 Table of Contents Welcome to Stitch/Design Era Universal software.... 1 Basic User Interface... 1 Application button
Installing Komplete 5 with Direct Install
 Installing Komplete 5 with Direct Install This document discusses how to use Receptor s Direct Install feature to install and update Komplete 5, its plugins, and its libraries. In order to install Komplete
How to Get Started. Figure 3
 Tutorial PSpice How to Get Started To start a simulation, begin by going to the Start button on the Windows toolbar, then select Engineering Tools, then OrCAD Demo. From now on the document menu selection
Install and upgrade Qlik Sense. Qlik Sense 3.0 Copyright QlikTech International AB. All rights reserved.
 Install and upgrade Qlik Sense Qlik Sense 3.0 Copyright 1993-2016 QlikTech International AB. All rights reserved. Copyright 1993-2016 QlikTech International AB. All rights reserved. Qlik, QlikTech, Qlik
Confluence User Training Guide
 Confluence User Training Guide Below is a short overview of wikis and Confluence and a basic user training guide for completing common tasks in Confluence. This document outlines the basic features that
End User Manual. December 2014 V1.0
 End User Manual December 2014 V1.0 Contents Getting Started... 4 How to Log into the Web Portal... 5 How to Manage Account Settings... 6 The Web Portal... 8 How to Upload Files in the Web Portal... 9 How
Segmentation Guide using open source resources By Paul Russell, Ana Carolina Fiorini, and Trevor Caughlin
 Segmentation Guide using open source resources By Paul Russell, Ana Carolina Fiorini, and Trevor Caughlin This guide aims to give you a step by step guidance to digitize tree cover in google earth using
In the first class, you'll learn how to create a simple single-view app, following a 3-step process:
 Class 1 In the first class, you'll learn how to create a simple single-view app, following a 3-step process: 1. Design the app's user interface (UI) in Xcode's storyboard. 2. Open the assistant editor,
QGIS Workshop Su Zhang and Laura Gleasner 11/15/2018. QGIS Workshop
 1. Introduction to QGIS QGIS Workshop QGIS is a free and open source Geographic Information System (GIS). QGIS can help users create, edit, visualize, analyze, and publish geospatial information on various
Getting Started With the Cisco PAM Desktop Software
 CHAPTER 3 Getting Started With the Cisco PAM Desktop Software This chapter describes how to install the Cisco PAM desktop client software, log on to Cisco PAM, and begin configuring access control features
If there is not a shortcut icon on the desktop: Click on the Start menu > All Apps> and select Word 2016 from the list.
 MICROSOFT WORD PART 1 Office 2016 Opening Word Double click the Word icon on the desktop. -OR- If there is not a shortcut icon on the desktop: Click on the Start menu > All Apps> and select Word 2016 from
Handout Objectives: a. b. c. d. 3. a. b. c. d. e a. b. 6. a. b. c. d. Overview:
 Computer Basics I Handout Objectives: 1. Control program windows and menus. 2. Graphical user interface (GUI) a. Desktop b. Manage Windows c. Recycle Bin d. Creating a New Folder 3. Control Panel. a. Appearance
Dynamic Work Order System (DWOS) Installation Guide
 Installation Guide") Dynamic Work Order System (DWOS) Installation Guide The Future of Job Shop Software 4506 Hwy. 20 Suite 200 Niceville, FL 32578 Phone (800) 725-7304 Support@ds2corp.com www.getdwos.com Copyright Notice
Dynamic Work Order System (DWOS) Installation Guide The Future of Job Shop Software 4506 Hwy. 20 Suite 200 Niceville, FL 32578 Phone (800) 725-7304 Support@ds2corp.com www.getdwos.com Copyright Notice
Code Finix Label Designer V 1.0 User Guide
 Code Finix Label Designer V 1.0 User Guide Introduction Welcome, Code Finix Label Designer is a family of professional labeling software products that brings a complete barcode printing solution for desktop
OU EDUCATE TRAINING MANUAL
 OU EDUCATE TRAINING MANUAL OmniUpdate Web Content Management System El Camino College Staff Development 310-660-3868 Course Topics: Section 1: OU Educate Overview and Login Section 2: The OmniUpdate Interface
Getting Started (1.8.7) 9/2/2009
 9/2/2009") 2 Getting Started For the examples in this section, Microsoft Windows and Java will be used. However, much of the information applies to other operating systems and supported languages for which you have
2 Getting Started For the examples in this section, Microsoft Windows and Java will be used. However, much of the information applies to other operating systems and supported languages for which you have
Getting Started with GIS using ArcGIS 10.6 What is GIS? and - Module 1 Creating a map document
 Getting Started with GIS using ArcGIS 10.6 What is GIS? and - Module 1 Creating a map document Marcel Fortin Map & Data Library mdl@library.utoronto.ca 2018 http://mdl.library.utoronto.ca This workshop
Acronis Backup & Recovery 11 Beta Advanced Editions
 Acronis Backup & Recovery 11 Beta Advanced Editions Quick Start Guide Table of contents 1 Main components... 3 2 Supported operating systems... 3 3 Where do I install the components?... 3 4 What you need
HCA ArcGIS. Online Tool - How To Guide V1.0 2/15/2016 HAWAII CONSERVATION ALLIANCE AGOL
 HCA ArcGIS 2/15/2016 Online Tool - How To Guide V1.0 HAWAII CONSERVATION ALLIANCE AGOL Table of Contents What is ArcGIS Online?... 1 Getting Started... 1 Getting a Login... 1 Logging In... 2 Searching
Q u i c k S ta r t G u i d e
 Quick Start Guide GETTING STARTED The first time you run Trust ID, you will be presented with an option to enable security accounts. Enabling this feature will require knowledge of the username and password
CUMULUS WEB CLIENT USER ASSISTANCE 2015, CANTO GMBH. ALL RIGHTS RESERVED. Welcome!
 Cumulus is Canto s state-of-the-art Digital Asset Management solution. Cumulus makes it easy to quickly organize, find, share, and track all of your digital files: photos, logos, presentations, videos,
Microsoft Word 2011 Tutorial
 Microsoft Word 2011 Tutorial GETTING STARTED Microsoft Word is one of the most popular word processing programs supported by both Mac and PC platforms. Microsoft Word can be used to create documents, brochures,
VMware Horizon FLEX Client User Guide
 Horizon FLEX 1.10 This document supports the version of each product listed and supports all subsequent versions until the document is replaced by a new edition. To check for more recent editions of this
Second Summer School on Digital Tools for Humanists. Instructions for the hands-on tutorial on GIS
 Second Summer School on Digital Tools for Humanists Instructions for the hands-on tutorial on GIS Augusto Ciuffoletti Dipartimento di Informatica - Università di Pisa Pisa - June 2018 Abstract This document
COPYRIGHTED MATERIAL. Using Adobe Bridge. Lesson 1
 Lesson Using Adobe Bridge What you ll learn in this lesson: Navigating Adobe Bridge Using folders in Bridge Making a Favorite Creating metadata Using automated tools Adobe Bridge is the command center
Adobe Dreamweaver CC 17 Tutorial
 Adobe Dreamweaver CC 17 Tutorial GETTING STARTED This tutorial focuses on the basic steps involved in creating an attractive, functional website. In using this tutorial you will learn to design a site
A Practical Guide to Using QGIS
 A Practical Guide to Using QGIS 1.1 INTRODUCTION Quantum GIS (QGIS) is a useful mapping software that enables the compilation and displaying of spatial data in the form of a map. Gaining experience in
Configuring the WebDAV Folder for Adding Multiple Files to the Content Collection and Editing Them
 Configuring the WebDAV Folder for Adding Multiple Files to the Content Collection and Editing Them The Content Collection should be the repository for all of the files used in Blackboard. The Content Collection
The walkthrough is available at /
 The walkthrough is available at https://downloads.openmicroscopy.org/presentations/2018/gbi-sydney / Description We will demonstrate a number of features of the OMERO platform using an OMERO server based
Quick Guide to MapWindow GIS Desktop Application
 Quick Guide to MapWindow 1 Quick Guide to MapWindow GIS Desktop Application Version 2 January 2007 Adapted by Tom Croft. This is a summary user guide for commonly used tools and capabilities and does not
Microsoft Word: Steps To Success (The Bare Essentials)
") Microsoft Word: Steps To Success (The Bare Essentials) Workbook by Joyce Kirst 2005 Microsoft Word: Step to Success (The Bare Essentials) Page Contents 1 Starting Word 2 Save 3 Exit 5 Toolbars, Alignment,
Microsoft Word: Steps To Success (The Bare Essentials) Workbook by Joyce Kirst 2005 Microsoft Word: Step to Success (The Bare Essentials) Page Contents 1 Starting Word 2 Save 3 Exit 5 Toolbars, Alignment,
Voyant Connect User Guide
 Voyant Connect User Guide WELCOME TO VOYANT CONNECT 3 INSTALLING VOYANT CONNECT 3 MAC INSTALLATION 3 WINDOWS INSTALLATION 4 LOGGING IN 4 WINDOWS FIRST LOGIN 6 MAKING YOUR CLIENT USEFUL 6 ADDING CONTACTS
2 Getting Started. Getting Started (v1.8.6) 3/5/2007
 3/5/2007") 2 Getting Started Java will be used in the examples in this section; however, the information applies to all supported languages for which you have installed a compiler (e.g., Ada, C, C++, Java) unless
2 Getting Started Java will be used in the examples in this section; however, the information applies to all supported languages for which you have installed a compiler (e.g., Ada, C, C++, Java) unless
IHS Enerdeq Desktop International Training Guide
 IHS > Decision Support Tool IHS Enerdeq Desktop International Training Guide May 2009 Version 1.5.2 2009 IHS, All Rights Reserved. All trademarks belong to IHS or its affiliated and subsidiary companies,
MicroStrategy Academic Program
 MicroStrategy Academic Program Creating a center of excellence for enterprise analytics and mobility. HOW TO DEPLOY ENTERPRISE ANALYTICS AND MOBILITY ON AWS APPROXIMATE TIME NEEDED: 1 HOUR In this workshop,
Using Sitecore 5.3.1
 Using Sitecore 5.3.1 An End-User s Guide to Using and Administrating Sitecore Author: Sitecore Corporation Date: December 12, 2007 Release: Rev. 1.0 Language: English Sitecore is a registered trademark.
CUMULUS WEB CLIENT USER ASSISTANCE 2014, CANTO GMBH. ALL RIGHTS RESERVED. Welcome!
 Cumulus is Canto s state-of-the-art Digital Asset Management solution. Cumulus makes it easy to quickly organize, find, share, and track all of your digital files: photos, logos, presentations, videos,
MCDOUGAL LITTELL EASYPLANNER USER S GUIDE
 MCDOUGAL LITTELL EASYPLANNER USER S GUIDE 1 Introduction The McDougal Littell EasyPlanner allows you to quickly and easily access Resource materials such as tests, quizzes, books, and other supporting
ImageNow Interact for ESRI ArcGIS Server Installation and Setup Guide
 ImageNow Interact for ESRI ArcGIS Server Installation and Setup Guide Microsoft Windows.NET Framework Version: 6.6.x Written by: Product Documentation, R&D Date: November 2011 ImageNow and CaptureNow are
Multi-Sponsor Environment. SAS Clinical Trial Data Transparency User Guide
 Multi-Sponsor Environment SAS Clinical Trial Data Transparency User Guide Version 6.0 01 December 2017 Contents Contents 1 Overview...1 2 Setting up Your Account...3 2.1 Completing the Initial Email and
Virtual Desktop Infrastructure Setup for MacOS
 Virtual Desktop Infrastructure Setup for MacOS Virtual Desktop Infrastructure (VDI) allows you to connect to a virtual computer and use software that you don t have installed on your own computer or mobile
Content Publisher User Guide
 Content Publisher User Guide Overview 1 Overview of the Content Management System 1 Table of Contents What's New in the Content Management System? 2 Anatomy of a Portal Page 3 Toggling Edit Controls 5
VMware Horizon FLEX Client User Guide. 26 SEP 2017 Horizon FLEX 1.12
 26 SEP 2017 Horizon FLEX 1.12 You can find the most up-to-date technical documentation on the VMware Web site at: https://docs.vmware.com/ The VMware Web site also provides the latest product updates.
Optimizing GRITS. In this chapter:
 Optimizing GRITS In this chapter: Creating Favorites and Shortcuts Optimizing Browser Performance Running Reports with Acrobat Reader Efficient Screen Navigation Creating Favorites and Shortcuts To access
Creating Interactive PDF Forms
 Creating Interactive PDF Forms Using Adobe Acrobat X Pro for the Mac University Information Technology Services Training, Outreach, Learning Technologies and Video Production Copyright 2012 KSU Department
DRAWings 8 and Wings modular 8 Embroidery Software INSTALLATION GUIDE
 DRAWings 8 and Wings modular 8 Embroidery Software INSTALLATION GUIDE We thank you for purchasing DRAWings 6 and Wings modular 5 software. We are committed to providing you with the most innovative technology.
Exercise 1: An Overview of ArcMap and ArcCatalog
 Exercise 1: An Overview of ArcMap and ArcCatalog Introduction: ArcGIS is an integrated collection of GIS software products for building a complete GIS. ArcGIS enables users to deploy GIS functionality