ezbusiness Card Management Company Reference Guide It s just easier here.
|
|
|
- Cory Hampton
- 6 years ago
- Views:
Transcription

1 ezbusiness Card Management Company Reference Guide It s just easier here. RepublicBank.com Member FDIC
2 2013, FIS. Intellectual property. All rights reserved. This document and its contents are confidential and proprietary to FIS. No reproduction or distribution of this document or its contents is allowed, in whole or in part, in any form, without the written permission of FIS.
3 DISCLAIMER FIS uses reasonable efforts to ensure the accuracy of the material described in this manual. This manual is current only through the published date. Thereafter, changes to FIS' systems, programs, and procedures may occur that are not referenced in this manual. Such changes will be communicated to the financial institution by the Client Communications department. In addition, from time to time, FIS may make updates to this manual available to the institution. FIS makes no warranty, express or implied, with respect to the quality, accuracy or completeness of this manual or the products it describes. FIS makes no representation or warranty with respect to the contents of this manual and specifically disclaims: any implied warranties of fitness for any particular purpose; and liability for any direct, indirect, incidental or consequential, special or exemplary damages, including but not limited to, lost profits resulting from the use of the information in the manual or from the use of any products described in this manual. Data used in examples and sample data files are provided for practice and illustration purposes only. Any similarities to real persons or companies in any examples or illustrations are entirely coincidental. Before using reference materials provided by FIS, the institution should review its entire Financial Institution Service Agreement with FIS to familiarize itself with all of the terms of the Agreement. The institution should specifically review the contractual obligations listed below. INSTITUTION S RESPONSIBILITIES The financial institution is solely responsible for complying with: all laws, rules, and regulations applicable to all aspects of the operations of the Visa and/or MasterCard programs; usury laws; the Truth-In-Lending, Fair Credit Reporting, Equal Credit Opportunity, and Electronic Funds Transfer Acts; all state laws and regulations regardless of whether the financial institution uses any forms or other materials supplied by FIS. The financial institution has already acknowledged that it either possesses a copy of the Visa and MasterCard by-laws, rules, and regulations, or it knows that it may receive a copy of each by requesting them in writing from Visa and MasterCard or FIS, and paying the applicable fees. i
4 CONFIDENTIALITY The financial institution has agreed to hold as secret and confidential information, reports, plans, cardholder lists, documents, drawings, writings, samples, know-how, and other proprietary material received from FIS (Confidential Information). Confidential Information provided by FIS remains the property of FIS. The financial institution must restrict access to Confidential Information received from FIS to those employees and persons in the organization who need to know such Confidential Information in order to fulfill their obligations. The contents of this manual and other information provided by FIS are deemed to be Confidential Information. The institution should review the Financial Institution Service Agreement with FIS if it has any questions regarding the above. For any questions of a legal nature, the institution should consult legal counsel. FIS, Inc. North America Card Division Documentation Department Roosevelt Blvd. St. Petersburg, FL FIS ( E-Library Address (mailto:electroniclibrary@fisglobal.com) ii
5 CONTENTS DISCLAIMER... I Institution s Responsibilities... i Confidentiality... ii COMPANY OVERVIEW... 7 ADMIN SECURITY/MANAGING ADMIN USERS... 8 Creating New Users... 8 Changing IP Address Restrictions Setting Maximum Credit Limit Amounts Viewing User Information Changing User Information Managing Your Password Changing User Passwords Locking Admin User Accounts Unlocking Admin User Accounts Inactivity Lock/Unlock Process Delete Security Account View Security Account History Reset Password Failures Deleting Users from an Admin Group Searching for Admin User Downloading Admin Login Search Results COMMERCIAL CARD Logging In to ezbusiness Card Management Using ezbusiness Navigation Features Viewing Company Lists Company Hierarchy Overview Basic Hierarchal Structure Viewing Company Hierarchies Viewing Company Account Lists Viewing Billing Account vs. Individual Account Information Searching for Account Information Downloading Account Lists Viewing Downloaded Account Lists Viewing Account Details Emulating a Cardholder Viewing Transactions Searching for Transaction Information Downloading Transaction Lists Viewing Downloaded Transaction Lists iii
6 Viewing Authorizations Viewing Transaction Detail and Disputing Transactions Viewing Statements Using the Commercial Card Navigation List Requesting Transaction Reports Viewing Level Financial Details Viewing Level Processing Information Viewing Level Administrative Information Managing Payment Accounts Making a Payment Payment Information Errors Reviewing the Payment Details Submitting a Payment Adding a Payment Account Viewing Information About an Existing payment Account Viewing Payment History Viewing Payment Details Modifying Pending Payment Cancelling a Payment Downloading Payment History Information Online Service Requests Adding Cash Access Adding a New Cardholder Fleet records Add New Driver Service Request Add New Vehicle Service REquest Add New Group Service REquest Adding or Removing PIN Access Address and Phone Change Change Cardholder Authorizations Block Changing Credit Limits Change Credit Limit Service Request Restrictions Current Temporary Credit Limit Option Active Temporary Credit Limit Indicator View Credit Lines Closing an Account Spending Restrictions Managing Spending Restrictions Online Request Merchant Restrictions Overview Manage Merchant Group Codes Merchant Category Code (MCC) List Adding a Merchant Group Review Manage Merchant Group Codes Confirm Manage Merchant Group Codes Changing Merchant GroupS iv
7 Manage Spending Limits Merchant Group Selection Adding a Spending Limit Review Manage Spending Limits Confirm Manage Spending Limits Changing a Spending Limit Delete Restrictions Delete Specific Limits Delete All Limits Browsing Merchant Group Codes Merchant Group Code Browse Browsing Spending Limits Spending Limits Browse Requesting Replacement Cards Setting Up Account AutoPay View Full Account Number View Virtual Account Security Data Using the company Inbox Viewing Sent Messages Viewing Archived Messages Searching for Companies Searching for Commercial Cardholders Alerts Company Alerts Company Navigation Company Alerts Create My Company Alerts Modify Existing Alerts Secondary Address New and Existing Admin Processing Commercial Card Account Transfers in ezcardinfo (MyCardStatement) Account Transfer and Cardholders ezcard/my Card Statement - Transaction View for Cardholders ezbusiness Transaction View for Admin Users Search by Transfer from Account in ezbusiness Payment History Account Transfer and Expense Management REPORTS Admin Activity Reports Admin User Report Admin User Hierarchy Admin User Report Purge Reporting Admin User Purge Process Report Output Select the Data to Output to the Report Report OUtput Selection Download Options Transactions Report v
8 This page intentionally left blank. vi
9 COMPANY OVERVIEW COMPANY OVERVIEW The ezbusiness Card Management Tool (ezbusiness) is a powerful credit card administration tool, which allows company and program administrators of commercial card accounts to manage their cardholder accounts. This feature allows administrative users to perform a variety of tasks, including the following: View corporation and company hierarchies and hierarchy sublevel information View a list of companies within a hierarchy View a list of commercial credit card accounts within a company Search for, view, and download information about a specific commercial credit card account Search for, view, and download account transaction information Dispute cardholder transactions Emulate a cardholder Set up payment accounts and make payments towards an account View financial details about a company or sublevel View processing details about a company or sublevel Manage online service requests, including: Add new cardholders to an account Change the credit limit for an account (temporary or permanent) Change address/phone number Close an account Request replacement cards for individual cardholders Temporary authorization block Manage messages to and from Client Services Search for a specific company or corporation within a hierarchy Search for a specific cardholder 7

10 ADMIN SECURITY/MANAGING ADMIN USERS If the User has the proper security access, they can manage the users in an admin group by performing the following tasks: Create new Admin user Associate Admin user with hierarchies Set Admin user IP Address restrictions Change Admin user profiles Delete Admin users from the system Create and reset Admin user passwords Lock Admin users from accessing ezbusiness Card Management Reset Password Failures and Unlock Admin user accounts View Admin user login activity View Admin user Security Account activity Note: Some ezbusiness features, links, or entry fields, may be associated with Admin User Rights and not accessible unless those Rights have been enabled. CREATING NEW USERS To add new users, perform the following steps: 1) Click the Admin Security tab on the menu bar. 2) Select Admin Group. The WEB ADMIN SECURITY page displays. The Web Admin Security page lists the existing admin groups in the Group Names column. 8
11 ADMIN SECURITY/MANAGING ADMIN USERS 3) Click the View Users link that corresponds to the group to which a new User is added. 4) The VIEW ADMIN GROUP page displays. The View Admin Group page lists any users assigned to a specific admin group. If there are no users that have not been assigned to the group, this section states No Records Available. 5) Click the Create a New User link. The CREATE ADMIN USER page displays. The Create Admin User page allows you to add a user to an admin group. TIP: Scroll up and down the page to view all the details for the user. 9
12 6) In the PERSONAL INFORMATION section, provide the following user information. An asterisk (*) indicates that the information is required. Name (*First, Middle, *Last) Salutation Name Suffix (if applicable) *Address (*City, *State, *Postal Code) Mail Drop Department Tax ID * Address (If the user is challenged during login authentication, an address is used for receiving a Security Code) Phone 1* Country Code Area Code, Phone Number*, Extn Note: An Admin user cannot receive the Security Code, if challenged during login, through a Phone Number with an Extension. Phone 2 Country Code Area Code, Phone Number, Extn 7) In the USER ID AND PASSWORD section, provide the following information. An asterisk (*) indicates that the information is required. Refer to Setting Passwords for more information about passwords. *Username *Password *Verify Password (retype the password) Note: It is recommended that you add the password as the last step, after the credit limit amount is added. 8) To place an IP address restriction on the user account, type IP address(s) that will be granted permission to access the web site in the IP Address Restriction section. 9) The Company ID(s) are pre-filled to restrict the Admin User to only view the accounts associated to the company to whom they are being given access. The corresponding elements can also be used to further restrict the Admin User to accounts set up under sub-levels within their company hierarchy. 10) In the MAXIMUM CREDIT LIMIT AMOUNT box, enter the maximum credit limit amount that the Admin User can manage for a company cardholder. The box supports a maximum of seven 9s (9,999,999). The box does not accept a decimal point. Note: This field is used for both the Change Credit Limit and Add New Cardholder Service Requests. 10
13 ADMIN SECURITY/MANAGING ADMIN USERS When creating user passwords, consider the following: Note: These rules apply each time you Create/Change Passwords. Passwords must be a minimum of eight characters, and a maximum of 20 characters (requirement). Passwords must contain at least one upper case alpha character, and one lower case alpha character. Passwords must contain at least one numeric character. Passwords expire, and must be reset every 90 days. A user s new password cannot be the same as the last four previous passwords. Must be different from Username. Cannot contain spaces. IMPORTANT! If there are three failed user log-in attempts within a 90 minute period, a user s account is suspended and must be unlocked. Note: The IP Address Restriction section can be used to define the IP address or addresses that are allowed for accessing the website. For example, your company may want to grant a user access to the site from a specific location only. You can restrict an unlimited number of IP addresses. Defined IP addresses can also be change or deleted. You can also add, change or delete IP Addresses from the Modify Admin User page. To add an IP address restriction, perform the following steps: 1. Type the allowable user IP address in the IP ADDRESS RESTRICTION boxes. 2. Click the Add link. 3. To add additional IP addresses for this user, repeat steps 1 and 2. Each specified IP address will be listed directly below the restriction boxes. 11
14 Once an IP address restriction has been set for the administrative user, their current IP address is validated against the IP addresses on file each time they access the site. If this IP address fails validation, the following error message displays: "You may not access this site from your current location. Please contact your security administrator for additional assistance." Note: If there are no IP addresses defined in a user s profile, the user can access the website from any location. To delete an IP address restriction, click the Delete link in the IP ADDRESS RESTRICTION box. The address is automatically deleted and the IP Address boxes re-display empty. This is an optional box for company administrators only. CHANGING IP ADDRESS RESTRICTIONS To change an IP address restriction, perform the following steps: 1. Click the Edit link in the IP ADDRESS RESTRICTION box. 2. Type the new address. 3. Click the Update link. Or, Click the Cancel link to cancel this process. Once an IP address is updated, the new address displays. 12

15 ADMIN SECURITY/MANAGING ADMIN USERS SETTING MAXIMUM CREDIT LIMIT AMOUNTS The maximum credit limit refers to the maximum amount that can be managed at one time for a company account. In ezbusiness, this feature is used to manage the amount that an administrative user account by limiting the amount that a credit limit can be increased if the user requests a credit limit increase. If you are creating a company administrator user account, specify the maximum dollar amount that can be requested for a credit increase in the MAXIMUM CREDIT LIMIT box (on the CREATE NEW USER page). This feature provides real-time updates to the credit card processing system. If a company administrator has access to a company credit card and performs a credit limit increase service request, the requested amount is compared against the maximum limit set. If the amount is greater than this limit, it will not be processed. Note: If no amount is specified in the MAXIMUM CREDIT LIMIT box, a company administrator requesting a credit limit increase will be notified that the request is invalid because their user account profile is not correctly defined. 1) When finished, click Save. The new Admin user is added to the ezbusiness Card Management, and a confirmation message displays. 2) To return to the previous page, click the Return to View Admin Group link. 13
16 VIEWING USER INFORMATION To view information about a user in an admin group, perform the following steps: 1) Click the Admin Security tab on the menu bar, and select Admin Group. The WEB ADMIN SECURITY page displays. 2) Choose the admin group the user is assigned to, and click the View Users link. The VIEW ADMIN GROUP page lists the users assigned to the group in the ADMIN USERS box. 3) Choose the user whose information you want to view, and click the View link. The MANAGE ADMIN USER page displays the user s current information. 14
17 ADMIN SECURITY/MANAGING ADMIN USERS The MANAGE ADMIN USER page provides the following information: Personal Info: User s name and address User Info: Assigned user name, Corp ID, and Institution ID (not currently in use) Auditing Info: User name and Date/Time that this user was created and last updated. Manage Admin User: Change Password, Emulate Admin User, Modify Admin User, Delete Admin User Administrative Lock/Unlock: Lock or unlock the admin user s account, and select a reason for placing an admin lock. Security Account Status: View Security Account Status, (Enrolled, Not Enrolled, Deleted), Delete or Unlock Security Account, View Security Account History User Account Status: View Password Failures, if any, Unlock for Password Failures or Inactivity. Activity Summary: View Activity Summary (history of action taken by the user while logged into the system). CHANGING USER INFORMATION To change a user s profile, perform the following steps: 1) Click the Admin Security tab on the menu bar. 2) Select Admin Group. The WEB ADMIN SECURITY page displays. 15

18 3) Choose the admin group that the user is assigned to. Click the View User link to view the group. The VIEW ADMIN GROUP page lists the admin users assigned to the group selected in the ADMIN USERS box. 16
19 ADMIN SECURITY/MANAGING ADMIN USERS 4) To change a user s information, select the user name from the list and click the View link. The Manage Admin User page displays the user s current contact information. TIP: You can also locate a specific user by clicking the Search for the Admin User link from the menu bar. Refer to Searching for Admin Users for procedures. 5) Click the Modify Admin User link in the MANAGE ADMIN USER page. The MODIFY ADMIN USER page displays the current user profile. 17
20 TIP: Scroll up and down the page to view all the details for the user. 6) Change the user s profile information, as applicable. 7) Click Save. The system updates the changes immediately, and a confirmation message displays. 8) Click the Return to Manage Admin User link to return to the previous page. 9) The new user profile information displays the next time you open the MANAGE ADMIN USER page. 18

21 ADMIN SECURITY/MANAGING ADMIN USERS MANAGING YOUR PASSWORD The password guidelines that apply to your users display on all the CHANGE PASSWORD pages. If you forget your password, and the forgot-password option is not available to you, please contact your system administrator to issue you a temporary password. Once you enter your temporary password, you will be prompted to update your temporary password with a permanent password. If you need to obtain a new password, the CHANGE PASSWORD feature is available under the ONLINE PROFILE option on the main left navigation menu. An Admin user who is logged into ezbusiness can self-manage by selecting Change Password under the ONLINE PROFILE menu. CHANGING USER PASSWORDS To change an Admin user s password, perform the following steps: 1) Click the Admin Security tab on the menu bar. 2) Select Admin Group. The WEB ADMIN SECURITY page displays. 3) Click the View Users link, next to the group where the user is assigned. The VIEW ADMIN GROUP page displays. 19
22 Click the View link, next to the user that you are updating. MANAGE ADMIN USER page displays the user s information. TIP: You can also locate a specific user by clicking the Search for the Admin User link from the menu bar. Refer to Searching for Admin Users for procedures. 4) Click the Change Password link in the MANAGE ADMIN USER page. The CHANGE PASSWORD page displays. The password requirements appear on the page. 5) Type the user s new password in the PASSWORD box. 6) Retype the new password in the VERIFY PASSWORD box. 20
23 ADMIN SECURITY/MANAGING ADMIN USERS 7) Select the reason for changing the password from the REASON dropdown list. 8) Click Save to save the new password. Or, Click the Return to Admin User link to return to the previous page without saving changes. 9) To return to the WEB ADMIN SECURITY page, click the Go to Previous Page link. Once saved, the user s new password is stored in the administrative user database, and a confirmation message displays. IMPORTANT: Be sure to alert the user of the password change. The new password must be used the next time this user logs in to the system. This updated password will not be ed to the user. LOCKING ADMIN USER ACCOUNTS To lock a user account, click the Click to Lock User link in the MANAGE ADMIN USER page. Select an ADMIN LOCK REASON from the drop-down list. The user account is locked, and a confirmation message displays. The CLICK TO LOCK USER link also toggles to the CLICK TO UNLOCK USER. Admin Security allows you to lock and unlock administrative user accounts and prevent users from accessing the website. Note: Each time a user account is locked or unlocked, the event is logged into the system. To lock an Admin user s account, perform the following steps. 1) Click the Admin Security tab on the menu bar. 2) Select Admin Group where the user is assigned. The WEB ADMIN SECURITY page displays. 3) Click the View User link for the user. The MANAGE ADMIN USER page displays. 21
24 22
25 ADMIN SECURITY/MANAGING ADMIN USERS TIP: You can also locate a specific user by clicking the Search for the Admin User link from the menu bar. Refer to Searching for Admin Users for instructions. Under the Administrative Lock/Unlock section, specify the reason the account is being locked. This information will be stored and visible for the duration the Admin user account remains locked. The options available for selection are, Misuse of Service, Employee Separated, Requested by Manager, Requested by FI and/or Other. Selecting Other will allow you to enter a custom reason if none of the available options are satisfactory. Once a reason for locking the Administrators account has been entered, select the Click to Lock User link next to Admin Lock. Once a user account is locked, a confirmation message displays in the MANAGE ADMIN USER page, and the CLICK TO LOCK USER link toggles to CLICK TO UNLOCK USER. The next time the user attempts to log in to the system, an error message displays. Note: If you do not have access to this feature, the CLICK TO LOCK USER will not display on the MANAGE ADMIN USER page. UNLOCKING ADMIN USER ACCOUNTS To remove an Administrative Lock from a user account, click the Click to Unlock User link in the Manage Admin User page under ADMINISTRATIVE LOCK/UNLOCK. The user account is unlocked, and a confirmation message displays. The CLICK TO UNLOCK USER link also toggles back to CLICK TO LOCK USER. 23
26 24

27 ADMIN SECURITY/MANAGING ADMIN USERS INACTIVITY LOCK/UNLOCK PROCESS Deactivation of admin users after 90 days of inactivity is required under the FIS Password Management policy and PCI. An admin user that attempts to log into his or her account after being locked by the Inactive Admin User will receive an error message. The Inactivity Lock process identifies the admin user as Locked for Inactivity, and includes an option for the Security Administrator to unlock an inactive user. If a Security Administrator removes the LOCKED FOR INACTIVITY status from an Admin User, the Admin Activity Report and the Admin User Activity Summary lists an entry, including date, time, and Administrator that processed the change. DELETE SECURITY ACCOUNT The DELETE SECURITY ACCOUNT feature is available to the Security Administrator to delete an admin user s security account by selecting the DELETE SECURITY ACCOUNT link. The DELETE SECURITY ACCOUNT feature is used by the security admin if the user has forgotten the answer to their security questions and needs to change them. When the security admin deletes the Admin user s Security Account, the Admin user will be asked to set it up again during their next login. When the Security Account has been deleted, the DELETE SECURITY ACCOUNT option will be displayed, but disabled. The Security Account status also displays as Deleted. The Security Administrator may also select the option to UNLOCK SECURITY ACCOUNT. If this option is selected, it initiates a request to the authentication application to unlock the Administrators Security account. The link is displayed as Lock Security Account if the unlock request is successful. VIEW SECURITY ACCOUNT HISTORY This allows the Security Admin to view the Admin user s security history logged under their Security Account. The option is available by selecting View Security Account History under the SECURITY ACCOUNT STATUS section on the Manage Admin User page. If security history is not available to display, a message stating No Data to Display is presented. Element Date/Time Activity Description Date and time of the real time transactions 25
, and on first failure the RESET PASSWORD FAILURES link is enabled on the MANAGE ADMIN USER page.")
28 RESET PASSWORD FAILURES If an Admin User enters an incorrect password numerous times, the system locks the account the next time the user tries to log on to the system. Each failure increments the failed count by one (until a successful log in is completed), and on first failure the RESET PASSWORD FAILURES link is enabled on the MANAGE ADMIN USER page. Once the failure count exceeds the allowable threshold, the link on the MANAGE ADMIN USER page is renamed CLICK TO UNLOCK USER. The Admin user should contact their Security Administrator to have their user account unlocked. The Security Administrator selects the CLICK TO UNLOCK USER link from the MANAGE ADMIN USER page under USER ACCOUNT STATUS, PASSWORD FAILURES. The number of password attempts displays next to the link. 26
29 ADMIN SECURITY/MANAGING ADMIN USERS DELETING USERS FROM AN ADMIN GROUP You can delete Admin users that have been added to an admin group. To delete an Admin user, perform the following steps: 1) Click the Admin Security tab from the ezbusiness navigation menu. 2) Select Admin Group. The WEB ADMIN SECURITY page displays. 3) Choose the user whose information you want to delete, and click the View link. The MANAGE ADMIN USER page displays. 27
 Click Delete Security Account link in the MANAGE ADMIN USER page. 5) Choose the Admin Lock Reason and place an Administrative User lock. 6) Modify the User and move them to the Deleted group.")
30 TIP: You can also locate a specific user by clicking the Search for the Admin User link from the menu bar. Refer to Searching for Admin Users for procedures. 4) Click Delete Security Account link in the MANAGE ADMIN USER page. 5) Choose the Admin Lock Reason and place an Administrative User lock. 6) Modify the User and move them to the Deleted group. 7) Delete the Admin User on the MANAGE ADMIN USER page. 8) Clicking the Delete Admin User link, presents a message advising that deleting an admin user permanently removes the Admin user from ezbusiness. You must select Ok in the message to continue and delete the Admin user from the admin group. The Admin user is automatically deleted from the admin group, and the View Admin Group page redisplays with the user s name removed from the user list. 28
31 ADMIN SECURITY/MANAGING ADMIN USERS SEARCHING FOR ADMIN USER Searching for Admin User allows you to easily locate user profiles, based on one or more search criteria. You can download the search results as both comma-delimited, or tab-delimited text files for future use. To search for an admin user, perform the following steps: 1) Click the Admin Security tab on the menu bar. 2) Select Search for Admin User. The ADMIN USER SEARCH page displays. This page allows you to restrict your search according to specific criteria. 3) For the best search results, provide as much information as possible in the search boxes to restrict your search. The following table describes the various ways to restrict a search. 29
32 This page or area of the page contains the following elements from left to right and top to bottom: Element Admin Group Hierarchy Admin Group Description SYSTEM This drop-down appears as read-only for Financial Institution and Company Admin Users ASSOCIATION This drop-down appears as read-only for Financial Institution and Company Admin Users CORPORATION This drop-down appears as read-only for Financial Institution and Company Admin Users. INSTITUTION This drop-down menu allows you to select the admin group institution IDs available for your access level. This drop-down menu allows you to select the admin groups that were created for the hierarchy level specified in the Admin Group Hierarchy section. Note: These elements are used by the financial institution only. 30
33 ADMIN SECURITY/MANAGING ADMIN USERS Search Parameters Last Name Type all or part of the user s last name. All last names that begin with the specified characters display in the search results. First Name Type all or part of the user s first name. All first names that begin with the specified characters display in the search results. Username Type all or part of the user name. All user names that begin with the specified characters display in the search results. Type all or part of the user s address. All user names that begin with the specified characters display in the search results. Postal Code Type the first five digits of the user s ZIP Code. All user names that begin with the specified values display in the search results. State Select the user s state from this drop-down menu. Dept. Type all or part of the department name that a user is associated with. All user names that begin with the specified department name display in the search results. Mail code Type the mail code associated with the company department (if applicable). Company ID Type the Company ID, which is a unique number within an association. Note: Two different associations may have companies that use same company ID. For example: Association 81 Company ID = 15 Association 39 Company ID = 15 Status Select the user s status from the drop-down menu, either All, Active, or Inactive. Note: A user s status is set on the Manage Admin User page. Refer to Locking Admin User Accounts for instructions. 4) Click Search. The system searches the database and displays the relevant search results on the ADMIN USER SEARCH RESULTS page. 31
 the user from accessing the system, reset failed user log-ins, or delete the user from an")
34 5) To view the user in the MANAGE ADMIN USER page, click the Username. You can now use the MANAGE ADMIN USER page to change the user s information and password, lock (or unlock) the user from accessing the system, reset failed user log-ins, or delete the user from an admin group. When finished, click the Back arrow (< ) in your browser to return to the ADMIN SEARCH RESULTS page, or click the Return to View Admin Group link to view information about the admin group that the user is assigned to. DOWNLOADING ADMIN LOGIN SEARCH RESULTS You can download the information that displays on the ADMIN LOGIN SEARCH RESULTS page as either a comma-delimited (.csv) file in an Excel spreadsheet or as a tab-delimited text file. To download these search results, refer to the steps below. 1) Select either Tab Delimited Text (.CSV or Comma Delimited Text (.DAT) from the Download dropdown menu. 32


35 ADMIN SECURITY/MANAGING ADMIN USERS 2) To view the downloaded file, click the downloaded file. It displays the Admin user information presented in the ADMIN LOGIN SEARCH RESULTS list in the format specified. Admin Login Search Results.CSV File 33
36 3) When finished viewing the Admin Login Search Results page, click the Return to Admin Login Search link to return to the previous page. 34
 From your Internet browser, type the following URL, https://www.ezbusinesscardmanagement.")
 Type your password in the PASSWORD box. Click Log In.")
37 COMMERCIAL CARD COMMERCIAL CARD LOGGING IN TO EZBUSINESS CARD MANAGEMENT To log in to ezbusiness Card Management, perform the following steps: 1) From your Internet browser, type the following URL, The Administrator Login page displays. 2) Type the user name in the USERNAME box. Click Log In. The Administrator Password page displays. 3) Type your password in the PASSWORD box. Click Log In. The default home page, based on the Users Admin Group displays. 35
38 USING EZBUSINESS NAVIGATION FEATURES Viewing Previous Pages Many pages contain a link that allows the user to return to the previous page. From any page you can also click the < (Back) arrow in your browser to return to the previous page. Printing Pages To print a copy of a particular ezbusiness page, refer to the steps below: 1) Click Print at the top-right of any open page. 2) Click Print in the Windows Print dialog box. The page automatically prints from the designated printer. Sorting Lists Whenever items appear in a list, they can be sorted and reorganized for viewing. Click a column heading on the page. For example, to sort the alerts, click the appropriate column header. The items in the column display in a new order. Accessing Online Help Admin Security provides extensive, context-sensitive online help. To access the online help window from any page, click Help at the top-right of the page. VIEWING COMPANY LISTS The View Company List feature allows you to easily view a list of all companies that you have access to, along with the hierarchy within each company. To view your company list, perform the following steps: 1) Log into ezbusiness. 2) Click the Commercial Card tab on the left menu. A sub-menu appears. 3) Select View Company List. The View Company List page displays. 36

39 COMMERCIAL CARD The table below describes elements in the View Company List page. ELEMENT Corporation Company ID Company Name Status View Hierarchy DESCRIPTION A unique ID number assigned to each financial institution A unique ID number assigned to each commercial card company The name of the commercial card company The account status of the commercial card company Open, Closed, Inactive, All Click the View Hierarchy link to view a commercial company s sublevel hierarchies. Note: This link displays only to administrative users with the appropriate access rights. COMPANY HIERARCHY OVERVIEW A company hierarchy identifies an organization that has implemented a commercial card program and the various levels at which the program is managed. A company hierarchy is separate from a financial institution hierarchy, as it drives the processes that are unique to commercial card management. A company hierarchy serves three main functions: It defines the commercial card processing options. It identifies the individual commercial card accounts that belong to a company. It provides the structure for reporting account transaction activity. 37
40 BASIC HIERARCHAL STRUCTURE A basic hierarchy consists of a company and up to five sublevels. The hierarchal sublevels identify the various levels of the organization such as subsidiaries, division, departments, and so on. Each level, company, or sub-level, is a separate physical record in the commercial card processing system. Company-ABC Company Sublevel 1 Sublevel-2 Sales Sublevel-3 Canada Sublevel-3 Mexico Sublevel-3 Sales United States Sublevel-4 Eastern US Sublevel-4 Southern US Sublevel-4 Midwest US Sublevel-4 Western US Sublevel-2 Information Technology Sublevel-3 WAN / LAN Engineering Sublevel-3 Data Center Sublevel-3 PC Desktop Applications and Support Sublevel-3 Application Development Sublevel-2 Purchasing VIEWING COMPANY HIERARCHIES The View Company Hierarchy allows you to view a single company and any related sub-levels in the form of a hierarchical list. To view a company hierarchy, perform the following steps: 1) Click the Commercial Card tab on the left menu in EZBUSINESS. 2) Select View Company List. The VIEW COMPANY LIST page displays. (see image below) 3) Click the View Hierarchy link for a respective company from the company list. The COMPANY HIERARCHY page displays. 38

41 COMMERCIAL CARD The Company Hierarchy page lists the company sublevels, which can be viewed according to your security access profile. Note: If your security access profile gives you access to more than one company, click the company name to display the company hierarchy. If you have access to only one company, only that company hierarchy displays. This page or area of the page contains the following elements from left to right and top to bottom: Element Description Hierarchy Level A company s hierarchal level, Company Sublevel 1 to Sublevel 6 Hierarchy ID Hierarchy Name Status A unique ID number assigned to each hierarchy. The company name used in the hierarchy. The status of the commercial card company s account Open, Closed, Inactive Click the View link to view the Accounts page, which lists the accounts associated with a selected company or sublevel. 39

42 VIEWING COMPANY ACCOUNT LISTS The ACCOUNTS page provides a list of commercial cardholder accounts that belong to a specific company or company sublevel. This page also allows you to view information about a specific account and search for specific cardholder account information. Once a search is performed, the results of the search display in the list. To view a list of company accounts, perform the following steps: 1) Click the Commercial Card tab on the left menu in EZBUSINESS. 2) Select View Company List. The VIEW COMPANY LIST page displays. 3) Click the View Hierarchy link for a company on the VIEW COMPANY LIST page. The COMPANY HIERARCHY page displays. 4) Click the View link from the COMPANY HIERARCHY page. The ACCOUNTS page displays with all accounts related to the selected company or sub-level. You can narrow the account list by using the search boxes at the top of the page. Refer to the table below for details on the search boxes. Note: The Accounts page can also be accessed from the Search Cardholders page when submitting a search request. Refer to Searching for Commercial Cardholders for more information. 40
43 COMMERCIAL CARD The table below describes the elements in the Accounts page based on access provided by your institution. ELEMENT Navigation List Status First Name/Last Name Card Number Name Status Balance Credit Limit Expiration Acct Type Hierarchy Name DESCRIPTION This drop-down menu provides options for performing the following administrative tasks. These options are based on user access. Accounts Transaction Report Level Financial Details Level Processing Options Level Administrative Options Make Payment Manage Payment Accounts Payment History Online Requests Company Inbox Sent Messages Archived Messages View Online Reports For more information, refer to Using the Commercial Card Navigation List. To search for a specific account by account status, select an option from the STATUS drop-down menu, All, Blocked, Closed or Open. To search for a specific account by cardholder name, type a first or last name (or both) in the respective name boxes. Commercial credit card account number (last four digits) If a cardholder is enrolled, a checkmark displays in the User column. Account s primary cardholder name The account s status Open, Blocked, or Closed The current balance owed on the account. If the letter M appears in front of the balance, this indicates that the balance is just a memo to the account and the actual balance rolls up to a billing account. Maximum credit amount allowed on the account. Date the credit card expires. Type of account individual, billing, or diversion Name of the company hierarchy for the account 41
44 User If this column is checked, it indicates that the cardholder has enrolled in the ezcardinfo (MyCardStatement) cardholder website. VIEWING BILLING ACCOUNT VS. INDIVIDUAL ACCOUNT INFORMATION Billing accounts differ from individual commercial card accounts in that all transactions made by individual cardholders are diverted for central billing. To help simplify the commercial card account management process, the Accounts page conveniently lists all of the accounts within a company hierarchy. A billing account displays in the Accounts page list with the prefix, BL ACCT, along with the billing account number. Individual accounts display in the list by the cardholder s name. Some of the Security Admin features described in this guide are specific to billing accounts or individual accounts only. SEARCHING FOR ACCOUNT INFORMATION You can view information about a specific account or accounts by performing a search based on the account status, account number, cardholder s first name or last name, or any combination. To search for accounts, perform the following steps: 1) Click the Commercial Card tab in the home page menu bar. 2) Select View Company List. The VIEW COMPANY LIST page displays. 3) Select the View Hierarchy link for a company from the VIEW COMPANY LIST page. The COMPANY HIERARCHY page displays. 4) Click the View link from the COMPANY HIERARCHY page. The ACCOUNTS page displays with a list of any accounts related to the selected company or sublevel. 5) Choose from the following search parameters on the ACCOUNTS page. 6) Select All, Open, Blocked, or Closed from the STATUS drop-down menu. Type the cardholder s first name. Type the cardholder s last name. 7) Click Go. All accounts matching the search criteria display in the ACCOUNT list. DOWNLOADING ACCOUNT LISTS You can download your list of cardholders to a file in either Excel/Spreadsheet (.csv) or Text (tab spacing) format. To download the list, perform the following steps: 1) From the ACCOUNTS page, select either (comma spacing) or (tab spacing) from the DOWNLOAD drop-down menu. 2) Click Download. 42
45 COMMERCIAL CARD 3) A message box displays. Click Open in the message box to download and open the file. Or, 4) Click Save to save it to a specified location on your computer hard drive. If you click Save, you are prompted to designate a location for the file. 5) The file downloads, and a confirmation message displays. VIEWING DOWNLOADED ACCOUNT LISTS To view a downloaded account list, click Open in the confirmation message. When prompted, open the file in either Excel/Spreadsheet (.csv) or Text (tab spacing). The downloaded file displays the accounts list in the format specified. VIEWING ACCOUNT DETAILS The Account Detail page displays account and cardholder information. It also provides links for viewing account transactions and the details of outstanding transactions. To view the details of a specific account: 1) Click on a selected card number or cardholder name in the ACCOUNTS list. 2) The ACCOUNT DETAIL page displays. 43
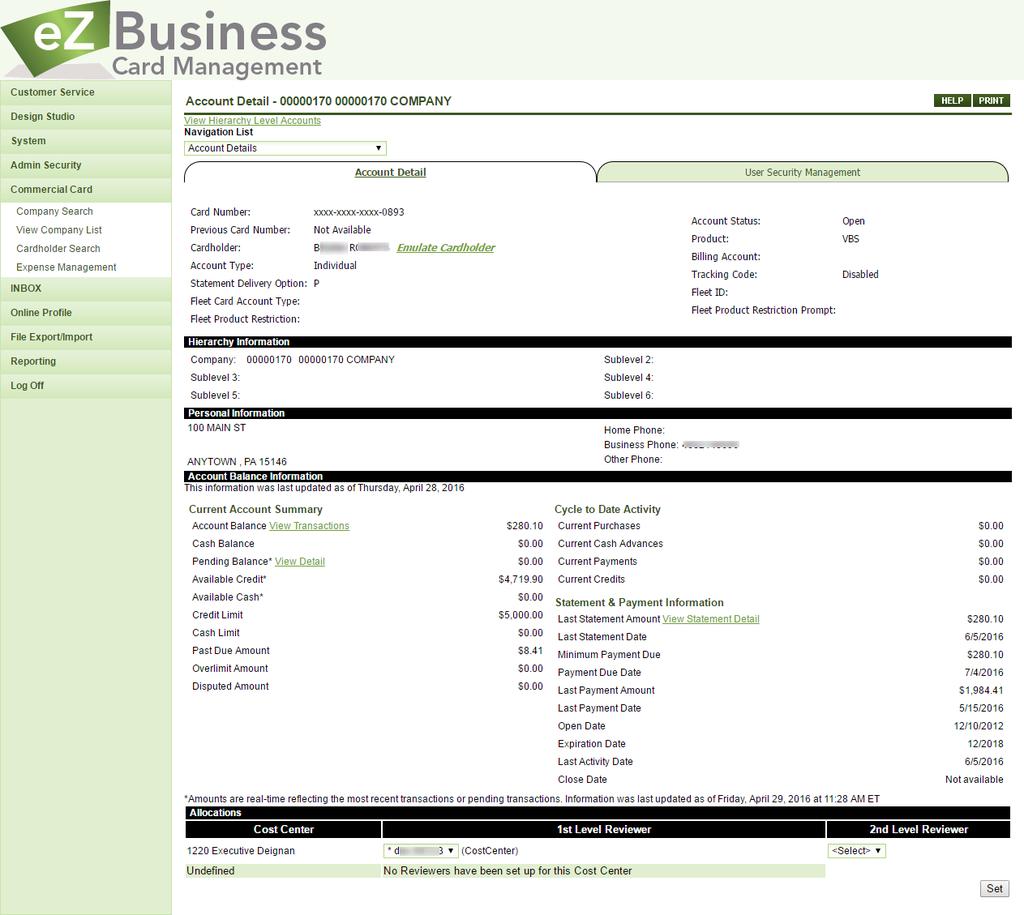
46 44
47 COMMERCIAL CARD 45
48 The table below describes the elements on the ACCOUNT DETAIL page. ELEMENT View Hierarchy Level Accounts Navigation List ACCOUNT DETAIL TAB Card Number Previous Card Number Cardholder Account Status Product Account Type Statement Delivery Option Billing Account Tracking Code Fleet Card Account Type Fleet ID Fleet Product Restriction Fleet Product Restriction Prompt Hierarchy Information Personal Information DESCRIPTION Hyperlink to navigate back to account list, which lists other cardholders within this hierarchy level. Select an option from Navigation List drop-down menu, which allows you to navigate to other pages for information about a specific account. Last four digits of the commercial credit card account number Displays the accounts previous account number, if applicable. Name of the individual cardholder or billing account The account status Open, Closed, or Blocked. A product may be identified in several ways, for example, VCL = Visa Classic, VGO = Visa Gold, and other products, or any other assigned product codes. An individual account or a billing account The code that designates the type of Statement Delivery used. The billing Account related to the account, if applicable. This field refers to the Auth Tracking field that must be set in BASE2000 to use Velocity Limits. Values: Enabled Disabled This field displays the type of account. This field displays the Driver, or Vehicle ID authorized on this account. This field displays the product restrictions for the Fleet Card. This field displays what the driver is required to enter at the point of sale. Company Sublevels 2-6 Cardholder address Home Phone Business Phone Other Phone 46
49 COMMERCIAL CARD Account Balance Information View Detail hyperlink The information in this section is current information. Current Account Summary Account Balance Click the link to view a list of outstanding authorizations USER SECURITY MANAGEMENT TAB USER ENROLLMENT DETAIL Enrolled User name: Inactivity Lock: View Activity Summary Change Address Password Failures: Generate Password Displays an enrolled user, and gives the option to delete a user enrollment Displays the Admin user name as a hyperlink if emulation is available. Click the link to unlock an inactive user Click the link to View Cardholder Activity Summary page Displays the current cardholder address. Click the link to display another address. Displays the number of failed password attempts. Click to generate password to users . USER SECURITY DETAIL Enrolled Click the Delete Security Account link if a cardholder has forgotten all of their security questions. They can create a new Security profile. Click View Security Account History to view the CARDHOLDER SECURITY ACCOUNT HISTORY page. Unlock Security Account Click this link to unlock a cardholder account. Administrative Lock/Unlock: Account: User: Reasons for Lock/Unlock: Click to Lock or Unlock a cardholder account. Click to Lock or Unlock a user s account. Select a reason from the drop-down list for locking or unlocking an account. Reasons: Misuse of Service Unauthorized Access Account Frozen Cardholder Request Other 47
50 EMULATING A CARDHOLDER If you are a company administrator, you can emulate, or view an enrolled individual cardholder s online account to understand what the cardholder is viewing on ezcardinfo (MyCardStatement). To emulate a cardholder, perform the following steps: 1) Click the Commercial Card tab in the menu bar. Select View Company List. The VIEW COMPANY LIST page displays. 2) Click the View Hierarchy link for a company on the VIEW COMPANY LIST page. The COMPANY HIERARCHY page displays. 3) Click the View link on the COMPANY HIERARCHY page. The ACCOUNTS page displays with a list of any accounts that are related to the selected company or sublevel. 4) Click the Card Number or Name link on the ACCOUNTS page. The ACCOUNT DETAILS page displays. 5) Click the Emulate Cardholder link next to the cardholder s name. Note: The Emulate Cardholder option is not available unless the cardholder is enrolled in ezcardinfo (MyCardStatement). 6) ezcardinfo.com (MyCardStatement) automatically launches, allowing you to view the cardholder s commercial card account online. By default, the ACCOUNT SUMMARY page provides a summary of their account. VIEWING TRANSACTIONS The TRANSACTIONS page displays the cardholder transactions of commercial card accounts for a selected company or company sublevel listed on the ACCOUNTS page. Transactions for the last 45 days are listed for both billing and individual accounts. This page also allows you to search for specific transaction information by cardholder name, transaction amount, and date of the transaction and download the list (or search results) as a text file or to a Quicken financial software application. To view the account activity of a cardholder or group of cardholders in a billing account, perform the following steps: 1) Click the link for the cardholder Name or Card Number on the ACCOUNTS page. 2) The ACCOUNT DETAIL page displays for the selected account. 3) Click the View Transactions link in the ACCOUNT DETAIL page. Or, 4) Select Transactions from the NAVIGATION LIST. Refer to Using the Commercial Card Navigation List for more information. The TRANSACTIONS page displays. 48
51 COMMERCIAL CARD SEARCHING FOR TRANSACTION INFORMATION You can view information about a specific transaction by performing a search based on a specific transaction amount, date, or any combination. If you have a long list of transactions, this feature is also useful for limiting the number of transactions in the list. To search for transaction information, perform the following steps: 1) Click the appropriate link for the cardholder Name or Card Number on the ACCOUNTS page. The ACCOUNT DETAIL page displays for the selected account. 49

52 2) Select Transactions from the NAVIGATION LIST. The TRANSACTIONS page displays. 3) From the TRANS AMOUNT drop-down menu. This variable can be based on either an exact or approximate amount. The options include: Greater Than - to search for a transaction that is more than a specified amount. Less Than - to search for a transaction that is less than a specified amount. Equal To - to search for a transaction of an exact amount. Between - search for a transaction within a range of amounts. If you select Between, a second blank box allows you to type a range of transaction amounts. From/To - Click in the From and To boxes to display the date calendar and select specific posting dates. 4) Type the dollar amount to be used in the transaction search in the blank TRANS AMOUNT box. Select the search amount variable. Click Go. All transactions matching the search criteria display as the search results in the Transactions list. DOWNLOADING TRANSACTION LISTS You can download your list of cardholder transaction to the following formats and financial software programs: Excel/Spreadsheet (.csv) format Text (tab spacing) format Quicken 98/MSMoney (QIF) Quicken (QFX) Quickbooks (QBO) To download the list, perform the following steps: 1) From the TRANSACTIONS page, select either Excel/Spreadsheet (.csv), Text (tab spacing), Quicken 98/MSMoney (QIF), Quicken (QFX), or Quickbooks (QBO) from the DOWNLOAD drop-down menu. 2) Click Download. 50

53 COMMERCIAL CARD 3) A message box displays. Click Open in the message box to download and open the file. Or, 4) Click Save to save it to a specified location on your computer hard drive. If you click Save, you will be prompted to designate a location for the file. The file downloads, and a confirmation message displays. VIEWING DOWNLOADED TRANSACTION LISTS To view a downloaded Transaction list, click Open in the download confirmation message. When prompted, open the file in either Notepad (comma spacing) or Excel (.csv). The downloaded file displays the transactions list in format specified. Downloading Transaction Lists to Quicken To download the list to a Quicken financial application, perform the following steps: 1) From the Transactions page, select one of the Quicken options: Quicken 98/MSMoney (QIF) Quicken (QFX) Quickbooks (QBO) 2) Click Download. VIEWING AUTHORIZATIONS The Outstanding Authorizations page displays a list of any transactions made on an account that have not yet posted to the Current Activity. To view a list of outstanding transactions, perform the following steps: 1) Click the link for the cardholder Name or Card Number on the ACCOUNTS page. 2) The ACCOUNT DETAIL page displays for the selected account. 3) Click the View Detail link in the ACCOUNT DETAIL page. The OUTSTANDING AUTHORIZATIONS page displays. 4) To view the details of a specific outstanding authorization in the list, click a link for an authorization record. 51
54 The table below describes the information shown on the Outstanding Authorizations page. ELEMENT Date Time Amount MCC MCC Description Merchant Name Status DESCRIPTION Authorization date Authorization time The pending Authorization amount. Merchant Category Code. A four-digit code that classifies suppliers into market segments. This code is assigned by Visa or MasterCard. The English-equivalent of the numeric Merchant Category Code. The name of the merchant or business where the authorization occurred. Authorization status. 52
55 COMMERCIAL CARD VIEWING TRANSACTION DETAIL AND DISPUTING TRANSACTIONS If an individual account cardholder does not recognize a transaction, did not receive the item, or believe that this transaction does not belong to their account, the transaction may be disputed by filing a transaction dispute claim, per the instructions provided. Note: You may have the option to submit the dispute electronically, or print the form and either fax or mail. To dispute a transaction, perform the following steps: 1) Click the appropriate link for the cardholder Name or Card Number on the ACCOUNTS page. The ACCOUNT DETAIL page displays for the selected account. 2) Click the View Transactions link in the Account Detail page. The STATEMENT DETAIL page displays. 3) Click the link for the transaction. 4) The TRANSACTION DETAIL page displays. 53
56 5) Click the DISPUTE TRANSACTION link. 6) The DISPUTE TRANSACTION page displays. 54
57 COMMERCIAL CARD 7) Click the here hyperlink at the bottom of the page. The Dispute form displays. 8) Complete the form with the required information. 9) Print the form by using the browser print function. Be sure to sign the dispute form or your dispute letter. 10) The system gives an option to electronically submit the dispute form. Once you submit a dispute claim electronically, a confirmation page with a confirmation number displays. 11) A confirmation that the dispute claim was received will be sent within 30 days. Important! All dispute claims must be received within 60 days of the statement closing date. VIEWING STATEMENTS To view Statements, perform the following steps: 1) Click Statements in the NAVIGATION LIST. 2) Click on the date to view transactions within the statement period. 3) To view an image of statements, click the View Images hyperlink. 55

58 USING THE COMMERCIAL CARD NAVIGATION LIST The NAVIGATION LIST drop-down menu allows you to perform a number of tasks efficiently from a single menu, making it easy to navigate through the various pages of detailed information about a specific account. Once you have selected an account or company hierarchy level on the ACCOUNTS page, this menu appears on every page of the Commercial Card module. Selecting an option from the list opens a separate page that can be used for a specific task. 56
59 COMMERCIAL CARD The table below describes the menu options in the Navigation List, based on your institution s configurations. ELEMENT Accounts Transaction Report View Spending Restrictions View Credit Lines Level Financial Details Level Processing Options Level Administrative Options Make Payment Manage Payment Accounts Payment History Online Requests Company Inbox Sent Messages Archived Messages Expense Reports DESCRIPTION Opens either the Accounts page, which provides a list of all commercial cardholder accounts that belong to a specific company or company sublevel. Opens the Transaction Report page, which is used to view account transaction reports. Allows Admin User to view Merchant Groups and Spending Limits. Allows Admin User to view a company s temporary and permanent credit lines. Opens the Level Financial Details page, which provides company financial information. Opens the Level Processing Options page, which provides account processing information. Opens the Level Administrative Options page, which provides company contact information. Opens the Make Payment page, which is used to make payments towards commercial card accounts. (Displayed only to users with the proper access rights) Opens the Manage Payment Accounts page, which is used to set up and manage automatic bill payment accounts. (Displayed only to users with the proper access rights) Opens the Payment History page, which provides a record of account payments. (Displayed only to users with the proper access rights) Opens the Online Requests page to request for a change to your Company or an Individual Account. Opens the Inbox page, which displays responses to service requests and other messages. Opens the Sent Message page, which displays a list of messages sent to cardholders or Client Services. Opens the Archived Messages page, which displays a list of saved incoming and sent messages. Opens the Expense Reports page, which allows you to search for expense reports that meet certain criteria. 57
 Select Transaction Report from the NAVIGATION LIST drop-down menu. 2) Select an account option from the ACCOUNT drop-down menu.")
60 REQUESTING TRANSACTION REPORTS This feature allows you to request a transaction report for all accounts or a specific account and download it as a text file. To request a transaction report, perform the following steps: 1) Select Transaction Report from the NAVIGATION LIST drop-down menu. 2) Select an account option from the ACCOUNT drop-down menu. 3) Click in the Start Date and End Date boxes to display the date calendar. Select the date, range of dates, or Statement Period of the requested transaction activity. Note: If all accounts are selected, the Statement Period option is not available. 4) Select Text (tab spacing) to download the report to Microsoft Wordpad from the Download dropdown menu. Or, 5) Select Excel/Spreadsheet (.csv) to download the report to Excel. 6) Click Download. 7) Follow the prompts to either open or save the file. 58

61 COMMERCIAL CARD VIEWING LEVEL FINANCIAL DETAILS The Level Financial Detail page allows you to view financial information, including balances and credit limit data, for a specific company or sublevel. To view this information, select Level Financial Details from the NAVIGATION LIST drop-down menu. The LEVEL FINANCIAL DETAIL page displays. The table below describes the information shown on the Level Financial Detail page. ELEMENT Hierarchy Information DESCRIPTION Level displays the company or sublevel ID displays the company ID Name displays the company ID and name Enroll Date displays the ezbusiness Enrollment date for the applicable company. Format is MM/DD/CCYY 59
62 Company/Sublevel Information Total Balance Product Information Cash Balance Credit Limit Cash Limit Available Credit Available Cash The current amount owed on your account, including purchases and credits to the account since your last statement and any purchases from previous statements that you have not yet paid. The balance of all cash advances or other cash transactions that have posted to the account. The total amount, set by your financial institution that can be charged to the account. The balance of all cash advances or other cash transactions that have posted to the account. The credit limit minus the account balance. The amount of available cash that can be drawn from the account. This value is determined by the cash limit minus the cash balance minus the cash transaction authorizations. Outstanding Authorizations Pending transactions on the account. Past Due Overlimit Last Payment Date Last Statement Date Current Cycle Date Product Product Type Active Accounts - All Levels Active Accounts - Current Levels Total Balances Outstanding Authorizations The amount owed on the account immediately if a payment was not received by the due date. The amount an account exceeds the credit limit, if applicable. The date the last payment to the account was made. The date of the last account statement. The monthly billing date. 60

63 COMMERCIAL CARD Processing Options Administration Info Click this link to view the LEVEL PROCESSING OPTIONS page. Click this link to view the LEVEL ADMINISTRATIVE INFORMATION page. VIEWING LEVEL PROCESSING INFORMATION The Sublevel Processing Options page allows you to view processing options for a selected company or sublevel. To view the level processing information, select Level Processing Options from the NAVIGATION LIST drop-down menu. The LEVEL PROCESSING OPTIONS page displays. Note: The page is also accessed from the FINANCIAL DETAIL or ADMINISTRATIVE INFORMATION pages. The table below describes the options on the Level Processing Options page. ELEMENT Hierarchy Information DESCRIPTION Level ID Name 61
64 Company/Sublevel Information Fee Account Number Cardholder Statements Bill Day Financial Year End Month Currency Code Emboss Company Name Product Information Product Product Type PIN Suppression Billing Account Options Billing Account Number Level Financial Details Admin Info Click this link to view the LEVEL FINANCIAL DETAIL page. Click this link to view the LEVEL ADMINISTRATIVE INFORMATION page. 62

65 COMMERCIAL CARD VIEWING LEVEL ADMINISTRATIVE INFORMATION The Level Administration Options page allows you to view administrative information for a selected company or sublevel such as the address and contact information. To view this information, select Level Administrative Options from the NAVIGATION LIST dropdown menu. The LEVEL ADMINISTRATIVE INFORMATION page displays. The table below describes the options on the Level Administrative Options page. This page or area of the page contains the following elements: ELEMENT Navigation List Hierarchy Information Contact Information DESCRIPTION Select an option from NAVIGATION LIST drop-down menu to navigate to other pages for information about a specific account. Level ID Name Primary Address Statement Mailing Address Contact Name 1/Contact Name 2 Phone 1/Phone 2 Fax 1/Fax 2 Financial Details Processing Options Click this link to view the LEVEL FINANCIAL DETAIL page. Click this link to view the LEVEL PROCESSING OPTIONS page. 63

66 MANAGING PAYMENT ACCOUNTS The Manage Payment Accounts page allows you to view existing payment accounts and set up payment accounts that can be used for making account payments online. To view this information, select Manage Payment Accounts from the Navigation List drop-down menu. The Manage Payment Accounts page displays. This page lists all of the active and deleted payment accounts, which can be used to pay your cardholder s bills online. The table below describes the information on the Manage Payment Accounts page. ELEMENT Navigation List Add Payment Account Account Nickname Account # Routing # Status DESCRIPTION Select an option from Navigation List drop-down menu to navigate to other pages for information about a specific account. Click this link to open the Add Payment Account page, and add a specific payment account to your list. A unique name assigned by the cardholder to identify the account. Also referred to in ezcardinfo (MyCardStatement) as Payment Account. The checking or savings account number of the account to be accessed for the online payment. The nine-digit routing number used to identify the financial institution from which the funds are withdrawn for the online payment. The status of the online payment either Pending, Completed, or Cancelled. 64
67 COMMERCIAL CARD MAKING A PAYMENT Administrators may make payments to individual and billing commercial card accounts. The onetime payment feature allows you to schedule one or more online payments for a current or future payment date. You can schedule a payment for a future date of up to 60 days. Once the payment is made, the payment amount is automatically deducted from the designated account. Note: If you have not yet set up a payment account, the Payment Account page displays. Before making a payment, you must first have a Payment Account. Refer to Adding a Payment Account for more information. To make a payment on a commercial card account, perform the following steps: 1) Select Make Payment from the NAVIGATION LIST drop-down menu. The MAKE PAYMENT page displays. 2) Click the Make Payment link next to the account you want to make a payment. The MAKE PAYMENT page appears. 3) From the PAYMENT ACCOUNT drop-down menu, select the account you want to use for making the payment. 4) In the PAYMENT AMOUNT section, check one of the following options for the amount you want to pay. Minimum Payment Due Statement Balance Current Balance Other Amount - If you select Other Amount, type the dollar amount in the $ box. 5) Click in the blank Payment Date box. Select the date for the payment from the date calendar. You can set up a one-time payment up to 60 days from the current date. 6) To add a note or additional information about the payment, click in the blank Payment Memo box. Type the desired text for the memo. 7) If you want to receive an confirmation when the payment has been updated in the ezcardinfo (MyCardStatement) system, check the Send payment confirmation to this address check box. To enter multiple addresses, separate each address with a semicolon. 8) Click Submit to submit the payment for validation. If the payment is validated, the PAYMENT CONFIRMATION page displays the payment details. Refer to Reviewing the Payment Details for more information. 65

68 The table below describes the options on the Make a One-Time Payment page. ELEMENT Navigation List DESCRIPTION Select an option from NAVIGATION LIST drop-down menu to navigate to other pages for information about a specific account. Payment Information Payment Account The account name or nickname of the payment account to be used for making the payment. To add a new payment account to the list, refer to Adding a Payment Account. Payment Amount The amount of the one-time payment. Select the amount you wish to pay from one of four options: 66
69 COMMERCIAL CARD Minimum Payment Due Statement Balance Current Account Balance Other Amount The minimum payment amount that must be made to keep the account current. This is the default payment amount (pre-selected). The balance owed on the account as of the last statement date. If the minimum payment due is less than the statement balance, or statement balance is zero, this option will be disabled. The balance owed on the account as of the current date. If the current account balance is less than the statement balance, or statement balance is zero, this option is disabled. A different payment amount, specified by the cardholder. This option may be the default amount (pre-selected) if the minimum payment due is zero dollars. If Current Balance is zero, or the sum of the other payment amount and any pending payments exceeds the current balance by more than ten percent, this option will be disabled. Payment Due Date The date that the payment will be made and funds withdrawn from the payment account. Other Payment Date Specifies a payment date selected other than the Payment Due Date. Payment Memo Send payment confirmation to this address Additional identifying information about the payment for the cardholder s records. This memo will also display in the payment confirmation . Specifies the address where the payment confirmation will be sent. Refer to Managing Payment Accounts for more information. 67
70 Submit Button Click Submit to open the REVIEW PAYMENT DETAILS page, and review the payment details before submitting the one-time payment. Note: If the payment is made before 5:00 P.M. EST, the payment posts to the account on the same day. If the payment is made after 5:00 P.M. EST, the payment posts to the account on the next business day. If the payment is made on a Saturday or Sunday, the payment posts to the account on the following Monday. PAYMENT INFORMATION ERRORS If the payment is not validated, an error message displays identifying the following error Detail. The payment amount entered less than the minimum payment due amount. The payment date entered is greater than the payment due date on the account. The total amount of pending payments exceeds the current balance by more than X%. Correct these errors. Click Continue to resubmit the payment and review the payment details on the PAYMENT CONFIRMATION page. REVIEWING THE PAYMENT DETAILS After the ONE TIME PAYMENT has been submitted and validated, the REVIEW PAYMENT DETAILS page displays the payment details, along with the REGULATION DISCLOSURE STATEMENT and AUTHORIZATION AND SIGNATURE STATEMENT. Review this information carefully. Select from one of three payment confirmation options, described in the table below. ELEMENT Edit Payment Don't Make Payment Make Payment DESCRIPTION Click Edit Payment to return to the MAKE ONE TIME PAYMENT page, and make any changes to the payment information. Click Don't Make Payment to cancel the payment. Click Make Payment to submit the payment. SUBMITTING A PAYMENT To submit the payment, perform the following steps: 1) Click Make Payment in the REVIEW PAYMENT DETAILS page. 68
71 COMMERCIAL CARD Note: If the payment is scheduled for a future date, you will receive the confirmation after the payment is made and updated in the system. 2) The PAYMENT CONFIRMATION page displays the final confirmation with your confirmation number, and the payment is logged on the PAYMENT HISTORY page with a payment status of pending. 3) An confirmation is also sent to the specified addresses. 4) To print a copy of this page for your records, click Print, and use the features of your Windows printer. 5) To make another payment, click Make Another Payment to redisplay the MAKE ONE-TIME PAYMENT page. Note: You may also want to record this transaction in a checking or savings account register. ADDING A PAYMENT ACCOUNT The Add Payment Account page allows you to set up multiple checking or savings accounts to be used as payment accounts to pay your cardholder s bill online. It also lists any active or cancelled payment accounts. You can create an unlimited number of payment accounts. Once a payment account is created, it can be used immediately to make an online payment. To add a new payment account to your payment accounts list, perform the following steps: 1) Select Manage Payment Accounts from the NAVIGATION LIST drop-down menu. The MANAGE PAYMENT ACCOUNTS page displays. 69

72 2) Click the Add Payment Account link. The ADD PAYMENT ACCOUNT page displays. An example image of blank check is provided to assist with finding the information required for setting up the account. Note: The ADD PAYMENT ACCOUNT page also displays if you attempt to make an online payment to an account that has not yet been set up. 3) Select the appropriate TYPE OF ACCOUNT, either Checking or Savings. 4) In the FINANCIAL INSTITUTION NAME box, type the name of the financial institution where the account you want to use is located. You may enter up to 40 alpha, numeric, and special characters in this box. 5) In the NAME ON ACCOUNT box, type the name of the registered user. If there are multiple names on the account, type the primary name. You may enter up to 40 alpha, numeric, and special characters in this box. 6) In the ROUTING TRANSIT NUMBER box, type the financial institution's nine-digit routing number. 7) In the ACCOUNT NUMBER box, type your checking or savings account number. You may enter up to 17 digits. Alpha and special characters are not allowed. Note: Do not type your credit card number in this box. 8) In the ACCOUNT NICKNAME box, type a unique name for the account. You may enter up to 40 alpha, numeric, and special characters in this box. Note: The account nickname must be selected whenever you make a payment. Be sure to create a nickname that clearly identifies the account. 9) Click Save. The MANAGE PAYMENT ACCOUNTS page displays the new account in the PAYMENT ACCOUNTS list. 70
73 COMMERCIAL CARD 10) To cancel and return to the MANAGE PAYMENT ACCOUNTS page without adding the new payment account, click Cancel. Note: If the payment account is not validated, an error message displays, identifying the error or errors. Correct these errors and click Save to resubmit the add payment account request. The table below describes the elements on the Add Payment Account page. An asterisk (*) indicates that the information is required. ELEMENT Type of Account* Financial Institutions Name* Name on Account* Routing Transit Number* Account Number* Account Nickname* DESCRIPTION The type of account used to make an online payment, either checking or savings. The financial institution of the checking or savings account where funds are withdrawn when making an online payment towards the cardholder account. The name of the registered account holder. The nine-digit routing number that identifies the financial institution from which funds are withdrawn for an online payment. The checking or savings account number of the account that will be used to make an online payment. A unique name assigned by the cardholder to identify the account. Also referred to in ezcardinfo (MyCardStatement) as Payment Account. Save Cancel Important: You cannot establish two payment accounts with the same nickname. If you plan to use two or more payment accounts from the same bank, include the type of account or other identifier in the nickname. Click Save to save the new payment account. Click Cancel to cancel adding the new payment account. VIEWING INFORMATION ABOUT AN EXISTING PAYMENT ACCOUNT To view information about an existing account, perform the following steps: 1) Select Manage Payment Accounts from the NAVIGATION LIST drop-down menu. The MANAGE PAYMENT ACCOUNTS page displays. 71

74 2) Click the link for the Account Nickname of the payment account in the left column of the MANAGE PAYMENT ACCOUNTS page. The PAYMENT ACCOUNT DETAILS page displays the details of a selected payment account. This page also allows you to change, save, and delete active payment accounts. The table below describes the elements on the Payment Account Details page. All fields marked with an * are required. 72
75 COMMERCIAL CARD ELEMENT Type of Account Financial Institutions Name* Name on Account* Routing Transit Number* Account Number* Enter your full checking or savings account number Account Nickname* Save Delete Cancel DESCRIPTION The type of account used to make an online payment, either checking or savings. The financial institution of the checking or savings account used to make the payment. The name of the registered account holder. The nine-digit routing number that identifies the financial institution from which funds are withdrawn for an online payment. The checking or savings account number of the account accessed for an online payment. The account number is masked with the exception of the last four digits. You can change your account number by entering a new account number into this box. A unique name assigned by the cardholder to identify the account. Also referred to in ezcardinfo (MyCardStatement) as Payment Account. Click Save to save any changes make to a payment account. Click Delete to delete a payment account. Click Cancel to exit the page without making any changes. VIEWING PAYMENT HISTORY The payment history for a commercial card account consists of all payments that have been made on the ezcardinfo (MyCardStatement) site within the last eighteen months, including pending and cancelled payments. Payments with a pending status can also be updated or cancelled. To view the online payment history for a commercial card account, perform the following step: 1) Select Payment History from the NAVIGATION LIST drop-down menu. The PAYMENT HISTORY page displays. You can now view the account payment history information, modify any pending payments, and download the information as an Excel Spreadsheet (.csv) and text file (tab spacing). 73
76 The table below describes the information on the Payment History page. ELEMENT Navigation List Payment Status Account Number/Card Number Confirmation Number Payment Date Payment Amount Payment Account DESCRIPTION Select an option from Navigation List drop-down menu to navigate to other pages for information about a specific account. Payment status either Pending, Processing, Processed, or Cancelled The checking or savings account number of the account accessed for an online payment. The account number is masked with the exception of the last four digits. An identifying number assigned sequentially by ezcardinfo (MyCardStatement). The date of the payment. The amount of the payment. The payment account nickname. 74
77 COMMERCIAL CARD VIEWING PAYMENT DETAILS To view the details of a selected payment, click the Confirmation Number link in the left column of the Payment History page. The Payment Details page displays. 75
78 If the transaction has been cancelled, you can view the details of the payment only. If the transaction is still pending, you can now edit the payment information or cancel the payment. The table below describes the elements on the Payment Details page. ELEMENT Navigation List Return to Payment History Card Number Entered Date Payment Account Financial Institution Name Account Number Routing Number Account Type Payment Option Payment Amount Payment Date Payment Memo Send Confirmation to: Resend confirmation to the address provided Confirmation Number Status Last Updated DESCRIPTION Select an option from Navigation List drop-down menu to navigate to other pages for information about a specific account. Click the Return to payment history link to return to the PAYMENT HISTORY page. The last four digits of the commercial credit card account number The date the payment was made online An account nickname assigned by the cardholder or administrator The financial institution of the checking or savings account used to make the payment The checking or savings account number of the account accessed for an online payment The nine-digit routing number that identifies the financial institution from which funds are withdrawn for an online payment The type of account used to make an online payment, either checking or savings The minimum payment due The amount of the online payment The date of the payment Optional text entered by the cardholder related to a one-time payment The address entered in the cardholder profile, or the address entered in the Payment Confirmation box If this option is checked, the text box displays the address where a payment confirmation is sent. A random, sequential confirmation number assigned by ezcardinfo (MyCardStatement) upon payment The payment status either Pending, Completed, or Cancelled The date when the system last updated the payment details 76
79 COMMERCIAL CARD Save Cancel Payment Click Save to save the payment information and return to the PAYMENT HISTORY page. Click Cancel Payment to cancel the payment. MODIFYING PENDING PAYMENT If a transaction status is pending, the following information can be changed in the Payment Details page: Payment Account Payment Amount Payment Date Payment Memo To change this information, perform the following steps: 1) Click the box for the item(s) you want to change. 2) Type the new payment information. 3) When completed, click Save to save the changes. CANCELLING A PAYMENT Pending payments can be cancelled as long as the payment status indicates pending. To cancel a pending payment, click Cancel Payment on the PAYMENT DETAILS page. Once a payment is cancelled, the changeable fields on the PAYMENT DETAILS page appear disabled, and the payment status is cancelled. Changing the Payment Account If you have set up two or more payment accounts and want to switch to a different account, click the down arrow in the PAYMENT ACCOUNT box. Select the payment account to be used for the payment. Changing the Payment Date To change the date the payment will be made, click in the Payment Date box. Select the new date from the date calendar. Note: Once the new changes have been saved, the payment information cannot be modified. To change it, you must cancel the payment, then create a new payment with the desired changes. Important! Once a payment status indicates Submitted, the payment cannot be cancelled. 77
80 DOWNLOADING PAYMENT HISTORY INFORMATION You can download your cardholder s account payment history list to a file in either comma-delimited (.csv) or tab-delimited (.dat) format for a cardholders report. To download the payment history, perform the following steps: 1) From the PAYMENT HISTORY page, select either Excel/Spreadsheet (.csv) or Text (tab spacing) from the DOWNLOAD drop-down menu. 2) Click Download. A message box displays. Click Open in the prompt to download and open the text file. Or, 3) Click Save to save it to a specified location on your computer hard drive. If you click Save, you will be prompted to designate a location for the file. The file downloads, and a confirmation message displays. 78
81 COMMERCIAL CARD ONLINE SERVICE REQUESTS NOTE: If you initiate Online Service Requests while inquiring on a specific cardholder account, the page populates with that cardholder s information. In addition, you can only choose an account from the drop-down list if the Service Request is selected from the Company level. Cardholder add or change requests can be easily completed by the company administrator using the ONLINE REQUESTS feature. There are several types of service requests, as described in the table below. Service requests are submitted real time to the card processing system, or are delivered to the financial institution through a queue. You access Online Service Requests either from the company record or a cardholder s account. The available options may differ based on where you start. To submit an online service request, perform the following steps: 1) Click the Commercial Card tab on the home page menu bar. 2) Select View Company List. The VIEW COMPANY LIST page displays. 3) Click the View Hierarchy link for your company on the VIEW COMPANY LIST page. The COMPANY HIERARCHY page displays. 4) Click the View link on the COMPANY HIERARCHY page. The ACCOUNTS page displays with a list of accounts that are related to the selected company or sublevel. 5) Select Online Requests from the NAVIGATION LIST drop-down menu. The ONLINE REQUESTS page displays with company level information. 79
82 This page contains drop-down menu for selecting the service request type, along with the following information if you accessed the page while viewing an account: Card Number Previous Card Number Cardholder Account Type Statement Delivery Option Fleet Card Account Type Fleet Product Restriction Account Status Product Billing Account Tracking Code Fleet ID Fleet Product Restriction Prompt 80
 Enter your information on the service request page.")
83 COMMERCIAL CARD The available Service Requests appear based upon the institution s parameters include: 6) Select a request type option from the SERVICE REQUEST drop-down list. 7) Click Go. The page for the selected request type displays, for example, ADD NEW CARDHOLDER. 8) Enter your information on the service request page. 9) To cancel a request, click Cancel on any page to return to the ONLINE REQUESTS page. To reset the information on the page to your previous settings, click Reset. 10) Click Continue. The review page provides a summary of the service request. To modify the request, click Edit to return to the ADD NEW CARDHOLDER entry form page. 11) Review the cardholder information, and verify that it is correct. Click Submit. The CONFIRMATION page is displayed. 12) To make another request, click the MAKE ANOTHER ONLINE REQUEST option on the confirmation page. Or, 13) Select Online Requests from the NAVIGATION LIST drop-down menu to return to the ONLINE REQUESTS page. Important: Some online requests only display to a user if the permissions have been set to include the request types set up by the financial institution. 81
84 Service requests are submitted real-time or are delivered to the financial institution through ezbusiness using a queued process. If a request is queued, the financial institution retrieves your request, reviews it, and enters it into the card processing system manually. Requests that are processed on a real time basis update the card processing system immediately, though real time requests that encounter exception conditions may be submitted as a queued request. The confirmation message you receive when submitting a request provides information about the processing time associated for each request. Please consult with your financial institution if you have any questions about processing times for queued requests. The following table describes each request. SERVICE REQUEST TYPE REQUEST PROCESSING DESCRIPTION Add Cash Access Queued to FI Allows an individual cardholder access up to an institution specified percent of their credit limit. Add New Cardholder Add New Driver Add New Group Add New Vehicle Queued to FI or Real time Update* Queued to FI or Real time Update* Queued to FI or Real time Update* Queued to FI or Real time Update* Creates a new commercial cardholder payment account. Creates a new Fleet card driver record, which can be connected to a cardholder account. Provides the Driver or Vehicle record information to the institution Admin to create a group of Drivers or Vehicles. New Fleet card vehicle record, which can be connected to a cardholder account. Add PIN Access Queued to FI Add or removes PIN access to an individual account. A PIN mailer is sent to the cardholder s address. Address and Phone Change Real time Update* Allows Admin User to submit an address and/or phone number change. Change Cardholder Authorization Block Change Company Payment Due Date Real time Update* Queued to FI Allows Admin User to submit a temporary authorization block. NOTE: For a lost or stolen account, please contact the phone number provided by your institution. Allows Admin User to request a new billing and payment due date. 82
85 COMMERCIAL CARD Change Credit Limit Real time Update* Changes the permanent or temporary credit limit on a commercial cardholder account. Close Account Real time Update* Closes the commercial card account. This prevents authorizations and account reissue. NOTE: For a lost or stolen account, please contact the phone number provided by your institution. Manage Spending Restrictions Real time Update* Allows Admin User to view, add, edit, or delete Merchant Groups and Spending Limits. Request Replacement Card Queued to FI Orders a new replacement credit card for a commercial cardholder. NOTE: For a lost or stolen account, please contact the phone number provided by your institution. Set up Account AutoPay Queued to FI Set up or change automatic payments for the account. View Full Account Number Real time Update* Allows Admin User the ability to view the card account number immediately. View Virtual Account Security Data Real time Update* Allows Admin User the ability to use Virtual accounts to make online or mail order transactions. *Important! This is a real time request, except in cases where the request is not configured for real time processing or when certain error conditions are encountered during processing. For some requests, a Submit as Queued button is displayed in the event that you receive edit errors or other exception conditions are encountered. You can attempt to fix the errors, but if unable, use the Submit as Queued button to send the request to the financial institution. ADDING CASH ACCESS The Add Access to Cash Service Request allows you to request access to a percentage of an individual cardholder's credit limit for use as a cash advance. To request this service, perform the following steps: 1) Select Online Requests from the NAVIGATION LIST drop-down menu. The ONLINE REQUESTS page displays. 83
86 2) Select Add Cash Access from the SERVICE REQUEST TYPE drop-down menu. 3) Click Go. The ADD ACCESS TO CASH SERVICE REQUEST page displays. 4) Select the cardholder name and account number from the CARDHOLDER NAME/ACCOUNT dropdown menu, or access Online Service requests directly from the cardholder s link. 5) Type the percentage of the cardholder's credit limit for use as a cash advance in the % OF LINE TO ACCESS FOR CASH box. 6) To post questions or comments about your request, type them in the SERVICE REQUEST MEMO box. 7) Click Continue. The REVIEW ADD ACCESS TO CASH SERVICE REQUEST page provides a summary of the service request. 8) Review the service request information, and verify that it is correct. Click Submit. Or, Click Edit to go back to the ADD ACCESS TO CASH SERVICE REQUEST page and make a change to the request. 9) Once the request is submitted, a confirmation message displays. The request is transmitted immediately. It can take up to 48 hours for processing. 10) To make another request, click Make Another Online Request to return to the ONLINE REQUESTS page. Note: You may request up to an institution determined percent of the credit limit using the online request. Contact Client Support if the required percentage is greater than that amount. If your commercial card program is not set to allow cash access by individual cardholder, an error message displays. Contact Client Support for assistance. 84
87 COMMERCIAL CARD ADDING A NEW CARDHOLDER The ADD NEW CARDHOLDER ACCOUNT service request allows you to add new cardholders to a commercial card program. Important! If your commercial card program has multiple hierarchy levels defined, be sure to validate the hierarchy level you have selected to ensure that this is the correct hierarchy level you wish to add the new account. In addition, if you have multiple commercial card products in your program please ensure that you have selected the correct product for the new account. When completing the Add New Cardholder Service Request page, here are a few reminders: The fields, ALLOW CASH ACCESS, CASH LIMIT and PIN ACCESS fields do not display if the company is set up without access to cash. The FLEET ACCOUNT DETAILS section displays only for Fleet products, and only when the Fleet option is enabled. The RUSH CARD section does not display if the Rush Card option is not enabled. The AUTO PAY section does not display if the Auto Pay option is not enabled. The VIRTUAL ACCOUNT fields do not display if Virtual Accounts are not enabled for the company. The AUTO ENROLLMENT fields do not display if Auto Enrollment into ezcardinfo/my Card Statement is not enabled. A sample Add New Cardholder Service Request page follows: 85

88 Note: Fleet Card information displays only if your company has a Fleet program and the option is enabled. In addition, if your company is signed up for the Fleet product, the Company Admin needs to go to Online Requests, and first select either Add Driver or Add Vehicle. When that information is completed, the Company Admin proceeds to the Add New Cardholder screen to complete the page. 86
89 COMMERCIAL CARD To request this service, perform the following steps: 1) Select Online Requests from the company NAVIGATION LIST drop-down menu. The ONLINE REQUESTS page displays. 2) Select Add New Cardholder from the SERVICE REQUEST TYPE drop-down menu. 3) Click Go. The ADD NEW CARDHOLDER SERVICE REQUEST page displays the Company Name and Company ID. 4) In the COMPANY DETAILS select the SUBLEVEL ID/NAME* from the drop-down list. 5) Select a product option from the PRODUCT* drop-down menu. 6) In the CARDHOLDER DETAILS section complete the applicable and required information marked with an asterisk (*). 7) Complete the PRODUCT DETAILS applicable and required information. 8) If a Fleet product is chosen, complete the information in the FLEET ACCOUNT DETAILS section. NOTE: The value to place in the Fleet ID field is from the Driver or Vehicle record. 9) Provide the new cardholder s mailing address in the CARDHOLDER ADDRESS DETAILS boxes. 10) Provide the cardholder s phone numbers. The Home Phone field should contain the phone number to best contact the cardholder. 11) Provide any RUSH CARD DELIVERY information, if applicable, and if prompted by the page. 12) Complete AUTO PAY information, if applicable. 13) To post comments about this request, type them in the SERVICE REQUEST MEMO box. The information entered in the Service Request Memo box will not be reviewed by the financial institution if the request is configured for real time processing. 14) Click Continue. The REVIEW ADD NEW CARDHOLDER SERVICE REQUEST page provides a summary of the service request. 15) Review the cardholder information, and verify that it is correct. Click Submit. Or, Click Edit to return to the ADD NEW CARDHOLDER page and enter new information. 16) Once the request is submitted, a confirmation message displays. 17) To make another request, click Make Another Online Request to return to the ONLINE REQUESTS page. The table below describes the elements for Adding a New Cardholder. 87
90 ELEMENT COMPANY DETAILS Company ID Company Name Sublevel ID/Name Product* DESCRIPTION Displays the unique number identifying the company. Displays the company name of the corresponding Company ID. Displays the unique number and name assigned to sublevels set up for the company. Select a company sublevel ID/name where the cardholder is located from the drop-down list. This is a required field. Important! Some field values in the form are defaulted based on the Sublevel selected. If you change the sublevel after you have updated default values, the system repopulates the fields with new default values. Select a product/sub-product from the drop-down list. This is a required field. Important! Some field values in the form are defaulted based on the Product selected. If you change the Product after you have updated default values, the system repopulates the fields with new default values. Virtual Accounts CARDHOLDER DETAILS Prefix First Name* Middle Name Last Name* Click to indicate this account is a virtual account. This field only appears if the company is enabled for Virtual Accounts. Type any optional prefix used at the beginning of a cardholder s name. The values entered in the Prefix, First Name, Middle Name, Last Name and Suffix fields cannot exceed a total of 25 characters. Type the cardholder s first name. The values entered in the Prefix, First Name, Middle Name, Last Name and Suffix fields cannot exceed a total of 25 characters. This is a required field. Virtual defaults as the first name if the Virtual Account box is checked. Type the cardholder s middle name, if applicable. The values entered in the Prefix, First Name, Middle Name, Last Name and Suffix fields cannot exceed a total of 25 characters. Account defaults as the middle name if the Virtual Account box is checked. Type the cardholder s last name. The values entered in the Prefix, First Name, Middle Name, Last Name and Suffix fields cannot exceed a total of 25 characters. This is a required field. Type a company or account specific last name for a Virtual Account. 88
91 COMMERCIAL CARD Suffix Date of Birth* Employee ID Employee Cost Center Cardholder SSN/Tax ID* Mother s Maiden Name PRODUCT DETAILS Type Processing* Allow Cash Advance Access PIN Access Credit Limit* Type any optional suffix used at the end of a cardholder s name. The values entered in the Prefix, First Name, Middle Name, Last Name and Suffix fields cannot exceed a total of 25 characters. Type the selected cardholder s birthdate in MM/DD/YYYY format. This can be an optional or required field, depending on your financial institution s implementation. Type the optional employee s identification number. Type the optional employee s cost center. If your company is set up on the card processing system with a default Employee Cost Center, the field defaults to that value, but it may be updated. Type either the cardholder s Social Security Number or Tax ID number. This number is often used to activate the new card. If your company is set up on the card processing system with a default Cardholder SSN/Tax ID, the field defaults to that value. Type information used for cardholder verification. Select a code from the drop-down list that defines the type of account added. If the institution has a default Type Processing set up on the card processing system, the field defaults to that value and cannot be changed. This is a required field. Values: 50 - Corporate account Default value 51 Corporate account No activation required 53 Corp Employee 54 Corp Empl Exp 55 Corp Relocation 56 Virtual Account defaults if the Virtual Account box is checked Check this box to allow cash advances based on the Cash Limit. This option does not display if the company Cash Limit is 0 or when the Virtual Account box is checked. Check this box to issue a PIN for the account. This option does not display if the company Cash Limit is 0 or when the Virtual Accounts box is checked. Values: Checked Yes, issue a PIN Unchecked No, do not issue a PIN Type the total amount of approved credit for the cardholder account. This is a required field. 89
92 CASH LIMIT Order Plastics Now Number of Plastics Name to Print on Card Instead of Company Name Type the total cash limit approved for the account. The dollar amount entered in this field must not exceed the percentage allowed that is defined for your company. This option does not display if the company Cash Limit is 0 or when the virtual Accounts box is checked. Check this box to order a plastic for the account. This box does not appear when the virtual Accounts box is checked. Type a number of plastics to order for the cardholder. This box generally defaults to 1 for plastic orders, but changes to 0 if the ORDER PLASTICS NOW box is left unchecked. If your company is set up on the card processing system with a default Number of Plastics, the field defaults to that value. This box does not appear when the virtual Accounts box is checked. Important! If the Order Plastics Now option is unchecked, the Number of Plastics is set to 0 and a card will not be issued. Type a name to emboss on the plastic other than the company name. This option will not display on the page if the feature is not enabled for your financial institution. FLEET ACCOUNT DETAILS Account Type Fleet ID Prompt Fleet Card information displays only if you have a fleet program and your financial institution has enabled the feature. Select a Fleet account type from the drop-down list. This is a required field when a Fleet product has been selected. Values: D Driver V - Vehicle Enter a Fleet Driver or Vehicle record ID, or use the SEARCH option to view and select a FLEET ID from the list of all the fleet identification numbers associated with the company s drivers and vehicles. This is a required field when a Fleet product has been selected. Select from this drop-down list the prompt the driver is required to enter at the point of sale. If an option is not selected, it defaults to 5 No Prompt when the account is added to the card processing system. Values: 1 ID and Odometer Reading 2 Vehicle ID and Odometer Reading 3 Driver ID and Odometer Reading 4 Odometer Reading 5 No Prompt 6 - ID only 90
93 COMMERCIAL CARD Product Restriction Auth Decline Override Select this drop-down list to choose the card restrictions for the Fleet Card product. If an option is not selected, it defaults to 0 No Restrictions when the account is added to the card processing system. Values: 0 No Restrictions (A cardholder/account is not restricted to purchases at a Visa or MasterCard Fleet merchant location.) 1 Fuel and Maintenance (The cardholder is limited to fuel and maintenance only purchases at a Visa or MasterCard Fleet merchant location. Refer to Visa or MasterCard Fleet Implementation Guide for more information.) 2 Fuel Only (The cardholder is limited to fuel only purchases.) Check this box for overriding a declined authorization for the account. Important! Checking this option results in authorizations that would be declined, or would normally decline, due to an invalid or missing prompt value, (for example, Driver ID of Vehicle ID), to be approved. Values: Not Checked - do not override a declined authorization Checked override a declined authorization CARDHOLDER ADDRESS DETAILS Address Line 1* Address Line 2 Address Line 3 City* State/Province* Zip Code/Postal Code* PRIMARY MAILING ADDRESS: Type the address for all plastics, correspondence, and statement if Statement Address is not noted. If your company is set up on the card processing system with the option to use the Company s Primary Address as the Cardholder s Primary Mailing Address, the address field defaults and the Company Admin will not be able to update the Primary Address fields. This is a required field. Type any additional address information in this optional field. Type any additional address information in this optional field. Type the cardholder s city of residence. This is a required field. Select the cardholder s state of residence from the drop-down list. If entering a Canadian address, select the Province from this list. This is a required field for U.S. or Canadian addresses. Type the cardholder s ZIP Code. This is a required field for U.S. or Canadian addresses. 91
94 Foreign Address Check this box if the mailing address is a foreign address. Important! Requests that involve foreign addresses may be processed as a queued request depending on the option chosen by your financial institution. Canadian addresses are not foreign addresses. Enter the Canadian address the same as a U.S. address. Country Same as Primary Mailing Address Address Line 1* Address Line 2 Address Line 3 City* State/Province* Zip Code/Postal Code* Foreign Address Values: Checked - Yes Unchecked - No Select the cardholder s country of residence from the drop-down list. This field applies only when the Foreign Address is checked. STATEMENT ADDRESS: Check this box if the statement address is the same as the mailing address. Type the address for mailing statements to a different address. This is a required field, if statement address differs from mailing address. Type any additional statement address information in this optional field. Type any additional statement address information in this optional field. Type the city for the statement address. This is a required field. Select the state for the statement address from the drop-down list. If entering a Canadian address, select the Province from this list. This is a required field for U.S. or Canadian addresses. Type the statement address Zip Code. This is a required field for U.S. or Canadian addresses. Check this box if the statement address is a foreign address. Important! Requests that involve foreign addresses may be processed as a queued request depending on the option chosen by your financial institution. Canadian addresses are not foreign addresses. Enter the Canadian address the same as a U.S. address. Country Values: Checked - Yes Unchecked - No Select the country to which the statement will be mailed from the drop-down list. This field applies only when the Foreign Address is checked. This field applies only when the Foreign Address is checked. PHONE NUMBERS 92
95 COMMERCIAL CARD Home Phone* Business Phone* Mobile Phone Other Phone Type Other Phone Type the cardholder s home phone number or the best number to reach the cardholder This could be a cell phone. Type the cardholder s business phone number. This can be an optional or required field, depending on your financial institution s implementation. Type the cardholder s mobile phone, if applicable. Select the type of phone number being entered in the OTHER PHONE field from the drop-down list. Values: B-Business C-Mobile H-Alternate Home N-Neighbor O-Other If your company is set up on the card processing system with a default work phone, the OTHER PHONE TYPE field populates with a value of B-Business. The default value may be updated. Type the cardholder s alternate phone number, if applicable. If your company is set up on the card processing system with a default work phone, the OTHER PHONE field populates with that default value. The default value may be updated. RUSH CARD DELIVERY Rush Card Delivery Requested Signature Required Shipping Instructions Contact Phone* Ext This section only appears if allowed by the financial institution. Contact your financial institution for details. Check this box to indicate rush delivery of the plastic. Check this box only if a signature is required for delivery. Default value is checked. Your financial institution may have this option set so that it is automatically checked, and the user is unable to update it. Select the Rush Card Delivery shipping instructions from the dropdown list. Values: N-Next Day Delivery S-Saturday Delivery The Saturday Delivery option may not be available. This is a configuration option and will not be displayed in the drop down if it is not configured for the company. Type a contact phone number. This is a required field. The extension is an optional. 93
96 Special Instructions Reset Add additional information regarding the delivery instructions for the rush card. This field is optional. Click this button to reset the Rush Card Delivery information and clear all fields. CARD MAILING ADDRESS Card Mailing Address Name* Address Line 1* Address Line 2 Address Line 3 City* State/Province* Zip Code/Postal Code* Foreign Address Country Select from the drop-down list where the rush card is mailed. This is only required when Rush Card Delivery is requested. Values: C Cardholder Address K Company Main Address O Other Address If chosen, type the address to mail the rush plastic in the Card Mailing Address fields. P Company Plastics Address Type a contact name to receive the rush card plastic. This field is only required when Rush Card Delivery Requested is checked. If Other Address is selected, type an alternate address to send the rush card. This is a required field. If Other Address is selected, type any additional alternate address information in this optional field. If Other Address is selected, type any additional alternate address information in this optional field. If Other Address is selected, type the city for the alternate address. This is a required field. If Other Address is selected, select the state for the alternate address from the drop-down list. This is a required field. If Other Address is selected, type the alternate address Zip Code. This is a required field. If Other Address is selected, check this box if the alternate address is a foreign address. Important! Requests that involve foreign addresses may be processed as a queued request depending on the options enabled by your financial institution. Values: Checked - Yes Unchecked - No If Other Address selected, select the country from the drop-down list if the card is being mailed to a foreign address. This field applies only when the Foreign Address is checked. 94
97 COMMERCIAL CARD AUTO PAY Auto Pay Requested Auto Pay Account Type Auto Pay Option* Bank Account Name Bank Account Number* Routing Transit Number* This function is sent real time if it is added when setting up a new cardholder. If it is added later, it is queued to the institution. Check this box to indicate that auto pay is being set up for the account. Select the Account Type from the drop-down list. This is a required field. D Checking S - Savings Select the auto pay option from the drop-down list. This is a required field. Options that may be displayed include the following and may differ based on your financial institution s implementation: A Fixed amount (The Fixed Amount field is also required.) B Previous Balance less Disputes C Current Balance F Full balance G Full Balance minus adjustment H Full Balance Including Disputes Allow Credit Balance I Installment J Minimum payment K Full Balance Less Disputes/Payments/Misc Credits Allow Credit Balance M Minimum payment less CTD Credits O Minimum payment plus Add-ons P Percentage of balance (The Percentage field is also required.) Type the name of the institution that receives the debit transaction for an automatic payment. This field is optional. Type the checking or savings account number from which the system drafts the automatic payment. This is a required field. Type the routing number for the institution from which the system drafts the automatic payment. This is a required field. 95
98 Frequency* Day* Percentage Fixed Amount Reset Select the frequency of the automatic payments from the drop-down list. This is a required field. Options that may be used include: M Monthly D Daily S Specific Date U Due Date 1 Weekly on Mondays 2 Weekly on Tuesdays 3 Weekly on Wednesdays 4 Weekly on Thursdays 5 Weekly on Fridays If the Monthly frequency is selected, this indicates the number of calendar days after the statement billing date that the auto payment is processed. If the Specific Date frequency is selected, this is the actual date the auto payment is processed. Select the percentage of the account's balance that is used to calculate the automatic debit. This field is only required when the value P is selected from the Auto Pay Option field. Type the fixed amount of the automatic debit. This field is only required when the value A is selected from the Auto Pay Option field. Click this button to reset the Auto Pay information and clear all fields. AUTO ENROLLMENT This section only appears when auto enrollment into ezcardinfo/my Card Statement is allowed by the financial institution. Auto Enrollment Requested Address User Name Password and Verify Password Memo Continue The box defaults as checked if auto enrollment has been established. Unclick it if auto enrollment is not required for this account. Type the address where ezcardinfo/my Card Statement enrollment notification is sent. Create and type a user name for this account s access into ezcardinfo/my Card Statement. Type and re-type a temporary password for this account s access into ezcardinfo/my Card Statement. The information entered here by the user is posted to the card processing system as a memo. Only the financial institution can view it in the card processing system. Click this button to add and move through the process and display Review Add New Cardholder Service Request. 96
99 COMMERCIAL CARD Reset Cancel Click this button to reset Add New Cardholder information and clear all fields. Click this button to return to the Online Requests page. FLEET RECORDS NOTE TO THE COMPANY: Fleet Card capability is only an option if your financial institution offers it. When a new account is added to a Fleet program, it must be associated to a Driver, Vehicle, and optionally, a Group record. The Company Admin sets up Driver, Vehicle, and Group records prior to using the Add New Cardholder request to add an account to a Fleet program. The following pages support Fleet Card specific data. You can add new drivers, vehicles and groups and maintenance information for existing drivers, vehicles and groups. The system assigns Driver and Vehicle ID numbers automatically if the user does not enter it. To request this service, perform the following steps: 1) Select Online Requests from the NAVIGATION LIST drop-down menu. The ONLINE REQUESTS page displays. 2) Select ADD NEW DRIVER, ADD NEW GROUP, or ADD NEW VEHICLE from the SERVICE REQUEST TYPE drop-down menu. 3) Click Go. The ADD NEW DRIVER, GROUP, OR VEHICLE page displays the default Sublevel, and Company Name. 4) Select the SUBLEVEL ID/NAME* where the record is to be located from the drop-down list. 5) Complete the applicable information in all the sections. 6) To post comments about this request, type them in the SERVICE REQUEST MEMO box. The information entered in the Service Request Memo box will not be reviewed by the financial institution if the request is configured for real time processing. 97

100 ADD NEW DRIVER SERVICE REQUEST The Add New Driver service request allows you to enter a new driver record for your Fleet program. The driver record is used when setting up a cardholder account for that driver. 98
101 COMMERCIAL CARD The table below describes the elements for Add New Driver. ELEMENT COMPANY DETAILS Company ID Company Name Sublevel ID/Name DRIVER IDENTIFICATION Driver ID* Driver Type* DESCRIPTION Displays the unique number identifying the company. Displays the company name of the corresponding Company ID. Select a company sublevel ID/name from the drop-down list. The system assigns the next driver ID or you can enter a specific numeric value in this box, which must be at least six-digits. This is a required field. Select driver from the drop-down list. This is a required field. Value: D - Driver Card Type* First Name* Middle Initial Last Name* License ID Issue State Issue Country Expiration Date Select a card type from the drop-down list. This is a required field. Values: M MasterCard V Visa Type the driver s first name. This is a required field. Type the driver s middle initial, if applicable. Type the driver s last name. This is a required field. Type the driver s license identification number. License ID is required when selected Driver Type is D-Driver. Select the driver s license issue state from the drop-down list. Select the country from the drop-down list for the driver s license identification number. Select the driver s license identification expiration date from the dropdown calendar. VEHICLE DETAILS Authorized Vehicle Type an optional authorized vehicle ID for this record. Click the Search button to open a window with available vehicles to select and add to the form. 99
102 Authorized Vehicle Group EXCEPTION REPORTING Report Exception Type an optional authorized vehicle group ID. Click the Search button to open a window with available vehicle groups to select and add to the form. This option only displays when configured for display. Check this box to indicate if the driver record is restricted and included in the exception reporting. Contact your financial institution to receive the Exception report. Values: Checked Restricted Not checked No restriction Service Type Weekend Option Time Start Time End Oil Comps Fillups Per Day Unit Price $ Transaction Amount S Select the service type code from the drop-down list. Values: 1 Self Service 2 Full Service N None Select the driver s weekend use option. Values: 1 Valid Monday Friday 2 Valid Monday Saturday 3 Not Valid on holidays 4 Not Valid on Sundays or holidays N - None Type the four-digit vehicle s start of day in military time. Values include: Type the four-digit vehicle s ending time of day in military time. Values include: This field is reserved for future use. Type the vehicle s maximum fillups per day. This is limited to three digits. Type the fuel unit cost. Type the fuel transaction amount. Service Request Memo Continue The information entered here by the user is posted to the card processing system as a memo. Only the financial institution can view it in the card processing system. Click this button to display the Review Add New Driver Service Request. 100

103 COMMERCIAL CARD Reset Cancel Click this button to reset the Add New Driver information and clear all fields. Click this button to return to the Online Requests page. ADD NEW VEHICLE SERVICE REQUEST The Add New Vehicle service request allows you to enter a new vehicle record for your Fleet program. The driver vehicle is used when setting up a cardholder account for that vehicle. 101
104 The table below describes the elements for Add New Vehicle Service Request. ELEMENT DESCRIPTION COMPANY DETAILS Company ID Company Name Vehicle ID* Vehicle Type Card Type Authorized Driver Search Authorized Driver Group Displays the unique number identifying the company. Displays the company name of the corresponding Company ID. The system assigns the next vehicle ID or you can enter a specific numeric value, which must be at least six-digits. This is a required field. Select the vehicle record from the drop-down list. Value: V Vehicle Select the vehicle card type. Values: M MasterCard V Visa Type an authorized driver ID for this record. Click the Search button to open a window with available authorized drivers to select and add to the form. Click this button to search for an existing driver or driver group. Type an authorized driver group ID for this record. Click the Search button to open a window with available authorize driver groups to select and add to the form. This option only displays when configured for display by your financial institution. VEHICLE INFORMATION Description VIN License ID Issue State Type the vehicle description. Type the vehicle identification number. Type the vehicle s license identification number assigned to the vehicle. License ID is required when selected Vehicle Type is V - Vehicle. Select the vehicle s license issue state from the drop-down list. 102
105 COMMERCIAL CARD Issue Country Expiration Date Select the country from the drop-down list for the vehicle s license identification number. The expiration date for the vehicle s license tag. EXCEPTION REPORTING Report Exception Check this box to indicate if the vehicle is included in the exception reporting, if a credit card transaction exceeds one of the following restrictions. Contact your financial institution to receive the Exception report. Values: Checked Restricted Not checked No restriction Service Type Select the service type code from the drop-down list. Values: 1 Self Service 2 Full Service N None Oil Comps Weekend Option Time Start This is reserved for future use. Select the vehicle s weekend use option from the drop-down list. Values: 1 Valid Monday-Friday 2 Valid Monday-Saturday 3 Not valid on holidays 4 Not valid on Sundays or holidays N None Type the vehicle s start of day in military time. This is a four-digit field. Values include:
106 Time End Type the vehicle s ending time of day in military time. This is a fourdigit field. Values include: Fillups Per Day Type the vehicle s maximum fillips per day. Unit Price Type the fuel unit cost up to Transaction Amount Tank Capacity Type the fuel transaction amount. Type the vehicle s fuel tank capacity. MPG Low Type the lowest expected miles per gallon up to 99.0 MPG High Type the highest expected miles per gallon up to 99.0 Fuel Type Service Request Memo Continue Reset Cancel Select the types of fuel for the vehicle from the drop-down list. If specified, fuel type 2 must be greater than type 1. The information entered here by the user is posted to the card processing system as a memo. Only the financial institution can view it in the card processing system. Click this button to display Review Add New Vehicle Service Request. Click this button to reset Add New Vehicle information and clear all fields. Click this button to return to the Online Requests page. 104

107 COMMERCIAL CARD ADD NEW GROUP SERVICE REQUEST The Add New Group service request allows the Company Administrator to create a vehicle or driver group record for their Fleet program. NOTE: The request is transmitted immediately to the institution s Incoming Messages for the institution to complete the request in BASE
108 The table below describes the elements for Add New Group Service Request. ELEMENT COMPANY DETAILS Company ID Company Name GROUP DETAILS Group ID* Group Description* Group Type Search ID Driver Name Or Vehicle/Group Description Add Remove Service Request Memo Continue Reset Cancel DESCRIPTION Displays the unique number identifying the company. Displays the company name of the corresponding Company ID. Type the group s identifier numeric only. This is a required field. Type the group s description. This is a required field. Select the group type from the drop-down list. Values: D Driver V Vehicle Click this button to search for a driver or vehicle ID number. This column displays the group driver ID or group vehicle ID. This column displays either the driver name or vehicle description depending on the Group Type specified. Click this button to add one or more Fleet Driver or Vehicle selected records to the Fleet Group. Click this button to remove one or more selected Fleet Driver or Vehicle records from the Fleet Group. The information entered here by the user is posted to the card processing system as a memo. Only the financial institution can view it in the card processing system. Click this button to display the Review Add New Group Service Request. Click this button to reset the Add New Group information and clear all fields. Click this button to return to the Online Requests page. 106
109 COMMERCIAL CARD ADDING OR REMOVING PIN ACCESS The Add PIN Access Service Request allows you to request a PIN mailer so a commercial cardholder has the ability to access their account through a PIN number, or remove this access. NOTE: If your commercial card program is not set up to allow PIN Access by individual cardholders please contact Client Support for additional assistance. Adding PIN Access To add PIN access, perform the following steps: 1) Select Online Requests from the company or cardholder NAVIGATION LIST drop-down menu. The ONLINE REQUESTS page displays. 2) Select Add PIN Access from the SERVICE REQUEST TYPE drop-down menu. 3) Click Go. The ADD PIN ACCESS SERVICE REQUEST page displays. 4) Select the cardholder name and account number from the CARDHOLDER NAME/ACCOUNT dropdown menu. 5) Check the following option, Add Pin Access. 6) To post questions or comments about your request, type them in the SERVICE REQUEST MEMO box. 7) Click Continue. The REVIEW ADD PIN ACCESS SERVICE REQUEST page provides a summary of the service request. 8) Review the service request information, and verify that it is correct. Then, click Submit. Or, Click Edit to go back to the ADD ACCESS TO CASH SERVICE REQUEST page and resubmit the request. 9) Once the request is submitted, a confirmation message displays. 10) To make another request, click Make Another Online Request to return to the ONLINE REQUESTS page. Note: The request is transmitted and may take up to 48 hours to process it. Once processed, the new PIN is sent to the default mailing address of the commercial card account. Removing PIN Access To remove a cardholder's PIN access, perform the following steps: 1) Check Remove Pin Access in the ADD PIN ACCESS SERVICE REQUEST page. 2) To post questions or comments about your request, type them in the SERVICE REQUEST MEMO field. 3) Click Continue. The REVIEW ADD PIN ACCESS SERVICE REQUEST page provides a summary of the service request. 107
110 4) Review the service request information, and verify that it is correct. Then, click Submit. Or, Click Edit to go back to the Add Access to Cash Service Request page and resubmit the request. 5) Once the request is submitted, a confirmation message displays. 6) To make another request, click Make Another Online Request to return to the ONLINE REQUESTS page. Note: The request is transmitted and may take up to 48 hours to process it. ADDRESS AND PHONE CHANGE The ADDRESS AND PHONE service request allows you to make a change to the address and/or phone number information for a commercial card account. Important! If your commercial card program has multiple hierarchy levels defined, be sure to validate the hierarchy level you have selected to ensure that account is available to be selected. Important! This is a real-time request as long as the address is a United States address and that the comments section is not used for the request. To request this service, perform the following steps: 1) Select Online Requests from the company or cardholder NAVIGATION LIST drop-down menu. The ONLINE REQUESTS page displays. 2) Select Address and phone change from the SERVICE REQUEST TYPE drop-down menu. 3) Click Go. The ADDRESS AND PHONE CHANGE page displays the first cardholder based on account number, in the CARDHOLDER/ACCOUNT drop-down list. The boxes below display with the current address and phone information for the selected cardholder. 4) Select the cardholder's account that required the change from the CARDHOLDER/ACCOUNT dropdown list. The boxes below update with the selected cardholder's information. 5) Update boxes with the necessary information. 6) To post questions or comments about this request, type them in the Service Request Memo box. Please note that the request is not updated real-time if this section is used. The update occurs when the Financial Institution User makes the updates in the credit card processing system. 7) Click Continue. The ADDRESS AND PHONE CHANGE review page displays with a summary of the service request. 8) Review the cardholder information, and verify that it is correct. Click Submit. Or, Click Edit to return to the address and phone change page and enter new information. 9) Once the request is submitted, a confirmation message displays. 108
111 COMMERCIAL CARD 10) To make another request, click Make Another Online Request to return to the ONLINE REQUESTS page. Note: This Service Request is a real-time process. An Administrator will not review any entry in the SERVICE REQUEST MEMO box but serves as a notation. CHANGE CARDHOLDER AUTHORIZATIONS BLOCK The CHANGE CARDHOLDER AUTHORIZATIONS BLOCK Service Request allows Company Administrators to impose or remove a real-time cardholder authorizations block at the account level. This block prevents additional approved authorizations on the account until an Administrator removes the block. Note: This feature is not intended for lost or stolen accounts. Please contact your institution or the lost/stolen number provided on cardholder statements to report a card lost or stolen. Important! If your commercial card program has multiple hierarchy levels defined, be sure to validate the hierarchy level you have selected to ensure that account is available to be selected. To request this service, perform the following steps: 1) Select Online Requests from the company or cardholder NAVIGATION LIST drop-down menu. The ONLINE REQUESTS page displays. 2) Select Change Cardholder Authorizations Block from the SERVICE REQUEST TYPE dropdown menu. 3) Click Go. The CHANGE CARDHOLDER AUTHORIZATIONS BLOCK page displays the first cardholder based on account number, and appears in the CARDHOLDER/ACCOUNT drop-down list. 4) Select the cardholder's account that required the authorizations block (or to unblock) from the Cardholder/Account drop-down list. The current status appears. 5) Select the Authorization Block action by clicking on the option button to ADD, or REMOVE. 6) To post questions or comments about this request, type them in the SERVICE REQUEST MEMO box. Note: This Service Request is a real-time process. An Administrator will not review any entry in the Service Request Memo box but serves as a notation. 7) Click Continue. The CHANGE CARDHOLDER AUTHORIZATIONS BLOCK REVIEW page displays with a summary of the service request. 8) Review the information, and verify that it is correct. 9) Click Submit. Or, Click Edit to return to the CHANGE CARDHOLDER AUTHORIZATIONS BLOCK REVIEW page and enter new information. 10) Once the request is submitted, a confirmation message displays. 109

112 11) To make another request, click Make Another Online Request to return to the ONLINE REQUESTS page. CHANGING CREDIT LIMITS The CREDIT LIMIT CHANGE - SERVICE REQUEST screen allows you to request an increase or decrease in a cardholder's credit limit in real time, or provide the cardholder with a temporary credit limit increase. To request this service, perform the following steps: 1) Select Online Requests from the company or cardholder NAVIGATION LIST drop-down menu. The ONLINE REQUESTS page displays. 110
113 COMMERCIAL CARD 2) Select Change Credit Limit from the SERVICE REQUEST TYPE drop-down menu. 3) Click Go. The CHANGE CREDIT LIMIT - SERVICE REQUEST page displays the current credit limit for the account. 4) Select the cardholder name and account number from the CARDHOLDER NAME/ACCOUNT dropdown menu. 5) Check one of the following options, and provide the new credit limit information: Permanent Credit Limit Increase or Decrease -Type the new credit limit in the New Credit Limit box in a whole dollar amount. Temporary Credit Limit Increase - temporary credit limit increase or decrease amount in the Increase Credit Limit box in a whole dollar amount. Type the date that the temporary increase/decrease amount expires (during nightly processing) in mm/dd/yyyy format. 6) To post questions or comments about your request, type them in the SERVICE REQUEST MEMO box. NOTE: This Service Request is a real-time process. The Service Request Memo box serves as a notation. 7) Click Continue. The REVIEW CHANGE CREDIT LIMIT SERVICE REQUEST page provides a summary of the service request. 8) Review the service request information, and verify that it is correct. Click Submit. Or, Click Edit to go back to the CHANGE CREDIT LIMIT - SERVICE REQUEST page and resubmit the request. 9) Once the request is submitted, a confirmation message displays. 10) If CANCEL is selected, no changes are made. To make another request, click Make Another Online Request to return to the ONLINE REQUESTS page. 111
114 The table below describes the elements for changing/displaying credit limits. ELEMENT Last Permanent Credit Limit Updated On (Last Permanent Credit Limit) Permanent Credit Limit Increase or Decrease New Credit Limit $ Temporary Credit Limit Increase Temporary Adjusted Credit Limit Last Temporary Credit Limit Updated On: by: (Last Temporary Credit Limit) Increase Credit Limit By: $ Temporary Credit Limit to Expire on Delete Temporary Credit Limit Increase Service Request Memo DESCRIPTION Displays the previous permanent credit limit amount. Displays the date the permanent credit limit was last changed. Select this option button to perform a permanent credit limit change. Type the new credit limit in whole dollar amounts only. Select this option button to perform a temporary credit limit change. Displays the cardholders assigned (permanent) credit limit plus the (increased by) temporary credit limit amount. Displays the previous temporary credit limit amount. Displays the last temporary credit limit change date and the Administrator s User ID who requested the change. Type a whole dollar amount for the temporary credit limit change. Note this is the amount the credit limit is being changed by not the new credit limit. Type the date the temporary credit limit should expire at the end of the processing day. Format is MM/DD/YYYY Select this option button only if there is an active temporary credit limit increase in effect. If not active, the button is disabled. This optional field displays only when the request does not qualify for real time processing. CHANGE CREDIT LIMIT SERVICE REQUEST RESTRICTIONS NOTE: Do not process this request if the account is in a Closed or Blocked status. These restrictions prevent the change credit limit service request from being submitted under any of the following conditions: For Individually Billed, Billing Accounts, and Centrally Billed Accounts: Requested credit limit change cannot exceed the company limit. Requested credit limit change cannot exceed the Admin s allowed amount. Requested credit limit change must be different than the cardholder s current CREDIT LIMIT. If the Service Request is unable to be completed in a real time manner it will be routed to the Financial Institutions INCOMING MESSAGE QUEUE to be worked. 112

115 COMMERCIAL CARD CURRENT TEMPORARY CREDIT LIMIT OPTION If an account selected has an active (not expired or deleted) temporary credit limit, the active temporary limit is displayed in the Current Temp Limit field on the CHANGE CREDIT LIMIT SERVICE REQUEST page. The CURRENT TEMP LIMIT field allows the Admin the ability to change the amount, but this does not require entry of a new expiration date. The CURRENT TEMP EXP DATE field allows the Admin the ability to change the date, but does not require entry of a new limit. ACTIVE TEMPORARY CREDIT LIMIT INDICATOR An active temporary credit limit indicator T displays next to the CREDIT LIMIT any time the account has an active Temporary Credit Limit. If you place the cursor over the indicator, a message displays, there is an Active Temporary Credit Limit increase on this account. A sample follows: 113
 Select Commercial Card, and select Company Search from the navigation pane.")
116 VIEW CREDIT LINES The VIEW CREDIT LINES page displays detail of a company s temporary and permanent credit lines. To view cardholder credit line information on the VIEW CREDIT LINES page, perform the following steps: 1) Select Commercial Card, and select Company Search from the navigation pane. 2) Enter the COMPANY ID, and click the Search button. The VIEW COMPANY LIST page appears. 3) Click the View Hierarchy link. 4) Click the View link next to the HIERARCHY NAME. The ACCOUNTS page appears for that hierarchy level. 5) Select View Credit Lines from the NAVIGATION LIST. A list of all cardholder and information about their credit limits appears. Click a column header to sort the data by that information. 6) To change a cardholder s credit limit, click a cardholder s link to navigate to the Online Service Request for Credit limit Change. To view the details of temporary and permanent credit lines for a specific cardholder, complete the following: 1) Complete the search criteria in the STATUS, CARD NUMBER, FIRST NAME, and LAST NAME boxes. 2) Click Go. 114
 Click Select All to include all options in the spreadsheet. 3) After making the selections, click Save.")

117 COMMERCIAL CARD To create a customized listing or spreadsheet of all company accounts credit limits, complete the following: 1) Click Configure Report View, and click or unclick boxes to select the columns to appear in the report. 2) Click Select All to include all options in the spreadsheet. 3) After making the selections, click Save. 4) Select either the Download all Columns or Download Configured Columns box. 5) Select a download format (Excel CSV, Excel XLS, or text) 6) Click Download. A download box appears with the following options: Click Open to open the file in your default text-editing program. Click Save, and you are prompted to name a location for the file. The table below describes the elements in the VIEW CREDIT LINES page. 115
118 ELEMENT Configure Report View Status Card Number First Name Last Name Company Hierarchy Current Account Status Card Number Cardholder Name Permanent Credit Limit Cash Limit Current Account Balance Active Temporary Credit Limit Active Temporary Increase Exp Date Active Temporary Credit Limit Requestor Temporary Adjusted Credit Limit DESCRIPTION Click this button to include only specific data elements of the report. Click to select a status option to narrow the search of cardholders: All Blocked Closed Open Type the 16-digit account number to display the cardholder s information. Type the first name of the cardholder to display the cardholder s information. Type the last name of the cardholder to display the cardholder s information. Displays the Reporting, Sub Level, and Name. Displays the cardholder status: All Blocked Closed Open Displays the masked 16-digit account number, with only the last fourdigits unmasked. Displays the full cardholder name. Displays the current permanent credit limit established for an account. Displays the Cash Limit established for an account. Displays the outstanding balance on the accounts. Displays the non-expired temporary amount by which the credit limit was increased or decreased. Displays the expiration date of the active temporary credit limit. Displays the User ID who requested the current temporary credit limit. Displays the temporarily adjusted credit limit. Cardholders are assigned a permanent credit limit, and can receive a temporary credit limit increase. The account s permanent credit limit plus the amount of an active temporary credit limit increase = a temporary adjusted credit limit. 116
119 COMMERCIAL CARD Last Temporary Increase Amount Last Temporary Increase Exp Date Last Temporary Increase Requestor Last Temporary Increase Maint Date & Time Last Permanent Credit Limit Change Date Last Permanent Credit Limit Change Amount Displays the amount of the last temporary increase. Displays the expiration date of the last temporary increase amount. Displays the User ID who requested the previous temporary credit limit increase. Displays the date and time the last temporary credit increase was modified. Displays the last date the permanent credit limit was changed. Displays the change in the amount of the permanent credit limit. CLOSING AN ACCOUNT The Close Account Service Request allows you to request to close a commercial card account in real time. This prevents future authorizations and the account will not reissue. NOTE: This feature is not intended for lost or stolen accounts. Please contact your institution or the lost/stolen number provided on cardholder statements to report a card lost or stolen. To request this service, perform the following steps: 1) Select Online Requests from the company or cardholder NAVIGATION LIST drop-down menu. The ONLINE REQUESTS page displays. 2) Select Close Account from the SERVICE REQUEST TYPE drop-down menu. 3) Click Go. The CLOSE ACCOUNT SERVICE REQUEST page displays. 4) Select the cardholder name and account number from the CARDHOLDER NAME/ACCOUNT dropdown menu. 5) Check one of the following reasons for closing the account: No Longer Employed Terminated Employee Company Closed Business Did Not Use Completed Project 6) To post questions or comments about your request, type them in the SERVICE REQUEST MEMO box. NOTE: This Service Request is a real-time process. Any entry in the Service Request Memo box is not reviewed by an Administrator but serves as a notation. 117
120 7) Click Continue. The REVIEW CLOSE ACCOUNT SERVICE REQUEST page provides a summary of the service request. 8) Review the service request information, and verify that it is correct. Click Submit. Or, Click Edit to return to the Close Account Service Request page and resubmit the request. Once the request is submitted, a confirmation message displays. NOTE: The request is transmitted immediately. 9) To make another request, click Make Another Online Request to return to the ONLINE REQUESTS page. Note: To reopen a closed account, please contact your financial institution. 118
121 COMMERCIAL CARD SPENDING RESTRICTIONS Depending on your commercial card servicing agreement and your user security profile, you can manage spending restrictions for your commercial card program. To manage spending restrictions, start with Merchant Group Code (MGC) definitions. An MGC definition contains a specific category of Merchant Category Codes (MCCs). You can refer to the online MCC list for available codes and choose which MCCs to include in an MGC definition. You need these definitions in place before you set spending limits. Spending limits are rules that limit card usage by dollar amount, the number or transactions within an MGC definition, or both. Commonly, spending limits are set up with a decline response. Transactions that qualify for MGC definitions that violate transaction amount or count criteria are not authorized. You can establish spending limits for a time period that you can determine, or select a time period from a drop down list. You can set up spending limits for a company, sublevel or cardholder account. Set the initial spending limit for at least one period. Adding limits for other periods is considered a change or modification. In addition, the same MGC is then displayed for all periods. The amount, count, and response criteria, however, can remain undefined, and differ from the other time periods. If you add sublevel or cardholder account spending limits to a company, be sure to set up all criteria that you want applied at each level. The system applies the spending limit to the lowest level it finds. For example, a company hierarchy can consist of a company, and one or more sublevels. Cardholder accounts can be set up under a company, or under any sublevel. A spending limit set for a cardholder account takes precedence over sublevel and company limits, and a spending limit set for a sublevel takes precedence over one set for a company. If you delete an MGC definition from a spending limit, the definition is removed from every time period. If you want to apply a spending limit to an MGC definition for one period, but not another, leave the Transaction Amount, Transaction Count, or Response Code fields blank for the MGC definition for the period that the spending limit does not apply to. If criteria already exist for an MCG definition, delete the criteria but keep the MGC definition. You can delete the MGC definition only if you plan to eliminate all spending limits for that definition for all time periods by selecting the Delete All Spending Limits option. If you want to remove all of the spending limits for a particular cardholder account, a sublevel, or a company, you can delete these limits. You can delete a spending restriction from one time period, only. In this case, you must delete the Transaction Amount, Transaction Count, and Response Code for all of the groups under that time period. You can set each MGC definition without applying spending criteria to approve or decline transactions with the Exclude MGC option. You can approve or decline transactions for undefined MCCs with the Other Merchants option. An MCC add/change/delete or a Spending Limit add/change/delete is passed to the Incoming Messages Queue if the request is unable to be processed in a real-time manner. 119
122 MANAGING SPENDING RESTRICTIONS ONLINE REQUEST Based on your administrative access, company administrators implement authorization restrictions to manage the risk of their commercial card programs. Your access to manage codes and restrictions is based on the decisions made by your financial institution: Your Administrative access is one of the following: No access The institution is creating the groups and restrictions on your behalf. Access to Manage groups and/or restrictions, (Add, Change, or Delete). View Only access The institution may create groups of codes on your request, or you may create your own groups. Based on admin group and company access, the admin can: Create groupings of Merchant Category Codes (MCG) Restrict spending to that group, or to all merchants except that group Set # and $ restrictions to that group Spending Restrictions are set by: Cardholder, Sublevel, or Company Time Period Frequency (#) and Amount ($) Authorization requests are declined if a request: Exceeds the Count Exceeds the Amount Is from a restricted MCG Two features work together to enable you to establish spending limits and general criteria for approving or declining transactions: Manage Merchant Group Codes (MGC) Manage Spending Limits Note: All changes made to company and cardholder spending limits are processed on a real time basis. If an error prevents a submission in real time, the request is submitted to the institution s Incoming Messages queue for manual review and update. To implement authorization restrictions, perform the following steps: 1) Click Commercial Card in the home page menu bar. 2) Select View Company List. The VIEW COMPANY LIST page displays. 3) Click the View Hierarchy link for a selected company on the VIEW COMPANY LIST page. The COMPANY HIERARCHY page displays. 4) Click the View link on the COMPANY HIERARCHY page. The ACCOUNTS page displays with a list of any accounts that are related to the selected company or sublevel. 120
 Select MANAGE SPENDING RESTRICTIONS from the SERVICE REQUEST TYPES drop-down list. 7) Click GO. The MERCHANT RESTRICTIONS OVERVIEW landing page displays.")
123 COMMERCIAL CARD 5) Select Online Requests from the NAVIGATION LIST drop-down menu. The ONLINE REQUESTS page displays. 6) Select MANAGE SPENDING RESTRICTIONS from the SERVICE REQUEST TYPES drop-down list. 7) Click GO. The MERCHANT RESTRICTIONS OVERVIEW landing page displays. 8) Click the MANAGE MERCHANT GROUP CODES OR MANAGE SPENDING LIMITS tab. 9) Enter your information on the appropriate page. 10) To cancel this request, select ONLINE REQUESTS from the NAVIGATION LIST drop-down list. Important: Some online requests only display to a user if the permissions have been set to include the request types set up by the financial institution. MERCHANT RESTRICTIONS OVERVIEW If you select the Manage Spending Restrictions from the online service request types, the Merchant Restrictions Overview page appears. Please review this to understand how the process works in ezbusiness. The page elements and descriptions follow. 121
124 ELEMENT MERCHANT RESTRICTIONS OVERVIEW MANAGE MERCHANT GROUP CODES MANAGE SPENDING LIMITS DESCRIPTION This tab shows general information about the Manage Spending Restrictions option. Click this tab to view, modify, delete, and add Merchant Group Code (MGC) definitions. Click this tab to view, modify, delete, and set spending (velocity) limits for an MGC definition, or set general criteria for approving or declining an MGC or MCCs. 122

125 COMMERCIAL CARD MANAGE MERCHANT GROUP CODES Merchant Group Codes (MGCs) contain the Merchant Category Codes (MCCs) to include in or exclude from Spending (Velocity) Limits, which are group restriction parameters. Access the Manage Merchant Group Codes page to create one or more groupings of Merchant Category Codes. After the groups are added, you can place restrictions on the groups. 123
126 The page elements and descriptions follow: ELEMENT Merchant Category Code (MCC) List Back to Merchant Group Code Browse Create New MGC Submit Undo Delete All DESCRIPTION Select this button to go to the MCC List. Refer to the Merchant Category Code (MCC) List topic. Select this button to go to the Merchant Group Code Browse screen to view current groups. Select this button to define a new merchant group. Refer to the Adding a Merchant Group Code topic. Make your changes and click this button. The Review Merchant Group Code page displays. Select this button to clear any changes, and return to the unchanged values in the MGC record. You can delete an MGC only if you deleted, previously, the MGC from the spending limits that used it. If you delete an MGC, and the associated spending limits are not deleted, the request is submitted and fails. An error message appears on the confirmation page. Merchant Group Code Description To delete, select the Delete All check box. The two-character code that categorizes the merchant group. To view or maintain an existing group, select the appropriate code from the dropdown list. This field more fully defines the MGC. MCC Codes Comments Example: Excluded MCC codes. Type codes to create a new group or maintain an existing group. Place dash (-) for ranges. Use comma (,) or space to indicate individual MCC entries. You can enter text to document when you add, modify, or delete an MGC. For a change to a company, the comment generates a Service Builder memo in real time to the company. MERCHANT CATEGORY CODE (MCC) LIST You can view and download available Merchant Category Codes to include in spending restrictions by clicking the Merchant Category Code (MCC) List button on the Merchant Group Code (MGC) Definition Service Request page. 124

127 COMMERCIAL CARD The page elements and descriptions follow: ELEMENT All DESCRIPTION Select this button to display all of the available MCC Codes. Latest DownLoad MCC Code Description Date of Last Update Select this button to display the latest MCC codes added to ezbusiness. You can download the MCC Codes list to use for reference to determine your spending limits. To download: Select a format: Excel/Spreadsheet Text (Tab Spacing) Click the Download button. This is an entry field to search for a specific MCC Code. To sort by MCC Code, click the MCC Code link. All codes that contain the entered value are displayed. This is an entry field to search for a specific MCC Description. To sort by Description, click the Description link. All MCC codes that contain the entered description are displayed. This is an entry field to search for the most recently updated MCC Codes. To sort by the date an MCC Code was last updated, click the Date of Last Update link. 125
128 ADDING A MERCHANT GROUP Depending on your access rights, you can add new Merchant Groups using the Manage Merchant Group Codes page. From the Manage Merchant Group Codes - Service Request page: 1) Click the CREATE NEW MGC button. 2) Enter an unused two digit code definition in the Merchant Group Code box. 3) Enter a description of the Merchant Group Code in the Description box. 4) Enter at least one MCC Code in the MCC Codes table. 5) Click the SUBMIT button. The REVIEW MANAGE MERCHANT GROUP CODES SERVICE REQUEST page appears. 6) Click Edit to make a correction, or Submit. 7) The CONFIRM MANAGE MERCHANT GROUP CODES SERVICE REQUEST page appears. 126
129 COMMERCIAL CARD REVIEW MANAGE MERCHANT GROUP CODES This Review Manage Merchant Group Codes Service Request page appears if you select the Submit button from the Manage Merchant Group Code - Service Request page to add or change a Merchant Group Code (MGC). The page elements and descriptions follow: ELEMENT Edit Submit Cancel DESCRIPTION Click to return to the Manage Merchant Group Codes Service Request page and make corrections. Submits the request for update, and goes to the Confirm Manage Merchant Group Codes Service Request page. Returns to the Online Service Request page. 127

130 CONFIRM MANAGE MERCHANT GROUP CODES The Confirm Manage Merchant Group Codes Service Request page appears if you select the Submit button from the Review Manage Merchant Group Codes Service Request page, and your request is successfully submitted. If your submission fails, you receive a different message to explain your request will not process in real time. The page elements and descriptions follow: ELEMENT DESCRIPTION Make Another Online Request Returns to the Online Service Request page. CHANGING MERCHANT GROUPS Depending on your access rights, you can modify or delete a new Merchant Group Code (MGC). To delete, refer to the Delete Restrictions procedures. From the Manage Merchant Group Codes - Service Request page: 1) Select the two-digit code to change from the Merchant Group Code box. 2) Make your changes to the MGC descriptions and MCC values, as necessary. 3) Click the SUBMIT button. The REVIEW MANAGE MERCHANT GROUP CODES SERVICE REQUEST page appears. 4) Click the SUBMIT button from the review page. 5) Click OK. 6) The CONFIRM MANAGE MERCHANT GROUP CODES SERVICE REQUEST page appears. 128
131 COMMERCIAL CARD MANAGE SPENDING LIMITS Spending limits are rules that limit company/sublevel or card usage by dollar amount, the number or transactions within a Merchant Group Code (MGC) definition, or both. The limits are created and modified on the Manage Spending Limits page. You can manage these limits by completing the fields and submitting this service request through one of the following options: For a single addition or change to an MGC restriction, enter data into the columns at the bottom of the page. For numerous additions and changes, complete the fields in the Maintain Spending Limits section in the center of the page. For additional information, see the Merchant Group Selection topic. 129

132 Page elements and descriptions for the company level and account level for the Manage Spending Limits Service Request page follow: 130
133 COMMERCIAL CARD ELEMENT Merchant Category Code (MCC) List Back to Spending Limit Browse Hierarchy Selection (Company Level/Account Level) Company Sub-level Account Account Level Restrictions Period Other Days DESCRIPTION Select this button to go to the MCC List. Refer to the Merchant Category Code (MCC) List topic. Select this link to go to the Spending Limits Browse screen. Select the level of hierarchy you want to view or update spending limits for: Company Level Account Level If limiting a company level, select the level to restrict from the Company/Sub-level dropdown box. If limiting an account, select the cardholder account. Available for Account Level Limits only: Enable Restrictions Select this option in the following cases: To restrict a cardholder account If return restrictions to a cardholder account where restrictions were previously disabled Disable Restrictions Select this option to disable restrictions. Select the time period that the restrictions are in effect. Once restrictions for a period are completed, restrictions for a different time period can be completed. This is a required field. Values follow: C - Cycle D - Daily M - Monthly O - Other Q - Quarterly T - Transaction (Single Purchase) W - Weekly Y - Yearly This is a required field when you select Other from the Period field. This sets a revolving number of days in which the set limit cannot exceed. For example, if the days are set to 180 and the amount is set to $500.00, the account has 180 days to spend up to the maximum limit. If the maximum amount is met within 180 days, the account must wait until 180 days expires. At that time, the days reset, and purchases are allowed on the account at merchants with an MCC code defined under the specific Merchant Group Code (MGC). 131
134 ELEMENT Delete All Spending Limits for All Periods Merchant Group Code Selection Set Transaction Limits Transaction Response Set Transaction count Transaction Response Other Merchants Response DESCRIPTION Select the check box to delete permanently all of the spending limits for all periods for the selected company, sublevel, or account. Select from the drop-down list of available MGCs to manage and click Close. The MGCs you select from the list appear in the MGC column of this page after clicking Apply Limits. For more information, see the Merchant Group Selection topic. *MGCs actively used for the selected company/sublevel or account are indicated in this list with an asterisk. *To view the MCC detail for the listed groups, select the detail link next to the Merchant Group and description. This field is optional. Enter the maximum dollar amount allowed on a transaction within the selected Period. If nothing is added, the limit is restricted by the account s credit limit. Example: Enter 501 to set the limit for $500. This field is required. If you entered a transaction dollar amount, the system s default response is Decline. You can change the response as needed. Select a response: Approve all transactions for the selected MGCs. Decline transactions above the entered value. This field is optional. Enter the maximum number of transactions to allow for the MGCs selected from the Merchant Group Code Selection drop-down list within the selected Period. Select Apply Limits to populate these changes into the Spending Limits form. This option cannot be set for Transaction Spending Limits. Example: 30 This field is optional. If you entered a count, the system s default response is Decline. You can change the response as needed. Select a response: Approve all transactions for selected MGCs Decline transactions above the entered value For transactions with undefined MCCs in the MGCs with spending limit criteria, or in your Exclude MGC group, you can set an approved or declined response. Once set, it is the same for all spending limit parameters. Select an option: Approve Decline 132
135 COMMERCIAL CARD ELEMENT Reset Apply Limits Submit MGC Transaction Limit Transaction Response Count DESCRIPTION Select this button to clear any changes, and return to the unchanged values. Select this button to apply the selections in the Maintain Spending Limits section. The selection results appear in the columns of the Spending Limits form. If necessary, you can edit the data by modifying or deleting the values from the form directly. You must select the Apply Limits button before this button is enabled. Click this button to submit changes. The Review page displays. Enter the two-digit MGC you want to add to this restriction. If you selected and applied limits to MGCs from the Select MGC drop down list in the Maintain Spending Limits section, the selected MGCs appear in this column. A New icon appears next to changes or additions. This field is optional. Enter or change the maximum dollar amount allowed on an MGC. Example: Enter 501 to set the limit for $500. If you selected and applied transaction limits to MGCs from the Select MGC drop down list in the Maintain Spending Limits section, the corresponding values appear in this column. A New icon appears next to changes or additions. If you entered a transaction dollar amount, select a response: Approve all transactions for selected MGCs Decline all transactions about the entered value If you selected and applied a transaction response to MGCs from the Select MGC drop down list in the Maintain Spending Limits section, the selected corresponding values appear in this column. A New icon appears next to changes or additions. This field is optional. Enter or change the maximum number of transactions to allow. This option cannot be set for Transaction Spending Limits. Example: 30 If you selected and applied a transaction count to MGCs from the Select MGC drop down list in the Maintain Spending Limits section, the corresponding values appear in this column. 133
136 ELEMENT Count Response Exclude MGC Exclude MGC Response Comments DESCRIPTION If you entered a count, select a response: Approve all transactions for selected MGCs Decline transactions above the entered value If you selected and applied limits to MGCs from the Select MGC drop down list in the Maintain Spending Limits section, the corresponding values appear in this column. A New icon appears next to changes or additions. Enter a two-digit MGC to set to decline al authorizations without applying spending limit criteria. Once set, it is the same for all spending limit parameters. If you entered an MGC to restrict, select a response for these transactions: Approve Decline Enter optional text to document when you add, modify, or delete a spending limit. For a change made at the account level, any data entered in the Comment field generates a Service Builder memo in real time to the company and the account. For company/sublevel changes, any data entered into the Comments field generates a Service Builder memo in real time to the company/sublevel. MERCHANT GROUP SELECTION You must select from a list of available MGCs from the Select Merchant Group Code Selection drop down list. Select the Detail hyperlink from the MGC detail column to view the Merchant Category Codes (MCCs) and the descriptions contained within an MGC. A red asterisk appears next to MGCs with spending limits attached. 134

137 COMMERCIAL CARD ADDING A SPENDING LIMIT To manage spending restrictions, you set a spending (velocity) limit on a Merchant Group Code (MGC) definition. You can set these restrictions at the company, sublevel or account levels. From the Manage Spending Limits Service Request page: 1. Select the ACCOUNT LEVEL or COMPANY LEVEL button. a. If setting a restriction for a specific sublevel or for an account that belongs to a sublevel, select a sublevel. b. When setting a restriction on an account for the first time, select ENABLE RESTRICTIONS. For ongoing ACCOUNT LEVEL maintenance, select ENABLE RESTRICTIONS or DISABLE RESTRICTIONS from the Account Level Restrictions section. 2. Select the Period and MGCs you want to limit, and the other required and optional field values as specified in the Manage Spending Limits topic, and click the APPLY LIMITS button. The selected MGCs and spending limit data appear in the columns following the Maintain Spending Limits section. A New icon appears next to changes or additions. 3. Edit the data in columns, if necessary, and click the SUBMIT button. The REVIEW MANAGE SPENDING LIMITS SERVICE REQUEST page appears. 4. Click the SUBMIT button from the review page. A confirmation message appears, and prompts you to verify your submission. 5. Click OK. 6. The CONFIRM MANAGE SPENDING LIMITS SERVICE REQUEST page appears. 135
138 REVIEW MANAGE SPENDING LIMITS The Review Manage Spending Limits Service Request page appears if you select Submit from the Manage Spending Limits Service Request page. The page elements and descriptions follow: ELEMENT Edit DESCRIPTION Returns to the Manage Spending Limits Service Request page. Submit Cancel Goes to the Confirm Manage Spending Limits Service Request page. Returns to the main Online Service Request page. 136

139 COMMERCIAL CARD CONFIRM MANAGE SPENDING LIMITS This Confirm Manage Spending Limits Service Request page appears if you select Submit from the Review Manage Spending Limits response message. The page elements and descriptions follow: ELEMENT DESCRIPTION Make Another Online Request Returns to the main Online Request page. An institution-specific window appears reminding you of how your Merchant Group affects cardholders. CHANGING A SPENDING LIMIT You can modify or delete a spending (velocity) limit set up for a Merchant Group Code (MGC). You can modify or delete these restrictions at the company, sublevel, or account levels. From the MANAGE SPENDING LIMITS service request page: 1. Select the ACCOUNT LEVEL or COMPANY LEVEL button. a. If you select ACCOUNT LEVEL, you must select ENABLE RESTRICTIONS from the Account Level Restrictions section. 2. Enter the changes to the Period or MGC you want to make, and the other required and optional field values as specified in the Manage Spending Limits topic. 3. Click the SUBMIT button. The REVIEW MANAGE SPENDING LIMITS page appears. 4. Click the SUBMIT button from the review page. A confirmation message appears, and prompts you to verify your submission. 5. Click OK. 6. The MANAGE SPENDING LIMITS CONFIRMATION page appears. 137

140 DELETE RESTRICTIONS Once restrictions are in place, they may be deleted. If restrictions already exist for an MGC definition, consider disabling the restrictions, but keep the MGC definition. The definition can be used at a later date with new restrictions. DELETE SPECIFIC LIMITS Delete values in TRANSACTION LIMIT and/or COUNT field for a specific period, to delete specific spending limits for a particular cardholder account, sublevel, or company. DELETE ALL LIMITS To delete all spending limits for all time periods for all cardholders, complete the following steps: 1) Access the Company, then ONLINE SERVICE REQUESTS, MANAGE RESTRICTIONS, MANAGE SPENDING LIMITS. 2) In HIERARCHY SELECTION, select Company, Cardholder or Sublevel. 3) Click Delete All Spending Limits for All Periods. The page greys out. 138

 A confirmation message appears.")
141 COMMERCIAL CARD 4) The screen blinks and greys out. Click Submit. Note: A message appears on the confirmation page if restrictions are tied to an MGC you attempt to delete. 5) The REVIEW MANAGE SPENDING LIMITS SERVICE REQUEST page appears. Click Edit to make changes, or Submit to continue. 6) A confirmation message appears. Click OK to continue. 139
142 7) Confirmation message appears. BROWSING MERCHANT GROUP CODES You can browse, view, and download the MCCs within an MGC definition set up for a company. From the Merchant Group Codes Browse page, you can go to the appropriate service request page to add or change an MGC definition. 1) Click Commercial Card, and select View Company List. The VIEW COMPANY LIST page displays. 2) Click the View Hierarchy link for a selected company on the VIEW COMPANY List page. The COMPANY HIERARCHY page displays. 3) Click the View link on the COMPANY HIERARCHY page. The ACCOUNTS page displays with a list of any accounts that are related to the selected company or sublevel. 4) Select View Spending Restrictions from the NAVIGATION LIST drop-down menu. The MERCHANT GROUP CODES BROWSE landing page displays the available MGC codes. 5) To browse through additional MGC codes, use the page navigation at the bottom of the list. 6) To download the list of MGC codes, click the DOWNLOAD button. 7) Select a two-character code from the MGC dropdown box, and select GO. The MCCs for that code are returned on the Manage Merchant Group Codes Service Request page. You can view or maintain the codes. Click Back to Merchant Group Code Browse. 8) To download the MCC codes or Spending Limits for the selected MGC, click the DOWNLOAD button. Hint: You can add or delete an MCC to or from the MGC definition by selecting the two-character MCG code hyperlink. The Manage Merchant Group Codes Service Request page displays. Refer to the Changing Merchant Group Codes topic. 140

143 COMMERCIAL CARD MERCHANT GROUP CODE BROWSE You can search for and download Merchant Group Code (MGC) definitions. The page elements and descriptions follow: ELEMENT BROWSE TYPES MGC DROP DOWN LIST MGC DESCRIPTION BOX MGC DETAIL BOX DESCRIPTION Merchant Group Code This is the selected page. Spending Limits You can select this to browse for spending limits. This displays the list of the two-character code assigned to a Merchant Group Code (MGC). To browse, select a two-digit MGC. Only merchant groups established for your company are available. This is an entry field to search on an MGC description. Entering text in this field selects all entries that contain the entered value. This is an entry field to search on an MGC detail. Entering text in this field selects all entries that contain the entered value. 141
144 ELEMENT Go Download DESCRIPTION Select this button to return search results based on your search criteria. You can download the MGC details that appear on the page to determine which MCCs to include or exclude in the definition. MGC No. of Accounts With MGC MGC Description MGC Detail Company Level Sublevel To download: Select a format: Excel/Spreadsheet Text (Tab Spacing) Click the DOWNLOAD button. The column contains hyperlinks to the Manage Merchant Group Code page displaying all the MCC codes contained in the selected two-digit MGC. This column displays the number of accounts within the specified company that have account level restrictions for this MGC. This column displays the description assigned to the established Merchant Group Code (MGC). This column displays the four-digit MCCs belonging to a Merchant Group Code (MGC). An asterisk (*) indicates that a partial list of MCCs is displayed in the column. In this case, select the two digit code from the MGC column for a complete list of MCCs available for the definition. The values in this column show if the MGC is applied at the company level in the hierarchy: Y = Yes N = No The values in this column show if the MGC is applied at a company sublevel in the hierarchy: Y = Yes N = No BROWSING SPENDING LIMITS You can browse, view, and download the spending restrictions within an MGC definition set up for a company. From the Spending Limits Browse page, you can go to the appropriate service request page to add or change a spending Limit. 142
145 COMMERCIAL CARD 1. Click Commercial Card, and select View Company List. The VIEW COMPANY LIST page displays. 2. Click the View Hierarchy link for a selected company on the VIEW COMPANY List page. The COMPANY HIERARCHY page displays. 3. Click the View link on the COMPANY HIERARCHY page. The ACCOUNTS page displays with a list of any accounts that are related to the selected company or sublevel. 4. Select View Spending Restrictions from the NAVIGATION LIST drop-down menu. The MERCHANT GROUP CODE BROWSE landing page displays the available MGC codes. 5. From the Browse types, select SPENDING LIMITS. 6. To browse through additional Spending Limits, use the page navigation at the bottom of the list. 7. To download the list of Spending Limits, click the DOWNLOAD button. 8. Select a status from the Status dropdown box, and select GO. The Spending Limits for that status is returned. You can view or download the spending restrictions. 9. Enter the MGC in the textbox, select GO. The MCCs for that code are returned. You can view or download the codes. 10. To view a cardholder, click the cardholder s link to view the ACCOUNT DETAIL. The Tracking Code displays as Enabled. 11. To view an MGC or Period, click the respective links to access Manage Spending Limits Service Request. 12. To download Spending Limits for the selected Account/Sublevel, enter the Account Number or Sublevel in the textbox, select GO. The Account/Sublevel are returned. Click the DOWNLOAD button. Hint: You can add or delete a Spending Limit to or from the Spending Limits by selecting the Period from the PERIOD hyperlink. The Manage Spending Limits Service Request page displays. Refer to the Changing a Spending Limit topic. SPENDING LIMITS BROWSE You can view and download spending (velocity) limits set up for a Merchant Group Code (MGC). 143

146 The page elements and descriptions follow: ELEMENT Browse Types Download Status Drop Down List MGC box DESCRIPTION Merchant Group Codes You can select this to browse for Merchant Group Codes. Spending Limits This is the selected page. You can download the list of cardholder accounts and sublevels that appear on the page for which spending limits are set to use as a reference when managing your spending limits. To download: Select a format: Excel/Spreadsheet Text (Tab Spacing) Click the Download button. This represents the current status of an account. Select a value to search: All Open Closed Blocked This is an entry field to search on an MGC detail. Entering text in this field selects all entries that contain the entered value. 144
147 COMMERCIAL CARD ELEMENT Account/Sublevel box CardHolder Name box Period Go Company Hierarchy Account/Sublevel CardHolder Name Status MGC DESCRIPTION This is an entry field to search on an account or a sublevel in a company hierarchy. This is an entry field to search on the name on a cardholder account. Entering text in this field selects all entries that contain the entered value. This is the time period to apply to a Merchant Group Code definition. Select a time period from the dropdown list: All C - Cycle D - Daily M - Monthly O - Other Q - Quarterly T - Transaction (Single Purchase) W - Weekly Y - Yearly Select this button to return search results based on your search criteria. Displays the name of the level in the company hierarchy where restrictions are located. Displays the cardholder account number or the Company ID and sublevel number where restrictions are located. If you select an account hyperlink in this column, the Account Detail page appears. Displays the name on a cardholder account where restrictions are located. Displays the account status: Open Closed Blocked Displays one or more two-digit MGC s for which spending limits are set on an account, sublevel, or company. If you select an MGC hyperlink in this column, the Manage Merchant Group Codes Service Request page appears. 145
148 ELEMENT Period DESCRIPTION One or more of the following time periods are displayed indicating the restriction time period: C - Cycle D - Daily M - Monthly O - Other Q - Quarterly T - Transaction (Single Purchase) W - Weekly Y Yearly If you select a period hyperlink from this column, the Manage Spending Limits Service Request page appears. REQUESTING REPLACEMENT CARDS The Card Replacement Service Request allows you to request replacement credit cards for existing commercial cardholders. Replacement plastics arrive within 7-10 business days. NOTE: This feature is not intended for lost or stolen accounts. Please contact your institution or the lost/stolen number provided on cardholder statements to report a card lost or stolen. To request this service, perform the following steps: 1) Select Online Requests from the company or cardholder NAVIGATION LIST drop-down menu. The ONLINE REQUESTS page displays. 2) Select REQUEST REPLACEMENT CARD from the SERVICE REQUEST TYPE drop-down menu. 3) Click Go. The CARD REPLACEMENT SERVICE REQUEST page displays. 4) Select the cardholder name and account number from the CARDHOLDER NAME/ACCOUNT dropdown menu. 5) Check one of the following options in the Reason For Replacement of Cards section: Damaged Card Name Change Magnetic Strip Invalid Other 6) To post questions or comments about your request, type them in the Service Request Memo box. 7) Click Continue. The REVIEW REPLACEMENT CARD SERVICE REQUEST page provides a summary of the service request. 146
149 COMMERCIAL CARD 8) Review the service request information, and verify that it is correct. Click Submit. Or, Click Edit to go back to the CARD REPLACEMENT SERVICE REQUEST page and resubmit the request. 9) To make another request, click Make Another Online Request to return to the ONLINE REQUESTS page. SETTING UP ACCOUNT AUTOPAY AutoPay allows administrators to make payments to their individual commercial card accounts through automatic deductions from a checking or savings account. To set up AutoPay for an account, perform the following steps: 1) Select Online Requests from the company or cardholder NAVIGATION LIST drop-down menu. The ONLINE REQUESTS page displays. 2) Select Setup Account AutoPay from the SERVICE REQUEST TYPE drop-down menu. 3) Click Go. The AUTOPAY SETUP SERVICE REQUEST page displays. 4) Provide the following information about the account from which the payment is deducted: Select the individually billed commercial cardholder s name or the name of the billing account for the automatic payment from the CARDHOLDER NAME/ACCOUNT drop-down menu. Specify the TYPE OF ACCOUNT. Select either Checking or Savings. Type the name of the financial institution for this account in the FINANCIAL INSTITUTION NAME box. Type the account number in the ACCOUNT NUMBER box. Type the routing transit number in the ACCOUNT NUMBER box. 5) Check one of the following payment options in the PAYMENT OPTIONS section to indicate the amount of the payment: A Fixed Amount If this option s checked, enter the amount to be paid in the AMOUNT OF PAYMENT field. F Pay Full Statement Balance. J Pay the statement minimum payment. M - Minimum amount due minus Cycle-to-Date credits P Pay % of Statement Balance If this option is checked, enter the % of Statement Balance to be paid up to 20%. 6) Select one of the following options from the FREQUENCY drop-down menu to indicate when the payment is to be deducted: M Monthly - If this option is selected, in the DAY field, type the number of calendar days after the statement is generated to deduct the Payment amount. 147
 Click Continue. The AutoPay enrollment is finished. A confirmation message is sent to your inbox, notifying the date the first AutoPayment will be made for the account. Important!")
 Select a reason for viewing the full 16-digit account number. 2) Click Continue. The REVIEW VIEW FULL ACCOUNT NUMBER page appears. 3) Click Submit to continue.")
150 S Specific Date - If this option is selected, in the DAY field, type the calendar date of the month to deduct the payment. 7) To add a memo to this request, type it in the SERVICE REQUEST MEMO box. 8) Click Continue. The AutoPay enrollment is finished. A confirmation message is sent to your inbox, notifying the date the first AutoPayment will be made for the account. Important! Continue making payments to the account until you receive confirmation from Client Services. VIEW FULL ACCOUNT NUMBER Note: This option appears only if allowed by your financial institution. 1) Select a reason for viewing the full 16-digit account number. 2) Click Continue. The REVIEW VIEW FULL ACCOUNT NUMBER page appears. 3) Click Submit to continue. 4) The entire 16-digit account number displays. 148

 Click Continue.")
151 COMMERCIAL CARD VIEW VIRTUAL ACCOUNT SECURITY DATA Security Data for Virtual accounts is needed to make online or mail order transactions. Note: This Online Service Request only appears for institutions with Virtual Accounts, admins with access, and only for Virtual accounts. 1) Select View Virtual Account Security Data from the ONLINE SERVICE REQUEST drop-down. 2) Select the required Virtual Account. 3) Click Continue. 4) The VIRTUAL ACCOUNT SECURITY DETAILS page appears with the full 16-digit account number, card expiration date, and CVV2. 149

152 USING THE COMPANY INBOX If you have submitted a service request or online message to ezcard (MyCardStatement) Client Services, you can view the response in your message inbox. You may also receive messages from the site administrator to notify you of important events or special offers. If you have more than one account linked to your username, you will see incoming messages for all your accounts. Tip: Click a header to sort the list according to Message Topic, Subject, Date or Status. To access your message inbox, perform the following steps: 1) Click the Commercial Card tab in the ADMIN menu bar. 2) Click View Company List. 3) Click the View Hierarchy link for a selected company on the VIEW COMPANY LIST page. The COMPANY HIERARCHY page displays. 4) Click the View link on the COMPANY HIERARCHY page. The ACCOUNTS page displays with a list of any accounts that are related to the selected company or sublevel. 5) Select Company Inbox from the NAVIGATION LIST drop-down menu. The INBOX page displays the following information: Message Topic Subject Account Date Status Hierarchy Name 150
153 COMMERCIAL CARD VIEWING SENT MESSAGES You can view any service requests or online messages that you have sent. If you have linked more than one account to your username, you will see sent messages for all your accounts. To view your sent messages, perform the following steps: 1) Search and open a Company record from COMMERCIAL CARD menu. 2) Select Sent Messages from the NAVIGATION LIST drop-down menu. The SENT ITEMS page displays the following information: Message Topic Subject Account Date Hierarchy Name 3) Click the View link for the message you wish to view. The VIEW MESSAGE page displays the sent message. VIEWING ARCHIVED MESSAGES To view archived messages, perform the following steps: 1) Select Archived Messages from the NAVIGATION LIST drop-down menu. The ARCHIVED ITEMS page displays a list of archived messages. 2) Click the View link for a selected message to view it. 3) To delete an archived message, click the Delete link. 4) Click OK in the message box. SEARCHING FOR COMPANIES The Company Search page allows administrative users to search the ezcardinfo (MyCardStatement) database for a specific corporation and companies within corporations. This feature can also be useful in locating specific cardholder accounts within a company. NOTE: This feature is only available to administrative users with the proper security access rights to this information. To search for a company, perform the following steps: 1) Click the Commercial Card menu bar. 2) Select Company Search. The COMPANY SEARCH page displays. 3) Specify one or all of the following search criteria: 151
 searches are allowed.")
154 Corporation ID Select All or a specific company ID from this drop-down menu. If All is selected, the system searches for all corporations available to you. Company ID Type the company ID is this box. Company Name If you don't know the company ID, type the company s name in this box. Wild card (*) searches are allowed. Status Select an account status from this drop-down menu, either Open, Closed, Inactive, or All. If All is selected, the system searches all account statuses. 4) Click Search. The system searches the database for companies that match the specified search criteria (and your security access), and displays the search results on the VIEW COMPANY LIST page. You can now view the company hierarchy information or information about a specific cardholder account. To perform another search, click the Return to Company Search link on the VIEW COMPANY LIST page. SEARCHING FOR COMMERCIAL CARDHOLDERS The Search Cardholders page allows you to search the database for individual commercial cardholder accounts. You can search within all company hierarchal levels and sublevels that you have access to. To search for a cardholder, perform the following steps: 1) Click the Commercial Card menu bar. 2) Select Cardholder Search. The SEARCH CARDHOLDERS page displays. 3) Specify one or all of the following search criteria: Number Type the commercial credit card account number in this box. First Name Type the cardholder s first name in this box. Last Name Type the cardholder s last name in this box. Employee ID Type the Employee ID in this box. This is an optional field that allows a maximum 22 alphanumeric (A/N) characters. 4) Click Search. The system searches the database for companies that match the specified search criteria (and your security access), and displays the search results on the ACCOUNTS page. 152

155 COMMERCIAL CARD You can now view the cardholder's account information, make online service requests and more. 153
156 ALERTS The COMPANY ALERT feature in ezbusiness provides actionable information that the Company Administrator can: Anticipate potential credit problems Ensure payment timeliness Be notified of other events that may occur Use preventive measures or follow-up activity COMPANY ALERTS Note: Only Company Administrators and above are able to set up company level alerts. Admins who have Company Sublevel restrictions do not have the option to set up most of company level alerts, but do have access to the Personal Reminder alert. COMPANY NAVIGATION COMPANY ALERTS To access the option, the Company Admin performs the following: 1) From the COMMERCIAL CARD menu, either select COMPANY SEARCH, or VIEW COMPANY LIST to select a company. 2) From the NAVIGATIONS LIST drop-down menu in the ALERTS group, select My Company Alerts. 3) The MY COMPANY ALERTS page displays. 154

157 COMMERCIAL CARD 155

158 The MY COMPANY ALERTS page lists the alerts that the Admin has added. CREATE MY COMPANY ALERTS An Admin clicks the link CREATE MY COMPANY ALERTS, which is located at the top of the page, to navigate to that page and create new multiple alerts. Once the page displays, the Admin can perform the following and click Submit: choose any alert(s) enter the variable data select the Admins that should be alerted If the Admin wants to choose multiple alerts for the same event with different variables, they must submit those separately. After clicking Submit, the alert(s) is saved, and the Admin is returned to the MY COMPANY ALERTS page. Dollar amounts should be whole amounts, excluding decimal points and cents. Criteria for creating the Company Alert(s): CURRENT BALANCE IS WITHIN $X OF CREDIT LIMIT Company Credit Limit Current Balance is < or = $X (specified by the user in the alert setup) CURRENT BALANCE EXCEEDS $X Company Current Balance is > $X (specified by the user in the alert setup) CURRENT BALANCE DROPS BELOW $X Company s Current Balance is < $X (specified by the user in the alert setup) CREDIT LIMIT REACHED OR EXCEEDED Company Balance > or = Company Credit Limit CASH LIMIT REACHED OR EXCEEDED COMPANY CASH BALANCE > OR = COMPANY CASH LIMIT 156
159 COMMERCIAL CARD This alert is only applicable if the Company Cash Limit > $0, and the option does not display if it is not > $0. AVAILABLE BALANCE DROPS BELOW $X Company Available Balance is < $X defined on the alert. PAST DUE Company Past Due Amount >$0 Note: Alerts that notify the Admin about current balance, credit limit, cash limit, and available balance are produced only when the company first qualifies for the Alert. When the condition is met and no longer qualifies for the specific variables set in the Alert, the alert is reset. Once the Alert is reset, the company is eligible for the alert again. If Additional Administrators are copied on the alert, the alert is always sent to the primary address for those users. The PAST DUE ALERT is produced when the criteria is first eligible and each time a new statement drop date occurs if the company is still past due at that time. PERSONAL REMINDER alerts are produced only once, on the date selected by the Admin. Sublevel users with sublevel restrictions are only able to view the COMPANY PERSONAL REMINDER ALERT section of the CREATE COMPANY ALERTS page. 157


160 MODIFY EXISTING ALERTS The Alerts and selected criteria are displayed by clicking the appropriate link to perform the task, which include: Enable Disable View Modify Delete 158
161 COMMERCIAL CARD The Admin can change any variable criteria to include selecting or unselecting the ADDITIONAL ADMINISTRATORS to copy. Click Submit to save any changes to the Alert and returns the Admin automatically to the MY COMPANY ALERTS LIST. If the Admin does not want to perform changes to the alert selected, the Admin clicks either the MY COMPANY ALERTS LIST link or CREATE MY COMPANY ALERTS link at the top of the page. Note: The CARD REISSUED alert is generated based on the plastic issue date, and not for mailing specifications, such as Rush Plastics. This alert is cancelled for the cardholder if the account meets any criteria that may inhibit it. For example, Bankruptcy, Charged-Off and so on. SECONDARY ADDRESS NEW AND EXISTING ADMIN The Secondary Address, ( ADDRESS 2) is created on the CREATE ADMIN USER page for new Admins, or the MODIFY ADMIN USER page for existing Admins. It has the same requirements as the primary or ADDRESS 1, but is not a required field. It is available for selection when the Admin is assigning an address for COMPANY ALERTS. 159
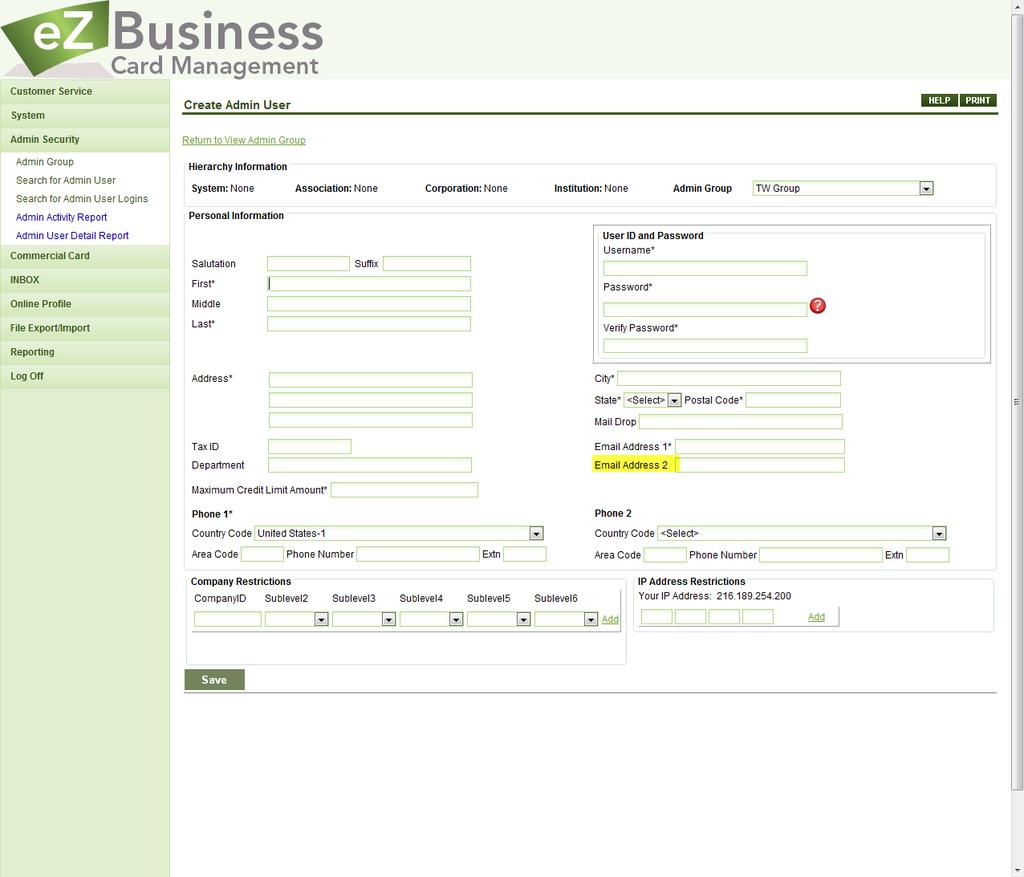
162 160
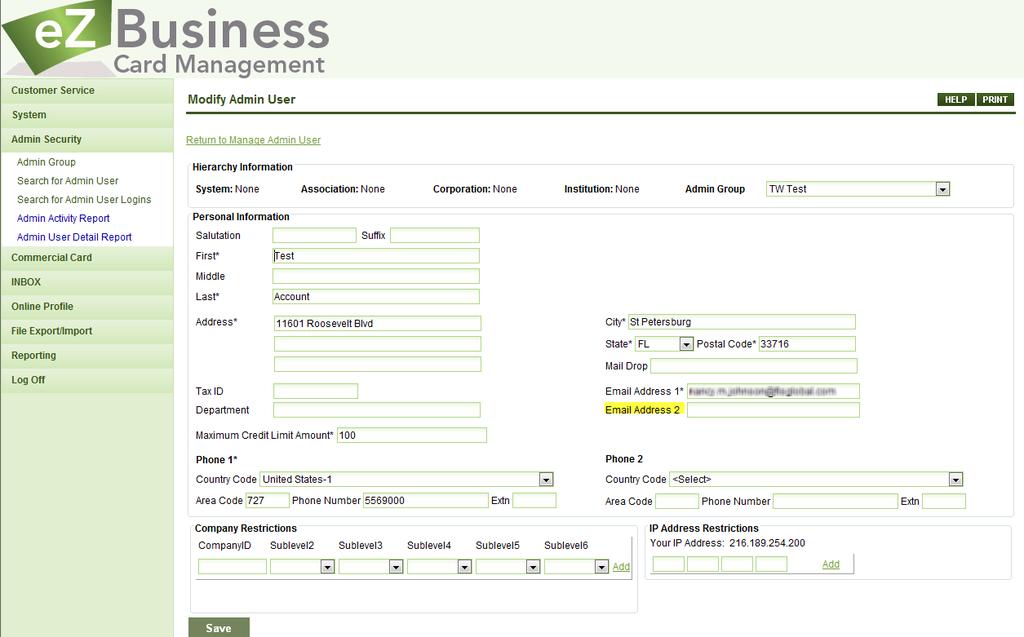
163 COMMERCIAL CARD 161
 and ezbusiness.")
164 PROCESSING COMMERCIAL CARD ACCOUNT TRANSFERS IN ezcardinfo (MyCardStatement) Account transfers, when they are performed in the system, are applied in the ezcardinfo (MyCardStatement) application. The results of account transfers appear in both ezcardinfo (MyCardStatement) and ezbusiness. The transferred from account number displays on the CARDHOLDER PROFILE and the Company ACCOUNTS DETAIL pages. This account number displays as PREVIOUS ACCOUNT NUMBER on the CARDHOLDER PROFILE page. 162
165 COMMERCIAL CARD ACCOUNT TRANSFER AND CARDHOLDERS Cardholder users do not have to re-enroll and recreate: New login ID Password Multi-Factor Authentication (MFA) account, unless the user was not enrolled prior to the account transfer. Payment accounts and payments Alerts All user account attributes also transfer under the new account, for example, associated addresses, account status, user status, administrative locks, rewards, statement delivery preferences, and so on. Note: If the cardholder user has disabled their online access using the DISABLE ONLINE ACCESS option, the user account is associated with the new account, but in a disabled state. The transferred from account number displays as PREVIOUS CARD NUMBER on the ACCOUNT DETAIL page. 163

166 ezcard/my Card Statement - TRANSACTION VIEW FOR CARDHOLDERS The cardholder is able to view transaction history and statement balance information for all accounts in the transfer chain. The pages show the new account s account number, but the user can view transactions from previous accounts. All transaction history transferred from the previous accounts is displayed under the most current accounts in the transfer chain. If the user selects a specific transaction from the list, the user is able to view the transactions originating under which the transaction was initiated in the ORIGINAL ACCOUNT NUMBER field. From the ACCOUNT DETAILS page, click View Transactions, and click on a specific transaction to view the details of the transaction, including the originating account number. 164
167 COMMERCIAL CARD Note: Cycle-to-date transactions not transferred to the new account during the account transfer process, and/or transactions posting to the previous account number after the account transfer has completed, are not visible within the ezcardinfo (MyCardStatement) application to the cardholder user. 165

168 ezbusiness TRANSACTION VIEW FOR ADMIN USERS ezbusiness Admin users can view the transactions for accounts of participating companies that have transferred to the new account record. Cycle-to-date transactions not transferred to the new account during the account transfer process, and/or transactions posting to the previous account number after the account transfer has completed, are not visible within the ezbusiness application to the Admin user. The Admin user also has access to Cycle-to-Date activity not transferred to the new account during the account transfer/transfer of balance process and/or any residual activity that originates and posts to a previous account record. ezbusiness provides an alternate view that allows an Admin user, including Company Admins, the ability to view the financial transactions that remained on the previous accounts(s) and any residual financial activity continuing to post. To view a transaction report, perform the following: 1) From the COMMERCIAL CARD menu bar, select either COMPANY SEARCH, or VIEW COMPANY LIST to select a company. 2) From the NAVIGATION LIST drop-down menu in the REPORTING group, select Transaction Report. 3) The REQUEST TRANSACTION REPORT displays. The user is able to view transactions on previous accounts by Statement cycle and Date range, and has the ability to view Current Balances for the transferred from account. This page also has a RECORD SOURCE drop-down list providing the options, ezcard TRANSACTIONS, and ONLINE TRANSACTIONS. 166
169 COMMERCIAL CARD SEARCH BY TRANSFER FROM ACCOUNT IN EZBUSINESS Within the ezbusiness application, Administrators may use the current (Transferred To) or previous (Transferred From) account number when searching for a specific account record. Admin users entering the previous (Transferred From) account number when searching for a specific account record, have the most current account record in the transfer chain returned in the search results. These searches include: CARDHOLDER SEARCH EXPENSE REPORT SEARCH TRANSACTION SEARCH PAYMENT SEARCH Note: This does not include account records that have been purged from the mainframe. If the account record has been purged, searching for it in ezbusiness does not yield any results. Admin user executes an EXPENSE REPORT SEARCH for any account number that is part of a transfer chain. Whether it is a previous account or is the most current account in the transfer chain, ezbusiness returns all Expense Reports that were submitted under any account in that transfer chain. 167
170 PAYMENT HISTORY The CARD NUMBER field in the PAYMENT INFORMATION section of the PAYMENT HISTORY page allows companies that are set up for individual billing and make payments for their cardholders, to identify the credit card account number for the payment. Companies that have more than one Billing Account, or have Diversion or Fee accounts, are able to identify the account number for which the payment was made. Note: The Admin user can also search by CONFIRMATION # and date range payment amount. If an Admin user is performing a payment search at the company level, the ACCOUNT NUMBER field is enabled for search. If the search is performed at the account level, the ACCOUNT NUMBER field is pre-populated with the account number and disabled for search. If the Admin searches for payments by any number in the chain, all payments display, but only the newest account number appears. ACCOUNT TRANSFER AND EXPENSE MANAGEMENT ezcard/my CARD STATEMENT CARDHOLDER EXPERIENCE: Cardholder s financial transactions transfer to the most current account record remaining available for Expense submission. All expense reports created under the previous account Submitted and Pending, are moved to the New (Transferred To) account record available for maintenance and review. Note: 1) If the Previous (Transferred From) account has a pending, submitted, or rejected expense report containing any Cycle-to-Date financial transactions that were not transferred to the New (Transferred To) account during the account transfer process, see a Get copy of image advising the Cardholder user or Admin user that the Expense report contains transactions that are not eligible for Expense submission is displayed. 168
171 COMMERCIAL CARD 2) Residual financial activity posting to the Previous account, is not available in Expense Management for Expense submission or reporting. ezbusiness ADMIN EXPERIENCE: The Cardholders Cost Center assignment is transferred to the New (Transferred To) account. The Cardholders 1 st Level and 2 nd Level approvers are transferred to the New (Transferred To) account. The Cardholders Submitted Expense Reports are transferred under the New (Transferred To) account. 169
 Click the Admin Security tab on the menu bar. 2) Select Admin Activity Report. The ADMIN USER ACTIVITY REPORT page displays.")
172 REPORTS ezbusiness offers reports to be viewed and/or exported into CSV or Space delimited file formats. ADMIN ACTIVITY REPORTS To view Admin Activity reports, perform the followi.ng steps: 1) Click the Admin Security tab on the menu bar. 2) Select Admin Activity Report. The ADMIN USER ACTIVITY REPORT page displays. 3) The HIERARCHY appears in read-only for Financial Institution and Company Users. 4) Select to run the Admin User Activity Report by ADMIN GROUP or specific ADMIN USER by entering the ADMIN USERNAME. 170
 Based on the category selected,")
 Select the Start Date and End Date")
 Select the download option, comma or tab delimited.")
173 REPORTS 5) Select the CATEGORY from the drop-down list. The options include: 6) Based on the category selected, the ACTIVITY drop-down lists appropriate activities. Examples include: 7) Select the Start Date and End Date by selecting the dates from the calendar pop-ups. 8) Select the download option, comma or tab delimited. 9) Click Download. 171

174 10) A message box appears. 11) Click Open to view, or click Save to save the file to the local or network drive. You can then view, sort, modify and save the report. NOTE: This report displays only to administrative users with the appropriate access rights. 172
175 REPORTS ADMIN USER REPORT The ADMIN USER REPORT gives the ability for the Admin user at the Company level with the appropriate Security rights, to effectively monitor and manage enrolled Administrators. The Admin User Hierarchy selection in the SEARCH PARAMETERS includes the following: Note: At least one DETAIL TYPE must be selected in the Admin Group/Security Admin setup to display the ADMIN USER DETAIL REPORT option on the Main Menu. The Admin User Hierarchy selection in the report Search Parameters default to: SYSTEM LEVEL This option allows access to run the ADMIN USER DETAIL REPORT. This is for System Level Admins only. Admin can select DETAIL TYPE and choose ALL Admins in that DETAIL TYPE included in the report. Selecting ALL provides all Admins, to include Application, System, Association, Corp, Institution and Company Admins setup within the selected System. Selecting the System Level Detail Type provides all Admins at the Application, System and Association level. (This would include all Admins above the Corp/FI Level.) Selecting the System Level Detail Type provides all Admins at the selected System Level. This would include all System Level Admins above the Corp/FI Level. (This would not include the Application Level Admins.) Selecting the FI Level Detail Type provides all Admins at the Corp Level to include the Institution Level Admins. Selecting the Company Level Detail Type provides all Admins at the Company Level, (in a Company Admin Group), including Admins with Sublevel restrictions. 173
176 The Admin has the ability to choose up to five FIs, Companies or Groups with expanded selections. COMPANY LEVEL This option allows access to run THE ADMIN USER DETAIL REPORT for Company level Admins only. System, Association, Corporation, and Institution, Company ID and Sublevel of the Company Admin logged in. If the Company Admin has access to multiple companies, the Admin is able to select from those companies in the drop-down list box. If the Admin has only Sublevel Access, this is restricted and the Admin is only able to view data at their level and below. The Default with no hierarch selected is all Company Admins. The ALL DETAIL TYPE creates a report that contains All Detail Levels according to the hierarchy of the Admin requesting the report. The ADMIN USER DETAIL REPORT contains the following elements and descriptions: 174
177 REPORTS ELEMENT DESCRIPTION ADMIN GROUP HIERARCHY System Association Corporation Institution Company Sublevel Admin Group Reset Choose the system level. Choose the association to which the financial institution belongs. Choose the financial institution Corporation ID. Choose the institution ID number. (For Financial Institutions only) Choose the company ID number associated with the financial institution. A company s hierarchal level. Drop-down list for the Admin Group to include in the report. Click this link to reset the Admin Group Hierarchy selections. SEARCH PARAMETERS Detail Type Last Name First Name Username Dept Business Unit User Profile Status Select the detail type of the Admin level to include in the report. Values: ALL-all Admins at the Application, System, Assoc, Corp, Institution, and Company/Sublevel SYSTEM LEVEL-all Application, System, and Association Level Admins FI LEVEL-all Corp and Institution Admins COMPANY LEVEL-all Company Admins Type the user s last name. All last names that begin with the specified characters display in the search results. Type the user s first name. All first names that begin with the specified characters display in the search results. Type the user name. All user names that begin with the specified characters display in the search results. Type the user s address. Type the department name that a user is associated with. All user names that begin with the specified department name display in the search results. Select from the Drop-down list the Business Unit you want to view for the report. Select the user s status from the drop-down menu. Values: All 175
178 Last Login Date Last Login Status Security Admin Enrollment Date Active Inactive Deleted Select from the drop-down list the Admin user s last login date for the report. A calendar displays to choose a date. Values: Equal to Before After Between Select from the drop-down list the Admin user s last login status for the report. Values: All Successful Standard Successful SSO Failed Standard Failed SSO The Admin User that established (added/created) the Admin User(s). Select from the drop-down list the Admin user s enrollment date. A calendar displays to choose a date. Values: Equal to Before After Between # of Days Inactive Select from the first box the value associated with the number of days specified for the report. Type the number of days the Admin user was inactive in the second box. Values: Equal To Greater than Download Option Download Configure Report View Search Select all or specific elements to include in the report. Click this button to download all or specific data elements of the report. Click this button to select specific criteria to include in the report. Click this button to search for the Admin user specified in the appropriate fields. 176
179 REPORTS Audit Purge Reports Admin User Purge Report Hover Text - When the cursor hovers over the question mark image, information text appears. Date Report Format Export Select from the drop-down list, a date that coincides with the specific report dates (up to 24 months) of the past scheduled purge jobs/purge reports. The dates appear in descending order, from most recent to oldest. Select from the drop-down list the available report formats for exporting the Admin User Purge report. Values:.CSV Text.PDF file Click this button to retrieve or export the Admin User Purge report for the report date selected in the desired report format. 177

180 ADMIN USER HIERARCHY You can select or display the Hierarchy depending on the Admin User Level access and enter the Search Parameters. The user can choose to configure the report output. The Hierarchy view displays fields according to the level of access of the Admin User Group. System Level View If no further Hierarchy is defined outside of the default of the logged in Admin, the user does not have to click the + button. If the Admin adds multiple selections, the user clicks the + button. The + button is clicked after each entry, up to five entries. Perform the following steps to add additional entries: 12) Click the + button to provide another row for additional hierarchical selection. You can choose up to five rows. The option to MODIFY or DELETE any row is provided. Click the RESET link to clear the Admin Group Hierarchy selections. 178

181 REPORTS 13) Admin selects a row for modification. It is brought to the top and the Admin can change and confirm it. Company Level View 179


182 ADMIN USER REPORT PURGE REPORTING The Admin User Purge Report generates on a monthly basis when the Admin User Purge process runs. This process is available through the Admin User Report page. This page provides a summary of activity for the Admin User you are currently viewing. Elements and descriptions follow: 180
183 REPORTS Element Return to Manage Admin User Action Action Admin User Target Admin User Date/Time Description Click this link to return to the Manage Admin User page. Displays an action taken by the Target Admin User, or another user with access to security administration. Displays the Username of the user account, who took an action on the Target Admin User s account. Displays the Username of the user account the action was taken on. This is the username of the account you are currently viewing. Displays the date and time of the action. ADMIN USER PURGE PROCESS The Admin User Purge is based upon a configurable setting that defines the number of months from the date the Admin user(s) is placed into a Deleted status. Once the defined number of months has been reached, the Admin user(s) is purged. The scheduled purge job runs monthly on the third Saturday of each month. Note: Admin users are placed into a Deleted status once System Security selects the DELETE ADMIN USER link on the MANAGE ADMIN USER page. 181
184 The step action table below provides details on the evaluation steps that occur when determining if the Admin user qualifies for the Admin User Purge process. Step Action If Then 1 Evaluate the Admin User Id 2 Evaluate the new USER ADMIN PURGE MONTHS configuration setting. 3 Evaluate the number of months that have elapsed from the date the Admin users is placed into a Deleted The Admin user is placed into a Deleted status The Admin user is NOT placed into a Deleted status The USER ADMIN PURGE MONTHS configuration setting is set to 01 through 60 The USER ADMIN PURGE MONTHS configuration setting is set to 99 The number of months that have elapsed from the date the Admin users is placed into a Deleted status is less than the value defined within the USER ADMIN PURGE User may be eligible for the purge process. Move to Step 2 Admin user not eligible for the purge process. Stop evaluation. User may be eligible for the purge process. Move to Step 3 Admin user not eligible for the purge process. Stop evaluation. Admin user not eligible for the purge process. Stop evaluation. 182
185 REPORTS Step Action If Then status MONTHS configuration setting The number of months that have elapsed from the date the Admin users is placed into a Deleted status equals the value defined within the USER ADMIN PURGE MONTHS configuration setting NUMBER OF MONTHS BEFORE PURGE field equals 0 (zero). The number of months that have elapsed from the date the Admin users is placed into a Deleted status is greater than the value defined within the USER ADMIN PURGE MONTHS configuration setting User is eligible for the purge process. Purge Admin User The number of months that have elapsed from the date the Admin users is placed into a Deleted status cannot be greater than the value defined within the new USER ADMIN PURGE MONTHS configuration setting; as the user would have purged when the number of months from when the Admin users is placed into a Deleted status equals the value defined within the USER ADMIN PURGE MONTHS configuration setting. This scenario may arise in situations where the new USER ADMIN PURGE MONTHS configuration setting is changed to a lower value than the current setting. Purge Admin User 183
 Note: PDF reports have two standard layouts and are not available for customization. You must choose ALL COLUMNS to enable the PDF option.")
186 REPORT OUTPUT You can export and save reports in the following formats:.txt (text).csv (comma delimited text).xls (Excel).pdf (Adobe) Note: PDF reports have two standard layouts and are not available for customization. You must choose ALL COLUMNS to enable the PDF option. Refer to the DOWNLOAD OPTIONS topic for more information. SELECT THE DATA TO OUTPUT TO THE REPORT The options available for view in the CONFIGURE REPORT VIEW drop-down depends on the Admin User Group level of access as well as the logged-in Admin s security access. System Level Options: 184

187 REPORTS Company Level Options: REPORT OUTPUT SELECTION The USERNAME is a link on the ADMIN USER DETAIL REPORT page, and when the link is clicked, it accesses the MANAGE ADMIN USER page for the selected user. A corresponding link is available in the MANAGE ADMIN USER page when accessed from the report to return the user back to the USERNAME in the ADMIN USER DETAIL REPORT. DOWNLOAD OPTIONS If the Admin User selects the ALL COLUMNS check box, PDF is an available download option in the drop-down list box. You can choose all or specific elements to include in the report by performing the following steps: 1) Check All Columns option to include all data elements of the report and click Download. 185

188 If the Admin User selects CONFIGURED COLUMNS, PDF is not an available download option in the dropdown list box. 2) To include only specific data elements of the report, click Configure Report View. 186
 Click the Commercial Card tab on the")
189 REPORTS 3) After making the selections, click Save. 4) Check Configured Columns option. 5) Click Download. TRANSACTIONS REPORT To view transaction reports, perform the following steps: 1) Click the Commercial Card tab on the EZBUSINESS menu bar. 187
 Enter the COMPANY ID or COMPANY NAME. Click Search.")

190 2) Select the VIEW COMPANY LIST or COMPANY SEARCH to search for a company. 3) Enter the COMPANY ID or COMPANY NAME. Click Search. The VIEW COMPANY LIST page displays. 4) Click View Hierarchy. The COMPANY HIERARCHY page displays, displaying the list of company sublevels, if applicable. 5) Click View. The accounts display. 188
 From the PLEASE SELECT AN ACCOUNT: drop-down, select All Accounts (default), or select a specific account from the list.")
191 REPORTS 6) From the NAVIGATION LIST, select Transaction Report. 7) The REQUEST TRANSACTION REPORT page displays. 8) From the PLEASE SELECT AN ACCOUNT: drop-down, select All Accounts (default), or select a specific account from the list. 9) If you select All Accounts, navigate to the FROM and TO date boxes and select dates for the range. If an individual account is selected, there are two date options, statement period or date range. 189
ezbusiness Card Management 7/1/2015
 ezbusiness Card Management 7/1/2015 Table of Contents Logging In........ 3 Out-of-Band Processing.... 5 Navigation.....5 Viewing Pages. 5 Sorting Lists.5 Accessing Online Help...6 Menu Options and Navigation...6
ezbusiness Credit Card Management User s Guide
 ezbusiness Credit Card Management User s Guide This document provides an overview of the different options available within your Internet-based ezbusiness Card Management website. TABLE OF CONTENTS (click
Business Card Services StatementLook User s Guide Phone:
 Business Card Services StatementLook User s Guide Phone: 1-800-441-4025 www.businesscardstatement.com Register Your Account... 2 Successful Registration First Time Login... 8 Forgot User Name... 10 Forgot
BB&T Credit Card Connection for Company Administrators
 BB&T Credit Card Connection for Company Administrators Instructional Guide 1 Welcome to BB&T Credit Card Connection! With BB&T Credit Card Connection you can manage your company Purchasing card program
core user guide business gateway TABLE OF CONTENTS BANKING > WEALTH > INSURANCE
 business gateway core user guide TABLE OF CONTENTS Getting Started... 2 Administration Approval... 8 Logging In... 2 Administration Report... 8 Electronic Report Delivery (ERD)... 17 Security Key... 2
onecard Smart Data OnLine Getting Started Guide for Program Administrators
 Smart Data OnLine Getting Started Guide for Program Administrators Table of contents Introduction 3 Login 4 Company site configuration 6 Set-up Tasks 7 Creating a reporting structure 9 Cost allocation
Business ebanking User Guide
 Business ebanking User Guide If you have any questions, please contact Business ebanking Support at 1-800-593-4345 Contents About Business Online Banking... 3 System Requirements/Considerations... 4 Password
User s Guide. (Virtual Terminal Edition)
") User s Guide (Virtual Terminal Edition) Table of Contents Home Page... 4 Receivables Summary... 4 Past 30 Day Payment Summary... 4 Last 10 Customer Transactions... 4 View Payment Information... 4 Customers
User s Guide (Virtual Terminal Edition) Table of Contents Home Page... 4 Receivables Summary... 4 Past 30 Day Payment Summary... 4 Last 10 Customer Transactions... 4 View Payment Information... 4 Customers
smartdata.gen2 Corporate Cardholder Guide February 2014
 smartdata.gen2 Corporate Cardholder Guide February 2014 Table of Contents Chapter 1 Getting Started... 1-i Introduction... 1-1 Browser Requirements... 1-1 Security... 1-2 Selecting a Language Preference...
OneCard Smart Data OnLine Getting Started Guide for Program Administrators. Help for what matters
 Smart Data OnLine Getting Started Guide for Program Administrators Help for what matters Table of contents Introduction 3 Login 4 Company site configuration 6 Set-up Tasks 7 Creating a reporting structure
NetTeller Online Banking Functionality Training Guide
 February 7, 2017 NetTeller Online Banking Functionality... 4 NetTeller Login Process... 4 Login Screen... 4 Online Agreement... 4 Multi-Factor Authentication...5 Watermark Selection... 5 Password Change...
BBVA Compass Spend Net Payables
 User Guide BBVA Compass Spend Net Payables User Guide Vault Services Table of Contents Introduction 2 Technical Requirements 2 Getting started 3 Sign In 3 General Navigation 4 Upload/Create Payment 5
Online Banking User Guide
 Online Banking User Guide Contents Login... 1 Passcode... 1 Online Agreement... 2 Online Banking ID Change... 2 Watermark Selection... 3 Multi-Factor Authentication Security Question Collection... 3 Update
Business Online Banking User Guide
 Business Online Banking User Guide Table of Contents Contents Overview... 2 Logging In... 2 Additional Login Information... 5 Home/Dashboard... 6 Top Line Tool Bar... 6 Bulletins... 7 Dashboard... 8 Accounts...
User s Guide. Learn how to maximize your new BP Business Solutions MasterCard Program. BP Business Solutions MasterCard
 User s Guide Learn how to maximize your new BP Business Solutions MasterCard Program Use this guide to learn how to access the unique program features that come with your new account to help get the most
Administrator Guide. Regions itreasury. Administrator Guide
 Administrator Guide Regions itreasury Administrator Guide Revised 082011 itreasury Administrator Guide Welcome to Regions itreasury. This Guide contains information about all administrative duties associated
PLCU Business Online
 PLCU Business Online Contents Logging In... 2 Online Agreement... 3 Password Change... 3 Watermark Selection... 3 Multi-Factor Authentication Security Question Collection... 4 My NetTeller... 5 My NetTeller
Mountain Credit Union MCU Online Banking
 Mountain Credit Union MCU Online Banking End-User Guide 2011.11a Contents Login... 1 Login Screen... 1 Online Agreement... 2 Password Change... 2 Watermark Selection... 2 Multi Factor Authentication Security
User Guide for Consumer & Business Clients
 Online Banking from Capital City Bank User Guide for Consumer & Business Clients Revised September 2015 www.ccbg.com/upgrade Contents Overview... 4 Exploring the Home Page... 5 Menu... 6 Accounts... 7
Business Online Banking & Bill Pay Guide to Getting Started
 Business Online Banking & Bill Pay Guide to Getting Started What s Inside Contents Security at Vectra Bank... 4 Getting Started Online... 5 Welcome to Vectra Bank Business Online Banking. Whether you re
Chapter 1 - Overview of Works Features Account Spending Account Funding Spend Reconciliation Card Control...
 Works User s Guide Works Table of Contents Chapter 1 - Overview of Works Features... 12 Account Spending...12 Account Funding...12 Spend Reconciliation...13 Card Control...13 Real-Time Reporting...13 About
Business Online User Guide July 2017
 Business Online User Guide July 2017 Business Online Account Holder 1 Introduction.. 1 Types of Activity 1 Log In 2 Multifactor Authentication. 2 MFA Device Print Security 2 MFA Enrollment 3 Registered
Visa Payments Control
 Visa Payments Control Getting Started Guide Effective: June 2017 2017 Visa. All Rights Reserved. Notices and Disclaimers This document is protected by copyright restricting its use, copying, distribution,
Personal Online Banking & Bill Pay. Guide to Getting Started
 Personal Online Banking & Bill Pay Guide to Getting Started What s Inside Contents Security at Vectra Bank... 4 Getting Started Online... 5 Welcome to Vectra Bank Online Banking. Whether you re at home,
CitiManager Quick Start Guide for Administrators
 1 CitiManager Quick Start Guide for Administrators March 2017 Treasury and Trade Solutions Contents Self-Register as a Non-Cardholder 3 Log Into CitiManager 6 Perform an Account Search 7 View Statements
GETTING STARTED ONLINE
 GETTING STARTED ONLINE Logging into Direct Business Internet Banking is easy. Just open your web browser and type calbanktrust.com in the address line. * You ll be able to view your account information,
LOGON. Citizens Bank CentreSuite Website for Single Cardholders. Navigate to Citizens Bank s CentreSuite website at
 Navigate to Citizens Bank s CentreSuite website at http://www.centresuite.com. LOGON Enter your User ID and Password as provided to you by the Purchasing Department and click on Log On to proceed. Please
Portico VT. User Guide FOR HEARTLAND MERCHANT USERS APRIL 2015 V2.8
 Portico VT User Guide FOR HEARTLAND MERCHANT USERS APRIL 2015 V2.8 Notice THE INFORMATION CONTAINED HEREIN IS PROVIDED TO RECIPIENT "AS IS" WITHOUT WARRANTY OF ANY KIND, EXPRESS OR IMPLIED, INCLUDING BUT
Reference Guide (IRIS)
") Reference Guide For Santander Bank s Interactive Reporting & Initiation Services (IRIS) Equal Housing Lender. Santander Bank, N.A. is a Member FDIC and a wholly owned subsidiary of Banco Santander, S.A.
Reference Guide For Santander Bank s Interactive Reporting & Initiation Services (IRIS) Equal Housing Lender. Santander Bank, N.A. is a Member FDIC and a wholly owned subsidiary of Banco Santander, S.A.
NetTeller Online Banking
 NetTeller Online Banking End-User Guide for Episys Jack Henry & Associates, Inc. 2011.11a Contents Login... 1 Login Screen... 1 Online Agreement... 2 Password Change... 2 Watermark Selection... 2 Multi-Factor
Getting Started with Transaction Express. Transaction Express User Guide
 Getting Started with Transaction Express Transaction Express User Guide Table of Contents Transaction Express User Guide... 5 Section 1 Getting Started... 5 Welcome Email... 5 Merchant List... 5 Navigation...
Mobile Banking App User s Guide
 Mobile Banking App User s Guide Enrollment Enroll Using Online Banking 1. Log in to your Online Banking account at easternmichiganbank.com. 2. Go to Options > Mobile Settings > Web Mobile Settings. 3.
Commercial Online Banking. Quick Reference
 Commercial Online Banking Quick Reference . All rights reserved. This work is confidential and its use is strictly limited. Use is permitted only in accordance with the terms of the agreement under which
Enterprise Payment Solutions User Administrator. User Administrator Handbook
 Enterprise Payment Solutions 1999-2014 Jack Henry & Associates, Inc. All rights reserved. Information in this document is subject to change without notice. Printed in the United States of America. No part
Easthampton Savings Bank Online Business Banking User Guide
 Easthampton Savings Bank Online Business Banking User Guide Page 1 of 100 Table of Contents SECURITY...6 PASSWORD TAB FUNCTIONALITY...6 SECURE DELIVERY TAB FUNCTIONALITY...9 CHALLENGE CODE TAB FUNCTIONALITY...10
Help Document USER ACCOUNT PROFILE. Menu. Policy
 Menu - Policy - Definitions and Charts - Getting Started: Managing User Accounts - How to Manage User Information - How to Unlock an Account - How to Reset a Password - How to Enable/Disable an Account
AgentWorks Administrator and Manager User Guide - Release 12.5
 AgentWorks Administrator and Manager User Guide - Release 12.5 March 21, 2013 2012 MoneyGram InternationalAll rights reserved. Table of Contents Registration Overview... 2 1. Initial Log In AgentWorks
LOGON. Citizens Bank CentreSuite Website for Multiple Cardholders. Navigate to Citizens Bank s CentreSuite website at
 Navigate to Citizens Bank s CentreSuite website at http://www.centresuite.com. LOGON Enter your User ID and Password as provided to you by the Purchasing Department and click on Log On to proceed. Please
Payment Solutions MyCardRules. MyCardRules Mobile App. User Guide. Release 3.1
 Payment Solutions November 27, 2017 Installing MyCardRules... 2 Registering a Card and Creating an Account on MyCardRules... 2 Logging In to MyCardRules... 2 Registering a Card... 3 Creating an Account...
Provider Secure Portal User Manual
 Provider Secure Portal User Manual Copyright 2011 Centene Corporation. All rights reserved. Operational Training 2 August 2011 Table of Contents Provider Secure Portal... 5 Registration... 6 Provider -
REACH Remote Deposit Capture
 REACH Remote Deposit Capture Company Administration CONTENTS Introduction to REACH... 1 Overview of Roles... 1 Session Timeouts and Maintenance... 1 User Login... 2 Login via Online Cash Management...
GLOBAL TRANSPORT VT & BATCH SOLUTION
 GLOBAL TRANSPORT VT & BATCH SOLUTION USER GUIDE VERSION 17.2 NOVEMBER Global Payments Inc. 10 Glenlake Parkway, North Tower Atlanta, GA 30328-3447 COPYRIGHT 2007- GLOBAL PAYMENTS INC. ALL RIGHTS RESERVED.
QNB Bank-ONLINE AGREEMENT
 This is an Agreement between you and QNB Bank ("QNB"). It explains the rules of your electronic access to your accounts through QNB Online. By using QNB-Online, you accept all the terms and conditions
PO Box Lehigh Valley, PA Fax: apcifcu.org APCIRCUIT PC Home Banking Service HOW TO Guide
 APCIRCUIT PC Home Banking Service HOW TO Guide Page 1 HOW TO Guide Online Banking: APCIRCUIT PC Home Banking Service 01-19 Table of Contents APCIRCUIT Overview 3 APCIRCUIT Access 3 HOW TO - Change the
USER HELP. Copyright Information Copyright 2016 Global Payments Inc. All rights reserved worldwide.
 MERCHANT SALES: 800-637-8268 New Merchant Accounts PARTNER PROGRAMS: 800-637-8268 New and existing partnerships CUSTOMER CARE: 800-338-6614 Existing merchant account support Statements and deposits Changes
Overview. Business Online Banking BASIC OVERVIEW PAGE 1
 Overview Business Online Banking BASIC OVERVIEW PAGE 1 Basic Overview Business Online Banking Main navigation: My Accounts, Move Money, and Additional Services. Admins have full access to all accounts
MASTER TERMINAL WEB PORTAL USER'S GUIDE VERSION Copyright 2018 Jade Logistics Group Limited. All rights reserved.
 MASTER TERMINAL WEB PORTAL USER'S GUIDE VERSION 8.5.1.200 Copyright 2018 Jade Logistics Group Limited. All rights reserved. Jade Logistics Group Limited cannot accept any financial or other responsibilities
ATB Online Business General User. User Guide
 ATB Online Business General User User Guide Contents Welcome to ATB Online Business 4 How to use this guide 5 Roles and entitlements in ATB Online Business 5 Administrator role 5 User roles 5 Limits 6
Getting Started With Transaction Express
 Getting Started With Transaction Express Table of Contents Product Overview... 8 Welcome Email... 8 Merchant List... 8 Navigation... 9 Left Navigation Sections... 10 Password Security... 11 Change... 12
Add/Manage Business Users
 Primary and Secondary Administrators are created by First Interstate Bank and have full access to functionality; these Administrators set up other employees as Business Banking users via the Entitlements
SmartPay Express User Guide
 SmartPay Express User Guide Table of Contents INTRODUCTION... 4 SmartPay Express Overview... 4 System Requirements... 5 Trusted Sites... 5 Available Resources... 7 Additional Resources... 7 LOGGING IN...
- 1 - Revision Date: 7/27/09
 Deposit Checks QuickBooks Module Documentation... - 2 - Installation... - 2 - Initial Setup... - 5 - Granting Permission... - 5 - Setting Up the Gateway Credentials... - 7 - Processing Transactions...
Registering a Card and Creating an Account on
 Installing MyCardRules The MyCardRules App is available for both iphones and Android phones. To install MyCardRules: 1. Search for the app in the App Store or on Google Play. 2. Follow the instructions
CHEP Portfolio+Plus 1.3. User Guide V March 2010
 CHEP Portfolio+Plus 1.3 User Guide V 1.0 17 March 2010 Table of Contents Chapter 1: Introduction to Portfolio+Plus 1 1.1 Welcome... 2 1.2 Glossary... 3 1.3 Register for Portfolio+Plus... 6 1.4 Getting
Cardholder & Program Administrator
 Access Online Transaction Management User Guide Cardholder & Program Administrator Version 2.9 Contents Introduction...3 Transaction Management Variables by Organization... 3 Procedures in This Guide...
Simply e C A S H M A N A G E M E N T U S E R G U I D E
 Simply e C A S H M A N A G E M E N T U S E R G U I D E Simply e Cash Management Rev. 06/01/15 Simply e Cash Management Rev. 06/01/15 Table of Contents 1. WELCOME TO 7 1A. TYPES OF ACTIVITY 7 1B. GETTING
Business Online Banking User s Guide
 Business Online Banking User s Guide Published By FIRST NATIONAL BANK ALASKA This User s Guide is designed solely to assist First National Bank Alaska customers in understanding the various functions and
FirstNet for Business
 Page 1" First State Community Bank FirstNet for Business End-User Guide Page 2" Table of Contents" Logging In... 3% Changing Your Password... 4% Cash User Login Screen... 4% Navigation... 7% Account Listing
USER S GUIDE Last Modified: 04/08/2013 1
 USER S GUIDE Last Modified: 04/08/2013 1 Contents 1 Welcome 1 Activating ROAMpay X4 2 Using the System 2 Login 2 First-time Login 2 Default Settings 3 Retrieving Your Password 3 Online Sales 4 Saved Item
CitiManager. Mobile User Guide. Cardholder. Transaction Services. December 2012
 CitiManager Mobile User Guide Cardholder December 2012 Transaction Services CitiManager Mobile User Guide Table of Contents Table of Contents User Guide...2 Introduction to CitiManager Mobile...3 Select
ACCESS ONLINE USER GUIDE
 ACCESS ONLINE USER GUIDE PREPARED BY: SUPPLIER PAYMENT SERVICES FINANCIAL SERVICES ACCESS ONLINE USER GUIDE GETTING STARTED LOGGING IN:... 2 FORGOT YOUR PASSWORD?... 4 LOGGING OUT... 6 MY PERSONAL INFORMATION
ACT! by Sage. Premium for Web 2007 (9.0) User s Guide
 User s Guide") ACT! by Sage Premium for Web 2007 (9.0) User s Guide ACT! by Sage Premium for Web 2007 (9.0) User s Guide Copyright Notice and Trademark 2006 Sage Software SB, Inc. All Rights Reserved. The Sage Software
ACT! by Sage Premium for Web 2007 (9.0) User s Guide ACT! by Sage Premium for Web 2007 (9.0) User s Guide Copyright Notice and Trademark 2006 Sage Software SB, Inc. All Rights Reserved. The Sage Software
WELCOME TO WEBLINK..1. Internet Explorer Browser Settings...3. WebLink Features...5. Accessing WebLink Registration Process...
 WebLink User Guide Table of Contents WELCOME TO WEBLINK..1 Internet Explorer Browser Settings......3 WebLink Features.....5 Accessing WebLink..... 6 Registration Process..... 6 Log In Process After Registration.......15
Business Online Banking
 » Flagstar business Banking Business Online Banking Reference Guide Flagstar Bank Corporate Headquarters 5151 Corporate Drive Troy, MI 48098 (888) 324-4100 flagstar.com/business Member FDIC 1 Table of
web po user guide Supplier
 web po user guide Supplier web po user guide table of contents supplier section 1 before you begin section 2 getting started and the basics section 3 Web PO Supplier Administration section 4 Viewing Purchase
AT&T Cloud Solutions Portal. Account and User Management Guide
 AT&T Cloud Solutions Portal Account and User Management Guide October 2017 1 Legal Disclaimer The information contained in this document should not be duplicated, transmitted, or disclosed, in whole or
ANCHORLINK ONLINE BANKING PERSONAL USER GUIDE Nov. 1, 2017
 ANCHORLINK ONLINE BANKING PERSONAL USER GUIDE Nov. 1, 2017 1 Welcome to AnchorLink Online Banking... 3 Sign Up Process... 3 Subsequent Log In... 6 Landing Page... 7 My Anchorlink... 7 Configure My Anchorlink...
Table of Contents UFA Credit Account Application... 9 Card Link Online Account Management User Management... 77
 Table of Contents Launch into the Card Link Online Web Application... 4 Roles for User Management... 5 UFA Credit Account Application... 9 Credit Application Options... 10 Accessing Card Link Online Launch
About MassMutual Electronic Bill Presentment & Payment
 Group Billing and Collections Frequently Asked Questions (FAQs) for ebill and epay About MassMutual Electronic Bill Presentment & Payment E-Bill Questions and Problems Payment Process Questions Payment
Order Management Bookings - Getting Started Guide for Manufacturers
 Order Management Bookings - Getting Started Guide for Manufacturers Table Of Contents Order Management Bookings Getting Started Guide... 3 Purpose of this Document... 3 What is Order Management Bookings?...
ROAMpay TM. X4 User's Guide
 ROAMpay TM X4 User's Guide Last Modified: 06/14/2013 Contents 1 Activating ROAMpay X4 2 Using the System 2 Login 2 First-time Login 2 Default Settings 3 Retrieving Your Password 3 Online Sales 4 Saved
Online Banking User Guide
 Online Banking User Guide If you need assistance, please call 315.477.2200 or 800.462.5000 M-F 7:30am - 6:00pm Sat 9:00am - 1:00pm empowerfcu.com 315.477.2200 800.462.5000 Table of Contents Online Banking
Guide to Getting Started. Personal Online Banking & Bill Pay
 Guide to Getting Started Personal Online Banking & Bill Pay What s Inside Welcome to National Bank of Arizona s Online Banking. Whether you re at home, at work, or on the road, our online services are
Attorney Registration System User Guide
 Attorney Registration System User Guide June 1, 2018 Administrative Office of Pennsylvania Courts http://ujsportal.pacourts.us Contents Section 1: Introduction... 1 Section 2: UJS Web Portal Access Accounts...
Universal's Instant Ticket Wizard User s Guide
 User s Guide Table of Contents... 1 Welcome message from Universal Orlando... 1 Terms... 1 How to Login and Select a Store and Location... 2 Things you should know about logging in... 2 Tickets... 8 How
Gift, Loyalty, and Tracking Program Web Portal Operating Manual
 Gift, Loyalty, and Tracking Program Web Portal Operating Manual (11/17) Need help? Web: moneris.com/support Toll-free: 1-866-319-7450 Record your Moneris merchant ID here: Contents Welcome to the Moneris
Consumer User Guide July 2017
 Consumer User Guide July 2017 Account Details. 1 Log In 1 Accounts Overview Page.. 1 Home Page Recent Transactions... 2 Edit Accounts 3 Transactions.. 4 Account Transaction Details. 4 Filter.. 5 Print...5
Business Online Banking
 First State Community Bank Business Online Banking End User Guide Table of Contents Logging In... 3 Navigation... 5 Account Activity Options... 7 Transactions... 8 Transfers... 9 Stop Payments...10 Statements...12
YOUR GUIDE TO BUSINESS ONLINE BANKING
 YOUR GUIDE TO BUSINESS ONLINE BANKING II Published by Murphy & Company, Inc. 360 Barrett Office Dr St. Louis, MO 630 www.mcompany.com 009-07 Murphy & Company, Inc. Microsoft, Microsoft Money, Windows and
Access Online. Navigation Basics. User Guide. Version 2.2 Cardholder and Program Administrator
 Access Online Navigation Basics User Guide Version 2.2 Cardholder and Program Administrator Contents Introduction... 1 Access Online Overview... 2 How We Gather and Manage Transaction Data in Access Online...
Table of Contents. Overview of the TEA Login Application Features Roles in Obtaining Application Access Approval Process...
 TEAL Help Table of Contents Overview of the TEA Login Application... 7 Features... 7 Roles in Obtaining Application Access... 7 Approval Process... 8 Processing an Application Request... 9 The Process
Webster Web-Link. Table of Contents. Company System Administrator (CSA) User Guide
 User Guide") Table of Contents 1 Welcome... 4 1.1 Overview of the CSA role... 4 1.1.1 What a CSA cannot do... 4 1.2 What is included in this guide?... 5 1.3 How is this guide organized?... 5 1.4 Where to get help...
Table of Contents 1 Welcome... 4 1.1 Overview of the CSA role... 4 1.1.1 What a CSA cannot do... 4 1.2 What is included in this guide?... 5 1.3 How is this guide organized?... 5 1.4 Where to get help...
ELECTRONIC SERVICES QUICK REFERENCE GUIDES
 ELECTRONIC SERVICES QUICK REFERENCE GUIDES Make your banking life easier Use these guides to set yourself up for convenient banking at Signal» How to Set Up a Password Reset Question» How to Set Up Account
CashLink Quick Reference Guide
 CashLink Quick Reference Guide Navigating your Account Summary Page After you log in, you will see the Account Summary Page screen. This screen gives you access to all other functions and displays important
User Guide. mpos Readers RP350x & RP457c Mobile Payment Acceptance User Guide for Android
 mpos Readers RP350x & RP457c Mobile Payment Acceptance User Guide for Android Disclosure Statements Confidential Notice The information contained herein is the property of Total System Services, Inc. (TSYS
Pathway Net User s Guide
 Pathway Net User s Guide TABLE OF CONTENTS 3. Logging onto Pathway Net 4. Changing Passwords 5. Transaction View 7. Viewing Transaction Detail 8. Reallocating Transactions 9. Splitting Transactions 11.
Business Online Banking User Guide
 Business Online Banking User Guide Table of Contents 1. WELCOME!... 3 1A. TYPES OF ACTIVITIES 3 1B. GETTING STARTED 3 1C. IF YOU NEED HELP 3 2. TRANSACTION ACTIVITY... 4 2A. ACCESSING YOUR BUSINESS ACCOUNTS
RONA e-billing User Guide
 RONA e-billing Contractor Self-Service Portal User Guide RONA e-billing User Guide 2015-03-10 Table of Contents Welcome to RONA e-billing What is RONA e-billing?... i RONA e-billing system requirements...
Gate City Bank Online Business Banking
 Gate City Bank Online Business Banking i Table Of Contents Table of Contents Online Business Banking... 5 Online Business Banking Overview... 5 Features and Services... 5 FREE* Online Business Banking...
Sterling Virtual Terminal. User Guide
 Sterling Virtual Terminal User Guide Version 3.1.00 August 2015 Chapter 1: Getting started Table of Contents USER GUIDE... 1 CHAPTER 1: GETTING STARTED... 5 SYSTEM REQUIREMENTS... 5 STERLING VIRTUAL TERMINAL
Table of Contents UFA Credit Account Application... 9 Card Link Online Account Management User Management... 71
 Table of Contents Launch into the Card Link Online Web Application... 4 Roles for User Management... 5 UFA Credit Account Application... 9 Credit Application Options... 10 Accessing Card Link Online Launch
For Delegates: Creating Your Shared Access Account, Viewing Student Information, and Making a Payment with Shared Access
 For Delegates: Creating Your Shared Access Account, Viewing Student Information, and Making a Payment with Shared Access Creating a Shared Access Account in MyNIU Once a student has shared access through
Merchant Administration User Guide
 Merchant Administration User Guide For MasterCard Payment Gateway Version 6.8 09 March 2017 Notices Following are policies pertaining to proprietary rights and trademarks. Proprietary Rights The information
TREENO ELECTRONIC DOCUMENT MANAGEMENT. Administration Guide
 TREENO ELECTRONIC DOCUMENT MANAGEMENT Administration Guide February 2012 Contents Introduction... 8 About This Guide... 9 About Treeno... 9 Managing Security... 10 Treeno Security Overview... 10 Administrator
Security We keep your security a priority
 Welcome Welcome to Berkshire Bank s Business Solutions. With Business Solutions, you may access your accounts 24 hours a day, seven days a week anywhere an internet connection is available. This guide
PowerSchool Student and Parent Portal User Guide. https://powerschool.gpcsd.ca/public
 PowerSchool Student and Parent Portal User Guide https://powerschool.gpcsd.ca/public Released June 2017 Document Owner: Documentation Services This edition applies to Release 11.x of the PowerSchool software
N4A Device Manager 4.6.0
 N4ACMSX-UG460 N4A Device Manager 4.6.0 User Guide Version 1.0 October 30, 2015 NOVATEL WIRELESS COPYRIGHT STATEMENT 2015 Novatel Wireless, Inc. All rights reserved. The information contained in this document
Volume Licensing Service Center User Guide
 Volume Licensing Service Center User Guide Microsoft Volume Licensing February 2015 What s new License Summary has been improved with expanded search capabilities Contents What s new... 1 Overview of the
Enterprise Payment Solutions. Rent Collector Portal. Rent Collector Portal Handbook
 Enterprise Payment Solutions Rent Collector Portal Contents Contents... 2 I. Rent Collector Portal: Overview... 1 II. System Requirements... 1 III. Payments... 1 A.Making a One-Time (Pay Now) Donation/Payment
Online Banking Overview
 Online Banking Overview Online Banking Services Check you account balances, make a transfer, and view recent activity View, download, or print your monthly statements Set-up and manage custom alerts for