Agenda. Breaking the Ice Physical Setup Walkthrough of REPETREL First Print
|
|
|
- Austen Welch
- 6 years ago
- Views:
Transcription


1 T1 Training Session
2 Agenda Breaking the Ice Physical Setup Walkthrough of REPETREL First Print


3 Breaking the Ice SYSTEM 30M ENGINE
4 Breaking the Ice Protected build environment Slightly larger build area Better printing results SYSTEM 30M
5 Breaking the Ice Entry-Level HYREL All metal construction Built to last ENGINE
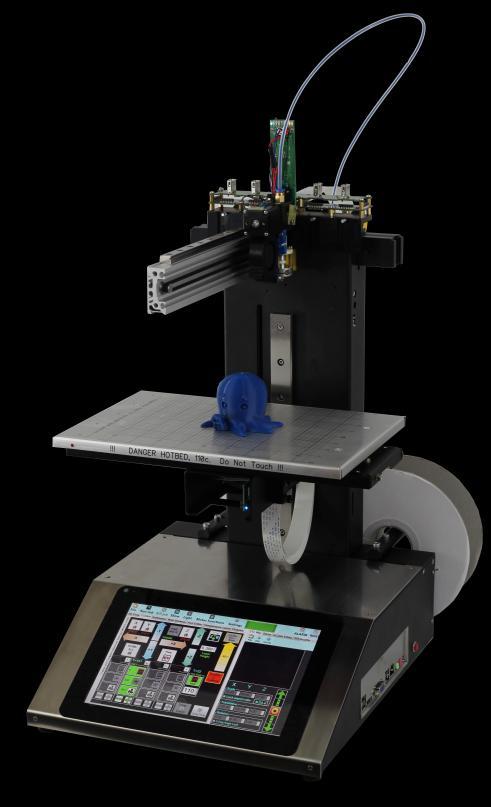
6 Physical Setup Y-Axis Y-Axis X-Axis Z-Axis X-Axis Z-Axis SYSTEM 30M ENGINE
7 Physical Setup Build Platform Build Platform SYSTEM 30M ENGINE
8 Physical Setup Yoke -Holds heads & accessories Yoke -Holds heads & accessories SYSTEM 30M ENGINE
9 Physical Setup Touchscreen Controls Touchscreen Controls SYSTEM 30M ENGINE
10 Physical Setup Tool Tree 5 Slots Tool Tree: 2 Slots SYSTEM 30M ENGINE
11 Physical Setup Filament Spool Holder Filament Spool Holders SYSTEM 30M ENGINE


12 Physical Setup USB Mini USB A Connector USB Mini Connector USB A Control your HYREL from a separate PC


13 Physical Setup Power Supply: ATX Form Factor 500W


14 Physical Setup CAUTION: Make sure you know your Outlet s Voltage Requirements. If you are unsure, start with the Power Supply set to 230V and turn it on. If the machine does not turn on with the Power Supply set to 230V, then Set the Power Supply to 115V and turn it on. Doing this in reverse WILL blow a capacitor in your Power Supply and will void your warranty.


15 Physical Setup 2. Turn on your Power Supply 1. Plug in your power cord Off [O] On [-]


16 Physical Setup System 30M Power On Button Engine Power On Button
17 Walkthrough of REPETREL Q: What is it? A: REPETREL is the control software suite included on all HYREL machines. Q: Why use it, instead of other software? A: Most other 3D printing software, if not all, is based solely around the Arduino. The HYREL machines demand state-of-the-art electronics to handle higher precision movements (such as G2 & G3 moves), multiple heads, and accessories using a CAN bus architecture. REPETREL was programmed to interface with these embedded electronics.


18 Walkthrough of REPETREL Repetrel Desktop Icon opens this window:
19 Walkthrough of REPETREL Click here to turn on / off the light This also serves as a doublecheck to make sure the PC is communicating with the printer
20 Walkthrough of REPETREL Click here for the drop-down menu To move the x & y axises around, use Unlock Motors Every time any of the axis move from commands in REPETREL, all of axises motors will lock up. Use this command to unlock them.
21 Walkthrough of REPETREL 3D View tab Provides a graphical simulation of the user s parts
22 Walkthrough of REPETREL 3D View tab Control Buttons Rotate Move Viewpoint (Pan) Move Camera Move Object (X & Y) Zoom Reset / Front View Top View Parallel Projection Clear All
23 Walkthrough of REPETREL 3D View tab Log Filters Displays commands passed to the ARM processor in the printer Displays information/text messages to/from the printer Displays warning messages to/from the printer Displays errors messages to/from the printer

24 Walkthrough of REPETREL Control tab Provides manual movement, head, & bed calibration and controls


25 Walkthrough of REPETREL Control tab Most Used Buttons Sends X & Y Axis to Home Position Home = X0, Y0 Does not move Z-Axis Sends X & Y Axis to Park Position Park = X130, Y130 Does not move Z-Axis NOTE: Both the Home & Park X&Y Axis values can be changed in the Printer Settings


26 Walkthrough of REPETREL Control tab Manual Move Arrows


27 Walkthrough of REPETREL Control tab Setting the Z-Height Buttons, Part 1 of 2 Off On * 10mm moves only possible when Enable Big Z Move is On More information on next slide

28 Walkthrough of REPETREL Control tab Setting the Z-Height Buttons, Part 2 of 2 Off On Will Not Travel 10mm Will Travel 10mm Every time you use the 10mm move, the Enable Big-Z Move turns off. We purposely coded this in to prevent head crashes from Spamming top arrow button.

29 Walkthrough of REPETREL Control tab Setting the Z-Height Buttons, Part 2 of 2 Sends X-Axis to the Home Position Home = X0 Does not move Y or Z Axis Sends Y-Axis to the Home Position Home = Y0 Does not move X or Z Axis Sends Z-Axis to the last Height-Set Position Home = Z0

30 Ch1: Turn your.stl file into G-Code Step 1: Load a.stl file


31 Ch1: Turn your.stl file into G-Code Step 1: Load a.stl file Select your.stl file Open to Load

32 Ch1: Turn your.stl file into G-Code Step 2: Scale, Rotate, & Translate If your.stl is in Imperial instead of Metric, this is what you ll see

33 Ch1: Turn your.stl file into G-Code Step 2: Scale, Rotate, & Translate To Rescale Click on this Button To auto-scale Imperial to Metric
34 Ch1: Turn your.stl file into G-Code Step 2: Scale, Rotate, & Translate Rescaled, it needs to be rotated to lay flat on the build surface
35 Ch1: Turn your.stl file into G-Code Step 2: Scale, Rotate, & Translate 2. Use these buttons to Rotate the shape flat 1. Select this Box to Rotate the part about the X-Axis NOTE: Other.stl files may require rotation in other Axis
36 Ch1: Turn your.stl file into G-Code Step 2: Scale, Rotate, & Translate Rescaled & Rotated, it needs to be centered on the build surface


37 Ch1: Turn your.stl file into G-Code Step 2: Scale, Rotate, & Translate 1. Select this Box to allow the part to be centered by the Bulls-eye 2. Click on the Bullseye to Auto- Center NOTE: This will center the X & Y Axis, and bring the closest, bottom surface of the part to the build surface

38 Ch1: Turn your.stl file into G-Code Step 3: Check your EMO Nozzle Diameter Size 2 mm 1.5 mm 1 mm For the rest of this documentation, we will be using the 2 mm nozzle
39 Ch1: Turn your.stl file into G-Code Step 4: Select the appropriate Slic3r Recipes Nozzle Size


40 Ch1: Turn your.stl file into G-Code Step 5: Slice NOTE: This can be a long process This Pop-up window informs you Slic3r is converting your.stl file into G-Code

41 Ch1: Turn your.stl file into G-Code Step 6: G-Code ready to print Gcode Editor tab automatically opens when slicing is complete

42 Ch2: Prep Printer for Printing Step 1: Tram Install Digi-tram Extruder GIBs Head GIB Slot
43 Ch2: Prep Printer for Printing Step 1: Tram Install Digi-tram
44 Ch2: Prep Printer for Printing Step 1: Tram Install Digi-tram Tighten thumbscrew in rear of Yoke to lock in the Extruder

45 Ch2: Prep Printer for Printing Step 1: Tram Place Removable Build Platform Set Screw Do Not Cover


46 Ch2: Prep Printer for Printing Step 1: Tram Place Removable Build Platform Set Screw Do Not Cover Use Blue Painter s Tape to Hold Removable Build Platform NOTE: Follow along the edge of the glass For best results
47 Ch2: Prep Printer for Printing Step 1: Tram Home, then Park This will place the Digi-tram over the center of the build platform

48 Ch2: Prep Printer for Printing Step 1: Tram Setting the Zero Elevate the build platform just pass the point the pin of the Digi-tram touches. The Digi-tram will register the distance the pin was displaced.

49 Ch2: Prep Printer for Printing Step 1: Tram Setting the Zero Press the Zero button to set this point to zero
50 Ch2: Prep Printer for Printing Step 1: Tram Unlock the Four (4) Lock Screws Included in your kit, use the 2.5mm Allen wrench to unlock the four (4) lock screws under the build platform
51 Ch2: Prep Printer for Printing Step 1: Tram Unlock your Motors

52 Ch2: Prep Printer for Printing Step 1: Tram Position Pin in first corner
53 Ch2: Prep Printer for Printing Step 1: Tram Adjust Set Screw with Philips Head Screwdriver +/ is within tolerance Adjustable Set Screw

54 Ch2: Prep Printer for Printing Step 1: Tram Position Pin in next corner


55 Ch2: Prep Printer for Printing Step 1: Tram Adjust Set Screw with Philips Head Screwdriver +/ is within tolerance NOTE: Continue this process through all of the corners, returning to the original corner. Adjustable Set Screw It is normal to repeat this process several times until all corners are within tolerance.
56 Ch2: Prep Printer for Printing Step 1: Tram Lock the build platform lock screws Included in your kit, use the 2.5mm Allen wrench to lock the four (4) lock screws under the build platform.

57 Ch2: Prep Printer for Printing Step 1: Tram Remove Digi-tram 1. Unlock Yoke Thumbscrew 2. Remove Digi-tram


58 Ch2: Prep Printer for Printing Step 2: Install Extruder Head Physical Installation Extruder Connector Head Connector Extruder GIBs Head GIB Slot


59 Ch2: Prep Printer for Printing Step 2: Install Extruder Head Physical Installation


60 Ch2: Prep Printer for Printing Step 2: Install Extruder Head Physical Installation Ensure Connector is Seated Properly Tighten thumbscrew in rear of Yoke to lock in the Extruder


61 Ch2: Prep Printer for Printing Step 2: Install Extruder Head What you see in REPETREL, 1 of 2 Before
62 Ch2: Prep Printer for Printing Step 2: Install Extruder Head What you see in REPETREL, 2 of 2 After


63 Ch2: Prep Printer for Printing Step 3: Prime Extruder Head Click to extrude a small amount of material. Once a small amount comes out, click again to stop.


64 Ch2: Prep Printer for Printing Step 4: Set the Extruder Head Height 2. Use Z-Height Calibration to bring the build surface to the nozzle 1. Place a piece of paper between the nozzle and the build surface 3. Once the piece of Paper just starts to pinch, the Extruder Height is correct.

65 Ch2: Prep Printer for Printing Step 5: Prepare build surface Rub a small amount of Plasticine on the build surface. The film it leaves on the surface allows the printed Plasticine to stick.

 Z Fine Adj [+] [-] 2.")
66 Keep the Hot-Bed off / cold Plasticine has a low melting point, and will start to melt around 40 C / 104F First Print with Plasticine Ch3: Printing Step 1: Press Run Job button When running, this control panel opens. The most used buttons are: 1.) Z Fine Adj [+] [-] 2.) Kill Job


67 Ch3: Printing Step 2: Pay close attention to the first layers & adjust height while printing Use when lines are not touching For Plasticine, these print lines are near perfection Use when lines are 50% wider than the adjacent lines


68 Ch3: Printing Step 3: Allow the print to finish

69 Ch3: Printing Step 4: When complete, remove the print from the build surface
70 More Information Available at: HYREL LLC 2900 Cole Court Norcross, GA (404) (US Shop Phone) Skype: Hy.Rel Ustream:
Dreamer Series User Manual
 Dreamer Series User Manual Welcome to the world of the Dreamer. To ensure that you have the best possible user experience, it s important that you follow this user manual. Let s get started! In Parts I
think big, print huge
 think big, print huge quick start guide Table of Contents a Receiving and uncrating 5 b bed level & z home 11 c Loading filament 19 d SOFTWARE 23 e Setup 23 f preparing a print 26 g printing on gigabot
M2 3D Printer V4 M2 3D Printer
 M2 3D Printer V4 Contents 2 Important Safeguards 3 Welcome 4 M2 Features 6 Other products included with your printer 7 Set up 9 Slicing.STL or.obj files 10 Maintenance and Support 11 Warranty 12 About
A GUIDE TO GETTING STARTED
 Florida Public Library Printing A GUIDE TO GETTING STARTED Prepared for the Florida Public Library by Robert Persing Table of Contents Section-A. Download the software... 3 Section-B. Install the software...
ENJOY Introduction. Software Installation* Hardware. Calibration Settings. Print test. Appendex. Install print S/W Driver Install
 Quick Start Manual 1 ENJOY Introduction C O N T E N T S 6 5 Appendex 4 Print test 3 2 Hardware Calibration Settings Software Installation* Install print S/W Driver Install Hardware Intro Cable installation
SHENZHEN GETECH TECHNOLOGY CO., LTD. Geeetech A10 3D Printer. User Manual (V2.0)
") Geeetech A10 3D Printer User Manual (V2.0) 1 Content 1 Attention... 3 1.1 Safety instruction... 3 1.2 Factory test before delivery... 3 2 Printer display... 4 3 Assembling... 7 3.1 Assembling the main
Geeetech A10 3D Printer User Manual (V2.0) 1 Content 1 Attention... 3 1.1 Safety instruction... 3 1.2 Factory test before delivery... 3 2 Printer display... 4 3 Assembling... 7 3.1 Assembling the main
3-7. Set Materials (Touch Screen) Set Materials (Software) Material Weight adjustment (grams) Current material weight. Increase.
 Set Materials (Software) Material Weight adjustment (grams) Current material weight. Increase.") Set Materials (Touch Screen) 3-7 Decrease Material Weight adjustment (grams) Increase Current material weight Save current settings Stop extrusion and heating Back withdraw material change material extrude
Set Materials (Touch Screen) 3-7 Decrease Material Weight adjustment (grams) Increase Current material weight Save current settings Stop extrusion and heating Back withdraw material change material extrude
4. Using Cura to Set Up Your Auto-Leveling Probe and Create Your First Print
 4. Using Cura to Set Up Your Auto-Leveling Probe and Create Your First Print Give a short summary. Written By: Printrbot Support INTRODUCTION Outline what you are going to teach someone how to do. 2015
SHENZHEN GETECH TECHNOLOGY CO LTD. Geeetech A10M 3D Printer. User Manual (v2.0)
") Geeetech A10M 3D Printer User Manual (v2.0) 1 Content 1 Attention... 3 1.1 Safety instructions... 3 1.2 Factory test before delivery... 3 2 Printer display... 4 3 Assembling... 7 3.1 Assembling the main
Geeetech A10M 3D Printer User Manual (v2.0) 1 Content 1 Attention... 3 1.1 Safety instructions... 3 1.2 Factory test before delivery... 3 2 Printer display... 4 3 Assembling... 7 3.1 Assembling the main
UP! Quick Start Guide
 Personal Portable 3D Printer UP! www.pp3dp.com 1. Assemble Printer Open the box, take out the printer and accessories. Assemble the parts contained in the box as following procedure: 1. Unscrew the M4
Cura - DUET Dual Extrusion Setup
 SeeMeCNC Guides Written By: SeeMeCNC 2018 seemecnc.dozuki.com/ Page 1 of 15 INTRODUCTION Please note that dual extrusion is for advanced users. You should have some advanced knowledge on some G-Code and
3d Printing with the Prusa I3 Operation & Printing via a USB Cable
 3d Printing with the Prusa I3 Operation & Printing via a USB Cable Instructions for: Prusa I3 Printer Set-up Slic3r Software Use Pronterface Software Use Prusa I3 - Parts Identification Prusa I3 Printer
Software Manual. Revision 1.3
 Software Manual Revision 1.3 Copyright 2015 by Kudo3D. This material may be distributed only subject to the terms and conditions set forth in the Creative Commons Attribution-NonCommercial-NoDerivatives
Technical Support: CUBE USER MANUAL
 CUBE THE DESKTOP 3D PRINTER USER MANUAL 2012-12-05 1 Contents 1 Installing software...3 1.1 Installing Python... 3 1.2 Installing ReplicatorG... 5 2 Pre-print checks...9 2.1 Power up...9 2.2 Connect to
Geeetech Aluminum Prusa I3. User Manual
 Geeetech Aluminum Prusa I3 User Manual 1 Safety Instructions Building the printer will require a certain amount of physical dexterity, common sense and a thorough understanding of what you are doing. We
ideamaker Manual
 ideamaker Manual Using ideamaker... 2 Basic information... 2 What is ideamaker?... 2 Where to download ideamaker?... 2 Install ideamaker... 3 Let s Print!... 6 How to use ideamaker?... 23 Interface...
USER MANUAL Resolution 0.02mm Speed 300mm/second Software: Wanhao Maker
 1 Duplicator 5S & 5S MINI Desktop 3D Printers USER MANUAL Resolution 0.02mm Speed 300mm/second Software: Wanhao Maker 2014/2015 Wanhao USA 3 Table of Contents Welcome 1 Printer Specifications 2 Unboxing
DeltaMaker 3D Printer Getting Started
 DeltaMaker 3D Printer Getting Started Last Updated: December 2014 Table of Contents TABLE OF CONTENTS 2 WELCOME 3 SECTION 1: UNPACKING/SETUP 4 REMOVING THE PRINTER FROM THE BOX 4 INSTALLING THE FILAMENT
English. Quick Guide
 English Quick Guide Specification Product Overview Button and Indicator light Unpacking Accessory Checklist Important Safety Notes Extruder module installation Accessory installation XYZware operation
da Vinci Jr.1.0 April 2016 da Vinci Junior 1.0w 3D Printer da Vinci Jr.1.0w Quick Guide HD23F1JW0N1
 da Vinci Junior 1.0w 3D Printer w Quick Guide P 1 Product Overview A: Filament movement area B: Feed module C: Detector D: Extruder E: Filament F: Print bed G G: SD card port (Storage format: FAT32) H:
Geeetech Duplicator 5 3D printer. User Manual
 Geeetech Duplicator 5 3D printer User Manual Contents Safety Instructions... 4 1.Software Resources... 5 1.1 Repetier-Host... 5 1.2 Driver... 5 1.3 Arduino IDE... 6 2.Connect the Printer... 6 3.Printer
USING YOUR BIGBOT. 1/18/2017 V0.1
 USING YOUR BIGBOT www.bigbot-3d.com 1/18/2017 V0.1 FOREWORD: YOUR PRINTER IS REPRAP, WHICH STANDS FOR "REPLICATING RAPID PROTOTYPERS". THIS MEANS IT CAN PRINT THE PARTS THAT ARE CUSTOM FOR THIS MACHINE,
3D SYSTEMS University CubeX 3D Printer
 3D SYSTEMS University CubeX 3D Printer Lesson Leveling the Print Pad and Print Tips, Setting the Z-Gap Revision date: 10/22/13 1 1 2016 年 6 月 14 日 Objectives After completing this lesson you will: Be able
3.1 Removal Procedures Removing EF-102 from the Main Body Removing Parts from the Tray
 Contents 1 Introduction 1.1 Introduction... 1-2 1.2 Safety Precautions... 1-3 1.2.1 Notices for Safety... 1-3 1.2.2 Precautions When Replacing Units... 1-4 1.2.3 Caution Labels and Indicators... 1-6 2
M2 3D Printer V4 Rev. D
 M2 3D Printer V4 Rev. D Contents 2 Important Safeguards 3 Welcome 4 M2 Features 6 Other products included with your printer 7 Set up 9 Slicing.STL or.obj files 10 Maintenance and Support 11 Warranty 12
ZHEJIANG FLASHFORGE 3D TECHNOLOGY CO., LTD. Creator Pro Start-up Guide
 www.ff3dp.com ZHEJIANG FLASHFORGE 3D TECHNOLOGY CO., LTD. Creator Pro Start-up Guide www.ff3dp.com Contents 1 What's Included in the Box? 2 2 Un-boxing 2 3 Initial Hardware Installation 6 4 Software Installation
Product User Manual. IdeaWerk 3D Printer WT150
 Product User Manual IdeaWerk 3D Printer WT150 Contents Contents 1. Unpack and checking... 1 1.1 Check the Machine... 1 1.2 Check the Accessories... 3 2. Brief Introduction... 3 2.1 Precautions and Safety...
Panowin F1. User Manual
 Panowin F1 User Manual 1 PANOWIN TECHNOLOGIES CO.,LTD. WARNING power outlet. CAUTION: In case of emergency unplug the Panowin F1 from the WARNING: Carefully monitor the Panowin F1 during operation. Do
Removal and Installation8
 8 Screw Types 8-4 Top Cover Assembly 8-5 Left Hand Cover 8-6 Right Hand Cover 8-10 Front Panel Assembly 8-14 Left Rear Cover 8-15 Right Rear Cover 8-16 Extension Cover (60" Model only) 8-17 Media Lever
3D SYSTEMS University Cube 3D Printer
 3D SYSTEMS University Cube 3D Printer Lesson Troubleshooting Machine Issues Revision date: 10/20/13 1 1 2016 年 6 月 14 日 Table of Contents Slide 3 Temperature Errors Slide 5 File Read Errors Slide 7 Filament
MAKERGEAR USER GUIDE. V4 Rev. E Made in the USA since 2009
 MAKERGEAR USER GUIDE M2 V4 Rev. E Made in the USA since 2009 Contents 1 - Welcome 2 - Warning & Important Safeguards 4 - What's Included 5 - Set Up 8 - Slicing.STL or.obj Files 10 - Changing Filament 11
Contents-1. 1 Introduction. 2 Installing Fusing Unit EF Removing Fusing Unit EF Copy/Print Operation.
 Contents 1 Introduction 1.1 Introduction... 1-2 1.2 Safety Precautions... 1-3 1.2.1 Notices for Safety... 1-3 1.2.2 Precautions When Replacing Units... 1-4 1.2.3 Warning and Caution Labels... 1-6 2 Installing
Repetier-Host Documentation for use with Kora Pro 3D PC
 Repetier-Host Documentation for use with Kora Pro 3D PC Installation Prerequisites Before you start with the installation, you should check if your computer meets the requirements. Currently available
BD Laser User Guide * IMPORTANT * PLEASE READ THE FOLLOWING INSTRUCTIONS CAREFULLY AS IMPROPER USE MAY DAMAGE THE MACHINE AND VOID THE WARRANTY.
 BD Laser User Guide * IMPORTANT * PLEASE READ THE FOLLOWING INSTRUCTIONS CAREFULLY AS IMPROPER USE MAY DAMAGE THE MACHINE AND VOID THE WARRANTY. BD Laser arrives ready to use with jaws and cutters preinstalled.
3D BIO-PRINTER. USER MANUAL Version D Cultures
 3D BIO-PRINTER 3D Cultures USER MANUAL Version 2.0 Product pictures are for reference only. Color(s), size, parts, and interface may vary. Preheating is not recommend with the use of cells. This manual
Quick Start Guide. including AutoMaker. Version 1.0
 Quick Start Guide including AutoMaker Version 1.0 NOT FOR MEDICAL USE Version 1.0 Welcome Package Contents Check your product package for the following items. 2m USB A-B Cable IEC C5 Power Cable Robox
3D Printing Getting Started!
 ARCHITECTURE & LANDSCAPE ARCHITECTURE 3D Printing Getting Started! White filament is free to students for academic use. Where do I buy filament? NORTH DAKOTA STATE UNIVERSITY www.makerbot.com/store www.ultimachine.com/pla
Moving your printer 1. Remove cables. Printing Moving the printer. Using color. Paper handling. 1 Turn the printer off. Maintenance.
 Moving the printer Moving your printer 1 If you re going to move the printer, you must remove the supplies and attached options to prevent damage to the printer. Use the following steps to remove the options
ideamaker Manual
 ideamaker Manual www.raise3d.com 1 Using ideamaker... 3 1.1 What is ideamaker?... 3 1.2 Where to download ideamaker?... 3 2 Install ideamaker... 4 3 Let s Print!... 9 3.1 Import.STL files... 9 3.2 Slice
Repetier-Host Documentation
 Repetier-Host Documentation Installation Prerequisites Before you start with the installation, you should check if your computer meets the requirements. Currently available computers should have no problems
SIMPLEST Bltouch/3Dtouch guide for Creality CR-10/CR- 10s/Ender 2/Ender 3 printers created by Danny Walmsley.
 SIMPLEST Bltouch/3Dtouch guide for Creality CR-10/CR- 10s/Ender 2/Ender 3 printers created by Danny Walmsley. The aim of this guide is to bring auto bed leveling to the masses by making it simple and affordable
Repetier-Host Documentation
 Repetier-Host Documentation Installation Prerequisites Before you start with the installation, you should check if your computer meets the requirements. Currently available computers should have no problems
Written By: Walter Galan
 imac Intel 21.5" EMC 2428 CPU Replacement Replace the CPU in your imac Intel 21.5" EMC 2428. Written By: Walter Galan ifixit CC BY-NC-SA www.ifixit.com Page 1 of 33 INTRODUCTION Use this guide to upgrade
PowerSpec Ultra 3D Printer Start-up Guide Table of Contents
 PowerSpec Ultra 3D Printer Start-up Guide Table of Contents 1 What's Included in the Box?...Page 3 2 Un-boxing.Page 4 3 Initial Hardware Installation Page 6 4 Software Instruction.Page 8 5 Filament Page
Quickstart Guide Kora Pro 3D PC Printer
 Quickstart Guide Kora Pro 3D PC Printer 1 Rev001/01/2018 Kora Pro PC General Precautions and Advice Only use original accessories from or approved by the manufacturer Always read the manual before initial
* IMPORTANT * REGISTERING YOUR MACHINE
 * IMPORTANT * REGISTERING YOUR MACHINE Thank you for your purchase of the Keyline 994 Laser. Before continuing with machine setup and use, please complete the following; COMPLETE PRODUCT REGISTRATION FORM
Replacing the Battery HP t5730 and t5735 Thin Clients
 Replacing the Battery HP t5730 and t5735 Thin Clients Copyright 2009 Hewlett-Packard Development Company, L.P. The information contained herein is subject to change without notice. Microsoft and Windows
1.1 Software Overview. 1.2 Software Types
 1.1 Software Overview Aleph Objects, Inc., the maker of the LulzBot Mini, completely supports free/libre hardware and software. Along with the Mini being a free/libre hardware design, it has been tested
LED Lighting Kit For Elara NanoEdge Fixed Frame. Installation Guide. Attention: Read this guide before assembling your screen.
 LED Lighting Kit For Elara NanoEdge Fixed Frame Installation Guide Attention: Read this guide before assembling your screen. INTRODUCTION GETTING STARTED WARNING - Sharp Edges This product may contain
DIGITAL OBSERVATION GUARD LOW PROFILE PAN TILT KIT USER MANUAL
 DIGITAL OBSERVATION GUARD LOW PROFILE PAN TILT KIT USER MANUAL Version 2.1 June 4, 2013 0 Table of Contents Low Profile Pan Tilt Kit Description... 3 Low Profile Pan Tilt Unit Basic Operation... 4 Mounting
SCSI Cable Installation Instructions
 Identifying the SCSI Cable Parts SCSI Cable Installation Instructions for HP ProLiant DL100 Series Generation 2 Servers Item Description 1 Connector end 2 240 mm location 3 Terminator end Read instructions
Printing Your First Page. Attaching the Paper Support. Plugging in the Printer. Checking the Printer
 Printing Your First Page Attaching the Paper Support Checking the Printer Plugging in the Printer Installing the Ink Cartridges Installing the Printer Software Connecting the Printer 4011307 XXX-00 Attaching
OPERATING INSTRUCTIONS:
 List OPERATING INSTRUCTIONS: Preparation For Installation, Product Identification Charging The Batteries ing And Adjusting The Lift Mounting Head s Brackets Mounting Clamps And Quick-Locking Arms Installation
Dremel Digilab 3D Slicer Software
 Dremel Digilab 3D Slicer Software Dremel Digilab 3D Slicer prepares your model for 3D printing. For novices, it makes it easy to get great results. For experts, there are over 200 settings to adjust to
Written By: Jakub Dolezal
 5. Preflight check Written By: Jakub Dolezal 2018 manual.prusa3d.com/ Page 1 of 17 Step 1 P.I.N.D.A. adjustment (part 1) Ensure the printer is turned off and not plugged in. Note your extruder is slightly
Cura (Documentation for version )
") Cura (Documentation for version 15.04.06) Getting Started Installation To start the installation of Cura, download it first. After downloading, open the installer and run the installation wizard to complete
Cura (Documentation for version 15.04.06) Getting Started Installation To start the installation of Cura, download it first. After downloading, open the installer and run the installation wizard to complete
Installing the Printer Software
 4 Printing Your First Page Attaching the Paper Support 7 1 Checking the Printer 6 2 Plugging in the Printer 3 Installing the Ink Cartridges 5 Installing the Printer Software Connecting the Printer 4012581-00
Portabee GO. Mobile 3D Printer. Portabee 3D. Romscraj. Software & Support. Manufacturing & Engineering.
 Portabee GO Mobile 3D Printer Portabee 3D Software & Support http://portabee3d.com support@portabee3d.com Romscraj Manufacturing & Engineering http://romscraj.com contact@romscraj.com A. Software Package
Z-Truck (Vertical Moving) Z-truck Flag. Y-Truck (Horizontal Moving) FIGURE 1: VIEW OF THE Z-TRUCK. Flexshaft Assembly
 Z-truck Flag. Y-Truck (Horizontal Moving) FIGURE 1: VIEW OF THE Z-TRUCK. Flexshaft Assembly") Replacing the LCD Cable To remove and replace the LCD Cable you will need the following tools: #2 Phillips screwdriver (magnetic tip preferred) Socket wrench with 10mm socket Removing the Side Panel 1.
Replacing the LCD Cable To remove and replace the LCD Cable you will need the following tools: #2 Phillips screwdriver (magnetic tip preferred) Socket wrench with 10mm socket Removing the Side Panel 1.
Select Mini 3D Printer V2
 Select Mini 3D Printer V2 P/N 15365, 21711, 21872, 24166 User's Manual CONTENTS SAFETY WARNINGS AND GUIDELINES... 3 INTRODUCTION... 4 FEATURES... 4 CUSTOMER SERVICE... 5 PACKAGE CONTENTS... 5 PRODUCT OVERVIEW...
TABLE OF CONTENTS SECTION 1 TABLETOP CONFIGURATION SECTION 2 TABLETOP CONFIGURATION ACCESSORIES SECTION 3 SLIDE CONFIGURATION
 S6 USER S MANUAL TABLE OF CONTENTS SECTION 1 TABLETOP CONFIGURATION SECTION 2 TABLETOP CONFIGURATION ACCESSORIES SECTION 3 SLIDE CONFIGURATION SECTION 4 SLIDE CONFIGURATION ACCESSORIES SECTION 5 RACK MOUNT
9ft Jib Arm with Tripod (P-9-TS)
") 9ft Jib Arm with Tripod (P-9-TS) I NSTRUC TI ON MANUA L All rights reserved. No part of this document may be reproduced, stored in a retrieval system, or transmitted by any form or by any means, electronic,
9ft Jib Arm with Tripod (P-9-TS) I NSTRUC TI ON MANUA L All rights reserved. No part of this document may be reproduced, stored in a retrieval system, or transmitted by any form or by any means, electronic,
DOWNLOADING THE APP FOR APPLE PHONES: DOWNLOADING THE APP FOR ANDROID PHONES: For Android Phones go to Google Play or the Android Store.
 DOWNLOADING THE APP FOR APPLE PHONES: DOWNLOADING THE APP FOR ANDROID PHONES: For Android Phones go to Google Play or the Android Store. For Apple Phones go to the app store and click GET. Make sure your
DIY PRINTER INSTALLATION AND OPERATION INSTRUCTION
 CTC DIY I3 PRINTER INSTALLATION AND OPERATION INSTRUCTIONS Thank you for buying and using DIY 3D printer produced by CTC Please read the installation and operation instruction carefully before use Company
Nov. 07, 2013 p. 5 - changed the B axis unit value to from Changed by Randy per Frank s request.
 Correction notes Nov. 07, 2013 p. 5 - changed the B axis unit value to 45.1389 from 40.0000. Changed by Randy per Frank s request. Jan. 22, 2018 p. 5 - changed the B axis unit value and corresponding picture
UPLIFT 2-Leg Height Adjustable Standing Desk (Version v4 Control Box)
") UPLIFT 2-Leg Height Adjustable Standing Desk (Version v4 Control Box) DIRECTIONS FOR ASSEMBLY AND USE TABLE OF CONTENTS Also watch our assembly video http://bit.ly/2qvkeuf PAGE 1 Safety and Warnings 2
UPLIFT 2-Leg Height Adjustable Standing Desk (Version v4 Control Box) DIRECTIONS FOR ASSEMBLY AND USE TABLE OF CONTENTS Also watch our assembly video http://bit.ly/2qvkeuf PAGE 1 Safety and Warnings 2
Bondtech QR Installation guide for the BCN3D Sigma
 Bondtech QR Installation guide for the BCN3D Sigma 1 Contents Introduction... 3 List of tool required... 3 Mechanical & Electrical Installation... 4 Adjustment of steps/mm...12 Change Log: 1) Added comment
Upgrading LVDS Cables Instruction Sheet
 Upgrading LVDS Cables Instruction Sheet INTRODUCTION Use the following instructions to replace the LVDS cables in CP2000-M/MR projectors. The new cables are slightly longer in length and allow for better
Replacement Instructions
 apple Xserve Memory Replacement Instructions Follow the instructions in this sheet carefully. Failure to follow these instructions could damage your equipment and void its warranty. Note: Online instructions
Written By: Ben Eisenman
 iphone 3GS Rear Panel Replacement Replace a broken rear case on your iphone 3GS. Written By: Ben Eisenman ifixit CC BY-NC-SA www.ifixit.com Page 1 of 22 INTRODUCTION The plastic rear half of the iphone.
Installing 6 Indexer: PRS Standard Tools
 888-680-4466 ShopBotTools.com Installing 6 Indexer: PRS Standard Tools Copyright 2016 ShopBot Tools, Inc. page 1 Copyright 2016 ShopBot Tools, Inc. page 2 Table of Contents Overview...5 Installing the
Easy use of Repetier-Host software
 Easy use of Repetier-Host software Examples base on version Repetier-Host 1.06 1. Repetier-Host overview Repetier Host is an easy to use software for 3D printing. The main functions include manual debugging
UCIT LIVE HD 4 Camera DVR. Installation Manual. 10/17 Version 2.0
 UCIT LIVE HD 4 Camera DVR Installation Manual 10/17 Version 2.0 Always Check https://www.safetytrack.net/camera-installation-and-user-manuals/ for the most up to date version of this installation guide.
SIMPLEST Bltouch/3Dtouch guide for Creality CR-10/CR- 10s/Ender 2/Ender 3 printers V2 created by Danny Walmsley.
 SIMPLEST Bltouch/3Dtouch guide for Creality CR-10/CR- 10s/Ender 2/Ender 3 printers V2 created by Danny Walmsley. The aim of this guide is to bring auto bed leveling to the masses by making it simple and
ideamaker Manual
 ideamaker Manual www.raise3d.com 1 Using ideamaker... 3 1.1 What is ideamaker?... 3 1.2 Where to download ideamaker?... 3 2 Install ideamaker... 4 3 Let s Print!... 9 3.1 Import.STL files... 9 3.2 Slice
Operation Instruction
 JGAURORA 3D Printer Model:Z-603S Operation Instruction www.jgaurora3d.com Read it carefully before printing and keep it properly. - 0 - - 1 - Z- 603S model is designed FDM 3d printer by Shenzhen Aurora
Instruction Manual. RS 3D Printer
 Instruction Manual RS 3D Printer 1) GENERAL This instruction manual contains important information regarding the installation, operation, maintenance and storage for RS 3D Printer. Please read these instructions
User Guide. M2 V4 Rev. E. Made in the USA since 2009
 jk User Guide M2 V4 Rev. E Made in the USA since 2009 Contents 1 Welcome 2 Warning & Important Safeguards 4 What's Included 5 Set Up 8 Slicing.STL or.obj Files 10 Changing Filament 11 M2 Features 15 What's
User Guide Dreamer Desktop 3D Printer
 User Guide Dreamer Desktop 3D Printer Dreamer User Guide www.ff3dp.com 1 Dreamer User Guide www.ff3dp.com 2 CONTENTS WELCOME TO FLASHFORGE DREAMER A. How to use this manual B. The FlashForge Experience
imac Intel 21.5" EMC 2389 Stand Replacement
 imac Intel 21.5" EMC 2389 Stand Replacement Replace a broken or cosmetically unappealing stand on the imac 2389 21.5 Written By: Aaron Cooke ifixit CC BY-NC-SA www.ifixit.com Page 1 of 30 INTRODUCTION
Unpacking and Installing the Flora 2512 UV Printer. Steps 1: Unscrew the 10mm bolts holding the top. Then remove the top and put in a safe place.
 Unpacking and Installing the Flora 2512 UV Printer Steps 1: Unscrew the 10mm bolts holding the top. Then remove the top and put in a safe place. Step 2: Unscrew 10mm bolts holding the end panels. On the
RSL PSM-2 Power Supply Module Project: Modifying a FlatCap2
 RSL PSM-2 Power Supply Module Project: Modifying a FlatCap2 Dear Do-It-Yourselfer, The stock FlatCap2 is less than a stellar performer. Used with a CD5 CD player, for example, it gives flabby bass control,
TROUBLESHOOTING GUIDE
 TROUBLESHOOTING GUIDE YOU SHOULDN'T ENCOUNTER many problems when using your Vector 3 printer, however, occasionally things can go wrong. Before contacting Customer Services, please consult this list of
F2A (M527) F2A (M506n/dn) F2A (M506x)
 F2A (M506n/dn) F2A (M506x)") F2A76-67910 (M527) F2A68-67915 (M506n/dn) F2A68-67916 (M506x) Lea esto primero www.hp.com/support/lj506 www.hp.com/support/ljm527mfp CAUTION: Electrostatic sensitive (ESD) parts. Always touch the sheet-metal
F2A76-67910 (M527) F2A68-67915 (M506n/dn) F2A68-67916 (M506x) Lea esto primero www.hp.com/support/lj506 www.hp.com/support/ljm527mfp CAUTION: Electrostatic sensitive (ESD) parts. Always touch the sheet-metal
IBM Systems. Quick start guide for IBM System p5 505 ( )
") IBM Systems Quick start guide for IBM System p5 505 (9115-505) 1 Before you begin This Quick start guide contains an abbreviated set of setup instructions designed to help you quickly unpack and set up
IBM Systems Quick start guide for IBM System p5 505 (9115-505) 1 Before you begin This Quick start guide contains an abbreviated set of setup instructions designed to help you quickly unpack and set up
da Vinci Super Quick Guide da Vinci Super Safety Precautions Product instructions Unboxing and Installation Product specification
 September. 2017 da Vinci Super Quick Guide ENG Safety Precautions Product instructions Unboxing and Installation Product specification Function Operation and Instructions Setting Print Supporting information
Cutter Option Installation Instructions
 This kit includes the parts and documentation necessary to install the cutter option on the Zebra XiII, XiIII, and XiIIIPlus-Series printers. NOTE: The Cutter Option is not available for the 96XiIII. Adding
M101M4 Tablet PC Quick Start Guide V1.0
 M101M4 Tablet PC Quick Start Guide V1.0 Please read these instructions carefully before using this product, and save this manual for future use. Getting Started Congratulations on purchasing this rugged
User Manual. Trinocular Stereo Microscope
 User Manual Trinocular Stereo Microscope Model V434 XV434 Series MicroscopeNet.com Table of Contents i. Caution.. 1 ii. Care and Maintenance... 2 1. Component Illustration... 3 2. Installation 4 3. Operation....6
Changing the Size of the Paper in the Paper Tray For Local Printing For Network Printing (WorkCentre PE120i only)...1.
...1.") Quick Start Guide CONTENTS Step 1: Unpacking... 1.3 Step 2: Installing the Toner Cartridge... 1.5 Step 3: Loading Paper... 1.7 Changing the Size of the Paper in the Paper Tray.. 1.9 Step 4: Connecting
Quick Start Guide CONTENTS Step 1: Unpacking... 1.3 Step 2: Installing the Toner Cartridge... 1.5 Step 3: Loading Paper... 1.7 Changing the Size of the Paper in the Paper Tray.. 1.9 Step 4: Connecting
Removing and Replacing Parts
 Removing and Replacing Parts Preparing to Work Inside the Computer Recommended Tools Screw Identification System Components Hard Drive Fixed Optical Drive Media Bay Devices Memory Modules Mini PCI Card
Instruction Manual. Gold Pan Tilt Head with 12V Joystick Control Box (PT-GOLD)
") Instruction Manual Gold Pan Tilt Head with 12V Joystick Control Box (PT-GOLD) All rights reserved No part of this document may be reproduced, stored in a retrieval system, or transmitted by any form or
Instruction Manual Gold Pan Tilt Head with 12V Joystick Control Box (PT-GOLD) All rights reserved No part of this document may be reproduced, stored in a retrieval system, or transmitted by any form or
TD-700 FLUOROMETER SERVICE MANUAL
 TD-700 FLUOROMETER SERVICE MANUAL July 1996 CONTENTS Page Section 1 INTRODUCTION 2 Section 2 PRELIMINARY CHECKS 3 Section 3 TROUBLESHOOTING GUIDE 5 A. Lamp (Fluorescent) 5 B. Lamp Heater 7 C. Fan 8 D.
da Vinci 1.0 Pro Quick Guide
 US da Vinci 1.0 Pro Quick Guide Product Description Print Parameters Description Support Details Product Model: da Vinci 1.0 Professional da Vinci 1.0 Pro Product Description Product Overview Cartridge
OpenSprinkler v2.2u Build Instructions
 OpenSprinkler v2.2u Build Instructions (Note: all images below are 'clickable', in order for you to see the full-resolution details. ) Part 0: Parts Check Part 1: Soldering Part 2: Testing Part 3: Enclosure
Documentation version Prusa i3 Rework USER GUIDE REV 1.5. Document Version 1.1.8
 Documentation version 1.1.8 Prusa i3 Rework USER GUIDE REV 1.5 2 INTRODUCTION Target : Prupose a visual guide of the differents steps to build and use a Prusa i3 Rework. Authors of this document : emotion
Schick Technologies Schick Technologies, Inc th Ave., Long Island City, NY (718) Fax: (718)
 Fax: (718)") Document #: B1051109 Revision #: Date: June 22, 2000 Page: 1 of 33 Schick Technologies Schick Technologies, Inc. 31-00 47 th Ave., Long Island City, NY 11101 (718) 937-5765 Fax: (718) 937-5962 CDRPan Installation
Document #: B1051109 Revision #: Date: June 22, 2000 Page: 1 of 33 Schick Technologies Schick Technologies, Inc. 31-00 47 th Ave., Long Island City, NY 11101 (718) 937-5765 Fax: (718) 937-5962 CDRPan Installation
Ender 3 Series 3D Printer Quick Start Guide
 Ender 3 Series 3D Printer Quick Start Guide This guide is for the Ender 3 Series of 3D printers. Select the correct input voltage to match your local mains (220V or 110V) Because of software/hardware upgrades
imac Intel 27" EMC 2639 Hard Drive
 imac Intel 27" EMC 2639 Hard Drive Replacement Replace the Hard Drive in your imac Intel 27" EMC 2639. Written By: Walter Galan ifixit CC BY-NC-SA www.ifixit.com Page 1 of 26 INTRODUCTION Replacing the
SeeMeCNC Guides. Configuring Artemis
 SeeMeCNC Guides Configuring Artemis Configuring your Artemis printer. Connecting it to your network and getting everything dialed in for successful printing. Written By: SeeMeCNC 2018 seemecnc.dozuki.com/