Key Total Treasury User Guide
|
|
|
- Kelly Webb
- 5 years ago
- Views:
Transcription
1 Key Total Treasury User Guide Copyright 2009 KeyCorp All rights reserved.
2 KTT User Guide Introduction Welcome to KeyBank s introduction to Key Total Treasury, our online tool for all your treasury management and reporting functions. KTT allows users to initiate transactions, view and download reports, manage your accounts, and make payment decisions. KTT is a Web-based system, so there s no need to use special software. Clients can access Key Total Treasury from any Internet-enabled PC. For optimal performance, we advise clients that they should use only versions of Browsers and Operating Systems that are currently supported by the manufacturer. This does not mean that older versions of Browsers and Operating Systems will not work with KTT; it means that they may not work as well, or as efficiently, or certain functions may not operate as intended. Processor: 486 or higher RAM: 32 MB or higher Communication Method: 28.8 Modem or higher (Key recommends 36.6 or higher) Encryption: Must support 128-bit Secure Socket Layer (SSL) Encryption Secure Port: 443 Non-secure Port: 80 Adobe: Statement viewing only. Need or higher KTT enables clients to choose the features and functions they need. Furthermore, access can also be controlled at the user level. Therefore, all reports and modules may not be available depending on the types and levels of services selected. Your company s system administrator can verify company and user-level authorizations in the Self Service Module on KTT. Please refer to the Self Service user guide for additional information. The following sections in this introduction provide instructions that are applicable throughout the various modules on KTT. Please refer to the individual module guides for more information on what features and services are available within the modules and for additional instructions. 2
3 KTT User Guide Introduction Contents I. Exporting a File 4 II. Printing Images from KTT 6 III. Accessing Other Modules 7 IV. Accessing Additional Services 8 V. Changing Passwords 9 VI. Digital Certificates 11 Module 1: Information Reporting Module 2: Receivables Module 3: Account Management Module 4: ACH Module 5: Wires Module 6: Loan Management Module 7: Deposit Concentration Module 8: Self Service 3
 2.")
4 I. Exporting a File 1. Users are able to download reports from KTT. To download a report, users must go to the report and click on filter or view. (For instructions on accessing specific reports, refer to the individual module user guides.) 2. On the Report Filters page, users can select the information they want in the report or the user can click view to obtain the most recent information. 3. Once all the desired parameters are entered, select the download button. 4. Depending on the type of file you are downloading, you may receive a Download screen, requesting the file type: Comma Delimited (CSV) This is the most popular file type. Information is separated by commas and easily identified. Tab delimited (TXT) 5. Depending on the type of file you are downloading, if a header row is desired, you can select yes to include the header row information. (The default is no header row.) 6. A file download box is presented. 7. Select Save. 4

5 8. Enter an appropriate file name and location for the file (i.e. desktop). 9. Click Save. 10. You can open the file by clicking Open. Please note: Depending on the type of file you are downloading the preceding steps may vary and/or you may need to complete additional steps in order to successfully download a file. 5


6 II. Printing Images from KTT 1. Images can be printed from KTT by clicking on the print button that appears when you move your cursor over the image. You can also select the print button on your toolbar or select file and then print from your browser s menu options. (Example of printing by selecting the print option from the image toolbar.) (Example of printing by using the print button on your toolbar or from your menu.) 2. Select print if a window appears that displays your default printer selection. 3. A copy of the image will be printed. 6
7 III. Accessing Other Modules Provided you have access to other modules, you can navigate to another module by simply clicking on the appropriate tab to access it. If you do not have access to a particular module, when you click on the tab, you will be able learn more about the service. 7

8 IV. Accessing Additional Services Additional services, such as ACH Direct, can be accessed only from the KTT homepage by clicking on the appropriate link in the services menu. After clicking on the link, you will be required to sign in to gain access to that particular service. If you do not have access to a service, when you click on that link you will receive a popup that asks if you want to learn more about the service. If you would like to sign up for additional services, please contact your Cash Management Sales Officer. Services 8
9 V. Changing Passwords To Change your Password: 1. Select the User Options link at the top right corner of the KTT homepage. 2. Select Change Password. 9
10 3. Enter your old password. Create a new password that conforms to the guidelines listed. Enter your new password and confirm it. 4. Select cancel to return to the user options screen or select submit to proceed with changing your password. 5. You will receive a confirmation screen when your password has been successfully changed. Select return to go back to the user options page. 6. If your password does not conform to the strong password guidelines, you will receive an error message that contains the corrections that need to be made. Reenter your old password and create a new password. 10
11 VI. Digital Certificates Digital certificates provide a second level of security used to authenticate a user. The digital certificate is linked to your computer, internet browser, and logon ID. If any of these factors change, you may need a new digital certificate. Digital certificates must be renewed on an annual basis. You will receive two notices 60 and 30 days prior to the expiration of your digital certificate alerting you that you must register for another certificate. Digital certificates are not required for all users, only certain modules and services on KTT; wires, foreign drafts, ACH transactions, and self service require users to register for a digital certificate. If a user has not been setup with access to any of these functions, they will not be able to register for a digital certificate. To Register/Renew your Digital Certificate: 1. Select the User Options link at the top right corner of the KTT homepage. 2. Select Register for Digital Certificate. 11

12 3. You will receive a screen that contains instructions on how to register for a digital certificate. After reviewing the instructions, select register. 12
13 13

14 4. Complete the required fields. 5. Select cancel to return to the user options screen or select SUBMIT to proceed with registering for your certificate. 14


15 6. You will receive a popup asking you to confirm that your address is correct. 7. After you have confirmed your address is correct, select OK. Please note: You may not receive all the popups included in the following steps or you may receive more popups, depending on your browser settings. 8. A second popup will appear informing you that your ID is being created. Select OK. 9. Another popup will appear. Select OK. 10. You will receive a screen asking for you to wait while your digital certificate is being created. 15
16 11. Once your certificate has been created, you will receive a confirmation screen. Select Return to KeyTotalTreasury to go back to the KTT homepage. Please close your browser window and log back on to KTT before attempting to use your new digital certificate. 16
17 Information Reporting User Guide Copyright 2010 KeyCorp All rights reserved. 1
18 Contents I. List of Available Reports 3 II. Previous Day & Intraday Reports 6 III. BAI2 Previous Day Reports 10 IV. BAI2 Intraday Reports 14 V. Global Account Reports 18 VI. Corporate Banking Statement 24 VII. ACH Customer Activity Reports 28 VIII. Account Analysis Statement 33 IX. EDI 822 Reports 39 X. Investment Reports 41 XI. Credit Sweep Reports 46 XII. Zero Balance Account Reports 51 XIII. High Order Prefix Detail Reports 55 XIV. Lockbox Detail Reports 59 XV. EDI Remittance Reports 65 XVI. Incoming/Outgoing Wire Activity Reports 70 XVII. ACH Entries Resubmitted via ACH Reports 76 XVIII. ACH Entries Converted to Draft Reports 81 2
19 I. Available Reports Key Total Treasury provides users with an extensive array of reporting options for all of your KTT services. The chart below describes the various reports available on the Information Reporting module, the information available in each report, and the number of days of history available. Report Information Contained Within the Report Length of time available Standard Reports Previous Day Intraday BAI2 Previous Day File BAI2 Intraday File EDI 822 File The Previous Day balance report displays prior day account status, account summary information, and detailed account transactions that include descriptions and reference information. The Intraday balance report displays current day account status, account summary information, and detailed account transactions that include descriptions and reference information. Available information includes: Controlled Disbursement (CDA), Lockbox, ACH, and Wire transactions. The Previous Day balance report offers prior day account status, account summary information, and detailed account transactions that include descriptions and reference information that is downloaded in the BAI2 format. The report will show summary only or summary and detail information depending on the level of service requested. The BAI2 Intraday balance report offers current day account status, account summary information, and detailed account transactions that include descriptions and reference information. Available information includes: Controlled Disbursement (CDA), Lockbox, ACH, and Wire transactions. The report will show summary only or summary and detail information depending on the level of service requested. The EDI 822 account analysis invoice data provides you with itemized information on your accounts and balances, and furnishes you with a clear summary of maintenance fees and service charges. Your account statement also summarizes all treasury management services you receive. Some of the information contained in your statement includes your average ledger balance, average float, average collected balance, the total depository and treasury management services used, the total of all service charges for your relationship, and a client history that provides a summary of your balances and service charge activity. 180 days 180 days 180 days 180 days 180 days 3
20 Global Account Reporting ACH Customer Activity Report Corporate Banking Statement Account Analysis Statement Investments Repo Sweep Confirmation Credit Sweep Zero Balance Accounts High Order Prefix Detail The Global Balance Report displays information for your international bank accounts that includes prior day account status, account summary and detailed account transactions that include descriptions and reference information. The report will show summary only or summary and detail information depending on the level of service requested. Customer Statements The ACH Customer Activity Report provides information on ACH transactions that were originated through Key. This report also includes adjustments to the account balance and/or corrections to the detail on transactions. All clients that originate ACH transactions through Key will receive the Customer Activity Report. The Corporate Banking Statement is designed to provide you with information regarding all commercial checking account activity, including all additions and subtractions. The Account Analysis Statement provides you with itemized information on your accounts and balances, and furnishes you with a clear summary of maintenance fees and service charges. Your account statement also summarizes all treasury management services you receive. Some of the information contained in your statement includes your average ledger balance, average float, average collected balance, the total depository and treasury management services used, the total of all service charges for your relationship, and a client history that provides a summary of your balances and service charge activity. Other Reports The Repurchase (Repo) Sweep Confirmation report provides daily information regarding your Repurchase Sweep Account. The report contains information on your commercial checking account that is designated as the Repurchase Sweep Account, including balance information, movement of float, income earned on purchase, net activity, and investment collateral. The Credit Sweep report shows the funds transfer activity between a commercial checking account that is tied to a loan account and the related activity on the loan account. The Zero Balance Account (ZBA) report enables you to monitor and review prior day activity on accounts that have been set up for this service. The standard ZBA report contains all of the pertinent information relating to the main and subsidiary Zero Balance Accounts. This same day report provides detailed transaction information and HOP summary information. The High Order Prefix (HOP) feature allows you to subdivide your CDA by adding a prefix number to your check serial numbers. This prefix is then used to subdivide your CDA clearings into subtotals. 180 days 180 days Rolling 24 months Rolling 12 months 180 days 180 days 180 Days 180 Days 4
21 Lockbox Detail EDI Remittance Incoming/ Outgoing Wire Activity ACH Entries Resubmitted via ACH ACH Entries Converted to Draft The Lockbox Detail report is the standard lockbox service output report. This report contains information regarding deposits received in your KeyBank lockbox. (Please see the Receivables section of the User Guide for additional information on lockbox reporting and imaging) This report contains detailed remittance information that accompanies an electronic payment received in your KeyBank account. Some of the information contained in this report includes payment information, payment originator, payment receiver, invoice information, and individual transaction detail. This report provides real-time details on incoming and outgoing wire transfers, including: date and time the wire was sent/received, the account number and name, a description of the transaction, the amount of the wire, and any text information included with the wire, such as the Fed reference number. This report contains a list of ACH entries that were returned for various reasons, including NSF returns that are being represented. This report serves to notify clients of ACH items that were rejected for various reasons and must be cleared as paper items. 180 Days 180 days 14 days 180 Days 180 Days 5

22 II. Previous and Intraday Reports Previous Day and Intraday reports provide you with balance and transaction information. Previous Day and Intraday Reports have been combined in this section because the features are similar. Sample screen shots are of Previous Day Reports. Please note that the balance totals displayed will be different for Previous Day vs. Intraday reports. Summary reports display an aggregate view of your account balances. Previous Day summary information includes: Closing Ledger Balance Closing Available Balance 1 Day Float 2+ Day Float Total Credits (amount) Total Debits (amount) Opening Available Balance Intraday summary information contains: Opening Ledger Balance* Total Credits (amount) Total Debits (amount) Holds* (amount) Uncollected Funds* Current Ledger Balance* Current Available Balance* * Denotes real time data The detailed reports provide an aggregate view of your account balances, as well as comprehensive transaction information that contains descriptions and associated reference information for incoming credits and debits. 6


23 Summary Reports b c a d a b Your Total Balances will appear at the top of the page. This information reflects your total cash position across all of your accounts, including both your KeyBank accounts and your accounts with any other banks that have been setup on KTT with Global Account Reporting. You can select the Information button to display the Balance Glossary for more information on how balances are calculated. By default, all of your accounts, their corresponding balances, and the totals for each bank are displayed. For each bank that is reporting, you can sort your accounts by any of the column headings simply by clicking on the column name, or you can collapse this information by clicking on the bank name to hide individual accounts. Details for each individual account can be viewed by clicking on the account name. For more information on detailed reports, please see the next section. c From the previous day summary screen you can search for information from prior previous day reports. Either individual days or totals for a period of days can be viewed. To obtain information from prior previous day reports, click on the filter dates icon. d From your previous day report you can also filter by account(s). To view information on a specific account or accounts, select the filter accounts icon. a. Your accounts will be displayed. By default, all accounts will be selected. You can unselect all accounts by removing the check mark on all accounts and then selecting only desired accounts OR you can remove only a few accounts from your report by selecting those accounts to remove them from your filtered report. Once your desired accounts have been selected, click view to display your filtered report. Information for each of the selected accounts will be displayed. Select clear to return to your current previous day report. Select one of the default options from the drop down menu. If custom date is selected, additional fields will appear for you to input the desired date or date range. Click view to apply the filter. Your new report will be displayed. Select clear to return to your current previous day report. 7


24 Detail Reports d Detail reports can be accessed by selecting from the information reporting main page or by selecting the detail tab from the summary or custom screens. b a a b By default, all of your accounts and their corresponding balances, credits, and debits are displayed. You can hide the account details by clicking on the account name to collapse the available information. Detailed information reporting includes a summary section for each account that provides the same balance information that is available on the summary report, as well as information on both credits and debits. c c Underneath the summary section, individual credits and debits are listed, along with additional information on the transactions. To view expanded details for all transactions for which reference information, etc. is available, click on show detail to expand the description field. You can also view detailed information on specific transactions by simply clicking on its description. You can also sort the transaction information by any of the column headings simply by clicking on the column name. d In addition to being able to filter your detailed report by date and by account, (see previous page for directions) you can also filter by transaction. Click transactions and then select the desired parameters. By default, all transaction groups and all transaction types are selected. You can unselect all transaction groups and all transaction types by removing the check mark on all groups and all types and then selecting only the desired types OR you can remove only a few groups and/or types from your report by selecting those groups and/or types. You can also restrict reporting based upon the dollar amounts of the transactions. To limit your report to transactions above a certain dollar limit or within a specified dollar range, enter the desired parameters in the Amount From and To fields. Select view to display your filtered detail report. 8


25 Custom Reports a Information Reporting Main Page a In addition to customizing reports from the summary and detail previous day report screens, you can also create, view, download, and save custom reports by selecting from the information reporting main page, or by clicking on the custom tab from either the summary or detail screens. Customized reports can be created according to Report type Date Account Transaction type and dollar amount Please note: filtering options for transaction type and dollar amount will only appear if you choose Balances and Transaction Detail or Transactions Only from the Report Type dropdown menu. Once you specify your desired parameters, you can view, save, or download your report by selecting the corresponding buttons. b b If you choose to save your reporting criteria you can enter a name for your customized report. Any saved reports will appear on the Information Reporting main page, in the My Saved Reports section, allowing you to easily access your customized reports with a single click, without entering the same criteria over and over. 9
26 III. BAI2 Previous Day Report The BAI2 Previous Day balance report offers prior day account status, account summary information, and detailed account transactions that include descriptions and reference information that is downloaded in the BAI2 format. The report will show summary only or summary and detail information depending on the level of service requested. To View the BAI2 Previous Day Report: 1. Select the view button next to BAI2 Previous Day File from the Information Reporting main page. 10
27 2. The report will be displayed. 11
28 To Filter the BAI2 Previous Day Report: 1. Select the filter button next to BAI2 Previous Day File from the Information Reporting main page. 2. Select the account(s) to be included in the report. (Multiple accounts can be selected by holding CTRL or Shift and clicking on the desired accounts.) 3. Select the date or date range for the report. Please note: The date/date range must be within the last 45 calendar days. 4. Select download to download a filtered report. Please refer to the KTT User Guide Introduction for instructions on downloading and saving reports. 12
29 13
30 IV. BAI2 Intraday Report The BAI2 Intraday balance report offers current day account status, account summary information, and detailed account transactions that include descriptions and reference information. Available information includes: Controlled Disbursement (CDA), Lockbox, ACH, and Wire transactions. The report will show summary only or summary and detail information depending on the level of service requested. To View the BAI2 Intraday Report: 1. Select the view button next to BAI2 Intraday File from the Information Reporting main page. 14
31 2. The report will be displayed. 15
32 To Filter the BAI2 Intraday Report: 1. Select the filter button next to BAI2 Intraday File from the Information Reporting main page. 16
33 2. Select the account(s) to be included in the report. (Multiple accounts can be selected by holding CTRL or Shift and clicking on the desired accounts.) 3. Select the date or date range for the report. Please note: The date/date range must be within the last 45 calendar days. 4. Select download to download a filtered report. Please refer to the KTT User Guide Introduction for instructions on downloading and saving reports. 17
34 V. Global Account Reporting The Global Balance Report displays information for your international bank accounts that includes prior day account status, account summary, and detailed account transactions that include descriptions and reference information. The report will show summary only or summary and detail information depending on the level of service requested. To View your Global Account Report: 1. Select the view button next to Global Account Reporting from the Information Reporting main page. 2. Your report will be displayed. The top of every report will display summary information for each account. Summary information includes: Currency Opening Balance Date Opening Balance Amount Closing Balance Date Closing Balance Amount Available Balance Date Available Balance Amount 18
35 3. If you have requested detailed information, a table containing transactions will be displayed. Information can be sorted by column headings: Description Dollar Amount of Credit Dollar Amount of Debit Optional Text 19
36 To Filter your Report: 1. Select the filter button next to Global Account Reporting from the Information Reporting main page OR select the filter button from the Global Account Report that was displayed when view was selected. 20
37 Global Account Report (Example has been reduced to focus on applicable area.) 2. To utilize a saved filter, use the dropdown menu to select the appropriate filter and select apply to use the filter, edit to update the filter with new criteria, or delete to remove the filter from the menu. 3. To create a new filter that can be saved and utilized later, enter a name for the new filter, enter the appropriate ranges and/or criteria (discussed in more detail in step 4), and select save. After the new filter has been saved, it will appear in the list of saved filters. 4. Limit information displayed on the global account report by applying the filtering capabilities for any or all of the following parameters. a. Choose to display detail or summary information, or summary and detail information. b. Choose the account(s) you wish to view information for. (Multiple accounts can be selected by holding CTRL or Shift and clicking on the desired accounts.) c. Select the bank(s) that the selected accounts are held at. (Multiple banks can be selected by holding CTRL or Shift and clicking on the desired banks.) 21
38 d. Select the day or days that you wish to view information for. Selecting custom date displays additional fields that enable you to specify a particular day or days. e. Select to display credits or debits or credits and debits. f. Enter a dollar range for transactions. Please note: This level of information is only available on the detailed section of the previous day report. If you do not have detailed reporting, you will not be able to specify a dollar range. 22
39 5. Select cancel to return to the Information Reporting main page, select download to download a report according to the specified criteria, select view to display the filtered report. For more information on downloading reports, please refer to the KTT User Guide Introduction. 23
40 VI. Corporate Banking Statement The Corporate Banking Statement is designed to provide you with information regarding all commercial checking account activity including all additions and subtractions. To Download your Corporate Banking Statement(s): 1. Choose account(s) and/or date(s) and click "get pdf" or "get zip" to download statements into one file for offline management. Please note: for instructions on how to save and download files from Key Total Treasury, please reference the KTT User Guide Introduction. 24
41 To View Individual Statements: 2. Select view statement list. 25

42 3. A. Select your desired criteria to limit the statements displayed B. Check on multiple statements and click get pdf or get zip to download selected statements C. Click on the statement link to view individual statements A C B 26
43 4. Your Corporate Banking Statement containing the following information will be displayed. Company Name. Address to which the statement is mailed. The statement date. The account number. Summary of account activity for the statement period including total additions, total subtractions, and ending balance. List of all additions (deposits, etc.) to account, including totals. List of all subtractions (withdrawals, etc.) from account, including totals. 27
44 VII. ACH Customer Activity Report The ACH Customer Activity Report provides information on ACH transactions that were originated through Key. This report also includes adjustments to the account balance and/or corrections to the detail on transactions. All clients that originate ACH transactions through Key will receive the Customer Activity Report. To View your Customer Activity Report: 1. Select the view button next to ACH Customer Activity Report from the Information Reporting main page. 28
45 2. The report will be displayed. Please refer to the screen shots below. 29
46 30
47 31
48 To Filter your Customer Activity Report: 1. Select the filter button next to ACH Customer Activity Report from the Information Reporting main page. 3. Select the account(s) to be included in the report. (Multiple accounts can be selected by holding CTRL or Shift and clicking on the desired accounts.) 4. Select the date or date range for the report. Please note: The date/date range must be within the last 45 calendar days. 5. Select download to download a filtered report. Please refer to the KTT User Guide Introduction for instructions on downloading and saving reports. 32
49 VIII. Account Analysis Statement The Account Analysis Statement provides you with itemized information on your accounts and balances, and furnishes you with a clear summary of maintenance fees and service charges. Your account statement also summarizes all treasury management services you receive. Some of the information contained in your statement includes your average ledger balance, average float, average collected balance, the total depository and treasury management services used, the total of all service charges for your relationship, and a client history that provides a summary of your balances and service charge activity. To View your Account Analysis Statement: 1. Select filter next to Account Analysis Statement from the Information Reporting main page. 33
50 2. Select the account for the statement that you wish to view. 3. Select cancel to return to the Information Reporting main page or select next to choose from the last 12 available statements for the selected account. Please note: You must have Adobe Acrobat Reader 4.0 or higher to view your statement. Please click on the link to download a free copy of Adobe Acrobat Reader if needed. 4. Your Account Analysis Statement containing the following information will be displayed. The Relationship Summary section includes the following information: Company name. Address to which the statement is mailed. The analysis period and number of days in the month. Name of your account officer. Earnings credit rate, balance criteria, and multiplier information. The multiplier indicates the amount of balances needed to offset $1.00 in service charges. Average ledger, float, and collected balance information for the analysis relationship. Account listing of all accounts included in the analysis relationship with balance and service charge summary information. The account that is charged for net service charges will be identified with an asterisk. The settlement cycle; this indicates the method and frequency by which your company is charged for services. The services used by all accounts in the relationship are listed, including the quantity, unit price, total service charges, and adjusted balances needed to support services. At the bottom of this section is a summary of the total service charges, the total earnings credit allowance, and the net service charge owed to the bank. The client history section provides a year-to-date summary of your balances and service charge activity for all accounts in the relationship. 34
51 The Account Detail section contains the following information: The analysis period and number of days included in the month. Account number. Account name. Address to which the account statement is mailed. Uncollected funds rate for this account. This is the rate applied to any negative collected balances to determine the uncollected funds charge. Average ledger, float, and collected balance information for this particular account. Average daily negative collected balance and the number of days in the month the account had a negative collected balance. Average daily positive collected balance and the number of days in the month the account had a positive collected balance. Balance available to support services; the average daily positive collected balance less compensating balances (if applicable) and less the reserve requirement. Adjusted balance available to support services: equals the balance available to support services times the number of positive days in the period divided by the total number of days in the period. The earnings credit allowance rate and earnings credit allowance amount for this account. The total net service charges and the net service charge for this account. Since the actual total net service charge owed to the bank is calculated at the relationship level, this section is for informational purposes only, and does not represent the total net service charge. The services used by this account are listed. The section includes the quantity, unit price, total service charges, and adjusted balances needed to support services. At the bottom of this section is a summary of the total service charges, the total adjusted balances needed to support the services for this account, and the adjusted balances available to support other bank services. If the adjusted balances available to support other bank services is a positive number, then there are extra balances from this account that could be used to support new bank services for this account and/or additional services used by another account. Please note: The sample account analysis statement provided below does not necessarily contain examples of all the information that your account analysis statement will include. 35


52 36


53 37
54 38
55 IX. EDI 822 Report The EDI 822 account analysis invoice data provides you with itemized information on your accounts and balances, and furnishes you with a clear summary of maintenance fees and service charges. Your account statement also summarizes all treasury management services you receive. Some of the information contained in your statement includes your average ledger balance, average float, average collected balance, the total depository and treasury management services used, the total of all service charges for your relationship, and a client history that provides a summary of your balances and service charge activity. To Download the EDI 822 Report: 1. Select the filter button next to EDI 822 from the Information Reporting main page. 39
56 2. If you wish to download the report to a PC, click the corresponding box. 3. Choose the desired account. 4. Choose the month and year for the report. 5. Select download to download a filtered report. Please refer to the KTT User Guide Introduction for instructions on downloading and saving reports. 40
57 X. Investment Reports The Repurchase Sweep Confirmation report provides daily information regarding your Repurchase Sweep Account. The report contains information on your commercial checking account that is designated as the Repurchase Sweep Account, including balance information, movement of float, income earned on purchase, net activity, and investment collateral. To View the Investments Report: 1. Select the view button next to Investments from the Information Reporting main page. 41
58 2. The report will be displayed. Select main page to return to the Information Reporting main page. 42
59 To Filter the Investments Report: 1. Select the filter button next to Investments from the Information Reporting main page or select the filter button from the Investments report that was displayed when view was selected. 43
60 Investments Report (Example has been reduced to focus on applicable area.) 44
61 2. Select the account(s) to be included in the report. (Multiple accounts can be selected by holding CTRL or Shift and clicking on the desired accounts.) 3. Select the date or date range for the report. Please note: The date/date range must be within the last 45 calendar days. 4. Select download to download a filtered report. Please refer to the KTT User Guide Introduction for instructions on downloading and saving reports. 45
62 XI. Credit Sweep Reports The Credit Sweep report shows the funds transfer activity between a commercial checking account that is tied to a loan account and the related activity on the loan account. To View the Credit Sweep Report: 1. Select the view button next to Credit Sweep from the Information Reporting main page. 46
63 2. The report will be displayed. 47
64 To Filter the Credit Sweep Report: 1. Select the filter button next to Credit Sweep from the Information Reporting main page or select the filter button from the Credit Sweep Report that was displayed when view was selected. 48
65 Credit Sweep Report 49
66 2. Select the account(s) to be included in the report. (Multiple accounts can be selected by holding CTRL or Shift and clicking on the desired accounts.) 3. Select the date or date range for the report. Please note: The date/date range must be within the last 45 calendar days. 4. Select download to download a filtered report. Please refer to the KTT User Guide Introduction for instructions on downloading and saving reports. 50
67 XII. Zero Balance Account Reports The Zero Balance Account (ZBA) report enables you to monitor and review prior day activity on accounts that have been set up for this service. The standard ZBA report contains all of the pertinent information relating to the main and subsidiary Zero Balance Accounts. To View the ZBA Report: 1. Select the view button next to Zero Balance Accounts from the Information Reporting main page. 51
68 2. The report will be displayed. 52
69 To Filter the ZBA Report: 1. Select the filter button next to Zero Balance Accounts from the Information Reporting main page or select the filter button from the ZBA Report that was displayed when view was selected. ZBA Report (Example has been reduced to focus on applicable area.) 53
70 2. Select the account(s) to be included in the report. (Multiple accounts can be selected by holding CTRL or Shift and clicking on the desired accounts.) 3. Select the date or date range for the report. Please note: The date/date range must be within the last 45 calendar days. 4. Select download to download a filtered report. Please refer to the KTT User Guide Introduction for instructions on downloading and saving reports. 54
71 XIII. High Order Prefix Detail Reports This same day report provides detailed transaction information and HOP summary information. The High Order Prefix (HOP) feature allows you to subdivide your CDA by adding a prefix number to your check serial numbers. This prefix is then used to subdivide your CDA clearings into subtotals. To View the HOP Report: 1. Select the view button next to High Order Prefix Detail from the Information Reporting main page. 55
72 2. The report will be displayed. 56
73 To Filter the HOP Report: 1. Select the filter button next to High Order Prefix Detail from the Information Reporting main page or select the filter button from the HOP report that was displayed when view was selected. HOP Report (Example has been reduced to focus on applicable area.) 57
74 2. Select the account(s) to be included in the report. (Multiple accounts can be selected by holding CTRL or Shift and clicking on the desired accounts.) 3. Select the date or date range for the report. Please note: The date/date range must be within the last 45 calendar days. 4. Select download to download a filtered report. Please refer to the KTT User Guide Introduction for instructions on downloading and saving reports. 58
75 XIV. Lockbox Detail Reports The Lockbox Detail Report is the standard lockbox service output report. This report contains information regarding deposits received in your KeyBank lockbox. (Please see the Receivables section of the User Guide for additional information on lockbox reporting and imaging). To View the Lockbox Detail Report: 1. Select the view button next to Lockbox Detail from the Information Reporting main page. 59
76 2. The report will be displayed. 60
77 61
78 To Filter the Lockbox Detail Report: 1. Select the filter button next to Lockbox Detail from the Information Reporting main page or select the filter button from the Lockbox Detail report that was displayed when view was selected. 62
79 Lockbox Detail Report (Example has been reduced to focus on applicable area.) 63
80 2. Select the account(s) to be included in the report. (Multiple accounts can be selected by holding CTRL or Shift and clicking on the desired accounts.) 3. Select the date or date range for the report. Please note: The date/date range must be within the last 45 calendar days. 4. Select download to download a filtered report. Please refer to the KTT User Guide Introduction for instructions on downloading and saving reports. 64
81 XV. EDI Remittance Reports This report contains detailed remittance information that accompanies an electronic payment received in your KeyBank account. Some of the information contained in this report includes payment information, payment originator, payment receiver, invoice information, and individual transaction detail. To View the EDI Remittance Report: 1. Select the view button next to EDI Remittance from the Information Reporting main page. 65
82 2. The report will be displayed. KeyBank EDI SERVICES REMITTANCE/PAYMENT ADVICE JANUARY 02, 2003 Sparky Consolidated Industries ATTN: BOB BOBBINSON 1 RIVERSIDE PLAZA COLUMBUS, OH ============================================================================= PAYMENT INFORMATION: CREDIT: $ EFFECTIVE DATE: 11/23/2002 INPUT FORMAT: ACHCCD CREDIT PARTY DEBIT PARTY ROUTING ID: ROUTING ID: ACCT: ACCT: COMPANY ID: TRACE NUMBER: RECEIVER: ORIGINATOR: OHIO POWER COMPANY ZZ: 07 AMER ELECT PWR ============================================================================= REMITTANCE INFORMATION: LINE PO INVOICE AMOUNT NET AMOUNT PAID $ $ ============================================================================= DETAILS: ORIGINATOR: LM Energy Research LINE: PO: AMOUNT PAID: $ TOTAL INV AMOUNT: $ IV: NV NV ============================================================================= REPORT TOTALS: CREDITS: $
83 To Filter the EDI Remittance Report: 1. Select the filter button next to EDI Remittance from the Information Reporting main page or select the filter button from the EDI Remittance report that was displayed when view was selected. 67
84 EDI Remittance Report (Example has been reduced to focus on applicable area.) 68
85 2. Select the account(s) to be included in the report. (Multiple accounts can be selected by holding CTRL or Shift and clicking on the desired accounts.) 3. Select the date or date range for the report. Please note: The date/date range must be within the last 45 calendar days. 4. Select download to download a filtered report. Please refer to the KTT User Guide Introduction for instructions on downloading and saving reports. 69
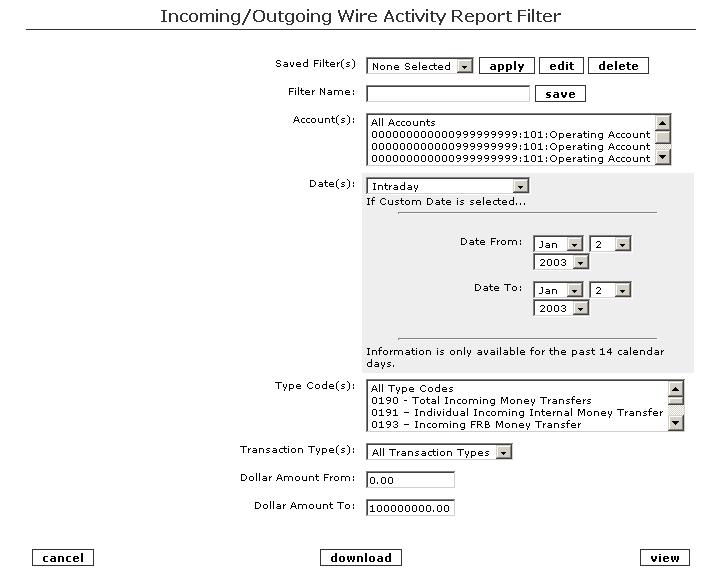
86 XVI. Incoming/Outgoing Wire Activity This report provides real-time details on incoming and outgoing wire transfers, including: date and time the wire was sent/received, the account number and name, a description of the transaction, the amount of the wire, and any text information included with the wire, such as the Fed reference number. To View the Incoming/Outgoing Wire Activity Report: 1. Select the view button next to Incoming/Outgoing Wire Activity from the Information Reporting main page. 70
87 2. The report will be displayed. 71
88 To Filter the Incoming/Outgoing Wire Activity Report: 1. Select the filter button next to Incoming/Outgoing Wire Activity from the Information Reporting main page or select the filter button from the Incoming/Outgoing Wire Activity report that was displayed when view was selected. 72
89 Incoming/Outgoing Wire Activity Report 73
90 2. To utilize a saved filter, use the dropdown menu to select the appropriate filter and select apply to use the filter, edit to update the filter with new criteria, or delete to remove the filter from the menu. (Example has been reduced to focus on applicable area.) 3. To create a new filter that can be saved and utilized later, enter a name for the new filter, enter the appropriate ranges and/or criteria (discussed in more detail in the following steps), and select save. After the new filter has been saved, it will appear in the list of saved filters. 4. Select the account(s) to be included in the report. (Multiple accounts can be selected by holding CTRL or Shift and clicking on the desired accounts.) 5. Select the date or date range for the report. Please note: The date/date range must be within the last 14 calendar days. 6. Select download to download a filtered report. Please refer to the KTT User Guide Introduction for instructions on downloading and saving reports. 7. Select the type code. 8. Select the transaction type, either credit or debits or credits and debits. 9. Enter a dollar amount or dollar range for the transactions. 10. Select cancel to return to the Information Reporting main page, select download to download the filtered report, or select view to view the filtered report. Please refer to the KTT User Guide Introduction section for instructions on downloading reports. 74
91 75
92 XVII. ACH Entries Resubmitted via ACH Reports This report contains a list of ACH entries that were returned for various reasons, including NSF returns that are being re-presented. To View the ACH Entries Resubmitted via ACH Report: 1. Select the view button next to ACH Entries Resubmitted via ACH from the Information Reporting main page. 76
93 2. The report will be displayed. RETURNED ACH ENTRIES RESUBMITTED VIA ACH ACH DATE: 01/02/2004 BANK: 0101 ACCOUNT: SPARKY CONSOLIDATED ATTN: NED SPIELMAN COMPANY NAME COMPANY ID ENTRY DESCR SEC EFF DATE SPARKY CONSOLIDATED LOAN PAYMT PPD BANK REF#/ T/R ACCOUNT# IND ID/ T/C AMOUNT RETURN REASON IND NAME R01-INSUFFICIENT FUNDS SPIELMAN, NED R01-INSUFFICIENT FUNDS SMITH, JANE , R01-INSUFFICIENT FUNDS WILLIAMS, SUSAN R01-INSUFFICIENT FUNDS FREEMAN, TONY R01-INSUFFICIENT FUNDS ROBERTS, PAUL TOTAL RESUBMITTED TODAY: DEBIT COUNT 5 DEBIT AMOUNT 3, CREDIT COUNT 0 CREDIT AMOUNT 0.00 RETURNED ACH ENTRIES RESUBMITTED VIA ACH ACH DATE: 01/02/2004 BANK: 0101 ACCOUNT: SPARKY CONSOLIDATED ATTN: NED SPIELMAN COMPANY NAME COMPANY ID ENTRY DESCR SEC EFF DATE SPARKY CONSOLIDATED LOAN PAYMT PPD BANK REF#/ T/R ACCOUNT# IND ID/ T/C AMOUNT RETURN REASON IND NAME
94 R01-INSUFFICIENT FUNDS SMITH, JANE R01-INSUFFICIENT FUNDS WOHLERS, ELAINE R01-INSUFFICIENT FUNDS YOST, JACK R01-INSUFFICIENT FUNDS ANDERSON, ALLAN R01-INSUFFICIENT FUNDS POWERS, SANDRA , R01-INSUFFICIENT FUNDS THOMAS, MARTIN R01-INSUFFICIENT FUNDS GREEN, ELAINE TOTAL RESUBMITTED TODAY: DEBIT COUNT 7 DEBIT AMOUNT 2, CREDIT COUNT 0 CREDIT AMOUNT 0.00 RETURNED ACH ENTRIES RESUBMITTED VIA ACH ACH DATE: 01/02/2004 BANK: 0101 ACCOUNT: SPARKY CONSOLIDATED ATTN: NED SPIELMAN COMPANY NAME COMPANY ID ENTRY DESCR SEC EFF DATE SPARKY CONSOLIDATED SAFE BOX PPD BANK REF#/ T/R ACCOUNT# IND ID/ T/C AMOUNT RETURN REASON IND NAME R01-INSUFFICIENT FUNDS SPEILMAN, NED TOTAL RESUBMITTED TODAY: DEBIT COUNT 1 DEBIT AMOUNT CREDIT COUNT 0 CREDIT AMOUNT
95 To Filter the ACH Entries Resubmitted via ACH Report: 1. Select the filter button next to ACH Entries Resubmitted via ACH from the Information Reporting main page or select the filter button from the ACH Entries Resubmitted via ACH report that was displayed when view was selected. ACH Entries Resubmitted via ACH Report (Example has been reduced to focus on applicable area.) 79
96 2. Select the account(s) to be included in the report. (Multiple accounts can be selected by holding CTRL or Shift and clicking on the desired accounts.) 3. Select the date or date range for the report. Please note: The date/date range must be within the last 45 calendar days. 4. Select download to download a filtered report. Please refer to the KTT User Guide Introduction for instructions on downloading and saving reports. 80
97 XVIII. ACH Entries Converted to Draft Reports To View the ACH Entries Converted to Draft Report: 1. Select the view button next to ACH Entries Converted to Draft from the Information Reporting main page. 81
98 2. The report will be displayed. 82
99 To Filter the ACH Entries Converted to Draft Report: 1. Select the filter button next to ACH Entries Converted to Draft from the Information Reporting main page or select the filter button from the ACH Entries Converted to Draft report that was displayed when view was selected. 83
100 ACH Entries Converted to Draft Report (Example has been reduced to focus on applicable area.) 84
101 2. Select the account(s) to be included in the report. (Multiple accounts can be selected by holding CTRL or Shift and clicking on the desired accounts.) 3. Select the date or date range for the report. Please note: The date/date range must be within the last 45 calendar days. 4. Select download to download a filtered report. Please refer to the KTT User Guide Introduction for instructions on downloading and saving reports. 85
102 Receivables Module User Guide Copyright 2009 KeyCorp All rights reserved.

103 The Receivables module on KTT allows authorized users to view lockbox reports and images. For a detailed overview of the features and functions available, please review the Lockbox Reporting & Imaging Tour, which provides information and instructions on viewing the lockbox detail report, viewing images, searching for images, and customizing your display settings. 2
104 Account Management User Guide Copyright 2007 KeyCorp All rights reserved.
105 A wide array of tools and functions available via the Account Management module on KTT allow you to research and control payments. Contents I. Check search 3 II. Research Services 3 Long Term Image Queue 3 Photocopy Request 4 Return Item Reporting 7 III. Transaction Services 13 Stop Payments 13 Stop Payment Listing 17 Book Transfer Entry 20 Book Transfer Listing 22 IV. Fraud Services 25 Best Practices 25 Same Day Positive Pay 25 Next Day Positive Pay 32 Secondary Authorization for Positive Pay 37 Positive Pay History 42 Payment Protection Report 45 Payment Protection History Report 52 V. Reconcilement Services 55 Account Reconcilement Reports 55 Check Issue Maintenance 59 Inquire 59 Add 63 Cancel 64 Check Issue History 70 VIII. Glossary 73 2
106 I. Check Search Key Total Treasury s Account Management Module provides easy-to-use features that enable you to quickly search for paid checks. You can review the quick tips that highlight the service, or you can watch a demo that takes you through the steps. Check images are available to view at 8 a.m. local time one business day after the day the check is presented for payment. II. Research Services Research services enable you to search your long term image queue for checks, review deposits, request photocopies, and view a report of returned checks. Long Term Image Queue To View Checks in your Long Term Image Queue: 1. From the Account Management main page, select Long Term Image Queue: Checks. 2. Any checks that are currently in your queue will be displayed. The image viewer allows you to reduce, enlarge, rotate, or print images of the checks. 3

107 Photocopy Request In order to submit a request from the Account Management main page, you must know the check number and the check amount. If you do not have this information available, please utilize the check search function to locate a specific check. To Request a Photocopy from the Account Management Main Page: 1. Click on Photocopy Request. 4
108 2. Utilize the dropdown menu to select the account that the check was issued from. 3. Enter the check number. 4. Enter the amount of the check. 5. Enter the Paid Date. 6. (Optional) Input the name of the person to whose attention the photocopy should be sent to. 7. Select the number of copies desired. 8. Select next. 5
109 9. After reviewing the confirmation information, select edit to make changes to the request, cancel to void the request and return to the Account Management main page, or accept to process the photocopy request. 10. You will receive a photocopy request confirmation. From this screen, you can return to the Account Management main page or to the check inquiry listing. 6
110 Return Item Reporting To View a Listing of Returned Items, Including Detailed Information and the Reason for the Return: 1. Click on the Return Item Reporting link from the Account Management main page. 7
111 2. From the Return Item Reporting screen, returns can be sorted in ascending and descending order by clicking on the up and down arrows to sort by the column headings: Return Date Item Type (the types of items available are dependent on the types of representments selected during the initial setup) Check Number Check Amount Maker Name (name on the account that the check was issued from) Return Reason (please refer to the glossary for descriptions of return reasons) Location ID (the location that deposited the item, i.e., store number 125 will have a specific ID assigned that will be reported as the location ID) Deposit Account (the account number that the item was deposited into) Original Date of Deposit 3. From this screen, the full report or a filtered report can be downloaded. (Please refer to the Introduction Section of the KTT User Guide for additional instructions on downloading reports.) The listing of returned items can also be narrowed down by utilizing the filtering capabilities. To reduce the number of items shown, click on filter. 8
112 4. Limit results by inputting parameters for any of the following criteria: a. Deposit Accounts select the account the item(s) were deposited into. Press CTRL + click on the account to select multiple accounts. b. Select return date (the date the item was returned) or original deposit date. c. Utilize the dropdown menus to limit the date range based on either return or deposit date. d. Select the type of item(s) to be returned. e. Input a dollar range. f. Enter the maker name (name on the account that the item was issued from) if known. 5. Select cancel to return to the Account Management main page, select download to download a text file of the report, or select view to view a report listing the items that fit the search parameter criteria. After selecting view to retrieve the filtered results, you can also return to the original Return Item Report listing by selecting unfilter to remove the search criteria. 9
113 6. To obtain additional detailed information regarding the return item from the Return Item Reporting screen, click on the active item type link for the desired returned item. 10
114 7. From the Return Item Detail screen, you can view additional detailed information on the returned item. From this screen, you can return to the previous results by selecting return item report, return to the Account Management main page by selecting main page or view an image of the returned item by selecting view image. 11
115 8. The Return Item Image screen will provide text information as well as a front and back image of the item. Images can be printed from this screen by using your browser s print button. Images can also be saved by right clicking and selecting save picture as and choosing a folder and location to save the image to. 9. From the Return Item Image screen, you can go back to the list of return items by selecting return item report return to the Account Management main page by selecting main page or return to the detailed information screen by selecting view detail. 12
116 III. Transaction Services Transaction services allow you to stop payment on a check or checks, transfer funds from one account to another, and view related reports. Stop Payments KTT is available for placing stop payments between 8 a.m. ET and 6 p.m. ET. Our stop payment deadline is 6 p.m. ET for same day action. Stop payments submitted through KTT prior to 6 p.m. ET are updated in our Teller system in real-time. When a stop payment entry is submitted via KTT, the system automatically checks 45 days of history to see if the check has been paid. Standard stops remain in effect for six months. They can be extended for additional periods of six months by placing a new request. If clients utilize our Account Reconcilement and/or Positive Pay service, all stop payment requests are permanently retained within the system until the physical item is captured. To Create a Stop Payment: 1. Click on the Stop Payment Entry link from the Account Management main page. 13
117 Use the dropdown menu to select the account that the check was issued from. 2. Select a reason for the stop payment. 3. Select to receive a mailed stop payment confirmation advice (if desired) at either the address on file or an alternate address. 4. Choose to stop either a single check or multiple checks. (When multiple checks are selected, the field will expand to accommodate a range of check numbers. Please note: Multiple checks must be consecutive. If there are gaps between check numbers, additional single stop payment entries must be created. 5. Enter the check number or range of check numbers. If a Single Check Stop is Selected: 6. Enter the check amount. 7. Utilize the dropdown menu to select the issue date. 8. Enter the name of the payee (the person/entity that the check was issued to). 9. Select cancel to return to the Account Management main page or select next to proceed with processing the stop payment. 14
118 10. After reviewing the information, select cancel to void the stop payment and return to the Account Management main page, select edit to make changes to the entry, or select accept to submit the stop payment entry. 15
119 11. Once the stop is submitted, you will receive a Stop Payment Confirmation. If any information is incorrect, remove the stop payment entry from the stop payment listing screen (see steps below). 12. From the Stop Payment Confirmation screen, you can return to the Account Management main page or create another stop payment entry by selecting the corresponding buttons. 16

120 Stop Payment Listing To View a Report of Stop Payments in Effect: 1. Select Stop Payment Listing from the Account Management main page. 2. Select an account to view the stop payments for that account. 3. Click main page to return to the Account Management main page or click select to view the stop payments for the chosen account. 4. A list of stop payments in effect for the selected account will appear. From this screen, you can select another account from the dropdown menu to view stop payments from another account, return to the Account Management main page by selecting main 17

121 page or remove a stop payment by selecting the remove button next to the stop payment entry that you wish to delete. 5. From the Approve Removal of Stop Payment screen you can select cancel to return to the Account Management main page without removing the stop payment, select edit to return to the stop payment listing, or select accept to proceed with the removal of the stop payment. 18
122 6. From the Stop Payment Removal Confirmation screen, you can return to the Account Management main page by selecting main page or return to the list of stop payments by selecting stop payment listing. 19
123 Book Transfer Entry Book transfers enable authorized users to transfer funds from one KeyBank account owned by the client to another KeyBank account owned by the client. Book transfers must be entered from the originating account by 7 p.m. local time on business days. If the transfer is entered after 7 p.m., the information will be retained and the transfer will be processed on the next business day. To Manage Funds via a Book Transfer: 1. Select Book Transfer Entry from the Account Management main page. 20
124 2. Utilize the dropdown menu to select the account to transfer funds from. This is the account that will be debited. 3. Utilize the dropdown menu to select the account to transfer funds to. This is the account that will be credited. 4. Enter the dollar amount to be transferred. 5. Select cancel to return to the Account Management main page or select next to proceed with the book transfer. 6. Select cancel to void the transfer and return to the Account Management main page, select edit to make changes to the entry, or select accept to process the transfer. 21
125 7. After accept is selected, you will be provided with a Book Transfer Request Confirmation screen. From this screen you can return to the Account Management main page or create another request for a book transfer. Please note: Do not use your browser s back button to return to the previous screen. Doing so can result in a duplicate transaction. Book Transfer Listing To View a List of Completed Book Transfers: 1. Select the Book Transfer History Report from the Account Management main page. 22
126 2. A report of all book transfers from all accounts will be displayed. You can sort the listing in ascending and descending order by column headings using the up and down arrows. The report can also be limited using the filter function. To limit the report, select filter. 3. Select the From Account number (press CTRL + click to select multiple accounts). 4. Select the To Account number (press CTRL + click to select multiple accounts). 5. Utilize the dropdown menus to select a date range. 6. Select main page to return to the Account Management main page or click view to display the results according to the parameters selected. 23
127 7. You can return to the Account Management main page by selecting main page or you can return to the complete list of book transfers by selecting unfilter from the Book Transfer History Report screen. 24
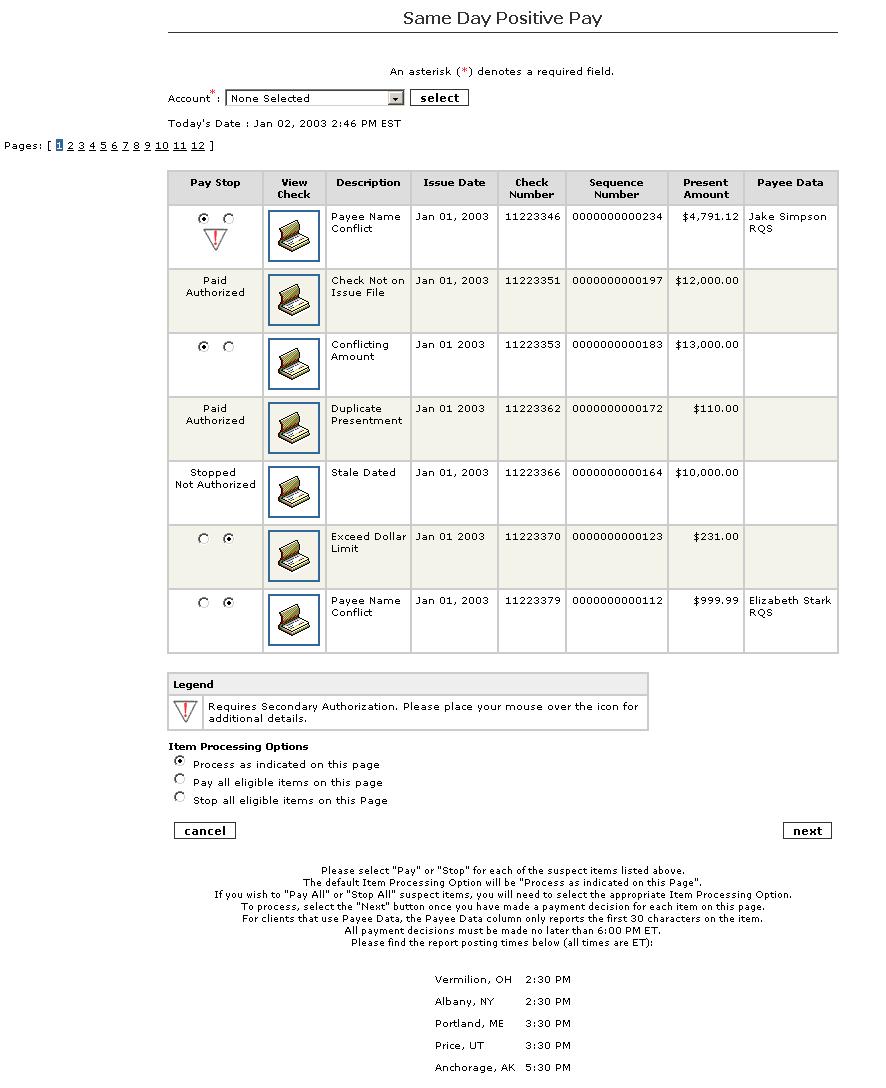
128 VI. Fraud Services KeyBank offers one of the most comprehensive and elite Positive Pay services available, including Same Day Positive Pay, Payee Positive Pay, and Teller Payee Positive Pay. These services strengthen your audit controls by comparing items presented for payment against the check details provided in your issue file. Any checks that do not match are presented to you for review and payment disposition (pay/no-pay decisions). KeyBank is one of the only financial institutions to offer Payee Positive Pay review through the Internet, through the Teller line, and on your ARP reports. KeyBank was also the first bank to offer comprehensive echeck (checks converted to electronic/ach transactions) reporting and the only bank to include Payee names on the report. As part of Key s Positive Pay services, you will benefit from fraud detection at our KeyCenter (branch) teller line with Teller Positive Pay and Teller Payee, reducing check fraud at all points of check presentment. Our systems allow Key to verify that a check presented over-the-counter at our KeyCenters conforms to the Issue File listings provided by our clients. If an item is presented to the teller that is not on the client s Issue File, the check will not be negotiated by the teller and the individual presenting the item will be referred to the maker of the check. Best Practices for Positive Pay Clients 1. Exception items are items that do not match your issue file. Items may be reported as exceptions if we detect a difference between the information contained in your issue file and the information on the presented check. For example, if the amount reported on your issue file differs from the amount of the check that was presented for payment, that item will be reported for you to review. Please note: Items are reported according to how they are recognized by Key s software. Although the recognition software generally accurately detects and reports the information from the paper checks, if any unusual information is reported, KeyBank recommends that clients view an image of the item to assist with pay/stop/return decisions. 2. Clients can choose either a pay all or return all default for positive pay items. Regardless of the default chosen, positive pay exception items are intended to be reviewed every day. Same Day Positive Pay Same Day Positive Pay works in conjunction with Controlled Disbursement Services. Controlled Disbursement accounts allow clients to have Same Day Positive Pay services because deferred posting provides an extra day of decisioning time. Same Day Positive Pay services compare your issue file of checks to the items presented for payment. Any discrepancies are reported on the same day report, along with additional details, the reason the item was flagged for review, and a link to view an image of the item (echeck images are not available). Items are ready for review at various times depending on the location of the account according to the following table. All pay or stop decisions must be made by 6 p.m. ET (5 CT, 4 MT, 3 PT) the same business day, regardless of where the account is located. 25
129 Same Day Positive Pay exception items will post to your account unless the payment is stopped or if your default decision is stop. Same Day Positive Pay Posting Times Account Location Bank Number Posting Time ET Posting Time CT Posting Time MT Posting Time PT Albany, NY :30 p.m. 1:30 p.m. 12:30 p.m. 11:30 a.m. Vermillion, OH :30 p.m. 1:30 p.m. 12:30 p.m. 11:30 a.m. Portland, ME* :30 p.m. 2:30 p.m. 1:30 p.m. 12:30 p.m. Price, UT :30 p.m. 2:30 p.m. 1:30 p.m. 12:30 p.m. Anchorage, AK :30 p.m. 4:30 p.m. 3:30 p.m. 2:30 p.m. *The Portland, ME site is no longer being offered to new clients, this site only serves existing Maine CDA clients. To Make Pay or Stop Decisions for Same Day Positive Pay Exception Items: 1. Select the Same Day Positive Pay link from the Account Management main page. 26
130 2. Utilize the dropdown menu to select an account. 3. Click select once the appropriate account is highlighted. 27
131 4. A list of exception items will appear. 5. From this screen you can make individual pay/stop decisions by selecting the appropriate action for each item and selecting process items as indicated, pay all items by selecting pay all eligible items on this page, or stop payment on all items by selecting stop all eligible items on this page. You can also view an image or additional details for the suspect items, by clicking on the view check icon for the item that you wish to view. Please note: echecks have been converted from paper items to ACH transactions; therefore, there are no associated images. Clicking on the echeck icon will provide additional details, including the type of ACH transaction. If you do not wish to have your paper checks converted to ACH transactions, please ask your cash management sales officer about Key s EPA service. If an image for a check (not an echeck) is not available, please contact the Commercial and Business Banking Center at and notify the CBBC representative that you are having difficulty retrieving an image of a Positive Pay exception item. 6. Once items have been decisioned and additional details have been viewed (if desired), select cancel to return to the Account Management main page or select next to proceed with paying and/or stopping items. Please refer to the screen shot below. 28
132 29
133 Item Detail 30


134 7. Review the information provided on the Approve Same Day Positive Pay screen. Those items requiring a second approver will be identified. You can void the return decisions by selecting cancel to return to the Account Management main page, selecting edit to change a decision by returning to the previous screen, or selecting accept to process items according to the pay or stop decisions selected. 8. Once accept is selected, you will receive a Same Day Positive Pay Confirmation screen. Any items that could not be processed according to your instructions will be identified. From the confirmation screen, you can go back to the Account Management main page by selecting main page, or return to the Positive Pay screen by selecting return to listing. 31
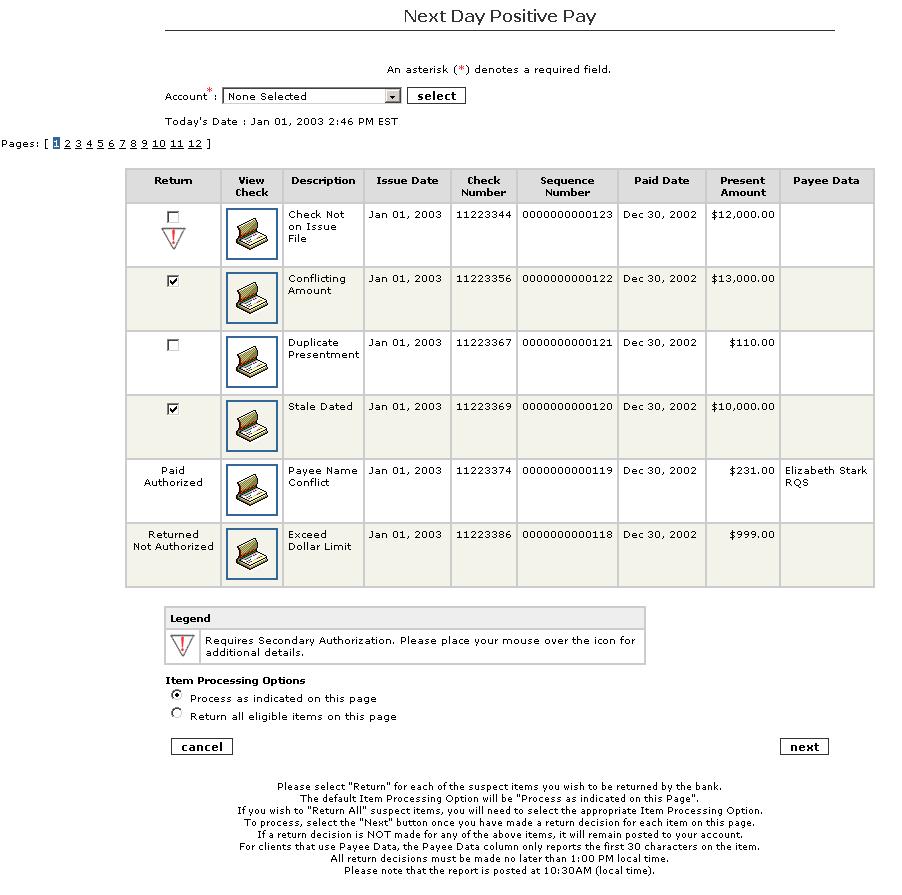
135 Next Day Positive Pay Next Day Positive Pay services compare your issue file of checks to the items presented for payment. Any discrepancies are reported, along with additional details, the reason the item was flagged for review, and a link to view an image of the item (echeck images are not available). Items are ready for review at 10:30 a.m. local time and all payment decisions must be made by 2 p.m. local time. (Local time is defined by where the account is housed within KeyBank.) Clients with CDA accounts automatically receive Next Day Positive Pay services and will be able to view items that were carried over from the Same Day Positive Pay Report prior to 10:30 a.m. This allows items that were missed on the Same Day Positive Pay Report to be returned. Return decisions can be reversed if changes are made prior to 2 p.m. the same business day. Please note: Next Day Positive Pay items are items that have already posted to your account. These items can be returned; however, they cannot be stopped as they have already posted. To Make Pay or Return Decisions for Next Day Positive Pay Posted Items: 1. Select the Next Day Positive Pay link from the Account Management main page. 32
136 2. Utilize the dropdown menu to select an account. 3. Click select once the appropriate account is highlighted. 4. A list of exception items will appear. 5. From this screen you can make individual return decisions for by selecting return specific items and selecting process items as indicated, or return all items by selecting return all eligible items on this page. You can also view an image or additional details for the suspect items, by clicking on the view check icon for the item that you wish to view. Please note: echecks have been converted from paper items to ACH transactions; therefore, there are no associated images. Clicking on the echeck icon will provide additional details, including the type of ACH transaction. If you do not wish to have your paper checks converted to ACH transactions, please ask your cash management sales officer about Key s EPA service. If an image for a check (not an echeck) is not available, please contact the Commercial and Business Banking Center at and notify the CBBC representative that you are having difficulty retrieving an image of a Positive Pay exception item. 6. Once items have been decisioned and additional details have been viewed (if desired) select cancel to return to the Account Management main page or select next to proceed with returning selected items. 33
137 34
138 Item Detail 35


139 7. Review the information provided on the Approve Next Day Positive Pay screen. Those items requiring a second approver will be identified. You can void the return decisions by selecting cancel to return to the Account Management main page, selecting edit to change a decision by returning to the previous screen, or selecting accept to process items according to the decisions selected. 8. Once accept is selected, you will receive a Next Day Positive Pay Confirmation screen. From the confirmation screen, you can go back to the Account Management main page by selecting main page or return to the Positive Pay screen by selecting return to listing. 36
140 Secondary Authorization for Positive Pay Clients can choose to require a second approver authorize all or certain positive pay decisions before payments are made. Secondary authorizations must be performed within the specified time frames. Please refer to the Same Day and Next Day sections for deadlines. To Perform Secondary Authorizations for Positive Pay Items: 1. Select Secondary Authorization Positive Pay from the Account Management main page. 37

141 2. Utilize the dropdown menu to select an account. 3. Click apply once the appropriate account is highlighted. 38

142 4. Items requiring secondary authorization will be displayed, along with the name of the user that initially approved the item. 5. Authorize individual payments by selecting specific payments and then clicking process modified items as indicated on this page at the bottom of the screen OR approve all items displayed by selecting authorize all items on this page. To view an image or additional details for the suspect items, click on the view check icon for the item that you wish to view. Please note: echecks have been converted from paper items to ACH transactions; therefore, there are no associated images. Clicking on the echeck icon will provide additional details, including the type of ACH transaction. 6. Select next. 39

143 Item Detail (e-check) 7. Review the information provided on the Approve Secondary Authorization screen. You can void the stop/return payment decisions by selecting cancel to return to the Account Management main page, selecting edit to change a decision by returning to the previous screen, or selecting accept to process items according to the pay or stop decisions identified. 40

144 8. Once accept is selected, you will receive a Secondary Authorization Confirmation screen. From the confirmation screen, you can go back to the Account Management main page by selecting main page or return to the Secondary Authorization screen by selecting return to listing. When you return to the Secondary Authorization screen, the secondary authorization decisions will now be identified. 41
145 Positive Pay History Clients with any positive pay service will receive the Positive Pay History Report. This report contains all decisions made by the client and any default decisions. To View the Positive Pay History Report: 1. Select Positive Pay History from the Account Management main page. 42
146 2. Utilize the dropdown menu to select the appropriate account. 3. Utilize the dropdown menu to select the appropriate period for the presentment date. 4. Enter a starting check number and an optional ending check number. 5. Enter a dollar range for the check amount. 6. Utilize the dropdown menus to select a range for the issue date. 7. Utilize the dropdown menu to select either checks or echecks. 8. Utilize the dropdown menu to select the appropriate action taken: All Actions - displays all decisions made Paid - displays all items with a paid status Paid Authorized - displays all paid items that received required secondary authorization Paid No Action Taken - displays items that were paid without the client making the decision Pay Pending Authorization - displays items that will pay pending a secondary authorization Requested Stop - displays items that the client requested to be stopped or that were stopped via stop all service (Only for same day positive pay clients) Returned - displays items the client requested returned or that were returned via return all service Returned Not Authorized - displays items that were returned because they did not receive a required secondary authorization Stopped Not Authorized - displays items that were stopped because they did not receive a required secondary authorization (only for same day positive pay clients) 9. Select cancel to return to the Account Management main page or select view to view the history report. 43

147 10. From the Positive Pay History Report you can select main page to return to the Account Management main page or select filter to return to the previous screen and further limit parameters. 44
148 Payment Protection Report KeyBank s Payment Protection Report allows clients to review all check and e-check transactions and return any suspicious payments that posted to your account. Unlike KeyBank s positive pay service, clients do not submit an issue file of checks; therefore, all check and e-check transactions are reported for clients to review. The Payment Protection Report is available at 9 a.m. local time. Pay/return decisions must be made by 2 p.m. local time the same business day. (Local time is defined by where the account is housed in KeyBank). To Review the Payment Protection Report: 1. Select Payment Protection Report from the Account Management main page. 45
149 2. Use the dropdown menu to select the appropriate account. 3. (Optional) enter the range of check numbers and/or the dollar amount range for the checks you wish to view. 4. Select next. 46
150 5. A list of items will appear. 6. To view an image or additional details, click on the view check icon for the item that you wish to view. Please note: echecks have been converted from paper items to ACH transactions; therefore, there are no associated images. Clicking on the echeck icon will provide additional details, including the type of ACH transaction. 47
151 9. From the check image screen, you can return to the Payment Protection Report by clicking return or go to the Account Management main page by selecting main page. 48
152 e-check Detail 49
153 10. From the Payment Protection Report, you can choose to make individual return decisions by selecting the return option for checks/echecks that you wish to return. 11. Click next. 50


154 12. Review the information provided on the Payment Protection Approve screen. You can void the return decisions by selecting cancel to return to the Account Management main page, selecting edit to change a decision by returning to the previous screen, or selecting accept to return the items selected. 13. Once accept is selected, you will receive a Payment Protection Confirmation screen. From the confirmation screen, you can go back to the Account Management main page by selecting main page or return to the Payment Protection Report by selecting return to listing. 51
155 Payment Protection History The Payment Protection History Report provides a listing of decisioned items and the associated action taken for a period of six months from the day the item was presented for payment. (This date may be significantly different from the day that the item was issued.) To View the Payment Protection History: 1. Select Payment Protection History from the Account Management main page. 52
156 2. Use the dropdown menu to select the appropriate account. 3. Use the dropdown menu to select the time period you wish to review. 4. (Optional) enter the range of check numbers and/or the dollar amount range for the checks you wish to view. 5. Select view. 53

157 6. The Payment Protection History Report will be displayed, along with the names of the users that decisioned the items. 7. To limit the items reported, select filter to input additional parameters or select main page to return to the Account Management main page. 54
158 VII. Reconcilement Services KeyBank provides a full suite of reconcilement services, including Full, Partial, and Deposit Reconcilement. The Full plan provides a complete itemized list of all paid and outstanding checks and exception items. This service requires that clients submit a check issue file to KeyBank. The Partial pan provides a listing of numerically sorted paid checks. The Deposit Reconcilement offering provides a list of deposits by store/location number. Account Reconcilement Reports To Access Account Reconcilement Reports (ARP): 1. Select Account Reconcilement (ARP) Reports from the Account Management main page. 55
159 2. Utilize the dropdown menu to select the appropriate account. 3. Click next. 56
160 4. Utilize the dropdown menu to select the type of report you wish to view. a. Check Reconciliation Period Ending: The Check Reconciliation report will provide a listing of paid checks, and Full Plan clients will also receive a listing of outstanding checks and exception items. These reports are available online for 13 months. b. Deposit Reconciliation Period Ending: This report provides a list of deposits by store/location number. These reports are available online for 13 months c. Daily Reports/Audit Listing: Daily reports are highly specialized and technical. Generally, our standard reports meet and exceed the needs of most clients. If you have any unique or atypical reporting requirements please contact your treasury management advisor to discuss your needs. The daily audit report contains details from the issue file. You can confirm receipt of your ARP file by checking the audit listing. These reports are available online for 62 days. Please note: The daily audit report confirms that your file was received. The File confirmation screen that appears after submitting a file only confirms that you successfully connected to KeyBank; it does not confirm that KeyBank received your ARP file nor does it confirm that the file was in the appropriate format and contained the correct information. d. Corporate Banking Statement: The end-of-period banking statement. These reports are available online for 13 months. 5. Select next. 57
161 6. From this screen you can view a PDF version of the selected report by clicking on the report that you wish to view, change the account number by clicking on change account, or change the type of report by clicking on change report type. Select main page to return to the Account Management main page. 58
162 Check Issue Maintenance Check Maintenance Services enable you to manually add or cancel issue records or inquire into the status of a check. Adds and cancels process just like an Issue File Transmission and update the ARP and Positive Pay systems as they are submitted. You can create up to 20 entries at a time. Adds should be submitted before checks are distributed. The Check Inquiry function is available on business days between 8:30 a.m. and 11 p.m. ET. To Inquire into the Status of a Check: 1. Select Check Issue Maintenance from the Account Management main page. 59
163 2. Use the dropdown menu to select the appropriate account. 3. Choose Inquire Check Issue Record from the available selections. 4. Select next. 60
164 5. Enter a beginning check number in the From field. 6. (Optional) Enter an ending check number in the To field. 7. (Optional) To further limit results, choose to apply advanced search criteria to show additional fields. a. Enter a minimum and maximum check amount. b. Utilize the dropdown menus to enter an issue date range. c. Utilize the dropdown menus to enter a paid/post date range. d. Utilize the dropdown menu to select a status. 8. Select view. 61

165 9. A listing of up to 250 checks, including the associated statuses, will be displayed. The items are displayed based upon the services you are setup for, such as payee name verification. 10. If more than 250 results were returned, select modify your search criteria to return to the Check Issue Inquiry screen to further limit the results. 11. From the Check Issue Listing screen, you can return to the Account Management screen by selecting main page or search for another check(s) by selecting perform another inquiry. 62
166 To Add a Check Issue Record: 1. Select Check Issue Maintenance from the Account Management main page. 2. Use the dropdown menu to select the appropriate account from which the new check has been issued. 3. Choose Add Check Issue Record from the available selections. 4. Select next. 63
 Select add more to input more than 10 adds. 7. To delete these adds, select cancel.")
167 5. Input the check number(s), dollar amount(s), and any other pertinent data into the appropriate fields. 6. (Optional) Select add more to input more than 10 adds. 7. To delete these adds, select cancel. To continue to process, select next. 64

168 8. Review the information provided on the Add Check Issue Approval screen. To delete the items, select cancel. To make changes to all or any of the adds, select edit to return to the Add Check Issue Entry screen and change information. To process the adds, select accept. 65

169 9. The Add Check Issue Confirmation screen will appear. Any checks that were unable to be added will be highlighted in red and additional information will be provided in the status column. To return to the Account Management screen, select main page. To add more checks, select perform another add. 66
170 To Cancel a Check Issue Record: 1. Select Check Issue Maintenance from the Account Management main page. 2. Use the dropdown menu to select the appropriate account from which the new check has been issued. 3. Choose Cancel Check Issue Record from the available selections. 4. Select next. 67
 Select add more to input more than 10 cancels. 7. To delete these cancels, select cancel.")
171 5. Input the check number(s), dollar amount(s), and any other pertinent data into the appropriate fields. 6. (Optional) Select add more to input more than 10 cancels. 7. To delete these cancels, select cancel. To continue to process, select next. 68


172 8. Review the information provided on the Cancel Check Issue Approval screen. To delete the items, select cancel. To make changes to all or any of the cancels, select edit to return to the Cancel Check Issue Entry screen. To process the cancels, select accept. 9. The Cancel Check Issue Confirmation screen will appear. Any checks that were unable to be cancelled will be highlighted in red and additional information will be provided in the status column. To return to the Account Management screen, select main page. To cancel more checks, select perform another cancel. 69
173 Check Issue History The Check Issue History Report provides a listing of adds and cancels entered via KTT along with their status, the time/date of entry, and the user that created the entry. Please note: Checks that were added or cancelled via other means, such as faxing a request to the ARP department, will not appear on the Check Issue History Report. To Access the Check Issue History Listing: 1. Select Check Issue History from the Account Management main page. 2. Use the dropdown menu to select the appropriate account from which the new check has been issued. 3. Select cancel to return to the Account Management main page or select next to proceed with viewing the history. 70
174 4. Enter a beginning check number in the From field. 5. (Optional) Enter an ending check number in the To field. 6. Enter a minimum and maximum dollar amount. 7. Utilize the dropdown menus to enter an issue/cancel date range. 8. (Optional) To further limit results, choose to apply advanced search criteria to show additional fields. a. Input payee data included on the entry. b. Input other data included on the entry. 9. Select cancel to return to the Check Issue History Account Filter screen, or select download to download the listing in an Excel format, or select view to display the results. 71

175 10. If view is selected, the check issue history listing will be displayed. You can sort results by column heading by clicking on the up and down arrows. You can also limit results further by clicking on the filter button to return to the Check Issue History Filter screen and apply additional parameters. Selecting unfilter will return you to the original results. Results can also be downloaded and saved by selecting download. To return to the Account Management page, select main page. Please refer to the KTT User Guide Introduction for instructions on how to download reports. 72
176 VIII. Glossary Paid Items: Items that have been presented for payment and funds were disbursed as a result of the presentment. Not Paid Items: Items that were presented for payment and funds were not disbursed for various reasons, such as the account did not have sufficient funds to cover the item (NSF) or because the item had a stop payment placed on it. echecks: Paper checks that have been converted to electronic transactions. Return Reasons: NSF 1st - The first time the item is being returned for non sufficient funds. NSF 2nd - The second time the item is being returned for non sufficient funds. Uncollected Funds - Held Funds. Payment Stopped - Issuer of the check has placed a stop payment on the check. Account Closed - Account that the check was issued from has been closed prior to the check clearing the account. No Account - The issuing bank cannot locate the account at their bank. Signature Missing - The check was not signed by the issuer of the check. Signature Does Not Agree - Signature on the check does not match the authorized signature for the account. Signature Illegible - Signature cannot be read. Endorsement Missing - The check was never endorsed by the depositor. Endorsement Not As Drawn - The endorsement of the item does not reflect what is on the payee line. Guarantee of Amount - The numeric amount is different from the written amount. Disc In MICR Amount - There is a discrepancy in the MICR amount (numeric dollar and written dollar may differ). Refer to Maker - Refer to the maker of the item for why it was returned (generally used for fraud). Account Held - Funds on the maker's account have been held. Supply Source of Receipt - This is a bank to bank reason. Payee Altered - The payee line of the item has been altered (it does not reflect the intended payee). Not Payable in US Dollars - Foreign item. Altered Amount - The written and/or numeric amount do not reflect the maker's intentions. Exceed Authorized Amount - The check is written for more than was authorized on the account. Two Signatures Required - Two signatures are required for the check to be properly payable. Endorsement Guarantee - Used when the endorsement of the item is questionable. Refer to Item - Refer to the face of the item for the return reason. No Reason Given - The item is received with no reason on the face of it. Affidavit - Usually required for altered amount, payee or endorsement return reasons. 73
177 Notifications: notifications are a courtesy service and KeyBank does not recommend that clients only view their accounts/services upon the receipt of an . Because KeyBank cannot guarantee the receipt of an , we recommend that clients review their accounts/services on a daily basis. 74
178 ACH User Guide Copyright 2007 KeyCorp All rights reserved.
179 Key Total Treasury s ACH module enables authorized users to initiate electronic debit and credit transactions. You can either create these transactions manually or import transaction information into the ACH module. For additional information on transmitting ACH data electronically, please refer to the transmission toolkit. Contents I. Existing Batch Listing 3 II. Creating a Batch Manual Entry 26 III. Creating a Batch Automated Data Import 38 IV. Import Data Status Report 45 V. Approving a Batch 49 VI. Releasing a Batch 53 VII. Batches Sent Report 58 VIII. Customer Activity Report 60 IX. ACH Entries Resubmitted via ACH 65 X. Glossary 69 2
180 I. Existing Batch Listing The Existing Batch Listing shows all of the batches that have been created in KTT that you have access to view (Confidential batches that you do not have access to will not appear. Please refer to the glossary for a description of confidential batches.). From the existing batch listing, you can edit and verify dollar amounts in the transactions within the batch, set the effective date, modify the batch header information, and delete a batch. From the existing batch screen, you can also release and approve batches, and create batches manually or by importing data. The latter functions can be completed by selecting the corresponding buttons at the bottom of the existing batch listing screen, or by selecting the desired function from the account management main page. Detailed instructions on releasing, approving, and creating batches are included in separate sections. Completing these functions from the existing batch listing screen are referenced within these sections. To View Existing Batches: 1. From the ACH main page, select Existing Batch Listing. 2. A list of existing batches will appear. In addition to being able to edit and verify dollar amounts in the transactions within the batch, set the effective date, modify the batch header information, and delete a batch, from this screen, you can also choose to release a batch, approve a batch, create a batch by importing data, and create a batch by manually entering data. Please refer to the corresponding sections for details and instructions on how to perform these actions. 3. You can search for a specific batch(es) by entering the name of the batch or using the filter function. To search for a batch by name: 3
181 a. Enter the batch name in the find batch name field and select find. b. The appropriate batch(es) will appear. 4. To search for a batch or view specific batches using the filter function: a. Select filter from the Existing Batch Listing Screen. Please refer to the screen shot below. 4
182 b. Enter the Batch name (if known). c. Select the appropriate status. d. Select the appropriate account. e. Select the transaction type. f. Select cancel to return to the batch listing or select view to view a filtered list of existing batches. 5
183 g. A list of batches that meet the entered criteria will appear. To return to the original batch listing, select unfilter. 6

184 5. To view the transaction details for a batch and to make changes to a batch: a. Click on the active batch name. 7
185 b. The batch details will appear. c. You can make changes to the batch header by clicking on edit batch header. 8
186 To prenote transactions in the batch, select yes. If the transaction is going from one KeyBank account to another, select yes. (If you are sending a transaction directly to another KeyBank account, batch processing can happen on the same day. If your transactions are not to another KeyBank account, you cannot choose today's date as the processing date.) The batch name can be modified if necessary. The batch description can be changed. The dropdown menu can be utilized to change the transaction type and offset. A dropdown menu can be utilized to change the default transaction code in the batch. The batch can be designated as confidential by selecting yes. To return to the previous screen with the batch details, select cancel. To delete the batch, select delete batch and then select delete. You will receive a screen confirming that the batch has been deleted. To save the changes to the batch header, select save. You will be returned to the batch listing screen. 9
187 d. To change the effective date of the batch, utilize the dropdown menus to select the appropriate effective date. If no other updates need to be made, proceed to step j. Screen has been reduced to focus on applicable area. e. To change the amount of transactions, enter the new transaction amount in the current transaction amount field. If no other updates need to be made, proceed to step j. Screen has been reduced to focus on applicable area. 10
188 f. To hold a transaction until a specified date, select all transactions or individual transactions by checking the hold box and then utilize the dropdown menus to select the date to hold the transactions until. If no other updates need to be made, proceed to step j. Please note: When a hold expires, the transaction will not automatically be sent; the transaction must still be approved and released. g. To add a transaction to a batch, select add transaction. 11
189 Enter the payee/payer name and ID, the receiving ABA number and account number, select the appropriate transaction code from the dropdown menu, enter the transaction amount, select yes to prenote the transaction if desired, and select to hold the transaction if desired (the hold until date field will be displayed if a hold is selected). Please note: Depending on the type of batch that you are adding a transaction to, additional fields may be displayed. Please refer to the instructions on adding transactions in the create batch manual entry section for additional information. Select cancel to return to the batch details screen or select next to proceed with adding the transaction. 12
190 Depending on the type of batch you are adding transactions to, you may be directed to an addenda entry screen. CCD+ and CTX type batches support addenda records. If addenda records cannot be added to the transaction, you will be returned to the batch details screen. If an addenda entry can be added to the transaction, complete the appropriate fields to add the addenda information. Select cancel to return to the batch details screen, select add more transactions to create additional transactions, select view addenda string to verify the addenda information, or select next to add to the transaction and return to the batch details screen. 13
191 After verifying the addenda string, select return to go back to the addenda entry screen and then select next to add the transaction. If no other updates need to be made, proceed to step j. h. To copy information from this batch, select copy batch. 14
192 Select cancel to return to the batch details page or select accept to proceed with copying the batch. You will receive a confirmation that the batch has been copied. Select main page to return to the ACH homepage or select existing batch listing to return to the batch listing screen where the duplicate/copied batch will now appear. The copied batch will be displayed with the letter C and a number after the batch name to identify it as a copy. For example, the first copied batch will be displayed with C1 after the batch name. 15
193 i. To import data into this batch, select import data. 16
194 Choose the file type and choose whether to update only the dollar amounts or add new transactions AND update dollar amounts. Select cancel to return to the batch detail screen or select next to proceed with importing data. 17
195 Choose whether to prenote transactions. Utilize the dropdown menu to select the import definition. Selecting apply will use the information from the saved filter. Reset clears out the filter options if an import definition isn t selected. Delete allows you to delete the saved import definition, and save allows you to choose the desired mapping options and save the import definition for later use. Choose whether or not to receive an notification. Overwrite the current transaction amount to $0 if desired. If amounts do not contain decimal points, only whole dollar amounts, select no. Ignore the first line of field names if desired. Specify the text delimiter, either single or double quotes. Enter the payee/payer name, ID, receiving ABA and account number, the transaction code, transaction amount, and payment type code. (Please refer to the glossary for more information on transaction and payment type codes.) Select next. Please refer to the screen shot below. 18
196 19
197 Review the information and enter the batch name or utilize the browse button to search for the correct file to be imported. To return to the batch details screen, select cancel. To make changes to the information, select edit. To proceed with importing the data, select accept. 20
198 You will receive a confirmation screen letting you know that the file was sent to KeyBank. You can return to the ACH main page by selecting main page. To view a report listing all attempted file imports, select import data status report. To return to the existing batch listing, select existing batch listing. Please note: The import data status report must be checked to see if there were errors or failures. Errors or failures will require that the batch be fixed and imported again or transactions must be manually added. 21
199 j. To save the changes made to the batch, select save batch. 22
200 To Change/Set the Effective Date for a Batch: 1. Utilize the dropdown menu to set the desired effective date for the appropriate batch. 2. Select save batches to save the changes made to the effective date. 23
201 To Edit Only the Batch Header: 1. Select edit batch header for the batch that you wish to make changes to. 2. To prenote transactions in the batch, select yes. 3. If the transaction is going from one KeyBank account to another, select yes. 4. The batch name can be modified if necessary. 5. The batch description can be changed. 6. The dropdown menu can be utilized to change the transaction type and offset. 7. A dropdown menu can be utilized to change the default transaction code in the batch. 8. The batch can be designated as confidential by selecting yes. 9. To return to the existing batch listing, select cancel. 10. To delete the batch, select delete batch and then select delete. You will receive a screen confirming that the batch has been deleted. 24
202 11. To save the changes to the batch header, select save. You will be returned to the batch listing screen. 25
203 II. Creating a Batch Manual Entry 1. Click on Create Batch Manual Entry from the ACH homepage or select the create batch - manual button from the existing batch listing screen. 26
204 2. You will receive a summary of the steps that must be completed to manually create a batch. Select cancel to return to the ACH homepage or select next to proceed with manually creating a batch. 3. The first step in manually creating a batch is to create a batch header entry. Complete the following steps to create your header entry. a. To prenote transactions in the batch, select yes. b. If the transaction is going from one KeyBank account to another, select yes. (If you are sending a transaction directly to another KeyBank account, batch processing can happen on the same day. If your transactions are not to another KeyBank account, you cannot choose today's date as the processing date.) c. Enter the batch name. A maximum of 20 characters can be used. d. Enter a description for the batch. A maximum of 10 characters can be used. This field will prefill with REVERSAL for a reversal batch and with REDEPCHECK for a RCK batch. e. Utilize the dropdown menu to select the transaction type and offset. PPD is used for pre-authorized payment or deposit. CCD is used for cash concentration or disbursement. CCD+ is used for corporate payments with addenda information including tax payments. CTX is used for corporate trade payments with addenda information. RCK is used for re-presented check entry. TEL is used for telephone-initiated entry. WEB is used for Internet-initiated entry. f. Utilize the dropdown menu to select the default transaction code in the batch. The Default Transaction Code is the type of transaction that you wish to occur. This is only the default transaction; you can change the transaction code for 27
205 specific transactions within the batch. The Transaction Code is from the perspective of your client. All transaction codes and explanations can be found in the Glossary. g. If the confidential option has been selected at the company level, the batch can be designated as confidential by selecting yes. h. To proceed to the next step, select next. i. To save the batch header entry and complete the rest of the steps required to create a manual batch at another time, select save & exit wizard, and you will be returned to the ACH homepage. You can access this batch by returning to the existing batch listing page. Please refer to the screen shot below. 28
206 4. After creating a batch header entry, you will need to add transactions to the batch. Depending on the type of transaction, you may select to add either a single transaction or multiple transactions (multiple transactions cannot be added for CCD+, CTX, and WEB batches). Select save & exit wizard to save the information entered and complete the rest of the steps required to create a manual batch at another time, upon which you will be returned to the ACH homepage. You can access this batch later by returning to the existing batch listing page. To proceed to the next step, select next. 5. If you are adding a single transaction: a. Enter the payee/payer name. b. Enter the payee/payer ID. (For RCK batches, you need to enter the Check Number in the Payee/Payer ID field.) c. Enter the receiving ABA number and account number. d. The transaction code that appears will be the same as the default transaction selected on the batch header entry screen, if needed, you can change the type of transaction code by using the dropdown menu. e. For CCD+ and CTX transaction types, an additional field will appear for tax payments. Select yes for tax payment and no if the transaction is not a tax payment. f. Enter the transaction amount. If this transaction is usually the same dollar amount, enter the amount here. If the dollar amount of this transaction will change frequently, set the default to $0.00, and then enter the actual amounts on the Batch Details Page. (Please refer to page 8.) g. Select yes to prenote this transaction. h. Select to hold the transaction (if desired). i. Select save & exit wizard to save the information entered and complete the rest of the steps required to create a manual batch at another time, you will be 29
207 returned to the ACH homepage. You can access this batch later by returning to the existing batch listing page. To add more transactions, select add more transactions and complete steps a through h. To proceed to the next step, select next. Please note: Depending on the type of transaction selected, addenda information may be entered after selecting next. Please see steps j through o for CCD+ addenda records and steps p through y for CTX addenda records. Please refer to the screen shot below. 30
208 For CCD+ Transaction Types ONLY Please note: The fields listed below that are appearing on the sample screen shots are standard fields. Depending on the taxing authority selected, the fields and screens may vary. Any questions regarding information that should be entered in the fields should be directed to the appropriate taxing authority. KeyBank is not able to assist clients with including information for tax payments. j. Enter the Taxpayer ID Number. The Taxpayer ID Number identifies the taxpayer as defined by the taxing authority receiving the transaction. k. Enter the Tax Type Code. The Tax Type Code identifies the type of tax being paid to the taxing authority (i.e. sales use, withholding, etc.). Refer to the taxing authority for the proper tax type code. l. Enter the Tax Period End Date. You will need to enter the month, day, and year representing the end of the tax period for which payment is being made. Refer to the taxing authority for the proper tax period end date. m. Enter the Amount Type. Refer to the taxing authority for the amount type. n. Enter the Tax Amount. o. Select save & exit wizard to save the information entered and complete the rest of the steps required to create a manual batch at another time; you will be returned to the ACH homepage. You can access this batch later by returning to the existing batch listing page. To add more transactions, select add more transactions and complete steps a through h under step 3. To view the addenda string, select view addenda string. To proceed to the next step, select next. 31
209 32
210 For CTX Transaction Types ONLY Please note: The fields listed below that are appearing on the sample screen shots are only for one type of addenda record. The fields and screens may vary significantly depending on the type of addenda record. p. Select the type of deduction from the dropdown menu. q. Enter the case identifier. r. Enter the pay date (must be in format: mmddyyyy) s. Enter the amount of the payment. t. Enter the social security number of the parent that is paying child support. u. Select the appropriate medical support indicator from the drop down menu. v. Enter the name of the parent that is paying child support (optional). w. Enter the FIPS code (optional). x. Enter the employment termination ind. (optional). y. Select save & exit wizard to save the information entered and complete the rest of the steps required to create a manual batch at another time, you will be returned to the ACH homepage. You can access this batch later by returning to the existing batch listing page. To add more transactions, select add more transactions and complete steps a through h under step 3. To view the addenda string, select view addenda string. To proceed to the next step, select next. (Please go to step 7). Please refer to the screen shot below. 33
211 34
212 6. If you are adding multiple transactions: a. Select multiple transactions from the add transactions screen. b. Select next to proceed with creating transactions or select save and exit wizard to save the information entered and resume creating transactions at a later time. c. Enter the payee/payer name. d. Enter the payee/payer ID. (For RCK batches, you need to enter the Check Number in the Payee/Payer ID field.) e. Enter the receiving ABA number and account number. f. Enter the transaction amount. If this transaction is usually the same dollar amount, enter the amount here. If the dollar amount of this transaction will change frequently, set the default to $0.00, and then enter the actual amounts on the Batch Details Page. (Please refer to page 8.) g. Select the checkbox to prenote this transaction (if desired). h. Select to hold the transaction (if desired). Enter a hold date (if the hold box was selected). i. Select save & exit wizard to save the information entered and complete the rest of the steps required to create a manual batch at another time; you will be returned to the ACH homepage. You can access this batch later by returning to the existing batch listing page. To add more transactions, select add more transactions and complete steps a through h. To proceed to the next step, select next. 35

213 7. You will receive a screen listing a summary and details of the entered transactions. Any transactions that require additional actions to be taken will be identified. 8. Select save to save the information entered and complete the rest of the steps required to create a manual batch at another time; you will be returned to the ACH homepage. You can access this batch later by returning to the existing batch listing page. To proceed to the next step, select next. Please refer to the screen shot below. 36

214 9. In order to use the batch that you just created, go to the existing batch listing by clicking on existing batch listing from this page or access this screen from the ACH homepage. Set the effective date, approve the batch, and release the batch. (Please refer to the corresponding sections for more information.) 37
215 III. Creating a Batch Automated Data Import ACH files created from an accounting or payroll system, or in an excel format, can be imported into the KTT ACH module. To Create a Batch by Importing Data: 1. Select Create Batch Automated Data Import from the ACH homepage or select the create batch - import button from the existing batch listing screen. 38
216 2. Select the type of file that you will be importing. NACHA imported files will not require you to manually input the batch header and mapping information in the KTT module since that information will already be contained in the files. For NACHA files, only steps 3e, 5, 6a, and 7 need to be completed. Fixed Column Text and Comma Delimited files will need to have all the information described in steps 3 through 7 entered. 3. Input the required batch header information. a. Enter the batch name. A maximum of 20 characters can be used. b. Enter a description for the batch. A maximum of 10 characters can be used. This field will prefill with REVERSAL for a reversal batch and with REDEPCHECK for a RCK batch. c. Utilize the dropdown menu to select the transaction type and offset. PPD is used for pre-authorized payment or deposit. CCD is used for cash concentration or disbursement. CCD+ is used for corporate payments with addenda information including tax payments. CTX is used for corporate trade payments with addenda information. RCK is used for re-presented check entry. TEL is used for telephone-initiated entry. WEB is used for Internet-initiated entry. d. Utilize the dropdown menu to select the default transaction code in the batch. The Default Transaction Code is the type of transaction that you wish to occur. This is only the default transaction; you can change the transaction code for specific transactions within the batch. The Transaction Code is from the perspective of your client. All transaction codes and explanations can be found in the glossary. e. To prenote transactions in the batch, select yes. Please note: A batch with only prenote transactions cannot be imported into the KTT system. The batch must contain at least one live transaction code in order to be imported. 39
217 4. If you have previously saved mapping information, you can select the appropriate import definition to prefill the mapping fields and then click apply. Reset clears out the filter options if an import definition isn t selected. Delete allows you to delete the saved import definition, and save allows you to chose the desired mapping options and save the import definition for later use. 5. If you would like to receive an notification regarding this batch, select yes. Please note: This will notify you that the file is being imported into KTT. The imported batch must still be approved and released in order to be sent to the ACH processing department 6. If you did not use previously saved mapping information, complete the required fields for mappings. a. Specify whether all dollar amounts in the imported file should be overwritten with $0.00. b. Specify an Import Default Amount that will be used for the dollar amount in the batch details for any transactions that do not have a value in the Current Transaction Amount field in the imported file. c. Specify whether the Current Transaction Amount in the file contains decimal points to denote cents. d. If the file you are importing has a header row, choose to ignore the First Line of Field Names. e. For the Comma Delimited File type, if quotes are used within the file to designate that the data is text (as opposed to a number), you must specify whether the file uses single or double quotes. f. For fixed column text files: Define the starting position for each data field and how long it is. g. For comma delimited files: Define the field number for each data field. 7. To return to the previous screen, select cancel. To proceed with importing data, select next. Please refer to the screen shot below. 40
218 Fixed Column Text Example Shown 41
219 8. Review the information you entered. Enter the name of the file you wish to import or utilize the browse button to search for the file on your computer. 9. Select cancel to return to the ACH homepage. Select edit to return to the previous screen and make any necessary changes. Select accept to approve the information and import the selected file. 42

220 10. You will receive a confirmation screen noting that the file was received in KTT. Any errors detected will be displayed on the Import Data Status Report. Errors or failures will require that the batch be fixed and imported again or transactions must be manually added. 11. To check on the status of imported files, select Import Data Status Report. Click existing batch listing to view current batches. Please note: It may take some time for KeyBank s systems to translate large files. When a file has been successfully translated and a KTT ACH batch has been created, that batch will appear in the Existing Batch Listing. Please refer to the screen shot below. 43
221 44
222 IV. Import Data Status Report The import data status report provides the status of all imported files. There are three possible statuses: successful, failed, and errors in file. Successful: All transactions/updates in the file were successfully imported and the batch has been created or updated. You can view and use these batches from the Existing Batch Listing. Failed: The file import was not completed. A new batch was either not created or updates to an existing batch were not performed. If more than 20 transactions in the batch contained errors, the file will fail. Transactions may fail because of incorrect data or incomplete data. Errors in File: Some transactions were successfully imported and some were not. Therefore, all transactions were not included or updated in the batch. If less than 20 transactions within a batch fail, the file will have a status of errors in file vs. failed. To View the Import Data Status Report: 1. Click on Import Data Status Report. 45

223 2. A list of imported files will appear, along with the corresponding statuses. 3. Files that were successfully imported and files with errors will appear in the existing batch listing. To view the batches created from imported files, select existing batch listing. To return to the ACH main page, select main page. To update the list select refresh. If a file contains errors and/or the file import failed, click on the active file name. a. After clicking on the file name, you will be directed to the batch level page. This page contains information on how many transactions within the file failed. To view the transactions that failed, click on the batch name. You will be directed to the Import Data Status Report Transaction Level screen. This screen will display the transactions that failed, along with the associated reason. Select cancel to return to the import data status report. Select filter to sort the list. Please note: Addenda information cannot be imported into KTT. Addenda information must be manually added from the batch details page. 46
224 Enter the batch name and batch description. Select the offset account, transaction type, and the status. Select cancel to return to the batch level page. Select view to see a list of batches that meet the selected search criteria. b. From the filtered or unfiltered import data status report batch level screen, click on the transaction to view the transaction level page. 47
225 c. This page displays all the failed transactions along with the associated reason for why each transaction failed. This information can be utilized to correct the failed transactions within the file or manually add/update transactions in the batch (please see Section II for instructions on how to manually add transactions). Click return to go back to the batch level page. 48
226 V. Approving a Batch To Approve a Batch: 1. From the ACH main page select approve batch or select the approve batch button from the existing batch listing screen. 49

227 2. A list of batches requiring approval will appear. After verifying the Batch Name, Effective Date, Batch Description, Debits/Credits, and Type; utilize the check all function to approve all batches listed or select specific batches for approval. You can also click on a batch name to view additional details (please refer to the batch details section for information on features and functions available from the details screen). 3. To view existing batches, select existing batch listing. To proceed with approving batches, select approve selected batch(es). 50

228 4. The batches selected for approval will be displayed. Select main page to return to the ACH module homepage, select cancel to return to the previous screen and add or delete batches to be approved, or select accept to approve the batches listed on this screen. 51

229 5. You will receive a confirmation screen. From this screen you can return to the ACH homepage, return to the existing batch listing, or go to the list of batches pending release. Please note: Batches still need to be released after they have been approved. 52
230 VI. Releasing a Batch The cutoff times for releasing an ACH batch are 10 a.m., 5 p.m., and 7 p.m. ET Monday through Friday on regular business days. The Release function is unavailable from 7 p.m. until 8 p.m. ET. Batches released after 8 p.m. ET will be processed at 10 a.m. ET on the next business day. When you release a batch, debits and credits information is transmitted and funds become available on the effective date. To Release a Batch: 1. From the ACH main page select release batch or select the release batch button from the existing batch listing screen. 53

231 2. Utilize the check all function to release all batches or select specific batches for release. 54
232 3. To view the existing batches, select existing batch listing, or select release selected batch(es) to proceed with the release. 55

233 4. Select main page to return to the ACH module homepage, select cancel to return to the previous screen and add or delete batches to be released, or select accept to release the batches listed on this screen. 56

234 5. You will receive a confirmation screen. From this screen you can either return to the ACH homepage or return to the existing batch listing. Please note: If you released a batch and you discover an error, you will need to immediately call the CBBC at KeyBank may be able to return the batch if it has not yet been processed. 57
235 VII. Batches Sent Report The Batches Sent Report allows you to view batches that have been sent via KTT within the last 12 months. To View the Report: 1. Select Batches Sent Report. 58
236 2. Select the appropriate account. 3. Choose either effective date (for when the credit/debit posted to the account) or sent date (for when the batch was sent). 4. Utilize the dropdown menus to select a date range. 5. Select cancel to return to the ACH homepage or select view to view the report. 6. A list of sent batches meeting your criteria will appear. To change filter criteria, select filter to return to the previous screen, or select main page to return to the ACH module homepage. 59
237 VIII. Customer Activity Report (CAR) Your Customer Activity Report (CAR) will provide information on all ACH transactions that were originated from your Key accounts. You will receive a report every day for which there is ACH activity, such as transactions initiated, adjustments, notifications of change, etc. To View Your CAR Report From the ACH Module: 1. Select Customer Activity Report. 60
238 2. Your most recent report will be displayed. You can download and save the report by selecting download. (Please refer to the KTT User Guide Introduction for instructions on downloading reports from KTT.) To view past reports, or filter the information contained on the CAR report, select filter. 61
239 62
240 63
241 a. Select the account(s) you wish to view information for. b. Utilize the dropdown menu to select the date or range of dates you wish to display. c. Select cancel to return to the CAR report without filtering the data, select download to download the report that will be created according to the parameters entered, or select view to view the report created from the filter. 64
242 IX. ACH Entries Resubmitted via ACH This report lists ACH entries originated through Key and returned checks that were rejected for non-sufficient funds (or another reason) and are being re-presented for possible acceptance upon retry. Resubmission is an optional service that must be requested. These items can be resubmitted up to two times To View the Report of Resubmitted Entries: 1. Select ACH Entries Resubmitted via ACH. 65
243 2. You will receive a report of returned ACH entries that have been resubmitted, along with the reason for the return, the amount of the entry, and other identifying details. You can download and save the report by selecting download. (Please refer to the KTT User Guide Introduction for instructions on downloading reports from KTT.) To view past reports, or filter the information contained on the report, select filter. 66
244 67
245 a. Select the account(s) you wish to view information for. b. Utilize the dropdown menu to select the date or range of dates you wish to display. c. Select cancel to return to the report without filtering the data, select download to download the report that will be created according to the parameters entered, or select view to view the report created from the filter. 68
246 X. Glossary Business Day: Regular business days are Monday Friday except for bank holidays. Please refer to KeyBank s calendar for observed holidays. Prenote: A prenote is a "zero" dollar transaction that will verify the accuracy of the account information on a specific transaction. Fixed Column Text: A data format in which the maximum number of characters in a column is specified. Comma Delimited: A data format in which each piece of data is separated by a comma. This is a popular format for transferring data from one application to another because most database systems are able to import and export comma-delimited data. Hold: a hold on a transaction prevents the transaction from being sent until the hold is removed or the hold date passes. Transactions must still be approved and released before they are sent. Effective date: The Effective Date is the date that you want the credit/debit to post to the payee/payer's account. Transaction Code 22 - Automated Deposit/Credit to Checking: This transaction code is used when you are sending money (a credit) to the receiver's checking account. This type of transaction could be used for payroll. Transaction Code 23 - Prenote of Deposit/Credit to Checking:This transaction code is used when you are sending a prenote for the person you are paying. The prenote is sent to the receiver's bank and they verify that you have the correct routing number, account number and type of account (savings or checking) for the payee. Transaction Code 24 - Zero Dollar Deposit/Credit to Checking: This transaction code is used when you are only sending information to the receiver and there is no transfer of funds involved. This type of transaction could be used to send EDI information. Transaction Code 27 - Automated Payment/Debit from Checking: This transaction code is used when you are taking money (a debit) from the receiver's checking account. An example would be monthly membership fees. Transaction Code 28 - Prenote Payment/Debit from Checking: This transaction code is used when you are sending a prenote for the person you are taking money from. The prenote is sent to the receiver's bank and they verify that you have the correct routing number, account number and type of account (savings and checking). Transaction Code 29 - Zero Dollar Payment/Debit from Checking:This transaction code is used when you are only sending information to the receiver and there is no transfer of funds involved. This type of transaction could be used to send EDI information. Transaction Code 32 - Automated Deposit/Credit to Savings: This transaction code is used when you are sending money (a credit) to the receiver's savings account. 69
247 Transaction Code 33 - Prenote of Deposit/Credit to Savings: This transaction code is used when you are sending a prenote for the person you are sending money to. The prenote is sent to the receiver's bank and they verify that you have the correct routing number, account number and type of account (savings or checking) for the payee. Transaction Code 34 - Zero Dollar Deposit/Credit to Savings: This transaction code is used when you are only sending information to the receiver and there is no transfer of funds involved. This type of transaction could be used to send EDI information. Transaction Code 37 - Automated Payment/Debit from Savings: This transaction code is used when you are taking money (a debit) from the receiver's savings account. Transaction Code 38 - Prenote of Payment/Debit from Savings: This transaction code is used when you are sending a prenote for the person you are taking money from. The prenote is sent to the receiver's bank and they verify that you have the correct routing number, account number, and type of account (savings or checking). Transaction Code 39 - Zero Dollar Payment/Debit from Savings: This transaction code is used when you are only sending information to the receiver and there is no transfer of funds involved. This type of transaction could be used to send EDI information. Transaction Code 42 - Automated Deposit/Credit to G/L: This transaction code is used when you are sending money (a credit) to the receiver's G/L account. This transaction code is used only when the receiving bank has specifically directed you to do so. Once funds are placed into this account they are forwarded on for further credit to a specific account. This is not a commonly used transaction code. Transaction Code 43 - Prenote of Deposit/Credit to G/L: This transaction code is used when you are sending a prenote for the person you are sending money to. The prenote is sent to the receiver's bank and they verify that you have the correct routing number, account number, and type of account (checking, savings, G/L). Transaction Code 44 - Zero Dollar Deposit/Credit to G/L: This transaction code is used when you are only sending information to the receiver and there is no transfer of funds involved. This type of transaction could be used to send EDI information. Transaction Code 47 - Automated Payment/Debit from G/L: This transaction code is used when you are taking money (a debit) from the receiver's G/L account.. This transaction code is used only when the receiving bank has specifically directed you to do so. This is not a commonly used transaction code. Transaction Code 48 - Prenote of Payment/Debit from G/L: This transaction code is used when you are sending a prenote for the person you are taking money from. The prenote is sent to the receiver's bank and they verify that you have the correct routing number, account number, and type of account (checking, savings, G/L) for the receiver. Transaction Code 49 - Zero Dollar Payment/Debit from G/L: This transaction code is used when you are only sending information to the receiver and there is no transfer of funds involved. This type of transaction could be used to send EDI information. 70
248 Code 52 - Automated Deposit/Credit to Loan: This transaction code is used when you are sending money (a credit) to the receiver's loan account. 71
249 Wire Transfer User Guide November 2007 Copyright 2007 KeyCorp All rights reserved.
250 Contents I. Wire Transfer Product Offerings and Implementation 3 II. Wire Transfer Terms, Definitions, and Additional Resources 5 III. Create Wires, Templates, and Drawdowns 9 Create Wire 10 Internal Wires 10 Domestic Wires 15 Finding an ABA using KTT 21 International Wires 23 Single Bank International Wire 23 Multibank International Wire 30 Finding a SWIFT BIC using KTT 36 Federal Tax Payments 38 Create Wire Template 44 Create Drawdown 51 Create Drawdown Template 57 IV. Authorize Transactions and Templates 61 Authorize Transactions 61 Authorize Templates 67 V. View 70 Template Listing 70 Editing Templates 72 Deleting Templates 75 Status Report 78 Incoming/Outgoing Wire Activity Report 80 VI. Phone Initiation Procedures 82 VII. Batch Wire Guidelines 83 VIII. Standing Transfer Orders 84 IX. Glossary 85 2
251 I. Wire Transfer Product Offerings and Implementation Product Description Set-up Time Initiation Times Voice Response Wire Initiation (Phone Initiation) 8 a.m. 5:30 p.m. ET Internet Wire Initiation (via Key Total Treasury) Batch Wire Transmission Standing Transfer Orders Clients are able to initiate wires by calling the Wire Department between the hours of 8 a.m. to 5:30 p.m. ET. An automated Voice Response Unit (VRU) requests that callers enter a PIN number and required account information. Callers are then connected to a wire transfer representative to complete the transaction. Wire transfers can be conveniently initiated from a desktop PC. Multiple levels of security provide protection against fraud. Wire transfer information is transmitted directly into Key s main wire system. Repetitive payments are automatically made on a daily, weekly, or monthly basis. KeyBank s standard Service Level Agreement (SLA) for setups for phone initiation is two business days. PINs are mailed to clients the same day that the agreement is received by the wire department. (This may or may not be the same day that the agreement is submitted to your Cash Management Sales Officer.) KeyBank s standard Service Level Agreement (SLA) for setups for KTT initiation is three to five business days. PINs are mailed to clients either the same day or one business day after the agreement is received by KTT services. KeyBank s standard Service Level Agreement (SLA) for setups for batch wire initiation is six to eight weeks depending on the availability of your technical resources and the validity of the test file(s). KeyBank s standard Service Level Agreement (SLA) for setups for STOs is hours once the STO form is received by the wire department. 6 a.m. 5:30 p.m. ET Extended initiation times are also available from 5:30 p.m. 8 p.m. ET. Wires initiated after 5:30 p.m. will be processed on the next business day. Files must be received by 5:30 p.m. ET for same day processing. Not applicable, STOs are sent automatically without client intervention. 3
252 To set up wire transfer services, clients must sign a master agreement, wire agreement, and complete the payment authorization form. Your Cash Management Sales Officer (CMSO) will be able to provide you with these documents. Standing Transfers Once clients have been set up with wire transfer services, those wishing to execute Standing Transfer Orders can complete the Standing Transfer Order Authorization form. Standing Transfer Orders are normally set up within two business days of receipt of the Authorization Form. Once completed and entered into the system, Standing Transfer Orders will remain in effect until cancelled. Revision to Services Clients must complete and sign a new Payment Authorization Form in order to make changes to their current setup. Examples of when a new Payment Authorization Form would need to be completed can include, but are not limited to: if/when an authorized user joins/leaves the client s organization, if initiation and/or approval limits change, if a client would like to add or cancel services. Your Cash Management Sales Officer will be able to assist with your setup needs, and can answer any questions that you may have regarding your selected services. Digital Certificates KTT Wire Transfer users are required to register for a digital certificate in order to use the Wire Transfer Module. Digital certificates must be renewed on an annual basis. Digital certificates help to provide multiple layers of security to verify identity and prevent fraud. For more information on digital certificates and registering for your certificate on KTT, please refer to the KTT User Guide Introduction Section. Billing Information Generally, the beneficiary of the funds is assessed an incoming wire fee. KeyBank does permit the originator of the wire transfer to specify that the recipient of the transfer receives the entire amount and the originator receives the incoming wire transfer fee that the beneficiary would normally be assessed. 4
253 II. Wire Terms, Definitions, and Additional Resources ABA: The Routing Number is intended to enable transactions to be processed quickly and efficiently with minimal manual intervention. The Routing Number is a 9-digit number consisting of the three following components for U.S. Banks: XXXXYYYYC XXXX = Federal Reserve Routing Symbol, the first two digits correspond to the 12 Federal Reserve Banks. YYYY = ABA Institution Identifier C = Check Digit Many larger banks have more than one ABA number. In addition, many banks have merged, so older ABA numbers used in the past may not be valid anymore. The ABA routing number on a check is not necessarily the routing number that will be used to process wire transfer requests. Before you initiate a wire transfer, please verify the ABA routing number with the receiving financial institution or use the ABA lookup function available on Key Total Treasury. National ID: Each country s internal coding (foreign equivalent to an ABA). S.W.I.F.T. BIC: The Society for Worldwide Interbank Financial Telecommunication is utilized by banks and other financial institutions to securely exchange messages. The Bank Identifier Code (BIC) was developed by SWIFT to identify financial institutions involved in financial transactions. Components of a BIC: BANK CC LL BANK = The four-digit Bank Code. This code is unique to each financial institution. CC = The two-digit ISO country code identifies the country in which the financial institution is located. Please refer to page 7 for a complete list of country codes. LL = The two-digit location code provides a geographical distinction within a country. 5
254 Bank Code: A three-character code at the end of a BIC, called the Branch Code. It identifies a specific branch within the country. This code may be alphabetical or numerical. The Branch code is optional for SWIFT users. For more information on obtaining BICs, please visit: Key Total Treasury also enables users to look up SWIFT codes based on Country, Currency, Bank Name, and City. IBAN: This European Standard provides an international standard account identifier for identifying an account held by a financial institution in order to facilitate automated processing of crossborder transactions through: Automatic processing of foreign bank account information Uniform validation of foreign bank account identifications Easy routing of transactions IBAN format: Up to 34 alphanumeric characters containing: Country code: 2 letter country code (see table) Check digits: 2 digits (calculated from the country code) Basic Bank Account Number (BBAN): Up to 30 alphanumeric characters, which is derived from, but cannot always be relied on to be, the actual domestic account number. The check digits are used for the validation of the complete IBAN. How to Obtain an IBAN: Only the bank servicing an account can provide the correct International Bank Account Number (IBAN) of that account and the related Bank Identifier Code (BIC). If you need an IBAN, you need to contact the owner of the account. If you attempt to generate the IBANs of your suppliers or other business partners, you risk having incorrect IBANs. If you use an incorrect IBAN in your cross-border payment instructions, you risk making payment to the wrong account or incurring a delay in payment and higher processing fees. For more information, please visit: 6
255 Table of Country Codes (Current at the time of publication) ISO Code: Country code used in BICs. IBAN Prefix: Country code used in IBANs. Name of Country ISO Code IBAN Prefix Austria AT AT Belgium BE BE Bulgaria BG BG Cyprus CY CY Czech Republic CZ CZ Germany DE DE Denmark DK DK Estonia EE EE Spain, including Canary Islands and Ceuta and Melilla ES ES Finland FI FI France FR FR United Kingdom of Great Britain and Northern Ireland GB GB or IE French Guiana GF FR Gibraltar GI GI Guadeloupe GP FR Greece GR GR Hungary HU HU Republic of Ireland IE IE Iceland IS IS Italy IT IT Liechtenstein LI LI Lithuania LT LT Luxembourg LU LU Latvia LV LV Martinique MQ FR Malta MT MT The Netherlands NL NL Norway NO NO Poland PL PL Portugal, including Azores and Madeira PT PT Réunion RE FR Romania RO RO Sweden SE SE Slovenia SI SI Slovak Republic SK SK 7
256 CLABE: The CLABE (Clave Bancaria Estandarizada) is an 18-digit code for bank accounts in Mexico. The CLABE has been required for sending and receiving international payments since June 1, Components of a CLABE: A C B D A = The three-digit bank code assigned by the Mexican Bankers Association (ABM). B = The three-digit location code is the city or region where the account is held. (Determined by the ABM s Location Catalog) C = 11-digit customer account number used by each bank. D = Control Digit used to verify the bank, location code, and account number. 8
257 III. Create Wires, Templates, and Drawdowns Internal, Domestic, and Foreign repetitive (from templates) and non-repetitive wires and drawdowns can be conveniently initiated via our KTT Internet channel from PCs containing a valid digital certificate from 6 a.m. 5:30 p.m. ET. Extended initiation times are available from 5:30 8 p.m. ET. (This option must be selected during initial setup). Users receive a message when wires are initiated after 5:30 p.m. ET informing them that they are creating a wire during the extended initiation time. Please note: Wires initiated during extended initiation times (after 5:30 p.m. ET) are not processed until the next business day. The Fed Wire system is not available to send wires after 6 p.m. ET. Federal Tax payments must be initiated prior to 4 p.m. ET for same day settlement. All payments in the Wire Module can be future-dated up to and including 17 business days in advance. Future-dating capabilities are selected and set at the client level. Clients set futuredating limits when completing the Payment Authorization Form. Please note: Wires that are future-dated will be initiated on that day, foreign wires and drawdowns may not settle on that day, depending on when the wire/drawdown is processed by the receiving bank. Please note: Access to initiating different types of wires is controlled at the client level. Therefore, if a client has not selected a certain service, such as drawdowns, users will not be able to utilize the function on KTT. All wires and templates are created and initiated from the Wires tab on KTT. Please refer to the following sections for instructions on creating wires and templates via KTT. 9

258 Create Wire Initiating Internal Wire Transfers Using KTT Internal wires are transfers of funds from one KeyBank account to another KeyBank account. To Create an Internal Wire: From the KTT homepage: 1. Click on the Wire tab. 2. Select Create Wire on the wire main page. 10

259 3. Under the Create One-Time Wire sub-heading, select Internal Wire. 4. Complete the required fields to create an internal wire. Additional information is included following the sample screen shots. 5. After completing the required information, click next to proceed with the transfer or cancel to return to the wire main page. 11
260 6. Review the information entered. Select cancel to return to the wire main page, select accept to approve the wire or edit to make changes to the wire. 12
261 7. After the wire is accepted, a confirmation screen will appear. The confirmation screen will also include the status of the wire, depending on your authorization requirements; secondary approval(s) may be necessary before the wire is released. 8. Select main page to go back to the wire main page, select void to delete the wire (this option is only available for wires that require a secondary approval), select create another wire to enter information for another wire, or select status report to be directed to the status report and view the status of wires initiated via KTT. Please refer to pages 80 and 81 for more information on the status report. 13
262 Sender Information Name, Company, Phone Number: Sender information is pulled from the user logon information and is automatically populated. Debit Account Number: The account to be debited. This account is selected from the dropdown menu. (Only accounts for which the user is authorized appear in the dropdown menu.) Beneficiary Account Information Bank Number: An internal designation for the state that holds the account that will be credited (receives the funds). Account Number: The beneficiary s (recipient s) account number. Amount: The amount to be transferred. Reference: Provides additional information that will be transmitted with the message. Date to Transmit: The date that the wire will be transmitted. Clients have the option of allowing wires to be future dated 1-17 business days from the current date. If the client has selected this option, users can future date wires. 14
263 Initiating a Domestic Wire Using KTT Transfers of funds to a U.S. bank or to a foreign bank via a U.S. bank. From the KTT homepage: 1. Click on the Wire tab. 2. Select Create Wire on the wire main page. 3. Under the Create One-Time Wire sub-heading, select Domestic Wire. 15
264 4. Complete the required fields to create a domestic wire. Additional information is included following the sample screen shots. The Key symbols next to select fields provide links to places within the document that contain more detailed information. 5. After completing the required information, select cancel to return to the wire main page or select next to proceed with creating a wire transaction. 16
265 6. Review the information provided. Select cancel to return to the wire main page, select edit to make changes to the wire or accept to approve the wire. 17
266 7. After the wire is accepted, a confirmation screen will appear. The confirmation screen will also include the status of the wire, depending on your authorization requirements; secondary approval(s) may be necessary before the wire is released. 8. Select main page to go back to the wire main page, select void to delete the wire (this option is only available for wires that require a secondary approval), select create another wire to enter information for another wire, or select status report to be directed to the status report and view the status of wires initiated via KTT. Please refer to pages 80 and 81 for more information on the status report. 18
267 Please note: In the above example, the void option is not available because this wire does not require secondary approval. If secondary approval was required, you would be able to void the wire. Sender Information Name, Company, Phone Number: Sender information is pulled from the user logon information and is automatically populated. Debit Account Number: The account to be debited. This account is selected from the dropdown menu. (Only accounts for which the user is authorized appear in the dropdown menu.) Target Bank Information This is the first (or only) bank that receives the wire after the wire leaves Key. ABA number: The 9-digit Routing Number. This is the ABA number for the bank that is the recipient of the Fed wire (target bank). Please note: Many larger banks have more than one ABA number. Please verify the ABA routing number with the beneficiary or receiving financial institution or by using the ABA lookup function available on Key Total Treasury. Please refer to pages 21 and 22 for additional instructions on looking up ABAs using KTT. Intermediary Bank Information An intermediary bank is rarely used unless the recipient has specified that the wire must be routed through three banks. This would be the second bank that the wire stops at (in a threebank transaction). Intermediary Bank Name: The name of the intermediary bank. Beneficiary Bank Information This is the last bank that receives the wire. This bank holds the beneficiary s account. The beneficiary bank Information only needs to be completed if this bank is different from the target bank. Bank Name: The name of the final bank. Bank Account: The number of the beneficiary bank s account that is held at the target bank (or intermediary bank if applicable). 19
268 Beneficiary Account Information This information must always be included. Account Number: The beneficiary s (recipient s) account number. Account Name: The name of/on the account. References Message to Beneficiary: Provides additional information that can help the beneficiary apply funds; i.e., payment for invoice #1234. Message to Bank: Information that will help the receiving bank apply funds to the beneficiary s account, branch information, etc. Reference to Beneficiary: Additional information can be entered here if extra space is required. Notify Beneficiary By: Phone, Letter, or Wire can be selected as a means of notifying the beneficiary of the incoming wire. Please note: This field is not required, selecting this field does not guarantee that the receiving bank will notify the beneficiary by the means selected. An additional fee may be assessed for this service. Notification Number: Phone number, etc. used to contact the beneficiary regarding the incoming wire. Amount: The amount to be transferred. Please note: The receiving bank may deduct fees. Date to Transmit: The date that the wire will be transmitted. Clients have the option of allowing wires to be future dated 1-17 business days from the current date. If the client has selected this option, users can future date wires. Please refer back to pages 17 and 18 for more on accepting or voiding a wire after required information has been entered. 20

269 Finding an ABA Using KTT 1. Select the Find an ABA option on the Create Wire screen. 2. Select the state the bank is located in from the dropdown menu. 3. Enter the bank name (if known). 4. Select view to obtain the search results. OR 5. Select the ABA for the desired bank. 6. Select the option to enter an unknown ABA if the search results did not return an ABA for the desired bank. 21
270 7. (Optional if desired ABA was not returned) enter the Bank name, Bank city, Bank state, and ABA number (if known). Please note: If an ABA number is not entered, or if an ABA number that is not recognized by KTT is entered, the wire transfer may be delayed while the destination bank is verified. Clients may also be contacted by the wire transfer room to obtain additional details and/or clarify information that was entered. 22
271 Initiating International Wires Transfer of funds to a foreign bank. When initiating international wire transfers, it is important to remember the following: If users do not specify a routing path for international wires, the Wire Transfer Department has the right to route a wire to a foreign country based on relationships established by KeyBank. The wire transfer department will not be held responsible for delays in payments if the customer does not give specific wiring instructions (e.g. BICs, IBANs, etc.) Please refer to the corresponding sections for more information. Funds will be received by the beneficiary bank on the send date. The beneficiary bank posts the funds to the recipient s account. Some beneficiary banks may post funds to the account when the payment message is received; other banks may wait to post the funds either until or after the actual funds are received. To Initiate a Single Bank International Wire Transfer: 1. From the KTT homepage Click on the Wire tab. 2. Select Create Wire on the wire main page. 3. Under the Create One-Time Wire sub-heading, select International Wire. 23
272 4. If multiple banks will not be involved in the transaction, select the No button. (If yes, please refer to page 31.) 5. Complete the required fields to create an international wire. Additional information is included following the sample screen shots. The Key symbols next to select fields provide links to places within the document that contain more detailed information. 24
273 6. After completing the required information, select cancel to be returned to the wire main page or select next to proceed with creating a single bank international wire transfer. 25
274 7. Review the information entered. Select cancel to return to the wire main page, select edit to make changes to the wire, or accept to approve the wire. 26
275 8. After the wire is accepted, a confirmation screen will appear. The confirmation screen will also include the status of the wire, depending on your authorization requirements; secondary approval(s) may be necessary before the wire is released. 9. Select main page to go back to the wire main page, select void to delete the wire (this option is only available for wires that require a secondary approval), select create another wire to enter information for another wire, or select status report to be directed to the status report and view the status of wires initiated via KTT. Please refer to pages 80 and 81 for more information on the status report. 27
276 Please note: In the above example, the void option is not available because this wire does not require secondary approval. If secondary approval was required, you would be able to void the wire. Sender Information Name, Company, Phone Number: Sender information is pulled from the user logon information and is automatically populated. Debit Account Number: The account to be debited. This account is selected from the dropdown menu. (Only accounts for which the user is authorized appear in the drop down menu.) Beneficiary Bank Information This is the bank that receives the wire after the wire leaves Key. This bank holds the beneficiary s account. Country: Select the appropriate country from the drop down menu. Currency: Select the appropriate currency. SWIFT: Enter the SWIFT code. Omitted or incorrect SWIFT codes may delay payment. At a minimum, users should enter the bank name and city, and additional information, such as the bank s address, if available. Please note: Enter the country and currency first before using the Find a SWIFT help link. Please refer to page 37 for additional instructions on looking up SWIFT codes using KTT. Beneficiary Account Information Account Number: The beneficiary s (recipient s) account number. If appropriate, enter the IBAN or CLABE here. Please note: The CLABE is required for transfers to Mexican banks. The IBAN is being increasingly utilized and certain European banks may assess a fee for omitted or incorrect IBANs. Users should make every effort to include complete and accurate information. Account Name: The name of/on the account. 28
277 References Message to Beneficiary: Provides additional information that can help the beneficiary apply funds. i.e., payment for invoice #1234. Reference to Beneficiary: Additional information can be entered here if extra space is required. Amount: The amount of the currency selected to be transferred. Please note: Fees may be deducted from this amount; therefore, the beneficiary may not receive the entire amount entered. Date to Transmit: The date that the wire will be transmitted. Clients have the option of allowing wires to be future dated 1-17 business days from the current date. If the client has selected this option, users can future date wires. Please refer to pages 17 and 18 for details on accepting or voiding a wire after required information has been entered. 29
278 To Initiate a Multibank International Wire Transfer: 1. From the KTT homepage, click on the Wire tab. 2. Select Create Wire on the wire main page. 3. Under the Create One-Time Wire sub-heading, select International Wire. 4. If multiple banks will be involved in the transaction, select the Yes button. 5. Complete the required fields to create an international wire. Additional information is included following the sample screen shots. The Key symbols next to select fields provide links to places within the document that contain more detailed information. 6. After completing the required information, select cancel to return to the wire main page or select next to proceed with creating the multibank international wire transfer. Please refer to the sample screen shot below. 30
279 31
280 7. Review the information provided. Select cancel to return to the wire main page, edit to make changes to the wire, or accept to approve the wire. 32
281 8. After the wire is accepted, a confirmation screen will appear. The confirmation screen will also include the status of the wire, depending on your authorization requirements; secondary approval(s) may be necessary before the wire is released. 9. Select main page to go back to the wire main page, select void to delete the wire (this option is only available for wires that require a secondary approval), select create another wire to enter information for another wire, or select status report to be directed to the status report and view the status of wires initiated via KTT. Please refer to pages 80 and 81 for more information on the status report. 33
282 Please note: In the above example, the void option is not available because this wire does not require secondary approval. If secondary approval was required, you would be able to void the wire. *Recipients/Beneficiaries should provide final routing destination details.* Sender Information Name, Company, Phone Number: Sender information is pulled from the user logon information and is automatically populated. Debit Account Number: The account to be debited. This account is selected from the dropdown menu. (Only accounts for which the user is authorized appear in the dropdown menu.) First Intermediary Bank Information The first bank that receives the wire after the wire leaves Key in a multibank transfer. The first intermediary bank is generally the head office (the target bank). Country: Select the appropriate country from the dropdown menu. Currency: Select the appropriate currency. SWIFT: Enter the SWIFT code. Omitted or incorrect SWIFT codes may delay payment. At a minimum, users should enter the bank name and city, and additional information, such as the bank s address, if available. Please note: Enter the country and currency first before using the Find a SWIFT help link. Beneficiary Bank Information This is the last stop (either the second or third stop depending on if a second intermediary bank is utilized). This is the bank that holds the beneficiary s account. National ID: If a national ID will be used, select Yes, and an additional field will appear. The help button will display a list of national IDs. This list is not all inclusive. Please note: National IDs are required for certain countries. Omission or incorrect national IDs may delay settlement and result in additional fees. Additional Bank Information: Information to help correctly route the wire, such as the bank name and location, can be included here. 34
283 Beneficiary Account Information Account Number: The beneficiary s (recipient s) account number. If appropriate, enter the IBAN or CLABE here. Please note: The CLABE is required for transfers to Mexican accounts. The IBAN is being increasingly utilized and certain European banks may assess a fee for omitted or incorrect IBANs. Users should make every effort to include complete and accurate information. Account Name: The name of/on the account. Second Intermediary Bank Information The second intermediary bank is not commonly used unless funds must be routed through three banks in order for funds to be applied to the beneficiary s account. If a second intermediary bank is used, this bank is the second recipient of the wire. SWIFT/Bank ID: The SWIFT BIC can be entered into this field. Please note: Omission or incorrect codes can delay settlement. Additional Bank Information: Information to help correctly route the wire, such as the bank name and location, can be included here. References Message to Beneficiary: Provides additional information that can help the beneficiary apply funds. i.e., payment for invoice #1234. Reference to Beneficiary: Additional information can be entered here if extra space is required. Amount: The amount of the currency selected to be transferred. Please note: Fees may be deducted from this amount; therefore, the beneficiary may not receive the entire amount entered. Date to Transmit: The date that the wire will be transmitted. Clients have the option of allowing wires to be future dated 1-17 business days from the current date. If the client has selected this option, users can future date wires. Please refer to pages 17 and 18 for details on accepting or voiding a wire after required information has been entered. 35
284 Finding a SWIFT: 1. Select the Find a SWIFT option. 2. Select the Country and Currency from the dropdown menus. 3. Enter the bank name and city (if known). 4. Select View. 36

285 5. Select the SWIFT for the desired bank. OR OR 6. Select the option to enter the bank information if the search results did not return the desired bank. 7. Click on the hyperlink to be directed to swift.com for additional information and search tools. 8. (Optional, only used if bank information was selected.) Enter the Bank name and Bank city only if the SWIFT is unknown. Please note: If a SWIFT code is not entered, or if SWIFT code that is not recognized by KTT is entered, the wire transfer may be delayed while the destination is verified. Clients may also be contacted by the wire transfer room to obtain additional details and/or clarify information that was entered. 37
286 Initiating Federal Tax Payments Using KTT Transfer funds to the IRS account. 1. From the KTT homepage, click on the Wire tab. 2. Select Create Wire on the wire main page. 3. Under the Create One-Time Wire sub-heading, select Federal Tax Payment. 38
287 4. Complete the required fields to create a federal tax wire. Additional information is included following the sample screen shots. 5. After completing the required information, select cancel to return to the wire main page or select next to proceed with creating a federal tax payment. 39
288 6. After reviewing the information, select cancel to return to the wire main page, select edit to make changes to the wire, or select accept to approve the wire. 40
289 7. After the wire is accepted, a confirmation screen will appear. The confirmation screen will also include the status of the wire, depending on your authorization requirements; secondary approval(s) may be necessary before the wire is released. 8. Select main page to go back to the wire main page, select void to delete the wire (this option is only available for wires that require a secondary approval), select create another wire to enter information for another wire, or select status report to be directed to the status report and view the status of wires initiated via KTT. Please refer to pages 80 and 81 for more information on the status report. 41
290 Please note: In the above example, the void option is not available because this wire does not require secondary approval. If secondary approval was required, you would be able to void the wire. Federal Tax Payments: Clients must be set up with the IRS in order to make Federal Tax Payments via KTT. Any questions regarding information that must be included with the payment should be directed to the IRS, not to KeyBank s Wire Department. Please note: In order to comply with IRS deadlines, tax payments must be initiated prior to 4 p.m. ET on KTT in order to allow adequate time for processing, repairs, etc. Sender Information Name, Company, Phone Number: Sender information is pulled from the user logon information and is automatically populated. Debit Account Number: The account to be debited. This account is selected from the dropdown menu. (Only accounts for which the user is authorized appear in the dropdown menu.) Beneficiary Tax Payment Information Tax Type Prefix: The beginning digits of your tax form. The help button tax type prefixes. displays all valid Tax Type Suffix: The last digit of the Tax Form. Tax ID Number: A nine-digit number assigned by the IRS. Taxpayer Name Control: A four-character designation assigned by the IRS. Taxpayer Name: The name of the company, organization, group, etc. Tax Date: This date must coincide with the date of the tax period and is not necessarily the current day. Target Bank Information ABA number: The ABA number for Federal Tax Payments is preset, as the IRS only accepts payments into one account. 42
291 Beneficiary Bank Information Bank Name and Bank Account: Like the ABA number, these fields have been preset for Federal Tax Payments to comply with IRS guidelines. Contact Information Name and Phone number: The IRS requires that the person submitting the payment provide his/her contact name and phone number. Amount: The amount to be transferred. Date to Transmit: The date that the wire will be transmitted. Clients have the option of allowing wires to be future dated 1-17 business days from the current date. If the client has selected this option, users can future date wires. Please refer to pages 17 and 18 for details on accepting or voiding a wire after required information has been entered. 43
292 To Create Wire Templates Templates allow users to initiate wires from pre-populated template screens without re-keying information every time. Only dollar amounts and dates need to be updated. From the KTT homepage: 1. Click on the Wire tab. 2. Select Create Wire Template. 44
293 3. Under Create Wire Template, select the type of wire that you wish to create a template for. (For this example, a domestic template was selected.) 4. Complete the required fields. (For instructions on what information needs to be entered into the fields, please refer to the create wire sections for internal, domestic, single bank international, multibank international, or federal tax payments). 5. After completing the required information, select cancel to return to the wire main page or select next to proceed with creating a template. Please refer to the sample screen shot below. 45
294 46
295 6. After reviewing the information, select cancel to return to the template page, select edit to make changes to the wire, or select accept to proceed with creating the template. 47
296 7. After accepting the template, you will receive a confirmation screen. Select main page to go back to the wire main page, select void to delete the template, select edit to make changes to the template, or select create another template to go back to the create wire template screen. Please note: Templates must be approved by a second user that has approval rights before they can be utilized to initiate wires. Templates requiring approval will appear on the authorize templates screen. 48
297 8. After the template has been authorized, users can initiate wires utilizing the template by selecting Create Wire and then Create Wire from Existing Template and selecting the appropriate template. Users can then update the amount and date to transmit fields. 49
298 Wire Templates Wire templates can be used to create and store information that can be utilized to initiate repetitive wire transfers. Please note: Wire templates MUST be approved by a second user that has approval rights. Template Information Description: This field can be used to help distinguish and identify templates and/or their purpose. Sender Information: For wire templates, the name, company, and phone number fields do not appear. Additional sender information (name, etc.) will be displayed when the template is used to initiate a wire. The remainder of the template fields will be filled out according to the type of wire. Please note: KeyBank recommends that you print and store a copy of wire template details for phone initiation in the event that users experiencing technical difficulties cannot access KTT. Template details can also be populated in the Phone System as Repeat codes. Repeat code numbers are NOT the same as the template numbers. 50
299 Create Drawdowns Requests for a transfer of U.S. funds from a U.S. bank to your account at KeyBank. Please note: In order for a drawdown request to be honored, there must be appropriate authorizations on file at the receiving bank. To Initiate a Drawdown: 1. Click on the Wire tab from the KTT homepage. 2. Select Create Drawdown. 51

300 3. Under the Create One-Time Drawdown sub-heading, select Domestic Drawdown. 52
301 4. Complete the required fields to create a drawdown. Additional information is included following the sample screen shots. 5. After completing the required information, select cancel to return to the create drawdown screen or select next to proceed with creating a drawdown request. 53
302 6. After reviewing the information, select cancel to return to the create drawdown screen, select edit to make changes to the drawdown, or select accept to proceed with creating the drawdown. 54
303 7. After the drawdown is accepted, a confirmation screen will appear. The confirmation screen will also include the status of the drawdown. Depending on your authorization requirements, secondary approval(s) may be necessary before the drawdown is released. 8. Select main page to go back to the wire main page, select void to delete the drawdown (this option is only available for drawdowns that require a secondary approval), select create another drawdown to enter information for another wire, or select status report to be directed to the status report and view the status of wires and drawdowns initiated via KTT. Please refer to pages 80 and 81 for more information on the status report. 55
304 Domestic Drawdowns Drawdowns can only be utilized if there are appropriate agreements on file at the financial institution that is receiving the request to debit an account. Beneficiary Bank Information Name, Company, Phone Number: Sender information is pulled from the user logon information and is automatically populated. Credit Account: The account at KeyBank that will be credited once the wire is received. Receiving Bank Information This is the bank that receives the request to debit an account and transfer funds to the credit account held at KeyBank. ABA number: The nine-digit Routing Number. This is the ABA number for the bank that is the recipient of the drawdown request. Debit Account Number: The account at another financial institution that will be debited when the drawdown request is authorized. Debit Account Name: The name of/on the account to be debited. References Message to Recipient: Provides additional information to the recipient regarding what the funds will be applied to. i.e., payment for invoice #1234. Message to Bank: Information that will help the receiving bank debit the recipients account, e.g. account, branch information, etc. Reference to Recipient: Additional information can be entered here if extra space is required. Notify Recipient By: Phone, Letter, or Wire can be selected as a means of notifying the beneficiary of the incoming drawdown request. Please note: Selecting this field does not guarantee that the receiving bank will notify the recipient. The receiving bank may charge additional fees for this service. Notification Number: Phone number, etc. used to contact the recipient regarding the incoming wire. Amount: The amount to be transferred. Date to Transmit: The date that the drawdown request will be transmitted. Clients have the option of allowing requests to be future dated 1-17 business days from the current date. If the client has selected this option, users can future date drawdowns. Please note: KeyBank s Wire Transfer Department will notify clients if a drawdown request is denied. 56
305 Create Drawdown Templates Drawdown templates can be created on KTT. To Create a Drawdown Template: 1. Select Create Drawdown Template from the wire main page. 2. Complete the required fields. (Please refer to the previous section for details on required drawdown fields.) 3. Select cancel to return to the main wire screen, select next to proceed with creating a drawdown template. Please refer to the sample screen shot below. 57
306 58
307 4. After reviewing the information, select cancel to return to the wire main page, select edit to make changes to the drawdown template, or select accept to proceed with creating the drawdown template. 59
308 5. After the drawdown template is accepted, a confirmation screen will appear. The confirmation screen will also include the status of the drawdown. Select main page to go back to the wire main page, select void to delete the drawdown template, select edit to make changes to the template, or select create another template to create another drawdown template. Please note: Drawdown templates must be authorized by a second approver before they can be used. Templates can be approved by selecting authorize templates from the wire main page. 60
309 IV. Authorize Transactions and Templates Secondary Authorization for KTT-initiated wires is based at the user level and limits are set per account. Clients select secondary authorization for KTT wires by completing the Payment Authorization form. KTT wires can require up to two additional approvals after the wire is initiated before funds are released. Wires awaiting secondary approval will not be processed, they will be held in a queue, pending approval, until 5:30 p.m. ET on the requested date of transmission. The Wire Department does not have the capability to release transfers that have not been authorized by the second approver because these wires do not leave KTT. All templates must be approved by a second user before they can be utilized. Templates require an additional approval because clients often set higher approval limits for repetitive transactions. Authorize Transactions To Approve Wires: 1. Click on the Wire tab from the KTT homepage. 2. Select Authorize Transactions. 61

310 To View Additional Details for a Transaction: 1. Select the active Trace ID. 62
311 2. From this screen, select return to go back to the previous screen, select main page to go back to the wire main page, select status report to view the report that provides the status of wires entered in KTT, select void to delete the wire, or select approve to authorize the wire (the wire may or may not be released at this point, depending on how many secondary approvals are required.) Please note: Wires must be canceled (voided) individually from this screen. 63


312 To Approve ALL or Specific Transactions: From the Authorize Transactions screen: 1. Click on the Authorize select/unselect all box or select specific transactions to authorize. A check mark will appear next to the selected transactions. 2. Select authorize selected payments. 3. A screen confirming the transactions selected for approval will appear. Click accept. 4. A confirmation screen will report the status of the authorized transactions. (For this example, the transaction highlighted in red must be approved by a third user before the wire is released.) 64
 Currency Amounts To Search for a Specific Wire or Wires: 1. From the Authorize Transactions screen click on filter.")
313 Approvers can also utilize the filtering capabilities to search for specific wires based on: Trace ID Account Types (foreign, domestic) Currency Amounts To Search for a Specific Wire or Wires: 1. From the Authorize Transactions screen click on filter. 65
314 2. Enter and/or select criteria for the filter fields. 3. Select view. 4. Any transactions that meet the search criteria will appear and transactions can be approved all at once or on an individual basis. 66

315 Authorize Templates To Authorize Templates: 1. Select Authorize Templates from the wire main page. 2. Click on the number of the template that you wish to approve. 67
316 3. Select cancel to return to the authorize templates screen, select edit to make changes to the template information, select void to remove a template, or select authorize to approve the template for use. Please note: Edits will need to be approved by a second user. 68
317 4. Once you have authorized the transaction you will receive a confirmation screen. From this screen you can select edit to make changes to the template information, select void to remove the template, select authorize another template to approve additional templates, or select create transaction from template to initiate a wire using this template. 69

318 V. View Template Listing To View a List of Templates: 1. Select template listing from the KTT wire main page. 2. From this screen you can filter the list, return to the main page, or click on a template number to view additional information. 70
319 3. From the template screen you can edit, void, or authorize the template. 71
320 Editing Templates To Edit a Wire Template: 1. Select edit to make changes to the template information. 2. Make any necessary changes to the template description, the debit account number, or the beneficiary information. 3. Select next. 72
321 4. Review the new template information. Select cancel to be directed to the create wire template screen, select edit to make additional changes to the template, or select accept to proceed with the changes to the template. 73
322 5. You will receive a confirmation page. Please note: The changes to the template must be authorized by a secondary approver before the new template can be utilized. Select main page to go back to the wire homepage, select void, then accept to void the new information for the template, select edit to change information on the template, or select create another template to be directed to the create wire template screen. 74
323 Deleting Templates To Delete a Wire Template: 1. Select Template Listing. 2. Click on the number of the template that you wish to remove. 3. Select void to delete the template. 75
324 4. Select cancel to be directed to the authorize templates screen or select accept to proceed with voiding the template. 76
325 5. You will receive a confirmation screen. You can return to the wire main page or create another template from this screen. 77
326 Status Report The KTT Status Report provides the status of all wires, drawdowns, etc. initiated via KTT for the current day. The KTT Status report retains information for 12 months. Please note: Phone-initiated wires do not appear on this report. To View the KTT Status Report: 1. Select KTT Status Report from the wire main page. 2. The current status report will be displayed. From this screen you can filter based on: Trace ID KeyBank Transaction Reference Account number Type (domestic, international, etc.) Status (In process, sent, etc.) Entered Date Transmit Date Currencies Amount range Please note: This report will not automatically update, you must select refresh to obtain the most current information. 78
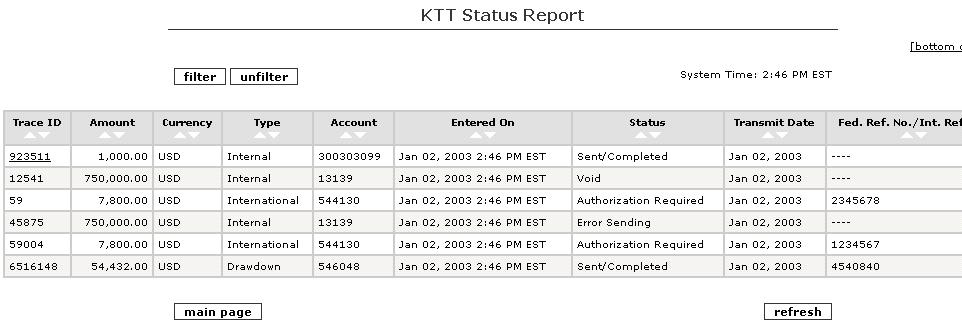
327 79
328 Incoming/Outgoing Wire Activity Report The Incoming/Outgoing Wire activity report provides information for all incoming wires and wires initiated via KTT, phone, or batch transmission. The Incoming/Outgoing Wire Activity report can also be downloaded. This report is available for 14 calendar days. To View the Incoming/Outgoing Wire Activity Report: 1. Select Incoming/Outgoing Wire Activity Report from the wire main page. 2. The current Incoming/Outgoing Activity report will be displayed. From this screen you can download the report or filter based on: Account number Date Type code Debits or credits Dollar amount Please note: This report will not automatically update, you must select refresh to obtain the most current information. 80

329 Additional Reporting Additional reporting on wire transfers is available in the Previous and Intraday reports available on the Information Reporting module in KTT. For more information on these reports, please refer to the Information Reporting section of the User Guide. 81
330 VI. Phone Initiation Procedures KeyBank highly recommends that all KTT wire transfer clients be set up with Phone Initiation capabilities so that in the event that you are unable to access KTT, you can initiate wires via the phone. Wires can be initiated by calling KeyBank s Wire Transfer Department at: (or ). Phone Initiation services for wire transfers are available from 8 a.m. ET to 5:30 p.m. ET. Clients that do not have phone-in capabilities (including an MTS PIN) must contact their Sales Officer or nearest KeyCenter for assistance. All telephone calls to the wire room are monitored by a recording device. Once the call is completed, a Voice Response Unit (VRU) prompts callers to enter the following information: MTS PIN (not the same as KTT PIN) KeyBank account number Repeat Code (if applicable, not the same as the Template number) Dollar Amount of Transfer After entering the above information into the VRU, you will be transferred to a wire specialist who will complete your wire transfer. If the transfer details are correct and you answer affirmatively, the specialist will give you a Transaction Number and complete the transfer. Please retain the Transaction Number. It should be used when referring to the transaction. Phone Initiation Secondary Authorization Secondary Authorization for phone-initiated wires is based at the account level. Secondary authorization for phone-initiated wire transfers provides a callback to an authorized representative whom is required to approve the wire before it is released. Clients select callback procedures when completing the Payment Authorization Form. Clients can choose to: 1. Waive the callback procedure. 2. Callback: The Wire Department calls the telephone number provided by the client and the additional Authorized Representative is asked to verify all non-repeat wires. (Repeat wires do not require a callback.) 3. Callback with PIN: The Authorized Representative is required to provide a PIN. Please note: At least two users are required for callbacks with PINs because two separate PINs must be utilized, one for initiating the wire, and a second PIN to approve the wire. 4. Callback with Dollar Limit: Callbacks will be utilized only for wires at or above a clientspecified dollar limit. 5. Callback with Dollar Limit and PIN: Callbacks will be utilized only for wires at or above a client-specified dollar limit AND the Authorized Representative is required to provide a PIN. 82
331 VII. Batch Wires Electronic batch input of wire transfers provides the ability to transmit wire information directly into Key's main wire transfer system. Batches can contain multiple wire types, including domestic, international, internal, and even drawdowns. These wire transfer instructions are reviewed and released within minutes after receipt of the files. The system also provides an electronic confirmation that can be utilized to automatically update accounting systems. The Batch Wire Service can easily accommodate clients with large volumes of repetitive wires initiated multiple times per day, or week. Batch wire files can be transmitted to Key via direct transmission or by utilizing the File Transfer tab in Key Total Treasury. All Transmission channels are available 24 hours a day, 7 days a week; however, files must be transmitted by 5 p.m. ET to ensure same-day processing. Clients will be provided with a sample batch file format, as well as a Data Transmission Toolkit that will include: Hardware and Software Specifications Technical Staffing Requirements Batch Wire Process Flow Implementation Contact Information Transmission Set-up & Testing Schedule Connectivity Information File Format Requirements Contact Information Transmission Analyst (216) New transmission setup Testing and upgrades of software or equipment Technical reviews Transmission Hotline (800) Resolve issues with transmitted data in production Escalate issues with data transmission Corporate Client Services (800) Resolve application problems Escalate issues with impacted application Please note: Because Batch Wires are transmitted to Key, normal transition Service Level Agreements apply. Standard setup time requires approximately nine weeks for implementation and testing. 83
332 VIII. Standing Transfer Orders Standing Transfer Orders allow clients to specify that funds should be transferred on a daily, weekly, bi-weekly, or monthly basis. In addition, clients can also specify that funds should only be transferred once a certain balance is reached. Clients can transfer: The entire available balance A fixed amount All funds in excess of a target amount: Funds are transferred once the balance hits a target amount Funds in increments of a specified amount Unless otherwise specified, STOs are sent out at approximately 8:30 a.m. ET. STOs remain in effect until changed or canceled. Please contact KeyBank s Wire Transfer Department data base at or , option 5, if you have special requirements related to standing transfer orders. 84
333 IX. Glossary Beneficiary The recipient of the wire funds. KeyBank can only guarantee delivery to the beneficiary bank on the value date, not to the beneficiary. It is the responsibility of the receiving bank to credit the beneficiary s account in a timely manner. Beneficiary Bank The Bank that ultimately receives the wire credit. Intermediary Bank Bank that receives funds for those banks that are unable to directly receive payments. Incoming Wire Transfer Funds received electronically into an account. Outgoing Wire Transfer Funds transferred electronically out of an account Drawdown A request sent to initiate a wire transfer from an account. The party being debited must have appropriate agreements on file with their financial institution allowing drawdowns. Internal Wire Transfer A wire transfer sent from one KeyBank account to another KeyBank account. Domestic Wire Transfer A wire transfer sent within the U.S. Foreign Wire Transfer A wire transfer sent outside the U.S. Foreign wire transfers may be sent in either U.S. dollars or foreign currency. Fed wire The fedwire system is an electronic funds transfer service. It links the 12 Federal Reserve Banks to approximately 10,000 depository institutions nationwide. Fedwires are used to transfer funds domestically. Fedwires can also be sent to correspondent banks for international transactions. SWIFT The Society for Worldwide Interbank Financial Telecommunication is utilized by banks and other financial institutions to securely exchange messages. KeyBank utilizes SWIFT to transmit payment messages internationally. BIC The Bank Identifier Code was developed by SWIFT to identify financial institutions involved in financial transactions. CHIPS The Clearing House Interbank Payments System is similar to SWIFT in that it is utilized to transfer funds. KeyBank does not participate in CHIPS at this time. MTS The Money Transfer System is an AIX system used to transmit both Domestic and International payments for all KeyBank wire transfer clients. Repeat Code A code assigned by the wire department to identify and initiate repetitive payments for which certain information remains constant. The message contains information including the destination bank, the transaction type, and the method of payment. 85
334 Outgoing Drawdowns A message requesting a debit from an account held at another Financial Institution. This function requires the recipient of the request to have a drawdown agreement on file with their Financial Institution allowing drawdown requests. Incoming Drawdowns A message received by KeyBank requesting that an account be debited and funds sent to another Financial Institution. KeyBank requires that clients have the necessary agreements in place allowing other parties to debit their account. Returned Domestic Wires If a wire is returned because of incorrect information, the Wire Transfer Department credits the client s account for the amount of the wire and phones the initiator and explains the reason for the return. Charges for incoming wires still apply. Returned Foreign Currency Wires - If a foreign wire is returned for less than the original amount due to an error by the initiator, the Wire Transfer Department will not be responsible for making up the difference. The wire room will contact the initiator for better instructions and will attempt to resend a foreign currency wire at the same rate. In the event that the wire cannot be resent, exchange rates used by the foreign bank can result in a significant difference in the amount that is returned to the client. Also, foreign banks can take a percentage of the wire or a set amount as their processing fee and will not refund that amount if a wire is returned. Please note: KeyBank s Wire Transfer Department cannot determine in advance whether such a processing fee will be taken by a foreign bank. Drafts Foreign drafts are legal, physical instruments that can be presented and paid at foreign banks in either U.S. or foreign currencies. Investigations Investigations include: Inquiries initiated by the Wire Transfer Department on behalf of the client to locate wires, originating from KeyBank that have not arrived at their destinations. After the initial inquiry is sent: Tracers (international) are sent every five days if no reply is received from the beneficiary bank. Services (domestic) are sent every three days if no reply is received. Amendments to wire instructions (i.e. beneficiary account should be 1234 not 1233). Attempts to recall/return funds. IBAN European Account Standard that provides an international standard account identifier for identifying an account held by a financial institution in order to facilitate automated processing of cross border transactions. CLABE The Clave Bancaria Estandarizada is an 18-digit code for bank accounts in Mexico. The CLABE has been required for sending and receiving international payments since June 1,
335 Deposit Concentration User Guide Copyright 2007 KeyCorp. All rights reserved.
336 KeyBank's Key Total Treasury (KTT) Deposit Concentration service collects deposit receipts made by multiple locations and concentrates funds into one centralized account. Authorized KTT users can monitor the activity of operating units and maintain control over funds from one easily accessible account. Individual locations make deposits into their bank accounts and report the deposits to KeyBank via either touch-tone phone or KTT. Verification codes and trace numbers are provided for reference. Each night, Key collects all data that has been entered and moves the funds via ACH. The total deposits are credited to the concentration account at KeyBank and any disbursement entries from the concentration account are credited to the specified depository accounts. The KTT Deposit Concentration system also allows clients to specify and define additional data fields that they would like their locations to input, such as sales date, number of units sold, etc. KTT input screens and reports are then customized with these fields per your specifications. This additional required data can also be added to the VRU prompts. Key's system provides daily information that contains a listing of all reporting units with dates of deposits and amounts, as well as information on non-reporting units. Contents I. Deposit and Disbursement Cutoff Times 3 II. Deposit Concentration Reports 4 III. Deposit and Disbursement Entries via Touch Tone Phone 5 IV. Create Deposit Input 6 V. Maintain Deposit Input 9 VI. Create Disbursement Input 14 VII. Maintain Disbursement Input 17 2
337 I. Deposit and Disbursement Input Cutoff Times In order for accounts to be credited the same day that the deposit or disbursement input is created, the entry must be made on or before the stated deadlines. Entries made after the stated time will be credited on the following business day. Location of KeyBank Account Consolidation Cutoff Times Disbursement Cutoff Times New York 8:00 ET 8:00 ET New Hampshire 8:00 ET 8:00 ET Vermont 8:00 ET 8:00 ET Ohio 8:00 ET 8:00 ET Indiana 8:00 ET 8:00 ET Michigan 8:00 ET 8:00 ET Maine 8:00 ET 8:00 ET Colorado 8:00 ET 8:00 ET Washington 8:00 ET 8:00 ET Oregon 8:00 ET 8:00 ET Idaho 8:00 ET 8:00 ET Utah 8:00 ET 8:00 ET 3
338 II. Deposit Concentration Reports Report Reporting Locations Non-Reporting Locations Inputs Summarized by Location Processed Inputs Deposit Information Description Displays information regarding all locations that reported deposits Displays locations that did not report deposits Displays summary information regarding deposits and disbursements. Information includes: location number and name, division, deposit and disbursement amounts, and number of deposits and disbursements. Displays processed transactions by location Displays deposit details by location. This report is for clients with templates. 4
339 III. Deposit and Disbursement Entries via Phone In addition to reporting deposits and disbursements via KTT, inputs can also be entered by touch-tone phone. To Enter by Phone: 1. Dial or Enter your access code followed by the pound sign (#). 3. Enter your Key code followed by the pound sign (#). 4. Select 1 for Deposit Inputs (option is only available if you can create deposit and disbursement entries). a. To add a deposit, press 1. i. Enter the deposit amount (in dollars and cents) followed by the pound sign (#). ii. The amount you entered will be repeated for verification. 1. If the amount is correct, press If the amount is incorrect, press 2. b. To change a pending deposit, press 2 (requires trace number). c. To delete a pending deposit, press 3 (requires trace number). d. To review a deposit, press 4 (requires trace number). 5. Select 2 for Disbursement Inputs (option is only available if you can create deposit and disbursement entries). a. To add a disbursement, press 1. b. To change a pending disbursement, press 2 (requires trace number). c. To delete a pending disbursement, press 3 (requires trace number). d. To review a disbursement, press 4 (requires trace number). 5
340 IV. Create Deposit Input Users are able to create deposit inputs for a specific location. Deposit inputs pull funds from a specified account at another bank to a concentration account at KeyBank. Users are set up with dollar limits for each deposit transaction. To Input a Deposit: 1. Select Create Deposit Input from the Deposit Concentration main page. 2. Depending on your setup, you may be able to select the division and/or location (steps 3 and 4) or these fields may be prefilled. 3. Utilize the dropdown menu to select the appropriate division. 4. Select the location for which the deposit is being created. 6
341 5. Enter the amount of the deposit. 6. Input any additional information for reference purposes, based on your setup. 7. Select cancel to return to the Deposit Concentration main page or select next to proceed with creating a deposit input. 8. Review the information presented. Select cancel to return to the Deposit Concentration main page. Select edit to return to the previous screen to make changes to the amount and/or additional information that was entered, or select accept to proceed with the deposit input. 7
342 9. You will receive a confirmation screen that displays the deposit input information as well as the status of the transfer. Select main page to return to the Deposit Concentration main page or select create another input to create another deposit input to transfer funds. 8
343 V. Maintain Deposit Input Deposit Inputs can be edited or deleted by utilizing the Maintain Deposit Input function. To Edit or Delete a Deposit Input: 1. Select Maintain Deposit Input from the Deposit Concentration main page. 2. Depending on your setup, you may be able to select the division and/or location (steps 3 and 4) or these fields may be prefilled. 3. Utilize the dropdown menu to select the appropriate division. 4. Select the location. 9
344 5. To Edit the Amount or Other Information for a Deposit: a. Select edit. b. From the Edit Deposit Input screen you can change the amount and/or change the additional information that was entered. c. Select cancel to return to the Maintain Deposit Input screen, select main page to return to the Deposit Concentration main page, or select next to proceed with making changes to the deposit input. 10
345 d. Review the information. Select cancel to return to the Deposit Concentration main page, select edit to return to the previous screen to make additional changes, or select accept to proceed with making the changes to the deposit input information. e. You will receive a confirmation screen. Select main page to return to the Deposit Concentration main page or select maintain another input to change or delete another deposit input. 11

346 6. To Delete a Deposit Input: a. Select delete from the Maintain Deposit Input screen. b. Review the information provided regarding the selected deposit input. c. Select cancel to return to the Maintain Deposit Input screen or select delete to proceed with deleting the deposit input. 12
347 d. You will receive a confirmation screen. Select main page to return to the Deposit Concentration main page or select maintain another input to change or delete another deposit input. Please note: Users can enter/edit/delete information until 8:00 p.m. ET. At that time, the information is sent to ACH for processing. 13
348 VI. Create Disbursement Input The Disbursement Input function within the Deposit Concentration module enables users to create disbursement inputs to move funds from an account at KeyBank to a specified account at another bank. Users are set up with dollar limits for each deposit transaction. To Create a Disbursement Input: 1. Select Create Disbursement Input from the Deposit Concentration main page. 2. Depending on your setup, you may be able to select the division and/or location (steps 3 and 4) or these fields may be prefilled. 3. Utilize the dropdown menu to select the appropriate division. 4. Select the location for which the deposit is being created. 14
349 5. Enter the amount of the disbursement. 6. Select cancel to return to the Deposit Concentration main page or select next to proceed with creating a disbursement. 7. Review the information presented. Select cancel to return to the Deposit Concentration main page. Select edit to return to the previous screen to make changes to the amount, or select accept to proceed with the disbursement input. 15
350 8. You will receive a confirmation screen that displays the disbursement input information as well as the status of the transfer. Select main page to return to the Deposit Concentration main page or select create another input to create another disbursement input to transfer funds. 16
351 VII. Maintain Disbursement Input Disbursement Inputs can be edited or deleted by utilizing the Maintain Disbursement Input function. To Edit or Delete a Disbursement Input: 1. Select Maintain Disbursement Input from the Deposit Concentration main page. 2. Depending on your setup, you may be able to select the division and/or location (steps 3 and 4) or these fields may be prefilled. 3. Utilize the dropdown menu to select the appropriate division. 4. Select the location. 17
352 5. To edit the amount or other information for a deposit: a. Select edit. b. From the Edit Disbursement Input screen you can change the amount that was entered. c. Select cancel to return to the Maintain Disbursement Input screen, select main page to return to the Deposit Concentration main page, or select next to proceed with making changes to the disbursement input. 18
353 d. Review the information. Select cancel to return to the Deposit Concentration main page, select edit to return to the previous screen to make additional changes, or select accept to proceed with making the changes to the disbursement input information. e. You will receive a confirmation screen. Select main page to return to the Deposit Concentration main page or select maintain another input to change or delete another disbursement input. 19
354 6. To delete a disbursement input: a. Select delete from the Maintain Disbursement Input screen. b. Review the information provided regarding the selected disbursement input. c. Select cancel to return to the Maintain Disbursement Input screen or select delete to proceed with deleting the disbursement input. 20
355 d. You will receive a confirmation screen. Select main page to return to the Deposit Concentration main page or select maintain another input to change or delete another disbursement input. Please note: Users can enter/edit/delete information until 8:00 p.m. ET. At that time, the information is sent to ACH for processing. 21
356 Loan Management User Guide Copyright 2007 KeyCorp. All rights reserved.
357 KTT s Loan Management module provides you with the ability to manage and view information on your commercial loans 24 hours a day. Contents I. Commercial Loan Statements 3 II. Advance Funds from a Line of Credit 6 III. Pay Down a Line of Credit 9 IV. Make a Payment to a Term Loan 12 V. View a Loan Transfer History Report 15 VI. Perform a Loan Inquiry 19 2

358 I. Commercial Loan Statements Commercial Loan Statements are only drawn on the obligor level. Only current obligations generate Commercial Loan Statements. Commercial Loan Statements are available on KTT for a rolling 13 months. Commercial Loan Statements can generally be viewed one to two business days after they are cut. Statements can be viewed online at any time. To View your Commercial Loan Statement: 1. Select Commercial Loan Statements from the Loan Management main page. 2. Select the account for which you would like to view a statement. 3. Select cancel to return to the Loan Management main page or select next to view a list of statements for the account selected. 3
359 4. A list of statements will be displayed. Select cancel to return to the Loan Management main page or click on the statement that you wish to view. 4
360 5. Your commercial loan statement will be displayed. 5
361 II. Advance Funds from a Line of Credit Funds can be drawn from a line of credit from 7 a.m. to 7 p.m. ET on business days. To Draw on a Line of Credit: 1. Select Draw on a Line of Credit from the Loan Management main page. 2. Utilize the dropdown menus to select the loan account number to transfer funds from. Select the checking account number to transfer funds to. 3. Select cancel to return to the Loan Management main page or select next to proceed with transferring funds from your line of credit to your checking account. 6
362 4. The next screen will provide you with your current balance as well as the amount of credit available. Enter the amount that you wish to transfer. 5. Select cancel to return to the Loan Management main page, select edit to return to the previous screen to change either of the account numbers, or select next to proceed with transferring funds. 6. Review the information provided. Select cancel to return to the Loan Management main page, select edit to return to the previous screen to change the amount of the transfer, or select accept to transfer the funds. 7
363 7. You will receive a confirmation screen. Select main page to return to the Loan Management main page or select create another transaction to return to the account selection screen to transfer additional funds. Please note: Funds are immediately available upon the completion of a successful transaction. 8
364 III. Pay Down a Line of Credit Payments to a line of credit can be made from 7 a.m. to 7 p.m. ET on business days. To Make Payments on a Line of Credit: 1. Select Pay Down on a Line of Credit from the Loan Management main page. 2. Utilize the dropdown menus to select the checking account number to transfer funds from. Select the loan account number to transfer funds to. 3. Select cancel to return to the Loan Management main page or select next to proceed with making a payment from your checking account to your loan account. 9
365 4. The next screen will provide you with your current balances as well as the amount of principle and interest due on your loan. Enter the amount that you wish to pay toward the principle and the amount you wish to pay toward the interest due on your loan. 5. Select cancel to return to the Loan Management main page, select edit to return to the previous screen to change either of the account numbers, or select next to proceed with making a payment. 6. Review the information provided. Select cancel to return to the Loan Management main page, select edit to return to the previous screen to change the amount of the payment, or select accept to continue making a payment. 10
366 7. You will receive a confirmation screen. Select main page to return to the Loan Management main page or select create another transaction to return to the account selection screen to make additional payments. Please note: Payments made to the principal on a line of credit will be reflected immediately; however, interest and fee payments on a line of credit will not be reflected on KTT until the next business day. 11
367 IV. Make a Payment to a Term Loan Payments to term loan can be made from 7 a.m. to 7 p.m. ET on business days. To Make a Payment on a Term Loan: 1. Select Payment to a Term Loan from the Loan Management main page. 2. Utilize the dropdown menus to select the checking account number to transfer funds from. Select the loan account number to transfer funds to. 3. Select cancel to return to the Loan Management main page or select next to proceed with making a payment from your checking account to your loan account. 12
368 4. The next screen will provide you with your current balances as well as the principle, interest, fees, and escrow amounts due on your loan. Enter the amount that you wish to pay toward your loan. 5. Select cancel to return to the Loan Management main page, select edit to return to the previous screen to change either of the account numbers, or select next to proceed with making a payment. 6. Review the information provided. Select cancel to return to the Loan Management main page, select edit to return to the previous screen to change the amount of the payment, or select accept to continue making a payment. 13
369 7. You will receive a confirmation screen. Select main page to return to the Loan Management main page or select create another transaction to return to the account selection screen to make additional payments on your term loan(s). Please note: Term loan transactions performed on KTT will not be reflected on KTT until the next business day. 14

370 V. View a Loan Transfer History Report To View your Report Containing Loan Transfer History: 1. Select Loan Transfer History Report from the Loan Management main page. 2. You will be presented with a report that contains the transactions performed via KTT during the past 45 days, including the status, account numbers involved in the transaction, the amount transferred, the date and time of the transaction, as well as the user that performed the transfer. Please note: Only transactions performed on KTT will be displayed on the loan transfer history report. 3. To Filter the Report: a. Select filter from the loan transfer history report. b. Utilize the dropdown menus to select the type of transaction (either debits, credits, or both), the account that the transfer was made from, and/or the account that the transfer was made to. 15
371 c. Enter the amount that was transferred out and/or the amount that was transferred in. d. Utilize the dropdown menus to select a specific date or a date range. e. Utilize the dropdown menu to select a user that performed the transaction(s). f. Select cancel to return to the loan transfer history report, select download to download a report that is filtered according to the parameters that you selected, or select view to view the filtered report. g. To return to the original listing, select unfilter. 16
372 4. To Download the Report: a. Select download from the loan transfer history report. 5. To View Additional Details Regarding a Specific Transfer: a. Click on the transaction. 17
373 b. Additional detail will be displayed. Select return to go back to the loan transfer history report. 18

374 VI. Perform a Loan Inquiry To view details regarding loans that the user has access to on KTT, including information on the balance, available credit, and amount due: 1. Select Loan Inquiry from the Loan Management main page. 2. A list of your loans will be displayed, along with the obligor and obligation numbers, obligation type, principal balance, line of credit available, total amount due, and the maturity date. 3. To Filter the Report: a. Select filter from the loan transfer history report. 19
375 b. Utilize the dropdown menus to select the obligor and obligation numbers and obligation type. c. Enter the amount of the principal balance or a balance range. d. Enter the amount of the line of credit available or an available credit range. e. Enter the total amount due or a range. f. Enter the maturity date or a date range. g. Select cancel to return to the loan inquiry listing, select download to download a report that is filtered according to the parameters that you selected, or select view to view the filtered report. h. To return to the original listing, select unfilter. 20
376 6. To Download the Report: a. Select download from the loan inquiry listing. 7. To View Additional Details Regarding a Specific Transfer: a. Click on the obligation number. 21
377 b. Additional details, including the rate and a history of transactions performed since the last cutoff will be displayed. Please note: All transactions, not just those performed on KTT will be reflected. c. Select return to go back to the loan inquiry listing. 22
378 Self-Service Module User Guide Copyright 2007 KeyCorp All rights reserved.
379 The Self-Service module on KTT allows authorized users to update information for the company, users, and accounts, as well as view a history log of actions performed on the Self-Service module. Please note: Users cannot perform maintenance to their own profiles. Contents I. Company Level Maintenance 3 Changes to a Company s Address 3 II. User Level Maintenance 5 Resetting a User s Password 5 Changing Information on a User s Profile 7 Changing Dates/ Times of a User s Access 9 Editing Services 10 Changing the Features/Functions a User can Access 11 Changes to Lockbox Reporting & Imaging 12 Changes to Information Reporting Services 14 Changes to a User s Account Management Functions 17 Changes to User s Access to ACH Services 20 Changes to a User s Access to Financial Institutions Services 24 Update Notifications 25 Remove a User from KTT 28 Add a User to KTT 29 III. Account Maintenance 42 Editing an Account 42 Removing an Account from KTT 46 Adding an Account to KTT 48 IV. Self-Service History Report 52 Viewing/Downloading a Report 52 V. User Services Summary 55 View Users Services 55 View List of Users and Accesses by Account 58 View List of Users and Accesses and Services 61 VI. Appendix 63 2
380 I. Company Level Maintenance Company Level Maintenance allows users to update the company s address. To Make Changes to the Company s Address: 1. Select Company Maintenance from the Self-Service main page. 2. You will be directed to a screen with the company s address. Update the appropriate fields. Select cancel to return to the Self-Service main page or select next to proceed with updating the address. 3
381 3. Review the information. To remove the change, select cancel, to edit the updated information, select edit, or to proceed with the address change, select accept. 4. You will receive a confirmation screen reflecting the updates to the company s address. Please note: Changes made in KTT are only reflected in KTT, in order to update address information across all KeyBank systems, please contact the CBBC at Select return to go back to the Self-Service main page. 4
382 II. User Level Maintenance The User Maintenance function allows users to maintain existing KTT users, add additional users to existing services (some service exclusions apply), and/or remove existing users from the current setup. Please note: Please contact your treasury management advisor to completely remove an employee s access to any or all treasury management services. For example, removing a user from KTT does not remove a user s wire transfer phone initiation capabilities. To Perform User Level Maintenance: The company administrator can reset user passwords, update users names, telephone numbers, and addresses, edit users access times, change the services users can access, and remove users from KTT via User Maintenance on the Self-Service module. Please note: You cannot change your own information on the Self-Service module. Self-Service users can reset a user s password in the Self-Service module. Changes made to a password are updated immediately and the next time the user logs into KTT, he/she will be prompted to change the temporary password created by the self-service user. To Reset a User s Password: 1. Select User Maintenance from the Self-Service main page. 5
383 2. Click on the active Password link in the Reset Password column next to the user whose password you wish to update. 3. Enter a new password into the first field and enter the new password again in the second field to confirm. The password is updated immediately. This is a temporary password; when the user logs in to KTT, the user will be prompted to update their password. Please refer to the Appendix for strong password descriptions. 4. To update the user s password, click submit. To return to the previous screen without processing changes, select cancel. 5. You will receive a confirmation page letting you know that the password has been successfully changed. Select return to go back to the User Maintenance screen. 6
384 To Change Information on a User s Profile, Including Updating a User s Name, Address, Phone, and/or Fax Number: 1. From the User Maintenance screen, click on the active Profile link in the Edit Profile column next to the user whose information you wish to update. 2. From this screen, you can update the user s name, address, phone, and/or fax number with the appropriate information. 3. Click submit to proceed with the changes or return to go back to the User Maintenance screen. 7
385 4. Review the information provided. Select approve to make the changes effective, or select cancel to return to the User Maintenance screen. 5. You will receive a confirmation screen. Select return to go back to the User Maintenance screen. To Change the Times and/or Days that a User is Allowed to Access KTT: 8

386 1. From the User Maintenance screen, click on the active Access Times link in the Edit Access Times column next to the user whose information you wish to update. 2. To enable a user to access KTT on a specific day, ensure that the box next to the appropriate day is checked. Utilize the dropdown arrows to specify hours of the day (Eastern Time) that the user is allowed to access KTT. 3. You can also enable users to have unlimited access by selecting the 24 x 7 option. 4. Select submit to process the selected access times or cancel to return to the User Maintenance screen. 9

387 5. Review the days and times selected. Select approve to proceed with the changes or cancel to return to the User Maintenance screen. 6. You will receive a confirmation screen displaying the selected access times. Click return to go back to the User Maintenance screen. To Edit Services: You can add or make changes to a user s services via the Edit Services feature. In order to add services to a user s profile, that service must exist at the company level. Please note: Due to inherent associated risks, not all services are able to be updated online via KTT. Services including Deposit Concentration, File Transfer, Foreign Drafts, Loan Management, Self-Service, and Wires cannot be added or modified on the Self-Service module. 10

388 To Make Changes to the Features and or Functions that a User can Access on KTT: 1. From the User Maintenance screen, click on the active Services link in the Edit Services column next to the user whose information you wish to update. 2. Select the type of services that you wish to make changes to for the selected user. (Details for each service type are included below.) 11
389 For Changes to Lockbox Reporting & Imaging: 1. Select Lockbox Reporting & Imaging from the User Maintenance Edit Services screen. 2. Choose whether or not to allow this user access to Lockbox Reporting and/or Imaging. 3. Select the appropriate account that this user will be allowed to access. Green checkmarks indicate which lockbox services were selected at the company level. 4. You can also use the check/uncheck all button to add or remove access to all accounts. 5. Select submit to proceed with the changes or cancel to return to the User Maintenance Edit Services screen. 12
390 6. You will receive a confirmation page that displays the new access. On this page, the selected accounts will be checked; however, you cannot uncheck or make changes from this page. Select return to go back to the User Maintenance Edit Services screen. 13
391 To Make Changes to a User s Access for Information Reporting Services: 1. Select Information Reporting Services from the User Maintenance Edit Services screen. 14

392 2. If desired, choose to allow this user access to account analysis and/or EDI 822 services for all accounts. 3. Select the appropriate reports for each account that you wish to allow this user to access. Please note: For some reports you will have to specify access times. (Please refer to the Information Reporting section for more detailed descriptions concerning what information is included in the available reports.) 4. You can also chose to check/uncheck all reports by using the corresponding button. 5. To return to the User Maintenance Edit Services screen, select cancel to proceed with the changes. After reviewing for accuracy, and then select submit. 15

393 6. You will receive a confirmation screen with the changes displayed. On this page, the selected reports will be checked; however, you cannot uncheck or make changes from this page. Select return to go back to the User Maintenance Edit Services screen. 16
394 To Make Changes to the Account Management Functions a User has Access to: 1. Select Account Management from the User Maintenance Edit Services screen. 2. You can then select the services for specific accounts that the selected user will have access to. Please note: Only the services that have been selected at the company level will appear. a. Book Transfer: Allows users to transfer funds from one of the company s accounts to another. If the user will have access to the book transfer function, please specify the maximum dollar limit that this user can transfer. Check the Book Transfer History box to allow this user to access the book transfer history report. b. Check Inquiry: Allows users to search for an individual check or a range of checks. c. Check Image: Allows users to view an image of a selected check. d. Photocopy Request: Allows users to request that a photocopy of a check be sent to the company. 17
395 e. Stop Payment: Allows users to request for payment on an issued check to be stopped. f. Positive Pay Same Day: Allows users to perform pay/stop decisions on same day positive pay exception items. g. Same Day Secondary Authorization: Allows users to authorize decisions for same day positive pay items requiring secondary approval. h. Positive Pay Next Day: Allows users to perform return decisions on next day positive pay exception items. i. Next Day Secondary Authorization: Allows users to authorize decisions for next day positive pay items requiring secondary approval. j. Positive Pay History: Allows the user to view a list of positive pay items, along with the user that decisioned the item, and the secondary approver (if applicable). k. Return Item: Allows users to review returned item information, including images of returned items (if applicable). l. Account Reconcilement Daily Report: Allows users to view account reconcilement reports. m. Check Issue Maintenance: Allows users to add and cancel checks for reconcilement purposes. n. Check Issue History: Allows users to view a history of checks that were added and cancelled via KTT, along with the name of the user that performed the corresponding action. Please note: Checks that were added or cancelled via other means, such as faxing a request to the ARP department, will not appear on the Check Issue History report. 18
396 3. You can use the check all function to allow this user to have access to all functions for all accounts. 4. Select submit to process the changes or cancel to return to the User Maintenance Edit Services screen. 5. You will receive a confirmation screen that displays the user s access levels. Select return to go back to the User Maintenance Edit Services screen. 19
397 To Change a User s Access to ACH Services: 1. Select ACH from the User Maintenance Edit Services screen. 2. Input the maximum dollar amount that this user is able to initiate credits and debits for (scroll down for additional limits). Please note: The user s dollar limits cannot exceed the company s dollar limits. a. PPD: Prearranged Payments and Deposits. This is commonly used for payroll transactions. b. CCD: Cash Concentration and Disbursement. A credit or debit entry initiated by an organization to consolidate funds of that organization from its branches, franchises or agents, from other organizations, to fund the accounts of its branches, franchises or agents, or of another organization. c. CCD+: CCD entry with a 94-character addenda record to allow additional information about the transaction. These types of transactions are used for tax payments. d. CTX: Corporate Trade Exchange. An ACH format that combines the record structure and enveloping required by the ACH system with the flexible length standards of ASC X12. 20

398 e. RCK: Paper returned item converted into an ACH transaction and presented to the paying bank for clearing. f. TEL: This type of transaction may only be originated when there is either (1) an existing relationship between the Originator and the receiver, or (2) no existing relationship between the originator and the receiver, and the receiver has initiated the telephone call. g. WEB: This transaction is used for the origination of debit entries (either recurring or single entry) to a consumer's account pursuant to an authorization that is obtained from the receiver via the Internet. 3. Press submit to proceed with the changes. 21

399 4. For each type of transaction, select the services the user will be able to access. You can also select check/uncheck all to allow a user access to all functions for all types of transactions. a. Existing Batch Listing: Allows a user to view the existing batches for the selected batch type. b. Create/Edit/Copy Batch Header: Allows a user to create, edit, or copy information in the batch header, including prenotes, batch name, batch description, transaction type, default transaction code, and confidentiality restrictions. (Company Information is prepopulated.) Any user that has access to a batch can edit and/or change that batch. c. Create/Edit/Copy Batch Detail: Enables users to view, create, edit, and copy details of individual transactions. d. Delete Batch: Allows users to delete a batch. e. Approve Batch: Allows users to approve batches for release. f. Release Batch: Allows users to release batches to KeyBank s ACH Department for processing. g. Batches Sent Report: Allows clients to view batches that have been sent for processing. h. Confidential Rights: Grants a user rights to confidential files (such as payroll). Any user that has confidential rights to a batch can create, edit, copy, or change the confidentiality designation of that batch. 5. Select submit to proceed with the changes. 22


400 6. After submitting both the dollar limit and access changes, you will receive a confirmation screen with the selected access changes displayed. Select return to go back to the User Maintenance Edit Services screen. 23
401 To Change a User s Access to Financial Institutions Services: 1. Select Financial Institutions from the User Maintenance Edit Services screen. 2. Check the box to allow the user to view the Fed Funds Sweep. 3. Select submit to proceed with the changes or cancel to return to the User Maintenance Edit Services screen. 24
402 4. You will receive a confirmation screen with the changes displayed. 5. Select return to go back to the User Maintenance Edit Services screen. To Update the Notifications that a User will Receive: 1. Select Notifications from the User Maintenance Edit Services screen. 2. Review the user s address and make corrections/changes if necessary. 3. Select the user s preference. 4. (Optional) Confirm/enter the user s code. 25

403 5. Select the services that this user will have access to. Use the check/uncheck all button to grant or remove access to all services. 6. Select submit to proceed with the changes or cancel to return to the User Maintenance Edit Services screen. 26

404 7. You will receive a confirmation screen displaying the changes. 8. Select return to go back to the User Maintenance Edit Services screen. 27
405 To Remove a User from KTT: 1. Select Remove User from the User Maintenance screen. 2. To remove all functions and services that his user has access to on KTT select remove. To return to the previous screen without removing the services, select return. 3. You will be directed to another screen asking if you wish to remove the user. Select yes to remove the user or no to return the User Maintenance screen. 28
406 4. You will receive a confirmation screen displaying the removal of the selected user from KTT. 5. Select return to go back to the User Maintenance screen. Please note: You still need to notify your treasury management advisor if you remove a user from KTT. Your treasury management advisor will be able to help you determine if any additional forms need to be completed. For example, you may be required to complete a new Payment Authorization Form for wire transfers that deletes the user as an Authorized Representative of the company. KeyBank recommends that the self service administrator or another representative of your company review any pending and/or future-dated transactions initiated by the user that you are removing from KTT. To Add a User to KTT: 1. Click on the add user button from the User Maintenance screen. 29
407 2. You can chose to model this user after another user. To model this user after an existing one, utilize the dropdown menu to select the appropriate user. Please note: notifications must be selected separately. All other accounts, services, and limits will be mirrored after the modeled user. 3. Enter the user s information into the appropriate fields. 4. To proceed with the addition of the user select next. To go back to the User Maintenance screen, select cancel. 30

408 5. To enable a user to access KTT on a specific day, ensure that the box next to the appropriate day is checked. Utilize the dropdown arrows to specify hours of the day that the user is allowed to access KTT. 6. You can also enable users to have unlimited access by selecting the 24 x 7 option. 7. Select finish to process the selected accesses. You will receive a confirmation screen that displays information for the new user. Proceed to step 37. OR 8. Select next to add more services for this user. 9. If desired, choose to allow this user access to account analysis and/or EDI 822 services for all accounts. 10. Select the appropriate reports for each account that you wish to allow this user to access. Please note: For some reports you will have to specify access times for reports that are generated throughout the day. 11. Please refer to the Information Reporting section for more detailed descriptions concerning what information is included in the available reports. 12. You can also chose to check/uncheck all" reports by using the corresponding button. 31

409 13. Select finish to process the selected accesses. You will be provided with a confirmation screen displaying the added user s information and accesses. OR 14. Select next to add more services for this user. 32
 17. You can also use the check/uncheck all button to add or remove access to all accounts. 18.")
410 15. Choose whether or not to allow this user access to Lockbox Imaging. 16. Select the appropriate account to allow this user to access. (Red checkmarks indicate which services the lockbox was setup with.) 17. You can also use the check/uncheck all button to add or remove access to all accounts. 18. Select finish to process the selected accesses. You will receive a confirmation screen that displays information for the new user. Proceed to step 37. OR 19. Select next to add more services for this user. 20. Select the services for specific accounts that this user will have access to. Please note: Only the services that have been selected at the company level will appear. a. Book Transfer: Allows users to transfer funds from one of the company s accounts to another. If the user will have access to the book transfer function, please specify the maximum dollar limit that this user can transfer. Check the Book Transfer History box to allow this user to access the book transfer history report. 33
411 b. Check Inquiry: Allows users to search for an individual check or a range of checks. c. Check Image: Allows users to view an image of a selected check. d. Photocopy Request: Allows users to request that a photocopy of a check be sent to the company. e. Stop Payment: Allows users to request that an issued check not be paid. f. Positive Pay Same Day: Allows users to perform pay/stop decisions on same day positive pay exception items. g. Same Day Secondary Authorization: Allows users to authorize same day positive pay decisions requiring secondary approval. h. Positive Pay Next Day: Allows users to perform return decisions on next day positive pay exception items. i. Next Day Secondary Authorization: Allows users to authorize next day positive pay decisions requiring secondary approval. j. Positive Pay History: Allows the user to view a list of positive pay items, along with the user that decisioned the item, and the secondary approver (if applicable). k. Return Item: Allows users to review returned item information, including images of returned items (if applicable). l. Account Reconcilement Daily Report: Allows users to view account reconcilement reports. m. Check Issue Maintenance: Allows users to add and cancel checks for reconcilement purposes. n. Check Issue History: Allows users to view a history of checks that were added and cancelled via KTT, along with the name of the user that performed the corresponding action. Please note: Checks that were added or cancelled via other means, such as faxing a request to the ARP department, will not appear on the Check Issue History report. 34

412 21. You can use the check all function to allow this user to have access to all functions for all accounts. 22. Select finish to process the selected accesses. You will receive a confirmation screen that displays information for the new user. Proceed to step 37. OR 23. Select next to add more services for this user. 24. Input the maximum dollar amount that this user is able to initiate ACH credits and debits for. (Scroll down for additional limits). Please note: The user s dollar limits cannot exceed the company s dollar limits. a. PPD: Prearranged Payments and Deposits. This is commonly used for payroll transactions.ccd: Cash Concentration and Disbursement. A credit or debit entry initiated by an organization to consolidate funds of that organization from its 35

413 branches, franchises or agents, from other organizations, to fund the accounts of its branches, franchises or agents, or of another organization. c. CCD+: A CCD entry with a 94-character addenda record to allow additional information about the transaction. These types of transactions are used for tax payments. d. CTX: Corporate Trade Exchange. An ACH format that combines the record structure and enveloping required by the ACH system with the flexible length standards of ASC X12. e. RCK: Paper returned item converted into an ACH transaction and presented to the paying bank for clearing. f. TEL: This type of transaction may only be originated when there is either (1) an existing relationship between the Originator and the receiver, or (2) no existing relationship between the originator and the receiver, and the receiver has initiated the telephone call. This SEC Code facilitates access to the ACH Network by providing an alternative authorization method (oral authorization via the telephone) for certain types of consumer debit entries. g. WEB: This transaction is used for the origination of debit entries (either recurring or single entry) to a consumer's account pursuant to an authorization that is obtained from the receiver via the Internet. 36

414 25. For each type of transaction, select the services the user will be able to access. You can also select check/uncheck all to allow a user access to all functions for all types of transactions. a. Existing Batch Listing: Allows users to view existing batches that they have access to. b. Create/Edit/Copy Batch Header: Allows a user to create, edit, or copy information in the batch header, including prenotes, batch name, batch description, transaction type, default transaction code, and confidentiality restrictions. (Company Information is prepopulated.) Any user that has access to a batch can edit and/or change that batch. c. Create/Edit/Copy Batch Detail: Enables users to view, create, edit, and copy details of individual transactions. d. Delete Batch: Allows users to delete a batch. e. Approve Batch: Allows users to approve batches for release. f. Release Batch: Allows users to release batches to the ACH Department where they will be processed. g. Batches Sent Report: Allows clients to view batches that have been processed. h. Confidential Rights: Grants a user rights to confidential files (such as payroll). Any user that has confidential rights to a batch can create, edit, copy, or change the confidentiality designation of that batch. 37
415 26. Select finish to process the selected accesses. You will receive a confirmation screen that displays information for the new user. Proceed to step 37. OR 27. Select next to add more services for this user. 28. Select the box to allow this user to have access to the Fed Funds Sweep Confirmation report. 29. Select finish to process the selected accesses. You will receive a confirmation screen that displays information for the new user. Proceed to step 37. OR 30. Select next to add more services for this user. 38
416 31. Review the user s address and make corrections/changes if necessary. 32. Select the user s preference. 33. Confirm/enter the user s code. 34. Select the services that this user will have access to. Use the check/uncheck all button to give or remove access to all services. 35. Select finish to process the selected accesses. You will be provided with a confirmation screen displaying the added user s information and accesses. OR 36. Select next to proceed to the final step. 37. You will receive a confirmation screen that displays information for the new user. 39
417 38. Use your browser s print button to print the displayed welcome letter for the new user. 39. Select return to go back to the User Maintenance screen. 40

418 40. You will receive a pop up window reminding you to print the welcome letter. Select OK to return to the User Maintenance screen. 41
419 III. Account Maintenance Account Maintenance allows the user to maintain account(s), add new account(s) to existing services (some service exclusions apply), and/or remove account(s) from the current setup. Please note: Please contact your treasury management advisor to completely delete an account. Removing access to an account on KTT does not deactivate the account. From the Self-Service module you can edit services on an account, or add/delete accounts. To Edit an Account: 1. From the Self-Service main screen, select Account Maintenance. 42

420 2. Click on the active link for the account that you wish to edit. 43
421 3. From this screen: a. You can change the name of the account. b. You can select long-term imaging archive access, which will allow authorized users to retrieve and view images of items from our image archive. (After 75 days, short-term images are moved to our long-term image archive.) c. You can also choose to discontinue check return. If you discontinue this service you will no longer be sent cancelled/paid paper checks. You will be able to retrieve, view, save, and print copies of these checks online via KTT. 4. Select next to proceed with the edits or cancel to return to the Account Maintenance screen. 44
422 5. The next screen will provide a summary of the services for the selected account. Select approve to accept the changes, or cancel to return to the Account Maintenance screen. 6. You will be provided with a confirmation screen that displays the updated information. 7. Select return to go back to the Account Maintenance screen. 45

423 From the Self-Service module s Account Maintenance screen, you can remove accounts from KTT. Accounts that you no longer receive a paper statement for cannot be removed from KTT. Please note: Removing an account from KTT does not close the account; it only removes access and related services via KTT. To close an account, please contact your treasury management advisor. In addition, if you have selected not to receive paid/cancelled paper checks for this account, or if you remove the account from KTT, you will not automatically receive your paper checks. If you wish to resume receiving your paper checks, please contact the Commercial and Business Banking Center Internet Group at To Remove an Account from KTT: 1. Select the remove account link for the account that you wish to remove from KTT. 2. You will receive a screen with account summary information. Select remove to proceed with the removal, or cancel to return to the Account Maintenance screen. 46
424 3. You will receive another approval screen asking if you are sure that you want to remove the account and all services and users associated with this account from KTT. 4. Select yes to proceed with the removal or no to return to the Account Maintenance screen. 5. You will receive a confirmation page displaying the removal of the selected account. 6. Select return to go back to the Account Maintenance screen. 47
425 To Add an Account to KTT: 1. Click the add account button from the Account Maintenance screen. 48

426 2. Enter the KeyBank account number that you wish to add to KTT. 3. Enter an account name. 4. Select the appropriate ABA number from the dropdown menu. 5. Enter the tax identification number for your company/organization. 6. Select Long-term Archive Imaging Access if you want to be able to retrieve long-term images for this account. 7. Select the services that will be utilized for this account. Please refer to the Information Reporting and Account Management User Guides for detailed information on the available services. 8. Select cancel to return to the Account Maintenance screen or select next to proceed with adding an account. Please note: Any service that is not added to an account during the initial setup cannot be added via Self-Service. You must add services by contacting your treasury management advisor. 49

427 9. Review the information. Select next to proceed with adding the account. 50

428 10. Select the users that will have access to the specific services for this account. The check all button can be used to grant all users access to all services. 11. Select next to proceed with adding the account. 12. You will receive a confirmation screen showing that the account was successfully added. Select return to go back to the Account Maintenance screen. 51
429 IV. Self-Service History Report The Self-Service History Report allows you to view all changes that have been made through the KTT Self-Service module, along with the user that made the change. To View and/or Download a Copy of the Self-Service History Report: 1. Select Self-Service History Report from the Self-Service main page. 52
430 2. The Self-Service History Report will appear. 3. From this screen you can: a. Limit the results by clicking on the filter button and utilizing the drop down menu to narrow the results. The results will be displayed in the same format as the original screen. To return to the original results, select unfilter. 53
431 b. Download a copy of the report by clicking the download button and following the onscreen prompts. (Please refer to the KTT introduction for instructions on downloading reports.) c. Display additional columns by selecting the Show All Columns button. 4. After you are finished viewing/downloading the report, select return to go back to the Self-Service main page. 54
432 V. User Services Summary The User Services Summary reports on KTT provide a listing of all users and services each user has access to. To View the Services a User has: 1. Click on the User Services Summary on the Self-Service main page. 2. A list of KTT users will appear. You can view the services assigned to each user by clicking on their name. 55

433 3. To view a specific service at the account level that a user has access to, click on the appropriate category, then click on the account that you wish to view services for. 4. A list of the users and their accesses for that account for the selected category will be displayed. 5. You can also view all of the accesses by clicking the expand all button. 6. A list of all services, for all accounts and for all categories, will be displayed. (Click collapse all to minimize the sections.) 7. Click return to go back to the User Services Summary User Listing screen. Sample screen has been reduced. 56
434 8. You can also view the user s profile and access times by clicking on the active Profile or Access Times links for a user. From these screens, you can select return to go back to the User Services Summary User Listing screen. User Profile 57

435 Access Times To View a List of all Users and their Corresponding Accesses by Account: 1. Click on view all users by account from the User Services Summary User Listing screen. 58
436 2. To view the users that have access to a particular category: a. Click on the appropriate category. b. Click on the account that you wish to view users for. c. Click on the feature or function that you would like to see which users have access to. 3. A list of users that have access to the selected feature or functionality for the account in the selected category will be displayed. 4. You can also view a complete list of users accesses by clicking the expand all button. 5. A list of all users with access to functions for all accounts will be displayed. (Click collapse all to collapse the sections.) 6. Click return to go back to the User Services Summary User Listing screen. Please refer to the screen shot below. 59
437 a b c 60
 that you would like to see which users have access to.")
438 To View a List of all Users and their Corresponding Accesses by Services: 1. Click on view all users by service from the User Services Summary User Listing screen. 2. To view the users that have access to a particular category: a. Click on the appropriate category. b. Click on the service that you wish to view users for. c. Click on the account(s) that you would like to see which users have access to. 3. A list of users that have access to the selected service for that account will be displayed. 4. You can also view a complete list of users accesses by clicking the expand all button. 5. A list of all users with access to services for all accounts will be displayed. (Click collapse all to collapse the sections.) 6. Click return to go back to the User Services Summary User Listing screen. 61
439 a b c 62
DESKTOP. User & Administrative Guide
 DESKTOP alerts User & Administrative Guide 1 TABLE OF CONTENTS Overview... 2 Important Information to Remember... 3 The Alerts Service.... 4 Setting Up Contact Points... 5 Editing Contact Points... 7 Setting
Welcome. Today we are going to review the Information Reporting features in BBVA Compass net cash. Before we begin, if you have questions during this
 Welcome. Today we are going to review the Information Reporting features in BBVA Compass net cash. Before we begin, if you have questions during this presentation, please type them in the chat, and we
User s Guide. (Virtual Terminal Edition)
") User s Guide (Virtual Terminal Edition) Table of Contents Home Page... 4 Receivables Summary... 4 Past 30 Day Payment Summary... 4 Last 10 Customer Transactions... 4 View Payment Information... 4 Customers
User s Guide (Virtual Terminal Edition) Table of Contents Home Page... 4 Receivables Summary... 4 Past 30 Day Payment Summary... 4 Last 10 Customer Transactions... 4 View Payment Information... 4 Customers
Table of Contents CLIENT INTERNET ACCESS...4. Mobile Devices...4. Browser Compatibility...4 SYSTEM NAVIGATION Header Links...
 WebLink User Guide Table of Contents CLIENT INTERNET ACCESS...4 Mobile Devices...4 Browser Compatibility...4 SYSTEM NAVIGATION... 9 Header Links... 9 Navigation Bar... 9 USER OPTIONS... 9 Change Password...
BUSINESS BANKING ONLINE. Deskside User Guide
 BUSINESS BANKING ONLINE Deskside User Guide INTRODUCTION TO BUSINESS BANKING ONLINE Business Banking Online (BBOL) offers our business customers both large and small the tools and features needed to manage
Eastern Bank TreasuryConnect Balance Reporting User Manual
 Eastern Bank TreasuryConnect Balance Reporting User Manual This user manual provides instructions for setting up or editing a user and accessing services within the three Balance related groups. Within
SANTANDER TREASURY LINK USER GUIDE
 SANTANDER TREASURY LINK USER GUIDE Welcome to Santander Treasury Link Santander Treasury Link is a secure Web application that allows you to manage accounts, payments, transfers, reports, and users. This
Table of Contents CLIENT INTERNET ACCESS...4. Mobile Devices...4. Browser Compatibility...4 SYSTEM NAVIGATION Header Links...
 WebLink Guide November 2017 Table of Contents CLIENT INTERNET ACCESS...4 Mobile Devices...4 Browser Compatibility...4 SYSTEM NAVIGATION... 9 Header Links... 9 Navigation Bar... 9 USER OPTIONS... 9 Change
Treasury Management User Guide. Online Banking
 Treasury Management User Guide Online Banking Released August 2018 Treasury Management... 4 Logging in to Treasury Management...5 Helpful Hints...10 User Menu... 12 Profile and Preferences... 12 Notification
Nexsure Training Manual - Accounting. Chapter 7
 Nexsure Training Manual - Accounting Vendor Entries In This Chapter Vendor Entries at the Organization and Territory Level Vendor Entity Definition Disbursements to Vendors Line Item Distribution Receiving
Intellix Payments Reference Guide
 Intellix Payments Reference Guide Table of Contents Overview 3 Accessing Payment Functionality 3 About this Guide and Additional Training 3 Using List Functionality in Intellix Payments 4 Overview 4 Standard
TexConnect Online User Guide
 TexConnect Online User Guide TexConnect Online User Guide I. Log on.. 2 A. Create Password. 3 B. Reset Password... 4 II. Disclaimer... 5 III. Pool Information.. 6 IV. Transactions A. Deposit... 7 B. Withdrawal.
Online Banking for Business ACCOUNT INFORMATION & TRANSFERS USER GUIDE
 Online Banking for Business ACCOUNT INFORMATION & TRANSFERS USER GUIDE Contents Contents... 2 Online Banking for Business Getting Started... 4 supported browsers... 5 Minimum system requirements... 5 Account
Document Management System. for QC Postfunding Review
 Document Management System for QC Postfunding Review Contents Quick Overview: How to Submit Documents to FM Processing... iii How to Log in to the Document Management System (DMS)... iv How to Search for
First Financial Bank Transaction Management System User Guide
 First Financial Bank Transaction Management System User Guide Please note: The options available to you in the Transaction Management System (TMS) depend upon your product configuration. This modular approach
II.1 Running a Crystal Report from Infoview
 Page 1 of 9 Last Updated: September 2007 This document describes how to run a crystal report from Infoview. The basics of running a report are the same for any report, however the parameters will vary
WELCOME GUIDE. BankConnect Plus ONLINE TREASURY MANAGEMENT. information reporting. ach file transmission. wire transfer.
 BankConnect Plus ONLINE TREASURY MANAGEMENT information reporting ach file transmission wire transfer positive pay Updated December 7, 2016 Contents About BankConnect Plus... 2 System Requirements... 2
User Manual. Online Treasury Manager: Electronic Report Delivery
 User Manual Online Treasury Manager: Electronic Report Delivery Table of Contents OVERVIEW... 1 System Access...1 Login/Logout Procedures...2 Online Treasury Manager Modules...2 Accessing Images...3 System
Regions Image Lockbox Online User Guide Options
 Regions Image Lockbox Online User Guide Options 2011 Regions Bank. Regions Lockbox Services subject to product terms and conditions. Rev. 041411. Image Lockbox Online Image Lockbox Online allows you to
User Guide Regions Association Image Lockbox Online
 User Guide Regions Association Image Lockbox Online 2012 Regions Bank. Regions Lockbox Services subject to product terms and conditions. Rev. 111312 Association Image Lockbox User Guide Association Image
Quick Reference. For HHG Sellers. Table of Contents. Getting Started. Find Transactions
 Quick Reference For HHG Sellers PowerTrack HHG Help Desk 1-866-561-6930 Table of Contents Getting Started...1 Find Transactions...1 Work with Audit Exception Transactions...3 Work with Unmatched Transactions...4
Reference Guide (IRIS)
") Reference Guide For Santander Bank s Interactive Reporting & Initiation Services (IRIS) Equal Housing Lender. Santander Bank, N.A. is a Member FDIC and a wholly owned subsidiary of Banco Santander, S.A.
Reference Guide For Santander Bank s Interactive Reporting & Initiation Services (IRIS) Equal Housing Lender. Santander Bank, N.A. is a Member FDIC and a wholly owned subsidiary of Banco Santander, S.A.
BBVA Compass Spend Net Payables
 User Guide BBVA Compass Spend Net Payables User Guide Vault Services Table of Contents Introduction 2 Technical Requirements 2 Getting started 3 Sign In 3 General Navigation 4 Upload/Create Payment 5
ONLINE TREASURY MANAGER ACH USER MANUAL
 ONLINE TREASURY MANAGER ACH USER MANUAL www.suntrust.com The information contained in this manual is the property of SunTrust Bank, Inc. Reproduction, manipulation, adjustment or transfer transmission,
Lockbox: Digital Archive User Guide
 Lockbox: Digital Archive User Guide Table of Contents Getting Started...2 Check Computer Software Log In Home Page Dashboard Overview Archive Search...5 Templates...6 Daily Summary...8 Digital Archive
Financial Report Guide
 Financial Report Guide 2008 Washington University All rights reserved. For RAPS Support, send an e-mail message to RAPS@wustl.edu, or call 935-3890. Last Modified: 09/16/08 This page is intentionally left
Reporting User Guide. Account Summary Widget
 Reporting User Guide Account Summary Widget The Account Summary widget appears on the Balance and Transaction workspace. It lists the balances of the accounts that you have permission to see. You can also
Heritage Bank Correspondent Lockbox. Lockbox. User Guide
 Heritage Bank Correspondent Lockbox Lockbox User Guide Contents Accessing Lockbox... 1 Messages... 2 Moving messages... 4 Batch messages... 5 Message administration... 6 Creating a message... 6 Recalling
Nexsure Training Manual - Accounting. Chapter 13
 Tax Authority In This Chapter Tax Authority Definition Reconciling Tax Authority Payables Issuing Disbursement for Tax Authority Payables Paying the Tax Authority Prior to Reconciling Tax Authority Definition
SYSTEM LOGIN/PASSWORD SUPPORT
 SYSTEM LOGIN/PASSWORD SUPPORT Why am I unable to log into the system? What if I forgot my password? Why do I need to create Security Questions/Answers? Why does it ask me if I want to remember this computer?
Employer Self Service (ESS) User Quick Guide
 User Quick Guide") Employer Self Service (ESS) User Quick Guide i Table of Contents Getting Started 6 Accessing the Employer Self Service (ESS) Portal 6 Maintaining Account Settings 7 Switching Employers within Session 7
Employer Self Service (ESS) User Quick Guide i Table of Contents Getting Started 6 Accessing the Employer Self Service (ESS) Portal 6 Maintaining Account Settings 7 Switching Employers within Session 7
PATRONAGE / EQUITY USER'S GUIDE
 PATRONAGE / EQUITY USER'S GUIDE This document is non-technical and explains the operation of the Patronage / Equity programs. It is intended for both accounting staff and operators. COPYRIGHT 2017 AgTrax
CashLink Quick Reference Guide
 CashLink Quick Reference Guide Navigating your Account Summary Page After you log in, you will see the Account Summary Page screen. This screen gives you access to all other functions and displays important
Transaction History User s Guide
 Transaction History User s Guide Last Revised on: 01/12/2009 EPL, Inc. 22 Inverness Parkway Suite 400 Birmingham, Alabama 35242 (205) 408-5300 1-800-243-4EPL (4375) www.eplinc.com Property of EPL, Inc.,
REMITTANCE MANAGER + RECEIVABLES ONLINE USER GUIDE
 REMITTANCE MANAGER + RECEIVABLES ONLINE USER GUIDE Welcome to Remittance Manager, your online portal for accessing your lockbox through the Receivables Online platform. Receivables Online provides secure
ANZ TRANSACTIVE GLOBAL REPORTING USER GUIDE
 ANZ TRANSACTIVE GLOBAL REPORTING USER GUIDE November 2016 CONTENTS Introduction 3 Reporting 4 Net Position... 6 Operating Accounts... 8 Transaction Search... 17 Nostro Accounts... 21 Nostro Accounts Search...
PO Box Lehigh Valley, PA Fax: apcifcu.org APCIRCUIT PC Home Banking Service HOW TO Guide
 APCIRCUIT PC Home Banking Service HOW TO Guide Page 1 HOW TO Guide Online Banking: APCIRCUIT PC Home Banking Service 01-19 Table of Contents APCIRCUIT Overview 3 APCIRCUIT Access 3 HOW TO - Change the
ATB Online Business General User. User Guide
 ATB Online Business General User User Guide Contents Welcome to ATB Online Business 4 How to use this guide 5 Roles and entitlements in ATB Online Business 5 Administrator role 5 User roles 5 Limits 6
First Mid Bank & Trust Commercial Online Banking User Guide
 Commercial Online Banking: Corporate First Mid Bank & Trust Commercial Online Banking User Guide Table of Contents Getting Started... 1 Before You Begin... 1 Installation... 2 Registration... 4 Commercial
First State Bank of Blakely, Inc. Cash Manager. User Guide
 First State Bank of Blakely, Inc. Cash Manager User Guide Table of Contents Logging In... 1 Changing Your Password... 2 Cash User Login Screen... 3 Cash Management User Single Sign On... 4 Navigation...
Your Quick Reference Guide to Regions itreasury GETTING STARTED
 Your Quick Reference Guide to Regions itreasury GETTING STARTED Contents 2 SECTION 1 Welcome 3 Before you begin SECTION 2 Administrative Overview 4 Customer setup Set up check services Set up payments
accessmoney Manager ACTION PAGES
 accessmoney Manager ACTION PAGES 1 accessmoney Manager Action Pages accessmoney Manager Action Pages are quick reference pages that provide information for the major components of accessmoney Manger. Click
Lockbox. Chapter 13. Lockbox Integration Setup. Nexsure Training Manual - Admin. In This Chapter
 Lockbox In This Chapter Lockbox Integration Setup Notification Setup Accounting Setup Invoice Defaults Setup Territory Level Lockbox Sestup Lockbox Exceptions Handling Lockbox Integration Setup Lockbox
NCLTEC Accounting User Manual
 NCLTEC Accounting User Manual Latest Update: Feb 6, 0 For information about customer support, please visit our homepage at http://www.ncltec.com on the World Wide Web. Copyright 05 NCL Energy Technology
BUSINESS ONLINE & MOBILE BANKING ACCOUNT ACCESS
 PO Box 1149 Bellevue, NE 68005-1149 402.292.8000 800.228.0392 www.sacfcu.com BUSINESS ONLINE & MOBILE BANKING ACCOUNT ACCESS Conduct your credit union business from your personal computer anytime from
Revised (10/17) ACH User Guide
 ACH User Guide") Revised (10/17) ACH User Guide Table of Contents Page 1. KeyNavigator ACH 1 1.1 Payment Management 2 1.2 Creating Payments 6 1.3 Templates 10 1.4 Reporting 14 2. User Maintenance 17 3. Role Maintenance
Revised (10/17) ACH User Guide Table of Contents Page 1. KeyNavigator ACH 1 1.1 Payment Management 2 1.2 Creating Payments 6 1.3 Templates 10 1.4 Reporting 14 2. User Maintenance 17 3. Role Maintenance
The first time (and only the first time) you log on to your account, you will get a welcome screen.
 you log on to your account, you will get a welcome screen.") TABLE of CONTENTS The First Time You Log On 2 After the First Time 3 Alert Icons 4 My Alerts 5 My Transactions 6 My Deposits 11 My Information 12 My Creditors 13 My Library 14 My Documents 16 1 The first
TABLE of CONTENTS The First Time You Log On 2 After the First Time 3 Alert Icons 4 My Alerts 5 My Transactions 6 My Deposits 11 My Information 12 My Creditors 13 My Library 14 My Documents 16 1 The first
Client-Account Receivable
 Nexsure Training Manual - Accounting Client-Account Receivable In This Chapter Client Accounts Receivable Entity Definition Receive Payments from Clients Relating to Policies Allocation of Payment Leave
ACH Payments. User Guide
 ACH Payments User Guide Table of Contents Overview... 2 Supported SEC Codes... 2 Create Batch... 2 Creating a Free Form Batch... 3 Creating a Batch from a Template... 14 Manage Batch Templates... 21 Transaction
Business Online Banking
 » Flagstar business Banking Business Online Banking Reference Guide Flagstar Bank Corporate Headquarters 5151 Corporate Drive Troy, MI 48098 (888) 324-4100 flagstar.com/business Member FDIC 1 Table of
O N L I N E B A N K I N G C A S H M A N A G E M E N T End-User Guide
 ONLINE BANKING CASH MANAGEMENT End-User Guide TABLE OF CONTENTS LogIn Process...1 Company Login... 1 Cash User Login... 3 Cash Management User Single Sign On... 4 Navigation...5 Account Listing Page...6
The Guide below is to help assist Users in navigating our Cash Management Online Banking
 The Guide below is to help assist Users in navigating our Cash Management Online Banking If you have questions please call or email our Cash Management Support Team at 1-844-213-5198 or CEN-CMOperations@my100bank.com
Company and User Set Up. Company Policy. NOTE: The Company Policy controls the companylevel feature entitlements and dollar limits.
 Company and User Set Up Company Policy NOTE: The Company Policy controls the companylevel feature entitlements and dollar limits. 1. Select Commercial and then Company Policy. 2. Select a transaction type
Detailed Conversion Steps to Transition from Business Online Banking Getting Started Business Continuity Checklist for CashManager OnLine
 Detailed Conversion Steps to Transition from Business Online Banking Getting Started Business Continuity Checklist for CashManager OnLine *Once logged on to CashManager OnLine, users have access to extensive
USER GUIDE FOR INTERNET BANKING OF PPF banka a.s.
 USER GUIDE FOR INTERNET BANKING OF PPF banka a.s. PPF banka a.s., Evropská 2690/17, P.O. Box 177, 160 41 Praha 6 1/14 Content: 1. Introduction... 3 2. Accounts... 3 3. Account statements... 5 3.1 Statements
What's New in General Ledger Munis - Financials: General Ledger
 [MU-FN-4-F] [MU-FN-10-E] What's New in General Ledger Munis - Financials: General Ledger CLASS DESCRIPTION This session will highlight some of the new functionality available in the version 11.2 of the
User Manual. Online Treasury Manager: Account Transfer
 User Manual Online Treasury Manager: Account Transfer Table of Contents OVERVIEW... 1 System Access...1 Login/Logout Procedures...2 Online Treasury Manager Modules...2 Accessing Images...3 System Availability
Sterling Virtual Terminal. User Guide
 Sterling Virtual Terminal User Guide Version 3.1.00 August 2015 Chapter 1: Getting started Table of Contents USER GUIDE... 1 CHAPTER 1: GETTING STARTED... 5 SYSTEM REQUIREMENTS... 5 STERLING VIRTUAL TERMINAL
Business ebanking Mail and Alerts
 Business ebanking Mail and Alerts Business ebanking Mail and Alerts 11.01.2016 Page 1 of 16 This guide provides instructions for sending electronic mail to and receiving electronic mail from Chemical Bank.
INBUSINESS BANKING SYSTEM
 Introducing your new INBUSINESS BANKING SYSTEM Companion Guide to Business Banking Video Tutorials Updated 0.09.8 WELCOME TO THE INBUSINESS SYSTEM The InBusiness System will help you efficiently and securely
This product is the proprietary material of CheckCare Enterprises, LLC. And is not to be distributed or copyrighted without written permission from
 CheckCare ACH Gateway Reference Secure Pay Edition This product is the proprietary material of CheckCare Enterprises, LLC. And is not to be distributed or copyrighted without written permission from CheckCare
Registration. Adding Accounts. How do I sign up for this service? The sign-up process for this service is quite simple.
 Registration How do I sign up for this service? The sign-up process for this service is quite simple. Step 1: Complete a short registration form. If you want to, you can register the accounts you hold
User Documentation for School Activity Funds Accounting
 User Documentation for School Activity Funds Accounting By: Applied Business Services, Inc. 800 S. Frederick Avenue, Suite 101 Gaithersburg, MD 20877 1-800-451-7447 ext. 130 www.appliedbusinessservices.com
Ionic, LLC 7300 Turfway Road, Suite 190 Florence, KY Toll-free Telephone No. (866)
") Ionic, LLC 7300 Turfway Road, Suite 190 Florence, KY 41042 Toll-free Telephone No. (866) 496-3470 Table of Contents USER GUIDE VERSION INFORMATION... 3 CHAPTER 1: INTRODUCTION TO WEBCHECKS... 4 CHAPTER
Ionic, LLC 7300 Turfway Road, Suite 190 Florence, KY 41042 Toll-free Telephone No. (866) 496-3470 Table of Contents USER GUIDE VERSION INFORMATION... 3 CHAPTER 1: INTRODUCTION TO WEBCHECKS... 4 CHAPTER
User Guide. Customer Self Service (CSS) Web Application Progress Software Corporation. All rights reserved.
 Web Application Progress Software Corporation. All rights reserved.") User Guide Customer Self Service (CSS) Web Application 1993-2017 Progress Software Corporation. Version 2.1 March 2017 Table of Contents Welcome... 3 Accessing the Customer Self Service (CSS) Web Application...
User Guide Customer Self Service (CSS) Web Application 1993-2017 Progress Software Corporation. Version 2.1 March 2017 Table of Contents Welcome... 3 Accessing the Customer Self Service (CSS) Web Application...
Webster Web-Link. Table of Contents. Company System Administrator (CSA) User Guide
 User Guide") Table of Contents 1 Welcome... 4 1.1 Overview of the CSA role... 4 1.1.1 What a CSA cannot do... 4 1.2 What is included in this guide?... 5 1.3 How is this guide organized?... 5 1.4 Where to get help...
Table of Contents 1 Welcome... 4 1.1 Overview of the CSA role... 4 1.1.1 What a CSA cannot do... 4 1.2 What is included in this guide?... 5 1.3 How is this guide organized?... 5 1.4 Where to get help...
Liberty Guide for Representatives & Financial Advisors
 Liberty Guide for Representatives & Financial Advisors 2 Table of Contents Quick Start Guide... 6 General Information... 8 Menu Options... 8 Notifications... 8 Search Bar... 9 Sorting Tables... 9 Exporting...
USER GUIDE. Version 2.0. Reflex Online Cash Management
 TM USER GUIDE Version 2.0 Reflex Online Cash Management Table of Contents USER GUIDE VERSION 2.0 Table of Contents... 2 1. Introduction... 4 1.1 What is Reflex?... 4 1.2 How do I access Reflex?... 4 1.3
Mobile Banking Frequently Asked Questions
 Mobile Banking Frequently Asked Questions What types of Mobile Banking does Midwest BankCentre offer? We offer three types of Mobile Banking: Mobile Apps allows you to easily connect to Midwest BankCentre
Rabo Supplier Finance User Manual - Suppliers -
 Rabo Supplier Finance User Manual - Suppliers - Page 2 of 33 Table of Contents 1 About This Document... 3 1.1 Objectives of This Document... 3 1.2 Inside This Document... 3 2 Rabo Supplier Finance platform...
Simply e C A S H M A N A G E M E N T U S E R G U I D E
 Simply e C A S H M A N A G E M E N T U S E R G U I D E Simply e Cash Management Rev. 06/01/15 Simply e Cash Management Rev. 06/01/15 Table of Contents 1. WELCOME TO 7 1A. TYPES OF ACTIVITY 7 1B. GETTING
Internet Banking Cash Management Training Customer Documentation
 Fiserv Internet Banking Cash Management Training Customer Documentation Table of Contents General Information... 2 Cash Management... 3 ACH... 3 ACH Batch... 4 ACH Origination... 8 ACH Process... 15 ACH
DSWR User Guide. In effect from January 29 th,, BCLDB Direct Sales Web Reporting User Guide Page 1
 DSWR User Guide In effect from January 29 th,, 2017 BCLDB Direct Sales Web Reporting User Guide Page 1 Contents Introduction... 4 Before You Get Started... 4 Registering for the DSWR Application... 5 Log-in...
Business Treasury Management Services. Important Information About Your New Treasury Management Services
 Business Treasury Management Services Important Information About Your New Treasury Management Services Member FDIC Equal Housing Lender Welcome To Citizens Business Bank At Citizens Business Bank, we
Online Courier: Alerts Service
 Quick Reference Guide Online Courier: Alerts Service The SunTrust Online Courier Alerts service notifies you of specific events on your accounts to help you take an action, like when your account balance
FirstNet for Business
 Page 1" First State Community Bank FirstNet for Business End-User Guide Page 2" Table of Contents" Logging In... 3% Changing Your Password... 4% Cash User Login Screen... 4% Navigation... 7% Account Listing
MOBILE INTERNET BANK MANUAL
 MOBILE INTERNET BANK MANUAL www.blueorangebank.com Approved on 29.05.2018 Valid as of 29.05.2018 B2.1/C7-1073/10 CONTENTS Terms and Definitions...3 1. General Description of the Mobile Internet Bank...3
huntington Business security suite user guide
 huntington Business security suite user guide Contents Welcome 3 Section 1: Getting Started Logging In 5 Section 2: ACH Positive Pay Overview 7 Filters 8 managing exceptions 11 warehouse 14 approvals 15
Express Deposit User Guide
 Express Deposit User Guide The contents of this user guide are proprietary and the exclusive property of LegacyTexas Bank. Table of Contents Accessing Express Deposit... 3 Website Authentication....5 Navigating
Requirements and guidelines for use of My Fibank automated system for electronic banking of First Investment Bank AD
 Requirements and guidelines for use of My Fibank automated system for electronic banking of First Investment Bank AD Contents I. Description... 3 1. Passive (informational) banking services... 3 2. Active
BUSINESS ACH. ibanking
 BUSINESS ACH ibanking January 23, 2017 Table of Contents Business ACH & ibanking Terminology... 3 End User Guide... 4 Getting Started... 4 Participants... 4 Creating a participant... 4 The Participants
Online Banking for Business WHOLESALE LOCKBOX IMAGING USER GUIDE
 Online Banking for Business WHOLESALE LOCKBOX IMAGING USER GUIDE Contents Getting Started...1 Technical Requirements...1 Contact Us...1 Overview...2 Wholesale Lockbox Web Application... 2 Features... 2
core user guide business gateway TABLE OF CONTENTS BANKING > WEALTH > INSURANCE
 business gateway core user guide TABLE OF CONTENTS Getting Started... 2 Administration Approval... 8 Logging In... 2 Administration Report... 8 Electronic Report Delivery (ERD)... 17 Security Key... 2
User Manual for U-Bank New York
 User Manual for U-Bank New York China Merchants Bank New York Branch December 2016 Content 1. Overview... 4 1.1 Who Should Read This Guide?... 4 1.2 What Should You Know About U-Bank NY?... 4 1.2.1 Maker-Checker
WELCOME TO WEBLINK Accessing WebLink...6. Registration Process...6. Log In Process After Registration On-Line Help...
 WebLink User Guide Table of Contents WELCOME TO WEBLINK... 1 Internet Explorer Browser Settings...3 WebLink Features... 5 Accessing WebLink...6 Registration Process...6 Log In Process After Registration...
This Page Left Blank Intentionally
 Chapter 2 Receipts This Page Left Blank Intentionally CTAS User Manual 2-1 Receipts: Introduction Issuing the receipt is the first step in the collection of payments. This should be done immediately upon
GENERAL LEDGER USER'S GUIDE
 GENERAL LEDGER USER'S GUIDE This document is non-technical and explains the operation of the General Ledger programs. It is intended for both accounting staff and operators. COPYRIGHT 2017 AgTrax Copyright
Internet Banking User Guide
 Internet Banking User Guide Table of Content Table of Content... 2 Introduction... 3 Internet Banking Facilities... 3 Internet Banking Security... 3 Login Screen and Navigation... 4 Updating Personal Details...
E-Bill & Collect User Guide June 2016
 E-Bill & Collect User Guide June 2016 Table of Contents Page Introduction Simple Web Manual Payments Enter Payment Details Verify Payment Details Payment Confirmed Authenticated & SSO Payments Lookup Account
ACH. Treasury Solution
 ACH Treasury Solution V.5.24.2017 Contents ACH Overview... 3 Payments can be created using Treasury Solutions by three methods....3 Enhanced ACH Features...3 Payment Options...3 ACH Service Application...
Corporate Online. Using Accounts
 Corporate Online. Using Accounts About this Guide About Corporate Online Westpac Corporate Online is an internet-based electronic platform, providing a single point of entry to a suite of online transactional
DTS PAX (Public Access)
") DTS PAX (Public Access) I. INTRODUCTION... 1 II. Account Registration.....3 III. My Account...5 IV. My Account Profile......6 V. My Account History...7 VI. My Account - Charge Account.8 VII. Account Login..9
DTS PAX (Public Access) I. INTRODUCTION... 1 II. Account Registration.....3 III. My Account...5 IV. My Account Profile......6 V. My Account History...7 VI. My Account - Charge Account.8 VII. Account Login..9
Accounting Table of Contents
 Accounting Table of Contents Accounting Table of Contents 1 About Church Windows Accounting 4 Chart of Accounts Setup 6 Adding and Removing Accounts 7 Managing the Chart of Accounts 9 Detail tab 9 Balance
Job Aid: My Remittance Reporting. Contents. Access
 Job Aid: My Remittance Reporting The purpose of this document is to provide step-by-step instructions to select files and remit and pay in the My Remittance Reporting section of AgentNet. Contents Access...
Payments & Transfers User Guide
 Payments & Transfers User Guide Table of Contents Payee Maintenance...1 ACH Payments...4. Batch Creation...4 Creating a Manual Batch...4 Transaction Import...6 Templates & Recurring Payments... 7 Wire
SmartPay Express User Guide
 SmartPay Express User Guide Table of Contents INTRODUCTION... 4 SmartPay Express Overview... 4 System Requirements... 5 Trusted Sites... 5 Available Resources... 7 Additional Resources... 7 LOGGING IN...
Last Revised (06/12) ACH Direct Control Totals & File Collection
 ACH Direct Control Totals & File Collection") Last Revised (06/12) ACH Direct Control Totals & File Collection ACH Direct Control Totals & File Collection Contents Page Section 1: File Collection Alerts 2 Overview of Service 2 Notification Overview
Last Revised (06/12) ACH Direct Control Totals & File Collection ACH Direct Control Totals & File Collection Contents Page Section 1: File Collection Alerts 2 Overview of Service 2 Notification Overview
Business ebanking Guide Administration
 Business ebanking Guide Administration Revised 2/2016 Table of Contents ABOUT BUSINESS EBANKING... 4 MINIMUM SYSTEM REQUIREMENTS... 5 APPROVED OS AND BROWSERS FOR COMPANY USERS... 6 SYSTEM CONSIDERATIONS...
N Touch Treasury ACH User Guide
 N Touch Treasury ACH User Guide Revised 12-15-17 TreasurySupport@NTouchBanking.com (833) 846-2699 ACH Within Payments > ACH, you can create ACH payments and templates, import layouts, view templates, ACH
Professional Editions Setup Guide
 Professional Editions Setup Guide FOR TAX YEAR 2017 V 1 1 Table of Contents Click on any title to navigate directly to that section. Download and Install Download Installation File from Practice Manager