Creating Presentations with ispring
|
|
|
- Lee Angela McDowell
- 6 years ago
- Views:
Transcription
1 Creating Presentations with ispring Step 1: Download ispring ispring allows you to convert PowerPoint slides with audio narration into an online presentation that will play in your browser. This presentation allows the viewer to pause, move back, and jump forward giving the viewer control of how the presentation plays. A benefit of this is that the presentation is platform agnostic. No specific program is required, so both your Mac and PC using students can easily view the same files. Both Mac and PC students will be able to view the presentation but you can only download the software for ispring using a PC. The download is not available for Mac users. ispring has a free version that can be found here: Enter your and select Download Now. Download and install the software following the onscreen prompts. Pg. 1
2 Step 2: Create Your PowerPoint Slides Design your slides as you normally would, inserting text, images, and audio for your lectures. Pg. 2
3 Step 3: Check your Audio Settings There are two audio settings you should check to ensure the presentation you create with automatically play your audio. After creating your audio click on the speaker icon to select it. Pg. 3

4 Audio Tools When the speaker icon is selected there will be an "Audio Tools" area in the top right of the menu bar. Pg. 4

5 Playback Tab Under "Audio Tools" select the "Playback" tab. Pg. 5

6 Automatic Playback The audio associated with the slides can be triggered in different ways. When publishing as a compiled presentation in ispring, you will want to have your audio play automatically so that each slide plays the audio without having to be clicked after each slide change. You can set your audio to play automatically in the audio options area with a field labeled "Start." Click the drop down arrow and select "Automatically." Enable automatic play for each of your slides with audio. Pg. 6

7 Hide During Show A second setting you will want to enable is to have the audio icon hidden during the presentation. If this option is not enabled the gray speaker icons will appear in the middle of each slide, distracting your students from the content. Directly under the "Start" setting is "Hide During Show." Click this box on each of your slides with audio. Pg. 7
8 Step 4: Publishing Your Presentation You should now be ready to publish your presentation. Select the "ispring Free" tab (if you have upgraded or are on the 30 day free trial an "ispring Pro" tab will appear instead). Pg. 8

9 Under the ispring tab select the "Publish" button. Pg. 9
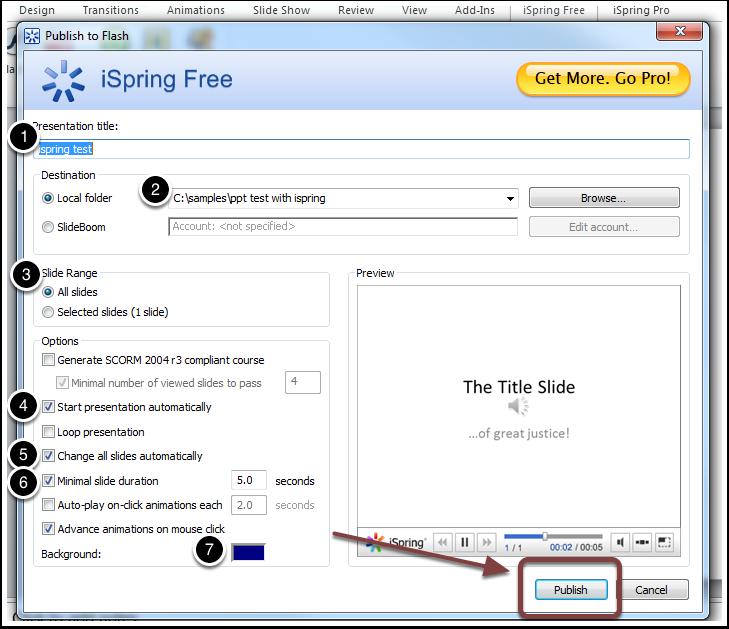
10 A pop up window will appear. There are several settings and many will depend on what type of presentation you are giving, but for all your presentations you will need to 1. Name the presentation 2. Choose a save location There are also other options that you will likely use in most cases such as 3. Set the range to include all slides 4. Start the presentation automatically 5. Change slides automatically 6. Set a minimum duration time on each slide NOTE: The presentation will default to the length of the audio recording, but if no audio is present this default setting will be how long your students get to look at the information. 7. You can also change the color of the background. Once you have the adjusted the settings to your needs click the "Publish" button. Pg. 10
11 Pg. 11

12 Step 5: Zipping the Folder Once your presentation is compiled it will open in your browser for you to review. If you are satisfied with your completed work you will now need to upload the files to your course. In order to add the whole folder to your course you will need to use a folder zipping utility such as 7-Zip (available for free at If you are using 7-Zip you can Right click on the folder, select 7-Zip, and click Add to "File Name.zip". You should now have a folder with the extension.zip. The process may be slightly different if you are using another utility to zip the folder. Pg. 12

13 Step 6: Uploading to Blackboard Learn You can now enter your course in Blackboard Learn and go to the file manager under "Control Panel" on the course menu. Pg. 13

14 Create a folder for your presentation files. It should be a descriptive name such as; "Intro to Philosophy Lecture 4 presentation" for organizational purposes. After you have named your folder click the "Submit" button. Pg. 14

15 Select your newly created folder and hover over "Upload" and select "Upload Package". NOTE: You will likely receive a message or two regarding the running of Java and perhaps your computer security confirming it is ok to carry out this process. In order to continue you should of course respond affirmatively. The specific responses will likely be "Allow" and "Run". Pg. 15
16 Click the Choose File button and Navigate to the presentation files you saved on your computer and select the zipped folder containing them. This will allow you to upload all of the files at once, as there are several and all are required for your presentation to run properly. Once you select the folder containing your zipped presentation files and hit "Open". The folder and all files within will be listed in the upload manager (pictured below). Make sure you have selected the correct folder containing the files you want and click Submit. Pg. 16

17 Step 7: Adding Your Presentation to Your Course The file that you will need to link to in your course is "index.html" from the set of files you uploaded. Create an Item in your course module and add a title and description. In the Attachments section, select Browse Course and attach the "index.html" file to your Item. You should also rename the link title to be more descriptive to your students. NOTE: If you are unsure how to create an item, review the document "Getting Started with Course Content" located on the Online Teaching Website under "Copy (Reuse) Content from an Existing Course into the Kent State Online Template" Pg. 17
18 Finished Your compiled presentation is now added to your course for your students to view. Pg. 18
Recording Narration in PowerPoint using ispring Free
 Recording Narration in PowerPoint using ispring Free Narrated PowerPoint shows saved as-is tend to be very large files. This makes them cumbersome and difficult to upload and share with your students or
Impatica and PowerPoint for Blackboard
 Impatica and PowerPoint for Blackboard Impatica is a software program which allows for the delivery of fully narrated and highly animated PowerPoint content over the Internet, plug-in free and even at
Updating Instructor Information Instructions
 Updating Instructor Information Instructions Purpose: Updating Instructor Information walks through the process of updating the Instructor Information, which informs students who their instructor is and
ispring Converter CLIPP Help Documentation
 How to use ispring Converter to produce a narrated PowerPoint presentation There are three components to producing online compatible narrated PowerPoint presentations: Step 1 Record narration and timings
USING PANOPTO ON A WINDOWS MACHINE
 USING PANOPTO ON A WINDOWS MACHINE Recording and posting a Panopto video on Blackboard requires the following steps: STEP 1: Connecting Panopto to Your Blackboard Course STEP 2: Installing Panopto Recorder
Blackboard 9.1: Level I
 Handout Objectives Blackboard 9.1: Level I I. Making course Available II. Creating Announcements III. Inserting Staff Information IV. Uploading Course Documents V. Creating Assignments VI. How to Send
Creating a YouTube Video in PowerPoint 2010
 Creating a YouTube Video in PowerPoint 2010 STEP ONE: Make Your Slides Widescreen YouTube defaults to widescreen so before you start creating your presentation, change the slides to widescreen. 1. Go to
Once file and folders are added to your Module Content area you will need to link to them using the Item tool.
 VITAL how to guides elearning Unit Last updated: 01.10.2010 Course Files tool Overview Course Files tool enables you to: Quickly copy large numbers of files into a VITAL module. Files can be dragged and
How to Attach the Syllabus and Course Schedule to a Content Item
 How to Attach the Syllabus and Course Schedule to a Content Item Getting Started Part of preparing your course for delivery to students includes uploading your syllabus and course schedule to your online
Creating Interactive Video with Camtasia
 Creating Interactive Video with Camtasia Audio SCORM Quizzes PowerPoint and Screen Shots v1.2: 2009 Page 1 Camtasia Studio 6.0.2 http://www.techsmith.com/camtasia.asp (free trial download) Table of Contents
Step 1: Use StudyMate to Publish files
 How to Publish StudyMate Files to Blackboard. This document will walk you through the steps necessary to successfully publish StudyMate activities to Blackboard. The following procedures are the recommended
Panopto. End-User Guide
 Panopto End-User Guide Table of Contents INTRODUCTION... 3 PROVISIONING A COURSE... 3 LOGGING IN... 7 NAVIGATION... 8 PREPARING TO RECORD... 9 CREATING A SIMPLE RECORDING (AUDIO AND VIDEO ONLY)... 10 CREATING
Creating Book Trailers Using Photo Story 3 Why Photo Story 3? It is a free program anyone can download.
 Creating Book Trailers Using Photo Story 3 Why Photo Story 3? It is a free program anyone can download. Before you begin using Photo Story 3 you will need to create a folder and title it Book Trailer.
Hello, welcome to this brief tutorial on accessing and playing Adobe Presenter video files.
 Hello, welcome to this brief tutorial on accessing and playing Adobe Presenter video files. Recorded video presentations for this course were produced using Adobe Presenter. After viewing this brief tutorial,
Essentials for Teaching Faculty
 Essentials for Teaching Faculty Table of Contents Panopto Access... 3 Panopto Recorder... 3 Recording... 3 Recording Options... 5 Capture PowerPoint Presentations... 5 Capture Primary Screen... 6 Capture
Educational Technology York College / CUNY
 How to Use itunes U ( A tutorial for Instructors) 1. Go to your course site, and click Control Panel. 2. Click Manage Tools under Course Options panel. 3. Click Building Block Tool Availability. 1 4. The
MyMediasite Blackboard Tool User Guide
 MyMediasite Blackboard Tool User Guide Purpose & Outcomes: This document is intended to walk faculty through the process of getting started with the MyMediasite tool within Blackboard. If you wish to use
Tegrity Recording and Proctoring
 Tegrity Recording and Proctoring Introduction The Tegrity software can be used as classroom video/screen capture recordings to be uploaded to a secure cloud. The video is segmented into chapters for easy
Guide to creating a PowerPoint presentation with audio (Mac) and uploading to Moodle
 and uploading to Moodle") Guide to creating a PowerPoint presentation with audio (Mac) and uploading to Moodle This is a guide to creating an audio enhanced PowerPoint presentation using the Mac version. The PowerPoint programme
Guide to creating a PowerPoint presentation with audio (Mac) and uploading to Moodle This is a guide to creating an audio enhanced PowerPoint presentation using the Mac version. The PowerPoint programme
Getting Started with Panopto (Windows and OSX) for Sakai
 for Sakai") Table of Contents Enabling Panopto in Your Sakai Course... 2 How to Record Lectures with Panopto... 4 For Windows:... 6 For OSX:... 11 Student Viewing Guide for Panopto Recordings via Canvas... 14 Downloading
Table of Contents Enabling Panopto in Your Sakai Course... 2 How to Record Lectures with Panopto... 4 For Windows:... 6 For OSX:... 11 Student Viewing Guide for Panopto Recordings via Canvas... 14 Downloading
Using VStream PCap Outside of Victoria
 Information Technology Services Using VStream PCap Outside of Victoria This How-To academic guide provides step by step instructions on recording, editing and publishing recorded content via the VStream
What is Adobe Connect Pro? Setting up a Meeting. Using Adobe Connect Pro
 What is Adobe Connect Pro? Adobe Acrobat Connect Pro is a Flash based application that allows you to have real-time, multi-point meetings and class sessions that participants can access through a web browser.
COURSE FILES. BLACKBOARD TUTORIAL for INSTRUCTORS
 OVERVIEW: Course Files provides file storage on the Blackboard server for a single course. Course Files within each course displays content for that specific course, not for other courses you teach. You
Creative Uses of PowerPoint 2016
 Creative Uses of PowerPoint 2016 Audio You can add audio, such as music, narration, or sound bites, to your PowerPoint presentation. To record and hear any audio, your computer must be equipped with a
Version 2.0. Campus 2.0 Student s Guide
 Campus 2.0 Student s Guide Version 2.0 Campus 2.0 Student s Guide Error! No text of specified style in document. i Important Notice Copyright 2008 Tegrity, Inc. Disclaimer 2008 Tegrity, Inc. all rights
Welcome to the CP Portal
 Welcome to the CP Portal Access your school documents from home Launch Internet Explorer and navigate to: https://files.cpcsc.k12.in.us/htcomnet/ Click on Continue to this website (not recommended) Key
Steps to View Online Lectures
 Steps to View Online Lectures Panopto recordings can be viewed on a multitude of operating systems such as Windows XP, Windows Vista, and Mac OS X (Intel Only) Panopto is also compatible with most major
Faculty Tutorial: Export/Import a Test
 Faculty Tutorial: Export/Import a Test Purpose: To demonstrate to faculty members how to export a test from one course, and then import it into another course. This process can also be used for Surveys
Contents 1. Accessing Microsoft Stream Uploading your video to My content area Deleting your video Sharing your video...
 Microsoft Stream Contents 1. Accessing Microsoft Stream... 1 2. Uploading your video to My content area... 4 3. Deleting your video... 11 4. Sharing your video... 12 4.1 Assign permission... 12 4.2 Send
Publishing with Adobe Presenter 10 (Detailed)
") Publishing with Adobe Presenter 10 (Detailed) Open PowerPoint Find PowerPoint and open it by clicking its icon. The PowerPoint icon may be found in one of the following locations: 1. Desktop 2. Start Menu
Publishing with Adobe Presenter 10 (Detailed) Open PowerPoint Find PowerPoint and open it by clicking its icon. The PowerPoint icon may be found in one of the following locations: 1. Desktop 2. Start Menu
Getting Started with Panopto (Windows and OSX)
") Table of Contents Setting up Panopto in Blackboard... 2 Setting up Panopto... 6 For Windows... 8 For OSX:... 11 Removing Panopto RSS Feeds in Blackboard... 14 Creating Placeholders for Future Lectures...
Table of Contents Setting up Panopto in Blackboard... 2 Setting up Panopto... 6 For Windows... 8 For OSX:... 11 Removing Panopto RSS Feeds in Blackboard... 14 Creating Placeholders for Future Lectures...
Blackboard Portfolio Quick Reference Guide for Students
 Blackboard Portfolio Quick Reference Guide for Students How to Create a Portfolio 1. On the My Institution tab, under Tools, click on the Portfolio link. 2. From the My Portfolios page, click the Create
e-snaps Online Training Navigation Tutorial
 e-snaps Online Training Navigation Tutorial e-snaps Online Training Navigation Tutorial Topic Table of Contents Page Orientation to the Online Training...1 Home tab...1 Reference Room tab...2 Administration
Publishing Narrated Presentations
 ACCC-ITL GUIDE Created By: Publishing Narrated Presentations Uploading Presentations to YouTube on PC Table of Contents Export a narrated PowerPoint...2 Upload a narrated PowerPoint to YouTube...3 Link
Use the Preferred Browser USE FIREFOX ON MAC & PC. If you do not have Firefox on your computer or laptop, please download Firefox by clicking here.
 Working In Mediasite (Part 2) Now that you ve completed Part 1, which included registering Mediasite, Downloading and Installation of the Mediasite Recorder, you re ready to proceed to Part 2 of the tutorial
PowerPoint. Instructions for playing On-Line Tutorials that are in Microsoft PowerPoint Slideshow (PPSX) format:
 format:") Detailed Instructions for viewing On-Line Tutorials: Q: How do I view and/or print an On-Line tutorial? A: On-Line Tutorials have been created in 2 different formats: Narrated Microsoft PowerPoint Slideshow
Detailed Instructions for viewing On-Line Tutorials: Q: How do I view and/or print an On-Line tutorial? A: On-Line Tutorials have been created in 2 different formats: Narrated Microsoft PowerPoint Slideshow
Articulate Engage 2013 Tutorial
 How to Access Engage 1. By Launching Engage Directly o You can open Engage directly from the desktop by clicking on the green Engage Icon, which is shown in the top right corner of this manual. 2. By Launching
Using PowerPoint to Create an Interactive Multimedia Portfolio Ben Johnson
 Using PowerPoint to Create an Interactive Multimedia Portfolio Ben Johnson www.psd.k12.co.us/staff/benj Getting Started 1. Launch PowerPoint from the start button. Select the Design Template radio button.
When attending an adobe room, you will view the room utilizing your computer and use a phone for the audio.
 Adobe Connect Rooms Best Practices: All times given for meetings are in EST. Call early (5-10 minutes prior to the start of the session). Use a phone headset (not computer). Do not use a speaker phone.
Blackboard Learn Kaltura Media
 Last Updated: 05/18/2017 Blackboard Learn Kaltura Media Kaltura CaptureSpace The Kaltura Building Block allows instructors to add powerful media tools to Blackboard, combing the best features of presentation
Mediasite Introductory Guide
 Mediasite Introductory Guide Starting the Summer 2016 session, a new lecture capture tool, Mediasite, will be used to record lectures. This software has new features that did not exist in the previous
Adding Emphasis to Video Content
 Adding Emphasis to Video Content Camtasia Studio: Windows From zooming/panning to adding callouts, there are numerous features in Camtasia studio to help you add emphasis to content in your videos. Preparation
I. Downloading Grades from the Grade Center
 I. Downloading Grades from the Grade Center If you use the Blackboard Grade Center for grading, it is recommended that you download the data from the Grade Center into Excel to keep a backup copy for yourself.
Kodiak Quick Guide: Content
 Kodiak Quick Guide: Content Overview The Content tool is the core of a Kodiak classroom. Use the Content tool to post and organize course content so that information about course expectations, course syllabus,
Faculty Guide for Panopto on Mac
 Faculty Guide for Panopto on Mac Updated: January 12 th, 2016 Table of Contents What is Panopto?...p. 3 Downloading Panopto.p. 4 Logging into Panopto...p. 7 An Overview of the Panopto Homepage...p. 8 Your
How to Enable and Use itunes U With Your Blackboard Course
 How to Enable and Use itunes U With Your Blackboard Course Please Note: Both instructors and students must download and install or have access to a computer with itunes. Please download and install itunes
Files to Contents. User Guide March 11, 2008
 Files 8.3.0 to 8.4.1 User Guide March 11, 2008 Contents Managing files File properties Opening a file or folder Creating a new folder Copying a file or folder Deleting a file or folder Renaming of a file
Captivating Movies! Getting Started with Captivate
 Captivating Movies! Getting Started with Captivate Welcome to Getting Started with Captivate. In this tutorial you will learn to import a PowerPoint file into a Captivate Project. Then you will prepare
TurningPoint AnyWhere
 TurningPoint AnyWhere TurningPoint Blackboard Registration Tool Making the Tool Available 1. From the Control Panel, select click Customization >>Tool Availability. 2. From the Tools list, check Registration
Blackboard Collaborate Ultra 2018 UT DALLAS USER MANUAL
 Blackboard Collaborate Ultra 208 UT DALLAS USER MANUAL UT Dallas elearning ELEARNING@UTDALLAS.EDU SPRING 208 Table of Contents Introduction... 3 Browser Support... 3 Blackboard Collaborate Ultra inside
WELCOME TO GOOGLE DRIVE!
 WELCOME TO GOOGLE DRIVE! Google Drive is a free service from Google that allows you to store files from your computer online and access them anywhere using the cloud. Google Drive also gives you access
Law Technology Team (LTT) Offices: OM Hours: 8:30am 5:30pm Panopto D2L Guide
 Offices: OM Hours: 8:30am 5:30pm Panopto D2L Guide") Panopto D2L Guide For additional training, please contact FITS@depaul.edu OR https://support.panopto.com Contents Adding Panopto to your D2L course... 2 Downloading and Installing Panopto Recorder... 3
Panopto D2L Guide For additional training, please contact FITS@depaul.edu OR https://support.panopto.com Contents Adding Panopto to your D2L course... 2 Downloading and Installing Panopto Recorder... 3
User Guide. : Preparation
 User Guide : Preparation : Preparation Contents Part : Part : What is Preparation? Book Resources Page 3. Accessing Pearson resources. Adding resources to Teaching Plans and Overview.3 Adding Pearson resources
Microsoft Office 2007
 Microsoft Office 2007 Adding Slide Transitions Transition Sound Transitions Transition Speed Apply to All A slide transition is the way one slide changes to the next in Slide Show view. Animations Tab:
Once you have entered your Google and password, you can click the Sign In button to continue.
 Slide 1 Welcome to the Creating and Uploading with Google Docs Tutorial. Google Docs allows you to create documents, spreadsheets, presentations, draw pictures, create forms, and much more directly within
Editing Videos. Overview. 1. Open the Editor
 Editing Videos Overview The Panopto editor allows for easy web-based editing from any modern browser. You can perform quick, non-destructive edits to any video on the Panopto platform and deliver exactly
Courseload 2.0 Documentation
 Courseload 2.0 Documentation Table of Contents What is Courseload?... 3 Using Courseload... 3 Requirements for Your Computer... 3 Installing the Chrome Frame Plugin... 3 Allowing Mixed Content on Internet
Panopto Quick Start (Faculty)
") Enabling Panopto in D2L Authorize your course to use D2L/Panopto integration. Login to D2L, open the Content section, Add a module, call it something like Recordings or Videos Then, click Add Existing
Enabling Panopto in D2L Authorize your course to use D2L/Panopto integration. Login to D2L, open the Content section, Add a module, call it something like Recordings or Videos Then, click Add Existing
Panopto Focus- Lecture Capture, Instructions
 Table of Contents Installation... 2 Media Standards... 3 Folder Quotas... 3 Logging Into the Recorder Application... 4 The Recorder Application... 5 The Basics... 5 Using Hotkeys... 5 Settings Menu...
GeographyPortal Instructor Quick Start World Regional Geography Without Subregions, Fifth Edition Pulsipher
 GeographyPortal Instructor Quick Start World Regional Geography Without Subregions, Fifth Edition Pulsipher For technical support call 1-800-936-6899 GeographyPortal Quick Start for Pulsipher, World Regional
MS PowerPoint Useful Features. Choose start options. Change Office backgrounds and colours
 MS PowerPoint Useful Features Note: Depending on your installation of MS Office, the screens you see on your PC may vary slightly from those shown on this fact sheet. Choose start options The first time
GET FAMILIAR WITH WINDOWS MOVIE MAKER
 GET FAMILIAR WITH WINDOWS MOVIE MAKER TASKS SELECTION COLLECTION PALETTE PREVIEW SCREEN PRODUCTION PALETTE The production palette has two modes: storyboard and timeline. To switch between the two click
FAU. How do I. Post course content? Folders
 How do I Post course content? Content is made up of folders, files, links, and assessments (this will be covered on page ## or see separate documentation). It is basically anything you want to share with
Creating a Recording in Canvas Embedding a Recording in Canvas To embed a recording into a discussion
 Table of Contents What is Kaltura... 3 Things to Remember... 3 My Media... 3 To access My Media... 3 Upload Media... 4 To perform a media upload... 4 Viewing Videos... 6 Add New List Options... 6 Media
Microsoft PowerPoint. - Package for CD Feature (Windows & Macintosh) - Make Movie Feature (Macintosh Only)
 - Make Movie Feature (Macintosh Only)") Microsoft PowerPoint - Package for CD Feature (Windows & Macintosh) - Make Movie Feature (Macintosh Only) ITS / Center for Teaching & Learning Dr. Luanne Fose Revised October 23, 2007 PowerPoint for Windows
Microsoft PowerPoint - Package for CD Feature (Windows & Macintosh) - Make Movie Feature (Macintosh Only) ITS / Center for Teaching & Learning Dr. Luanne Fose Revised October 23, 2007 PowerPoint for Windows
Moodle The Basics of Editing a Content Management Course
 Logging In Moodle The Basics of Editing a Content Management Course 1. Using Firefox or Internet Explorer, navigate to: http://learn.district196.org 2. Click on the Login link in the upper right corner
MARKING CANVAS ASSIGNMENTS OFFLINE (INCLUDING MARKING ANONYMOUSLY)
") LEARNING TECHNOLOGY AT LJMU MARKING CANVAS ASSIGNMENTS OFFLINE (INCLUDING MARKING ANONYMOUSLY) Information about Downloading Student Submissions If you want to download all student submissions for an assignment,
LEARNING TECHNOLOGY AT LJMU MARKING CANVAS ASSIGNMENTS OFFLINE (INCLUDING MARKING ANONYMOUSLY) Information about Downloading Student Submissions If you want to download all student submissions for an assignment,
Audio Recording. Technology in a Box. Box Contents: USB microphone Audacity Directions. What you can do:
 Technology in a Box Box Contents: USB microphone Audacity Directions What you can do: Record audio snippets for inclusion in your online course space Send an audio reminder via email Overview Audio recordings
Useful Google Apps for Teaching and Learning
 Useful Google Apps for Teaching and Learning Centre for Development of Teaching and Learning (CDTL) National University of Singapore email: edtech@groups.nus.edu.sg Table of Contents About the Workshop...
Advanced PowerPoint. Course Description. Objectives: Using Master Slides. Using a Notes Master and a Handout Master. Add a Picture to a master
 Course Description Advanced PowerPoint In the PowerPoint Introduction course, you learned how to create a new presentation, work with text objects, insert objects to enhance the presentation, add a background
Using Quicktime Pro to Make Digital Stories
 Using Quicktime Pro to Make Digital Stories Overview There are many ways to help students create digital stories. The major advantage of using QuickTime Pro is that the final format is more compatible
Canvas Conferencing Tool
 Canvas Conferencing Tool Contents Web Conferencing in Canvas... 2 Invite Course Members... 4 Select Individual Members... 4 Starting a Conference... 5 Conference Layout... 5 View Conference Tools... 6
Guide Developing your School of Medicine and Dentistry Course in Blackboard. UR SMD File Format and Technology Standards... 2
 Table of Contents UR SMD File Format and Technology Standards... 2 Learning Management System (LMS)...2 File Format PDF Standard...2 Discontinuation of Printing in the MD Degree Program...2 Software Recommendations
Adding Content. 4. The following page will display (see image to the right): 5. Enter the title of the text page in the Name* field (required).
: 5. Enter the title of the text page in the Name* field (required).") Adding Content When content is added to ecourses, two things must happen: 1. The content must be either composed within ecourses or uploaded from an offline storage area or located at an online site. 2.
Adding Content When content is added to ecourses, two things must happen: 1. The content must be either composed within ecourses or uploaded from an offline storage area or located at an online site. 2.
Kaltura Blackboard Building Block - KAF
 Kaltura Blackboard Building Block - KAF I. Introduction a. The Kaltura Building Block allows us to add powerful media tools to Blackboard, combing the best features of video sharing, webcam recording,
Blackboard 5. Instructor Manual Level One Release 5.5
 Bringing Education Online Blackboard 5 Instructor Manual Level One Release 5.5 Copyright 2001 by Blackboard Inc. All rights reserved. No part of the contents of this manual may be reproduced or transmitted
Introduction. Rehearse and Record Slide Shows. Advanced Presentation Options. Rehearsing Slide Show Timings. Page 1
 Advanced Presentation Options Introduction Page 1 There are many things to keep in mind when giving a presentation. How long will your presentation last? What will you say? If you're not in the same location
Kaltura Guidebook Table of Contents
 Kaltura Guidebook Table of Contents Upload a Video... 4 Kaltura Login... 5 FlashLine Account... 6 Media Upload... 7 Choose a file to upload... 8 Add Details... 9 Privacy Settings... 10 Review Upload...
Moodle 2.2 Student User Guide My Private Files
 Moodle 2.2 Student User Guide My Private Files Using My Private Files My Private Files saves files in the cloud. Only the user may access it, but you can access it from any computer where you can access
NEWPORT BEACH ALANO CLUB. Ryanne Tiffany. PowerPoint Guide
 NEWPORT BEACH ALANO CLUB Ryanne Tiffany PowerPoint Guide NEWPORT BEACH ALANO CLUB PowerPoint Guide Table of Contents Creating a Professional PowerPoint Presentation... 1 Designing a PowerPoint Slideshow...
myngconnect.com Teacher User Manual
 myngconnect.com Teacher User Manual Table of Contents Teacher & Student eeditions... 2 Resources... 6 Accessing Resources... 6 Digital Library... 6 Teacher Resource Directory... 7 Assessment Resource Directory...
Accessing Panopto through the Moodle Integration Feature
 Accessing Panopto through the Moodle Integration Feature Panopto is a lecture- capture service that enables recordings of webcam video, audio, PowerPoint presentations, and computer screen images. Recordings
Slide 1. Slide 2. Slide 3 Embedding Video. Angela. Objectives Topics
 Slide 1 Engaging and Enhancing Students Learning Through PowerPoint Angela The most awesome person ever Slide 2 Embedding Video Adding Links Adding Audio Presenter View Saving as PDF Converting lecture
Advanced PowerPoint Skills
 Table of Contents Advanced PowerPoint Skills 1 Applying the Dim Feature... 2 Adding Sound... 5 Adding Video... 7 Hyperlinks... 8 Linking to a place in the same document... 8 Linking to a different document...
Convert and Archive a Blackboard Collaborate recording in D2L
 These instructions outline the steps to convert Blackboard Collaborate recordings created in a D2L course from the native Collaborate format (.collab) to an MP4 video or MP3 audio format. You'll need to
Turnitin Bulk Download Instructions
 Turnitin Bulk Download Instructions Currently, there is no way for Turnitin administrators to bulk download an account s papers from the university s Institutional database. Therefore, it will be up to
VoiceThread Training
 VoiceThread Training Contents Introduction... 2 Objectives... 2 Connecting to VoiceThread Initially... 2 Creating a VoiceThread Presentation... 4 Accessing Existing VoiceThread Presentations... 5 Sharing
Topic 1: Topic 14: Topic 2:
 Topic 1: Beginnings: Introduction to Human Development Topic 2: Beginnings: Theories of Development Topic 3: Beginnings: Heredity and Environment Topic 4: Beginnings: Prenatal Development and Birth Topic
Creating Content in Panopto
 Getting Started with Panopto Panopto is GVSU s private video hosting service that will allow you to quickly create, edit, caption and host any academic videos. This user guide will take you through the
Introduction to Blackboard. Academic Technology & Distance Learning Department
 Introduction to Blackboard Academic Technology & Distance Learning Department Fall 2013 Spring 2014 LANK ACADEMIC TECHNOLOGY & DISTANCE LEARNING DEPARTMENT Support and FAQs: http://www.ccsnh.edu/academics/online-learning-blackboard
Creators Basic Guide to Using UICapture (Mac)
") Creators Basic Guide to Using UICapture (Mac) Download the software from http://helpdesk.its.uiowa.edu/software/signin.htm After downloading the software and setting up an account with your local IT support,
Creators Basic Guide to Using UICapture (Mac) Download the software from http://helpdesk.its.uiowa.edu/software/signin.htm After downloading the software and setting up an account with your local IT support,
Networks Florida Social Studies WorkText K-5 Digital Training Guide
 Networks Florida Social Studies WorkText K-5 Digital Training Guide Table of Contents Page Navigating Social Studies Content 2 Lesson Plans 3 My Calendar 4 Customize Lesson Plans 5 Lesson Presentations
PowerPoint Intermediate 2010
 PowerPoint Intermediate 2010 I. Creating a Slide Master A. Using the design feature of PowerPoint essentially sets up similar formatting for all of your slides within a presentation. However, there are
Fairfield University Using Xythos for File Storage
 Fairfield University Using Xythos for File Storage Version 7.0 Table of Contents I: Accessing your Account...2 II: Uploading Files via the Web...2 III: Manage your Folders and Files via the Web...4 IV:
Camtasia: Editing a Lecture to Add Captions
 Camtasia: Editing a Lecture to Add Captions Part I: Captions 1. Open Camtasia Studio 8. 2. Click Import Media (or File > Import Media) 3. Click Captions on the toolbar in the middle of the screen. Note:
What s New in Blackboard Faculty Tutorial
 What s New in Blackboard Faculty Tutorial Global Navigation menu: The new Notification area combines notices, alerts, messages, and other items from all of your courses in one place. Now you can find alerts
The following tutorial provides step-by-step instructions and best practices for using My Content and the Course Content file directories.
 OVERVIEW: The content system in Blackboard is the file storage and management system for the support documentation, individual courses, and CityU faculty (course instructors, course managers, builders,
Blackboard course design
 DEO team, Academic Registry www.bristol.ac.uk/digital-education Blackboard course design Updated: 8 th Jan 2018 Contents 1. About this guide... 2 2. Essential information... 2 3. Requesting a Blackboard
 Echo360 Personal Capture Echo360 Personal Capture allows you to create recordings in your office. Simply install the software on your computer and you can record what you see on the screen plus audio,
Updated 8/31/2018 with new recorder. Developed by Ken Silvestri, CFE Instructional Designer
 Updated 8/31/2018 with new recorder Developed by Ken Silvestri, CFE Instructional Designer INTRODUCTION TO TECHSMITH RELAY Techsmith Relay is a lecture capture tool that records what appears on a designated